Motivation
As part of the lecture “Software Development for Cloud Computing” we were looking for a solution, how a user can get basic assistance within our existing virtual reality game AIRA. The primary objective was a maximum of user-friendliness, while avoiding an interruption of the immersive gaming experience. It is also important to keep in mind, that the user is on its own and any kind of support from outside is usually not possible.
Moreover, considering that within virtual reality applications generally no conventional input devices will be available and therefore a keyboard is not an option. If we still following up this idea, many people may think next of an on-screen keyboard, as they know it from their smart TV at home, which might be operated by a game controller. Although such an approach would be contrary to a high ease of use and majority of implementations are quite crippled as well as hard to use.
So, what would be obvious and take all previous considerations into account? Simply think of something that each of us is carrying along at any time – the own unique voice. According to this we decided to implement a personal voice assistant into our game. In the following, it can be seen that the individuality of each human voice leads into a lot of difficulties we have to take care of.
In the following, it will be explained in detail how we implemented a personal voice assistant using multiple Watson services, which are part of the IBM Bluemix cloud platform. Especially fundamental problems we run into will be discussed and then possible approaches will be pointed out.
Preliminary work
Basic prerequisite is a valid IBM Bluemix account that everyone can set up for a 30-day trial at no charge. All students can get an additional promotion code for an extended 6-month evaluation period.
By now we are ready to begin our work on the IBM Bluemix cloud platform. After we have successfully logged in to our account for the first time, we will be prompted to choose between 4 regions from where the cloud services are provided later on. At this point possible variations in latency should be taken into consideration, although not all services are available at any region. For convenience, we created all services in the region US South, but afterwards we noticed that latency is still relatively low in average. Next it is required to assign an individual name for the project’s Organization and Space. These names are primarily needed to set up role based access rights, if you work in a team with multiple accounts.
Finally, we are able to create our first Watson service. For this we open the global navigation menu in upper left corner, scroll down and then select the option Watson. A click on the button Create Watson takes us to the catalog where we can choose our desired service. Then we select for example the Speech to Text service and click on the button Create afterwards. After a few seconds an instance of the service was created and we will be automatically redirected to the corresponding service’s dashboard. There we select the option Service credentials from the left-hand navigation pane and then we click on the toggle button View credentials. The displayed information is required to configure the IBM Watson Unity SDK later on. Ideally we copy them temporarily into a plain text file. Now we just have to repeat our previous steps with the other services Natural Language Classifier and Text to Speech.
At this point we can switch over from our preparations in the cloud to the local part. First of all, we have to fetch the IBM Watson Unity SDK from corresponding repository on GitHub and extract the downloaded ZIP archive to our existing Unity project directory. After it was successfully integrated, a new entry Watson appears in menu bar and there we select the option Configuration Editor.
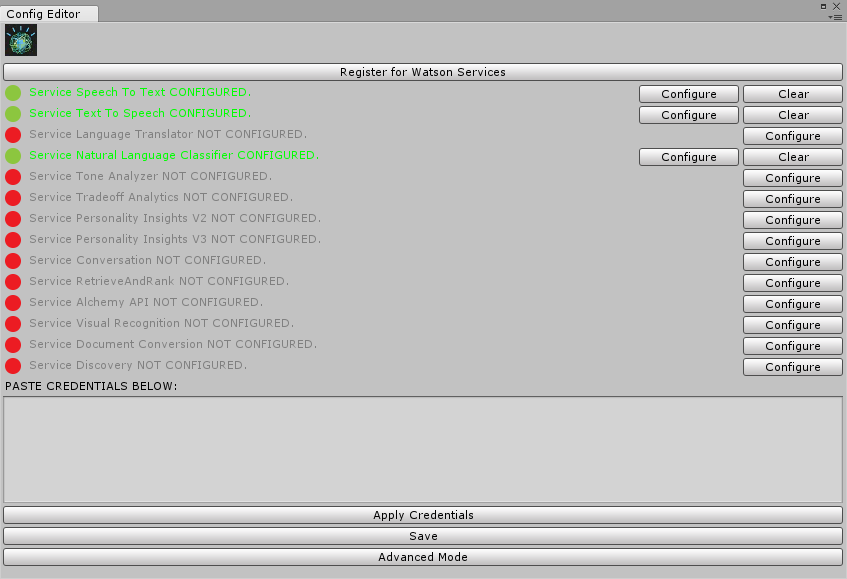
In the opening window we paste our previously copied service credentials from the plain text file into the input field one after the other. Finally, for saving them we click on the button Apply Credentials. If the status light now switch from red to green, everything went fine and we can continue with preparing our Unity project.
First, we have to add an empty GameObject as parent to the top level of our project hierarchy in the Unity Editor. For the next step we append another empty GameObject below and add the component Microphone Widget from the SDK. Now the last step has to be repeated with the other components Speech To Text Widget, Natural Language Classifier Widget and Class Display Widget. By now we have finished all necessary preliminaries, so let’s get down to business!
Software architecture and implementation
Speech Recognition

First of all, we need a possibility to recognize a unique predefined hotword or rather keyword to prevent our service from continuous listening. We all know a lot of familiar examples like Amazon with “Alexa”, Apple with “Hey Siri” or Google with “Ok Google”. If the keyword will be successfully recognized, we can open up a listening stream to our Speech to Text service afterwards, but it is not recommendable to use the same service for our hotword detection too. In this context it should be taken into consideration that every request to cloud services is normally quiet expensive and costs real money in consequence.
If you develop an application on Windows or with Unity, for a moment it is a huge problem that common hotword engines like the popular snowboy only runs on Linux. Fortunately since Windows 10 it is possible to use the Microsoft Cortana speech recognition engine within the .NET Framework. The best part is that the keyword detection works completely offline and out of the box! No training of the keyword engine is needed, but for a more satisfying hit rate it is helpful to define some alternative phonetic notations, e.g. “Aira”, “Eira” and “Ira” in our case. However, it is only possible to recognize single words, but no phrases.
Enough with theory – let’s get into our concrete implementation. First, we have to create a new MonoBehaviour script in Unity Editor with an instance of the class KeywordRecognizer and define an array of strings for our possible keywords. If our keyword detection was successfully started, it will trigger the event method OnKeywordRegcognized as soon as one of the previously defined keywords have been recognized. By means of this event, we are able to open up a listening stream and disable the keyword detection during following process.
void Start()
    {
        if (OSversion == "10.0")
        {
            speechToTextWidget.Active = false;
            // Change size of array for your requirement
            Keywords_array = new string[4];
            Keywords_array[0] = "Aira";
            Keywords_array[1] = "IRA";
            Keywords_array[2] = "Eira";
            Keywords_array[3] = "help";

            // instantiate keyword recognizer, pass keyword array in the constructor
            keywordRecognizer = new KeywordRecognizer(Keywords_array);
            keywordRecognizer.OnPhraseRecognized += OnKeywordsRecognized;
            // start keyword recognizer
            keywordRecognizer.Start();
        }
    }
Natural Language Understanding
From our previously added Speech To Text Widget which is already connected to the corresponding service, we will receive a character string of spoken question in form of a stream. Unfortunately we determined that this service does not support german yet, that is why we used english language instead. During the stream is opened up the character string will be revised until the event method HasFinalResult will be called. By now we can use the received text to classify it. For this classification we used the Natural Language Classifier service. First, we defined several classes with different question phrases to train the artificial intelligence of the service. Consistent with each class we have produced an audio file with a suitable answer or rather implemented a corresponding action, like turning down volume or switch back to main menu.
Artificial intelligence training
The accuracy of our results depends primary on the quality of the training data. We had to improve our training data in several iterations, until we were satisfied with the results. To train artificial intelligence of the service we had to create a JSON-File and define different classes with matching question phrases. While formulating we keep allways in mind to have multiple phases with different wording, but same meaning.
{
    "Expanded": true,
    "InstancesExpanded": true,
    "ClassesExpanded": true,
    "Name": "AIRA",
    "Language": "en",
    "Data": {
        "buildTower": [
            "How can I build a tower?",
            "How can I build a turret?",
            "How can I construct a tower?",
            "How can I construct a turret?",
            "How can I create a tower?",
            "How can I create a turret?",
            "What do I need to do to build a tower?",
            "What do I need to do to build a turret?"
        ],
        "BasicStrategy": [
            "How do I plan my strategy?",
            "Where can I build a tower?",
            "Where can I build a turret?",
            "Show me where I have to build a tower.",
            "Show me where I have to build a turret.",
            "Show me the place to build a tower.",
            "Show me the place to build a turret.",
            "Show me the location to build a tower.",
            "Show me the location to build a turret."
        ],
        "UpgradeTower": [
            "How can I upgrade my towers?",
            "How can I improve my towers?",
            "How can I remove a tower?",
            "How can I delete a tower?",
            "How can I make a tower upgrade?",
            "How can I make a tower improvement?",
            "Where can I upgrade my towers?",
            "Where can I upgrade my turrets?",
            "Where can I improve my towers?",
            "Where can I improve my turrets?",
            "What do I need to do to upgrade my towers?",
            "What do I need to do to improve my towers?",
            "What do I need to do to remove a tower?",
            "What do I need to do to delete a tower?",
            "Where can I buy a tower upgrade?",
            "Where can I buy a turret upgrade?",
            "Where can I get a tower upgrade?",
            "Where can I get a turret upgrade?",
            "I want to upgrade my tower.",
            "I want to upgrade my turret."
        ]
    },
    "DataExpanded": {
        "buildTower": true,
        "BasicStrategy": true,
        "UpgradeTower": true
    }
}
Also at this point the IBM Watson Unity SDK provides some assistance. We are able to train the artificial intelligence of the Natural Language Classifier service on a very comfortable way within the Unity Editor. First, in menu bar click on the entry Watson and then select the option Natural Language Classifier Editor.
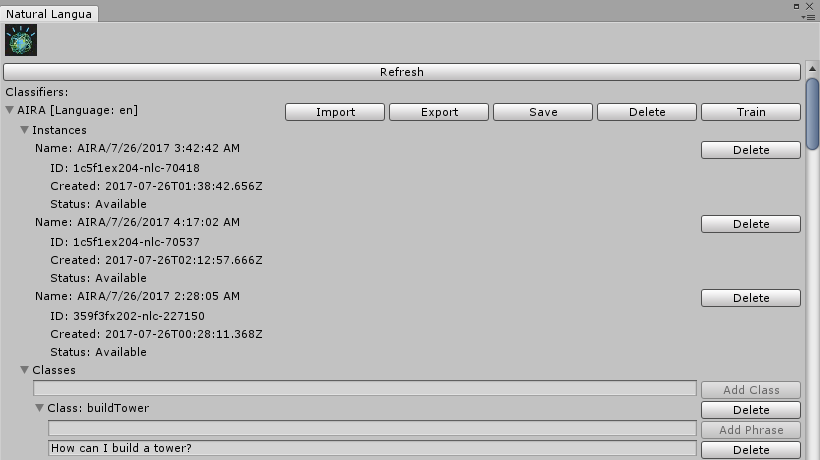
In the opening window we are able to add classes and phrases to train the artificial intelligence of the service. A corresponding JSON-File will be generated from the given data and automatically saved in our Unity project directory. Furthermore the status of our existing instances with previously submitted training data will be displayed for tracking.
Evaluation and Feedback
After the Natural Language Classifier service has done its evaluation, it will return one of our predefined classes with an additional confidence level. We have to take into consideration that there are a lot of influences which can lead to an inaccurate or maybe a totally wrong result, e.g. unclear pronunciation, bad microphone quality, question classes which are quite too similar, and so on. Since we got many wrong class assignments at the beginning, we created three different possible options, depending on the returned confidence level.
1. Confidence level > 75%
Within this range we assume a correct result and play a local audio file with the suitable answer or execute a corresponding action. During our tests we had a good hit rate in average, but it is not infallible. With a stricter border we have made rather bad experiences. The range should be not too small for covering several problems like slightly different pronunciations.
2. Confidence level 50% – 75%
Here we will cover all results where we believe that user has been understood, but with a small factor of uncertainty. For this reason the user will be asked by our assistant: “Would you like to know something about this subject?” Unfortunately at this moment we had not recorded all needed sound files, so we used the Text to Speech service for asking these kind of queries. To all of these questions the user can only answer with the words “yes” or “no”. For this purpose we used a second instance of the previously described keyword detection to evaluate it locally. This arise in fewer service requests and it runs noticeably faster.
3. Confidence level < 50%
Within this range we think, that we totally misunderstood the user’s question and subsequently terminate the process. He will be informed about this status by our assistant with the short answer: “Sorry, please ask again.”
Additional optical feedback
By thinking at one of our primary objectives for this project, we have created several kinds of feedback for the user to increase overall usability. This includes several animations of our ingame assistant AIRA, as well as an optical indicator above her head. It helps the user to get along with the sequence and it has following 3 different states:
- A blue light means that the service is active and currently listening
- A red light means that an error is occured and the service is not available or there is perhaps no internet connection
- The light is off means that our voice assistant is currently sleeping and waits for the keyword to wake up


Error handling
As with any application which uses remote services we have to take care about connectivity problems that could be caused by the network. In this context we should recall the 8 fallacies of distributed computing to our minds. Especially we have considered the following factors:
- A high latency
- One or more services are not available
- No internet connection
First of all, we implemented an own timeout handler to be able to terminate the process in time. Most Watson services are using a REST API in principle, so we can start our timer when the request was sent.
At our services we receive a response stream, which fires the event OnRecognize (e.g. in case of the Speech to Text service) multiple times until the event method HasFinalResult will be called. At every call we reset the timer and keep our timeout handler alive. So we can ensure to handle shorter and longer requests in the same way. If we would define a constant timeout value and check it only at the moment of the final response call, we could get in trouble with longer questions.
So, if we run into a timeout, we cancel the current process with a corresponding feedback and then we check the general internet connectivity. In this context we try to get a connection to google.com. In case no connection can be established, we will stop all our personal voice assistant routines and check the connectivity again from time to time.
private void OnRecognize(SpeechRecognitionEvent result)
{
if (isTimeOut)
{
m_SpeechToText.StopListening();
return;
}
timeoutHandler.FeedIsAlive(this);
m_ResultOutput.SendData(new SpeechToTextData(result));
if (result != null && result.results.Length > 0)
{
if (m_Transcript != null)
m_Transcript.text = "";
if (result.HasFinalResult())
{
timeoutHandler.StopTimeOut();
}
foreach (var res in result.results)
{
foreach (var alt in res.alternatives)
{
string text = alt.transcript;
if (m_Transcript != null)
m_Transcript.text += string.Format("{0} ({1}, {2:0.00})\n",
text, res.final ? "Final" : "Interim", alt.confidence);
}
}
}<span id="mce_marker" data-mce-type="bookmark" data-mce-fragment="1"></span>public void FeedIsAlive(ITimeoutable _currentObservable)
{
if (!isStarted)
{
Debug.LogWarning("No TimeOut is started, but trying to feed it!");
}
if (_currentObservable.Equals(currentObservable))
{
CancelInvoke("TimeOut");
Invoke("TimeOut", timeoutSeconds);
}
else
{
Debug.LogWarning("Timeout conflict with " + currentObservable + " and " + _currentObservable + ", timeout will not be feeded!");
}
}<span id="mce_marker" data-mce-type="bookmark" data-mce-fragment="1"></span>
Conclusion
In retrospect, we can say that our voice assistant performs very well and increases usability as well as user experience noticeably. A personal voice assistant in combination with virtual reality is a great solution, giving the user an intuitive and helpful tool without violating the immersive gaming experience.
Nevertheless this feature involves also some disadvantages. If you want to publish your application, you will need a business plan to cover extra costs of the service requests. Depending on the service provider you have to pay for each single request or for a defined volume. Furthermore variations in latency could be a serious problem and maybe the services are reacting a little bit too slow for real-time applications with very fast actions.
All in all, it is easier than originally expected to develop your own personal voice assistant for a virtual reality application using the Watson services on IBM Bluemix cloud platform. However, we had to overcome some unexpected hurdles. At the beginning of our personal voice assistant project, our existing virtual reality game was a relatively large project and such an extension was not planned initially. Thereby our architecture had to be changed in some cases, for example we had to rework the WebSockets for our online multiplayer mode.
As we have only a temporary license for the IBM Bluemix cloud platform, unfortunately it looks like that we cannot keep the voice assist in the final project.
If you want to know more about our virtual reality game, check out AIRA VR or follow us Facebook
Leave a Reply
You must be logged in to post a comment.