Implementation
Model
The model we’ve chosen is an attempt to implement one part of a large SCM business model. Since an example of shipping processes for single items does already exist on IBM’s platform ‘DeveloperWorks’, we focused on the ability to create and place composite orders.
During the definition of our model, we stumbled upon some decisions with regards to the object oriented design of our entities, as there were multiple approaches to tackle a variety of problems.
Participants
As the first step, we wanted to determine the different types of members for our network, also referred to as participants. The key roles we identified are Producers, Shippers and Retailers.
There are basically two ways to distinguish between these particular roles, one of them being classification by field values, e.g. an enum, a string or similar state variables, the other being classification by sub-typing.
The former allows a company to be present as a single participant and act as any of the specified types. This approach is very flexible and might be more accurate to the real world, but it also comes with a lot of additional effort to manage access controls, as these make use of the model’s type definition. On top of that, it introduces additional challenges to handle the different member types in chaincode.
In contrast, the second approach enforces a strong limitation for members, as they can only be present as the participant type as which they had joined the network. In practice, the business network represents a specific context. In this context, the relations between participants are often well defined.
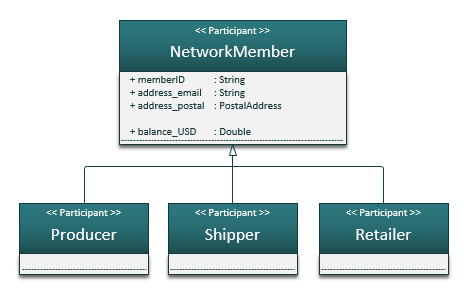 As shown in the diagram, we’ve chosen the second implementation. In order to compensate the tradeoffs anyway, companies that need to act as different participant types would simply join the network using multiple identities.
The implementation reduces complexity, it allows clean definitions of access controls and also leverages the advantages of interface-like appearance within the network as well as separation of concerns for both, the developers and the actual clients.
Concepts
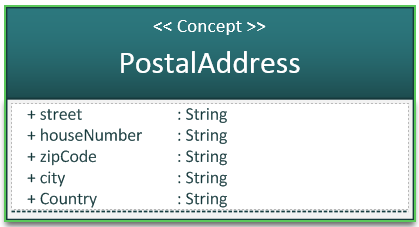
In order to keep the model simple, we only added a single concept to our model. It’s the postal address that can be set for a participant.
Enums
Our model was designed to keep track of an order’s state. We also wanted to categorize the products we add to the database. At first, two enums seemed enough to satisfy these needs.
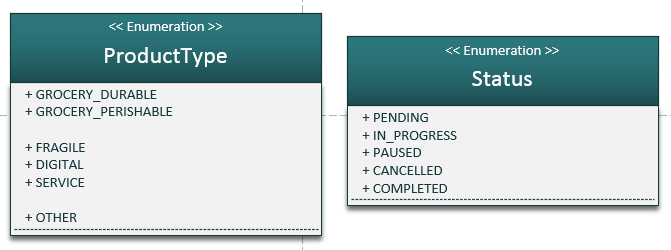
We soon noticed that the enum for the product type wasn’t enough. It is certainly possible that a product belongs to multiple of these categories. A better way to implement this are flags, so that single values can be combined, for example with bitwise operations.
Nevertheless, we kept the initial definitions, as they were enough for our test environment.
Assets
We have come up with a design that moves negotiable values and conditions into contract types, even though they are just normal assets.
There is no particular convention that we followed, however, once more it allowed us to seperate the actual purpose and enable access control to these specific types.
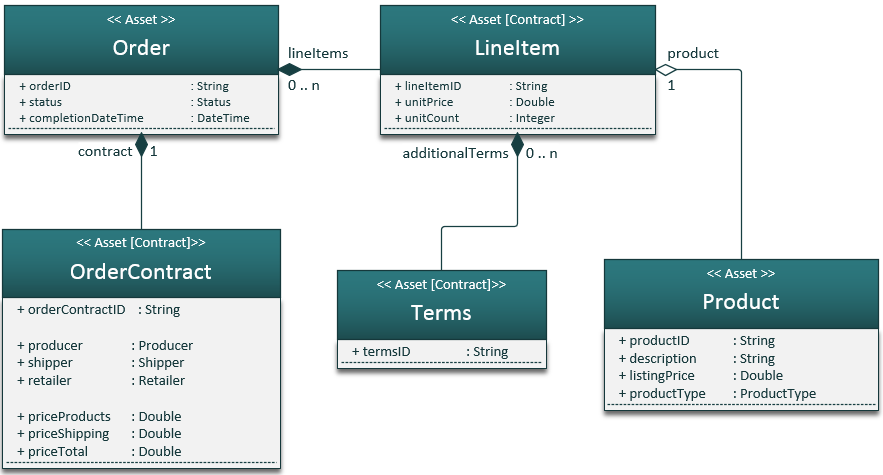
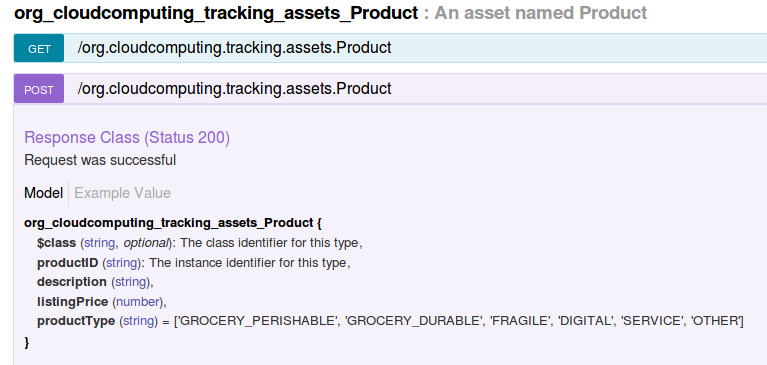
The product definition describes an item that can be exchanged. Using the unique identifier, we can reference any instance of the product. Every product requires a short description, a product type and a listing price.
Line items are one of our contract types. They reference a product that must already exist in the ledger. It also gets the unit count, the final unit price and some additional but optional terms, that is, anything the participants can agree on. The additional terms only serve as a placeholder in this model, however, they can be used to define further conditions for deadlines per product, penalties and more. Line items must be identifiable by their own unique ID, too.
When orders are created, one line item will be added for each product that is selected, and the participants can set the individual unit counts and prices for this deal. The actual state of the whole process and the date of completion is tracked by the order instance itself, as the information is not part of the agreements.
Last but not least, there is another type of contract for the order. It holds information that is associated with the complete order. It references the participants involved, calculates the shipping price, the costs for the products and the total costs for the retailer.
Transactions
As already mentioned, state can only be modified through transactions that are bound to corresponding chaincode. For our scenario, we’ve chosen basic transactions for adding participants and products to the ledger. We also defined transactions for placing orders and for completion of existing orders.
The setup transactions are inherit a general purpose NetworkSetupTX (TX being the suffix for transaction). As the chaincode takes care of generating dummy data, all we’ve added to these transactions is a simple message field, as shown in the following diagram.
![]()
For other transactions, all we needed was the reference to an order. That’s the most trivial way to setup transactions in our scenario, as we get access to all the necessary fields through an order. That said, an example of such a transaction is the one we submit when an order is finished.
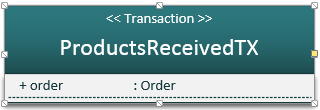
Pretty simple and straight forward.
Instances of the transactions will be passed to the actual chaincode and provide access to the information we need for the business logic to work. When a transaction is submitted, an ID and a timestamp will automatically be generated and associated with the transaction.
Chaincode – Transaction Logic
Chaincode is used to implement all the business logic that accesses the ledger, either by reading or writing, and it is normally associated with a transaction that will be passed as an argument.
Using Hyperledger Composer, chaincode can be written in JavaScript. In order for the transactions to be recognized, they have to be annotated with ‘@transaction’. Types for the parameters can also be specified with annotations.
/**
 * @param {org.cloudcomputing.tracking.assets.ProductsReceivedTX} tx
 * @transaction
 */
function onProductsReceivedTX(tx)
{
    // [...]
}
The example above is already valid chaincode, even though it doesn’t do anything in particular yet. If we executed this transaction using the a corresponding API call, it would still be saved and added to the blockchain.
Continuing with our project, one of the things we needed were transactions that we could use to generate instances of participants and assets. In order to speed up the setup of these instances, we’ve written chaincode that populates our database with hard-coded instances of participants and products.
The actual business logic, i.e. smart contracts, resides in transactions that manage the interaction between participants, which includes placing orders, updates to these orders based on newly received information and data, as well as the final completion.
As an example, we will take a closer look at the minimal chaincode for the completion of the order in our business network.
/**
 * @param {org.cloudcomputing.tracking.assets.ProductsReceivedTX} tx
 * @transaction
 */
function onProductsReceivedTX(tx)
{
    var order       = tx.order;
    var contract    = order.contract;

    var producer    = contract.producer;
    var retailer    = contract.retailer;
    var shipper     = contract.shipper;

    retailer.balance_USD -= contract.priceTotal;
    shipper.balance_USD  += contract.priceShipping;
    producer.balance_USD += contract.priceProducts;
    order.status = "COMPLETED";
    order.orderCompletedDateTime = tx.timestamp;

    return getParticipantRegistry(FQNProducer)
        .then(function (producerRegistry) { return producerRegistry.update(contract.producer);})
        .then(function(){ return getParticipantRegistry(FQNRetailer); })
        .then(function (retailerRegistry) { return retailerRegistry.update(contract.retailer);})
        .then(function(){ return getParticipantRegistry(FQNShipper); })
        .then(function (shipperRegistry) { return shipperRegistry.update(contract.shipper);})
        .then(function(){ return getAssetRegistry(FQNOrder); })
        .then(function(orderRegistry) { return orderRegistry.update(order); });
}
This logic will be executed as soon as the corresponding transaction for completion will be submitted.
The transaction grants access to the associated order. Using the order, we get access to the contract which in turns provides references to all participants involved in this deal. Given the assumption that nothing has gone wrong, we subtract the total costs from the retailers balance, add the shipping costs to the shipper’s balance and the total price for the products to the producer’s balance, respectively. We also set the status to be completed and use the transaction’s timestamp to set the date for the completion of the order.
When all changes have been applied to the objects, we request the registries for all resource types that we have modified and issue all the updates for the instances. After successful execution, we can find the transaction within a block that has been written to the underlying blockchain.
Setup and Deployment
There are valuable guides that lead you through the respective setup processes of Fabric, Composer and Explorer, which are each easy enough on their own.
The challenge was to combine the three modules and get them to run the same machine and business network. Although some inconsistencies remain, we found a working deployment workflow that allows us to interact with our model through all three modules.
We start with Fabric, as the other components depend on it. Fabric can be configured through three separate yaml files.
docker-compose.yml
The file docker-compose.yml defines the docker containers that will contain Fabric’s components: Peer, Orderer, MSP and Persistency.
configtx.yaml
Every HLF network starts with a “genesis block” that contains its basic configuration, such as initial network setup and the paths to ordering service and MSP to be used. The configuration data used to create this block is stored in this file. The name of the initial channel is defined here.
crypto-config.yaml
This file contains additional information about the network participants such as host and domain names, for the MSP.

A startup script then consumes these files, creates the containers, and generates the genesis block. Any additional changes to the network are made in the form of transactions. This allows to replicate the network state at any given timestamp, by taking the genesis block and applying the delta until that point.
As mentioned previously, Composer does not offer channel management. This is by design, as Composer is not supposed to manage the network architecture itself, but the business logic on top. Composer can be installed on any existing channel and offer a unique interface for each peer. Exporting an existing business network archive (.bna file) can be done from Composer Playground or through the command line, using the command “composer network deploy”. The archive contains the full model and chain code and can be deployed to Fabric using the “composer network deploy” command. We also generate an authentication card for the business network administrator. Finally, we start the REST server, authenticating ourselves using this network admin card, to create transactions on the ledger through the interface.
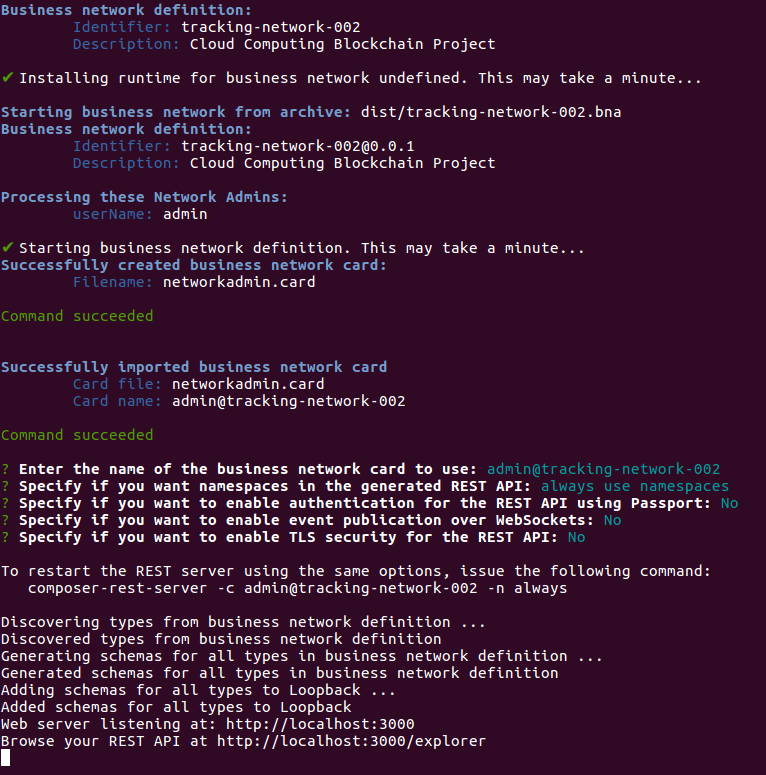
If all configurations are entered correctly, this boot process can be condensed into a single shell script, that starts Fabric and deploys Composer using the generated admin card for the Composer channel(s). The end result should look like this:

The docker stats command shows five running containers, all belonging to Fabric:
- Two peers, one being the instance with our Composer network and chaincode installed
- The ordering service (running SOLO)
- The MSP, that provides identity management
- Our persistence layer, we chose the JSON based couchdb over a key value store
A REST interface is running on localhost:3000, this way we can directly interact with our model through a web client.
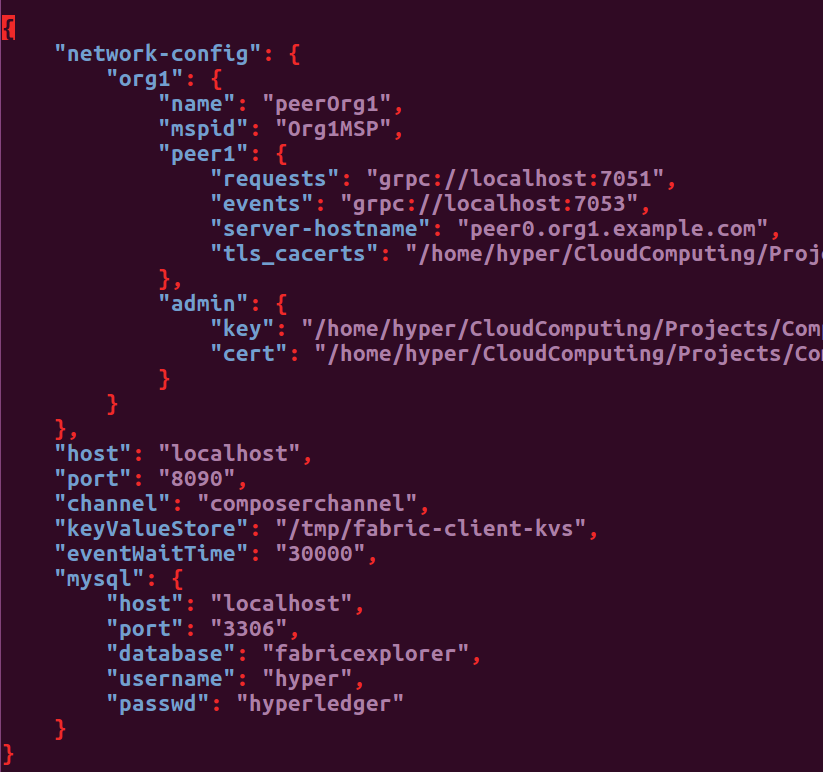
In order to run Explorer, a MySQL Database must be up and running, and fed an SQL setup script. Explorer gets all of its input parameters through a config.json, that specifies its DB connection as well as its access to the network channel and authentication through the peer’s crypto material (it authenticates directly against Fabric and does not use Composer’s cards).
Finally, we use the available startup script to execute Explorer.
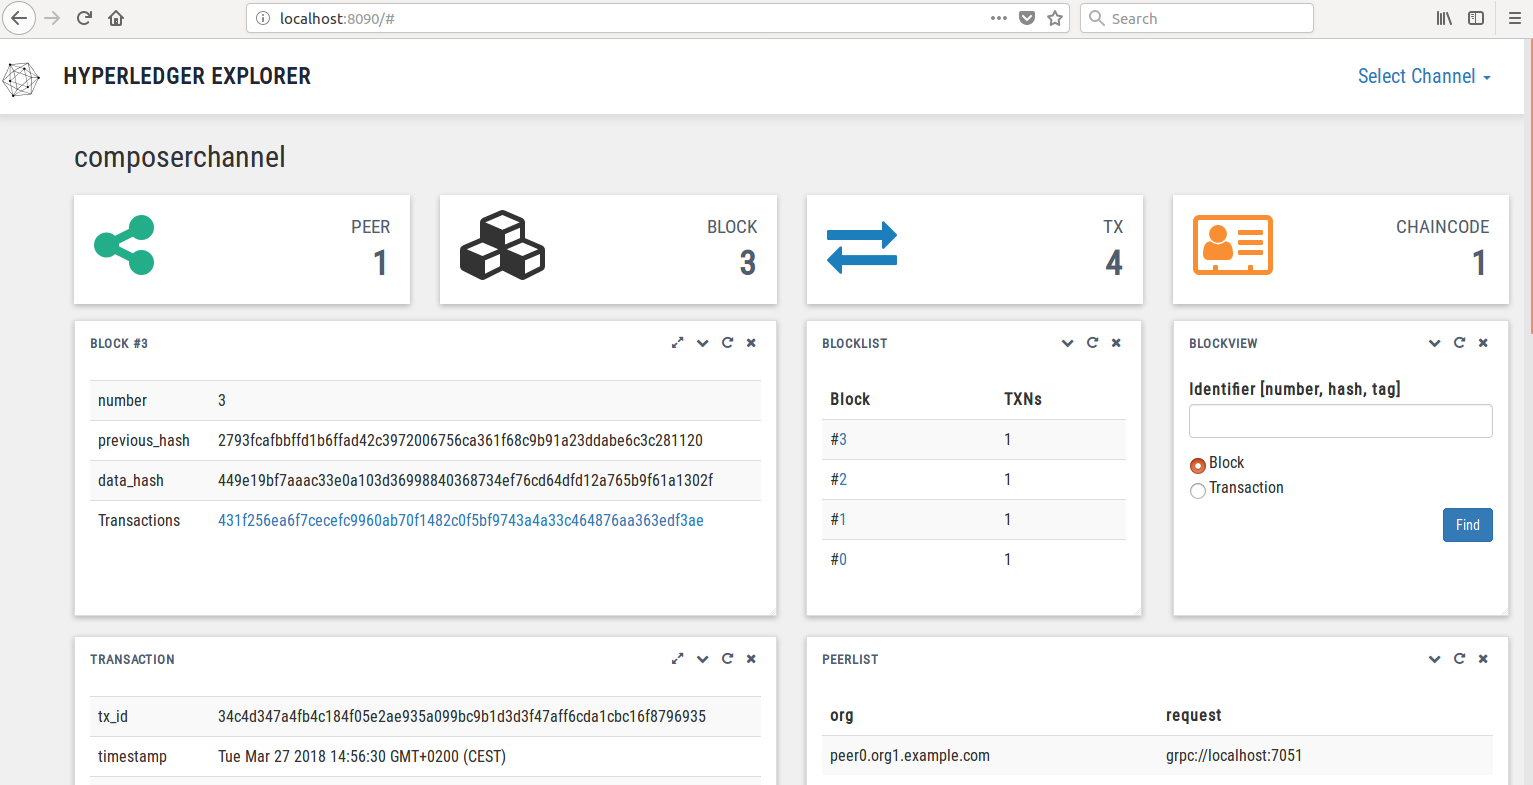
Any transactions we send, whether via the web interface or directly through the command line, will show up in Explorer’s browser window and can be explored there. Payload and metadata, even cryptographic information can be accessed here in human readable form, although usability falls apart once you start digging too deep.
Creating Transactions
We can now execute transactions on the running Composer/Fabric stack. There are three ways we can do this.
Transaction via REST Call
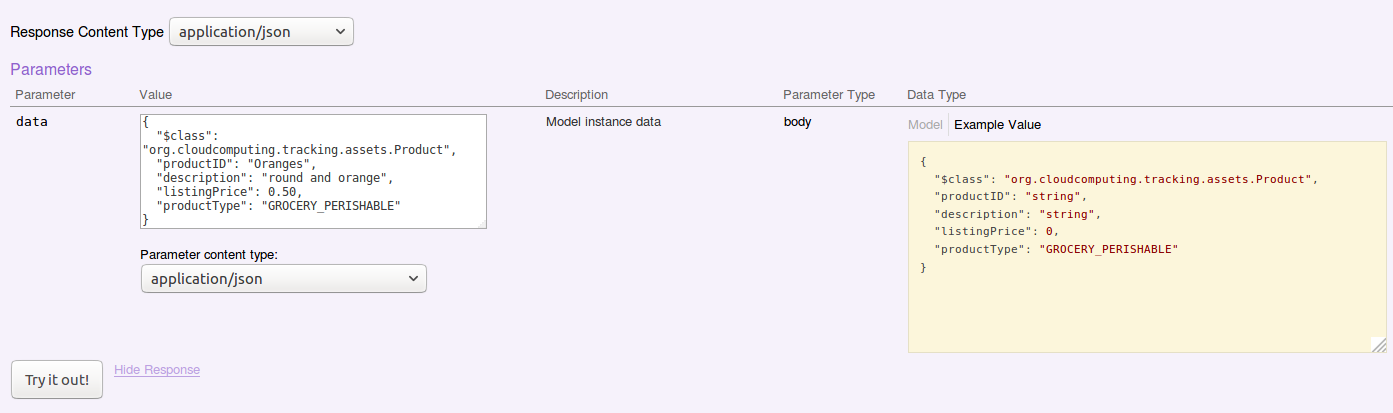
In order to create a transaction via the REST interface, you would create a POST request, that contains the parameters as payload, e.g. as a JSON string.
This example transaction creates a catalog product “Oranges” of type “grocery_perishable”.
{
 "$class": "org.cloudcomputing.tracking.assets.Product",
     "productID": "Oranges",
     "description": "round and orange",
     "listingPrice": "0.50",
     "productType": "GROCERY_PERISHABLE"
}
Transaction via Composer
With access to the composer command line, we can also create transactions directly, using the command:
composer transaction submit --card admin@tracking-network -d <JSON string>
We can’t simply supply the exact JSON string we used in our POST request above, though.
If we try to add a catalog item (an asset), we have to invoke a “wrapper” transaction, to specify whether the item we are creating is an asset or a participant.
With REST, this is already implied by your choice of call.
composer transaction submit --card admin@tracking-network -d
//tell composer, that you want to create a new asset, and where
'{"$class": "org.hyperledger.composer.system.AddAsset",
   “registryType": "Asset",
   "registryId": "org.cloudcomputing.tracking.assets.Product",
   "targetRegistry":
"resource:org.hyperledger.composer.system.AssetRegistry#
org.cloudcomputing.tracking.assets.Product",
   "resources":  [{
    //supply the actual asset
     "$class": "org.cloudcomputing.tracking.assets.Product",
     "productID": "Rice",
     "description": "1000g bag of Basmati rice",
     “listingPrice”: “1.50”,
     "productType": "GROCERY_DURABLE"
}]}'
Using the REST interface is usually more easy and less error prone.
Transactions Created by Chaincode
We can also call chaincode functions as transactions directly through the REST interface. Functions can then internally create multiple transactions, like instantiating participants and assets. This is useful for batch processes, like network initialization scripts. Our model has three of them: CreateSampleParticipantsTX, CreateSampleProductsTX, and CreateSampleOrderTX. They create three of each participant (producer, shipper, retailer), a few items of each product type and a sample order between three participants that contains a number of these products as line items. We call them just like regular transactions, but don’t need to supply any additional parameters other than the class and an optional message.

Querying the Network
As with creating, we have three ways to query our running network.
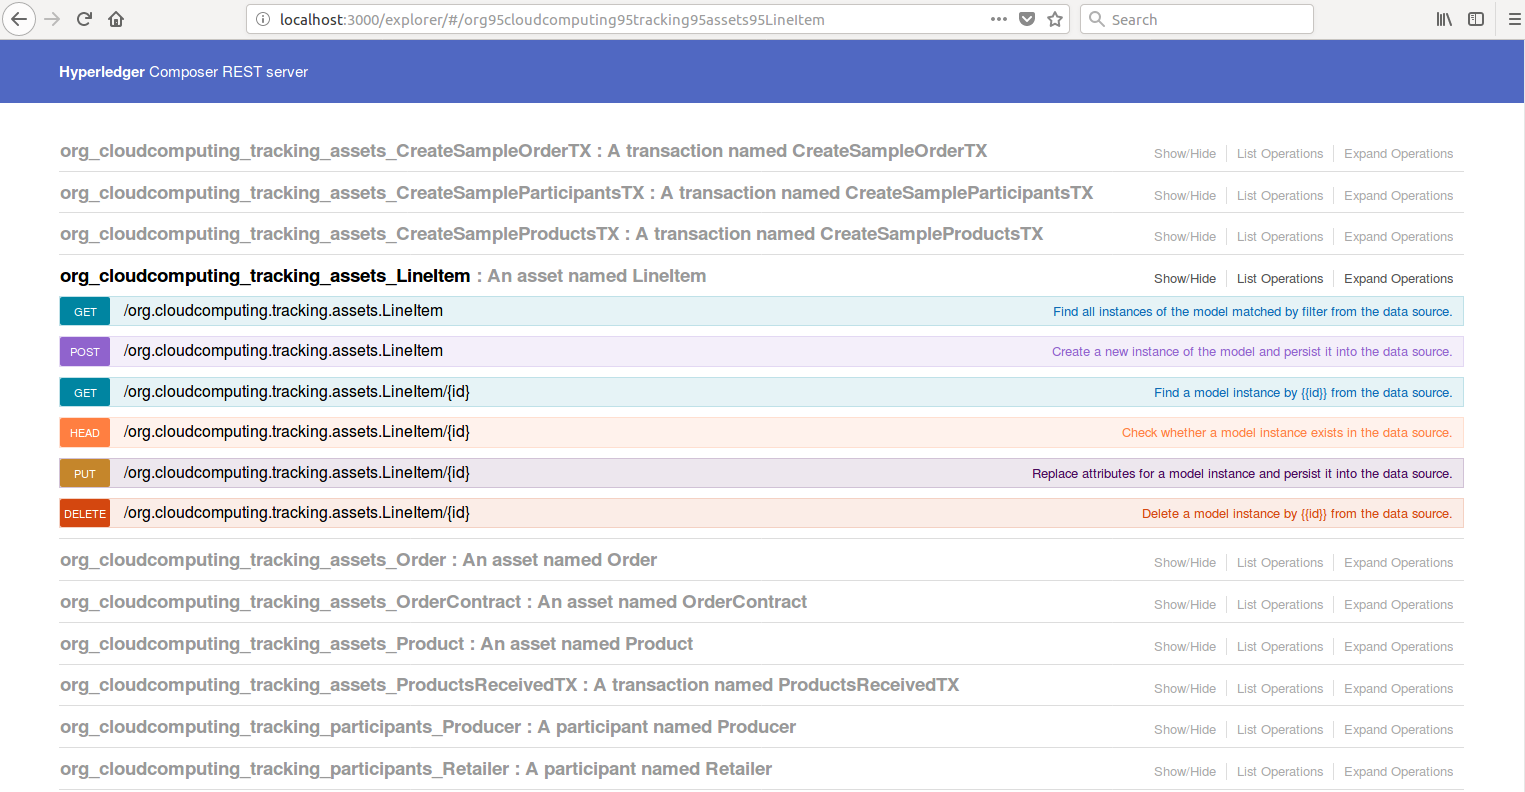
Querying With REST
Querying with REST is really simple. Just choose the part you want to query and use a GET request, i.e.
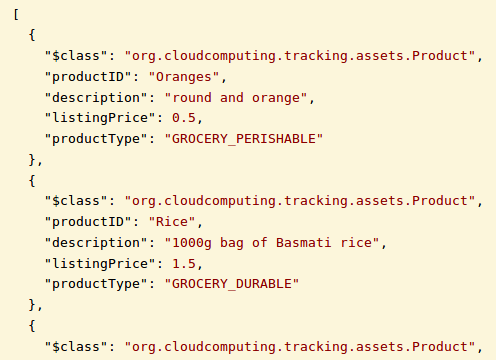
GET /org.cloudcomputing.tracking.assets.Product
returns the products we created earlier.
Querying With the Composer Command Line
Assets and registries can be displayed in Composer by using the command:
composer network list <options> --card admin@tracking-network
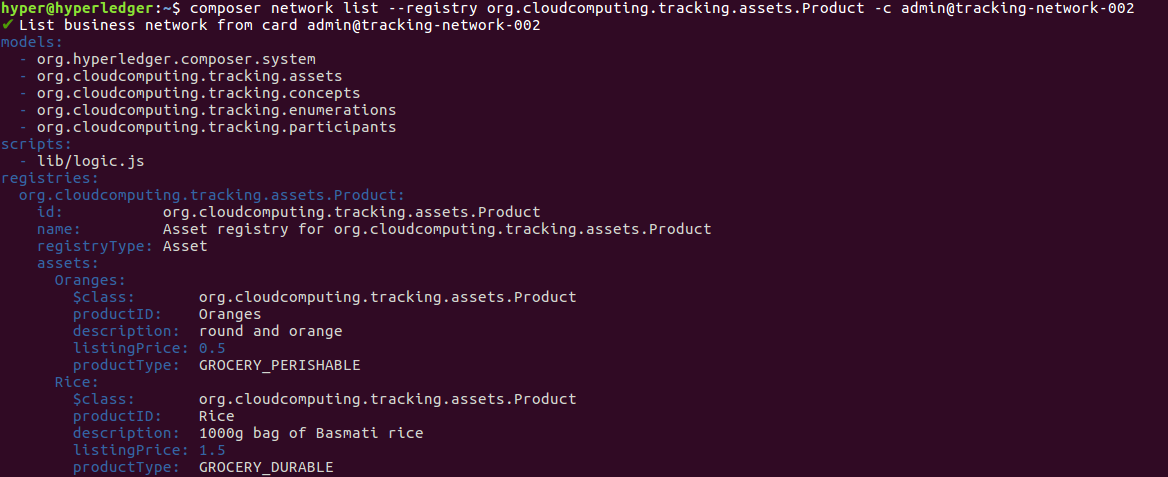
For instance, we can list our product catalog by issuing:
composer network list
--registry org.cloudcomputing.tracking.assets.Product
--card admin@tracking-network
Querying With Explorer
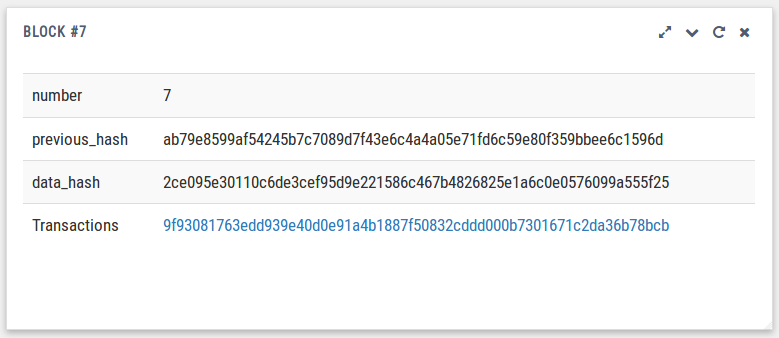
Everytime we create a new transaction (or set thereof), a new block appears in Explorer. Expanding the block shows all contained transaction inside.
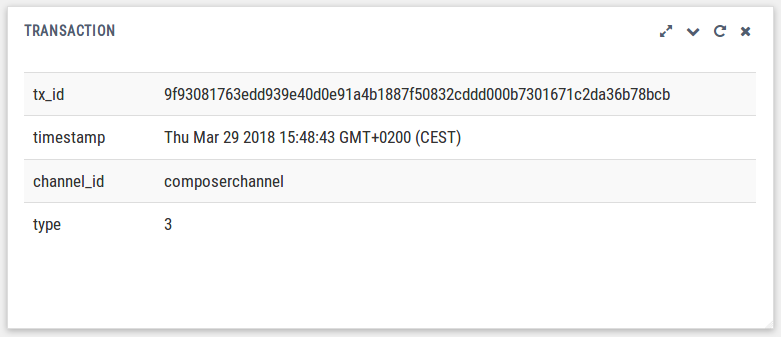
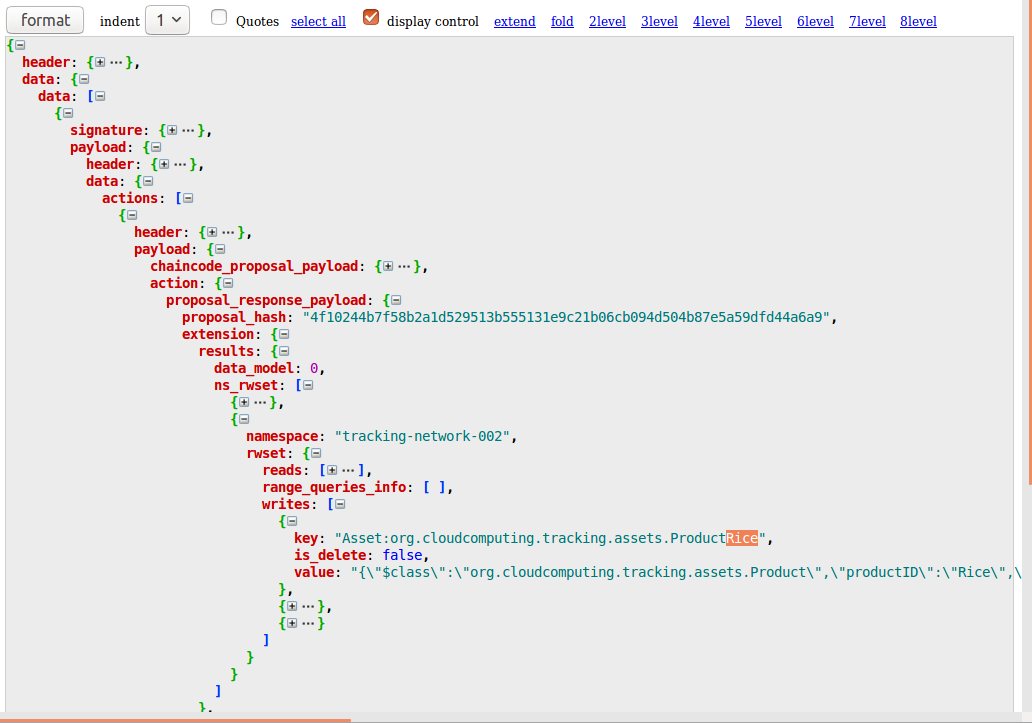
Explorer then allows you to drill down into the transaction body, where you can find payload, metadata. This one contains the transaction where we added the product “Rice”. Anything from payload to metadata, like peer response and executed chaincode policies can be extracted from here.
Challenges
Disclaimer!
Out of the three Tools, Fabric is the only officially released one. Both Composer and Explorer are still in their incubation phase. We are well aware that some of the issues we encountered might just be growing pains, or even caused by our inexperience with the technology.
That said, we have documented some interesting challenges we’ve met during the project.
Undeploying a Business Network
When Hyperledger Composer deploys a business network archive, it’s there to stay. Any updates can only be done through transactions, that is, cumulatively. In order to really remove a business network and free its namespace, you would need to completely remove its ledger and thereby destroy the entire blockchain it’s on. This is the reason, why the business network in our screenshots is called “tracking-network-002”. There are old versions, and they are impossible to undeploy.
The problem? Composer’s command line features a specific “undeploy” command.
After some research we learned, that by “undeploying”, the network is simply flagged as unreachable. This step is irreversible.
Restarting Explorer
We found no way to gracefully shutdown Explorer, we can only kill its process.
(lsof -i :8090 | grep node | awk '{print $2}'| xargs kill)After this, Explorer has to be completely reinstalled. This also happens after a system reboot and on restarting the Composer/Fabric Network.
Old blocks, that are persisted in the MySQL database, are still visible, but no new ones are added. The logs hint that its crypto-material isn’t accepted anymore. We haven’t found a solution to this yet, but at least we have a script do the setup for now.
Finding Documentation Online
Even though the official Hyperledger projects have extensive and well-maintained documentation available, the community behind it is still very young. This can make troubleshooting a real chore, as not every obscure error message has been documented yet. Stackoverflow might not help you, if you are the first one to encounter a problem.
Learnings
Before this project, neither of us had much experience with a blockchain technology.
This project was a great opportunity to experiment inside a DLT engine and explore use cases beyond the commonly known cryptocurrencies. Our main goal was to explore – this way, we gained a deeper understanding of Hyperledger’s modular principle. Had this been a fully accredited software project, we would not have been able to cover the three different tools. Organization played the most important role in this, which leads into our take-aways:
- Create a realistic scope for projects early on.
- Identify the exact tool set you need before you start coding, but still look out for new guides, tools and other resources that may simplify and speed up development.
- Being early to new platforms and technologies can be worth it, but expect to spend a lot of time troubleshooting.
- Don’t only search for solutions to occuring problems – Dig into related topics and gather as much information as possible.
- Engage in the community, especially if it’s still young.
- Document as much as possible, try to simplify and optimize your workflow iteratively.
- If you can automate, do it. (And comment your shell scripts.)
Conclusion
We started this project in the Summer of 2017. Someone who gets into Hyperledger right now would probably get a lot further much faster. The online documentation situation has improved a lot since last year.
Despite all the troubles and headaches we’ve been through with this project, it’s worth to follow the development of the Hyperledger Project and all the toolings it provides.
We think that creating a working POC that demonstrates multiple user access could make a great premise for a future software project. Some of Hyperledger’s components, like Fabric, are also available as a service. This way developers could narrow down their scope and focus on a specific application.
Tools
- Virtualbox Ubuntu VM
- Docker/Docker Compose
- Hyperledger Fabric
- Hyperledger Composer
- Hyperledger Explorer
- JavaScript & CTO in VSCode
- Git & SourceTree
- Yeoman
References
IBM Infographic: “The Paper Trail of a Shipping Container”
IBM Blockchain 101
Hyperledger.org
Hyperledger Fabric Documentation
Development and Deployment with Hyperledger Composer
Hyperledger Explorer Setup
Leave a Reply
You must be logged in to post a comment.