Introduction
Picture this: it’s a Friday night, and you and your friends are trying to grab a spot at your favorite hometown bar. But there’s a catch — they don’t have a website, let alone an online reservation system. You’re left with two options: anxiously calling and hoping someone picks up, or showing up and praying for a table. For many of us, making a phone call to book a table feels outdated and inconvenient, and for the bar staff, the chaos of scribbled reservations and the long papertrail is just another headache.
To tackle this, we developed HostHive, a cloud-based web application created as part of our “Software Development for Cloud Computing” course. HostHive allows clients to make quick and easy online reservations, without the hassle of calling, while providing restaurant staff with an intuitive platform to manage reservations in real time – no more back-and-forths, no more confusion.
Inspired by our hometown’s favorite bar’s lack of a proper system and our desire to avoid awkward phone calls, we set out to build something simple yet effective. While we were already familiar with web development, we had absolutely no experience with cloud computing. That is why we wanted to focus on the cloud technologies involved and to use the development of the app more as a learning journey. It’s not revolutionary, but it’s practical, useful, and, most importantly, doable.
Designing HostHive
In the early stages of development, we had to make some decisions regarding how HostHive would look functionally, what services would be best fitted for this purpose, etc. Here’s a few of them:
Bar-specific Reservation Management vs. SaaS: One bar or all the bars?
Firstly, we had to decide: would we want to create an example website for our favourite bar where users can create reservations just for that one bar or would we want to create one centralized product all venues can connect to? So we weighed out the pros and cons:
- Bar-Specific Reservation Management
- Pros: tailored to the individual bar/restaurant, less work
- Cons: less scalable – would require individual setups for each new location, restricted usability
- Software as a Service (SaaS)
- Pros: Scalable and reusable – we build it once, and any bar can use the same solution
- Cons: initial development would be more complex as it requires a generalized solution to fit a range of needs
Decision: We opted for the SaaS approach, because why settle for just one bar when you can have them all? Plus, this would allow us to think about scalability, a key goal not just in our project but in cloud development overall. We also decided we would create a very simple bar website for demonstration purposes so that we could show a clear example of our app’s features.
Functionality and Prioritization: What’s in, what’s out, and what’s just too much work
Initially, we had a lot of discussions about how to prioritize the features we imagined for our reservation management service and what would be our minimum viable product. We ended up settling on those two lists:
Goals:
- Customer Interface: Make it easy for users to book a table online by choosing a date, time, and number of guests.
- Staff Interface: Let staff mark reservations as “canceled” or “confirmed” and easily look over all reservations for a selected timeslot.
Non-Goals:
- Confirmation Emails
- Manager interface & Table Configuration
- User Registration
What ended up as non-goals were our nice-to-have-but-hard-to-implement-because-of-time-pressure features. Although it would’ve been nice to add a manager or an admin for handling user registration of staff members for example (instead of adding them manually through the Firebase console), a functioning user and staff interface were our top priorities, and we saw no point in having more bad looking and bad functioning features rather than few that ran (relatively) smoothly.
Cloud provider and cloud services
When we started building HostHive, we knew we wanted to experiment with cloud technologies a bit, since they were something completely new to us. Our challenge was to choose a provider and architecture that would keep things simple, scalable, and within the scope of our learning goals.
Firstly, we did what any student team would do: research cloud provider and cloud services prices. In the end, this is more or less what we had to work with (important- we don’t guarantee that all data is up to date or correct):
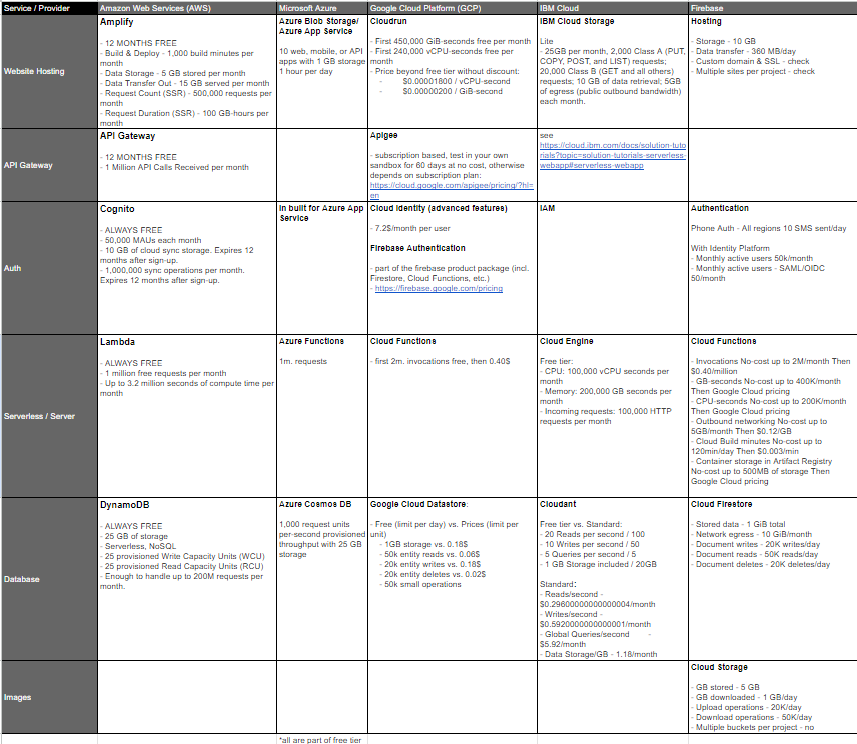
Initially, we considered a few options like Azure and IBM Cloud, but two main paths emerged at the end – AWS and Firebase.
On one hand, AWS is one of the most, if not the most well-known cloud provider and is regarded as really powerful with a vast array of services, including compute, storage, machine learning, and more, so learning to use it seemed like a big advantage. AWS is also highly customizable and adaptable for nearly any kind of project. However, with this flexibility came complexity. Setting up and managing AWS services would take up much more time and effort compared to Firebase and while AWS and its free-tier services were tempting, they didn’t align with our project’s straightforward needs or timeline.
On the other hand, Firebase was designed for simplicity and is very developer friendly – for example functionalities like authentication, which typically take up much more time to design and implement are handled by Firebase themselves – the only thing we had to do was choose the authentication method (in our case email and password) and call, you guessed it, signInWithEmailAndPassword. This allowed us to concentrate on other more relevant parts of the code, setup our system rapidly, plus it eliminated the need to maintain servers, as since Firebase is a managed service, the infrastructure is handled by Firebase.
Server or serverless
Then came the question – server or serverless? We didn’t want to spend our time wrestling with server setups, updates, and scaling issues. Serverless architecture, particularly cloud functions, felt like a perfect fit: we could deploy code that runs on demand, scales automatically with the workload, and doesn’t require us to worry about maintaining or configuring servers. This let us focus on building the core features of HostHive instead of being slowed down by infrastructure management.
While that solution works for us for now, there are some drawbacks to it. In hindsight, for a widely used app a server might be the better option. That is because our current simple implementation of HostHive already has enough logic to make the response times of the Cloud Functions rather slow in some cases, even with one requester at a time. If we were to expect a lot of traffic, with Cloud Functions that would result in longer response times and higher costs compared to a case where we use long-running servers instead. For the short term we still decided to stick to Cloud Functions because we wanted to see how they work and for the long term we expect a relatively straightforward transition to a server-based setup.
Project architecture
Until now, we have done only projects with a layered architecture, where everything is divided into layers like presentation, business logic, and data access. With HostHive we wanted to try something new. Since we were planning on using the Authentication service provided by Firebase, which would already store account data separately, we decided to stick to microservice architecture.
That decision provided us with benefits like the flexibility to scale components separately, which would be very handy later if our app expands, and better modularity and isolation of the services, which in turn makes HostHive more reliable because it ensures that if problems with one service occur, they won’t impact the entire system. An additional advantage in our specific case was that our project was rather simple. We were aware that microservices can get challenging to manage with larger applications but since HostHive is relatively small, it was an ideal sandbox to experiment with microservices. This allowed us to gain experience with the architecture without dealing with the complexities of a larger system.
Technical Background
Architecture
Our project has a microservice architecture with one interface, three services that connect to it and a separate database for each of the Cloud Functions.
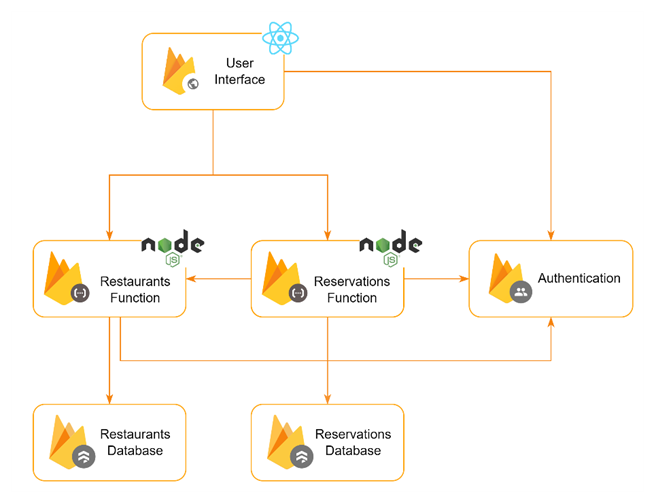
The user interface is written in React and hosted with Firebase Hosting. For the UI components we used an external library – Bootstrap, that helped us focus more on the functionality rather than the styling of the components.
The UI requests data to two Cloud Functions – Restaurants and Reservations. The Reservations function needs data from the Restaurants function for handling some of its own requests, so it also sends requests to the other function. Both Cloud Functions are written in Node.js and structured as REST APIs with the help of Express. The Restaurants and Reservations services, as well as the UI, connect to Firebase Authentication service for the authentication and authorization of staff members. Each Cloud Function connects to its own NoSQL document database – Firestore.
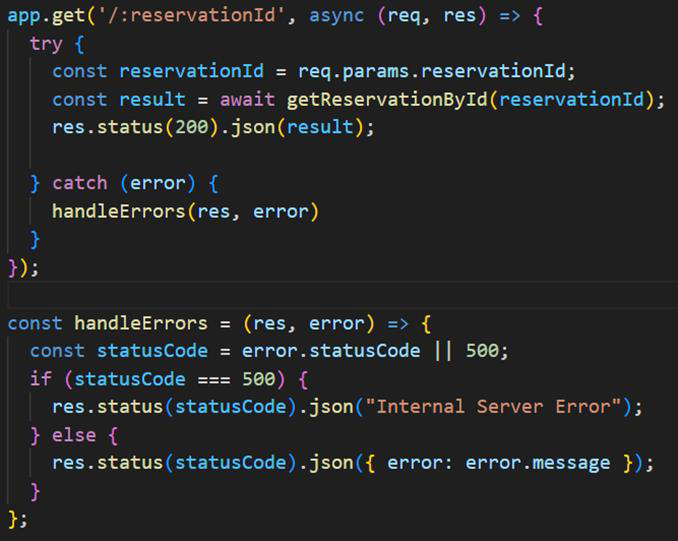
Error handling
To catch any unexpected errors within the application and return meaningful feedback to the clients of our API, we implemented error handling, logging and custom errors. We have four custom errors that contain a status code to be returned to the client that we throw in cases, where the client’s request data caused an error in the logic. All errors, including our custom ones, are caught in the index.js and returned with a fitting status code and message.


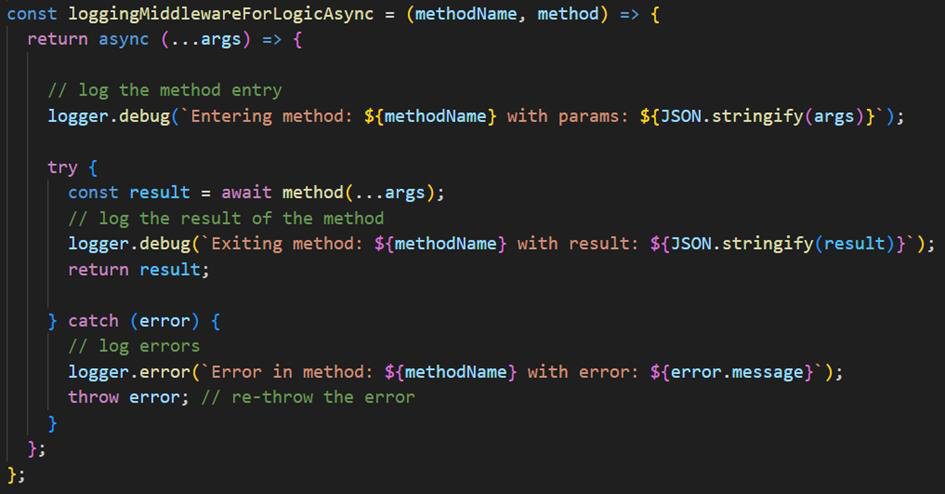
Logging
In order to fix any unexpected errors, we implement logging of all public methods from our business logic and of all API endpoints. The logging is handled by logging middleware, to avoid code repetition and inconsistencies in our logging strategy. We log with what data the method was called and what data it returned. If any errors are thrown, they also get logged. That strategy helps us identify where the errors occurred and what kind of input caused them, which in turn helps with the bug fixes.
Testing
Unit testing
Another way we attempted to avoid unexpected errors, was by having tests. We currently have unit tests that reach close to 100% coverage for our business logic.

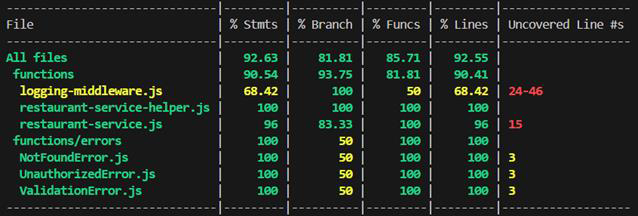
What was annoying when it happened but a learning experience afterwards, is that even with almost 100% test coverage and all tests passing, you are not guaranteed working-as-expected-in-all-cases business logic. In our case the getRestaurants endpoint was returning data in an edge case where we expected an empty array. We did not have a test for that specific case at that point, but the tests showed that this method is 100% covered. The problem turned out to be caused by a mistake in the name of one property. After we fixed it and wrote another test specifically for that edge case, there was no change in the coverage percentages. So even with 100% coverage of a method one really must double check if all edge cases are covered by the tests.
Integration testing
Initially, we planned to implement integration tests to ensure the seamless interaction between Firebase Functions and Firestore. However, when we started to research how to do them, setting everything up appeared to be complex and time-consuming. By that time, we were already facing other challenges with the implementation. As a result, due to time constraints and uncertainty about how the integration testing would work with these Firebase services, we decided to deprioritize them. Instead, we enabled the Firebase Emulators and used Postman to test if our Cloud Functions work together with the Firestore databases as expected.
API
The Restaurants Function provides two endpoints:
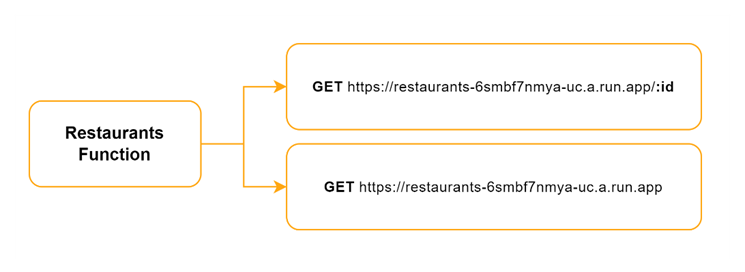
The first one is quite self-explanatory – the user sends a restaurant id and receives all the information about the restaurant that is stored in the database. Because the returned data contains information like the IDs of staff members, the endpoint should have a Cross-origin resource sharing (CORS) mechanism. Due to time limitations and previous negative experiences with CORS, we decided to keep that endpoint without it for now.
The second endpoint is a bit more complicated. It handles two use cases – the user requesting a list of all restaurants supported by HostHive and a staff member requesting a list of all restaurants they work at (during the login process). The first use case doesn’t require authorization since it’s meant for a later version of the HostHive homepage where a list of all restaurants, to which the client could make a reservation, would be provided. For that use case only data that is considered “public” is provided for each restaurant – name, address and opening hours. For the second use case an authentication token is required. The token is generated during the login process in the UI and is used in the function to extract the user id and return all restaurants, where the user is listed as staff, so the user could choose, to the dashboard of which restaurant they want to be forwarded.
The Reservations Function provides four endpoints.
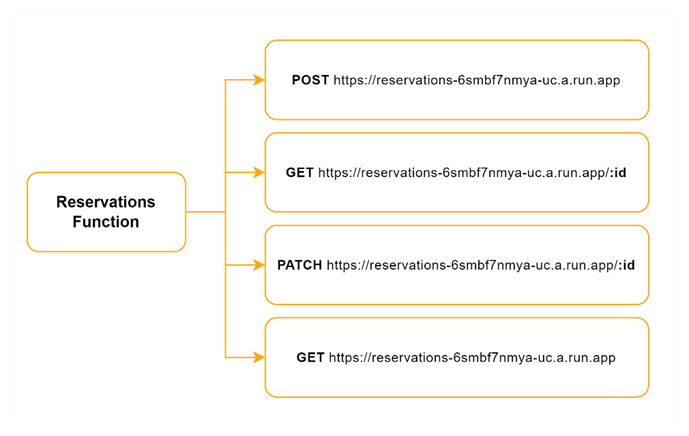
The first three are quite straightforward and deal with individual reservations. The first endpoint allows a user to create a reservation by providing the necessary reservation data. Once the reservation is created in the database, the user receives a confirmation message.
The second endpoint retrieves a specific reservation from the database using the reservation’s ID. This endpoint returns the details of the requested reservation. The third endpoint allows a user to update an existing reservation. The user needs to provide the reservation ID and the properties that need to be updated (currently only reservation status updates are accepted), after which a confirmation message is returned.
The fourth endpoint is more complex and handles multiple use cases:
- Availability Request: In this scenario, the user needs to provide the restaurant ID, the requested date, the number of timeslots, and the number of guests. The function returns a specified number of available timeslots for the user to choose from during the reservation process.
- All Reservations Request: This request requires authorization. The user (a staff member) needs to provide the restaurant ID, the requested timeslot, and an authorization header. The function returns all ongoing reservations for the specified timeslot, which is used for managing reservations within the restaurant dashboard.
- Timeslot Request: For this request, the user provides the restaurant ID and the requested date. The function returns all available timeslots within the restaurant’s opening hours for the specified day. This is helpful for restaurant clients during the reservation process – they see when they can potentially make a reservation on a particular day.
Deployment and Firebase Setup
The most unfamiliar part of our project for us was the deployment and the setup with Firebase. We expected it to be very complicated but it turned out to be quite straightforward (for the most part). The main thing one must do is install Firebase as npm package and run firebase init. Then a list of options was provided and we had to simply choose which services we wanted. From there we got feedback on whether everything was configured successfully or whether we must go to the Firebase console and do part of the configuration there. For us, it was the second case. We had to configure the Firestore service by choosing a location for our databases and we had to enable the pay-as-you-go plan, in order to use Cloud Functions. Connecting the Firebase project to one of our personal bank accounts worried us in the beginning because no one needs an additional bill (especially on a student budget), but we must say, that until now the services have been practically free for us.
CI/CD
Towards the later stages of development, we decided to implement CI/CD pipelines for both the frontend and the cloud functions repositories. While setting these up early would have been ideal, they weren’t our main priority, so we only tackled them when time allowed. We have (almost) no regrets about this – in fact, having automated deployment proved very convenient, especially when we needed to fix those last minute bugs at the end before submission, plus it gave us a chance to try out CI/CD and DevOps, which we hadn’t really explored before. The frontend pipeline is straightforward, with stages for building and deploying, while the functions pipeline included testing with Jest to ensure everything ran smoothly before merging into main. It also made the most sense that the deployment jobs only run on the main branch. In the end, even if they didn’t drastically change our workflow because they came in so late, they still brought us closer to our main goal: learning as much as we could about cloud development.
Though we’d like to think otherwise, there are some points where the pipelines could be improved. Currently there are some environment variables that are hardcoded into some of the scripts, for example here:

These could be set up in GitLab’s CI/CD settings instead, keeping them hidden and enhancing security by preventing exposure of sensitive information.
Challenges and Learnings
The challenges we faced could be roughly put into four groups – Firebase, Jest, Authentication tokens and Pipelines.
Firebase
Deleted service account
After a few successful deployments, the deployment started to fail because a service account ending with “@appspot.gserviceaccount.com” could not be found. After a bit of googling and having to go directly to the Google Cloud platform to check if the account exists, it became clear that the said service account “was deleted” (notice the passive case). Given that until that point we have never gone to the Google Cloud platform, let alone deleted an account there, we can only assume Google has deleted it at some point. The offered solutions were two (https://ashirazee.medium.com/http-error-400-default-service-account-appspot-gserviceaccount-com-accd178ea32a):
- Trying to undo the deletion of the account. That could only work if the account has been deleted in the last 30 days. That didn’t work for us unfortunately, which is strange since we were able to deploy successfully (and therefore that account existed) less than 30 days ago.
- Creating a new Firebase project and moving all the services there. That worked but it was a bit annoying since by that point we already had a semi-working version of the cloud functions and the UI and had stored some data in the Firestore for testing.
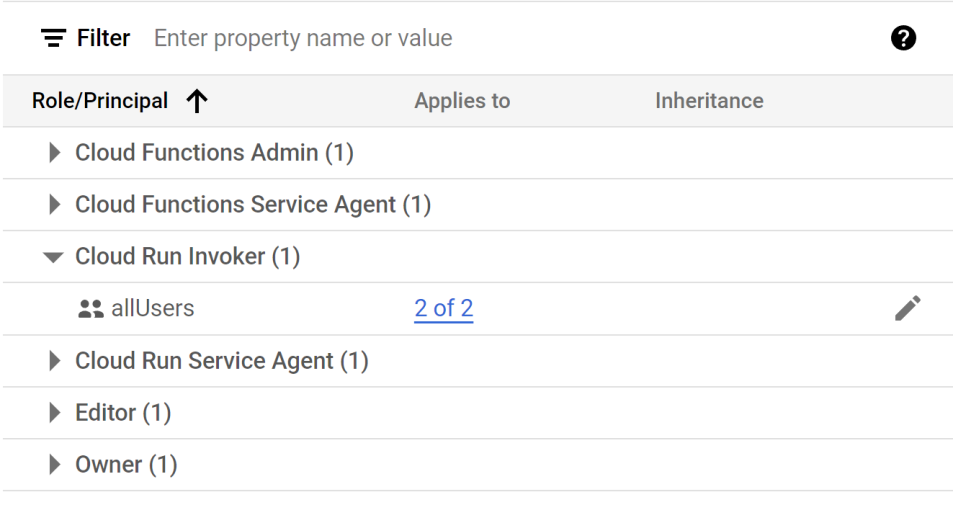
Status Code 401
Another thing that worked until it didn’t, was reaching the API endpoints. Again, for the first few deployments we didn’t have any trouble and were able to connect the cloud functions with the UI but then out of nowhere we started getting CORS errors and status code 401. We tried to solve that by allowing access to the endpoints by all addresses (cors({origin: true})), which didn’t work. It turned out that we had to go to the Google Cloud platform and add access permissions. First, we went to the Cloud Functions service and selected “allUsers” as Cloud Functions Invoker. Then it turned out that this works only for v1 functions and we use v2 functions. So then we had to go to another Google Cloud service – Cloud Run, and there set Cloud Run Invoker to “allUsers”. By this point, we were spending more time in the Google Cloud platform than in the Firebase Console, which was weird, giving that we are doing a Firebase project.
Using a non-default database
We wanted to use separate databases for the two cloud functions to achieve better modularity and to stick to the microservice architecture we decided on. The Firebase Console lets you create as many databases as you want (up to a hundred to be precise) but connecting to them turned out to be not so easy. The possibility of having multiple databases (instead of only the default one) turned out to be quite new (https://www.youtube.com/watch?v=3IXHv9arFlQ&t=6s), so naturally finding any documentation on how to connect to a non-default database was very hard. We ended up finding a GitHub issue (https://github.com/firebase/firebase-admin-node/issues/2268), which referred us to the solution, which we were looking for: getFirestore(databaseId) (https://firebase.google.com/docs/reference/admin/node/firebase-admin.firestore.md#getfirestore_53dc891).
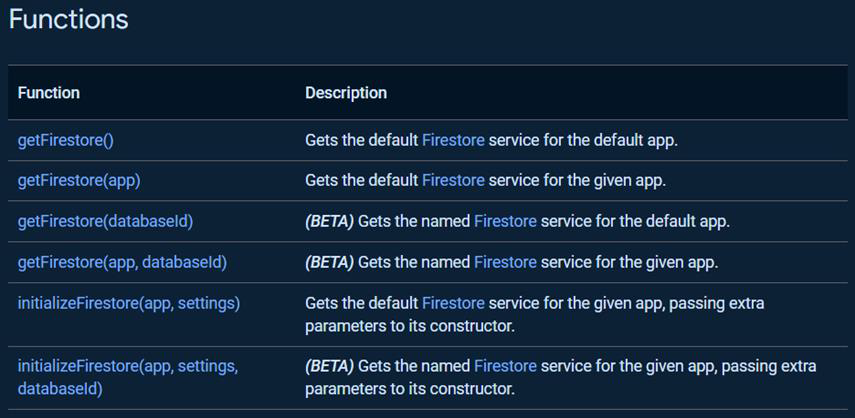
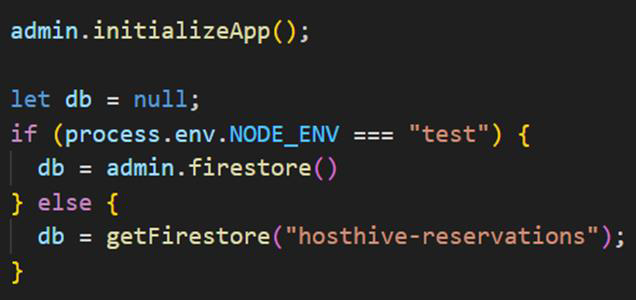
As of right now, the function is in BETA version and did not work with our Jest tests, so we had to create a workaround:
Jest
ES and Jest
Creating the business logic for the reservations was more complicated than we expected. That is why we started writing unit tests, while we were still developing it, in hopes we can ensure the different units work as expected separately before combining them. When we tried to run some of the tests, we got the following error: SyntaxError: Cannot use import statement outside a module. The suggested fix from Jest was:
- If you are trying to use ECMAScript Modules, see https://jestjs.io/docs/ecmascript-modules for how to enable it.
- If you are trying to use TypeScript, see https://jestjs.io/docs/getting-started#using-typescript
- To have some of your “node_modules” files transformed, you can specify a custom “transformIgnorePatterns” in your config.
- If you need a custom transformation specify a “transform” option in your config.
- If you simply want to mock your non-JS modules (e.g. binary assets) you can stub them out with the “moduleNameMapper” config option.
Our case was covered by the first suggestion because the problem was caused by import statements like import { logger } from ‘firebase-functions’ (https://stackoverflow.com/a/52224329). The solution suggested by Jest requires experimental flags, which we did not like too much because of additional potential problems that might come with them. While looking for other solutions we stumbled upon a video tutorial from Anson the Developer (https://www.youtube.com/watch?v=K-9IPd3oAoo&t=2s), in which he suggested either switching to commonjs and changing all import statements to require statement (const { logger } = require(“firebase-functions”) instead of import { logger } from ‘firebase-functions’) or configuring babel (a transpiler) to transform all ES modules into commonjs modules. Since our functions projects were quite small at that point we decided to go with the first option (switching to commonjs manually) to avoid the complications and potential delays in progress that might come with this additional configuration.
Mocking functions in the tested module
Another hurdle with testing with Jest was the inability to mock methods withing the same module. For example, we have the getRestaurants method that got a bit too long, so we split it into multiple methods. Depending on the input the getRestaurants method calls either getRestaurantsByStaffId or getAllRestaurants, both of which were initially private methods. In some of the tests we wanted to mock the two meant-to-be-private methods, so in case we want to change something later and it breaks some of the tests, we can more easily and faster identify where the problem comes from. Unfortunately, as Brian Adams explains on StackOverflow (https://stackoverflow.com/a/55193363) this is not possible. What we decided to do is experiment with different ways to test the private functions and see what the pros and cons of each are.
We first went with one of Brian’s suggestions (Move funcB to its own module) for getRestaurantsByStaffId and getAllRestaurants. We moved them into a helper class (restaurant-service-helper.js) that we required for the restaurant-service.js class where getRestaurants is stored. The mocking worked and we were able to test the methods separately, but there are two major drawbacks. First, we had to make methods, that were meant to be private, public by exporting them from a module to be used in another. Second, with increasing complexity this solution becomes unusable because you might end up with classes like restaurant-service-helper-helper-helper.js, due to methods needing to call other methods.
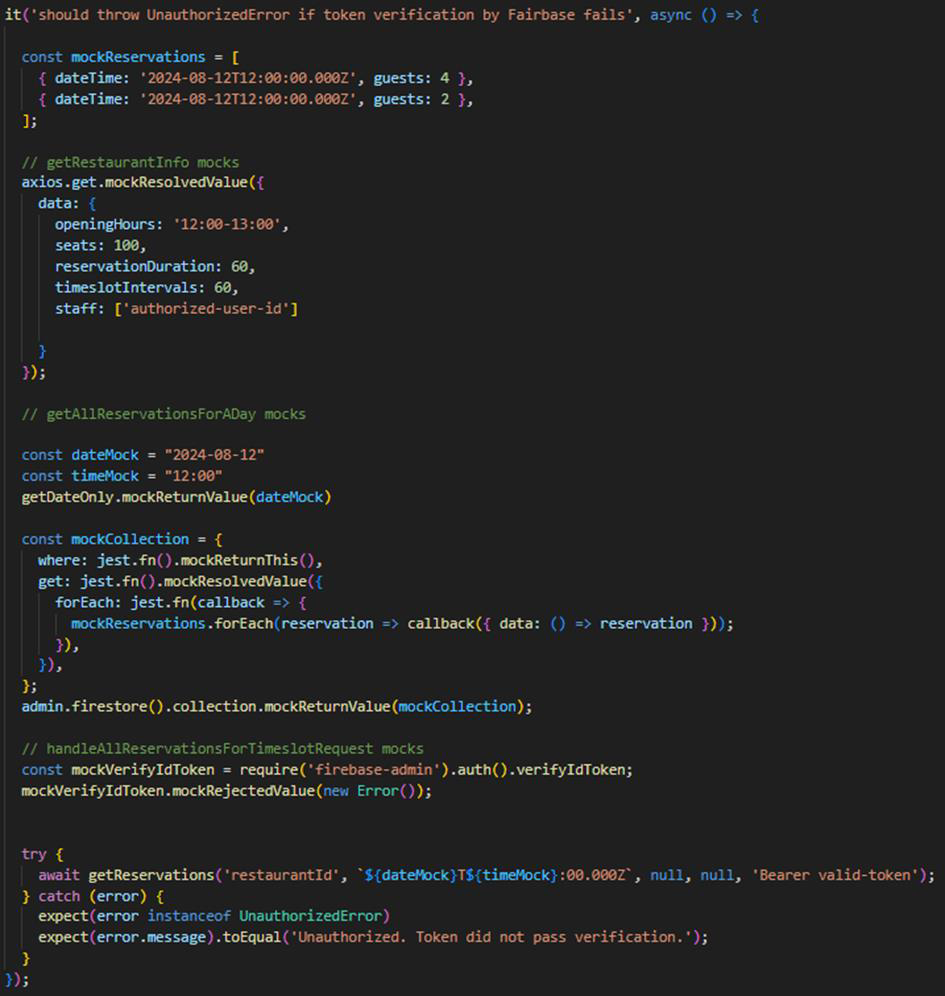
Then for the getReservations method in the Reservations Function we tried a different approach – we did not mock the private methods (handleAvailabilityRequest, handleAllReservationsForTimeslotRequest or handleAllTimeslotsForTheDayRequest). The good thing was that we didn’t have to make private methods public, but a major drawback was the increased complexity of the needed mocks. For example, if in getRestaurants you are testing a case where you use handleAllReservationsForTimeslotRequest and that method itself uses methods from other classes, you need to find out which ones exactly and mock them one by one, which is quite cumbersome. It ended up looking something like this:
In conclusion, moving private methods to separate modules allowed for easier testing but compromised encapsulation and scalability, while avoiding the exposure of private methods maintained encapsulation but increased the complexity of mocks.
Authentication tokens
For a while we would get a 401 Unauthorized Error when staying for a long time on the staff dashboard page. This felt very random and very confusing as we couldn’t even figure out the time interval between accessing the page and getting the error, so we initially thought it had something to do with the token expiration. But after working towards this direction and it not bringing us anywhere, we found this piece of documentation on Firebase’s docs:
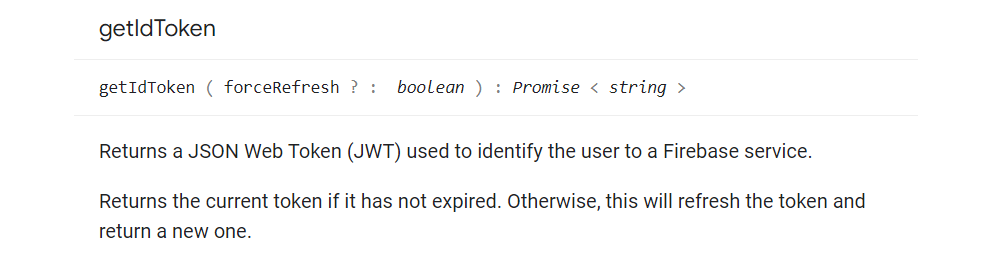
For clarification, we use getIdToken in our handleLogin method to retrieve the token in order to access functions protected by authguards. So then, if token expiration wasn’t the problem, what was? Well, we’re sad to admit we didn’t really figure it out either – what we did to fix the problem was simply adding a few more try catches in case the function which gets all the reservations using the user’s auth token fails.
Pipelines
Getting our pipelines up and running was…an interesting time, a time of learning to say the least. They failed more times than we’d like to admit, and each failure meant another tedious bug fixing session that tested our patience. Most of these issues weren’t anything new – turns out, plenty of people online had already run into the same problems and asked about them online. Our biggest problem was our own inexperience – what should’ve been quick fixes turned into frustrating searching through forums and documentation.
One example of something that confused us for some time was this error:

What the problem was: The command used for deployment until that time was – firebase deploy –only functions –token $FIREBASE_TOKEN. The problem and the solution were as simple as they come: with the first command, we were trying to deploy both our functions – reservations and restaurants. But, the problem was the restaurants function is developed in another repository – so it makes sense that it wouldn’t exist locally, so the only thing that needed to change was adding a specific function to the –only tag: – firebase deploy –only functions:reservations –token $FIREBASE_TOKEN
The environment variables also posed as a challenge for a little bit – namely because the pipeline itself was running smoothly, but the deployed product wasn’t working as expected. This was caused by two main variables missing – the URLs to the cloud functions. In our repository, we didn’t push the .env configuration, as it seemed like bad practice. In order to run locally, users have to create a .env file and add the following two URLs:
REACT_APP_RESTAURANTS_URL=https://restaurants-6smbf7nmya-uc.a.run.app
REACT_APP_RESERVATIONS_URL=https://reservations-6smbf7nmya-uc.a.run.app
Initially, these weren’t reflected neither in the pipeline script, nor in the GitLab CI/CD Settings, but after figuring it out and changing the script accordingly, it finally deployed to an expected state.
Future improvements
We designed HostHive with the aim of creating an easier way for customers to find and book tables at their favorite venues, as well as for businesses to manage those bookings. While we´ve tried our best in developing a user-friendly interface and robust business tools, there are several areas where future improvements can enhance both the customer and business experience. Here are some potential future enhancements for our HostHive App.
Develop a manager-inteface
Developing a comprehensive manager interface would give venue managers greater control over the booking process. This could include advanced analytics, real-time booking updates, and the ability to manage multiple venues from a single dashboard. By adding more detailed control and customization options, we can ensure that HostHive caters to the specific needs of each business.
Automated confirmation and reminder emails
Implementing an automated email system for booking confirmations and reminders would significantly enhance the customer experience. Customers would receive immediate confirmation of their bookings and timely reminders, reducing no-shows and improving overall satisfaction. For businesses, this means better attendance rates and a more streamlined process.
Table configuration and customization
Allowing businesses to configure their table setups directly within HostHive would be a major upgrade. This feature could include options for different table arrangements and special event setups. Such capabilities would allow businesses to maximize their space and improve operational efficiency.
Miscellaneous
Currently, there’s no dedicated system in place for adding staff members through an admin interface. Instead, we manually create mock accounts in the Firebase console and use those to simulate staff sign-ins. This workaround was sufficient for development and testing, but it’s not scalable or practical for real-world use. A future improvement would be to implement a proper user management system where admins can add, edit, or remove staff accounts directly within the app.
There is also the issue of the UX experience – it is clear none of us are good designers, so we opted for a very minimal interface. This isn’t all bad, as at least we think the UI is clean and easily understandable even for new users. However, good design isn’t just about functionality, it’s also about making your product stand out and feel inviting. To really elevate HostHive, we’d need to gather user feedback to understand pain points and preferences better, and establish a design system that brings consistency and a polished look to the app. Investing in UX design would make HostHive not only user-friendly but also more attractive to new users.
Project by Aleksandra Gidionova, Milena Hristova & Nikola Damyanov
Leave a Reply
You must be logged in to post a comment.