Introduction
During the Lecture “Software Development for Cloud Computing” I decided to develop a Cloud based Chat Application with the help of IBM’s Bluemix.
The Application consists of 3 separate Applications:
- Chat Server: Allows Clients to connect to it, manages the Chat-Channels/Users and relays messages sent from a client to the other clients in the same channel.
- Chat Client: The Client consists of a GUI where the User can connect to the Server and chat with other Users.
- Chat Backend Database: A simple Database which records and provides the chat history of a given Chat-Channel via REST.
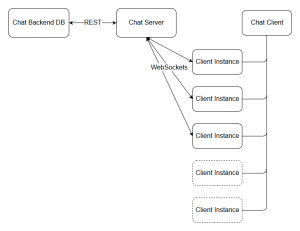
The following Image describes the connections/interactions between the different applications. These will be described in more detail later.
The motivation behind this was that I always wanted to do a traditional Client-Server application and this Project was a good reason for it.
To develop everything for the Cloud was an additional challenge since I had some experience with cloud based application but never really got into it.
In the following paragraphs I will explain how these services were developed, what Problems arose and how IBM’s Bluemix performed.
(You can try out the client right here.
It should be working for at least another month of the time of this publishing, after that my trial runs out and I don’t know what’ll happen.)
Development
Used Tools
All 3 applications were written in Java since I have the most experience with it and already knew some libraries I was going to use.
As an IDE I used Eclipse, as Build Tool I used Gradle.
A great tool to check for additional flaws or erros I used SonarQube for code analysis which also has a plugin(SonarLint) for Eclipse.
As a Build tool I chose Gradle since it is a lot more flexible due to its programmable nature.
And since groovy is very close to Java it’s quite easy to work with.
I chose Git as a Version Control System out of personal preference and experience.
The Continuous Delivery Service of Bluemix supports Github Repositories which is an additional plus.
First Steps
When I first started developing on this project I started with the most important part, exchanging messages in a Server-Client structure.
Naivly I tried to use standard Java Sockets(java.net.Socket) which quickly failed for a reason:
When developing a Application in Bluemix usually only one single Port is open for use, which is mapped to the url of your application(in my case https://studychatclient.bluemix.net etc.).
In my case the port defaulted to 8080 but others are possible.
Since each Java Socket connection needs its own port and I wanted/needed multiple connections that option was qickly ruled out.
After that I tried to solve the issue by using REST calls, which worked ok at the time but obviously not fast enough.
Only after a few weeks I found the oerfect(?) Solution for my problem: WebSockets.
WebSockets are based on TCP and work by sending an Upgrade request on an existing HTTP connection.
When this was succesful we have a full-duplex connection over an already used port and this isn’t limited to only one connection.
After this revelation I quickly searched for a fitting library and found org:java-websocket:Java-WebSocket(https://github.com/TooTallNate/Java-WebSocket) which provides two classes, WebSocketServer and WebSocketClient, which can easily be extended.
An empty WebSocketServer extended class looks something like this:
public class Server extends WebSocketServer
{
    public Server(final InetSocketAddress address)
    {
        super(address);
    }

    @Override
    public void onOpen(final WebSocket conn, final ClientHandshake handshake)
    {
    }

    @Override
    public void onClose(final WebSocket conn, final int code, final String reason, final boolean remote)
    {
    }

    @Override
    public void onMessage(final WebSocket conn, final String message)
    {
    }

    @Override
    public void onError(final WebSocket conn, final Exception ex)
    {
    }
}
The Client looks the same except for the Constructor, which needs an URI instead of an InetSocketAddress.
For actually connection to the Server there exists the “connect()” and “connectBlocking()” methods, with the first one being run in the background.
Additionally the WebSocket objects received as paramters in these methods can be used to send messages, either as a String, byte array or ByteBuffer.
With this solution it is very easy to send messages between server and client but for a chat application there needed to be a few more things done.
Graphical User Interface
A chat application needs a GUI to be used efficiently, chatting via a command line interface would be quite bad and very limiting.
I started looking into a HTML+Javascript combination but quickly stopped due to my aversion and limited experience of JavaScript.
But then I remembered Vaadin, which makes it possible to build web UIs in Java.
You can try out their demos here.
It’s based on the “javax.servlet.annotation.WebServlet” interface and provides similar functionality to the JavaFX framework, which I was already familiar with.
I had quite a few problems with settings it up and running it correctly but after many tries I settled on this:
@Theme("valo")
public class ChatUI extends UI
{
    @WebServlet(name = "ChatUIServlet", asyncSupported = true)
    @VaadinServletConfiguration(ui = ChatUI.class, productionMode = false)
    public static class ChatUIServlet extends VaadinServlet
    {
        private static final long serialVersionUID = -6216866496615055637L;
    }

    private static final Logger LOGGER = LoggerFactory.getLogger(ChatUI.class);

    private static final long serialVersionUID = 903938514945760669L;

    @Override
    protected void init(final VaadinRequest request)
    {
        final ChatView chatView = new ChatView();

        this.setContent(chatView);
        this.setPollInterval(500);
        this.addDetachListener(event ->
        {
            ChatUI.LOGGER.info("Closing View!");
            if (chatView.getClient() != null)
            {
                chatView.getClient().stopTimer();
            }
        });
    }
}
The UI class, which I extended here, represents the top most component in the Vaadin component hierarchy.
For every instance of the Chat Client openend in a Browser a ChatUI Object will be created.
As its content I created a ChatView, as you can see in the “init” method, which contains all the buttons, textfields and similar(usually in further subclasses).
There exists a Graphical Designer to design a Vaadin UI in a Drag-and-Drop fashion but it isn’t available for free so I had to do it all in Code which is unfortunate but not the end of the world.
Server
The Server has effectively two responsibilities:
- Managing users
- Managing channels
Managing channels
Managing Channels contains relaying messages from one user to the rest of the channel and handling joining/leaving of a user.
Channel registry
I had the idea of a single channel registry which controls/manages all channels.
Originally I wanted to add the ability to create custom channels but left it out because of time reasons and so the channel registry is a pretty lightweight class.
It has a list containing all channels, in this case 6 fixed channels. It allows to access them by name or to send a list of all channels to a user.
I made this class a singleton, since there should be only every one instance of it.
Joining/Leaving
    public boolean userJoin(final RemoteUser user)
    {
        LOGGER.debug("User {} wants to join Channel {}", user.getName(), this.getName());
        if (this.userList.size() < this.maxUsers && !this.userList.contains(user))
        {
            this.userList.add(user);
            this.sendMessageToChannel(user, MessageType.CHANNEL_USER_CHANGE);
            this.sendHistoryToUser(user);
            return true;
        }
        return false;
    }
When a User wants to join a channel, first the channel checks if the user can join and if so, notifies all other users that the user list has changed.
After that the chat history of that channel is retreived and sent to the new users client for display.
    public boolean userExit(final RemoteUser user)
    {
        LOGGER.debug("User {} wants to exit Channel {}", user.getName(), this.getName());
        final boolean success = this.userList.remove(user);
        this.sendMessageToChannel(user, MessageType.CHANNEL_USER_CHANGE);
        return success;
    }
A user leaving is almost the opposite, he/she is removed from the list of users and another notification is sent so everyone else has the correct user list.
The “sendHistoryToUser” method resolves to a relatively simple REST call which retreives the chat history and sends it to the user as a message.
Relaying messages
    public void sendMessageToChannel(final RemoteUser sender, final Message message)
    {
        final String messageType = message.getType();
        LOGGER.debug("Sending message to channel {} with type {}", this.getName(), messageType);
        Message msg = null;
        switch (messageType)
        {
        case MessageType.CHANNEL_USER_CHANGE:
            msg = MessageBuilder.buildUserChangeMessage(this.userList, this);
            break;
        case MessageType.CHANNEL_MESSAGE:
            msg = MessageBuilder.buildMessagePropagateAnswer(message.getMessage(), sender.getName());
            this.addMessageToHistory(msg);
            break;
        default:
            msg = new Message("{}");
            LOGGER.error("Tried to send message to channel with unknown type: {}", msg.getType());
            break;
        }
        for (final RemoteUser user : this.userList)
        {
            user.sendMessageToUser(msg.toJson());
        }
        LOGGER.debug("Message sent to channel {} with {} users, Content: {}", this.name, this.userList.size(), message.toJson());
    }
Relaying messages was pretty much a simple loop iterating over all joined users and sending them the given message.
If it was of the type “CHANNEL_USER_CHANGE” it sends the whole list of currently joined users, if it was just “CHANNEL_MESSAGE” it sent the chat message around and uploaded it into the chat history.
Managing users
User registry
As with the channels I created a user registry, managing all users.
When a user wants to join the server, he/she has to send the username they want to use while chatting.
Since every username should be unique to avoid confusions, already used usernames were rejected.
Additionally I assigned every user a unique and positive ID of the “long” datatype to make identification easy.
Out of the name and ID I created user objects which were stored in a Map with the ID as key and the user object as value.
Then of course I created methods for accessing and removing users.
Client
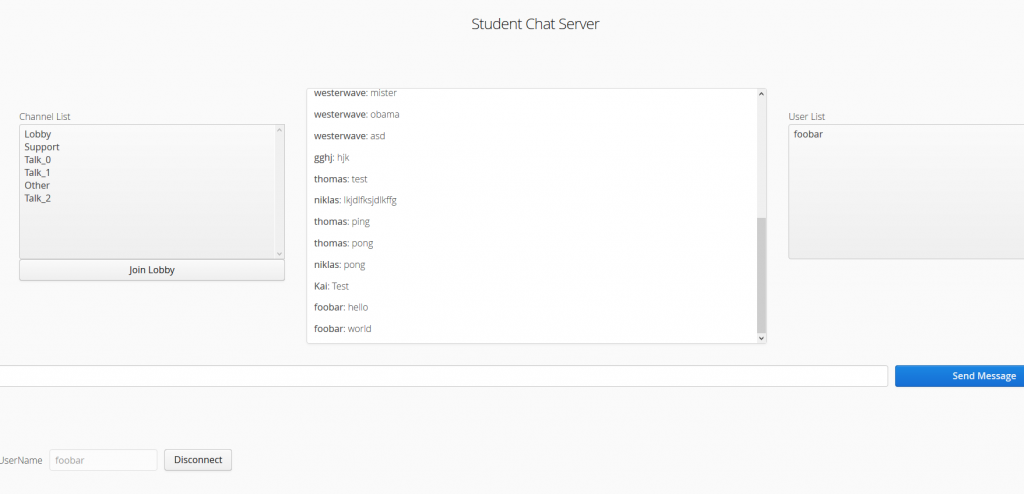
The client has a relatively simple GUI and, as written above, was built with the Vaadin framework.
I won’t go into too much detail of how the GUI itself was built, it’s mainly sticking pre-built blocks together.
Vaadin has several containers such as “GridLayout”, “VerticalLayout” or similar.
Those containers can be filled with controls such Textfields for inputting text, buttons for pressing, so called “ListSelects” for displaying a list and many more.
When you look at the screenshot above you can see many of them in action.
I used a GridLayout as the base and then tried to group the different parts together in sub-layouts, i.e. the user list on the right is a VerticalLayout containing a Label for the title and a ListSelect for the user list.
This splitting of parts helps a lot since they can be worked on seperately.
The more interesting part is the WebSocketClient although it’s very similar to the WebSocketServer.
Detecting disconnected clients
One interesting problem with Vaadin is detecting when a user/client disconnects under abnormal instances.
When he disconnects via the WebSocketClient it’s all fine and good but how is it detected if he closes the tab or even the Browser.
The answer is unfortunately not easy.
Vaadin provides several ways to detect this but I haven’t found a reliable solution.
You can add a “DetachListener” to the Client but I found this to be called only around 30% of the time when I was closing a tab or window.
I then built in a custom “Heartbeat”, basically a periodically updating timestamp for each user on the server.
Each period a message would be sent to the respective client and he would (not) answer it and when he would fail to do so, the server would disconnect him.
But since the closing isn’t detected very reliably more often than not there would be ghost users, sometimes I would find myself with 6 other users while testing, all of them created by me earlier.
Chat History Database
For the chat history service I chose to make it a REST based service with a NoSQL database attached.
Mainly because I already knew how to work with REST APIs but never user a NoSQL database before.
Its service is also kind of detached from the server and client so if it fails at any point, the rest can still work.
IBM Bluemix provides such a database, namely the Cloudant NoSQL database, which I promptly connected with my application.
This gives access to the database authentication via environment while running in the cloud.
Cloudant also provides a nice library to use with this database.
I used SpringBoot as the framework using a single controller with 3 methods:
@RestController
@RequestMapping("/history")
public class ResourceController
{
    @PostMapping("/channel/{channelName}")
    @ResponseStatus(HttpStatus.OK)
    public String addMessage(@RequestBody final String input, @PathVariable final String channelName)
    {
        final JsonObject jo = MessageDatabase.addChannelMessageToDB(channelName, input);
        return jo.toString();
    }

    @GetMapping("/channel/{channelName}")
    @ResponseStatus(HttpStatus.OK)
    public String getChannelMessages(@PathVariable final String channelName)
    {
        return MessageDatabase.getMessageFromDB(channelName, new MessageList().getId());
    }

    @PostMapping("/removeall/{channelName}")
    @ResponseStatus(HttpStatus.OK)
    public void removeDB(@PathVariable final String channelName)
    {
        MessageDatabase.removeDB(channelName);
    }
}
The methods are pretty self explanatory except the removeall POST mapping, which is only in there for development purposes.
The database has a very simple structure:
It is split into 6 documents, matching the 6 chat channels.
Each of those document contain the list of all messages sent to that channel, with the username who sent it.
These then can be requested per channel and will be sent as a JSON message containing the array of messages.
Custom Message protocol:
For the Server and Client to reliably exchange messages I created custom, standardized JSON messages.
Their base structure looks like this:
{
    "version" : <versionNumber>,
    "type" : <messageType>,
    "content" : {
        <additional Content, depending on messageType>
    }
}
Explanation:
The “version” field contains the Version of the chat protocol and serves to differentiate them, if there ever would be a conflict.
The “type” field contains the type of the message, one of the following:
- USER_JOIN: A new Client wants to join a Server(not Channel)
- USER_HEARTBEAT: Periodic message to check if the client is still running
- CHANNEL_MESSAGE: A normal chat message to a channel
- CHANNEL_JOIN: A Client connected to the Server wants to join a Chat Channel
- ACK_CHANNEL_JOIN: Response to Client for succesful Channel join
- CHANNEL_USER_CHANGE: Send to all Clients of a Channel whenever the Userlist of that channel changes, contains the list of clients connected to the channel
- CHANNEL_CHANGE: Sends the currently available channels to a freshly connected client
- CHANNEL_HISTORY: Contains the Chat history of a channel, which is sent to a client on a channel join
Example:
This would be a message sent from the Client to the Server, containing a chat “message” from a Client with a given “userID”.
With this ID the Server can find the User, the channel he/she is in and send the message to the rest of the users of this channel.
{
    "version" : 1,
    "type" : "CHANNEL_MESSAGE",
    "content" : {
        "userID" : 1234567890L,
        "message" : "Hello World!"
    }
}
IBM Bluemix
Right from the start of the project I wanted to use a continuous delivery pipeline to make developing and testing much easier and comfortable.
Luckily Bluemix had in-built support for this with a (mostly) easy setup:
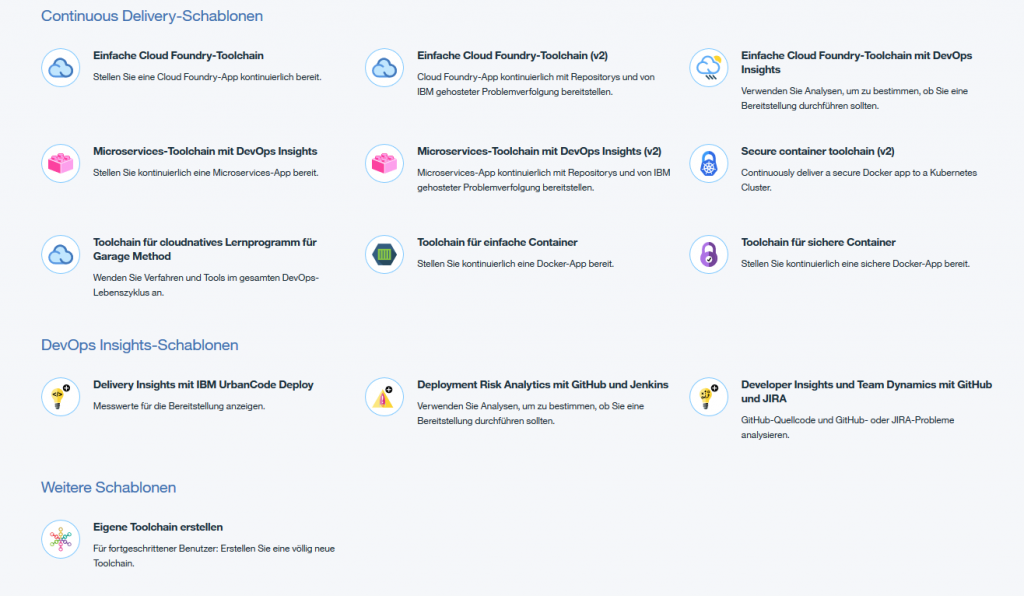
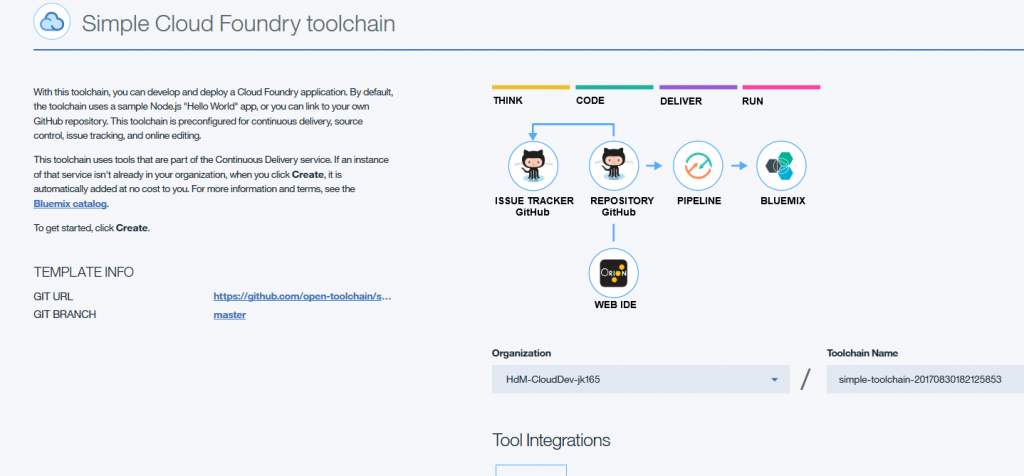
When creating a Toolchain Bluemix provides several pre built templates to choose from. In this case the “Simple Cloud Foundry Toolchain” was sufficient.
 This toolchain is based around a Github repository and even provides a Web based IDE.
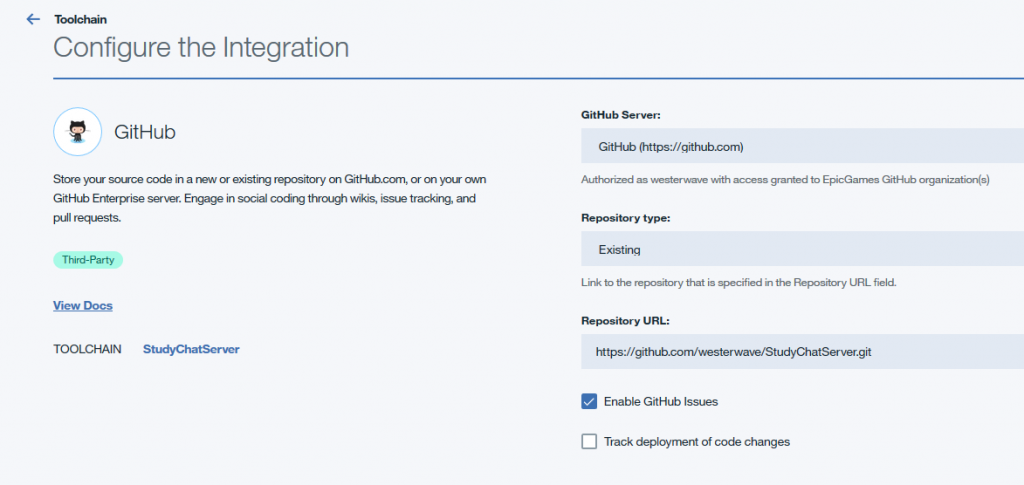
 The toolchain for the Server(and the other two apps) looked like this in the end.
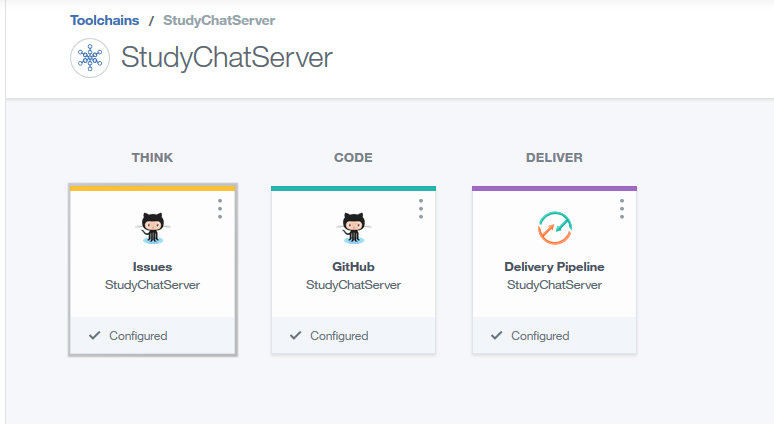 I used the Github repository and configured the toolchain with it. This enabled me to use it as an input in the build steps.
 I used the two pre-configured build Stages: “Build” and “Deploy”.
In Build the unit tests are run and the application assembled while in Deploy the application is pushed to the cloud via the cloud foundry cli.
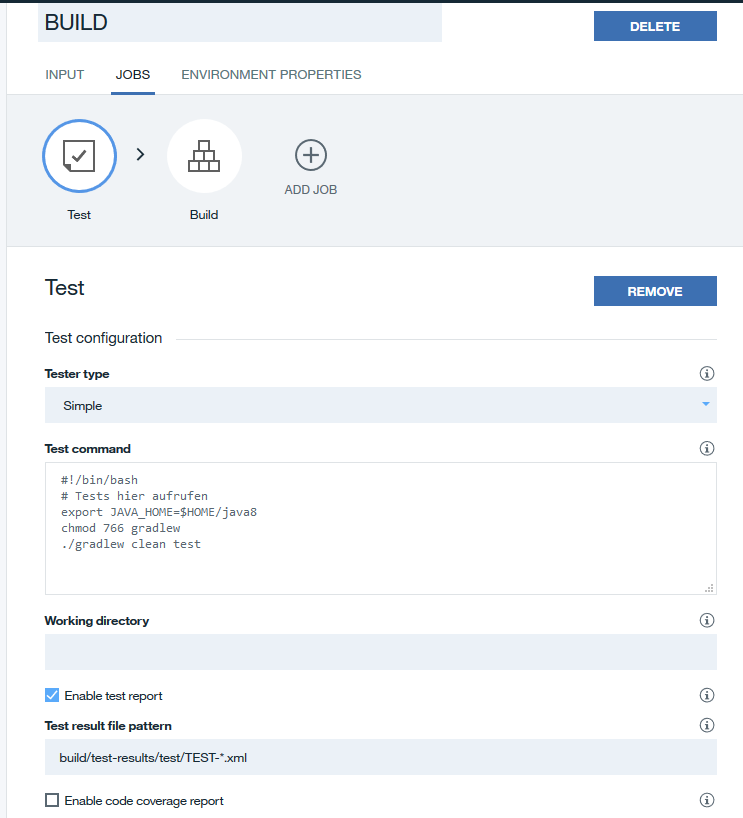
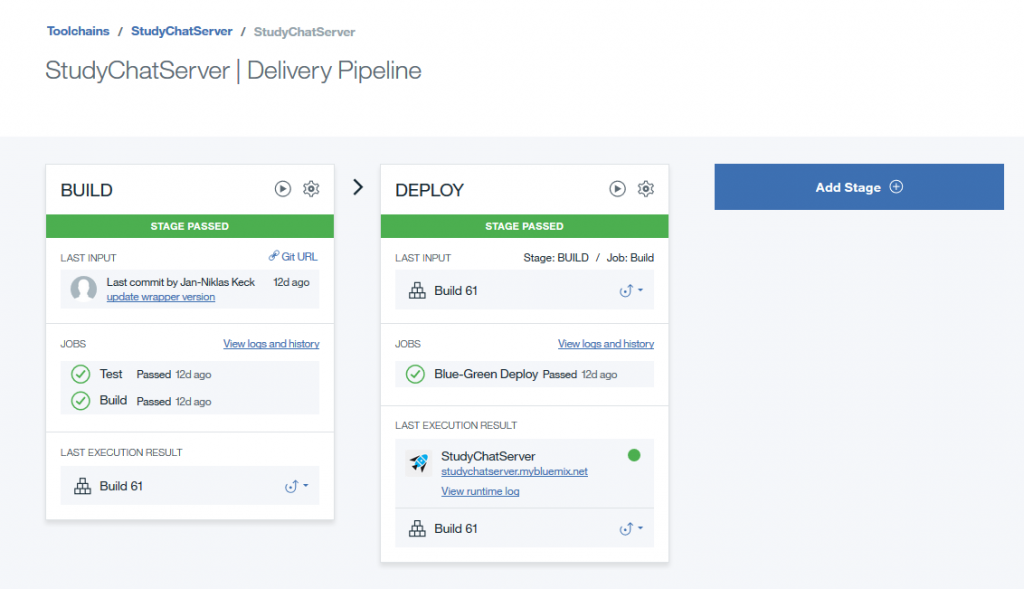 Each stage consists of one or more Jobs. In case of the Build stage there was a “Test” job and a “Build” job. As the names imply, the Test job ran the unit tests and the Build job assembled the application, all via Gradle tasks.
In case of the unit tests, Bluemix can display the result of the tests so you can see where something went wrong.
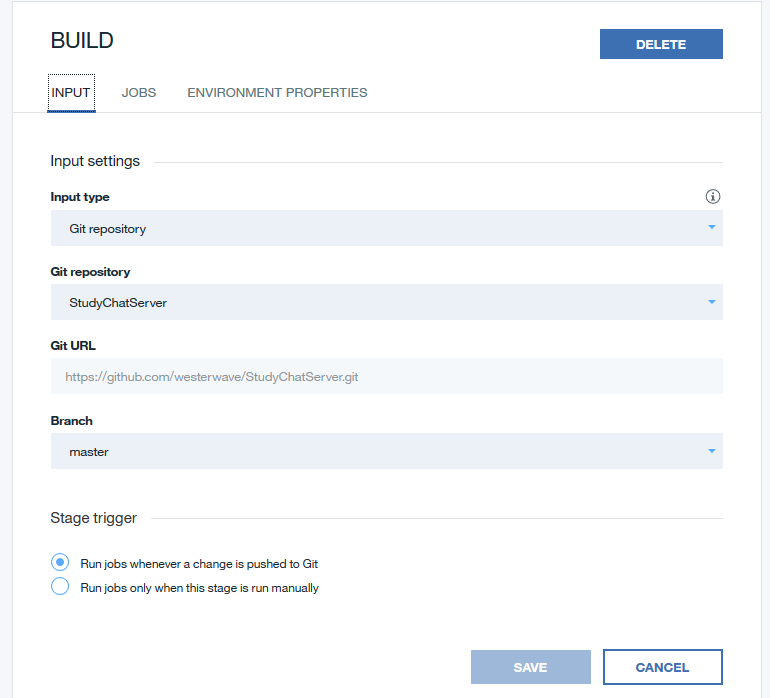
 In the Input Tab I configured the Stage to use the Git repository as an Input and more importantly set it to run whenever something is pushed to the repository on Github.
The Deploy stage is very simple, it configures the different Cloud-Foundry Variables(Organization, Space, Application Name etc.) and executes the command “cf push $CF_APP”. Additional configuration was stored per project in the “manifest.yml”.
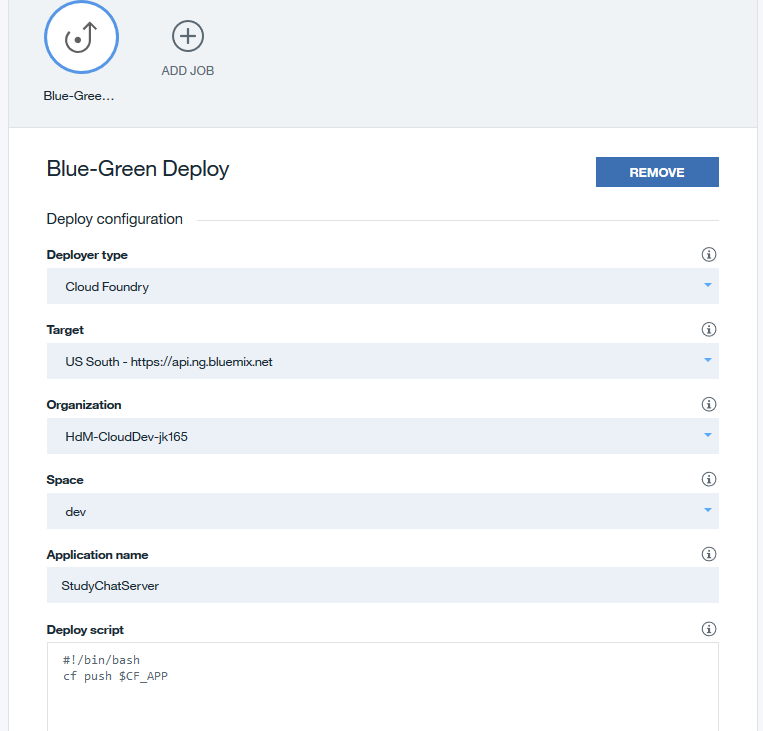
When the jobs of a stage have finished the next stage begins and runs its jobs and so forth.
This whole process made testing the application very easy since all I needed to was develop something, push the changes and I could test them after 1 or 2 minutes live in the cloud.
But not everything was great, the biggest problem was configuring a recent version of the JDK. As of this writing the standard version configured is the IBM JDK version 7 and I noticed this not until I tried to build a early version with Java 8 Lambdas. Then began the search on how to change to a Version 8 JDK, which took quite a while. I found the answer first on StackOverflow and later also in the official Documentation: Change the “JAVA_HOME” environment variable to $HOME/java8 (“export JAVA_HOME=$HOME/java8”).
Other Problems were with the UI of Bluemix itself but these were minor and some of them were solved over time.
Misc.
Github Repositories
Here the list of Github repositories used for this project.
Code quality and documentation could use some improvement but these were not intended for further development.
Still, if there are questions about the code, the best option would be to create an issue on Github.
https://github.com/westerwave/StudyChatServer
https://github.com/westerwave/StudyChatClient
https://github.com/westerwave/StudyChatBackend

Leave a Reply
You must be logged in to post a comment.