Content
RAG FastAPI
- The task
- Challenges
- Introduction to RAG
- The Journey
- Deciding on the technologies
- Easy Decisions
- The not so easy decisions
- Development
- Read in the PDF
- The text-splitter.
- Implementing the vector store
- Creating a retriever
- Creating retrieval chains
- Multi-Tenancy
- Improve Architecture
- The Architecture
- Extensibility
- Interchangeability
- Deciding on the technologies
- Learnings
- Development Team Review
Frotend
- How Did We Approach the Frontend?
- Challenges We Faced
- What Could We Do Better?
- Looking Ahead
Backend
- Task
- The journey
- Challenges
- Lessons Learned
- Summary
Deployment
- How did we proceed?
- Deployment process
- Advantages and challenges
- Advantages
- Challenges
- Looking left and right
- Alternative deployment strategy
- Future developments
- What could we do better?
RAG FastAPI
1. The Task
The task was to create a backend service, that would enable us to upload and communicate with documents. Better known as Retrieval Augmented Generation (RAG).
The goal of this subproject was to learn about the general topic of RAG and working with Frameworks like Langchain and Llamaindex to harness the power of an Larg Language Model (LLM). The personal goals in this project where to learn about the general topic of RAG, to learn about the different services and frameworks that are used in the process.
2. Challenges
- Converting a single process into a an abstracted Backend Service
- Implementing a multi-tenancy system
- Learning about the different services and frameworks that are used in the process
3. Introduction to RAG
RAG combines the process of retrieving relevant documents, and based on that generating a answer to a given question. It is also known as the Hello-World of working with LLMs Following subchapters will explain the process in more detail, by explaining provided image.
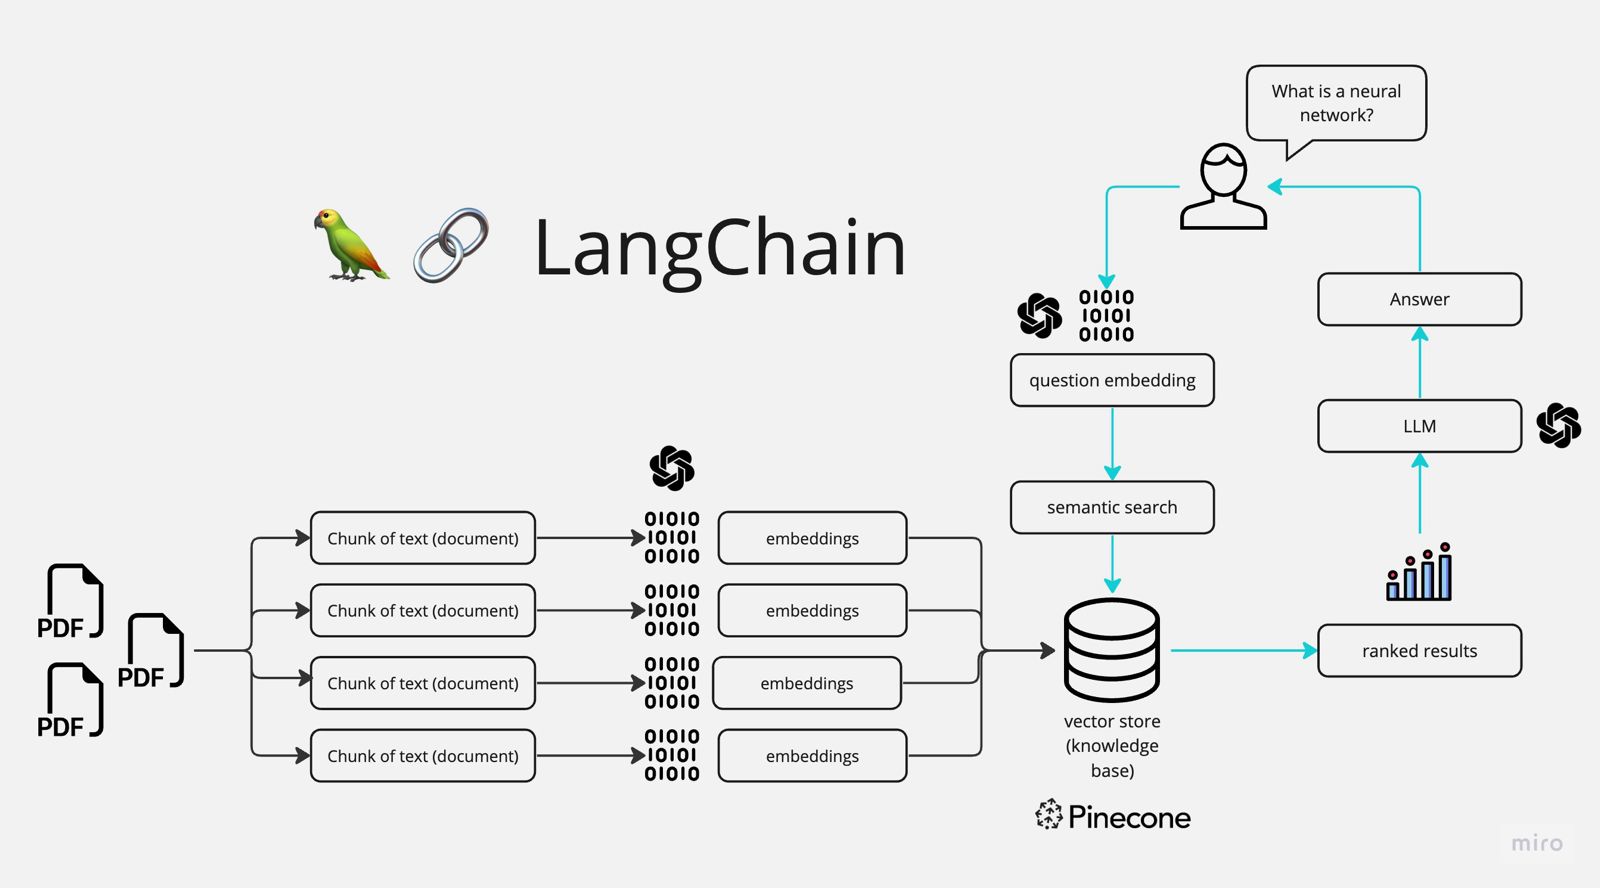
Chat with Multiple PDFs | LangChain App Tutorial in Python
3.1 Encoding new documents (Upload)
We start from the left side of the image, by chunking the documents into smaller parts. This means you read in a document like a pdf, extract the raw text and then split it by a defined logic into smaller parts. This generated chunks are then encoded into a vector representation of their values.
A sentence like this:
Optimismus hinsichtlich Apples KI-Ambitionen hinkt das Papier des iKonzerns schon seit Monaten im Branchenvergleich hinterher.
Is then encoded into a vector like this:
[0.02661253,-0.011285348,0.01718915,0.050273158,0.018801343,-0.03608132 ...]
This is what we then call an embedding. Those vectors / embeddings are then stored in a vector store.
A vector store is a n-dimensional space where those embeddings, representing our documents, are stored. But why do we even need this and how will this look like?
Down below you can see a 2d representation of a vector store. In reality, this vector store has 1536 dimensions.
In this example i uploaded two documents, both containing analysis of how Apple and Nvidias Stockmarket price will develop in the future, with a special focus on their AI ambitions.
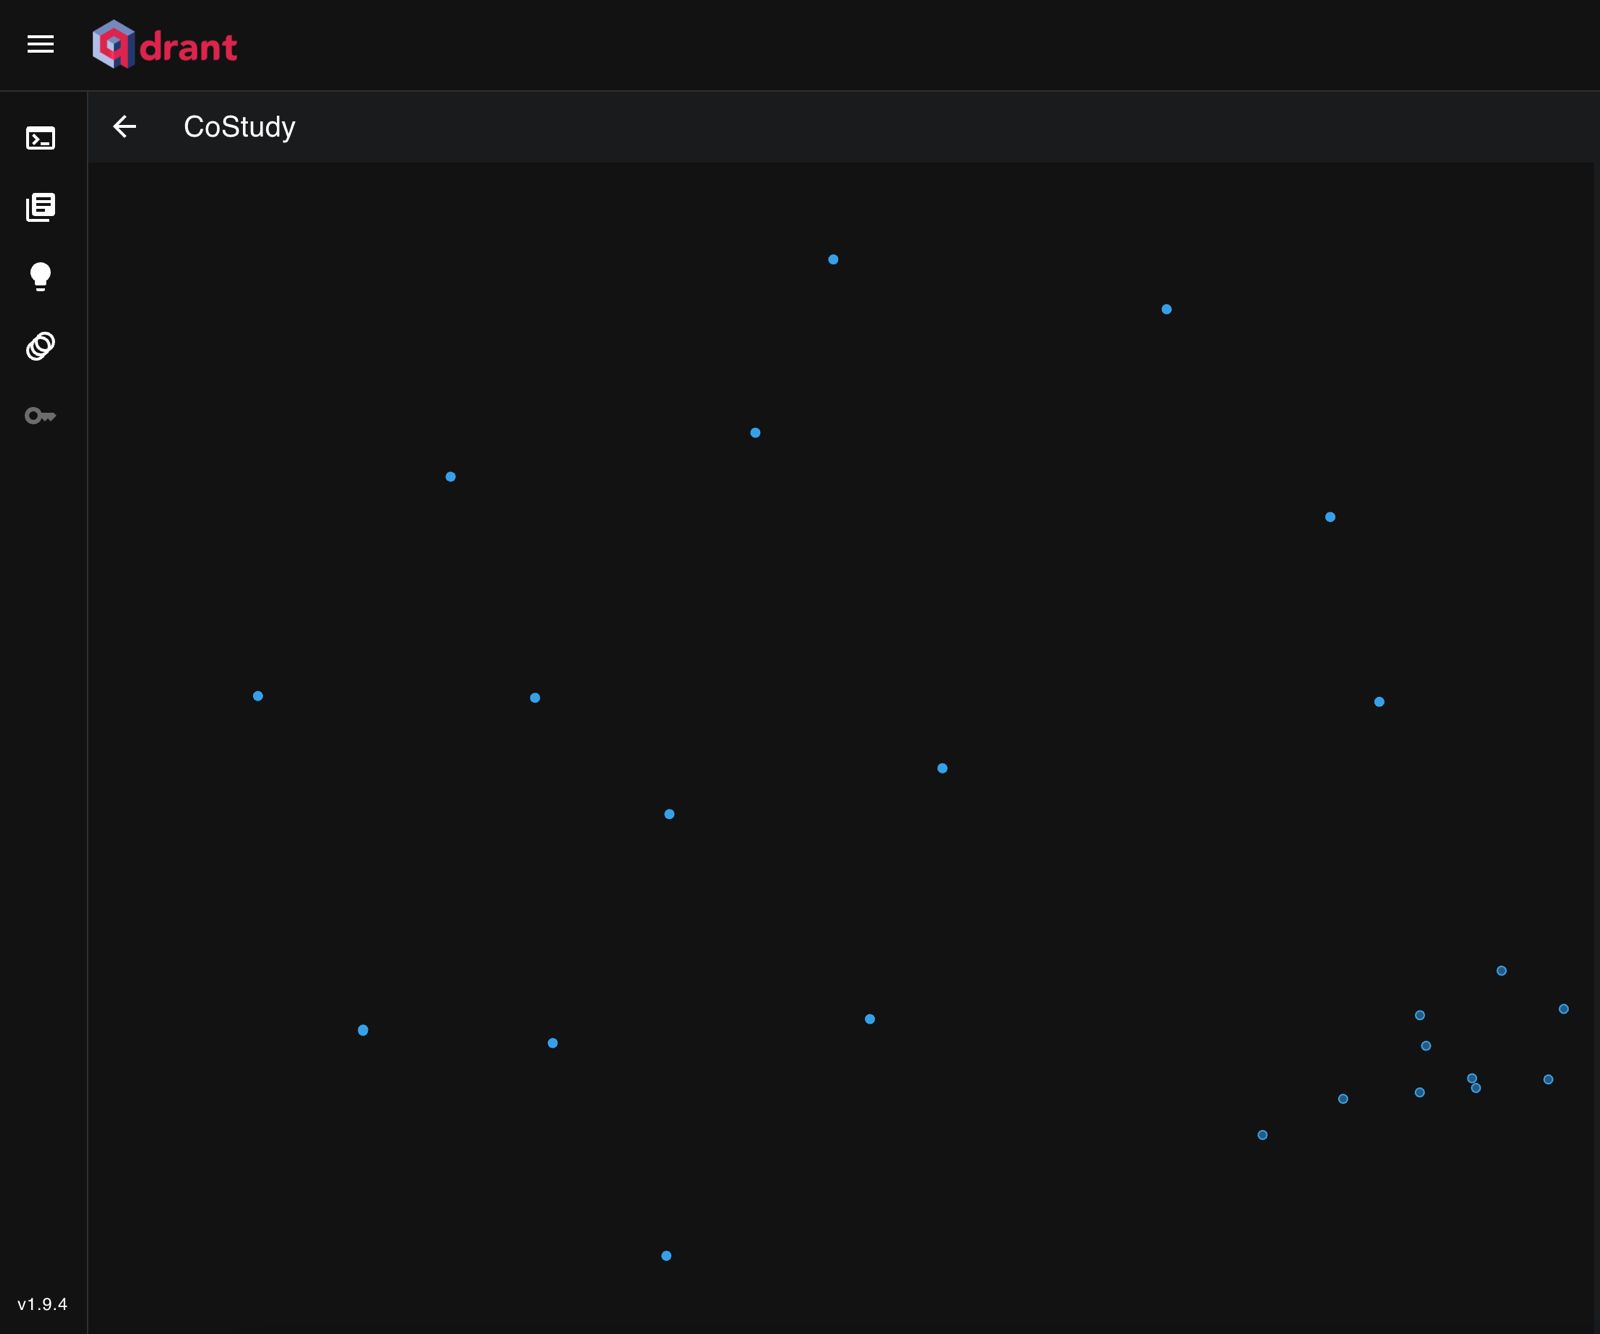
The image illustrates points representing document chunks in a vector space. Chunks with similar content are positioned closer together.
For instance, Nvidia-related chunks form a tight cluster due to their focused content, while Apple-related chunks are more dispersed because they cover diverse topics like the new iPhone release, stock prices, and AI ambitions.
To find similar chunks, we use cosine similarity, which measures the angle between vectors. Smaller angles indicate higher similarity, allowing us to identify and retrieve the most similar chunks effectively.
3.2 RAG QA Process
When we have uploaded our documents to the vector store, we can start the retrieval process. For that we take a look at out picture again. The RAG process starts at the top right corner of the image. The user asks a question, like: “Should i buy Apple or Nvidia stocks?”
This question is then encoded into a vector representation. We then pass this vector to the vector store which then searches for the most similar vectors to the question, by applying the cosine similarity method. The most similiar vectors are then returned an can be ranked by their relevance. This step is not necessary, but provides better results.
Then both the question and the retrieved documents are passed to the LLM. At the end the user gets an answer to his question, that is based on the retrieved documents.
4. The Journey
So now that you have a general understanding of how RAG works, i will explain how we approached this project, and tell you which decisions we had to make.
4.1 Deciding on the technologies
After the initial research it was time to choose the technologies we would use to implement Application.
Some of the decisions where easy to make, some where not. So first for the easy ones.
4.1.1 Easy Decisions
- Python: Python is the most used language for working with Artificial Intelligence and Data analytics in general. So it was clear for me that i would use Python for this part of the project. But as a sidenote there are also other languages that can be used to implement RAG, like Java or Javascript.
- FastAPI: FastAPI is a modern, fast (high-performance), web framework for building APIs with Python. I previously worked with FastAPI and i really liked the simplicity and features like automatic swagger documentation and deep integration with Pydantic.
4.1.2 The not so easy decisions
After we decided on the general technologies, we had to pick a framework and the services we would use to implement the RAG Application.
This was quite a challenge. Because of every day new emerging technologies and frameworks, it was hard to decide on what to use. Based on the visibility of content on youtube and medium we decided to take a closer look into langchain and llamaindex.
Langchain vs. Llamaindex
– LangChain
| Pros | Cons |
|---|---|
| – Flexible and Customizable (Complex Chains) | – Due to the customizability, beginners have a steeper learning curve |
| – Suited for several interacting tasks like Chatbots, Retrieval, Agents | – Larger Community -> more resources for research -> can be overwhelming |
| – Larger Community |
– Llamaindex
| Pros | Cons |
|---|---|
| – Specialized in retrieval and search tasks | – Primarily focused on search and retrieval (Now also supports Agents, so my own analysis is already outdated) |
| – Better developer experience | – Less customizable than LangChain |
| – Less resource intensive than LangChain | – Smaller Community |
For a more detailed explanation: Comparison of LangChain and Llamaindex
To implement a basic RAG application, we initially chose LlamaIndex due to its clear focus on retrieval tasks. However, we were more leaning towards LangChain because of its flexibility and customization options. We felt that due to langchain’s larger community, we would have more resources for research and troubleshooting. Also we wanted to learn a framework, that would enable me for even more complex projects in the future.
Deciding on the vectore store
So now that the first step was taken, we had to decide on the vector store we would use. Until now we never were confronted with this type of database, so we did not know what key aspects were important for the decision. A very helpful article to this topic was following. It compares popular vector databases and gives a clear overview of the pros and cons of each. Which Vector Database to choose
Based on this article, we chose QDRANT as the vector store service because of its high performance and the ability to self-host it as a publicly available Docker image.
What LLM should we use ?
When we started with the project, we were eager to use AWS and primarily it’s services. So based on this we wanted to use AWS Bedrock as our LLM provider. AWS Bedrock is a service that provides a set of LLM Models that are hosted on AWS infrastructure. From the many LLMs available on AWS Bedrock, we chose Claude 3 Haiku because it was one of the cheapest models available with a good performance.
But things changed shortly after our presentation. In our group we discussed to switch to Microsoft Azure as our Cloud Provider.
Because of the uncertainty which Cloud Provider we would use, we decided to look for a service that would not be bound to a specific Cloud Provider. So we decided to go with OpenAI’s API for GPT-3.5 turbo and text-embedding-3-small for the meantime. With it’s state-of-the-art performance and yet very low cost, even compared to Claude 3 Haiku, this was a clear choice to make.
4.2 Development
After all the general decisions where made, it was time to start the project. We generated an OpenAI API Key and started a new FastAPI project.
Because of the extensive research we did, we had plenty of tutorials to follow. But none of them was a 1:1 fit for our project.
Nearly all of the tutorials we watched showed a single python script with a few lines of code that would handle the RAG Process, paired with a streamlit frontend. Besides that, the code was often outdated and did not work anymore.
This was quite a challenge for us, and we had to primarily rely on the documentation of langchain, which is a challenge of its own. Lancghain is a very powerful framework, but the documentation is not very beginner friendly. The documentation on their website often covers only the basic functions and does not provide a clear overview of the different methods and their parameters.
4.2.1 Read in the PDF
The API endpoint is expecting a PDF file to be uploaded via multiplatform. It is a more efficient way to transfer files, compared to base64 encoding.
In our project we used the PyMuPDF library to read in the PDF file. It the fastest library to read in PDFs with a very good performance in recognizing text. But it also has some downsides. It can’t read in Files as bytecode. So we need to temporarily save the file on the server, before we can read it in. This caused some problems on windows devices, because the os is blocking the file release after reading it in We could not solve this problem entirely. But this was also not our goal because the application will run on a linux environment.
class PDFReaderService(PDFReader):
    @staticmethod
    @logger.log_decorator(level="debug", message="Reading in PDF")
    async def read_pdf(file):
        # Create temporary file
        temp_file = tempfile.NamedTemporaryFile(delete=False)
        temp_filename = temp_file.name
        try:
            async with AIOFile(temp_filename, 'wb') as afp:
                await afp.write(file)
                await afp.fsync()

            # Read in PDF
            loader = PyMuPDFLoader(file_path=temp_filename)
            data = loader.load()

            # Delete resources
            del loader

        finally:
            # Ensure file is not blocked by the os
            time.sleep(0.1)
            os.unlink(temp_filename)

        # return data
        return data
4.2.2 The text-splitter.
The test-splitting process is crucial for the performance of the retrieval process.
There are multiple ways and implementations to split the text into smaller parts. Everone has its pros and cons.
Here we will just cover two approaches:
- Split by Characters: Splits the text exactly after a defined amount of characters with the option for a sliding window. This is the most basic text-splitter and is used in all of the tutorials. It creates chunks of the same size, but does not respect the language context.
- Split by Tokens: A more advanced text-splitter, that considers the semantic meaning of the text. There are several implementation of this, again with their pros and cons. We opted for the SpaCy Text-Splitter, that uses a powerful NLP library to convert sentences into tokens. This results in a more linguistic coherent text chunks with better context representation. Also the Tokenization model gets downloaded from the SpaCy website, is not that large in size and can be used for free.
Comparison of Text-Splitters performance
Overview Langchain Text Splitters
Langchain Documentation Text Splitters
class TextSplitterService(TextSplitter):
    def __init__(self, chunk_size: int):
        self.splitter = SpacyTextSplitter(chunk_size=chunk_size)

    @logger.log_decorator(level="debug", message="Creating chunks")
    def split_text(self, text, document_id: str, owner_id: str, conversation_id: str) -> List[ChunkModel]:
        chunks = []
        for page_number, page in enumerate(text, start=1):
            page_chunks = self.splitter.split_text(page.page_content)
            for on_page_index, chunk in tqdm(enumerate(page_chunks, start=1), total=len(page_chunks)):
                metadata = ChunkMetadata(document_id=document_id,
                                         owner_id=owner_id,
                                         conversation_id=conversation_id,
                                         page_number=page_number,
                                         on_page_index=on_page_index)
                chunk_obj = ChunkModel(content=chunk, metadata=metadata)
                chunks.append(chunk_obj)
        return chunks
4.2.3 Implementing the vector store
So now that we have our textchunks, we need to embed them and save them in the vector store. Langchain combines these two steps in one process. This makes the implementation very easy and straightforward. But makes abstraction of the process a bit harder.
@logger.log_decorator(level="debug", message="Add chunks to collection")
def add_chunks(self, chunks: List[ChunkModel], embedding_model: EmbeddingModel) -> bool:
    documents = [Document(page_content=chunk.content, metadata=chunk.metadata) for chunk in chunks]

    try:
        QdrantVectorStore.from_documents(
            documents=documents,
            embedding=embedding_model.get_model(),
            url=os.getenv("VECTOR_STORE_URL"),
            collection_name=os.getenv("VECTOR_STORE_COLLECTION"),
            metadata_payload_key="metadata",
        )
        return True
    except:
        return False
4.2.4 Creating a retriever
The first part of the RAG process is done. Now we want to create the retrieval process.
We are using the database as our retriever, using the as_retriever interface. This is the most basic retriever, but it will be enough for the first iteration of the project.
There are generally two types of retrievers:
- Similarity Retriever: This retriever fetches the most similar documents to a given question. It is the most basic retriever and is used in all of the tutorials.
- MMR Retriever: This retriever fetches the most relevant documents to a question, and then pass them to an algorithm that find the most diverse documents. By doing this, the user gets a broader view on the topic and can make a better decision. Especially in case of a bachelor thesis, this can be very helpful to cite different sources.
    def get_mmr_retriever(self,
                          user_id: str,
                          document_id: Optional[str] = None,
                          conversation_id: Optional[str] = None,
                          k: int = int(MAX_K_RESULTS)):

        must_conditions = self._filter_conditions(user_id=user_id,
                                                  document_id=document_id,
                                                  conversation_id=conversation_id)

        vector_store_connection = self.vector_store.get_connection(embedding_model=self.embedding_model)
        return vector_store_connection.as_retriever(
            search_type="mmr",
            search_kwargs={
                "k": k,  # Number of documents to return; Default is 5
                "fetch_k": 20,  # Number of documents to pass into mmr algorithm; Default is 20
                "lambda_mult": LAMBDA_MULT,  # Diversity of Documents. Default = 0.5, Minimum = 1, Maximum = 0
                "filter": models.Filter(
                    must=must_conditions  # Filter for metadata
                )
            }
        )
4.2.5 Creating retrieval chains
Now that we have our retriever, we need to combine it with the LLM process. For this we need to create a chain. Chains are a way to combine different tasks whether to a LLM or data process.
But at this point, things are getting confusing. When we started implementing the project, the documentation did not provide a clear overview of the different methods and their parameters. Tutorials were also no help, because they were outdated and did not work anymore. So making this work, was a challenge.
For the retrieval process we needed to create three chains.
create_history_aware_retriever– This chain is responsible for fetching relevant documents belonging to the user, with taking the chat history into account.create_stuff_documents_chain– This chain passes the retrieved documents to the LLM.create_retrieval_chain– This chain combines the first two chains and returns the answer to the user.
*Chathistories are a collection of previous messages between the user and the LLM. By providing the chathistory, users are able to ask follow up questions on topics dicussed before.
For the chains we are also adding prompts for the llm to improve the quality of the answers. The goal was, so get an answer that is as close to the truth as possible. This was very important for the goal of the project.
At the same time i had to instruct the llm to only answer questions that are related to the documents that where retrieved.
This are the prompts we use to instruct the llm. The goals were:
- Consider the chathistory
- Give the LLM an identity
- Limit the LLM to awnser only questions that are related to the retrieved documents.
- Limit the length of the answer to a maximum of 5 sentences.
- We have a hard token limit implemented, but adding this instruction to the prompt, we were able to prevent the LLM to cut off the answer in the middle of a sentence.
Prompt for create_history_aware_retriever
Given a chat history and the latest user question which might
reference context in the chat history, formulate a standalone question which can be understood without the chat
history. Do NOT answer the question, just reformulate it if needed and otherwise return it as is.
Prompt for create_stuff_documents_chain
You are a helpful assistant for question-answering tasks.
Use only the following pieces of retrieved context to answer the question.
Don’t justify your answers.
Don’t give information not mentioned in the CONTEXT INFORMATION.
If you don't know the answer, just say that you don't know.
Use five sentences maximum and keep the answer concise.
{context}
4.2.6 Multi-Tenancy
A very important aspect of the project was the multi-tenancy. This means that multiple users can use the same service, without interfering with each other.
This is done by adding meta datas to the embeddings, that are added to the vectorstore. This metadata filters need to be provided in the document retriever within the chain.
Here is an example of a simple similarity search with metadata filters
Search Function with Filters
return self.client.scroll(
    collection_name=COLLECTION_NAME,
    scroll_filter=models.Filter(
        must=[
            models.FieldCondition(
                key="metadata.owner_id",
                match=models.MatchValue(value=user_id)
            ),
            models.FieldCondition(
                key="metadata.document_id",
                match=models.MatchValue(value=document_id)
            )
        ]
    ),
    with_payload=True,
    with_vectors=False,
)
4.3 Improve Architecture
During our incremental development, we managed to get a running RAG application, but the codebase was disorganized.
Typically, the code is executed as a single script.
However, I attempted to split the code into different files and classes.
Given the complexity of the RAG process and its reliance on multiple interdependent services, it was essential to structure the code in a maintainable and comprehensible manner.
For the refactoring process we set following goals:
- The architecture should give a direct understanding of the business logic it represents.
- The code should be extensible in the future. For example implementing summarization, agents or other services.
- The modules should be interchangeable. For example switching the vector store from QDRANT to Faiss should be easy to implement.
- Objects needed for functions should be passed in as parameters, instead of being created in the function itself.
4.3.1 The Architecture
We decided to use a Domain Driven Design (DDD) approach. DDD is a software development approach that focuses on the domain of the problem, instead of the technical aspects. It is a way to structure the code in a way that it is understandable for everyone, even if they are not familiar with the technology used.
I identified the following core/domains:
- chunks: Logic for maneging the splitted text chunks from uploaded documents
- qa: The question and answer process.
- retriever: Holds the logic for retrieving documents from the vector store.
- upload: The process of uploading documents to the vector store.
The business logic processes that orchestrate all objects that are in the domains and any other directories are placed in the core/services directory. It contains the logic for the RAG QA and uploading documents process.
Directory core/external_services holds the implementations of all external services
- llm: connection to the llm
- embedding: connection to the embedding service
- vector_store: connection to the vector store
4.3.2 Extensibility
The code should be easy to extend in the future. Either whole new processes like WebCrawling Agent can be added as a new domain. It can utilize the existing connections to the llms and vector stores.
If another retriever is needed, it can be added to the retriever directory and be imported to any chain in any domain. If another external service is needed, like a mongodb database for storing additional data, it can be added to the external_services directory.
4.3.3 Interchangeability
All implemented services and connections are implemented via interfaces.
For example the Embedding Modell has a interface called EmbeddingModel with abstract methods.
The function for adding new chunks to the database, takes the interface EmbeddingModel as a parameter. This way the function can be used with any embedding model that implements the EmbeddingModel interface. So we can seamlessly switch from OpenAI Embedding to AWS embedding models, without changing the function.
5. Learnings
Besides the theoretical knowledge about RAG and their technical implementations, we had some general learnings.
- Tutorials are nice to get an idea, but don’t rely on them to much.
- Young technologies and new frameworks are prone to change. Be prepared and always look for the newest information.
- A large community can provide a lot of resources, but can also be overwhelming. A good documentation is key.
6. Review
We successfully reached our goals in this project. But there are still a lot of improvements to be made.
We solely focused on the RAG implementation, but neglected security aspects like authentication and authorization. Even the database is fully open to the public, without any security measures. The next steps would be to implement security measures like Oauth2 and JWT for role based access.
We built a basic RAG application, but there are many improvements that can be made. The current retriever using the MMR-algorithm does not provide a score threshold. So even documents having only a relevance score of 20% are provided to the LLM. There are also some more advanced retriever techniques like a multi query retriever, to fetch more and better fitting documents, that could be relevant to the user.
We wanted to implement custom error handling messages. Due to our current implementation we only return a 500 error message, if something goes wrong. Other error messages like 4xx are also caught as 500 errors.
Because we chose PyMuPDF as our PDF reader, we always need to create a temporary file to read in the PDF. This is not very efficient and can result in problems when the user base grows.
Also the current upload process is blocking the server, because the file is read in synchronously. It should be converted into an asynchronous background task, to prevent the server from blocking.
Lastly even with improvements in the architecture, it is still not a 100% DDD implementation. But with the current state of the project, it is a good starting point for further development.
Nevertheless, we had fun working on this project. We learned about the practical implementation of RAG and Langchain, besides the typical tutorials. With it’s diverse nature, we covered many aspects to create a service that can be useful for many different people.
Frontend
After successfully setting up the backend architecture to handle communication with OpenAI and manage user data, our focus shifted to developing a robust frontend. The frontend serves as the interface for users, acting as a bridge between them and our backend services. In this blog post, we want to share our approach to frontend development and the decisions we made along the way.
How Did We Approach the Frontend?
For frontend development, we chose React, one of the most popular JavaScript libraries for building user interfaces. React’s component-based architecture makes it easy to create dynamic and interactive UIs, aligning well with modern web development practices. To ensure a consistent design language and enhance visual appeal, we used Material-UI. This library provides us with pre-built components such as buttons, cards, and navigation elements that adhere to Material Design principles. This not only sped up our development process but also ensured that our app maintained a professional and appealing look.
For handling HTTP requests and communicating with our backend services, we used Axios. This library allows us to perform CRUD operations efficiently and manage requests and responses in a promise-based structure, which suits React’s asynchronous nature well.
Challenges We Faced
During the development of the frontend, we encountered several challenges:
1. CORS Issues: One of the recurring challenges was dealing with Cross-Origin Resource Sharing (CORS) issues. Since our backend was hosted on a different domain or port than our frontend, we often encountered CORS policy errors when trying to make requests to the backend. To resolve these issues, we had to configure our backend properly to handle CORS and ensure that our frontend requests were correctly formatted to avoid these errors. Despite our efforts, these problems occasionally resurfaced, requiring continuous tweaks and adjustments.
2. State Management: Managing the state of the application was another challenge, especially with multiple asynchronous requests and user interactions. Although we did not use a dedicated state management library like Redux, we carefully managed the state within individual components and utilized React’s Context API for global state where necessary. This approach required careful planning to ensure that state changes were handled efficiently.
3. Handling Asynchronous Data: Given that our application heavily relies on data fetched from the backend (such as user data, chat histories, and document information), handling asynchronous operations correctly was crucial. We needed to ensure that the UI remained responsive and provided meaningful feedback to users while data was being loaded or submitted. This involved implementing loading spinners, error handling, and retry mechanisms to improve the overall user experience.
What Could We Do Better?
While we are proud of what we achieved with the frontend, there is always room for improvement. For instance, we could refine our approach to state management further, possibly by integrating a more robust state management library if the complexity of our application grows. We also recognize that there are additional optimizations and best practices we could adopt to enhance performance and security.
Although we managed to resolve most CORS-related issues, a deeper understanding of CORS policies and security headers would have been beneficial earlier in the process. This would have allowed us to build a more secure frontend from the start.
Looking Ahead
Our journey with frontend development was filled with learning and growth. We gained valuable experience in handling common challenges, optimizing performance, and ensuring a great user experience. Moving forward, we aim to refine our skills, explore new technologies, and continue building user-friendly applications.
Backend
Task
First let’s talk about what the goal was. The main job of our backend was to take users’ documents and answer their prompts based on these documents. Therefore it had many smaller tasks like getting requests from the frontend, store user data and chat histories as well as the uploaded documents and of course communicate with OpenAI.
Therefore there are 2 different types of tasks. On the one hand we have communicating with OpenAI and handle all the “AI stuff” with the documents and on the other hand we have storing and retrieving all the data (especially user data), as well as communicating with the frontend.
So what we did was split those two into two different backends that will be linked together.
In this part we want to give you some insides of our decision making, how and why we solved our challenges the way we did, as well as outline what we learned.
How did we approach the backend?
First we started with getting the connection to OpenAI on a basis where we knew it works. We decided to do this first because we felt it to be the most challenging. For more about this read the part about our RAG system. In this part we will focus on the Node.js of the backend.
So when we got to the point where the FastAPI (the RAG) was ready and working. We decided to let the FastAPI handle requests to OpenAI and work with the documents while the rest of the logic including the storing of user data will be done in a different backend. Here we went for Node.js with a MongoDB, because:
- 1. JavaScript Everywhere: Node.js allows us to use JavaScript on both the frontend and backend, which streamlines the development process
- 2. Non-blocking I/O Model: Node.js operates on a non-blocking, event-driven architecture, making it well-suited for handling multiple concurrent connections efficiently.
- 3. MongoDB’s Flexibility: MongoDB, being a NoSQL database, offers schema flexibility, which is perfect for projects where data structures might evolve over time.
- 4. Microservices Architecture: Using Node.js for the backend aligns well with our decision to separate concerns and adopt a microservices architecture. Each service can be developed, deployed, and scaled independently, which improves the flexibility and maintainability of our system.
- 5. Rich Ecosystem: Node.js comes with a vast ecosystem of open-source libraries via npm (Node Package Manager). This speeds up development as we can leverage existing libraries for everything from authentication to data validation.
The next step was to think of the models we need for the database. This was not so easy in the beginning because we did not really knew which data we exactly need. What helped us was to make clear which functionality we were planning on implementing and thinking of what models would make sense to store and how they are related to each other. For example if we want users to register, log in and upload documents, it makes sense that we need to store all the user data and documents. Also we see that these two were related with each other. But because we wanted to give users the possibility to have multiple conversations with different documents, we decided to put a conversations model in between which stores things like the messages in the conversation, the user, the documents and so on.
Here you can see an overview over our models and their relation to each other.
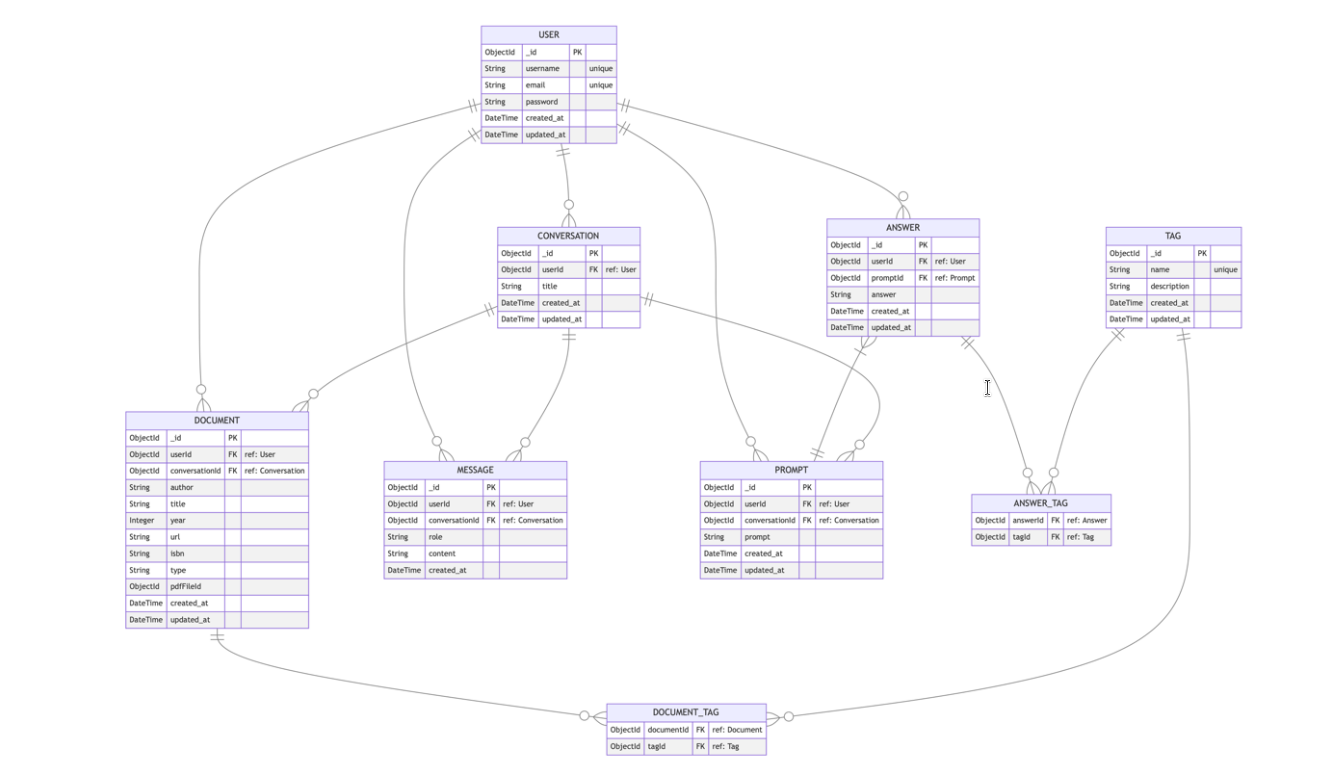
For the database connection we used mongoose as ODM.
After this was done we implemented CRUD operations for all the different models. For the routes we used express as our web-framework, because it is simple yet powerfull. The next step was to do the logic for important features like document upload and the /response endpoint where users will be sending their prompts. The special thing about it was, that it has to get the last messages in the chat so the ai will have context later on. While doing the logic for the backend there were several challenges like architecture, multipart/form-data, pdf storing, performance and security, but we want to go into detail about this in the challenges part of this blog post. Lastly we did end2end tests, error handling and documentation.
Challenges
In the backend we had some challenges some of them we already pointed out above. Starting with Node.js being a new technology for us, as well as all the frameworks and libraries on top like mongoose and express, so getting started with it was a lot of reading, trying and repeating.
Also a challenge was to think of the logical architecture, not only for the whole backend where we decided to go for a micro-service approach, but also thinking of how to logically structure the code and the models for the database. For the Node.js API we tried to logically split the routes from the logic and API requests to the FastAPI, while keeping everything well-organized. This was ensured by having routes for every single model like documents or conversations. The routes redirect to the controllers where the real logic is done for example storing data, getting chat histories as context for the API and so on. From there when a request has to be done, we use a service class whose job it is to put the data into a valid request and send it to the FastAPI.
Another problem that took quite some time to solve was sending and storing the pdfs. When sending them we used the multipart/form-data encoding in our requests, which was at least for me not so easy to handle in node.js. First we only stored and used the pdfs in binary, which lead to another problem: the performance. The binary data seemed to be very inefficient when used with the MongoDB. After requesting more than 3 pdfs the request timed out. Of course this was not optimal so we tried some libraries and finally got it to work after we did put in a lot of work.
Finally there was one more challenge for us the solve: The security. The problem was that because the backend was deployed public, everyone could theoretically use our API to send data to OpenAI which would cost us money. To fix this we made every user to put in their own open ai API key in the frontend, which is then send with each request.
What could we do better?
Of course the way we did our project and solved our challenges is probably not perfect, it was just the way we thought we could do it and also reflects our learning path. One thing we are aware of but did not have time to optimize it is security. We tried to use the bcrypt library to hash passwords and use JWT token for security but unfortunately we did not get everything to work as we wanted, even after quite a lot hours put into it, so we decided to focus on the functionality first. Another solution we were thinking of would have been to store the API keys in the database too.
Also we was thinking of using a different storage, especially a cloud storage to store the pdfs and only safe the URLs in the database. This might have been more efficient and better for the performance than always sending the pdfs. Further, even if we did write some end2end tests, more tests would always make sense.
Lessons Learned
What did we learn while doing this project? First, obviously how to use Node.js and “the world around it” to create an API with a database. Also what I learned is to rather use more time to concept all the routes and models necessary instead of reworking them multiple times, this would have saved me a lot of time. The next important learning was working with pdf files and how to store them efficiently and also how to do simple micro service architecture with multiple backends communicating with each other. Also we learned that good swagger documentation is very important when working together as a team, especially if you use different micro services, because this way you can ensure that the ones using your API know how to form a valid request and what to expect as a response.
Summary
The backend development for this project was a comprehensive learning experience, involving the integration of Node.js and MongoDB for efficient data management, alongside FastAPI for AI interactions. The journey included overcoming challenges related to technology adoption, architectural design, and data handling. Key lessons revolved around effective planning, efficient data storage, and the benefits of a microservices approach. Despite some areas for improvement, such as security and testing, the project successfully demonstrated the capability to handle complex backend tasks and integrate with external services effectively.
Deployment
CI/CD pipeline for RAG system on Azure with Terraform and GitHub Actions
1. Introduction
In modern software development, the seamless integration of Continuous Integration (CI) and Continuous Deployment (CD) is a key success factor. In this blog post, we would like to show you how you can successfully deploy a Retrieval Augmented Generation (RAG) system using a CI/CD pipeline based on GitHub Actions in combination with Terraform.
The focus here is on the use of Terraform to provide the infrastructure efficiently and consistently. Terraform allows us to define the entire cloud infrastructure as code, which ensures not only the repeatability but also the scalability of the setup. In addition, we use GitHub Actions to make the automation process seamless. With GitHub Actions, we can set up continuous integration and deployment workflows. This reduces manual intervention on our part and therefore minimizes sources of error.
Since our application is to be deployed in the cloud, the first question was: Which cloud provider is the best choice? After comparing several providers, including AWS, IBM, Google, Azure and Hetzner, we decided on Azure. This cloud provider offers all the services we need for our project, allowing us to focus on the implementation. In addition, the Azure for Students program allowed us to test our strategy risk-free in a “real” environment.
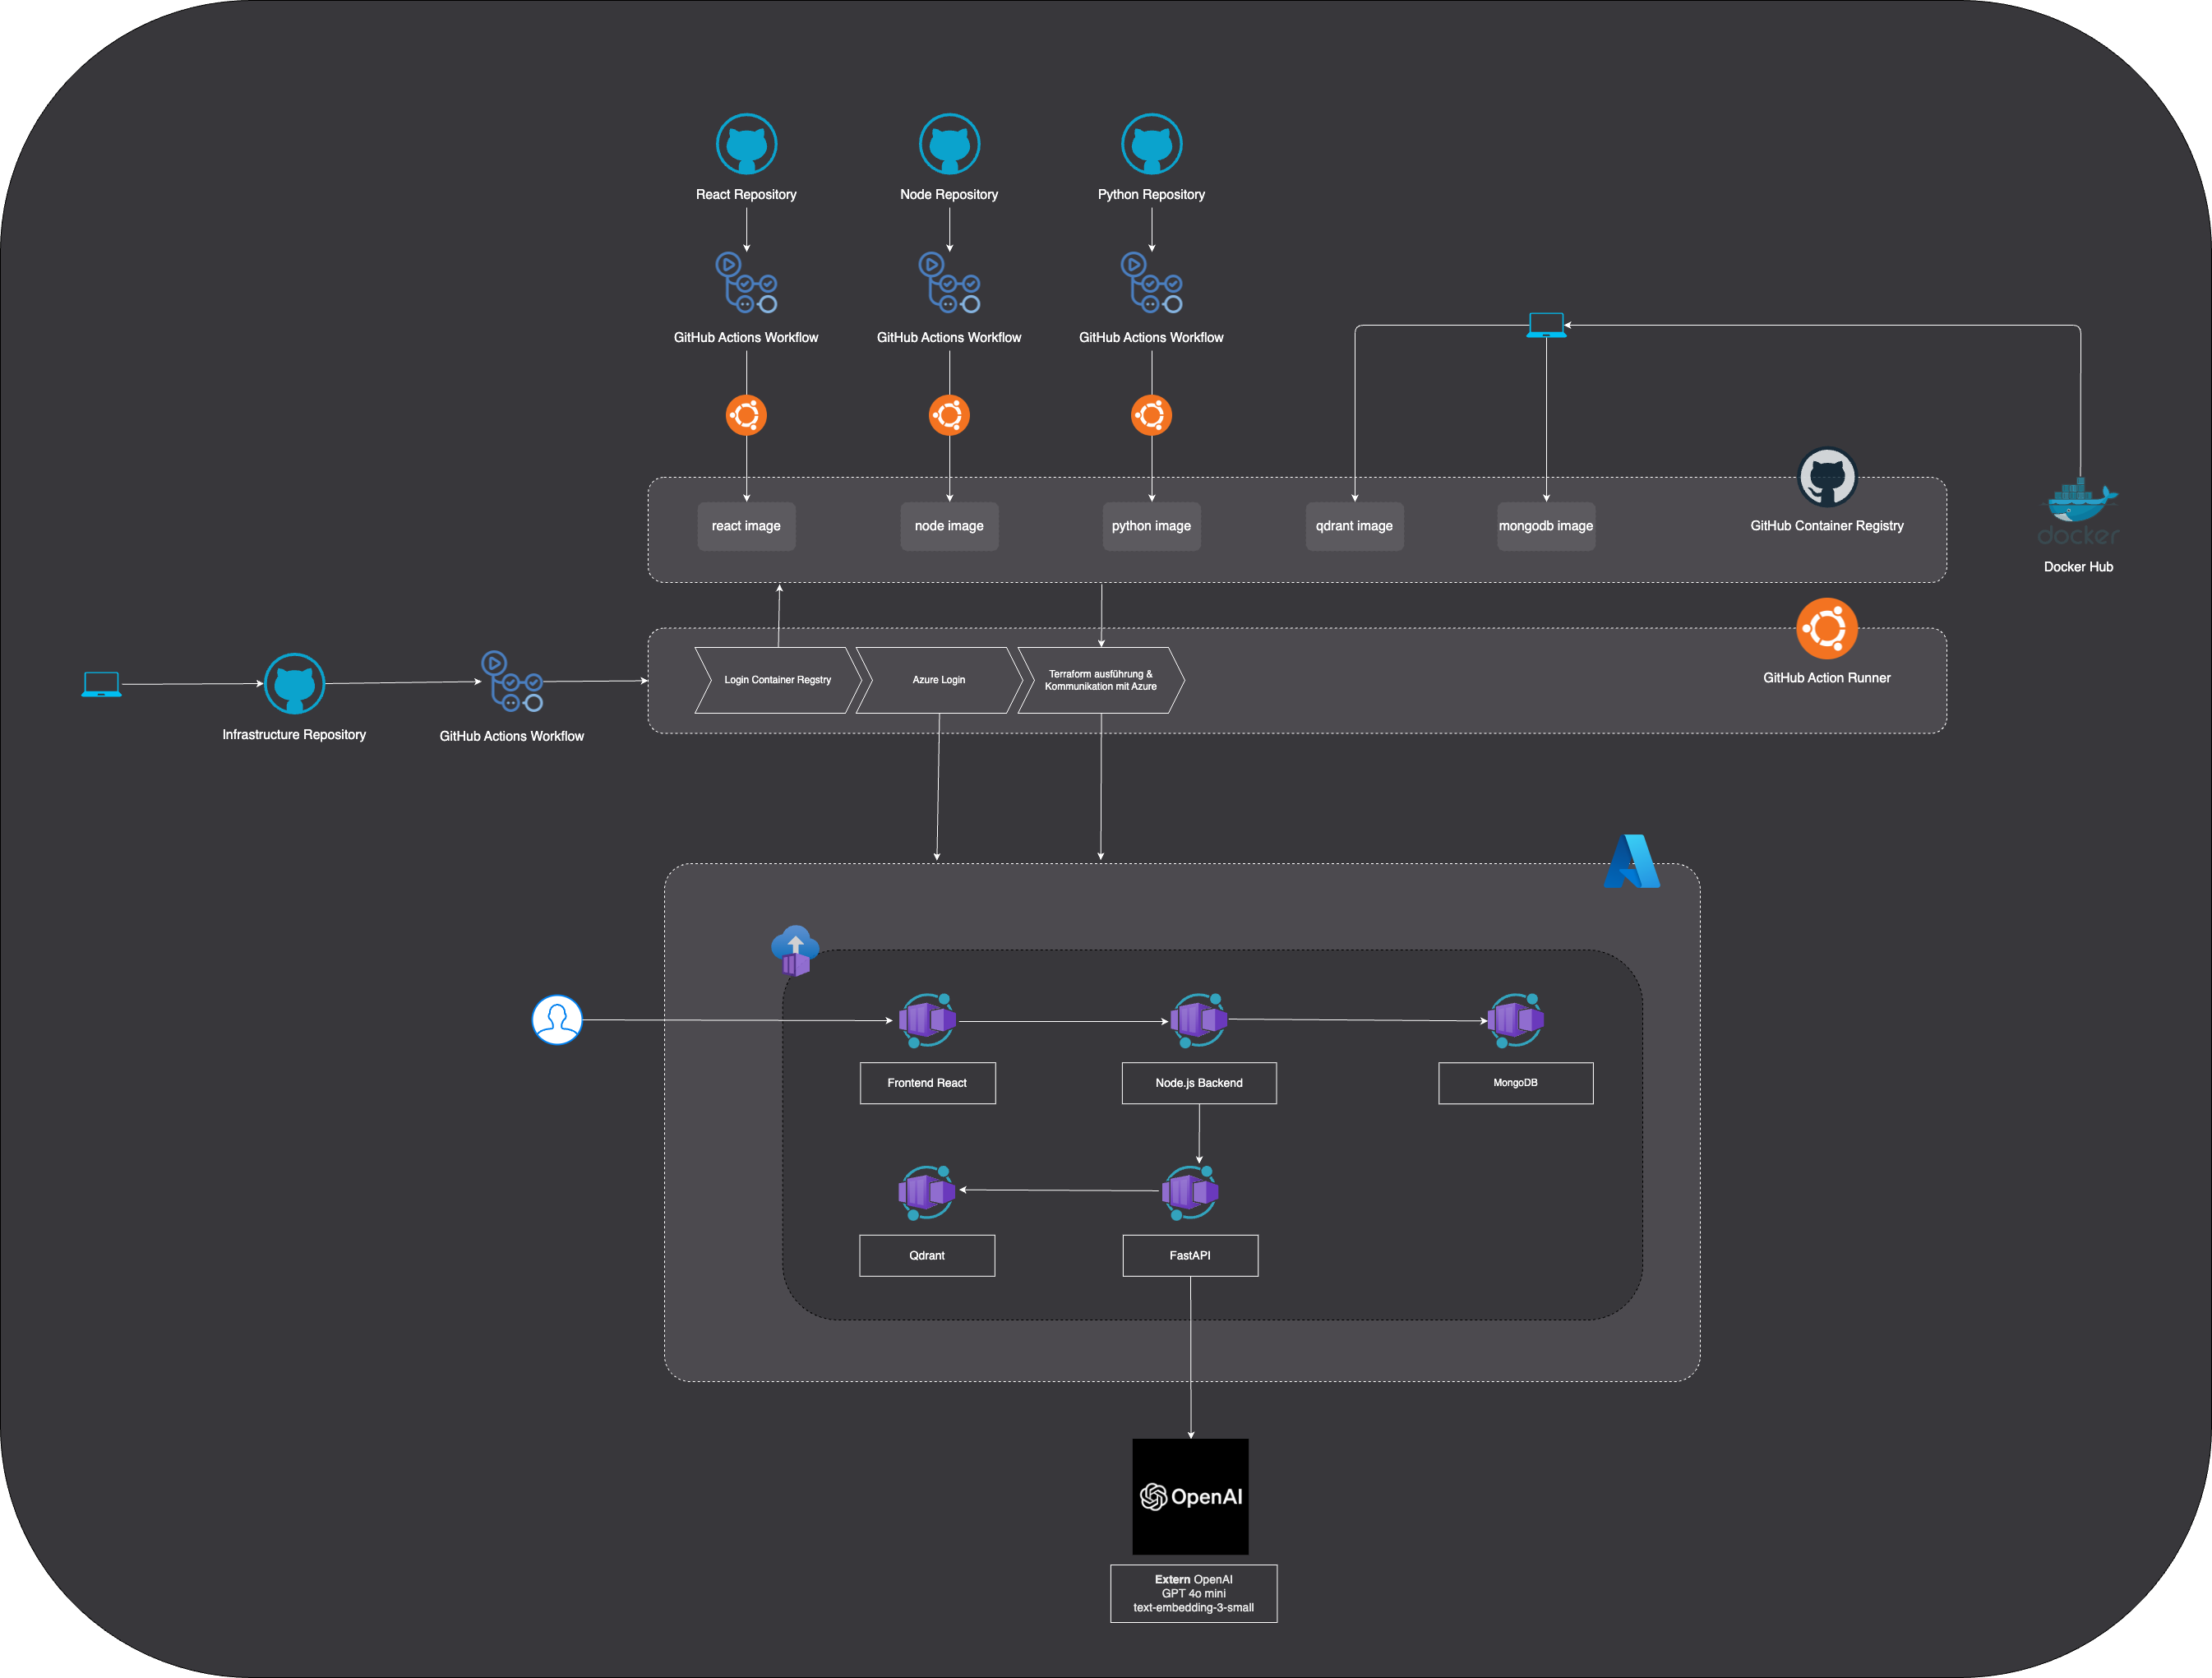
Our deployment strategy is based on a well-thought-out, structured architecture with four separate repositories. The first repository is responsible for our RAG (Retrieval Augmented Generation) application, where the core logic and processing takes place. The second repository manages the database. The third repository contains the code for the frontend, which forms the user interface of our application. Finally, the fourth repository, the infrastructure repository, ensures that all necessary resources are provided and managed in the cloud. As soon as changes are pushed to one of the first three repositories, GitHub Actions automatically creates a new container image and uploads it to the GitHub Container Registry. The infrastructure repository then accesses these images to deploy the applications as containers in an Azure Container Group.
2. Structure of the Terraform code
Terraform configuration
The complete Terraform code can be found here: https://github.com/software-dev-for-cloud-computing/infrastructure/blob/main/main.tf
main.tf
terraform {
  required_providers {
    azurerm = {
      source  = "hashicorp/azurerm"
      version = "=3.107.0"
    }
  }
}

provider "azurerm" {
  features {}
}
- Terraform block: Defines the required Terraform providers and their versions. The azurerm provider is used here to interact with Azure resources.
- Provider block: Configures the azurerm provider and activates optional functions.
Ressourcenbereitstellung
main.tf
resource "random_pet" "name" {
  length    = 2
  separator = "-"
}

resource "azurerm_resource_group" "main" {
  name     = "myResourceGroup-${random_pet.name.id}"
  location = "Germany West Central"
}
- random_pet resource: Generates a random name to ensure that the resource group names are unique and do not collide with existing resources.
- azurerm_resource_group Resource: Creates an Azure resource group in which all other resources are organised. The resource group is given a unique name based on the random name generated. The location is set to ‘Germany West Central’.
main.tf
resource "azurerm_container_group" "main_container" {
  name                = "rag-ss-dev4coud-${random_pet.name.id}"
  location            = azurerm_resource_group.main.location
  resource_group_name = azurerm_resource_group.main.name
  os_type             = "Linux"
  ip_address_type     = "Public"
  dns_name_label      = "rag-ss-dev4coud-hdm-stuttgart-2024"
...
}
- azurerm_container_group Resource: Creates an Azure Container Instance group that hosts multiple containers.
- name: Gives the container group a unique name that contains the generated random name.
- location und resource_group_name: Assigns the container group to the previously created resource group.
- os_type: Specifies that the containers are executed on a Linux-based operating system.
- ip_address_type: Assigns a public IP address to the container group so that it can be reached from outside.
- dns_name_label: Defines a DNS name for accessing the container group
Container-Definitions
The individual containers are defined within the azurerm_container_group. Each container represents a microservice of the application.
main.tf

container {
    name   = "qdrant"
    image  = "ghcr.io/software-dev-for-cloud-computing/qdrant:latest"
    cpu    = "0.5"
    memory = "1.5"

    ports {
      port     = 6333
      protocol = "TCP"
    }
  }
- qdrant Container:
- name: Names the container as ‘qdrant’.
- image: Verwendet das Qdrant-Image aus dem angegebenen GitHub Container Registry.
- cpu and memory: Assigns 0.5 CPU cores and 1.5 GB memory to the container.
- ports: Opens port 6333 for TCP connections to enable access to Qdrant.
Similar container definitions exist for mongodb, react, fastapi and nodejs. Each container has specific settings for image, resource allocation, ports and environment variables that are tailored to the respective requirements of the microservice.
Environment variables
Environment variables are defined within the container definitions in order to customise the configuration of the microservices.
environment_variables = {
      MONGO_INITDB_DATABASE      = "dev4cloud"
      MONGODB_PORT               = "27017"
      DISABLE_MONGO_AUTH         = "true"
    }
3. GitHub Actions Workflow
When implementing the GitHub Actions workflow for our project, we managed the individual repositories (backend, frontend, AI) in a clear organisational structure within our GitHub organisation. This allowed us to efficiently manage the specific requirements and dependencies for each component.
Setting up the repositories:
First, we created the repositories in our GitHub organisation and structured each one so that the backend, frontend and AI components are managed separately. This organisation facilitates modularity and enables better collaboration between the various development teams.
Creation of the workflow files:
For each repository, we configured individual deploy.yml files within the GitHub Actions. These files control the specific build and deployment process. We started with basic steps such as checking in the code (actions/checkout@v2) and set up the environment to have all the necessary dependencies ready for the successful build and deployment.
Docker integration:
Since our project is based on Docker containers, we designed the workflow so that a new Docker image is created and automatically pushed to the GitHub container registry every time the main branch is pushed. This ensures that an up-to-date and executable version of our applications is always available.
Infrastructure Repo – Github Actions Runner
You can find the Github workflow file here: https://github.com/software-dev-for-cloud-computing/infrastructure/blob/main/.github/workflows/deploy.yml
1. Trigger (on)
on:
  push:
    branches:
      - main
      - test_branch
The workflow starts automatically when code is pushed to the main or test_branch branches.
2. Job (jobs: terraform:)
jobs:
  terraform:
    runs-on: ubuntu-latest
runs-on: ubuntu-latest: The workflow is executed on a virtual machine with the latest Ubuntu operating system.
3. Steps (steps)
     - name: Checkout repository
      uses: actions/checkout@v2

    - name: Login to GitHub Container Registry
      uses: docker/login-action@v2
      with:
        registry: ghcr.io
        username: ${{ github.actor }}
        password: ${{ secrets.CR_PAT }}

    - name: Set up Terraform
      uses: hashicorp/setup-terraform@v1
      with:
        terraform_version: latest

    - name: Azure login
      uses: azure/login@v1
      with:
        creds: ${{ secrets.AZURE_CREDENTIALS }}

    - name: Install JQ
      run: sudo apt-get install -y jq

    - name: Terraform Init
      run: terraform init -upgrade

    - name: Terraform Plan
      run: terraform plan -out=tfplan

    - name: Terraform Apply
      run: terraform apply -auto-approve tfplan

    - name: Outputting Terraform Outputs to JSON file
      run: |
        echo "Outputting Terraform Outputs to JSON file..."
        terraform output -json > tf_outputs.json
      continue-on-error: true

    - name: Debugging Terraform Outputs on failure
      if: failure()
      run: |
        echo "Debugging Terraform Outputs on failure"
        echo "Contents of tf_outputs.json:"
        cat tf_outputs.json
      continue-on-error: true

    - name: Upload Terraform Outputs
      if: always()
      uses: actions/upload-artifact@v3
      with:
        name: tf_outputs
        path: tf_outputs.json
- Checkout repository: Downloads the code of the infrastructure repository to the runner so that it can work on it.
- Login to GitHub Container Registry: Logs in to the GitHub Container Registry to be able to download the required container images later. A GitHub user name and a personal access token (PAT), which is stored as a secret in the repository, are used for this purpose.
- Set up Terraform: Installs the latest version of Terraform on the Runner.
- Azure login: Logs in to Azure to be able to create the Terraform resources in the Azure account. The login information is read from another secret.
- Install JQ: Installs the command line tool jq, which is later used to parse JSON data.
- Terraform Init: Initialises the Terraform working directory and downloads all required providers.
- Terraform Plan: Creates an implementation plan that shows the changes Terraform would make to your infrastructure. The plan is saved in the tfplan file.
- Terraform Apply: Applies the previously created plan and creates the resources in Azure.
- Outputting Terraform Outputs to JSON file: Saves the outputs of Terraform (e.g. the IP address of your new virtual machine) in a JSON file called tf_outputs.json. (Currently no more outputs)
- Upload Terraform Outputs: Upload the tf_outputs.json file as an artefact so that you can download and use it later.
Summary
This workflow automates the deployment of your infrastructure with Terraform in Azure. Whenever you make changes to your Terraform code and push them to main or test_branch, the workflow is executed and ensures that your infrastructure in Azure is up to date.
Why GitHub Actions?
We chose GitHub Actions because it offers seamless integration with our code repository. Everything, from code changes to automated deployments, happens directly on the platform where our code lives, without additional tools or complex setups.
Strengths:
Seamless integration: GitHub Actions is perfectly integrated with GitHub, which means that our workflows are triggered directly with every push or pull request.
Flexibility: Each workflow could be customised to the needs of our repositories (backend, frontend, AI) without losing complexity.
Diverse actions: The GitHub Marketplace offers a wide range of pre-built actions that greatly simplify our workflow.
Weaknesses:
Error handling: error logging is sometimes too simplistic, making it difficult to accurately identify issues in complex pipelines.
Limited monitoring: GitHub Actions offers basic monitoring, but lacks in-depth analysis and monitoring capabilities that specialised CI/CD tools offer.
Platform dependency: The strong commitment to GitHub can be a disadvantage if parts of the project are hosted on other platforms.
4. Disadvantages and challenges
Even though our CI/CD setup for the RAG system on Azure with Terraform and GitHub Actions offers many advantages, there were some notable challenges that we had to overcome.
Complexity:
Building a CI/CD pipeline for a complex system like ours requires deep expertise. The combination of Terraform, Azure and GitHub Actions brings with it a certain complexity that should not be underestimated. In particular, setting up Infrastructure-as-Code (IaC) and automating the deployments required thorough planning and a lot of fine-tuning.
Maintenance effort:
A pipeline is not a ‘once-and-done’ project. It needs to be regularly updated and monitored to ensure that all components work together seamlessly. Any change in the infrastructure, codebases or tools used may require adjustments to the pipeline. This means that continuous maintenance and occasional troubleshooting sessions are necessary to keep operations running smoothly.
Security aspects:
Another critical issue is the protection of sensitive data. In an environment where we are continuously deploying to the cloud and interacting with various systems, the security of credentials and other sensitive information is of paramount importance. We had to ensure that our secrets were well protected and that access to critical systems was strictly controlled.
5. View to the left and right
Alternative CI/CD Tools
While GitHub Actions and Terraform offer a strong combination for CI/CD and infrastructure-as-code, it’s worth taking a look at alternative tools that may be more suitable depending on your specific requirements and preferences.
- Jenkins: An open source veteran in the field of CI/CD that impresses with its enormous flexibility and customisability. Jenkins offers a wide range of plugins that make it possible to automate almost any conceivable workflow. However, it requires a little more configuration effort than GitHub Actions.
- GitLab CI/CD: Tightly integrated into the GitLab platform, GitLab CI/CD provides a seamless experience for teams already using GitLab for version control. It offers an easy-to-use YAML-based configuration and supports a variety of use cases.
- CircleCI: A cloud-based CI/CD platform known for its speed and scalability. CircleCI offers an intuitive user interface and supports a wide range of programming languages and frameworks.
Infrastructure-as-code tools
There would also be alternatives for Terraform. There are other platform-independent but also platform-dependent tools
- Bicep: A domain-specific language (DSL) from Microsoft that was developed specifically for the provision of Azure resources. Bicep offers a more precise and declarative syntax than ARM templates, which improves readability and maintainability.
- AWS CloudFormation: The native IaC tool from Amazon Web Services, ideal for managing AWS infrastructures. CloudFormation uses JSON or YAML templates to define resources and offers a variety of features for automating and orchestrating deployments.
- Pulumi: A cloud-agnostic IaC platform that makes it possible to define infrastructures in various cloud providers (e.g. AWS, Azure, Google Cloud) with common programming languages such as TypeScript, Python or Go. Pulumi offers a high degree of flexibility and allows you to utilise the full power of your preferred programming language.
Next possible steps for the infrastructure
The application is executable with the IaC script mentioned above. However, several next steps should be considered for a project that should be online in the long term
Web apps or Azure Kubernetes Service (AKS) instead of containers
Whilst containers offer a flexible and portable way to package and deploy applications, there are scenarios where other services such as web apps or AKS may be more beneficial:
Azure Web Apps: Ideal for simple web applications and APIs that require rapid deployment and scaling without having to worry about the underlying infrastructure. Web Apps offer automatic scaling, high availability and integrated CI/CD functions.
Azure Kubernetes Service (AKS): Provides a managed Kubernetes platform for containerised applications that require high scalability, flexibility and control. AKS is particularly suitable for complex applications with multiple microservices or for scenarios where precise control over the infrastructure is required.
Optimisations in the Terraform structure
The Terraform structure can be further improved by the following measures:
Modularisation: splitting the Terraform configuration into smaller, reusable modules to improve readability, maintainability and reusability.
Variables and outputs: Use of variables and outputs to centralise configuration parameters and increase reusability.
Integrate security options
The security of the infrastructure can be increased by the following measures:
Azure Key Vault: Use of Azure Key Vault for secure storage of secrets and certificates to control access to sensitive data.
Azure VNETs: The use of virtual networks (VNETs) enables an isolated and secure network environment for the resources. By configuring NSGs, access to the front end can be restricted, while the other services are only accessible within the VNET.
Load balancer (for large requests)
For large requests, a load balancer can be used to distribute the incoming traffic evenly across several instances of the application. This increases the scalability and availability of the application, especially during peak loads.
From GitHub Container Registry to Azure Container Registry: A step towards cloud integration
While GitHub Container Registry offers a convenient way to store container images close to your code, migrating to Azure Container Registry (ACR) can offer significant benefits in certain scales.
Advantages of using Azure Container Registry:
Deeper integration into the Azure cloud: ACR is natively integrated into the Azure platform and enables seamless collaboration with other Azure services such as Azure Kubernetes Service (AKS), Azure App Service and Azure Container Instances.
Global replication: ACR supports geographic replication of images to enable fast and reliable deployment across regions, reducing latency and improving performance
Private network connection: ACR can be connected to your virtual network via Azure Private Link to provide secure and private access to your container images without the need for public internet.
From multi-repo to mono-repo
Another approach to improving efficiency and collaboration within the development process is to merge the four separate repositories (react, nodejs, fastapi, infrastructure) into one mono-repo.
Advantages of a mono repo
- Simplified dependency management: All project components are in one central location, making it easier to manage dependencies and track changes.
- Atomic commits and code reviews: Changes to multiple components can be combined into a single commit, increasing clarity and making code reviews more efficient.
- Sharing tools and configuration: Tools, scripts and configuration files can be shared across the project, leading to better consistency and reduced maintenance.
- Promoting collaboration: Developers have insight into the entire code and can more easily contribute to different components, which promotes collaboration and knowledge sharing within the team.
Integration of end-to-end tests into the CI/CD pipeline
To ensure the quality and reliability of our application, we integrate end-to-end tests (E2E tests) into our CI/CD pipeline. E2E tests simulate the behaviour of a real user and check whether all components of the system work together as expected. Advantages
- Early error detection: Errors are recognised at an early stage before they reach production.
- Faster feedback loops: Developers receive rapid feedback on the status of the application.
- Higher quality and reliability: E2E tests help to improve overall quality.
6. Conclusion
The deployment of our RAG system on Azure using a CI/CD pipeline was an enlightening experience that highlighted the challenges and benefits of modern DevOps practices.
Key Takeaways:
One of the most significant insights we gained is that a well-structured CI/CD pipeline not only accelerates the development process but also significantly enhances the quality and reliability of the final product. By managing the different components of our application in separate repositories within a GitHub organization, we were able to ensure a clear division of responsibilities, leading to more efficient collaboration and faster issue resolution.
Final Recommendations and Tips:
For future projects, we recommend establishing a clear structure for repositories and workflows from the outset. It is also crucial to conduct regular reviews and updates of the pipeline to ensure it remains aligned with current requirements and technologies. Integrating security tests and carefully managing sensitive data within the pipeline should also be top priorities.
Best Practices for CI/CD Pipelines:
Best practices include automating recurring tasks, regularly testing code in a staging environment, and ensuring that every step of the pipeline is reproducible and well-documented. Using feature branches for major changes and integrating them into the main branch through pull requests helps maintain a stable and clean codebase.
Key Considerations When Implementing RAG Systems:
When implementing RAG systems, it is important to consider the specific requirements for data processing and performance. Leveraging tools like Terraform for infrastructure management, in conjunction with a robust CI/CD pipeline, enables scalable and secure operation of such systems. Additionally, focusing on resource optimization and minimizing latency is crucial to ensure a fast and reliable system.
Overall, this project has demonstrated how critical a well-thought-out and effectively implemented CI/CD pipeline is to the success of modern software projects.
Leave a Reply
You must be logged in to post a comment.