
One of the requirements of the system is that organizations should be able to set up and deploy the HumHub system on their own. For this purpose, we have designed the Configtool. To meet this requirement we have to use different tools, procedures and interfaces from Bluemix. In the following we would like to introduce some of them.
Implementing the Configtool
To implement the Configtool, we decided to create a basic PHP application, written with the help of the web framework Laravel. We created the views, models and controllers necessary for the actions we wanted the users to perform. At first, we had some trouble to deploy the application on the Bluemix server, but after some research we found out, that we had to modify the folder structure of the Laravel application a little bit, so that it fits into the Bluemix web application structure. It’s not very complicated, you basically just move almost the whole application folder into an htdocs folder.
As a database we used a ClearDB Spark service which is provided by Bluemix and is based on MySQL. When you use a service instance like this database, Bluemix automatically creates some credentials for your application. So you just insert these into the Laravel database configuration file and there you go!
As Bluemix also provides you a custom git repository and a deployment pipeline, we could just develop and test locally, followed by committing and pushing the changes and wait some minutes for Bluemix to deploy the new version on the server.
Command Line Interfaces (CLI)
Bluemix provides two command line interfaces for the access of the services and applications, the IBM® Bluemix® and Cloud Foundry command line interfaces. With the assistance of the command line interfaces the Applications and Services from Bluemix can be provided, configured and changed. But for our use case we only need the command line interface from Cloud Foundry.
For example as an alternative way to deploy an app you could use the command line interface like this:
Code:
bluemix api https://api.eu-gb.bluemix.net
bluemix login -u <email> -o <organisation> -s <space>
cf push <app name>
There is also a manifest file that allows you to define the amount of instances to be launched. For the beginning we decided to launch two instances but it’s always possible to change the amount of running instances dynamically at a later time.
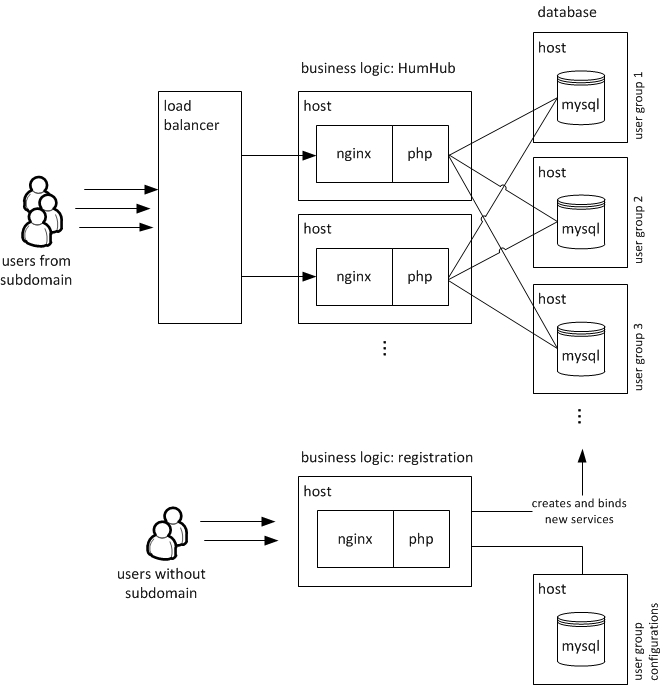
As mentioned in the previous blog post [TODO: LINK] we decided to create a separate database for each user group. To realize a dynamic creation we can create new database services and bind them to the HumHub application by using the following commands:
Code:
cf create-service mysql 100 <service name>
cf bind-service <app name> <service name>
cf create-route <space> eu-gb.mybluemix.net --hostname <route>
cf map-route <app name> eu-gb.mybluemix.net -n <route>
The script creates a mysql service with the plan option 100 (it was the only plan available ;-)) and binds it to HumHub. In the next step it connects to the newly created database and initializes it with the basic configuration set of tables for the application. Also the script is generating a new route (subdomain) to provide direct access to the application for the user groups.
For example a user could request the domain userGroup1.applicationName.eu-gb.mybluemix.net and would be forwarded directly to HumHub. At this point HumHub connects dynamically to the right database service depending on the given subdomain userGroup1. We made some small modifications in HumHub to use the database credentials from the given environment variables in Bluemix instead of hardcoded credentials in HumHub’s source code.
The good thing about the Cloud Foundry command line is the possibility to use the same commands in PHP with the functions like exec(). The disadvantage of the CLI is that we were able to use it on a local machine only, but not on a PHP instance of Bluemix. After some consideration, we came to the conclusion to migrate the PHP application in a virtual machine with an installed CLI.
Virtual machines (VM) from Bluemix
A virtual machine is an operating system or application environment that is installed on software which imitates dedicated hardware. Bluemix offers the possibility to create virtual machines similar as PHP instances. However, we can’t solve the previously described problem with a VM from Bluemix. The service to create virtual machines are only available for paying users. So, the plan to create a linux instance with the CLI was destroyed. Inspired from the lecture, we came up with the idea to solve the problem with a docker container from Bluemix.
Docker
Docker containers wrap up a piece of software in a complete filesystem that contains everything it needs to run like a normal server. Therefore, we tried to create a docker container with an installed CLI. However, we had rejected this idea quickly. Our teacher gave us the hint that Cloud Foundry provides a REST API, which offers the same functionalities as the CLI. Therefore a docker container was no longer necessary.
Cloud Foundry API
The Cloud Foundry API represents a REST service with the same functionality as the Cloud Foundry CLI. But the API is not very well described and we didn’t know how to start. After an intensive web search we finally found a good tutorial for beginners to start with the API in a right way.
At first we had to generate an access token from a bluemix account. This access token is needed in every single API HTTP-request to authenticate the user. After we received the access token, we could begin to test all the API functionalities.
Testing the API
For the testing of the API we used different tools. One of the tools is the PHP IDE PHPStorm with the functionality “Test Webful Rest Service”. The function provides facilities to emulate interaction with a web service by composing and running requests, like a proxy for the real application that actually calls the service. Another tool is the Postman chrome plugin, which enables you to do REST calls within the browser.But the testing of the API turned out to be more difficult as we thought at the beginning.

The examples of the Cloud Foundry API documentation are only made with curl. So we had to translate the API calls in our tools first. However, we had to realize that the documentation was in some parts very incomplete and didn’t worked as described. Even some of the features are well described but no longer available. One of the biggest problems was the private and public domain handling. For example, it wasn’t possible to create and map a route to a public domain from Bluemix like “eu-gb.mybluemix.net”. Only private domains are allowed. But this was never mentioned anywhere. This was one of the highest time-consuming problems. After all problems and peculiarities have been solved, we could go on to test the spare part of the API. In the following is an example to get all apps from bluemix:
Example
GET /v2/apps
HEADER
content-type  => application/x-www-form-urlencoded;charset=utf-8
authorization => ACCESS_TOKEN
CF to PHP
In the last step we had to convert the API calls to PHP code. But HTTP-request in plain PHP are more than ugly. To keep the code clean and simple we used the PHP library Guzzle to solve this problem. Guzzle is a PHP HTTP client that makes it easy to send HTTP-requests and trivial to integrate with web services like Laravel. To maintain and collect all the API requests we created a specific class called CloudFoundryProxy. The good thing of this class was that the methods names were equal as the commands of the Command Line Interface. So we could imitate and use it in the code in the same way. Furthermore, the use of the class in the main application made the code a lot of more readable and clearer. In the following is an example of the easy use of the class:
Code:
$cf = new CloudFoundryProxy("http://api.eu-gb.bluemix.net/v2");
$app = $cf->getApps(['q' => 'name:configtool']);
All in all our infrastructure ended up like this:
So the next blog post takes a closer look on the Open Source Social Network Kit “HumHub” and the reason, why we chose it.
Written by Natali Bopp, Andreas Gold, Jonas Häfele, Merle Hiort, Martin Kopp, Christian Lang, Anna Poth und Eric Weislogel
Leave a Reply
You must be logged in to post a comment.