[written by Roman Kollatschny and Matthias Schmidt]
Uhwe, hello and welcome back to the third of our posts in this series. Today we want to show you additional features and tipps on developing a node.js web application test driven. As stated in the last article we use Mocha.js and Chai.js as tools.
You can take a look at our first and second article to read some introduction if you missed it.
Mocha extended
In the last article, we let all of our test run synchronous, but Mocha.js allows us to run the test also asynchronously. To do this, we have to add a simple callback to our it() function as shown in the following example:
describe('an example testsuite', function() {
  it('is a exapmle testcase', function(done) {
   anAsyncFunction(done)
  });
});
With hooks it’s possible to execute commands before or after some test cases to prepare or clean up. Especially in combination with database tests it can be helpful to get always the same conditions. before and after run only once, beforeEach and afterEach run every time before or after each single test case. They are not only usable for database access but also for every other repeating task.
describe('a testsuite for hooks', function() {
  beforeEach(‘testcase’, function() {
    return doSomething();
  });
});
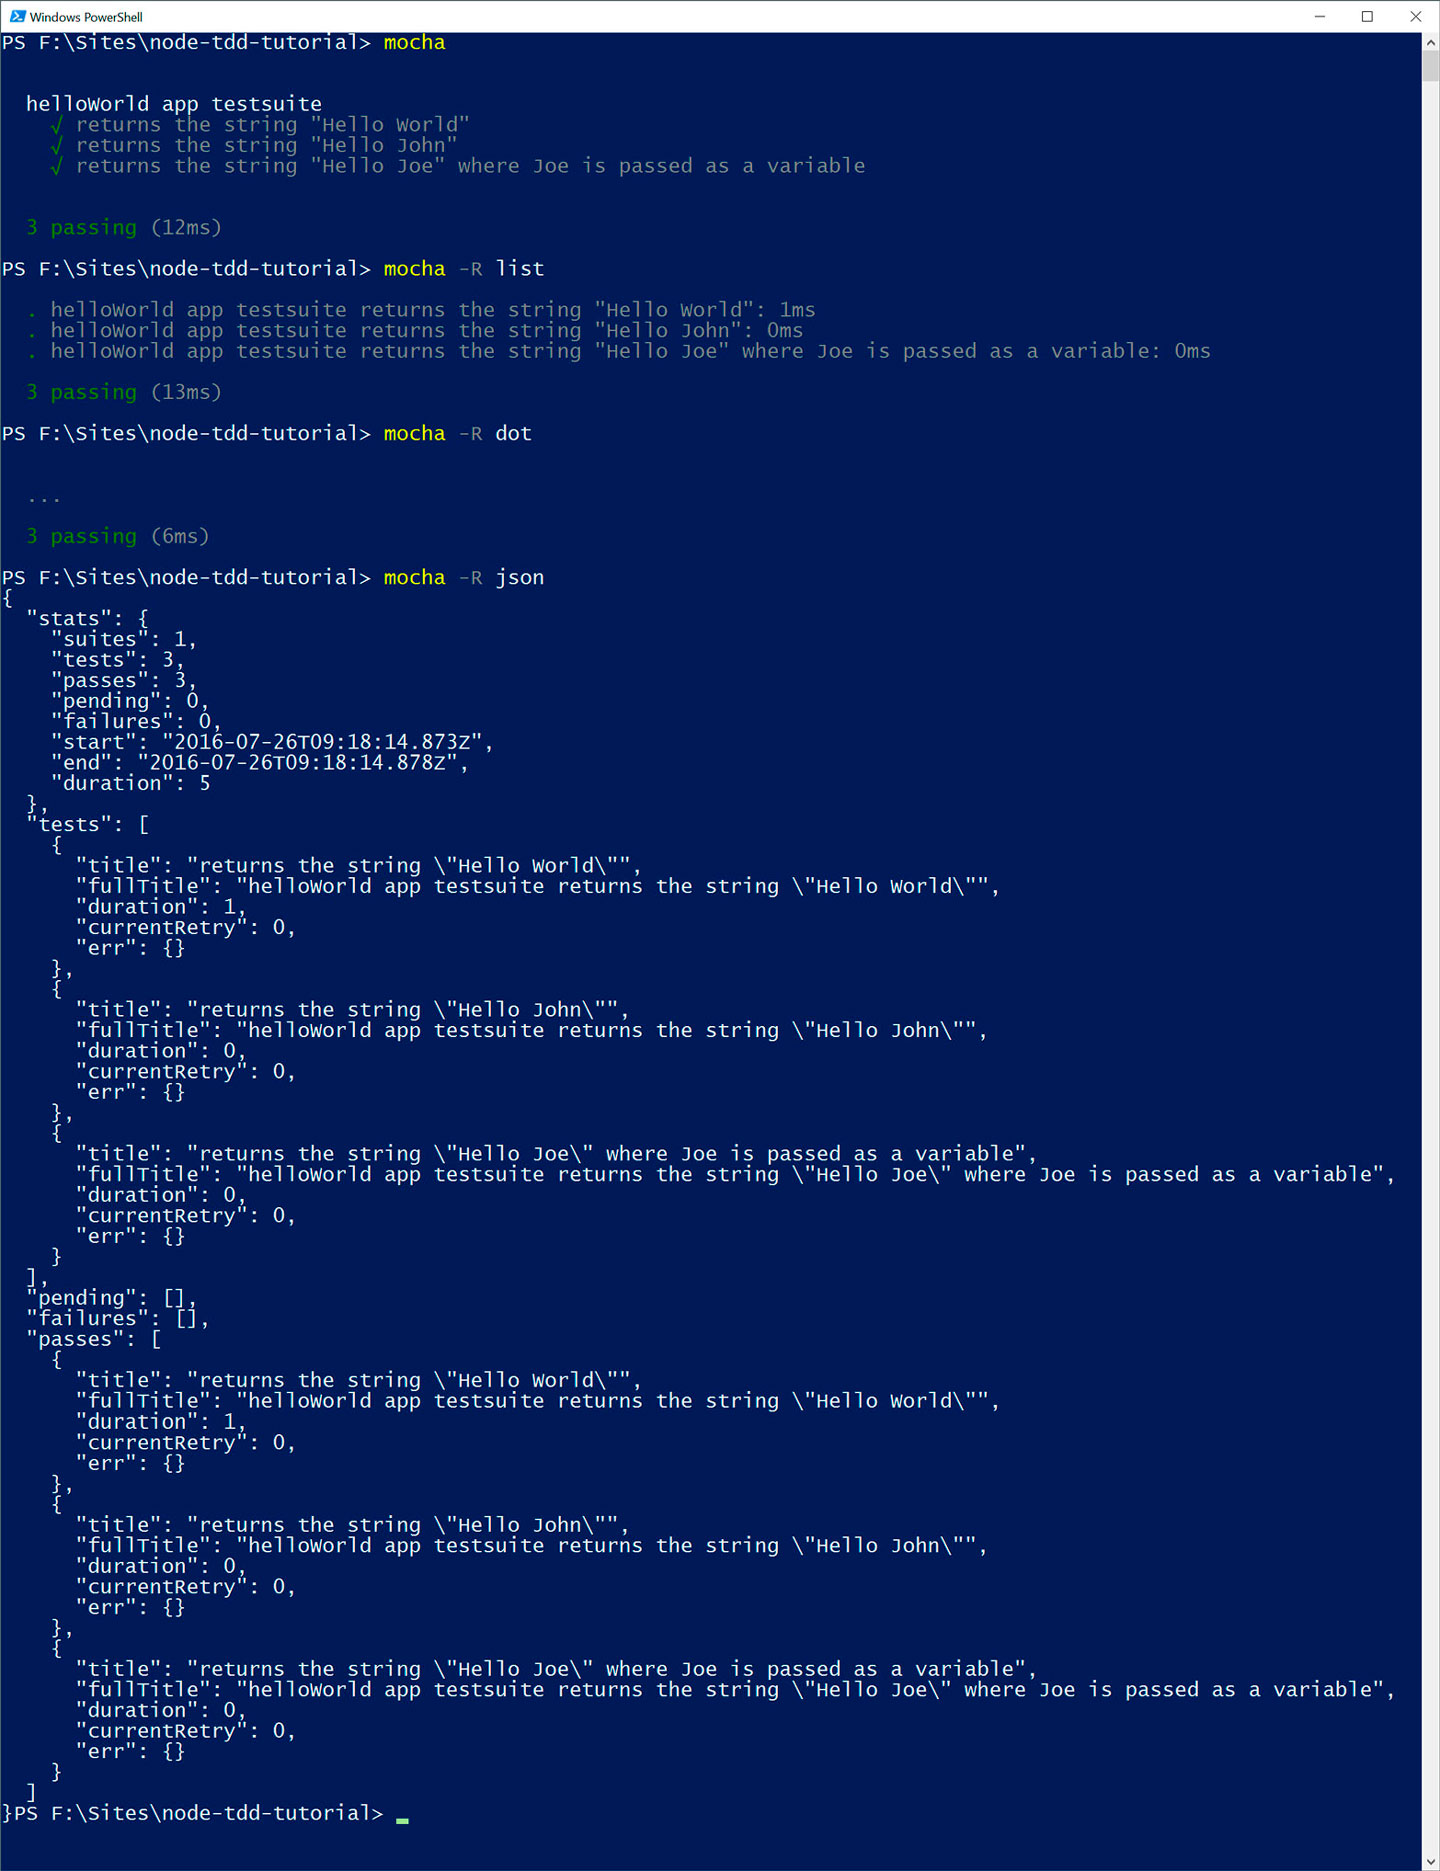
Mocha also supports various output styles, from which you can choose. There are e.g. spec, list, nyan, progress, markdown and html reporters available. The default reporter is spec. You can a other report style by calling mocha -R <style>.
The following image shows the default, list, dot and json reporter with our application of the last article.

Database access
If we want to use mongodb and mongoose as our database model in our application, we can also write tests for that.
Therefore we have to specify our mongodb URI and load mongoose packge in our test. In this example we want simply test if our db connection works and if we have the permissions to read and write to it. We create a simple dummy model to test with.
Preparations for the mongodb tests
var dbURI = 'mongodb://localhost/your-db;   // Define our database URI
var expect = require('chai').expect;        // Load chai.js with expect style
var mongoose = require('mongoose'); // Load mongoose

// Creating a simple dummy model
var dummy = mongoose.model(‘dummy’, new mongoose.Schema(
  {a: Number}
);
Pre and after hooks for connection and db clearing
In the case of this tests, we can use the hooks to check if we have a connection to the database by using the beforeEach() hook. To clear our database after all tests are done, we can use the after() hook.
describe("DB Check", function() {

  beforeEach(function(done) {
    if (mongoose.connection.db) return done();

    mongoose.connect(dbURI, done);
  });

  after(function(done) {
    mongoose.connection.collections[‘dummy’].drop(done);
  });
});
Writing to the database
To test our write permisson, we have to add our first test. To do this we create and save a new dataset on the database. Since our database queries are asynchronous, we have to use the done() callback as explained earlier in our save method.
describe("DB Check", function() {

  //… hooks

  it("saves our data", function(done) {
    new dummy({a: 1}).save(done);
  });

});
Reading from the database
After we checked for writing permission, we also have to check for our reading permission. So we add a second testcase for that. In this testcase we try to query for documents in the dummy database and check, if the database holds at least one record.
describe("DB Check", function() {

  //… hooks and save testcase

  it("queries our database", function(done) {
    dummy.find({}, (err, docs) => {
      if (err) return done(err);

      expect(docs).to.have.length.least(1);
      done();
    });
  });

});
Additional to our simple tests it’s possible to e.g. test if the database model meets the requirements or use existing models.
HTTP requests
Testing HTTP requests
For testing http requests, we use the chai-http plugin.
To have access to the plugin, we load and register it with chai. This is done by the following code:
var chai = require('chai'),
  chaiHttp = require('chai-http');

  chai.use(chaiHttp);
Before we can define our test cases we have to inform the plugin about our webserver configuration – either by using our app instance or by passing an URL to it:
chai.request(app)
// or
chai.request('http://localhost:8080')
Depending on the desired request method, we can chain functions like get, post, put with the corresponding path. It’s also possible to chain functions like send (for sending json objects), query (for defining get parameters), attach (for attaching files) or auth (for authentication) for easier or extended requests.
chai.request(app)
  .get(‘/website’) // Website path
  .query({search: ‘hdm’}) // GET request to /website?search=hdm
After specifying our request, we have to deal with the response. Therefore we use the method .end(). The end method expects two parameters, an error and an response object which are handled by a callback function.
chai.request(app)
  .get(‘/’)
  .end((err, res) => {
    // Tests here
  });
The callback function also holds our tests. Here we can test whether our request has failed or we got some response data. The response can be checked eg. on status codes, document types like text, json or html and more.
chai.request(app)
  .get(‘/’)
  .end((err, res) => {
    expect(err).to.be.null; // expect that there’s no error :)
    expect(res)
      .to.have.status(200)  // expect to have a 200 status
      .and.to.be.html       // expect to be a html document
      .and.to.have.cookie('session_id', '1234'); // expect to have a cookie with defined session-id
  });
To work with the response data, we have to access the body object of the response. Especially when working with json responses this can be very handy to use.
chai.request(app)
  .get(‘/’)
  .end((err, res) => {
    ...
    expect(res.body)
      .to.be.an(‘array’)
      .and.that.has.length.least(1);
  });
Final
In our next and final article we will write a bit about code style and code quality on Node.js. Another topic that also fits good into this series – keep testing.

Leave a Reply
You must be logged in to post a comment.