
In terms of security, obtaining Docker images from private or public Docker Registries is affected by the same issues as every software update system: It must be ensured that a client can always verify the publisher of the content and also that he or she actually got the latest version of the image. In order to provide its users with that guarantees, Docker ships with a feature called Docker Content Trust since version 1.8.
This third and last part of this series intends to give an overview of Docker Content Trust, which in fact combines different frameworks and tools, namely Notary and Docker Registry v2, into a rich and powerful feature set making Docker images more secure.
The software update process
First of all, I want to make sure that we have a common understanding of how software update systems generally do their job. It doesn’t really matter if we think package managers like APT or software library managers like RubyGems, since their core functionality is basically the same. So let’s briefly skim through the steps such an update system performs to check and – if necessary – install the latest updates:
- The updating process starts with a download of metadata files from the a certain repository. These files list the latest version(s) of the software hosted by this repository.
- The client’s update system investigates the previously fetched metadata files and checks if there’s any software available which is newer than what is currently installed on the client machine.
- In case there’s new software available, the software update system downloads and installs the latest version(s) of the package(s) or application(s).
- In case the client is already in posession of the latest software, nothing happens.
Conceivable attacks on software update systems
Now that we clarified how software update systems operate in high-level terms, I want to convey a first picture of why securing the software update process is so important. There’ re many different kinds of attacks a client might be exposed to, so let’s take a moment and review some of them:
- Arbitrary installation attacks – A client is presented arbitrary data by the attacker as a response to a software update download request.
- Endless data attacks – An attacker overwhelms a client with a large amount of data as a response to a software update download request. The client machine might not be able to cope with the masses of input that it receives and finally crashes. This is also called a DoS (Denial of Service) attack.
- Extraneous dependencies attacks – An attacker forces a client into downloading malicious software as dependencies which are not necessarily needed.
- Fast-forward attacks – An attacker tricks a client’s software update system into marking a file as newer than the most up-to-date and valid version on the update server. As a consequence, the client’s update system refuses to install a revision of a file that is older than what it has already seen, which prevents the client from receiving the latest updates.
- Indefinite freeze attacks – An attacker answers any update request with outdated metadata. The client therefore will never see that there’re any updates available.
- Mix-and-match attacks – An attacker presents a composition of different metadata concerning different packages. However, this combination of metadata might have never existed on the server at the same time. In this way, the attacker can serve an arbitrary combination of several packages with random versions.
- Rollback attacks – An attacker tricks a client into installing outdated software.
Why not use GPG for image signing?
A technology that is often used for signing software packages is GPG (GNU Privacy Guard). The package to distribute gets signed with a private key and is then published along with the corresponding public key, allowing any client to verify the signature (and also the idenity) of the original publisher. So why not use that approach for signing Docker images?
While GPG sounds like a simple and reliable system, it also comes with major drawbacks:
- No freshness guarantees – Consider a Man-in-the-Middle who serves you a package from years ago, which also has been signed by the currently valid key pair. Your update system will download the package, successfully verify the signature and install the software. Since the package was signed properly and you have no idea that it might come from an attacker, you unwittingly ran into a rollback attack.
- Vulnerable GPG key – Since managing software as well as building and signing packages is done by means of automated processes on remote (front-end) servers (e.g. CI servers), the GPG private key also has to be kept online, where it might be stolen by malicious invaders. In case that really happens, a new key pair has to be generated and all clients have to revoke their trust on the old keys for no longer successfully verifying software that is signed by the stolen key. This is not just lots of work, but also very embarrassing in the first place.
Facing that, it might be clear why Docker decided to go another way for image verification. In the next section, I want to focus on the approach Docker built upon.
The Update Framework (TUF)
TUF (a play on words with tough security) is a software update framework which has been started in 2009. It’s heavily based on Thandy, which is the application updater of the Tor browser.
In contrast to Thandy or other application updaters or package managers, TUF rather aims at being a universial extension of any software update system that wants to use it, than being a standalone software update tool. The TUF specification as well as a refrerence implementation can be found on Github.
Roles, keys and files
We already saw that the GPG approach is vulnerable due to a single signing key which is kept online and therefore exposed to potential attackers. In order to bypass that problem, TUF defines a hierarchy of different keys with different privileges and varied expiration dates instead of relying on a single key. These keys are bound to specific roles, the owner of the root key for example earns the root role within the system. On top of that, TUF determines a set of metadata files which must be present at a repository’s top level directory. Let’s take a closer look at the framework’s architecture.
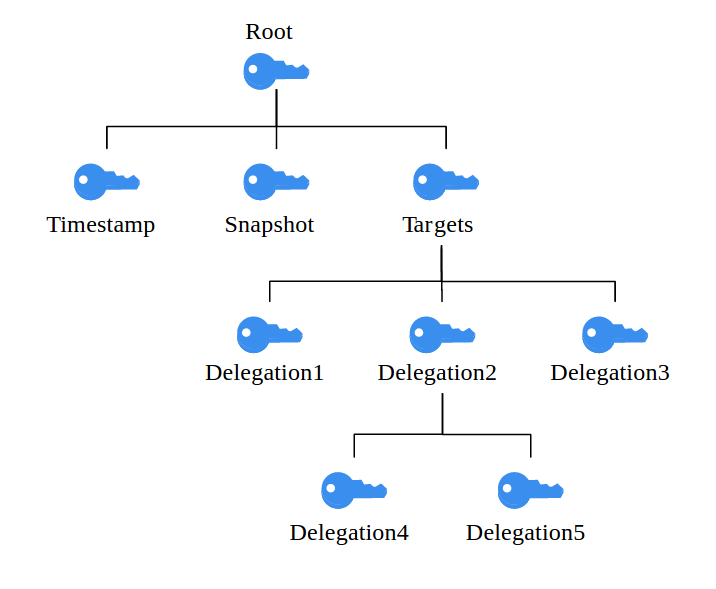
- Root key – The root key acts as the root of trust in TUF. It’s the key with the longest expiration date as well as the highest privileges, and it’s only job is to sign the other keys in the system, which is why it should be kept offline and secure, e.g. in a USB drive or smart card. More precisely, the root role signs a file called root.json, which is required by the TUF specification and lists the currently valid public keys for all the other keys in the system. In this way, the validity of the other keys can always be checked by a client at any time.
- Snapshots key – This key signs the snapshot.json file, which contains a list of all currently valid metadata files (i.e. file name, file size and hash) except from timestamp.json (more on that in a little while). In other words, this file gives us a “snapshot”, comprising everything in our repository that should be considered a part of the latest revision of our software. This idea of taking “snapshots” underlines one of TUF’s core concepts, which is thinking in collections instead of single files. In this way, we can protect ourselves from Mix-and-match attacks.
- Timestamp key – The timestamp key signs the timestamp.json file, which in turn indicates the currently valid snapshot.json file by hash, file size and version number. It has the shortest expiration time and the least privileges in the system, since it is kept online and therefore must be considered very vulnerable. Timestamp.json gets re-signed in regular intervals. Thereby, clients can be provided with freshness guarantees, which means they can be sure to actually download the latest updates.
- Targets key – This key is finally responsible for verifying the files we want to protect (i.e. the “target” files). It signs targets.json, a file which lists our target files by file name, file size and hash and therefore ensures their integrity. The targets role allows for delegating responsibility to one or more subordinated roles, meaning that they can also sign a subset of the present target files (e.g. a all files in a certain subdirectory). The advantage that comes with delegations is that the owner of the targets key doesn’t have to share it with others. Instead, the targets role signs one or more delegation keys, which only apply to the files it wants to delegate trust for. In this way, there’s no possibility for the delegated role to sign any content it isn’t supposed to.
TUF in action – Bringing it all together
I guess you might be clobbered over the head with all the different roles, files and keys that we went through. However, when stepping trough a single TUF workflow, it’s much more easier to understand what they do and how everything fits into the whole thing.
So when any client applications interacts with TUF in order to check for updates, the following steps occur:
- The client application instructs TUF to search for available updates. If the client interacts with the repository for the first time, root.json is downloaded and the root public key gets imported. Remember that this file allows us to verify the signatures of all the other keys.
- TUF downloads the timestamp.json file from the repository, checks its signature with the public key given by root.json and compares it to the latest version of the file that is present on the client machine. The timestamp file tells us about the latest valid snapshot within the system, remember?
- In case TUF recognizes that snapshot.json has changed, the framework also downloads this file and verifies the signature by means of the public key that came with root.json. TUF then inspects the latest version of the snapshots file and checks if any other metadata file (targets.json and/or root.json) has been modified.
- In case root.json has changed (e.g. due to a key rotation), the latest revision of this file is fetched from the repository and the update process restarts with step 1.
- If targets.json has been modified, that means that one or more target files have been updated in the meantime. TUF downloads the file, verifies it, inspects it and finally creates a list of files which can be updated. The list is then presented to the client update system.
- For all files on the list that shall be updated, TUF is instructed to download them.
- TUF downloads the files from the repository, stores them within a temporary directory and checkes their signatures. Only after all the fetched files have successfully been verified, TUF hands them over to the software update system.
What TUF gives us
Although we only scratched at the surface of TUF, it’s quite obvious that understanding its internals is not so trivial. So what do all these keys and files give us in the end?
Summing up, TUF helps us the bypass the most important flaws of GPG signing we discussed above:
- Surviving key compromise – Since several keys are needed for being able to sign and publish new valid content, a single compromised key does not immediately result in an entirely compromised system. Consider the timestamp key to be compromised: Because the attacker doesn’t also own the tagging key, all we loose is our freshness guarantees. However, the attacker is still not able to publish new content. Thinking about the inverse scenario where an attacker succeeds in stealing the tagging key, he or she can in fact sign the content, but since the timestamp key is still safe, there’s no way this content will ever be published as the most recent revision. In order to invalidate any stolen key, everything an admin has to do is taking the offline root key and rotate the other keys. A very nice side-effect that comes with this sort of key rotation is that any client of the affected repository only has to accept and import the new public keys. Of course all the guarantees concerning survival of key compromise presume the root key to be safe. If the root key is stolen, there’s no more guarantees to make about your content at all.
- Freshness guarantees – On top of allowing you to survive key compromise, TUF also ensures that a client’s software update system always gets not just exactly the file or package that it really wants to get, but also the latest version of it. Therefore, a hacker or Man-in-the-Middle can no longer serve clients outdated software, since it’s signed by means of a highly ephemeral timestamp key. Thereby, no client can ever be tricked into installing software which is actually older than what he or she has already installed.
Docker Notary
So how can Docker benefit from TUF in order to make image distribution more secure? The answer is quite simple: The Docker team stuck to the TUF specification and built its own update system on top of it. This is where Notary comes into play, which is in fact an opinionated implementation of TUF. Notary’s primary task is to enable clients to ensure a Docker image’s integrity as well as verify the identity of its publisher.
Bear in mind that it’s not Notary’s job to check the contents of an image in either way or perform any code analysis, as Diogo Mónica points out in his talk about Docker Content Trust. We only talk about integrity and publisher identity as the main concerns for Notary. From an OOP perspective, one can say that Notary follows the Single-Responsibility-Principle: It does exactly one thing, and that’s image signing.
It’s also worth mentioning that Notary, even though it has ben implemented by Docker, is not restricted to be applied on Docker images in any way. Instead, Notary is a completely independent tool which can work on arbirtary repositories or collections of data.
Notary architecture
Notary consists of two major components: The Notary server and the Notary signer. Notary clients only interact with the Notary server, by pulling metadata from or pushing metadata to it. It stores the TUF metadata files for one or more trusted collections in an associated database.
The Notary signer can be regarded as an independent entity, which stores all TUF private keys in a seperate database (the signer DB) and signs metadata for the Notary server. The following figure provides an overview of the architecture.
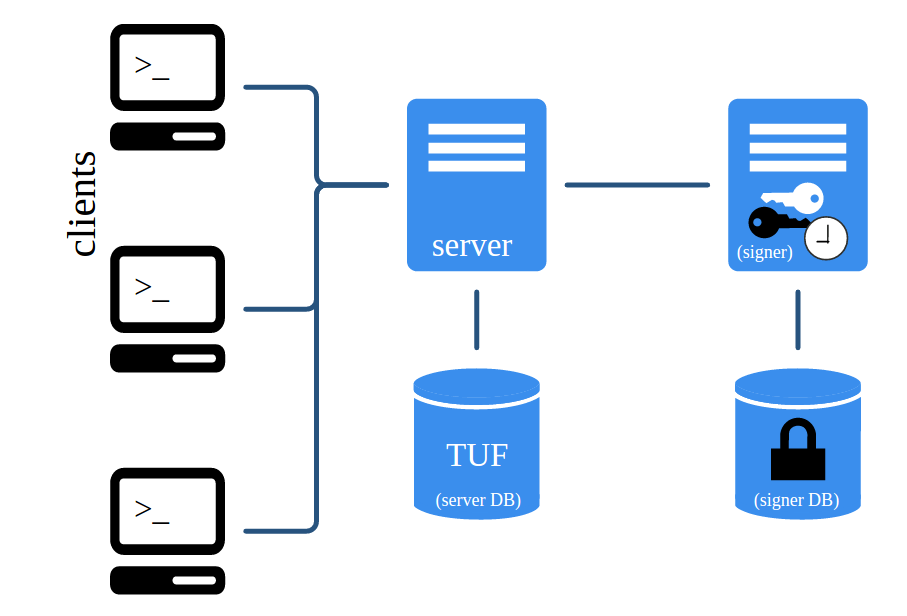
Notary server
As already mentioned, the Notary server stores and serves metadata for the Notary clients. When a client asks the Notary server for metadata, this component makes sure that the latest versions of the metadata files are fetched from the TUF database and delivered to the client. Beyond that, the Notary server checks all metadata that is uploaded by clients for validity as well as legal signatures. As soon as new valid metadata is supplied by a client, the Notary server also generates new timestamp metadata, which gets signed by Notary signer.
Notary signer
The Notary signer is much like a “back-end”, storing the private timestamp key (and possibly the snapshot key) and waits for the Notary server’s signing requests. The Notary server is the only component which directly connects to the signer. On the contrary, the Notary server directly serves clients and therefore acts more as a “front-end”.
Designing Notary’s architecture like this comes with very important advantages. First, TUF metadata which is sent to clients is not mixed up with the TUF keys in a single database. Second, the TUF private keys don’t have to be stored on a vulnerable front-end which is directly exposed to clients.
Client-server-signer interaction
With Notary’s basic architecture in mind, we’ll now examine what’s going on between a client, Notary server and Notary signer as soon as a client starts interaction with Notary. Consider that I’ll just shortly describe the actions which are preformed by the parties involved. For a more detailed explanation please visist the Notary documentation on Github.
- We assume that a client has modified an arbitrary target file. He or she adds the new hash, file size and file name to targets.json, signes this file with the targets key and finally uploads it to the Notary server.
- Notary checks the uploaded version of targets.json for validity as well as possible conflicts with existing versions and verifies the signature.
- If the verification step has been successful, Notary server generates new snapshot.json and timestamp.json files. Afterwards, this new metadata is sent to the Notary signer.
- Notary signer fetches the snapshot and timestamp private keys from the signer DB, decrypts the keys (yes, they’re never stored anywhere without being encrypted!), signs the metadata received by Notary server and returns it.
- The Notary server now holds new signed metadata which represents the new “truth” in terms of the state of the managed trusted collection of files. From now on, every Notary client is served the updated metadata from TUF database for the concerned collection.
- Finally, Notary sends a notification to the client that uploading the new metadata has been successful.
- If any other client requests Notary server for the latest metadata, it immediately returns the updated metadata files given that none of the metadata has expired. However, if timestamp.json has expired, Notary server again goes through the entire procedure of generating a new timestamp, having it signed by Notary signer and storing it in the TUF database before serving it to the client.
As I already mentioned above, there’re a few steps that I’ve skipped here. For example, it makes perfectly sense to provide authentication and authorization mechanisms for client connections. Again, I recommend the Notary documentation on Github for more information on these topics.
Docker Registry v2
We know that a Docker Registry is a central public or private repository to store and distribute our Docker images. But how does the Registry fit into what we’ve learned about Notary and Docker Content Trust so far? I’ll soonly answer that question, but first of all, we’ll take a look at how the latest release of the Docker Registry (which is version 2) operates.
Registry v2 fundamentals
At its core, Docker Registry v2 is a so-called content-addressable system. What does that mean?
With a content-addressable system, the location (or “address”) of an element it is holding is determined by the element itself. More precisely, an element is used to compute a cryptographic hash, which in turn defines the address under that the element gets stored. In the case of Docker Registry, the elements we want to store and retrieve are images:
image address = hash(image bytes)
As for the cryptographic hash function hash(x), SHA-256 is applied by the Docker Registry. So the correct equation is:
image address= sha256(image bytes)
Now you might ask: What’s the point of prefering the cryptographic hash of an image over a randomly generated sequence of characters and numbers as the image storage address?
The point with this is that all entries of a content-addressable system become self-verifiable:
- We pull an arbitrary image, let’s say ubuntu:latest, from the registry by providing the corresponding hash value (“pull by digest”).
- Docker Registry looks up the image by means of the hash that we just provided.
- Because we know that the hash value we used for pulling actually is a cryptographic hash of the image we just pulled from Docker Registry and that SHA-256 has been applied as the hash function, we can take the image we’ve just downloaded and compute its digest on ourselves.
- If the result equals the hash we provided earlier to pull the image from Docker Registry, we can be sure about the integrity of our image.
I admit that there’s a couple of things here which have been kind of oversimplified by my description. The first question is: Where does the hash we used for pulling ubuntu:latest in the example above come from?
On top of that, I was not completely honest with you so far. It’s not correct that Docker Registry stores entire images as its elements.
Docker Registry and Image Manifests
Think about what would happen if each element within Docker Registry really was an entire image. In the first part of this series, we realized that a Docker image consists of 1-n layers, whereat each layer can be shared across an arbirtary number of images. Sharing layers would actually not be possible if each entry inside the Docker Registry would contain a complete image, which by the way would waste lots of storage since there would be much redundancy.
Instead, what the Registry gives us when we ask for ubuntu:latest is a Image Manifest file, which lists all the layers this image consists of along with their SHA-256 hash values. Once we have such an Image Manifest available, the rest is pretty simple:
- As described above, we verify the Image Manifest we just fetched by computing its SHA-256 hash and compare the result to the hash we provided to perform the docker pull.
- For the next step, Docker inspects the list of image layers (or rather their hash values) and starts doing a pull by digest for every single layer in the Manifest. As for performance reasons, several of these operations can be ran in parallel.
- Afterwards, each layer is verified the same way as the original Manifest belonging to ubuntu:latest. The whole process might be recursive, since a Manifest may point to another Manifest as one of its layers. Diogo Mónica calls this “Turtles all the way down”, which is very accurate in my opinion.
You see where this is going? What Docker Registry really does is storing individual layers instead of complete images. A Docker Image is nothing but a composition of one or more image layers, which can be represented by means of Image Manifests within the Registry.
Docker Registry and Notary – The big picture
Summing up, Docker Registry v2 enables its clients to verify that what they just pulled really matches the content they were addressing by computing the received image’s SHA-256 hash value and comparing it to the digest that was used for pulling. However, the reliability of this approach entirely depends on if we truly have the correct hash for an image that we want to download.
Where Notary comes in
Why is this so important? Consider that a Docker user never specifies a digest directly when doing a docker pull. Instead, we use image names and tags like ubuntu:latest, since this is comes quite a bit more handy than having to type weird hash values. As a consequence, what we need is a service that safely translates an image name into the correct hash value which points to the corresponding entry within Docker Registry. And luckily for us, we already have an adequate service available: Notary.
Indeed, Notary is the perfect solution here since it guarantees to always give us the last version of a certain collection of files. In the same way, we can make Notary to provide us with the hash that identifies the publisher of the desired image and also points to the exact version of the image that we want to download. Let’s go through two scenarios that clearly illustrate how Notary and Registry teamwork mitigates common threats affecting Docker images.
Protection against Image Forgery
Consider a situation where an attacker attains a priviliged position in your network and enters the Docker Registry server. What he or she might do now is going into the Registry and tampering some of the existent layers. As soon as a client comes in and asks for an image which refers to any tampered layer, the verification process fails right after download and prevents the client from running potentially malicious software (see figure 3). What happend?

Imagine that we instructed Notary to give us the correct digest for ubuntu:latest. With that hash at hands, we go to Docker Registry and can be sure to actually download the desired image. The image’s TUF signatures are perfectly valid, there’s nothing wrong here. Though, since one or more layers have been modified by an attacker, the hash we compute by applying the SHA-256 function to the content we just downloaded doesn’t match the digest we got from Notary. Because we can rely on Notary in terms of what the correct hash for ubuntu:latest is, we can imply that something must be wrong with the image.
Protection against Replay Attacks
In another situation, an attacker who’s in a privileged network position might not tamper individual image layers but rather serve clients an old version of an image they want to fetch. For example, that’s the case when the image you long for is ubuntu:latest, but what the Man-in-the-Middle serves you is an outdated version of that image. Again, image verification fails after the download as the result.

So what happens here is that Docker Content Trust prohibits the clients from running an old image by means of the TUF timestamp key. In this example, verifying the old image against timestamp.json leads to the outcome that its signature does not match currently valid content and therefore fails with an error message.
How to get started with Docker Content Trust?
If you’re running at least Docker 1.8, launching Docker Content Trust is very easy. All you have to do is setting the corresponding environment variable:
export DOCKER_CONTENT_TRUST=1
That’s really all that has to be done. From now on, every single Docker command you’re executing will be secured by Content Trust, no matter if you’re doing a docker pull, docker run or whatever. What that means is that there’s no need for users to learn any additional commands in order to start working on signed images. Instead, Content Trust operates transparently once it has been enabled.
You may have recognized that so far Docker Content Trust must be enabled explicitly (“opt-in”). The reason for this is that Docker wants to collect as much feedback as possible before finally enabling it by default with a future release (“opt-out”).
Conclusion and further thoughts
I have to confess that understanding the details of Docker Content Trust is not so easy and took me lots of time to see through it. The reason is that although TUF comes with a spec that is in fact quite easy to read, getting familiar with its complex structure inlcuding many different roles and keys turned out as not so simple. But on the other hand, I think that the Docker team did a great job with their docs, focusing on the most important aspects of TUF without diving into its internals too deeply. And finally there’re many things I’ve learned about Content Trust, TUF and security in general.
What I like most about Docker Content Trust, aside from its great usability, is that every component (Notary signer/server, Docker Registry) exactly has one single responsibility, which facilitates getting an overview of what happens at a certain moment on a certain place within the system.
I want to end this with a question: Where does the journey go for TUF and Notary? Sure, they’re both very sophisticated solutions in terms of the most common threats for software update systems. However, I think we can be sure that new threats will arise (the public CA model?). As a consequence, TUF and Notary constantly have to be considered work in progress, since they’ll have to keep up with these. Though, I think that all in all these franeworks pose an excellent starting point for making Docker Image distribution more secure.
Acknowledgement
I want to thank Nathan McCauley (@nathanmccauley), Director of Security at Docker, who kindly agreed on answering me some questions on what I didn’t get in the first place. Beyond, this blog post highly profited by Docker Security Lead Diogo Mónica’s (@diogomonica) talk covering Notary and also by lots of valuable resources provided by Docker and TUF.
Sources
Web
- Cappos, Justin, and Kuppusamy, Trishank Karthik. 2014. The Update Framework Specification. Last modified August 25, 2016. https://github.com/theupdateframework/tuf/blob/develop/docs/tuf-spec.txt
- Day, Stephen. 2015. A New Model for Image Distribution (DockerCon SF 2015). Published by user “Docker, Inc.” June 29, 2015. http://de.slideshare.net/Docker/docker-registry-v2
- Docker Inc. 2016. Getting started with Docker Notary. Last modified Juni 12, 2016. https://github.com/docker/notary/blob/master/docs/getting_started.md
- Docker Inc. 2016. Image Manifest Version 2, Schema 2. Accessed September 11, 2016. https://docs.docker.com/registry/spec/manifest-v2-2/
- Docker Inc. 2016. Understand the Notary service architecture. Last modified August 2, 2016. https://github.com/docker/notary/blob/master/docs/service_architecture.md
- Mónica, Diogo. 2015. Introducing Docker Content Trust. Accessed August 28, 2016. https://docs.docker.com/engine/security/trust/content_trust/
- Wikipedia, The Free Encyclopedia. 2004. GNU Privacy Guard. Last modified August 15, 2016. https://en.wikipedia.org/wiki/GNU_Privacy_Guard
Videos
- McCauley, Nathan. 2015. Understanding Docker Security. YouTube video. 48:03. Posted by “Docker”. December 19, 2015. https://www.youtube.com/watch?v=w519CClzEuc
- Mónica, Diogo. 2015. A Docker image walks into a Notary – Diogo Mónica. YouTube video. 26:27. Posted by “ContainerCamp”. September 29, 2015. https://www.youtube.com/watch?v=JvjdfQC8jxM
Leave a Reply
You must be logged in to post a comment.