Introduction
IBMs artificial intelligence ‘Watson’ on the IBM Bluemix platform offers a wide range of cognitive services like image and audio analysis among other things. During our semester project in the lecture ‘Software Development for Cloud Computing’ we integrated useful Watson services into a Telegram chat bot to provide a convenient form of direct access to those services right out of an ongoing chat conversation.
Our goal was to create an intelligent Telegram bot with services like Tone Analyzer for audio messages, Visual Recognition for analyzing sent images, a Speech-To-Text functionality to be able to get spoken text inside audio messages and a translation service. Working both with a Telegram bot and IBM Watson services we came up with the name combination ‘Botson’.
In this blog post you’ll learn the basics on how to create and configure a Telegram bot as well as why we recommend creating several bot instances when working in a team. Afterwards we’ll provide an overview of the IBM Watson services that we used, what you should keep in mind when creating them in IBM Bluemix and the problems that we were facing along the way. Another part of the IBM Bluemix chapter covers how we configured the Continuous Delivery service, why we struggled to connect our existing GitHub repository to it and how we solved that among other problems.
Telegram Bots
Let’s jump right in and have a look at how to create a Telegram bot. To do that there’s an existing bot available called BotFather. You can start a chat with this bot and it will help you create your own, provide a name and other stuff. In the screenshot below you can see the required /newbot command that will trigger the BotFathers step-by-step assistance.
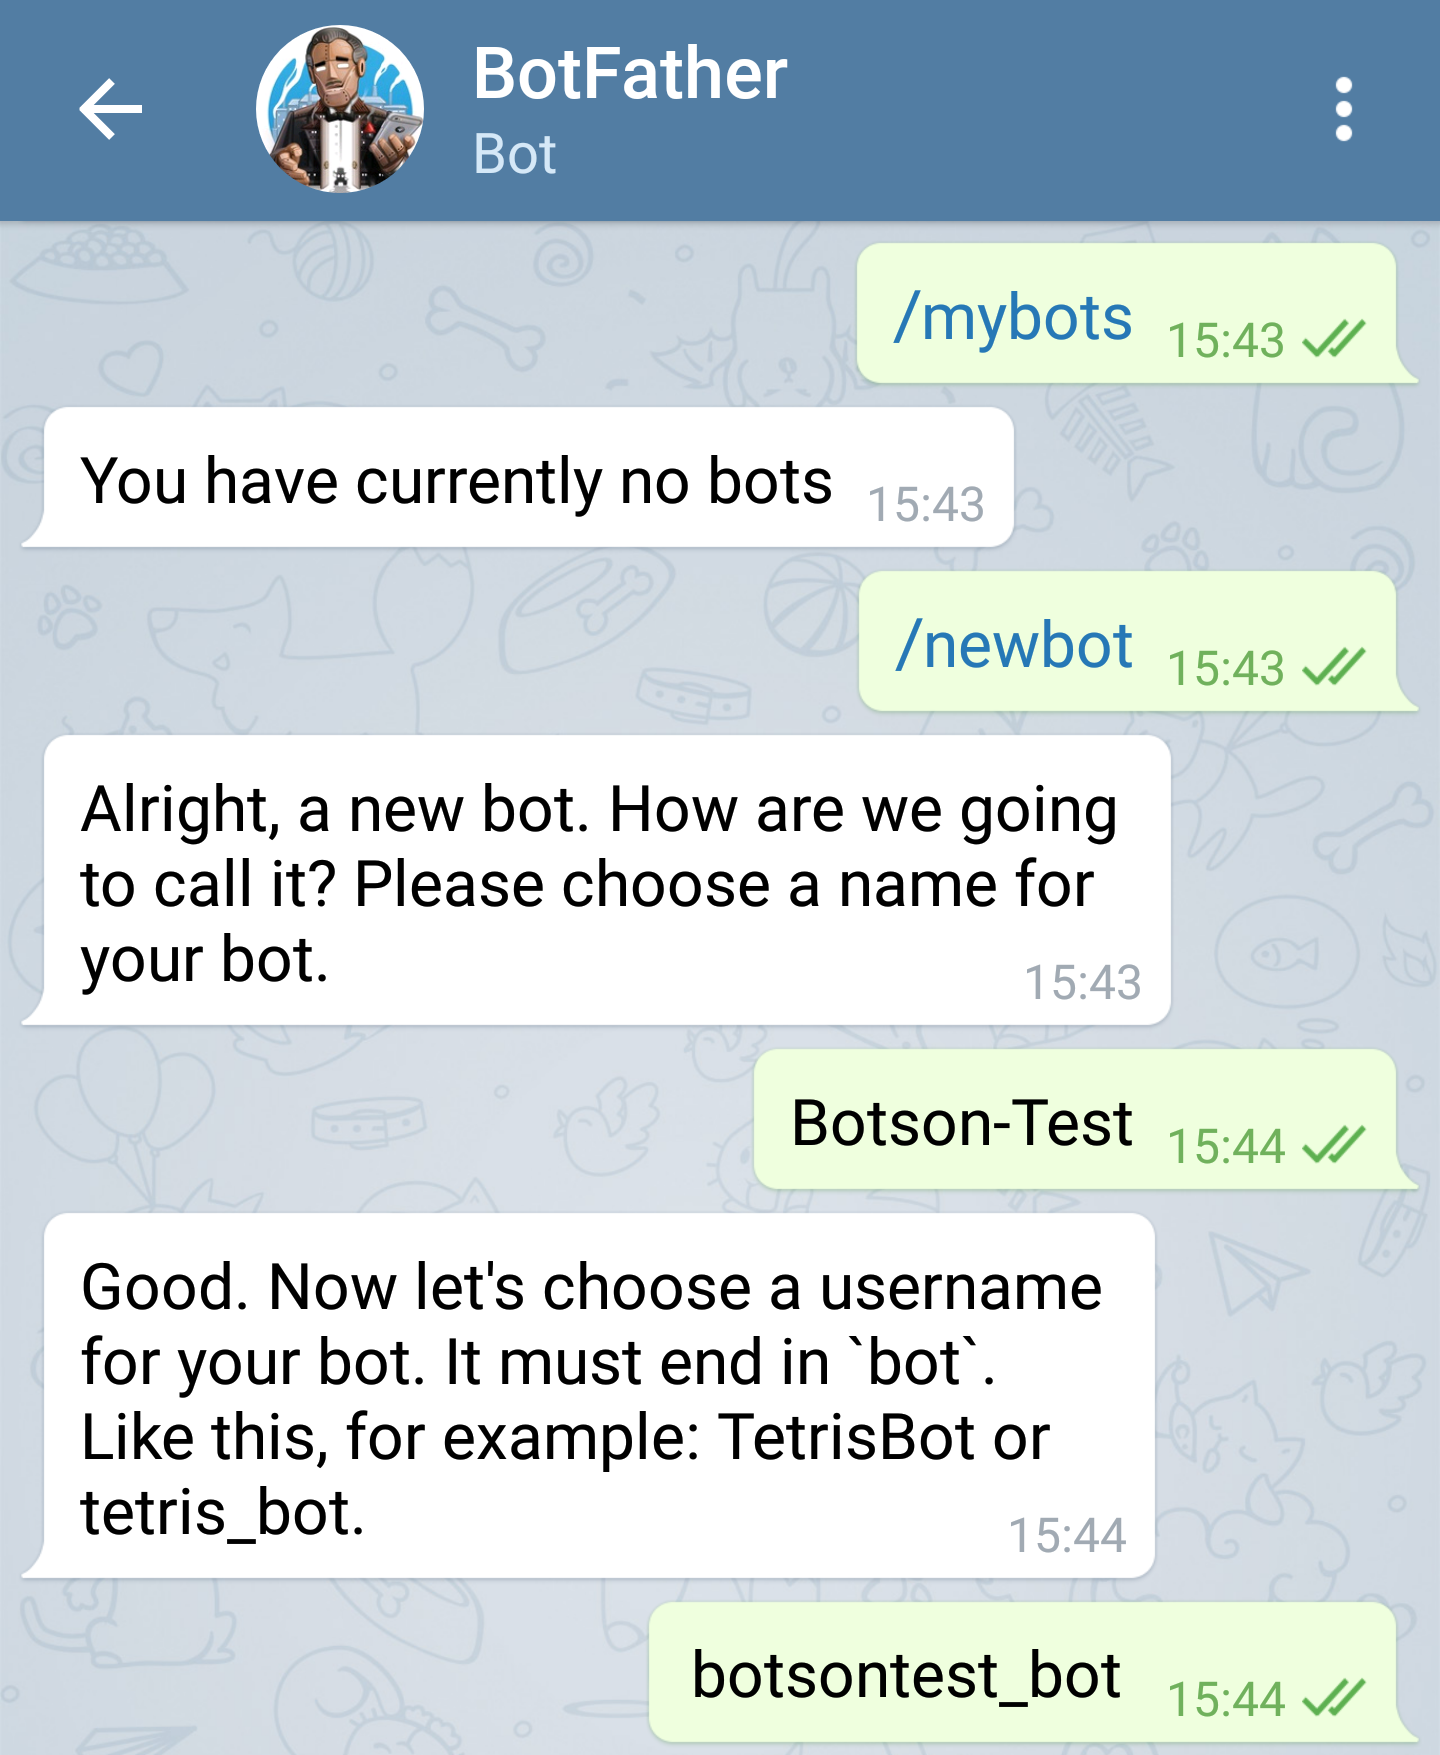
Once you chose at least a name and a displayed username for your bot the BotFather will provide a token for you to access the HTTP API and send requests. You can generate a new token for your bot anytime by simply sending the /token command to the BotFather and afterwards selecting the desired bot.
Talking about tokens: If you are working in a team like we were, you might want to create one test bot instance per group member. Even though running the same bot simultaneously on several machines is possible, you will get error messages in the console output permanently. Also if something triggers a response from the bot you will get one response per running instance. So if the same bot is running on let’s say 3 machines at once you will get the same response 3 times as well. Therefore we recommend having one dedicated bot running permanently on an IBM Bluemix platform and using different test bots that are executed locally and separately.
After the creation of your bot the BotFather will also provide a clickable link which will add your bot to your contact list. From then on you can also go ahead and add the bot to Telegram chat groups. One thing to consider here is that you should provide your bot with admin rights if you wish that the bot can read chat messages instantly without having to be triggered by someone using explicit commands. In our case we wanted the bot to be able to react directly to audio messages and image files that are sent. Regarding our translation service we wanted to configure the bot to listen for specific user commands. We will have a look at how to specify those commands below.

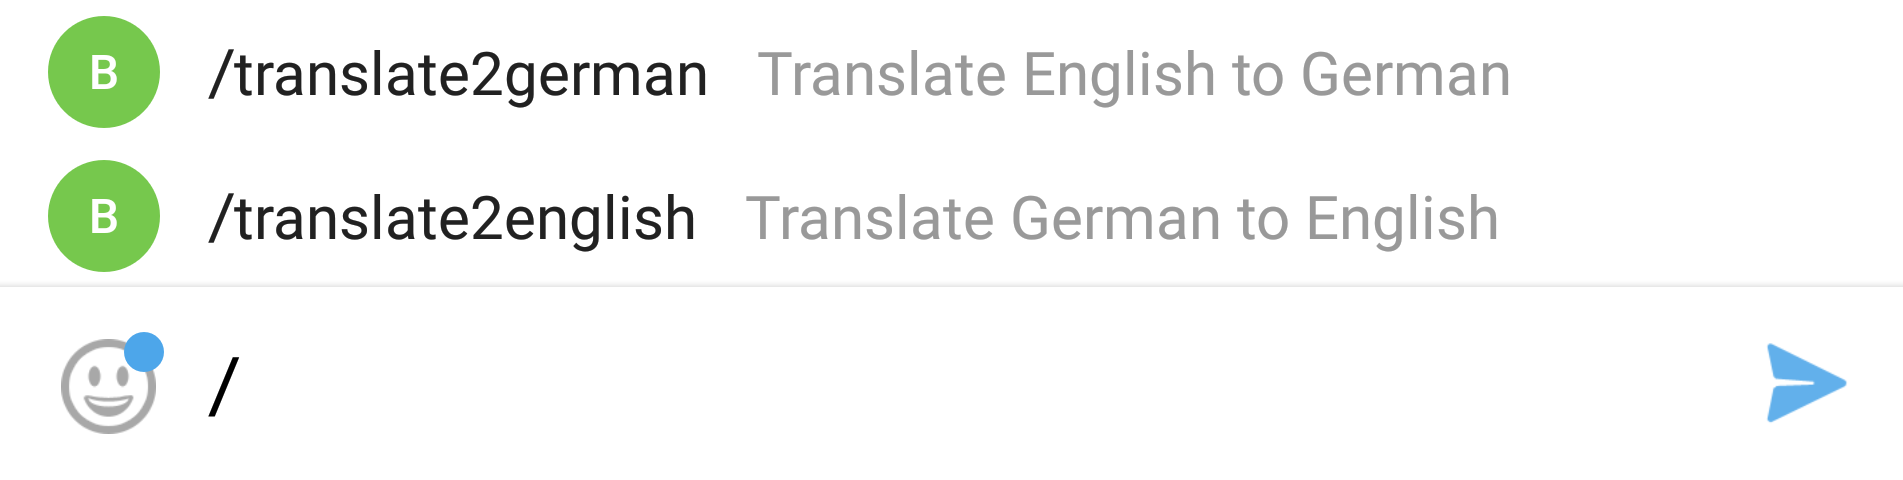
To react to specified commands, your Telegram bot can be configured by – guess what – talking to the BotFather. You can see in the provided screenshot above that by using /setcommands you can simply specify your Telegram bot that you wish to configure. Your desired command names and their descriptions can be set by using a given format. Inside the source code for your bot functionality any sent text message can then be checked for an occurence of your defined command. But why would you need to define those commands at the BotFather then anyway? Well, this way a user will get all the available commands suggested after typing a slash / as some form of auto-complete. In addition he can read the description for these commands.
Bluemix/ Watson services
If it is your first time working with services you may ask yourself: How does this even work? Well, all services come with credentials which provide you with everything you need to know to access them. These credentials can then be used for development.
One of the services that we initially aimed for was to implement the Watson ToneAnalyzer which should then evaluate emotions in sent audio messages. It would have helped in situations where you can’t listen to audio messages, e.g. sitting in a meeting or in the metro. We had the idea of then being able to not only get the spoken text inside an audio message but also get an insight into the current emotional mood of the speaker. That way you could get a full idea of what’s going on without actually having to listen to the audio file.
The problem that we quickly ran into was that the ToneAnalyzer service is actually not designed for audio files, quote: “Use the Tone Analyzer General Purpose model to monitor social media and other web data. Analyze short-form text like tweets and reviews, or longer documents like articles and blog posts”. Although we were not able to fully realize that idea, we kept it in mind and focused on the part we were able to do.
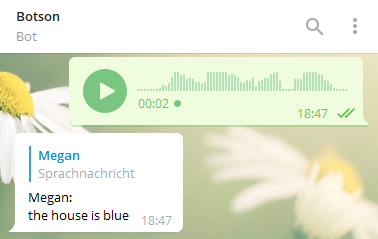
The Speech-To-Text service enabled us to at least convert audio messages to written text. This sounds quite good at first, but comes with flaws when you dig deeper. Only english audio messages can be converted to text and this text comes without punctuations, which can lead to misunderstandings. In addition there is an issue with providing data for Bluemix, but you will get more details on this topic later. Sure the service is not as perfect as we wished it to be, but considering the reaction speed and the results you get, it is pretty nice.
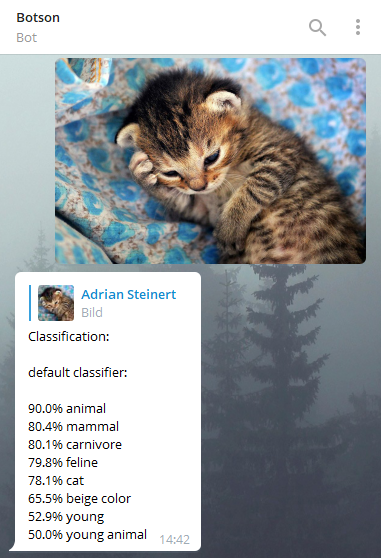
Now what if you see something you don’t know, but you can take a good picture of it? Maybe Botson can help you utilizing the Visual Recognition service with pre-trained image classification and face detection on top. If you send an image to Botson or in a group where he is part of, Botson tries to analyze this picture. If there are humans in the picture their gender and age will be estimated. In any case you get a list of recognized classes together with a confidence value which indicates how confident the classification decision was.
As mentioned earlier the issue with providing data for Bluemix applies to Visual Recognition as well but what is the meaning of this? Well the APIs of these services provide you with no other option than uploading a file to Bluemix. This results in a very clumsy way of making these services work. The Telegram API provides a URL to the audio messages and images sent in chat – don’t bother, they are only accessible for about an hour – so we need to download and save the specific file just to upload it to Bluemix in the next step. With respect to privacy protection there should be another way to do this and we hope Bluemix will deliver it in the future.
Our use case for the Language Translation services was a quick translation without switching to another app. As always with these services, they come with a thing. You get a huge amount of languages to choose from for source and target language. The problem here is that there are restrictions. A specific source language can be translated to a few specific target languages. You need to read the docs and check if your language in mind is supported. Because of this we were not able to choose languages as freely as wanted to and we couldn’t make use of the language identification utility provided by the service. Instead we chose to enable a fixed translation from English to German and vice versa.
Another Bluemix service (‘Continuous Delivery’) that we used did not aim to provide more functionality to our bot but rather helped in testing if new source code changes fail to build the application. This helped as well in automatically deploying buildable code and thereby separating our build and deploy stage among other improvements. We did not initially use the service but rather worked in a long way towards it. In the beginning we simply planned to use Liberty for Java as our cloud runtime environment which seemed to provide its own possibility of creating continuous delivery toolchains. Unfortunately we faced two problems quite early.
Firstly, working with Liberty for Java as our CloudFoundry application would have been somewhat of an overkill. It automatically provides you with an own domain and a web interface that we didn’t even want or need for our application use case.
Secondly and more importantly, there seemed to be no possibility of establishing a connection to our existing GitHub repository. Using Liberty for Java you could only use Bluemix’ own git environment. We could of course have imported our existing commits from GitHub to the Bluemix alternative and then work from there but we wanted to have this semester project visible and connected to our GitHub accounts for possible later use in job applications. Another idea was to work with the Bluemix alternative until the project is more or less done and then re-import it to GitHub. But since the commits would have to be made using our Bluemix accounts there would have been no connection to our existing GitHub accounts after re-importing.
But why was it so important to us to use a Continuous Delivery functionality for a small semester project anyway? In the beginning our process of getting new code changes to run on our environment wasn’t really efficient. After any implemented new code changes the application had to be built manually and locally using Maven. We then had to take our generated .jar file and deploy it manually as well to the CloudFoundry environment using console commands. As that process became quite tedious over time we dug deeper into such functionalities on Bluemix and found a dedicated Continuous Delivery service. That way we managed to integrate our existing GitHub repository the way we wanted so that deploys of the whole GitHub repository are triggered automatically by new commits to master.
Since our API credentials for the Telegram bot and all the Watson services were stored inside a local properties file up to now we had to find a new solution for that. After all we did not want that properties file to end up on our public GitHub repository. So from then on we could configure the processes in our toolchain to set those credentials as environment variables with every deploy. In the toolchain configuration you can even tell Bluemix that you want to connect some services to a certain application so that it will automatically take those particular credentials into consideration.
Problems
During our project we faced problems with one or two things like the Bluemix Interface. Here we get confronted with a buggy Login where you have to type your password twice. Also the long loading time isn’t very helpful.
If you want to develop in a group on Bluemix you have to create an organisation and invite your group members to that. This process isn’t intuitive as well.
Besides the problems with the Watson services we mentioned above there were two more. One was the outdated documentations where we had to find out how to use specific services on our own. The other problem was the regions where the services were restricted to. For example you get access to more Watson services in the United Kingdom than in Germany. So all our Watson services run in the UK because it’s the nearest point.
Of course we had also problems with the Continuous Delivery service. This service is available only in the United States but it is possible to deploy to other regions. Because we had all other services running in the UK we decided to deploy there as well.
The next problem was the phase configuration. This was difficult and counterintuitive. But we used it to solve another one. With every build and deploy process the manually added environmental variables were gone. To avoid this and the time-consuming addition we adapted the phase configuration of the deploy stage to our need. Unfortunately this comes with a disadvantage. You have more effort when there are code changes.
The last important problem was the Health-Check. It is set to ‘port’ by default. We had to change it to ‘process’ because we had no web service running. Otherwise the Health-Check would try to ping our application on a port and try to restart it, if it doesn’t get a response.
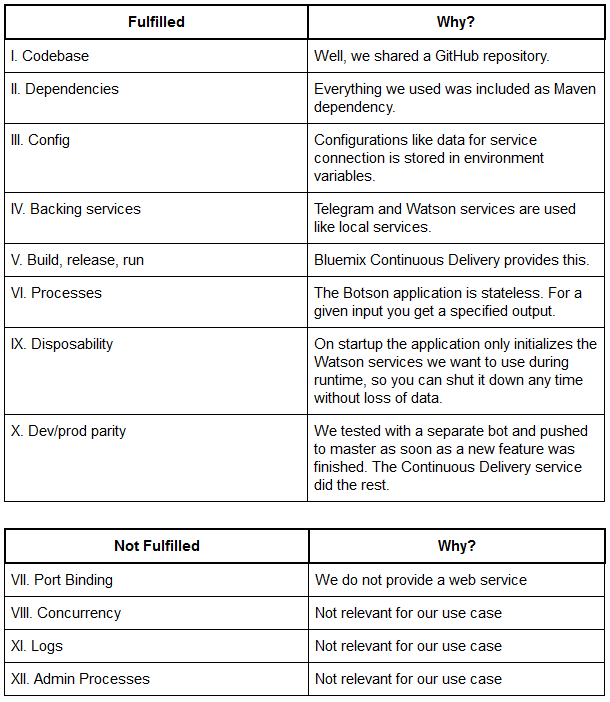
Botson regarding the Twelve-Factor App
If you want to run an application in the cloud smoothly there are a few basic methods you may want to pay respect to. There is a collection of these methods also known as the Twelve-Factor App. If you are not familiar with the Twelve-Factor App this site will help you out. The following table provides you with information about the methods we were using to realize the Botson application.
Conclusion
To put it in a nutshell it was interesting to develop software from a whole new point of view. Facing issues like how to work with configuration files in a cloud environment as well as debugging there and how to solve these problems. You need to think about things that you won’t get in contact with if you’re developing “standard” software. Question is: Would we work with Bluemix again? Now that we made our experience with it and know some strengths and weaknesses, we would if the use case is appropriate.
Unfortunately you won’t be able to check out Botson in action yourself, because we were using a test account for Bluemix as we created him. Nevertheless you can check out our GitHub project and resurrect your own version of Botson with the link provided below.
Thank you very much for your attention, curiosity and staying with us this far. Have fun checking out our Botson.
Related Links
Leave a Reply
You must be logged in to post a comment.