Welcome to our blog post ‘Moodkoala – An intelligent Social Media application’. The following provides an overview of our contents.
Contents
Introduction
– The idea behind Moodkoala
– Technologies overview
Technologies
– Frontend and Backend
– Bluemix Services
– Liberty for Java
– Natural Language Processing
– Tone Analyzer
– Language Translator
– Cloudant
– Mood analysis with IBM Watson
– Mood Analysis with IBM Watson Tone Analyser
– The Mood Analysis Algorithm
– Embedding the Tone Analyzer into the Java EE application
– Filtering Hate comments using Natural Language Understanding
– Natural Language Understanding
– Summing up text analysis
– Google and Facebook API
– Mood imaging analysis
Implementation
– Implementing the mood analysis algorithm
– Deserializing JSON Strings
– Implementing the Natural Language Processing API
– Implementing hate comment filter into the Java EE application
– Set up Google Sign-in
– Set up Facebook login
– Mood imaging implementation
– Configuration
– Docker and IBM Bluemix
– Gitlab CI
– Jenkins
Discussion and conclusion
– Discussion Moodkoala and 12 factor app
– Comparison to other cloud providers
– Conclusion
Introduction
Social media is becoming more and more important to people these days. Its use has risen by more than six times among the average american adult. This means that a lot more content is being published on social media. Because of this increased use, content from social media has a high influence on people. It is important to organize and filter this information. This is done to some extend. But most of it is done by humans.
We wanted to develop an intelligent social media app (name: Moodkoala) that can organize this large amount of content and is adaptable to the user’s mood.
With the increased use of cloud computing ‘as a service’, we decided to use IBM Watson’s cloud services to analyse text and rely on additional third party services for image analysis and image storage.
Our goal was to see what was possible with our automated social media content organization and which cloud service providers provide the best solutions.
The idea behind Moodkoala is to create a web app which reflects the emotions of a person. Every logged in user is able to create posts. The posts are being analyzed and tagged with a corresponding sentiment. Users can view the posts sorted by their emotion. Obviously users are able to comment these posts in the same manner. Filtering posts or comments for a desired mood is also possible.
The main idea is to reflect the user’s moods snd give the user the possibility to filter based on moods. On many websites such as Facebook and YouTube people often write hateful messages and offend other people. Insults occur more frequently and are only deleted when they are detected manually. We wanted to use these services to delete hate comments automatically. The users can also track their emotions on their profile. A statistic visualizes their activity and which emotions are most prevalent.
In addition to posting messages and interacting with other people, a user can get a custom Spotify playlist based on their mood. We get this mood from a photo the user takes. This image is analyzed by an image analysis service and the sentiment is extracted from the result.
To implement the app, we opted for a web app, so any user can use the software regardless of their operating system.
It was managed using Git as a version control system and many different frameworks, technologies and software.
A small impression of the used technologies and services is displayed below:
        - IBM Bluemix Cloud Service
        - Java EE (JSF and EJB)
        - PrimeFaces (Mobile)
        - CouchDB as Database
        - Tone Analyzer
        - Natural Language
        - Language Translator
        - Google API
        - Facebook API
        - Microsoft Emotion API
        - Spotify API
        - Minio API
        - Cloudinary API
        - Musicovery API
        - Docker
        - Jenkins
Technologies
In this section the technologies we used are presented and described in detail.
Our backend is based on two technologies: JavaEE as the framework and the Enterprise Java Beans (EJB), as a so-called component technology. These technologies can be easily integrated into the Bluemix cloud services.
On our frontend, we chose to use JavaServerFaces 2.2, a component based frontend framework. We used PrimeFaces and PrimeFaces Mobile as component libraries.
The downside of this approach was that we were stuck with the styling provided by PrimeFaces. There are different themes (CSS-Files) available. You have to pay for premium looking themes. You can create your own themes, but it proved to be difficult, because we had to override the PrimeFaces styles. That’s why we chose to stick with the default PrimeFaces styling.
We used IBM’s Websphere Liberty application server for local development. This server was recommended by IBM as being optimal for developing applications for their cloud. The related or subsequent deployment to the cloud was carried out with the provided IBM Bluemix tools.
For the implementation of our idea, we incorporated various services provided by Bluemix in our web app. For this purpose, we added these to our project using Maven.
<dependency>
   <groupId>com.cloudant</groupId>
   <artifactId>cloudant-client</artifactId>
   <version>2.9.0</version>
</dependency>
<!-- https://mvnrepository.com/artifact/javax.validation/validation-api -->
<dependency>
   <groupId>com.ibm.watson.developer_cloud</groupId>
   <artifactId>java-sdk</artifactId>
   <version>3.8.0</version>
</dependency>
<dependency>
   <groupId>com.cloudant</groupId>
   <artifactId>cloudant-client</artifactId>
   <version>2.9.0</version>
</dependency>
In the following, the services we use are described in more detail and the respective advantages and disadvantages are shown.
Liberty for Java
Liberty for Java is a highly customizable, fast, and very lean WebSphere Application Server profile. It was especially designed for Bluemix cloud applications. The deployment of the code (using the Bluemix Tools) to the server was problem-free in most cases, but there were occasional internal server errors (AppClassLoader Error). These were caused by a faulty rendering of the PrimeFacesMobile components and could be repaired by restarting the server.
Natural Language Processing
Natural Language Understanding allows the user to perform a semantic analysis of texts. Keywords, emotions and relationships of a text a determined. In terms of emotions, it is possible to analyze specific phrases or the whole document.
However, since this service was not optimally adapted to our idea / application (analyzing social media), we decided against further use. Furthermore, only English texts could be translated.
Tone Analyzer
The tone analyzer provides the possibility of differences in tone, e.g. joy, sadness, anger and disgust. For this purpose, a linguistic analysis is used to identify a multitude of variants in tone on both the sentence and the document plane. Three types of tone are recognized / differentiated into text:
- Emotions (anger, disgust, fear, joy and sadness)
- Social characteristics (openness, conscientiousness, extroversion, kindness and emotional range)
- Language styles (analytical, confident and hesitant)
Because this service provides a more accurate analysis of the emotions, e.g. due to the linguistic analysis, it was used instead of the Natural Language Understanding. Furthermore, it was better suited for the analysis of social media.
Language Translator
The Language Translator can be used to translate texts (the source language must be known). In our application, it was used to recognize the language used. The so-called language detection was carried out before the analysis of the emotions, so that only English texts were analyzed. Otherwise, for example, mistakes occurred in the Natural Language Understanding.
Cloudant
The Cloudant NoSQL database is a Document-Oriented Database as a Service. The documents are stored in the JSON format. It is based on CouchDB and works very similar to it.
Since the Java Cloudant API, which was initially used, was not recommended by IBM, unexpected errors arose or did not work as expected. For example, some access URLs were out of date. This meant that the API could not access views.
For this reason, we used the HTTP API and the Java API to get the best of both worlds. To avoid confusion, we abstracted the core database access methods behind the DatabaseManager.
We first tried to access the data using queries. This is possible but not recommended. For this reason, we have created views (special to Cloudant) to access the data as needed.
public User getCurrentUser (String username)
    {
        List<User> users = databaseManager.getDb().findByIndex(""selector": { "username": "" + username + ""}",
                User.class);

        return users.get(0);
    }
public String getView (String designDocument, String name, boolean descending, int limit, int skip) throws IOException
{
String url = "https://"+ USERNAME +
".cloudant.com/" + database +
"/_design/" + designDocument +
"/_view/" + name +
"?include_docs=false&"
+ "descending=" + descending + "&"
+ "limit=" + limit + "&"
+ "skip=" + skip;
Request request = new Request.
Builder().
url(url).
build();
Response response = httpClient.newCall(request).execute();
return response.body().string();
}
When reading the data, it was important to ensure that the existing JSON strings were correctly deserialized.
Mood analysis with IBM Watson
One of the central aspects of the application was to analyse the general sentiment of a post. The user should be able to choose what types of posts they want to see.
The most difficult part of this is that each of the Watson services we used gives back a lot of complex data through JSON Objects. So what we needed to do was to simplify that.
We decided to put every post into one of three categories:
- Positive
- Negative
- Neutral
These broad categories are fairly simple to understand and pretty easy to extract from the data that the Watson services give us. Every user can instantly see what the general sentiment of a post is.
Also, it is pretty simple to filter these posts by sentiment since there aren’t many properties involved.
What we wanted to do with that is give the user the possibility to see posts depending on what kind of mood they’re in. For instance: if I’m sad or angry or something similar to that I don’t want so see posts of people complaining about things or people arguing with each other about unimportant topics. The only thing that’ll do is bring me down even more. What I definitely want to see in that case are posts that are positive/uplifting or at least neutral.
On the other hand if I’m in a good mood I can handle negative posts.
Additionally, we wanted to automatically delete hate comments or posts. Those are comments with a lot of negativity and attitude (basically a lot anger and disgust in them). Though it could happen very easily that most negative comments/posts are wrongly classified as hate comments and therefore deleted. To avoid that we used a separate method to handle the hate comments before any analysis is made. More on that later.
To analyse the general sentiment we used the Tone Analyser Service.
To be able to analyse the text properly, it has to be in proper english. We wanted to leave the possibility open to classify the content by topic. That’s why we used the Language Translator to get the used language and throw exceptions if the wrong language is typed in or if the message is too short to be analyzed. Natural Language Understanding is used to make content-based analysis of the text (i.e. topics discussed) and tag posts with this information.
Mood Analysis with IBM Watson Tone Analyser
The Tone Analyzer analyzes a text based on social, emotional and language tones. You can get the image of what kind of personality the writer has, as well as what mood they were in when they wrote the text. The language analysis returns values based on the Big 5 personality traits. The analysis can be done on the whole text (document level) and also on every sentence (sentence level).
You can try every Watson service under https://servicename-demo.mybluemix.net/.
Example:
Our Example text is as follows:
I would say the biggest problem with PHP is that it is so easy to do wrong. Modern PHP has a lot of good stuff and I am going to try it again soon but older PHP has ruined a lot. There is so much bad outdated code, libraries, and tutorials that most people don’t know where to start when they learn.
I have heard this referred to as cowboy PHP. These coders tend to reinvent the wheel and it rarely works and has lots of security issues.
Modern PHP with a framework like laravel sounds pretty amazing to work on. I would choose it over Node in a heartbeat.
This is a post on reddit that discusses PHP being highly criticised. In my personal opinion the writer is not at all trying to criticize PHP as a whole, but only admits that it has some bad libraries and outdated code. Also in his opinion there are too many tutorials to effectively learn it. Still, he is being optimistic towards modern PHP frameworks like laravel and modern PHP in general.
So this reddit user is overall not very critical towards the subject, rather optimistic. My suggestion is that this post should be labeled as neutral.
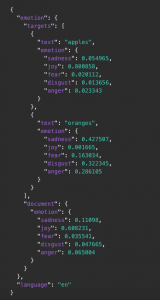
If we use the tone analyser on this text we get the following result:
{
"document_tone": {
"tone_categories": [{
"tones": [{
"score": 0.135708,
"tone_id": "anger",
"tone_name": "Anger"
},
{
"score": 0.062654,
"tone_id": "disgust",
"tone_name": "Disgust"
},
{
"score": 0.168413,
"tone_id": "fear",
"tone_name": "Fear"
},
{
"score": 0.654988,
"tone_id": "joy",
"tone_name": "Joy"
},
{
"score": 0.528533,
"tone_id": "sadness",
"tone_name": "Sadness"
}
],
"category_id": "emotion_tone",
"category_name": "Emotion Tone"
},
{
"tones": [{
"score": 0.053012,
"tone_id": "analytical",
"tone_name": "Analytical"
},
{
"score": 0,
"tone_id": "confident",
"tone_name": "Confident"
},
{
"score": 0.884138,
"tone_id": "tentative",
"tone_name": "Tentative"
}
],
"category_id": "language_tone",
"category_name": "Language Tone"
},
{
"tones": [{
"score": 0.616868,
"tone_id": "openness_big5",
"tone_name": "Openness"
},
{
"score": 0.065941,
"tone_id": "conscientiousness_big5",
"tone_name": "Conscientiousness"
},
{
"score": 0.141926,
"tone_id": "extraversion_big5",
"tone_name": "Extraversion"
},
{
"score": 0.117478,
"tone_id": "agreeableness_big5",
"tone_name": "Agreeableness"
},
{
"score": 0.467606,
"tone_id": "emotional_range_big5",
"tone_name": "Emotional Range"
}
],
"category_id": "social_tone",
"category_name": "Social Tone"
}
]
}
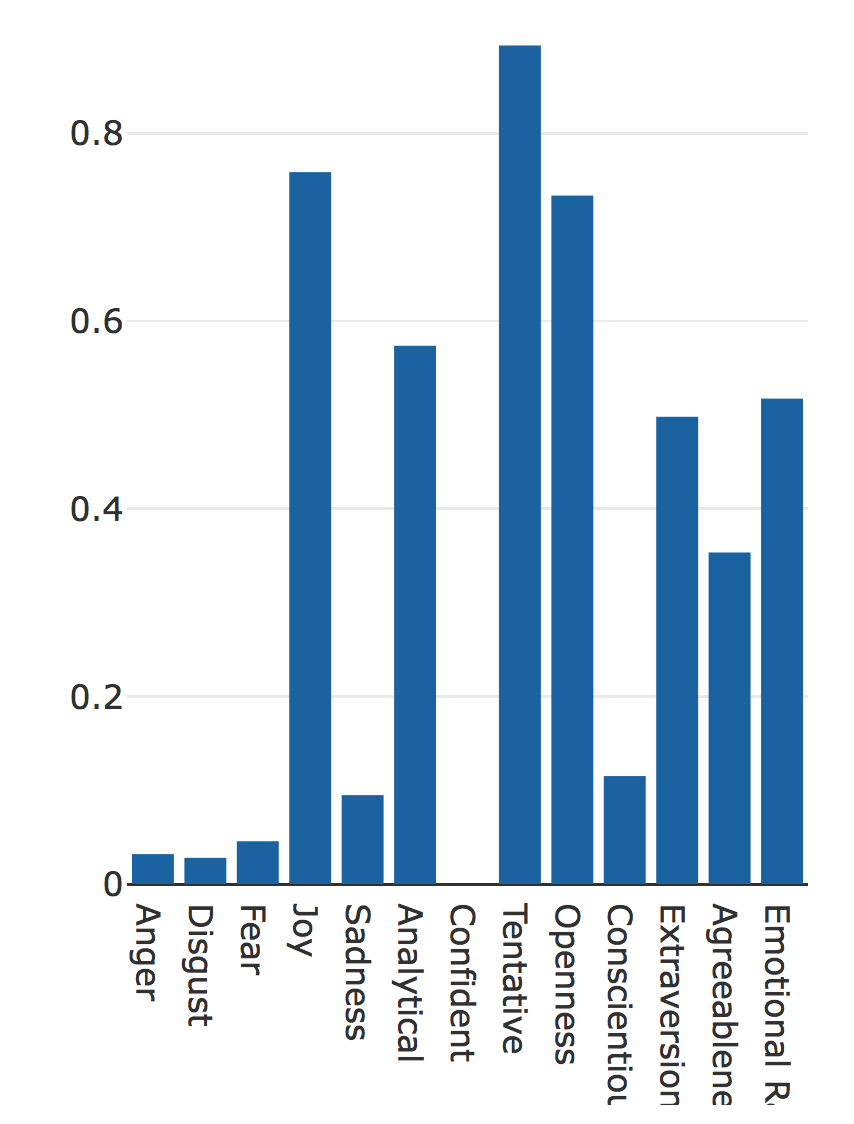
}The IBM demo gives us a graphical representation of the result as well, which is easier to understand:
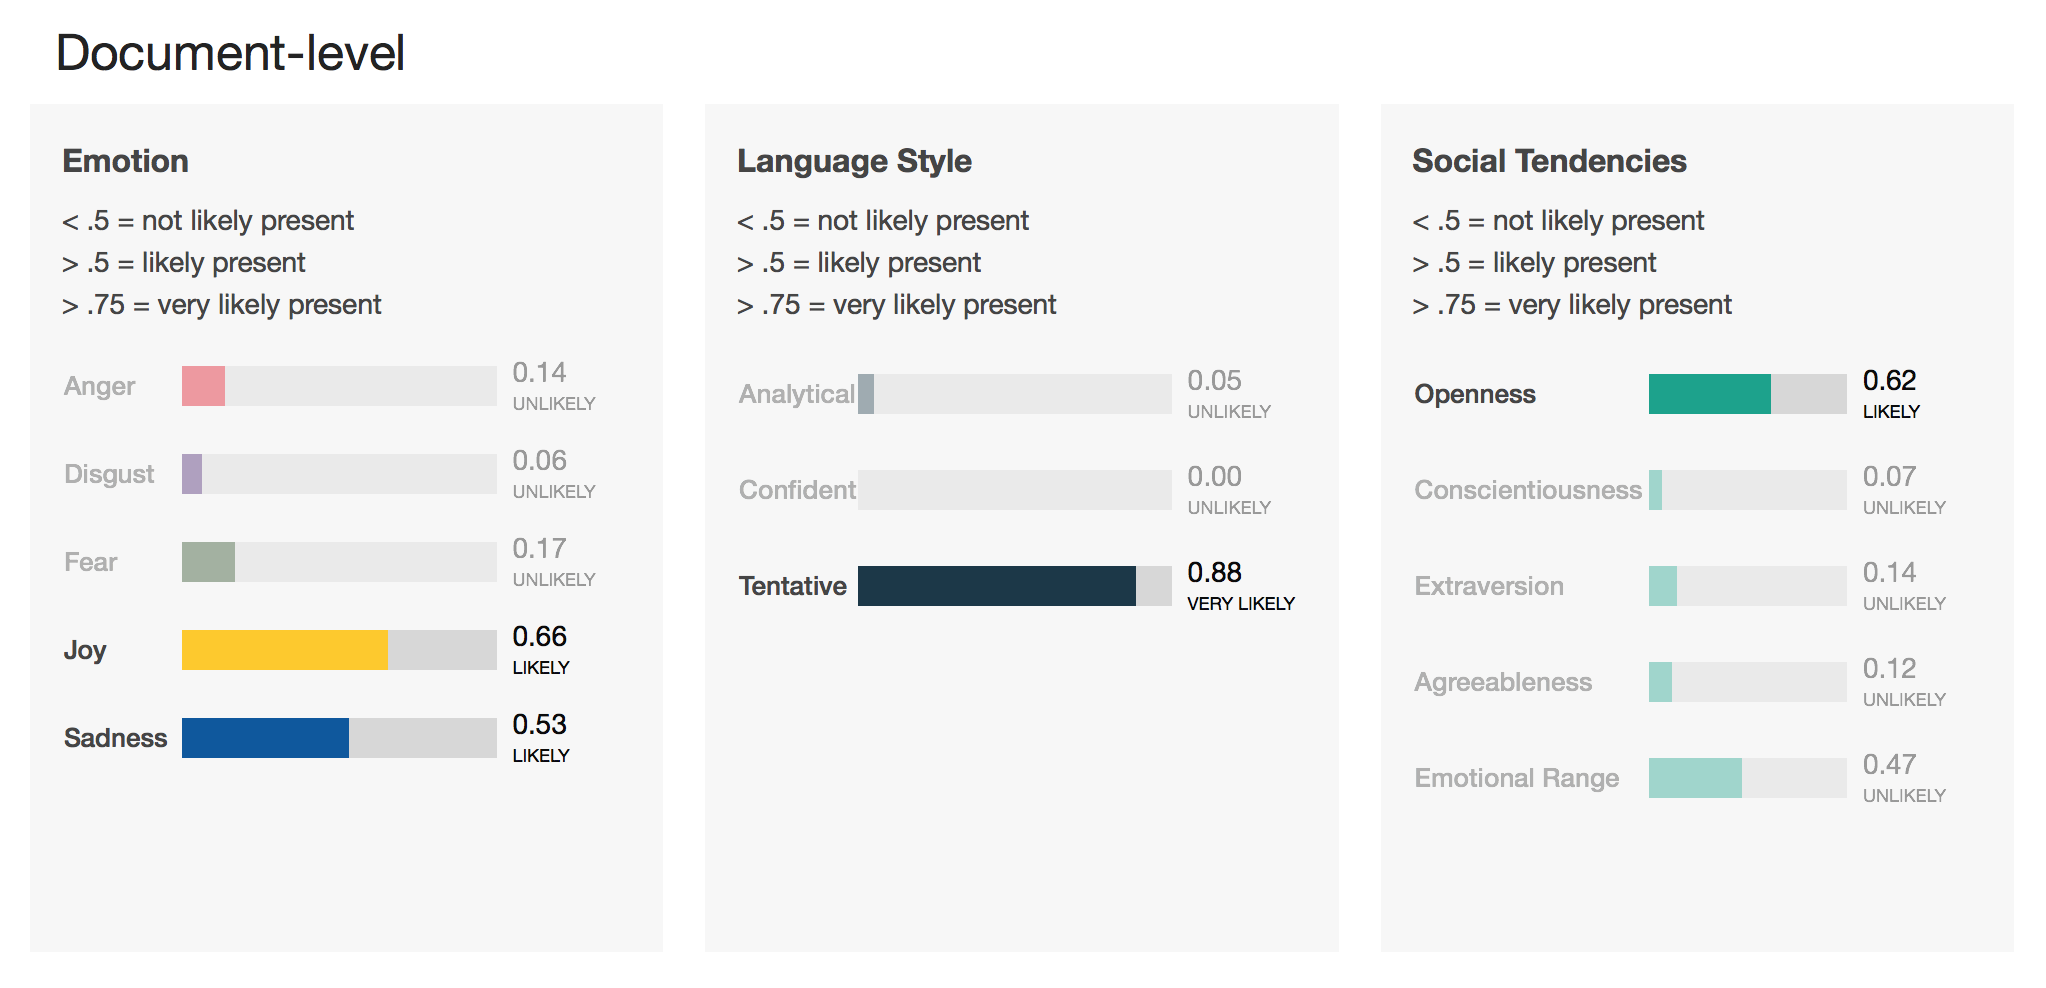
Our Tone Analyzer paints a clear picture of what is going on in this reddit post. This user is trying not to offend anyone, probably being aware that this is a touchy subject. You can see that in the language style (tentative has a very high rating). He displays an open minded rather than a close-minded or pragmatic personality. On an emotional level there is an equal amount of sadness and joy.
The problem is that you can’t exactly say whether this post is positive or neutral only by looking at the data. One thing is clear: it isn’t negative. But that doesn’t help much. That’s why we had to create an algorithm that is able to process this data and return a clear result.
The Mood Analysis Algorithm
We ran a lot of texts through the analyzer and found some patterns. Through these patterns we created an algorithm that interpretes the Tone Analyzer data and returns either positive, negative or neutral.
One side note: the social tendencies are not used in this algorithm at all.
It works as follows:
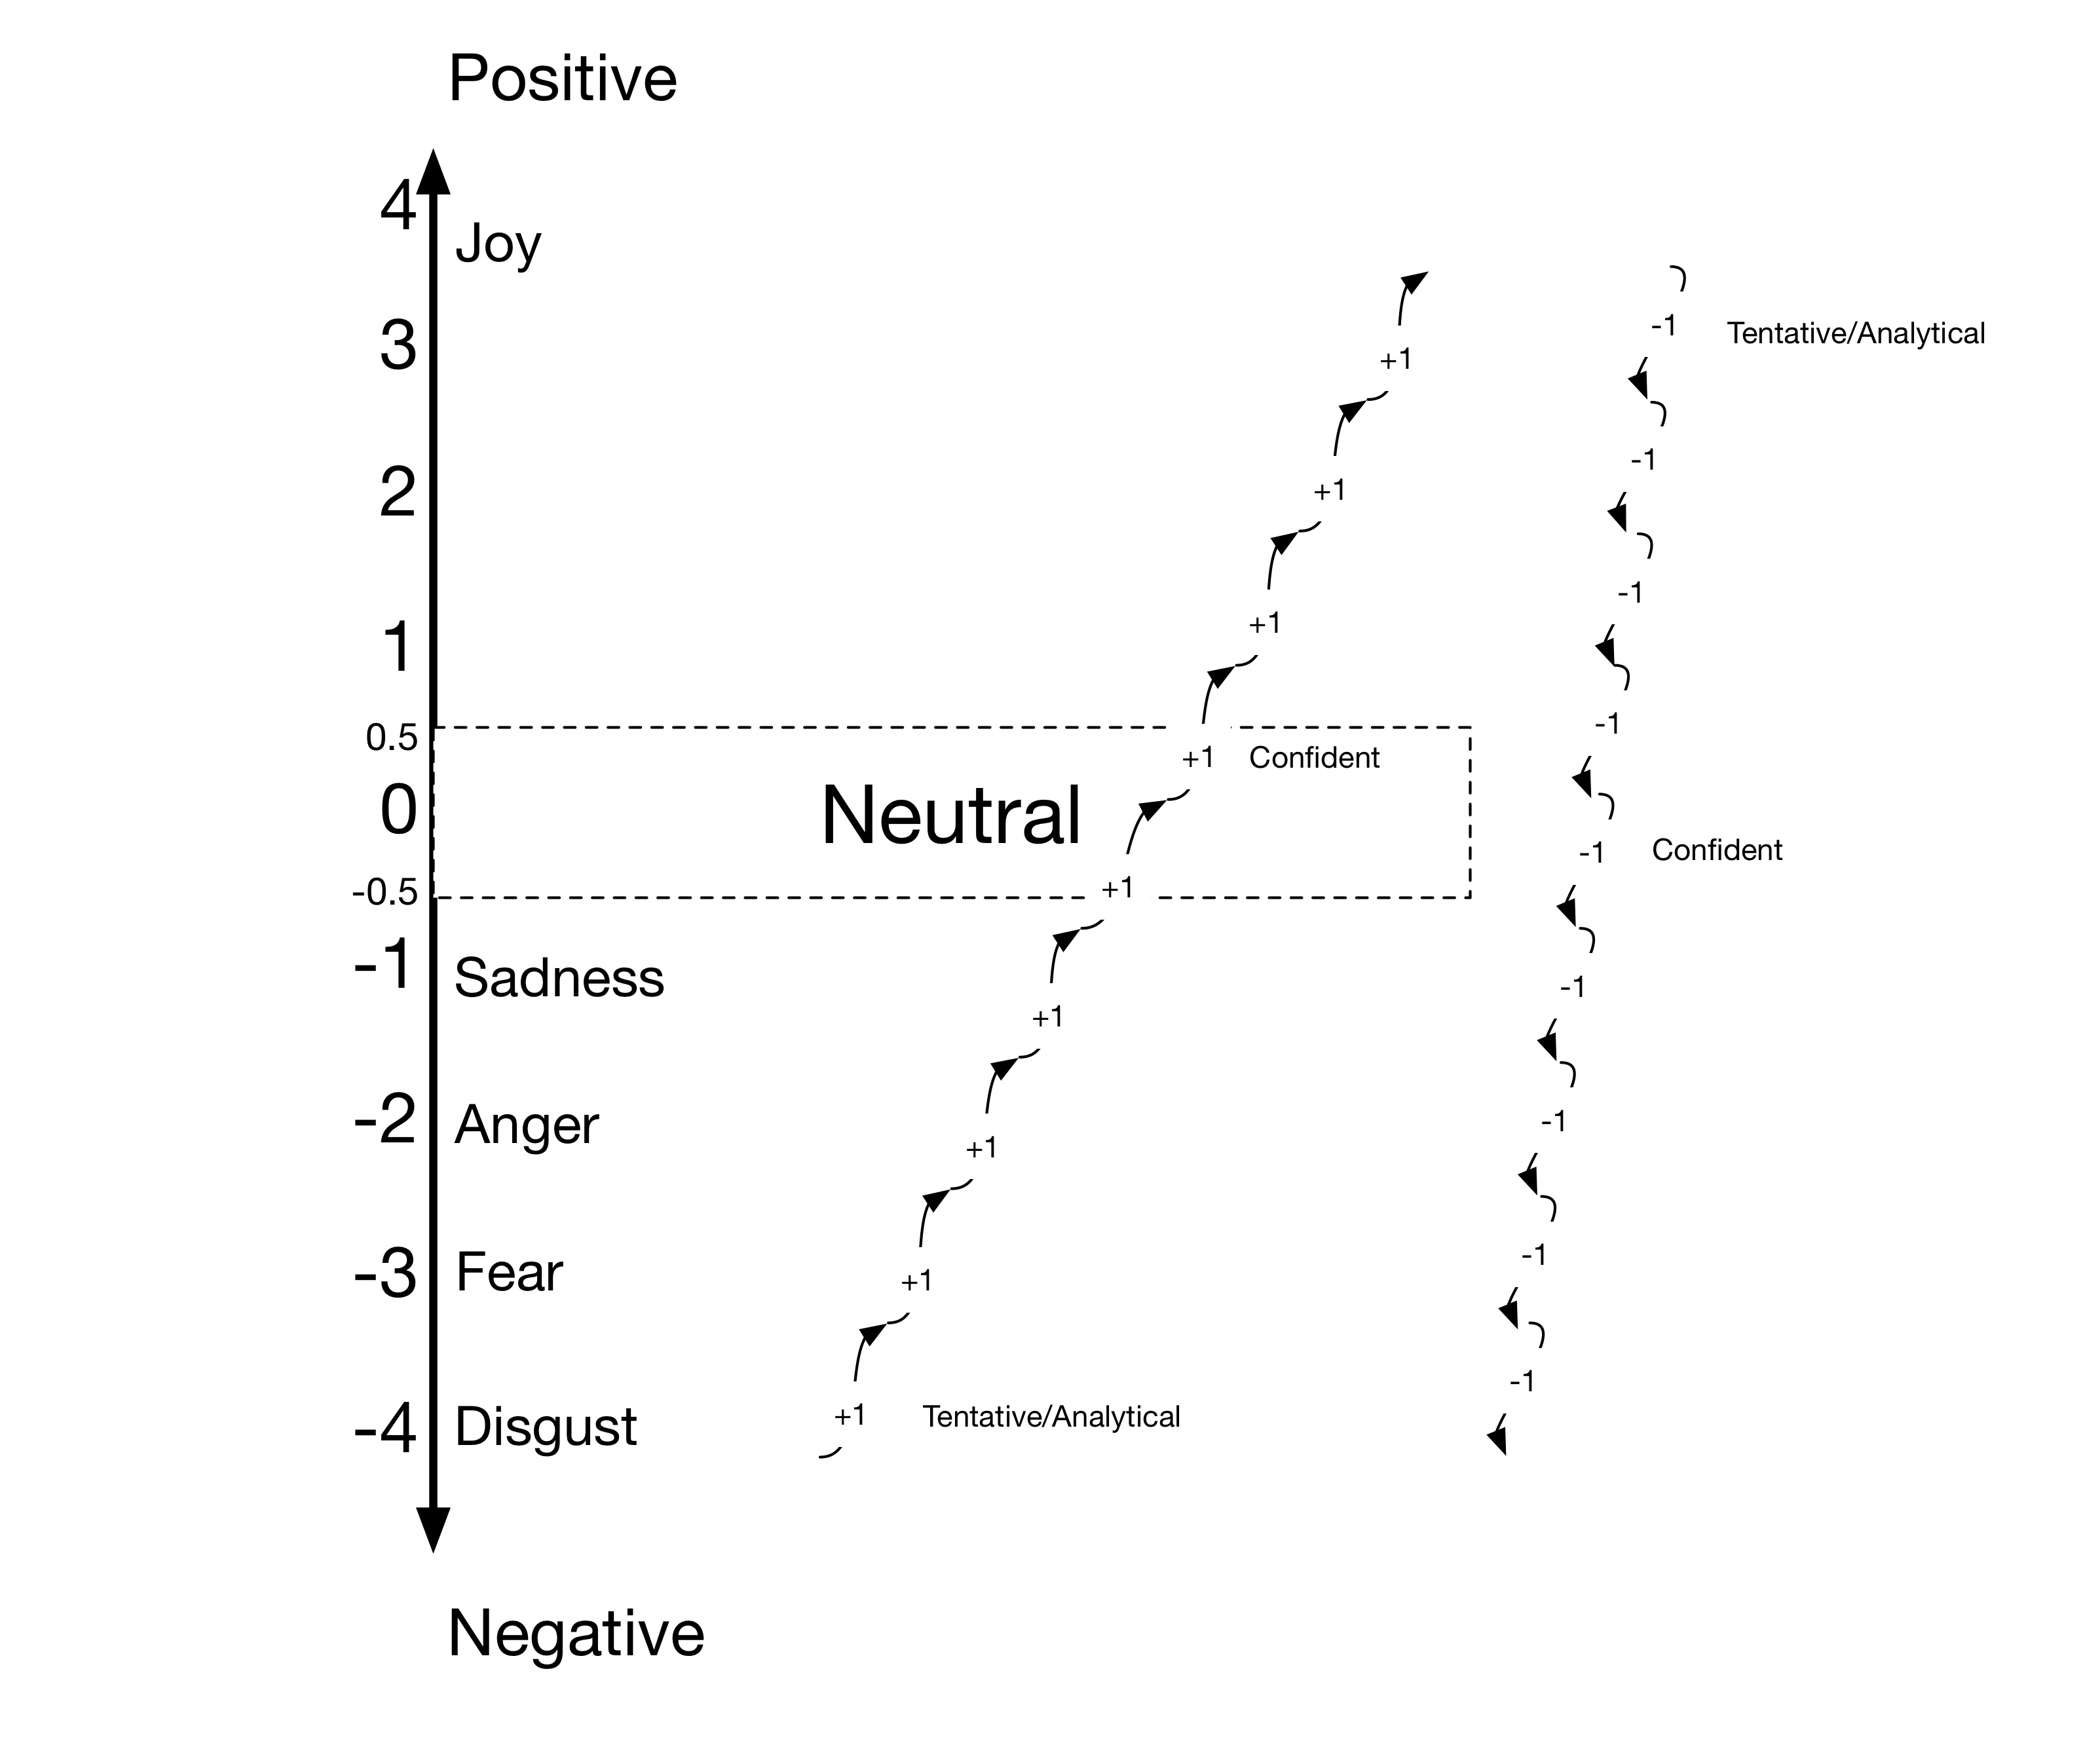
All emotions have a numeric value. The higher the value, the more positive it is. The higher the value the more positive it is. An emotion is added to the equation when its value is above 0.3. This saves us a lot of trouble because all emotions are present to some extend.
Likewise, every Language Style property is added if it is higher than 0.5. If there is more than one emotion present, we use their average numeric value. After doing that we get a value that we calculated based on the emotions.
Since you can express angry or sad emotions while still not being negative, we took the language tone into the equation as well. If the emotions-numeric is negative, we add one for every tentative or analytical language tone property. The reason for this is that if the general sentiment seems to be negative but the writer is pulling himself back and tries to argue neutrally, the text is perceived as neutral, not negative. For every confident language tone property, one is subtracted. The reason for this is that sad or angry tone with a lot of confidence is always perceived as spreading negativity in our examples.
If you’re being positive but have tentative or analytical language tone properties, the text is probably neutral. It still remains positive if joy is the only emotion detected in the text. It just may not seem as euphoric, because tentative or analytical always means that the writer pulls himself back. Also a positive and confident positive text is even more positive.
Tentative and analytical can add themselves up. Confident in combination with tentative/analytical properties never showed up in our texts, maybe because they contradict each other.
The neutral range starts at -0.5 and ends at 0.5. The final numerical value determines whether a text is positive, neutral or negative.
Example
Let’s run our Reddit post through this algorithm:
- Emotions
- Joy: value of 4
- Sadness: value of -1
- Language Style: Tentative
- Calculate the average value of the emotions: emotion = (4 – 1) / 2 = 1.5
- Emotion is positive
- The only language style property available is tentative. If we look at the diagram above, we can see that we have to subtract one.
result = emotion – 1 = 1.5 – 1 = 0.5 - Since the result is 0.5 we can see that this reddit post is neutral as expected.
Embedding The Tone Analyzer into the Java EE application
To use the Tone Analyzer in a Java EE application, we need to use IBMs Java API. There is also an HTTP API. So it is possible to use it with every programming language. It is more comfortable to use the Java API.
First, we need to create an instance of the service.
this.toneAnalyzer = new ToneAnalyzer(ToneAnalyzer.VERSION_DATE_2016_05_19);
this.toneAnalyzer.setUsernameAndPassword(TONE_ANALYZER_USERNAME, TONE_ANALYZER_PASSWORD);
You need to specify the version of the API that you use for it to work.
To authenticate, we need to first generate some credentials on the cloud. We don’t want them hard coded in our app. So we need to save them as environment variables and access them from the application. Environment variables can also be set on the bluemix cloud. That way the credentials are easily accessible in this environment, too. Every deployed application can use different cloud services (depending on the environment variables).
After the service has been initialized, we need to specify what kind of analysis it should run. In our case it should only run a document scoped analysis with social, language and emotional tones. We kept the social analysis to be able to use it in a later build of the application.
this.toneOptions = new ToneOptions.Builder().
    addTone(Tone.EMOTION).
    addTone(Tone.LANGUAGE).
    addTone(Tone.SOCIAL).
    build();
To run this service we need to make sure that it is connected to the cloud. It returns a JSON String. We deserialize this String into a custom Java object, which is called ToneAnalysis and return that.
public ToneAnalysis getTone(String text) {
    JsonParser jsonParser = new JsonParser();
    JsonElement jsonToneAnalysis = jsonParser.parse(toneAnalyzer.getTone(text, toneOptions).execute().getDocumentTone().toString());
    return Deserializers.deserializeToneAnalysis(jsonToneAnalysis);
}
Filtering Hate comments using Natural Language Understanding
Filtering hate comments is important if we want to keep any conversation online from escalating. To find examples for this, the only thing you need to do is look at the comment section of any YouTube video. Although some platforms are more prone to it than others, people on the internet are anonymous and therefore have less restraint. Normally, real people are needed to delete offensive content, which isn’t very effective considering the massive amount of text that is posted on most online platforms.
We tried to automatically filter comments and posts like that without anyone needing to manually delete them. We found that the easiest way to do that is to use the Natural Language Understanding Service by IBM. Its purpose is not to analyse text tone, but to analyse text meaning. That’s why we didn’t need an algorithm as complex as the one that analyses text mood. It would also be possible with the Tone Analyzer. However, we wanted to leave the possibility open to expand the filter on content based filtering and not be stuck with an analysis of the general tone of a text.
Natural Language Understanding
The API of the Natural Language Understanding Service works very similar to the Tone Analyzer API.
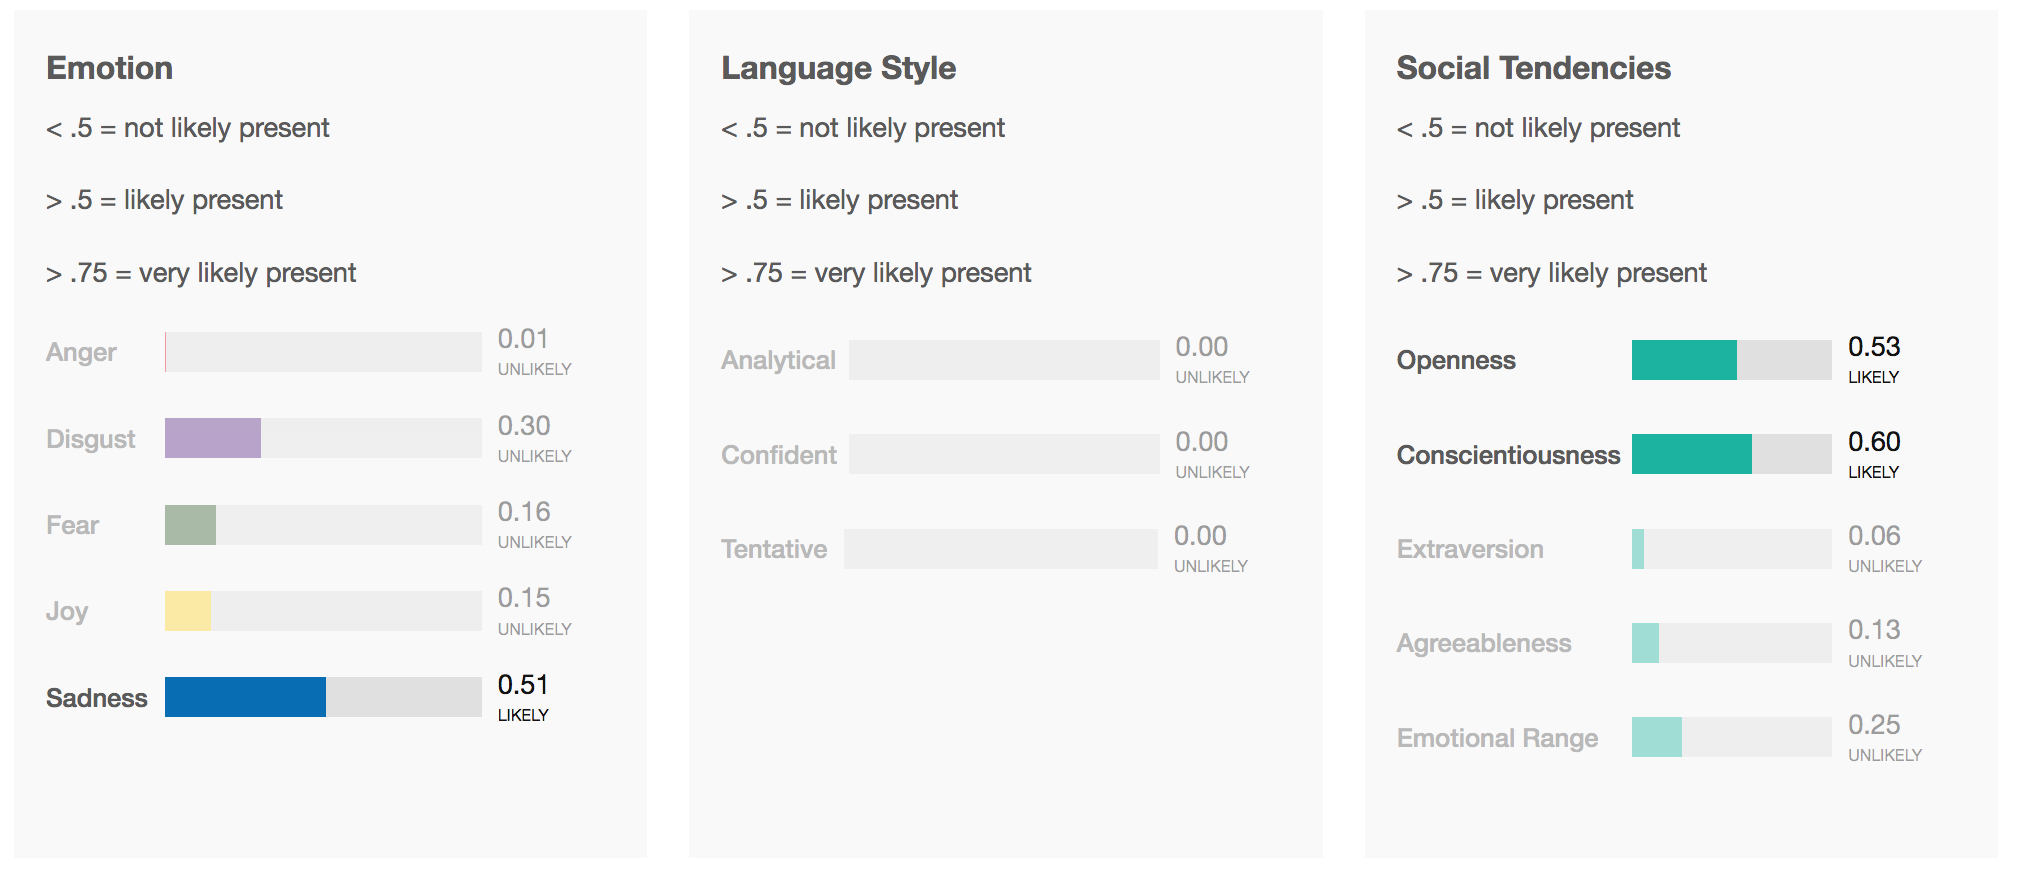
If we run our previously analysed text through the Natural Language Understanding service, we get a lot of different kinds of results.
First of, it returns an overall sentiment of the text:
{
    "sentiment": {
        "document": {
            "score": -0.0115505,
            "label": "negative"
        }
    }
}
Then, we get the emotions. In a way it is very similar to Tone Analyzer.
{
    "emotion": {
        "document": {
            "emotion": {
                "sadness": 0.528533,
                "joy": 0.654988,
                "fear": 0.168413,
                "disgust": 0.062654,
                "anger": 0.135708
            }
        }
    }
}
Also, we get frequently used keywords:
{
    "keywords": [{
                "text": "bad outdated code",
                "relevance": 0.973213
            },
            {
                "text": "Modern PHP",
                "relevance": 0.8045
            },
            {
                "text": "biggest problem",
                "relevance": 0.66206
            },
            {
                "text": "good stuff",
                "relevance": 0.573971
            },
            ...
And three Categories that the text could be tagged with:
{
    "categories": [{
            "score": 0.551908,
            "label": "/technology and computing/programming languages"
        },
        {
            "score": 0.353947,
            "label": "/business and industrial"
        },
        {
            "score": 0.258282,
            "label": "/technology and computing/software"
        }
    ]
}
The text has to have more than a few words. Otherwise, the service will return an error. That’s why this kind of service can only be used with texts containing at least one rather lengthy sentence.
To see whether a comment is hateful or not, we have to first check if the sentiment is positive or negative. If it is negative, we can progress to the next step.
If either the value of disgust or the value of anger is more than two times larger than the values of sadness and fear, we have a hate filled text.
The function looks as follows:
public static boolean isHaterComment(String text) throws ServiceResponseException {
    boolean isHateComment = false;
    LanguageProcessor languageProcessor = new LanguageProcessor();
    LanguageAnalysis languageAnalysis = languageProcessor.analyzeText(text);

    if (languageAnalysis.getSentiment() <= 0) {
        if (hasHighAngerRatio(languageAnalysis) || hasHighDisgustRatio(languageAnalysis)) {
            isHateComment = true;
        }
    }

    return isHateComment;
}
Summing up text analysis
There are many possibilities to use these services for our app idea. We could have done a lot more in terms of content based filtering. An idea we had was to analyse the user’s behavior and filter the posts accordingly. There are infinite possibilites that you experiment with.
When it comes to their accuracy, most of the time the services are correct. However, you can never be a 100% certain that a text is positive, negative or neutral. There is always room for interpretation. It depends on the person reading it. Some people would perceive a neutral post to be negative because it contradicts their views on a topic. We tried to design the mood analysis algorithm in a way that was logical and not based too much on pattern analysis. That’s one of the reasons we used the Tone Analyzer for that. What helped a lot were the analytical/tentative/confident properties. These enabled us to make the analysis a lot more accurate and less based on patterns and heuristics.
Still, it isn’t 100% accurate. And that can be a problem. If we want an intelligent social media app, we want a very high accuracy. The Tone Analyzer can’t process irony. That’s why a lot of playful joking would be marked as negative.
Example:
oml one time sprite came out of my nose and it burned ???
Apparently this text is very sad, eventhough it isn’t intended to be.
One problem with Natural Language Understanding is that it needs a lot of text to make a proper analysis. The Tone Analyzer only needs a few words. If you want to enable content based analysis and filtering, as well as tone based analysis, we need a lot of text. To find a solution for that can prove to be difficult, because you have to make the content analysis optional or come up with some other solution.
Given more time and resources, it is certainly possible to implement these services in a way that is better for a real life application. But you have to be aware that there are a lot of exceptions to be handled (like ironic texts). To see all of these exceptions to the rules, we would have to analyse a lot more texts. To integrate Natural Language Understanding in messaging system like YouTube, it would have to be optional and the hate comment analysis would have to be done using the Tone Analyser.
Moodkoala is therefore best for deep conversations rather than short messages.
What is astonishing though, is that it wasn’t too hard to build a basic intelligent social media app that works almost all of the time. The most difficult part is making it user friendly and handling exceptions to rules.
Everyone who wants to use the app needs to log in. For this purpose, each user can create an account on the login page of the app by clicking the register button.
Additionally we decided to support logging in with a Google or Facebook account (if available). In this case, the user does not have to create his own user account since he can use his Google or Facebook account to log in. Many websites and apps have been offering this possibility for a long time, as it is more convenient for the users. Google and Facebook offer an appropriate API for realizing this.
Google Sign-in API: https://developers.google.com/identity/
Facebook Login API: https://developers.facebook.com/docs/facebook-login
The procedure differs only minimally for both APIs. First, you need an account to use the APIs. Next, enter the domain / URL and then you get a public key and private key from the provider. The public key is then entered into the software.
We wanted our app to be able to take images of our users and determine their current mood based on these images. The resulting mood should be used to query a list of matching songs from Spotify. To accomplish such a complex task we divided it into the following steps.
1. Shoot or upload user images
2. Save user images
3. Analyze user images
4. Map the result of the analysis to songs on Spotify
5. Show the resulting songs
Before implementing, we did research to get an overview of the different ways to achieve our goal. In the following section, this overview is specified.
1. Shoot or upload user images
Since we were using PrimeFaces, our first attempt was to search on the PrimeFaces ShowCase website for documentation on how to shoot or upload an image. For shooting an image we found a very simple to use component called PhotoCam and for uploading an image we found the FileUpload component. The PrimeFaces examples are available here:
- https://www.primefaces.org/showcase/ui/file/upload/basic.xhtml
- https://www.primefaces.org/showcase/ui/multimedia/photoCam.xhtml.
Alternatively, we could have used plain HTML5 with JavaScript to upload an image or take a photo. HTML5 allows us to access webcam via video tag and the getUserMedia functionality. Uploading an image can be done with an Ajax request. The code HTML samples are accessible at http://jsfiddle.net/sBYHN/83/ and
https://jsfiddle.net/adiioo7/vjukm5fb/11/.
We did not want to store the uploaded images directly into our database due to performance reasons.
Additionally, we wanted to write textual data only in our database. That’s why we used an object storage service. Storage is a valuable resource and sadly most of the big Cloud Platforms like Google, Amazon, Microsoft, IBM do not provide free use of an object store or require a credit card number for identification. Neither of us had a credit card at our disposal. So we had to search for free object storage services. The following table displays the different Cloud Platforms and services we considered using as object storage to save our images.
| Minio Cloud Storage | Cloudinary | imagekit.io | Amazon | Microsoft | IBM | ||
| Java SDK | Yes | Yes | No | Yes | Yes | Yes | Yes |
| JavaScript SDK | Yes | Yes | Yes | Yes | Yes | Yes | Yes |
| Private Server | Yes | No | No | No | No | No | No |
| Pricing | 0$ | 0$ – (49$ – 549$)/month | 0$ – 19$/month | 0,023$ | 0,0245$ (50 TB) – 0,0235$ (450 TB) – 0,0225$ (over 500 TB) | 0,021$ (50 TB) – 0,02016$ (499 TB) 0,01932$ (4999 TB) | 0,09$ (50 TB) – 0,07$ (150 TB) – 0,05$ (over 501 TB) |
| Require Credit Card | No | No | No | Yes | Yes | Yes | Yes |
After realizing that we had to search for free to use object storage services we first came up with Cloudinary. Cloudinary offers image and video management on the cloud in the form of two varieties. The first one is a free plan and second one is an upgrade plan. If you want to use the upgrade plan, you can choose up to 250 GB of total storage and 1 TB of monthly bandwidth. The free plan includes a total storage of 2 GB and a monthly bandwidth of 5 GB. Cloudinary also supports image transformation by URL. E.g. if you have an URL to your image like this:
https://res.cloudinary.com/demo/image/upload/woman.jpg
You can now scale the image by simply editing the URL.
https://res.cloudinary.com/demo/image/upload/w_133,h_133/woman.jpg
You can also apply effects to it.
https://res.cloudinary.com/demo/image/upload/w_133,h_133,c_thumb,g_face,r_max/woman.jpg
Cloudinary supports a great variety of framework integrations and programming languages including JavaScript, Java, .Net, IOS, Ruby and Scala.
The second solution we found was Minio Cloud Storage. Minio Cloud Storage is a server application implementing the Amazon S3 v4 API. It is licensed under the Apache License 2.0, which permits us to free use. In comparison to the other object storage services, Minio Cloud Storage is a server itself, which allows us to host our own object storage. Additionally, Minio Cloud Storage may store any kinds of files, where Cloudinary on the other hand only supports images and videos. For a simple setup and deployment the server application is available as a Docker image at Docker Hub. A public accessible instance of the Minio Cloud Storage server can be reached at https://play.minio.io:9000/.
Setting up your own Minio Cloud Storage server is very straight forward. Using Docker you can simply run the following command.
docker run -p 9000:9000 minio/minio server /dataThis will pull the official Docker image minio/minio from Docker Hub if it is not locally available. Afterwards, Docker will start a new Container with a port mapping for the port 9000 and a data volume at the path ‘/data’ using this image. If the Minio Cloud Storage server is running, it writes a valid access name and key to the standard output. You can use these credentials to log into the local minio instance at http://localhost:9000/.
Similarly to Cloudinary, Minio Cloud Storage comes with SDKs for several programming languages including JavaScript, Java, .Net, Phyton and Go.
Imagekit.io is also a free Cloud Storage Service. Like Cloudinary, imagekit.io offers a free trial plan and a billable upgrade plan. The trial plan includes a total storage of 2 GBs, 5 GB of monthly bandwidth and 80.000 requests per month. Similar to Cloudinary, imagekit.io provides functionality to transform images via URL.
https://ik.imagekit.io/demo/medium_cafe_B1iTdD0C.jpg
https://ik.imagekit.io/demo/tr:w-700,tr:r-150/medium_cafe_B1iTdD0C.jpg
Compared to Cloudinary the image transformations take a bit longer to process.
Concerning support for SDKs of different programming languages or plugins imagekit.io covers Python, JavaScript/jQuery, a WordPress plugin and a REST API. So if we wanted to use imagekit.io in our Java application we would have to extend an existing Java HTTP client to access the REST API, since a Java SDK is currently not supported.
Image object recognition and further human face and emotion recognition is a difficult job to achieve. When it comes to analyzing images due to prior experiences in our studies we immediately thought of machine learning. One elegant and efficient manner of solving this kind of problem is using a neural network. A neural network has to learn its classification during a phase of supervised training with a lot of training data to be able to begin unsupervised classification. Since we did not have the resources to generate enough training data to train our own neural network, we decided to use service containing a pre-trained neural network to analyze our images.
When investigating human face recognition in addition to emotion recognition only a few Cloud Platforms provide a solution for this particular use case. The following table illustrates the most prominent cloud services for image recognition and compares them with respect to criteria like emotion recognition, multi-tracking and other requirements.
| Kairos | Amazon | Microsoft | IBM | Affectiva | OpenCV | ||
| Face recognition | Yes | Yes | Yes | Yes | Yes | Yes | Yes |
| Face recognition (video) | Yes | No | Yes | Yes | No | No | Yes |
| Emotion recognition | Yes | Yes | Yes | Yes | No | No | Yes |
| Emotional depth | Yes | No | Yes | Yes | No | Yes | No |
| Age & Gender | Yes | Yes | Yes | Yes | No | Yes | No |
| Multi-tracking | Yes | Yes | Yes | Yes | Yes | Yes | Yes |
| Creditcard | No | Yes | Yes | Yes | No | No | No |
The Microsoft Emotion API caught our attention first. On this demonstration website you are able to try the human face and emotion recognition yourself. As input, you need to either upload an image or you provide a URL to a web hosted image. As output, the Microsoft Emotion API returns a JSON string, which contains the number of recognized faces including a static spectrum of emotions with numerical scores between 0 and 1 representing the affiliation to the respective emotion. Let’s take a look at the following example. We looked up some sample images with a predominant emotion to be processed by the neural networks.
Happy pictures:


Sad pictures:


Neutral pictures:


Angry pictures:


Non human pictures:


We compared the Microsoft, Kairos and Google APIs using their demo websites.
Microsoft: https://azure.microsoft.com/de-de/services/cognitive-services/emotion/
Google: https://cloud.google.com/vision/?hl=uk
Kairos: https://www.kairos.com/demos
The Microsoft Emotion API recognized nearly every human face and emotion correctly. Only one of these sample pictures could not be recognized despite of a human face being shown. Also, the pictures of animal faces returned an empty response correctly. Kairos on the other hand did not recognize as many faces and emotions correctly. Additionally, Kairos subjectively needed more time to process the images than the Emotion API from Microsoft. The Google Vision API returns much more data than the prior APIs, but also requires a lot of time to process the images. Our sample pictures were recognized without any errors. However, due to a greater processing time and the aspect that Google requires a valid credit card in order to use their API, proper usage was hard to achieve.
| Microsoft | Kairos | ||
| Happy pictures | 1/2 | 1/2 | 2/2 |
| Sad pictures | 2/2 | 0/2 | 2/2 |
| Neutral pictures | 2/2 | 0/2 | 2/2 |
| Angry pictures | 2/2 | 1/2 | 2/2 |
| Non human pictures | 2/2 | 2/2 | 2/2 |
| Score | 9/10 | 4/10 | 10/10 |
4. Map the result of the analysis to songs on Spotify
Mapping a mood or emotion to query music is quite a non-trivial task to manage. Since searching songs by mood requires a database containing several songs already mapped to particular moods.
Building an own database mapping moods to songs would require huge amounts of processing time because every song to be stored would have to be worked beforehand by some kind of audio mood analyzer. Searching for backing services was also quite difficult due to this specialized use case.
While researching we stumbled on some promising applications like http://moodfuse.com/ or http://www.stereomood.com/ which might help us to solve this kind of problem. After a more detailed analysis of the source code, these applications turned out to not use any mood or emotion data to query the music at all. So we had to continue investigating. Finally, we found a service called musicovery.com which offers a music database to search by mood via two parameters. The two parameters are called trackarousal and trackvalence and have range of values between 1 and 1 million to express different moods. While the trackarousal value determines if the song will be either calm and smooth or very harsh and rough, the trackvalence value regulates, whether the song will be either sorrowful and sad or happy and uplifting. For example, with the following query only songs which are very calm and feeling good listed. In addition to the trackvalence and trackarousal values other parameters like the listener country, a certain decade and the track popularity can be specified.
When feeling more aroused and more energetic the trackarousal value can be increased.
Corresponding to the change the resulting list of songs adapted. Furthermore, musicovery.com offers a feature to add an id of a specific foreign music service like spotify, deezer, itunes or amazon music to each song, so the songs can be looked up quicker at the foreign music service. Unfortunately, this feature did not work and the song ids were not added to the returned songs.
Apart from this, we still wanted to establish the Spotify API in our app to show and play the suggested tracks. In order to query several tracks from the Spotify API the only option is to use the REST API endpoint ‘https://api.spotify.com/v1/tracks’, which allows us to enter an array of track ids for each requested song. Since the musicovery feature for returning foreign ids did not work, we needed to send a search request to spotify for each track returned by musicovery, which is very unfortunate.
Alternatively, we could have tried to use the last.fm API by mapping the mood to preexisting song tags. But in this case a numerical value mapping as with musicovery.com would not have been possible.
The outcome of the Microsoft Emotion API gave us a distribution of values for the different emotions but the Musicovery API requires input data in form of trackarousal and trackvalence values. So in order to combine both APIs we created our own mapping (similar to the Tone Analyzer mapping). The functionality of this mapping is represented in the following example. Imagine the image we saw earlier was processed by the Microsoft Emotion API.

A part of the result we receive contains the emotion scores which look similar to the following JSON document.
{
    "anger": 0.153076649,
    "contempt": 1.63173226E-08,
    "disgust": 0.0004185517,
    "fear": 0.00120871491,
    "happiness": 0.8409795,
    "neutral": 4.25880842E-07,
    "sadness": 0.0005652569,
    "surprise": 0.00375083764
}
An important fact for mapping or processing these kinds of JSON documents is that the above listed range of emotions is static and does not change. Knowing that we need two resulting values trackarousal and trackvalence with a value range between 1 and 1000000 we could split up and assign the different emotions to certain values. The following table shows the assignment of emotions we came up with for the particular trackvalence and trackarousal values. The emotions are sorted. So for example a high fear value should result in a low trackarousal value and a high surprise value should result in a high trackarousal value.
| Trackarousal | Trackvalence |
| Fear | Anger |
| Contempt | Sadness |
| Disgust | Neutral |
| Neutral | Happiness |
| Happiness | Surprise |
| Surprise |
Knowing this, a percentage distribution among the assigned emotions can be calculated. In case of our example the following values would result from the calculation.
trackArousalSum = 0.8463580464481
trackValenceSum = 0.9983726694208
| Assigned emotions | Distribution trackarousal | Assigned emotions | Distribution trackvalence |
| Fear | 0.15 % | Anger | 15.33 % |
| Contempt | 0.00 % | Sadness | 0.05 % |
| Disgust | 0.05 % | Neutral | 0.00 % |
| Neutral | 0.00 % | Happiness | 84.30 % |
| Happiness | 99.36 % | Surprise | 0.37 % |
| Surprise | 0.44 % |
Now, the assignment to the scale of the resulting trackvalence and trackarousal values has to be done. Next, we needed to match the assigned emotions to the range of values between 1 and 1000000. Therefore, we split up the range of values into the following three categories. We specified the influencing emotions for each category.
| Range of values | Emotions trackarousal | Range of values | Emotions trackvalence |
| 1 – 333333 | Fear Contempt Disgust | 1 – 333333 | Anger Sadness |
| 333333 – 666665 | Neutral | 333333 – 666665 | Neutral |
| 666666 – 1000000 | Happiness Surprise | 666666 – 1000000 | Happiness Surprise |
Next, we calculate the sum of the assigned emotions for each category. The category with the greatest sum of assigned emotions is selected. Afterwards, it is set in ratio to the range of values. So the higher the sum of the assigned emotions in category 1 – 333333, the lower will be the resulting value. Similarly, the higher the sum of assigned emotions in category 666666 – 1000000 the higher the resulting value. So in our example we get the following result.
| Range of values | Emotions trackarousal | Emotions trackvalence |
| 1 – 333333 | 0.15 % + 0.00 % + 0.05 % = 0.20 % | 15.33 % + 0.05 % = 15.38 % |
| 333333 – 666665 | = 0.00% | = 0.00 % |
| 666666 – 1000000 | 99.36 % + 0.44 % = 99.8 % | 84.30 % + 0.37 % = 84.67 % |
For both trackaousal and trackvalence values we select category 666666 – 1000000.
To set the values in ratio we need the overlaying percentage. Therefore we subtract by 33 % and divide by 67 % and apply the category. The final trackvalence and trackarousal would be calculated like this.
trackArousal = ((99.8 – 33) / 67) * (1000000 – 666666) + 666666 = 9990004.97
trackValence = ((84.67 – 33) / 67) * (1000000 – 666666) + 666666 = 923731.19
The selected songs would be feeling very good and exciting.
For displaying the suggested tracks from Spotify we wanted to be able to support as many platforms as possible. Ideally when running on a mobile device our app should trigger the Spotify app to play the selected tracks if it is installed. Similarly when running on a desktop computer our app should trigger the preinstalled Spotify client if it is available. Otherwise the Spotify Web Player should be used to play the tracks. To achieve such functionality we found the Spotify Play Button.
The Spotify Play Button is a HTML iframe tag which is very straightforward to set up. It only requires an URL to the Spotify track or playlist, a width and height to be embedded in your website. The following example shows the source code for a fully operational Spotify iframe and its result.
<iframe src="https://open.spotify.com/embed?uri=spotify:track:5FZxsHWIvUsmSK1IAvm2pp" width="300" height="80" frameborder="0"></iframe>Along with this neat HTML widget, we were able to show the resulting tracks in our app with Spotify support.
Implementation
In this section we state our way of realizing our features and our experiences we learned while implementing them.
The source files we created during the implementation can be found here on Gitlab.
Implementing the mood analysis algorithm
We need to create some collections to store the individual tone values. Also, we need to manually map the emotions to the numeric value that they’re given.
private List languageTones;

private List emotionTones;

private Map < String, Integer > emotionNumerics;

public TextMoodAnalyzer() {
    this.toneAnalyzer = new TextToneAnalyzer();
    this.emotionTones = new ArrayList < > ();
    this.languageTones = new ArrayList < > ();
    this.emotionNumerics = new HashMap < > ();
    this.toneAnalysis = null;

    this.emotionNumerics.put("Disgust", -4);
    this.emotionNumerics.put("Fear", -3);
    this.emotionNumerics.put("Anger", -2);
    this.emotionNumerics.put("Sadness", -1);
    this.emotionNumerics.put("Joy", 4);
}
This will initialize the mood analyzer. Before we can execute all the algorithmic steps, we need to call the API and deserialize the returning JSON String into a Java object. With that being done we need to add all of the tone values that are relevant for the analysis to the collections. Finally, we can execute the algorithm and return the numeric mood value.
private float analyzeMood(String text) {
    float emotionToneNumeric = 0;

    this.toneAnalysis = toneAnalyzer.getTone(text);

    // Going through all collected values and adding all language tones above 0.5
    // and all emotion tones above 0.3
    addValues();

    // Average all the numeric values of the emotions
    emotionToneNumeric = getAverageEmotionNumeric();

    // add/subtract language values
    return (float) emotionToneNumeric + addLangValues(emotionToneNumeric);
}
With all the calculations being done, what we need to do is to map the returned float value to one of the three mood states (positive/negative/neutral) and return the resulting state. We created a MoodState enum for that.
public Moodstate getMoodState(String text) {
    float moodNumeric = analyzeMood(text);
    Moodstate moodstate;

    if (moodNumeric > NEUTRAL_UPPER_BOUND) {
        moodstate = Moodstate.POSITIVE;
    } else if (floatEquals(moodNumeric, NEUTRAL_UPPER_BOUND) ||
                            moodNumeric < NEUTRAL_UPPER_BOUND &&
                            floatEquals(moodNumeric, NEUTRAL_LOWER_BOUND) ||
                            moodNumeric > NEUTRAL_LOWER_BOUND) {
        moodstate = Moodstate.NEUTRAL;
    } else {
        moodstate = Moodstate.NEGATIVE;
    }
    reset();
    return moodstate;
}
Every time a post is being made, the analysis runs and the resuls are saved in the database to later be filtered accordingly.
The Cloudant API maps Java objects to the database. Every user is saved as a seperate document. All information is essentially contained in the user object/document. That’s why we have to add the post we made to the currently logged-in user. Also, we have to add the analysis results to the Post object that is going to be added to the User object. Knowing that we have to send complete documents to update a document in the database, we send the updated user object with the added post to add one post including the language analysis data.
public void addPost(Post post) {
    LanguageProcessor languageProcessor = new LanguageProcessor();
    post.setLanguageAnalysis(languageProcessor.analyzeText(post.getBody()));

    this.user.getPosts().add(post);
    Response responseAddPost = databaseManager.getDb().update(user);

    // Refresh the rev ID to be able to access the object the next time
    this.user.set_rev(responseAddPost.getRev());
}
This is what one simple post from out of posts view looks like:
{
    "id": "9",
    "key": 1502310563437,
    "value": [
        "test",
        "test test",
        "hello hello. I am very happy, but also sad and suprised.",
        {
            "language": "en",
            "categories": [{
                    "label": "/art and entertainment/music",
                    "score": 0.707064
                },
                {
                    "label": "/shopping/retail/outlet stores",
                    "score": 0.000201069
                },
                {
                    "label": "/shopping/toys/dolls",
                    "score": 0.000201069
                }
            ],
            "sentiment": 0.0140318,
            "anger": 0.001416,
            "disgust": 0.008378,
            "fear": 0.051329,
            "joy": 0.119018,
            "sadness": 0.863275,
            "moodstate": "NEGATIVE"
        },
        "https://images.tagseoblog.de/bilder/bild-foto/bildsdfdsf.jpg"
    ]
}
Before we add a post, we have to verify that the post is in english. This can be done using the Language Translator by IBM Watson:
public String getTextLanguage(LanguageTranslator service, String text) {
    service.setUsernameAndPassword(USERNAME, PASSWORD);
    return service.identify(text).execute().get(0).getLanguage();
}
This way we can minimize the exceptions being thrown because of wrong language (or bad grammar).
String lang = translator.getTextLanguage(new LanguageTranslator(),
postModel.getPost().getBody());

    if(lang.equals("en")){

    ...
Deserializing JSON Strings
We used Gson for all of our JSON file handling. To deserialize a JSON String into an object, we first need a GsonBuilder. We need to register a TypeAdapter to implement the deserialization logic into the GsonBuilder. The logic is stored inside of a JsonDeserializer.
public static ToneAnalysis deserializeToneAnalysis (JsonElement toneAnalysisElement)
{
    GsonBuilder builder = new GsonBuilder();
    builder.registerTypeAdapter(ToneAnalysis.class, new ToneAnalysisDeserializer());
    Gson gson = builder.create();
    return gson.fromJson(toneAnalysisElement, ToneAnalysis.class);
}
This is what the deserializer looks like:
public class ToneAnalysisDeserializer implements JsonDeserializer{

    @Override
        public ToneAnalysis deserialize(JsonElement json, Type typeOfT, JsonDeserializationContext context)
        throws JsonParseException {

        final JsonObject jsonObject = json.getAsJsonObject();
        final ToneAnalysis toneAnalysis = new ToneAnalysis();

        final JsonArray jsonToneCategories = jsonObject.get("tone_categories").getAsJsonArray();

        ...

        return toneAnalysis;
    }
So basically we manually create an object and parse all properties from the JSON element into this object. It could also be possible to do this automatically, but most of the time the JSON structure delivered back from the database or the services isn’t equal to the object structure. Hence the manual deserialization.
Implementing the Natural Language Processing API
Creating the main object works similar to creating the main Tone Analyzer object. We have to authenticate the service via username and password and specify the version.
this.service = new NaturalLanguageUnderstanding(
NaturalLanguageUnderstanding.VERSION_DATE_2017_02_27, USERNAME, PASSWORD);
Then we need to specify which analysis options we want to use. These settings are stored in a Features object.
CategoriesOptions categoriesOptions = new CategoriesOptions();

EmotionOptions emotionOptions = new EmotionOptions.Builder()
        .document(true)
        .build();

SentimentOptions sentimentOptions = new SentimentOptions.Builder()
        .build();

this.features = new Features.Builder()
        .emotion(emotionOptions)
        .categories(categoriesOptions)
        .sentiment(sentimentOptions)
        .build();
Running the analysis works a little different from running the tone analysis, but is still very straight forward:
public LanguageAnalysis analyzeText(String text) throws ServiceResponseException {
    LanguageAnalysis result = null;
    AnalyzeOptions parameters = new AnalyzeOptions.Builder()
        .text(text)
        .features(features)
        .build();

    AnalysisResults response = service.analyze(parameters).execute();

    ...

    // Creating the LanguageAnalysis object and storing ToneAnalysis
    // and Natural Language Understanding results in it.
}
It can happen that the text is too short or written in the wrong language. If that is the case, a ServiceResponseException is thrown.
Implementing hate comment filter into the Java EE application
We wanted to filter every comment before it could be posted.
That’s why we used a JSF validator to prevent these texts from being sent to the backend. The user gets notified if a text is classified as being hateful.
To do that we needed to implement a custom JSF validator and let this validator validate both, the textfield for posting comment and the textfield for writing posts. If the text is recognized as being hateful, we throw a ValidatorException which is then caught by PrimeFaces and shown as a pop up dialog.
First, we need to create a custom JSF validator and name it accordingly. Ours is called de.mi.hdm_stuttgart.hatertextvalidator.
We need to implement the Interface javax.faces.validator.Validator.
The Object that is passed to the validate method is the string typed into the textfield. This string has to be validated.
@FacesValidator("de.mi.hdm_stuttgart.hatertextvalidator")
public class HatertextValidator implements Validator {

    @Override
    public void validate(FacesContext facesContext, UIComponent uiComeponent, Object obj)
    throws ValidatorException {

        if (obj instanceof String) {
            String value = (String) obj;
            boolean haterComment = false;

            FacesMessage msg = new FacesMessage("Warning", "Please don't be rude to others.");
            msg.setSeverity(FacesMessage.SEVERITY_WARN);

            try {
                haterComment = TextMeaningAnalyzer.isHaterComment(value);
            } catch (ServiceResponseException e) {
                msg = new FacesMessage("Info", "Text this short cannot be analyzed.");
                msg.setSeverity(FacesMessage.SEVERITY_INFO);
                throw new ValidatorException(msg);
            }

            if (haterComment) {
                throw new ValidatorException(msg);
            }

        }
    }
}
To use this validator, it has to be referenced from the textfield that it validates:
<p:inputTextarea value="#{postsController.postModel.post.body}" id="post"
        required="true"
        requiredMessage="Please type something in to make a Post">
    <f:validator validatorId="de.mi.hdm_stuttgart.hatertextvalidator"/>
</p:inputTextarea>
Also, this Textarea has to be within a form that needs to be updated on every submit to trigger the validation and also trigger the notification to pop up and show the error message:
<h:form>
    <p:growl id="growl" showDetail="true" sticky="true"/>
    <pm:field>
        ...
    <p:commandButton style="width: 100%;" action="#{postsController.makePost()}"
            value="Send" icon="ui-icon-check"
            update="@form" />

    </pm:field>
</h:form>
That concludes the text analysis algorithms.
On the Google Console API, which is shown at the image below, you can enter your URL.
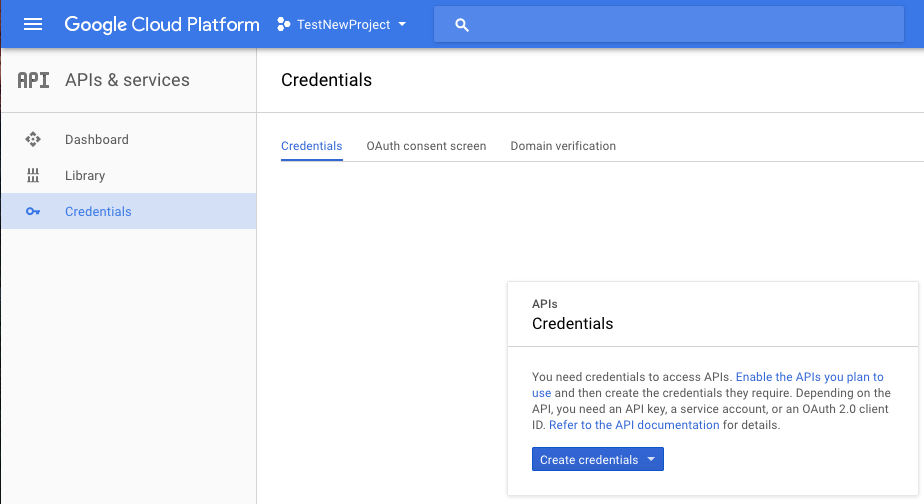
Go to the “APIs” section. In credentials, you can then create a new project and enter a product name under “OAuth content screen”. After clicking “Create credential” button, select OAuth client ID. In the next step you can select the application type (in this case it is a web application). You can enter one or several URLs under the respective project name.
The client ID is the public key, which must be included in the software. In the HTML file, the following is entered into the header area together with the client ID:
<meta name="google-signin-scope" content="profile email" />
  <meta name="google-signin-client_id"
            content="YOUR CLIENT ID.apps.googleusercontent.com" />
  <script src="https://apis.google.com/js/platform.js" async="async"
            defer="defer"></script>
Next, you have to bind the button with which the user can log in.
If the user clicks on the sign-in button a popup appears with which the user can login (of course he needs his Google Account). Then, a token is created with which you can get all data from the user.
For more information: https://developers.google.com/identity/sign-in/web/sign-in
The token is obtained on the frontend page and has to move it from the JavaScript code to the backend (Java). JSF does not work with servlets, so you cannot send the token with normal requests to the backend.
In PrimeFaces, you can create an invisible input field as part of a form. To transfer the token to backend we need to write it into the input field first. Then we can submit the form to send the data to the backend.
On the backend you can work with the token. To find the name of a person and to store such important data in the database (if the user is new) and pass the user a valid session.
Tokeninfo example:
{
 // These six fields are included in all Google ID Tokens.
 "iss": "https://accounts.google.com",
 "sub": "110169484474386276334",
 "azp": "1008719970978-hb24n2dstb40o45d4feuo2ukqmcc6381.apps.googleusercontent.com",
 "aud": "1008719970978-hb24n2dstb40o45d4feuo2ukqmcc6381.apps.googleusercontent.com",
 "iat": "1433978353",
 "exp": "1433981953",

 // These seven fields are only included when the user has granted the "profile" and
 // "email" OAuth scopes to the application.
 "email": "testuser@gmail.com",
 "email_verified": "true",
 "name" : "Test User",
 "picture": "https://lh4.googleusercontent.com/-kYgzyAWpZzJ/ABCDEFGHI/AAAJKLMNOP/tIXL9Ir44LE/s99-c/photo.jpg",
 "given_name": "Test",
 "family_name": "User",
 "locale": "en"
}
You can call the token endpoint with this URL:
https://www.googleapis.com/oauth2/v3/tokeninfo?id_token=XYZ123
https://developers.facebook.com
After you have created a developer account in Facebook, you can create a project just like Google and enter your URL. Afterwards, you also get a public key, which is integrated into the software.
In the following link you can customize and create a button, which should be used for the login – https://developers.facebook.com/docs/facebook-login/web/login-button?locale=en.
Afterwards the login functionality can be handled by these JavaScript API functions (https://developers.facebook.com/docs/facebook-login/web).
Firstly check the login status of the user, to determine, whether he is already logged in.
FB.getLoginStatus(function(response) {
    statusChangeCallback(response);
});
If the user is not logged in, the user logs in via the button. The following function is called:
function checkLoginState() {
  FB.getLoginStatus(function(response) {
    statusChangeCallback(response);
  });
}

FB.login(function(response) {
  if (response.status === 'connected') {
    // Logged into your app and Facebook.
  } else {
    // The person is not logged into this app or we are unable to tell.
  }
});
Compared to Google, where you get a token, you get the content directly (for example the name of the logged in person). The contents are then submitted to the backend and handed over the user as a valid session.
For testing with various Facebook accounts, you can create test accounts on the developer site from Facebook.
The functionality to take images of our users and determine their current mood based on these images was at first realized with the PrimeFaces PhotoCam and FileUpload components as well as with the Microsoft Emotion API. Since we were already using PrimeFaces with Maven we did not have to add any dependency to use the PhotoCam or the FileUpload component. Using the Microsoft Emotion API did not require any additional dependencies either, because we were able to reuse the HTTPClient from the org.apache.http package. The PhotoCam component was easy to integrate into our project. By adding the code snippets from the PrimeFaces showcase website, we were able to establish a basic functionality.
Similar to the example on the showcase website we held our PhotoCam HTML widget on the client side and a callback handler as part of a Java Bean on the server side. Whenever a user would click on the ‘capture’ button the callback handler on the server side would be called containing the captured image data as byte array. Then the images had to be uploaded. Therefore we started to use Cloudinary. Cloudinary comes with its own Maven dependency, which makes uploading images quite easy. Uploading data is basically done the following two lines of code.
Cloudinary cloudinary = new Cloudinary(baseUrl+username+”:”+password);
Map<String, Object> uploadResult = cloudinary.uploader().upload(data, ObjectUtils.emptyMap());
First, you need to connect to your Cloudinary backend service. A URL, a username and a password is required. Then you can call the uploader instance and upload your data e.g. as byte array. The resulting HashMap contains a persistent secure URL to the uploaded image, which can be accessed by the key ‘secure_url’.
This image URL is now handed to the Microsoft Emotion API. Similar to the Cloudinary API you need to connect to the service by specifying a correct URL containing the credentials. Using the org.apache.http package, this is done using the URIBuilder class. Afterwards, a HTTP Post request with the image URL is built and sent. The response is a JSON object containing the current mood based on the user image structured exactly as previously shown on the Microsoft Emotion API demonstration website.
To process the resulting mood and query a list of matching songs from Spotify we continued as follows. The JSON object with the key ‘scores’ is then handed to a function which maps the emotions to corresponding trackvalence and trackarousal values as described beforehand.
Since the execution of too many requests at the backend server may lead to high network traffic and performance issues we decided to source further requests out to the client side. The result of our own emotion mapping is stored into a JavaScript variable using the PrimeFaces RequestContext as follows.
RequestContext.getCurrentInstance().execute("var arousal = " + arousal + "; var valence = "+valence+";");These JavaScript variables are used to call the Musicovery API from JavaScript returning a list of tracks corresponding to the current mood. Due to the missing feature to receive track ids from Spotify using the Musicovery API we have to execute a search request to Spotify for each song in the list of tracks in order to get the track ids. With the help of the track ids and jQuery we are able to add the Spotify Play Button for each song found on Spotify.
Using the Spotify API and listing the tracks requires a Spotify Developer account and the user to be logged in. After setting up a Developer account you get a client id to identify your Spotify app. Additionally a redirect URL for logging in your users with Spotify is required. After a successful login with Spotify you will be redirected to this particular URL and Spotify will append the user specific access token as parameter to it. As stated in this Spotify login example http://jsfiddle.net/JMPerez/62wafrm7/ the redirect URL will fetch the access token and send it via cross-origin communication to the current page of our app. For security reasons the URL to the sender must be predefined. When the access token is received it is stored into a Session Object so the user does not have to login every time.
When implementing the functionality to add images to a post or a comment we thought it would be a relatively simple task because we already realized this feature of taking and uploading an image with the PhotoCam component before. Since the PhotoCam component was already operational we tried to duplicate it. Trying this we discovered the disadvantages of prebuilt PrimeFaces components. They seem to hide a lot of complexity and embedded code. For example while debugging the PhotoCam component we realized that PrimeFaces uses webcam.js in background and injects a JavaScript tag into the HTML file while initialization. We assume that only one PhotoCam component is supported due to the initialization process and the injected JavaScript tag.
When running two PhotoCam component instances at the same time only the last one gets initialized correctly. After some time of retrying, debugging, researching and reading documentation about the PhotoCam component without any success we decided to use replace the current PhotoCam implementation with a pure HTML and JavaScript solution based on the example represented earlier. This solution approach enabled us to make progress very quickly and easily create components for shooting images when creating a new post, creating a new comment or listing suggested tracks from Spotify. Replacing the PhotoCam component did also require us to change the backend side a bit. Instead of handling a predefined callback function we had to create an own callback function which we would call if the user clicks on the capture button at the frontend. Therefore we send the image in the form of an dataURL to the backend server. At the backend server the dataURL can be converted into a byte array. This way the function to upload the images to Cloudinary did not need to be changed. So in order to extend the creation of a new post or comment with an image we only needed to upload the images while processing the data at the backend. Adding the resulting image URL as separate field into the data object which is stored to the database will persistently assign the image URL with the post or comment. For displaying the posted or commented images we simply read the stored image URLs and added PrimeFaces graphicalImage components. The graphicalImage component contains an attribute ‘rendered’ which allows us to not render the HTML img tag if the read image URL is not set.
After our app was successfully running with Cloudinary as object storage we wanted to setup an own Minio Docker Container due to not being dependent on the Cloudinary service. Therefore we used the Minio Docker image we already showed earlier. So in order to deploy the Minio Docker Container we needed to upload the Docker image to our own image registry at Bluemix. Since Minio is an object storage server it requires a lot of disk space for storing the data. When running the Docker container a data volume can be mounted in addition. Bluemix offers the functionality to manage and create own data volumes by using the following command.
cf ic volume create minio_storageMounting a newly created volume into a container can be done by using the ‘volume’ option.
cf ic run –volume minio_storage:/export -p 9000:9000 registry.ng.bluemix.net/moodkoalaimages/minio:latest serverAfter the Docker container has been started successfully you can bind a public IP address to it when entering the web interface of Bluemix. When the public IP address was assigned the web interface of the Minio Server can be accessed by it using the port 9000. Our Minio instance is running here. For logging into the bucket management a username and password is required. These credentials are printed into the standard output when the Minio server starts and can be accessed with Docker using the command ‘logs’.
After setting up our own Minio server we wanted to access it and upload files to it. Therefore we used the Java SDK provided by Minio. Including it into our maven project was done by simply adding the particular Minio dependency. Setting up a code example is quite easy and very similar to other cloud service APIs we used before. The following example code demonstrates how to upload an image with the Java Minio API.
MinioClient minioClient = new MinioClient(minioURL, minioUsername, minioPassword);
// Check if the bucket already exists.
boolean isExist = minioClient.bucketExists(minioBucketName);
if(isExist) {
    System.out.println("Bucket already exists.");
} else {
    // Make a new bucket
    minioClient.makeBucket(minioBucketName);
 }
// Upload the image to the bucket with putObject
minioClient.putObject(minioBucketName, filename, inputStream, "image/jpeg");
When trying to run this sample code we experienced some difficulties related the local time of the executing computer. Using an URL for connecting securely via HTTPS to the Minio server and having a deviation in local time set on your computer leads to issues. We experienced this issue due to a dual boot configuration on our machine while developing. A synchronized local time at the executing computer is therefore a crucial requirement for connecting to a Minio server. First we assumed that in comparison to Cloudinary Minio does not offer persistent URLs to access the stored objects by default. Minio allows to generate pre signed URLs which expire at the latest in a week. So replacing the Cloudinary implementation with this option would require to store the bucketname and the filename into the database instead of an URL. Whenever a resource assigned with an image is being requested from the database a new presigned URL would have to be generated. By this means caching images from older posts would not be possible due to the continuously changing image URLs. Fortunately Minio offers a way to access objects via persistent URLs. Setting the bucket policy to public and prefixing the objects with the string ‘public/’ allowed us to get persistent URLs. Thus the adjustment regarding the implementation of Cloudinary was very manageable.
In addition to the previous way of deploying our application we also wanted to create an own Docker Container. Therefore we created a new Docker Image referencing the Websphere Liberty Docker image on Docker Hub https://hub.docker.com/_/websphere-liberty/. Since multiple versions of this image are available we decided to choose the one with the webProfile7 because it also comes with a preinstalled JavaEE7 version and support features required at a typical production scenario like app security, monitoring, ssl and web cache. In addition to the reference of this image we set the required environment variables to run our application. Deploying the application to the running container can be realized with the docker ‘cp’ or copy command. We copy a customized server.xml and WAR file into the running Websphere Liberty container and restart it afterwards. This way the new application is loaded and published by the Websphere Liberty server. After deploying and running the Docker container on Bluemix we experienced an issue we have seen before at a standard Java Liberty app on Bluemix. When pushing our application as WAR file to the JavaLiberty app an AppClassLoader exception due to JAR files we included appeared. Restarting the JavaLiberty app did solve the problem. Trying to fix this error we did a bit of search on the web and apparently it many people have experienced this behavior in different versions of the Websphere Liberty server. After several attempts of trying to configure the classloader properly and a lot of time, we were not able to solve this issue.
Due to quite a lot of backing services our app has a lot of connection URLs and credentials to access and authorize against them. For the sake of security, deployability and maintenance it is not recommended to hard code or write the credentials and connection URLs unencrypted into a configuration file. It is much smarter to store those values into environment variables at the particular machine where the application is deployed. Ideally the gap between a development and a production version of the application only relies on the configuration of the environment variables.
Since our app is based on Java and using Maven as build and management tool sourcing the connection URLs and credentials out into environment variables was quite easy. However different development platforms need to set up environment variables differently. So in order to make sure to set up the same environment variables on every platform we had to create shell or bash scripts for this task. Additionally Java reads the environment variables from a configuration file and does support reading environment variables after they were just set. Reading the environment variables with Java is very straight forward. The class ‘System’ maps the environment variable names to their values and makes them accessible via the method ‘getenv’. So simply by the following line of code a environment variable can be read.
String variable = System.getenv("variable_name");Since some of our app is written in JavaScript and HTML we needed to source connection urls and credentials out there as well, we used a Maven replacer plugin to exchange those values. Maven is able to read environment variables out of the box, simply by writing the following:
${env.variable_name}Ideally Maven should replace the values right before the Web Application Archive (WAR) is build. Transferring this to the maven build phases the proper phase to replace the values would be the ‘pre-package’ phase. Unfortunately when using the plugin at that phase the files with the replacements are overridden by the original ones. A workaround we used to achieve a proper environment variable replacement with maven is to create a separate configuration folder containing the template files with the tokens to be replaced. Then the maven plugin is executed and replaces the tokens with the environment variables. Afterwards the resulting files are replaced with the currently existing source code files. After executing this plugin the main maven build process is started to begin to build the WAR file. That way we can also replace tokens with environment variables in arbitrary text files with Maven when building the application.
For deploying multiple instance of our application we also needed to configure multiple apps at our Spotify developer account because one app only supports one host URL. Since we wanted to create multiple deployments with different host URLs we had to create one Spotify app for each one resulting in different client ids and different environment variables to be set at the various deployments.
Using Docker in combination with IBM Bluemix is quite easy after overcoming some issues during the setup. Bluemix offers an own registry for Docker images. In order to run Docker images in Bluemix you have to push your own local Docker images to the image registry from Bluemix. Therefore the Cloud Foundry command line tool with the IBM Container plugin has to be installed. Installing the Cloud Foundry tool from https://clis.ng.bluemix.net/ui/home.html is quite simple. At first, it was bit confusing that the two different types of command line tools Bluemix CLI and Cloud Foundry CLI were available. Each CLI comes with an own plugin to interact with the Docker and the IBM Docker registry. Since the IBM Bluemix documentation suggests using the Bluemix CLI to connect with Docker we tried this way first. Unfortunately we got stuck when setting a namespace for the IBM Docker images. When running the following command we received an error telling us that a connection to the backend service could not be established and we should try to connect a few minutes later.
bx ic namespace-set moodkoalaimagesRetrying and troubleshooting running the command did not help. So in order to connect to IBM Docker anyway we tried out the Cloud Foundry CLI by following the instructions mentioned in this IBM blog. After overcoming these minor problems with the Bluemix CLI we were able to interact with the IBM Docker registry using the Cloud Foundry CLI. Then we successfully pushed our first images to the IBM Docker registry and started to run some containers. After pushing a few more local Docker images to the IBM Docker registry we quickly realized the limitations of the IBM trial account. Our quota from one trial account was exhausted and we had to assign our images to two trial accounts.
Since we never built an own Contiguous Integration Pipeline before we first informed our selfs at https://docs.gitlab.com/ce/ci/quick_start/README.html to get a general overview about the topic.
Quickly we understood that the process is divided into the two components Gitlab Runner and the Gitlab Repository. The Gitlab Runner is a server which runs jobs specified at the Gitlab Repository at the .gitlab-ci.yml file. The Gitlab Runner server is available for different platforms. We chose the option to deploy the Docker image to IBM Bluemix so that it is available at all times. Until now the Gitlab Repository and the Gitlab Runner do not know each other. Connecting the two is fairly easy. When entering the Docker Container interactively you are able to register the runner at a Gitlab Repository. Therefore connection credentials available at the Gitlab Repository have to be entered. After the Gitlab Runner and the Gitlab Repository are connected we may add the .gitlab-ci.yml file to define jobs. There are many options to run jobs. You can for example execute a bunch of shell commands directly on the Gitlab Runner or start and run a docker container for each job or build. In order to determine the execution order of the jobs you can define stages and assign those to the jobs. For deploying our application to Bluemix via Cloud Foundry CLI we created and pushed an own Docker image to Docker Hub available at https://hub.docker.com/r/moodkoala/cf_image/. We wanted to use the Docker for each job and at first it seemed work out quite well. But quickly we realized that the jobs we defined were not run on our own Gitlab Runner. Apparently by default a public Docker Gitlab Runner was connected to our Gitlab Repository running our jobs. After detaching this public Docker Gitlab Runner our jobs were executed by our own Gitlab Runner. Suddenly all jobs which worked fine beforehand failed. The reason for that was, we did not had installed Docker on our Gitlab Runner before. So we installed Docker and tried to rerun the Pipeline again but it still did not work. It turned out that our setup was responsible for this failure. Using Docker inside Docker requires the host resource /var/run/docker.sock to be mounted into the container. Since in our case the host of our Gitlab Runner is Bluemix and due to security reasons it is not recommended to share this resource we could not run Docker containers for each job. So after realizing this we created a new Docker image containing the pre-installed tools to build our application, run tests and deploy it via shell. After a bit of struggling with pre-defined environment variables we got our Gitlab CI Pipeline to work. The pipeline consists of four stages. The first one builds our application for our Docker deployment using Maven. The second one deploys the resulting WAR file to Bluemix via Cloud Foundry CLI. The last two stages do the same thing for building and deploying the application to our Java Liberty app in Bluemix. The deployed instances can be found here http://javacloudantappmoodkoala.mybluemix.net/ and here http://169.46.28.167:9080/JavaCloudantApp/.
In addition to the Gitlab CI we also wanted to get familiar with Jenkins CI. Since we already did quite well using Docker we wanted to stick with it too. So our starting point was Docker Hub to check whether we could use an existing Docker image of Jenkins or we would have to create one ourselves. First we used the Docker image library/jenkins:latest which did perform while running locally quite well. After running Jenkins in a container we wanted to know how to combine it with Gitlab next. Using the Gitlab Plugin it is possible to configure a connection to the Gitlab Repository. The required parameters like the URL to the Gitlab repository and a way for connecting to the repository need to be configured. In our case we had to set https://gitlab.mi.hdm-stuttgart.de/ as URL. In order to connect to the repository we created a new Gitlab API token and handed it to Jenkins. The configuration of a WebHook would require us to enter the publicly available URL of the Jenkins server. Since we were running the Jenkins Docker image locally this was not possible at that time. However by using this configuration we were able to create a new freestyle project. As source code management we configured our Gitlab repository URL. In order to be able to fetch the project files from the Gitlab repository we needed a way to authenticate ourselves. Therefore, we created a new ssh key pair and registered it at our Gitlab repository.
Since our application uses Maven to build we needed to install Maven via Jenkins first. After installing it the project could be configured to run a Maven build step. In order to read environment variables during the Maven build we needed to set them first at Jenkins. Environment variables can be configured globally at the Jenkins settings. For deployment to Bluemix we needed to install the Cloud Foundry CLI. Thereby we were able to add another build step to our Jenkins project. This build step would be execute commands at the shell. Credentials are required for connecting and logging in to Bluemix with the Cloud Foundry CLI. Not to hard code the credentials in shell commands we used the bindings feature to make the credentials accessible via environment variables. Since we were done configuring our build steps we could set an action to execute after the build. A neat feature of Jenkins in combination with the Gitlab plugin enables us to create an icon at each commit which represents the current build status. By enabling this feature we were able to view whether the current build failed or succeeded on the web page of our Gitlab repository. After that we were able to run and deploy our application with Jenkins. Still we were running Jenkins locally with Docker, so we wanted to deploy it to Bluemix. After pushing the Jenkins Docker image and running a container with an IP address binding we experienced that the container did fail quite often at random times. After a bit of research we found out that the Docker image we were using was a deprecated one and that this is a known issue. So we did update our Docker image to the latest version and we did not experience those random failures anymore. When we had our Jenkins Docker container successfully running on Bluemix and assigned a public IP address to it we wanted to set up the WebHook at Gitlab next. In order to set up a WebHook we needed to create a new WebHook at Gitlab using an URL like http://169.46.27.96:8080/project/Moodkoala/, according to the documentation of the Gitlab Plugin. Since we already had a running Gitlab CI triggering on Git changes we thought it would be quite nice to configure our Jenkins to build and deploy our application frequently based on time. Using this code ‘0 8 * * *’ we tell Jenkins to build and deploy our application every day at 8 am. The deployed instance can be found here http://javacloudanttest1223234234234.mybluemix.net/.
Discussion and conclusion
In this section we want to discuss our application in comparison to the requirements of a twelve factor app. Also a summary about the cloud proviers is given. Finally, we conclude our blog post.
Discussion Moodkoala and 12 factor app
For managing the codebase of our app we used Git as version control system. Our codebase maps a one-to-one correlation to our app. Therefore with one codebase we are able to deploy multiple instances of our app for production like multiple Java Liberty apps and a Docker Container or for development on our local machines.
Related to dependencies our app makes use of Maven and therefore declares all its dependencies as a manifest in the form of a pom.xml file. For building our app the only requirement is a Java runtime environment with the version 1.8 or newer. The executable code will be generated by the deterministic build command ‘mvn clean install’.
As suggested by the twelve factor app our app is configured via environment variables. Simply because environment variables allow a very flexible configuration and setting up a production and development instance becomes very easy because only changing the values of the environment variables is required. For setting up our environment variables for the differing platforms and deployments we created a configuration folder at our codebase containing templates and shell scripts for setting up our environment variables at the deployments.
The backing services of our app like an object storage, a database, or image recognition service are addressed via a REST API which makes it easy to configure whether the attached resources are managed locally or by a third party. For example with the Minio SDK a local Minio server can be coupled to our application simply by changing the connection URL and the credentials required to access it.
The separation of the three stages build, release and run is guaranteed by using a Continuous Integration/Deployment tool like Gitlab CI or Jenkins. Though in our case both build and release stages are done using Maven. When building with Maven the required environment variables are configured in order to build the release for the particular deployment. At the run stage the execution environment will contain the predefined environment variables specialized for this instance.
Processes have to be scalable and not rely on the environment they’re running on for data storage. We never stored data on the local environment. Images were stored on Cloudant and Minio and normal data was stored on the database. The EJB beans are all stateless, while the JSF beans are stateful. All performance heavy operations (business logic, database operations) are executed by the EJB beans to make sure that this app is scalable.
EJB beans are highly scalable, while JSF beans aren’t. That’s why we use JSF beans only for GUI logic.
We never started any new processes during app runtime. Deployment on the local environment was handled by the application server. On the bluemix cloud, the process could also be restarted when changing some service configuration. The redeployment or rebooting doesn’t take long.
With respect to port binding our app is able to declare its own port the web service will be bound to. Using the configuration file server.xml we are able to tell the Websphere Liberty server on which port our app should have a binding. Therefore, our application could theoretically be used as backing service by other services.
In relation to Dev/Prod parity we tried to keep the three gaps (time gap, personnel gap and tool gap) as small as possible. To minimize the tool gap we used the same web server on our local development machines as in production as well as the same Docker image we used to deploy later on. Since we added our Continuous Integration pipeline a bit late to our project we had to manually deploy our application beforehand. Thus the Dev/Prod parity became a bit inaccurate. After setting up our Continuous Integration pipeline the gap between our production and development deployments was reduced to a minimum of changing environment variables.
In terms of logging we also have adhered to the twelve factor app’s guidelines. Logging the output of our application to the standard output comes with great flexibility. You can either redirect the output into a log file, or you can hand it to a analysis tool like Splunk or Elasticsearch, Logstash and Kibana.
We didn’t have any admin processes that we used to manage our app configuration. We used minimal in app configuration and relied as much as we could on external services like cloudant, that are accessible from every environment.
Comparison to other cloud providers
Before starting the development we looked at different cloud service providers to see which of fit our needs best. For this, Bluemix’s services were compared with those of Microsoft, Google and Amazon. The following overview shows the results of this comparison:
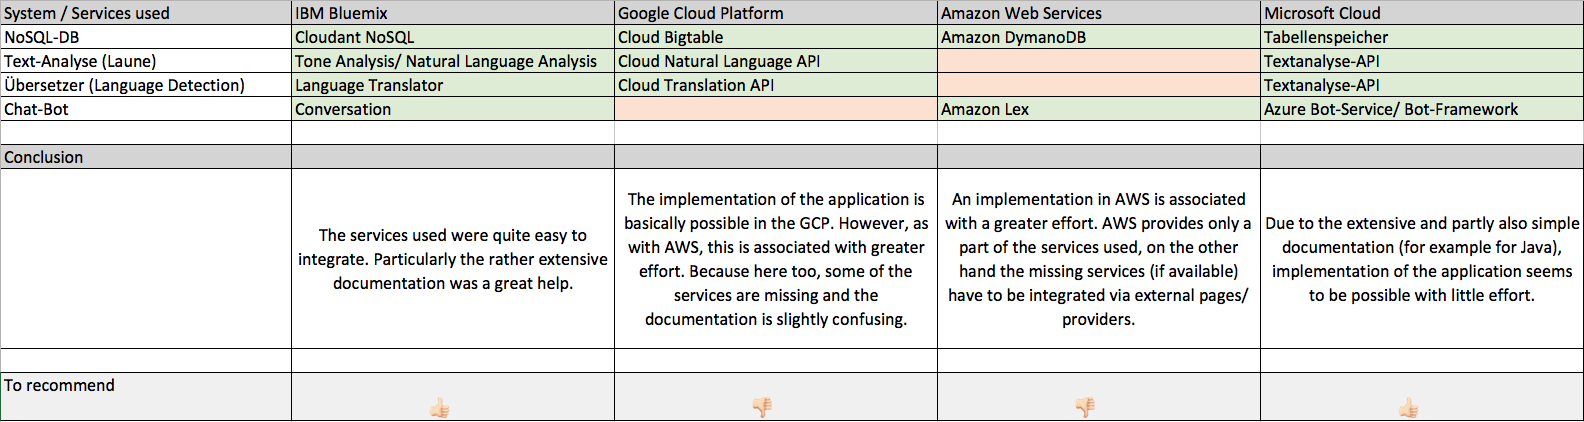
Moodkoala offers the user a social-media-application with which you can write posts and see with which mood it was written, the app also offers appropriate music, thanks to various cloud services which use artificial intelligence.
By the abundance of cloud services, one is inclined to try out many, which can lead to a problem, if one is dependent on many different providers.
We find that there is a lot of potential behind cloud services and you can quickly get a good software with it, since you do not have to program everything yourself, especially with regard to artificial intelligence. Cloud services offer a lot and are therefore a blessing for the respective Developer.
Creating this app was a very informative experience and made a lot of fun. Especially learning how to properly set up a project for long term maintenance including Continuous Integration and Continuous Deployment. We really appreciate the fact that we got to know and experience ourselves how cloud applications need to be designed and on which things we must pay attention the most in order to create an application for multiple deployments, instead of creating apps which will never be deployed once in any production scenario like in other lectures.
×
Leave a Reply
You must be logged in to post a comment.