Imagine a student who just got up. He knows exactly that he has lectures today, but he does not remember which one or even when it begins. So, he asks his Alexa device: “Alexa, which classes do I have today?’” His Alexa device is able to look into his timetable and answers: “You have five lectures today. The first lecture is Digital Media Technology and starts at 8:15 am in room 011, the second lecture is Web Development and starts at 10:00 am in room 135, the third lecture is Design Patterns and starts at 11:45 am in room 017. You can see more lectures in your Alexa app.”
This scenario is what we had in mind when we started to develop an Alexa skill which should be able to tell you information about your timetable.
General Information
Alexa, amazon’s cloud-based voice service, powers voice experience on millions of devices in the home. Alexa provides the possibility to interact with devices in a more intuitive way – using voice. By default, Alexa can give you information about the current weather, set an alarm or more. But Alexa has infinite abilities which are called skills. As a developer you can easily add your own skill with the Alexa Skill Kit. Before we get started let’s take a look at the components of an Alexa skill.
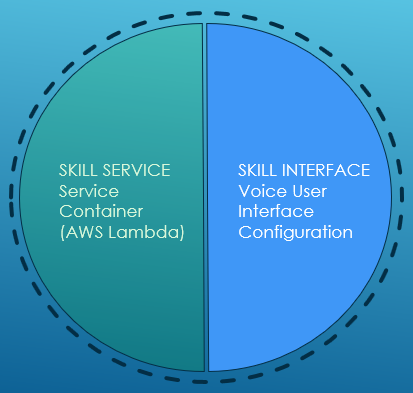
An Alexa skill consist of two main components: The Skill Service where we will write code and the Skill Interface which can be configured through the Amazon Developer Portal. (Figure 1)
The Skill Service will provide the functionality/business logic. It decides what actions to take in order to fulfill the users spoken request. You could use your own HTTPS Server or use AWS Lambda, which is Amazons serverless compute platform. It can handle HTTP Requests, sessions, user accounts or database access for example. For an Alexa skill we must implement event handlers. These handler methods define how the skill will behave when the user triggers the events.
The Skill Interface configuration is the second component of an Alexa Skill. It is responsible for processing the user’s spoken words. To be more precise: it handles the translation between audio from the user to events the skill service can handle. This is done within the interaction model configuration. This is where we train the skill, so that it knows how to listen for users spoken words. We define the words or phrases that should map to a particular intent name in the interaction model. We also define what intents the skill service implements.
The interaction between the code on the skill service and the configuration of the skill interface yields a working skill.
Getting started: Skill Interface
When you want to create an Alexa Skill you probably start with setting up your Alexa skill in the Developer Portal. To develop your own Alexa skill you have to sign up for a free Amazon Developer Account. Once you are signed in you can navigate to Alexa. The Alexa Skill Kit (ASK) is a free to use collection of self-service APIs, tools, documentation and code examples that you can use to quickly and easily add new capabilities which are called Skills. This part does not include any coding.
After clicking on Create Skill you must give your Skill a Skill name and set the language for your skill. The Skill Name will be the name that shows up in your Alexa App. The Amazon Developer Portal provides a simple skill builder checklist with all steps that need to be completed.
- The Invocation Name is a word or phrase that tells your Alexa enabled device which skill you want to trigger. It does not have to be the same as the skill name.
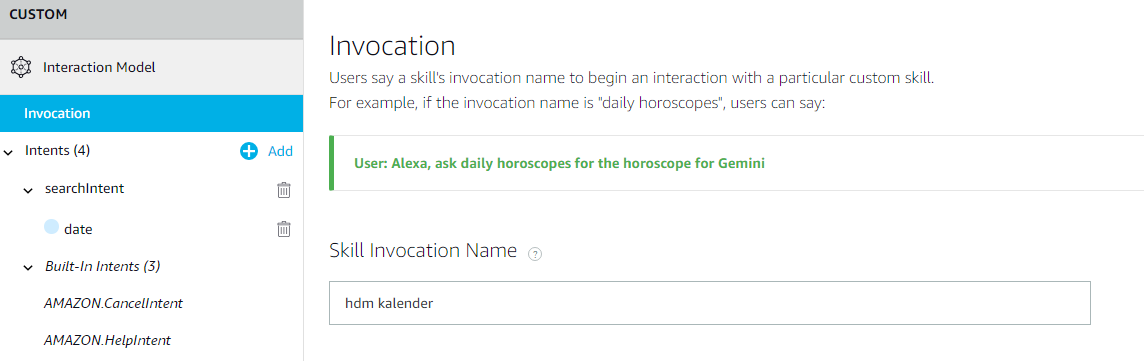
Figure 2 - Intents, Samples and Slots: An intentrepresents an action that fulfills a user’s spoken request. Intents can optionally have arguments called slots 1 Amazon offers built-in Slot types like AMAZON.EmailAddress which converts words that represent an email address into a standard email address. Samples or Utterances are phrases a User might say that are mapped to the intents. There should be as many representative phrases as possible.
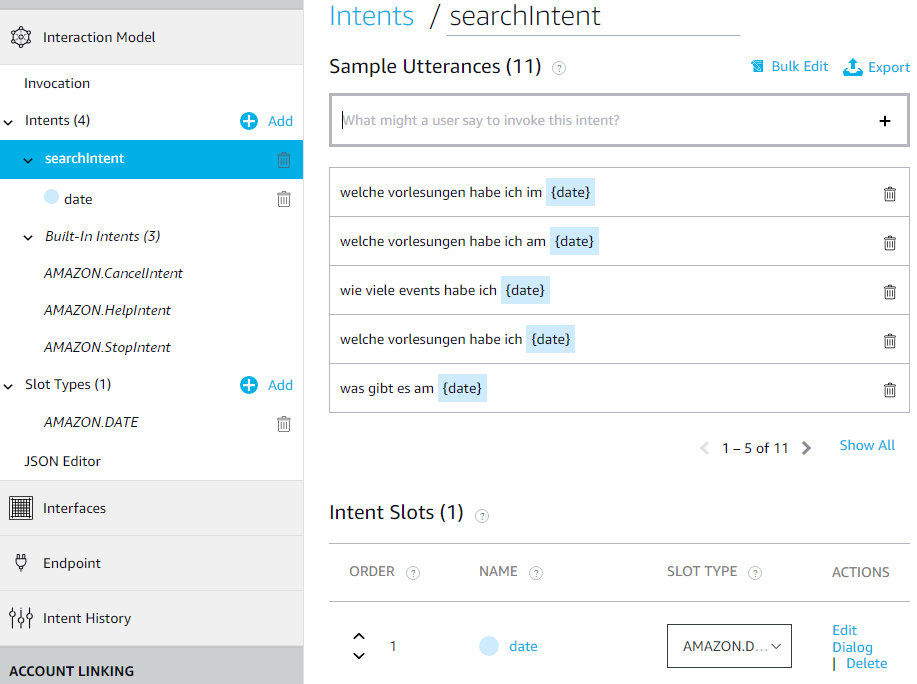
Figure 3 - Build Model: As you create and edit your skill save your work and validate, save and build your interaction Model. You must successfully build the model before you can test it.
- Endpoint: This is where you can configure your AWS Lamdba as Endpoint
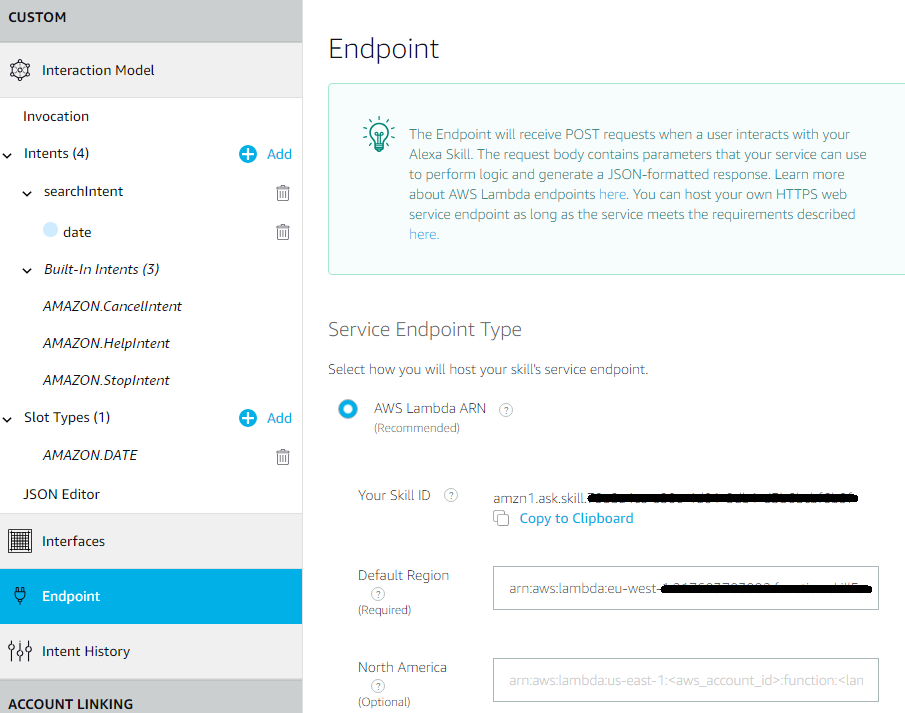
Figure 4
Skill Service
After we have created the intents for our skill within the Alexa Skill Kit, we have to create a new lambda function via the Amazon Web Service (AWS) services. To user AWS Lambda you must create an AWS account.
Various programming languages such as C#, Go, Java, Node.js or Python can be used for the AWS Lambda function. Amazon supports its developers and offers not only empty templates but also ready-made templates for use. In our example we chose the “alexa-skill-kit-sdk-factskill” for the template
After we have given the Function a suitable name and set the executing permissions, we receive an Amazon resource name (ARN) from AWS. The ARN is a unique identifier for AWS resources.This ARN must be entered as
the endpoint within the skill interface.
The ARN has following format:
arn:aws:lambda:eu-west-1:<Tenant-ID>:function:ical_startfunction
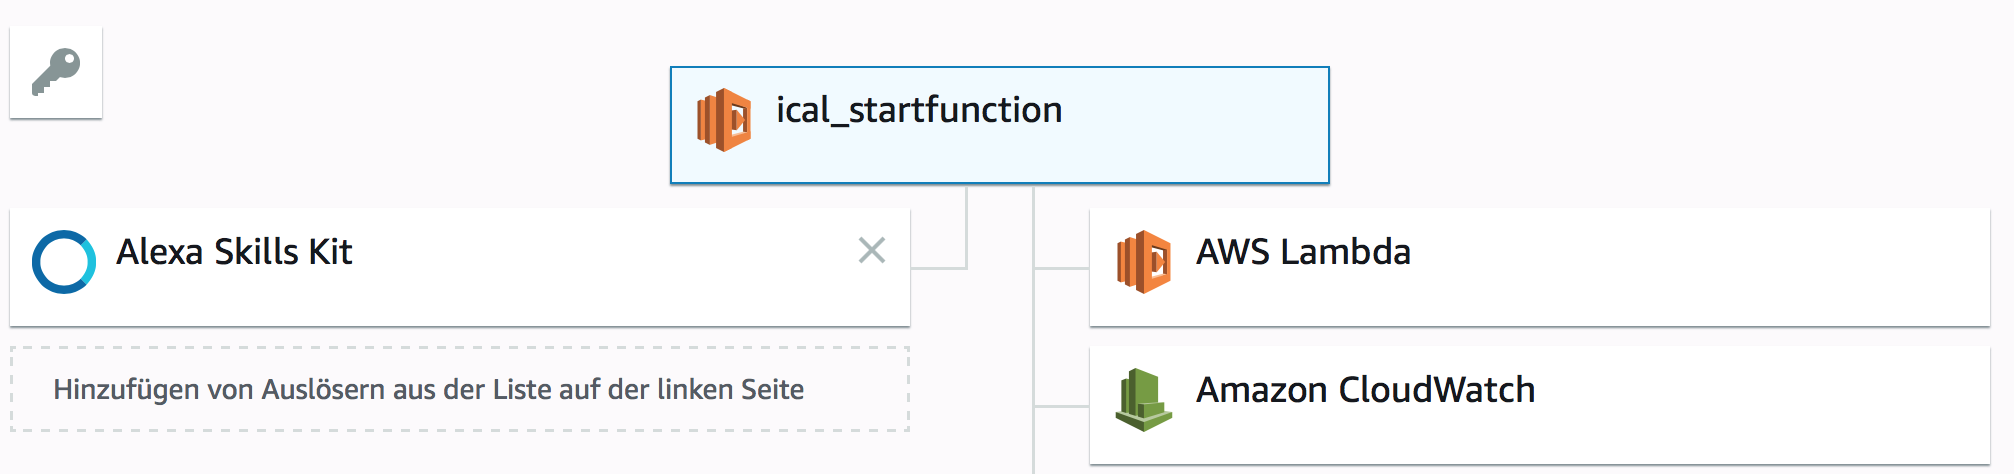
Now we need to tell the lambda function how it is triggered. Therefor we add the “Alexa Skill Kit” in the designer of the lambda function as trigger. To secure the function, you must insert the Skill ID of the Alexa skill into the trigger. So that the function may only be opened from a selected skill.
We started coding the AWS lambda function. In Node.js we use an Alexa handler that processes which Intent is called by Skill Kit. Depending on the incomming intent an event handler will be choosen.
Since we want to handle an iCal file, our program must be able to parse it. We found and used the appropriate iCal module in Node. That’s where we encountered the first problem. If you want to use an external module in Node.js you have to install it on the server. But it is not possible to install it in AWS Lambda and use it in the In-Line editor. Therefor we had to implement the code local, then zip it and upload it to AWS.
Here is the function to parse the events:
'searchIntent': function () {

        // Declare variables
        let eventList = new Array();
        const slotValue = this.event.request.intent.slots.date.value;
        if (slotValue != undefined)
        {
            // Using the iCal library I pass the URL of where we want to get the data from.
            ical.fromURL(URL, {}, function (error, data) {
                // Loop through all iCal data found
                for (let k in data) {
                    if (data.hasOwnProperty(k)) {
                        let ev = data[k];
                        // Pick out the data relevant to us and create an object to hold it.
                        let eventData = {
                            summary: removeTags(ev.summary),
                            location: removeTags(ev.location),
                            description: removeTags(ev.description),
                            start: ev.start
                        };
                        // add the newly created object to an array for use later.
                        eventList.push(eventData);
                    }
                }
                // Check we have data
                if (eventList.length > 0) {
                    // Read slot data and parse out a usable date
                    const eventDate = getDateFromSlot(slotValue);
                    // Check we have both a start and end date
                    if (eventDate.startDate && eventDate.endDate) {
                        // initiate a new array, and this time fill it with events that fit between the two dates
                        relevantEvents = getEventsBeweenDates(eventDate.startDate, eventDate.endDate, eventList);

                        if (relevantEvents.length > 0) {
                            // change state to description
                            this.handler.state = states.DESCRIPTION;

                            // Create output for both Alexa and the content card
                            let cardContent = "";
                            output = oneEventMessage;
                            if (relevantEvents.length > 1) {
                                output = utils.format(multipleEventMessage, relevantEvents.length);
                            }

                            output += scheduledEventMessage;

                            if (relevantEvents.length > 1) {
                                output += utils.format(firstThreeMessage, relevantEvents.length > 3 ? 3 : relevantEvents.length);
                                relevantEvents = relevantEvents.sort(function compare(a, b) {
                                    var dateA = new Date(a.start);
                                    var dateB = new Date(b.start);
                                    return dateA - dateB;
                                  });
                            }

                            if (relevantEvents[0] != null) {
                                let date = new Date(relevantEvents[0].start);
                                var eventName = removeTags(relevantEvents[0].summary)
                                var badCharacter = eventName.indexOf("(");
                                eventName = eventName.substring(0, (badCharacter - 1));
                                output += utils.format(eventSummary, "erste ", eventName, date.toLocaleTimeString(), relevantEvents[0].location);
                            }
                            if (relevantEvents[1]) {
                                let date = new Date(relevantEvents[1].start);
                                var eventName = removeTags(relevantEvents[1].summary)
                                var badCharacter = eventName.indexOf("(");
                                eventName = eventName.substring(0, (badCharacter - 1));
                                output += utils.format(eventSummary, "zweite ", eventName, date.toLocaleTimeString(), relevantEvents[1].location);
                            }
                            if (relevantEvents[2]) {
                                let date = new Date(relevantEvents[2].start);
                                var eventName = removeTags(relevantEvents[2].summary)
                                var badCharacter = eventName.indexOf("(");
                                eventName = eventName.substring(0, (badCharacter - 1));
                                output += utils.format(eventSummary, "dritte ", eventName, date.toLocaleTimeString(), relevantEvents[2].location);
                            }

                            for (let i = 0; i < relevantEvents.length; i++) {
                                let date = new Date(relevantEvents[i].start);
                                var year = date.getUTCFullYear();
                                var month = date.getUTCMonth();
                                var day = date.getUTCDate();

                                var germanDate = day + "." + (month + 1) + "." + year
                                cardTitle = utils.format(cardTitleText, germanDate);

                                var eventName = removeTags(relevantEvents[i].summary)
                                var badCharacter = eventName.indexOf("(");
                                eventName = eventName.substring(0, (badCharacter - 1));

                                var eventLocation = removeTags(relevantEvents[i].location)
                                var badCharacter = eventLocation.indexOf(",");
                                if (badCharacter >= 0){
                                    eventLocation = eventLocation.substring(0, (badCharacter));
                                }
                                cardContent += utils.format(cardContentSummary, date.toLocaleTimeString(), eventName, eventLocation + "\n");
                            }

                            output += eventNumberMoreInfoText;
                            this.response.cardRenderer(cardTitle, cardContent);
                            this.response.speak(output).listen(haveEventsreprompt);
                        } else {
                            output = NoDataMessage;
                            this.response.speak(output).listen(output);
                        }
                    }
                    else {
                        output = NoDataMessage;
                        this.response.speak(output).listen(output);
                    }
                } else {
                    output = NoDataMessage;
                    this.response.speak(output).listen(output);
                }
                this.emit(':responseReady');
            }.bind(this));
        }
        else{
            this.response.speak(dateNotFound).listen(dateNotFound);
            this.emit(':responseReady');
        }
    },
The result of the function is then passed back to Alexa. It converts the text result into speech and reads it out to the user via an
Alexa device.
Another challenge for us was the connection to the DynamoDB to enable
the user to read out the link. We therefore had to change the authorizations
of our lambda function and move the entire function into a single tenant.
The UserID of the user was given with the session start function of the Alexa Skill Kit. We read these out via the Alexa Handler in the Lambda function.
When the skill is opened, the launch request is executed, which normally greets the user and gives him an introduction to the skill. We adjusted this function so that it queries the database before it starts and searches for the current UserID. If it already exists in the database and an ical link exists, the skill is executed normally. If the current ID does not yet exist or there is no ical link associated, the user is requested to provide his ID and the ical link.
Here is the code for authorization:
'LaunchRequest': function () {
        ical_url = undefined;

        getDataFromDynamoDB();

        console.log('userId', userId);
        console.log('Attempting to read data');

        console.log('Warte auf Datenbankergebnisse');
        sleep(3*1000);

        console.log('iCal_Link', ical_url)
        this.handler.state = states.SEARCHMODE;

        if (ical_url) {
            console.log('Hab nen Link!');
            URL = ical_url;
            this.response.speak(welcomeMessage).listen(welcomeMessage);
            this.emit(':responseReady');
        } else {
            console.log('Hat nich geklappt..');
            this.response.speak('Ich kenne dich leider nicht, bitte hinterlege einen gültigen Link in der Datenbank');
            this.emit(':responseReady');
        }

    },
During one point in development we asked ourselves how we could identify a user so that everyone can query his or her own timetable. We knew from the beginning that we would need a website with a database. We wanted to show a simple form to get the users ical link and save it into the database. Therefor we created a small serverless Lambda web app using API Gateway, DynamyDB and S3 Bucket.
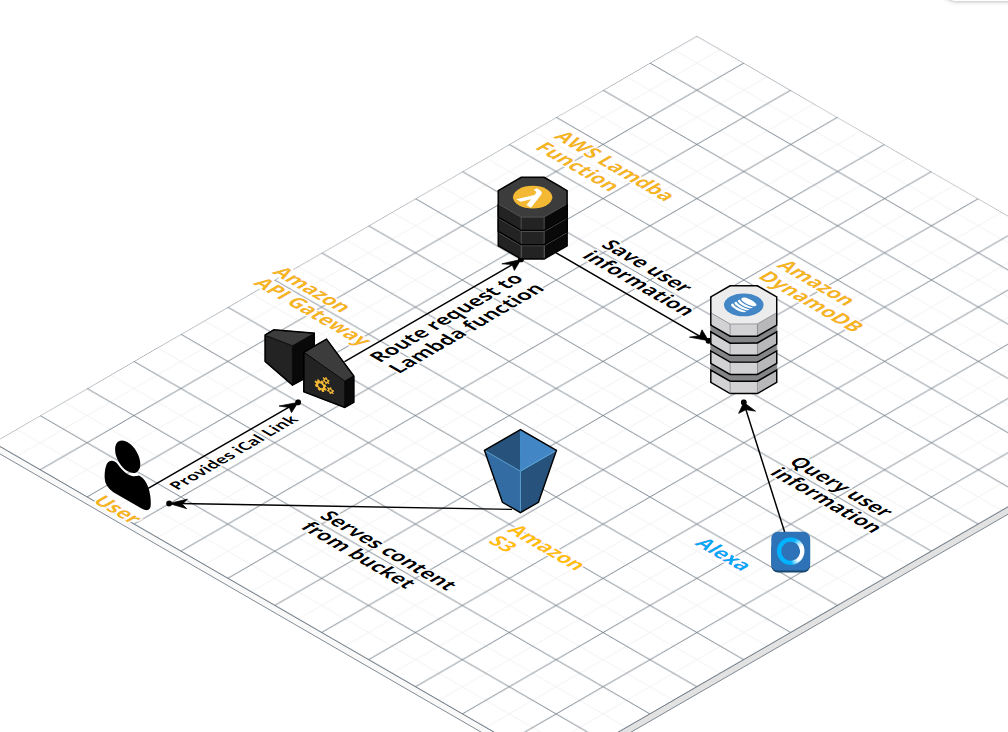
The API Gateway creates a POST endpoint for the provided user information and forwards the information to Lambda.
The Lamdba function takes the parameters User ID and an iCal link and saves them in the Database.
DynamoDB is where all the users with their iCal links are stored in a NoSQL database.
S3 hosts a HTML and CSS file as a website.
Once we finished the site with all its components, the question arose how to allow Alexa users to enter their data into the website. Our first approach was through the installed Alexa App and Amazons Account Linking. This way a user can provide his login credentials and it is the only way to display the ‘Settings’ button we wanted. So, we tried to use the Amazon Account of a user. The benefit would be that every Alexa user needs an Amazon Account and therefor has a unique user id we could use for identification. To use account linking, it only needs to be activated and configured in the Amazon Developer Portal as you can see in Figure 6. (We do not want to go into this part in detail.)
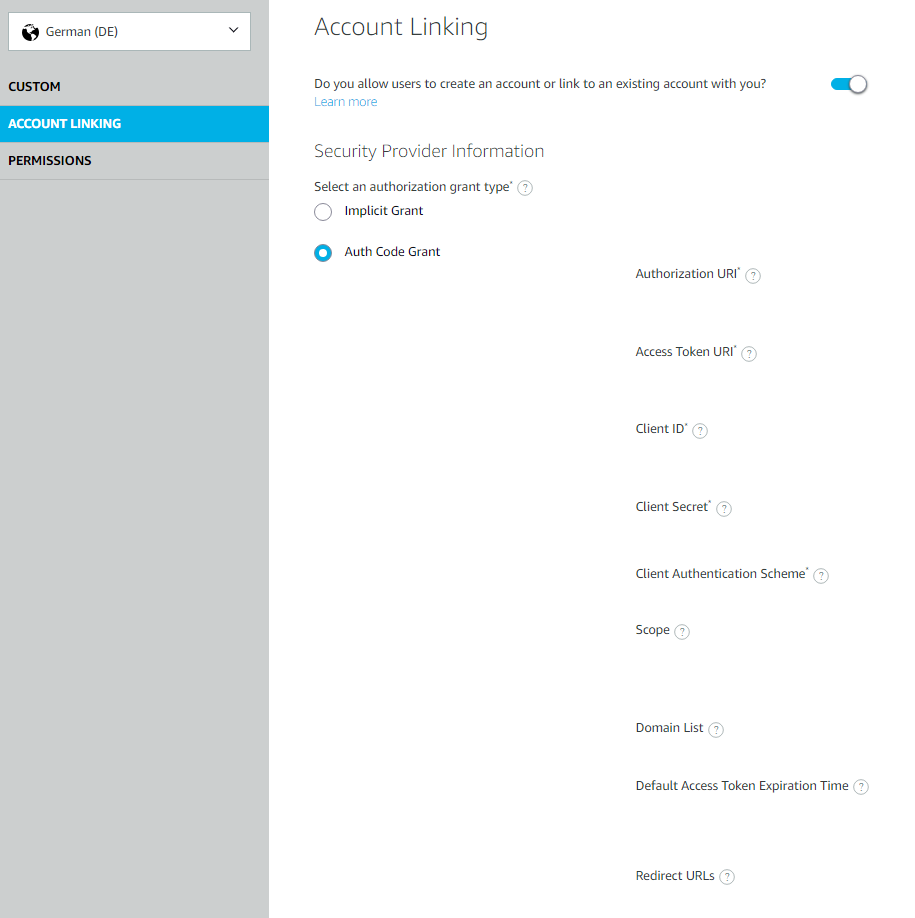
We tried account linking but let’s just say that we haven’t been able to fully configure it. We wanted to use the Amazon Account for authentication, but Amazon only allows a redirect to the Alexa App dashboard after login and not to our own website.
Our next idea was to use the cards in the Alexa app. After installing our skill, we wanted to display a card that directs the user to our website. Unfortunately, this was also not a possibility, since no clickable contents can be inserted in the card. Furthermore, it is not yet possible to copy content from a card, the user would have had to type in the very long URL to our website by hand.
Conclusion:
We had a lot of fun with the Cloud project in general, even though we have been confronted with problems during the whole developing phase.
As mentioned above we’re not happy with the way we had to handle the user information. It is frustrating that it’s not possible to copy information from the Alexa App or insert clickable links.
It’s also sad that it’s not possible to get the ‘Settings’ button without an authentication server. We don’t want any other account information. We simply wanted the user to provide some information.
Another difficulty was the format of our ical file. Some lectures are in more than one room which is why we had the problem that Alexa said things like “You have one lecture today: Web Development 2 (xxxxxx), Web Development 2 (xxxxxx), Web Development 2 (xxxxxx)”.
At one day our code didnt’t work anymore even though we did not change anything. We spent hours finding the problem until we realized that the personal timetable was deleted and you just have to reconfigure it.
At the end we were able to prepare our project ready for the final presentation, but it could not be used for productive operation because we can not offer a simple way to provide the ical link.
Leave a Reply
You must be logged in to post a comment.