Don’t you find it annoying not to be able to manage all your Kubernetes clusters at a glance? Ranger 2.0 offers an ideal solution.
The following article is less a scientific post than a how-to guide to creating a new Kubernetes cluster with custom nodes in Ranger 2.0.
But before we drift into the practical part, let’s take a look at what’s going on with Rancher and Kubernetes. We’ll briefly discuss the differences, origins, and use of the two tools.
What is Kubernetes?
Kubernetes, also often abbreviated as K8s, is a container orchestration system. An open source system for automating the deployment, scaling and management of container applications. In contrast to other orchestration systems, no fixed workflow is implemented. The actual state of the container system is continuously monitored and changed to the target state. K8s was originally developed by Google in 2014 and subsequently donated to the Cloud Native Computing Foundation (CNCF).
So-called ‘pods’ representing the smallest unit which are being orchestrated. These are wrappers that consist of either a single container or several containers. They encapsulate these containers from the outside (like a legume). These pods do run on worker nodes (either physically or as virtual machines in a cluster). The cluster is controlled by one (or more) dedicated machine(s), the ‘Kubernetes Master’ (‘Master-Nodes’).
What is Rancher?
Rancher 2.0 is an open source container manager for managing multiple K8s clusters. It doesn’t matter if a cluster consists of custom nodes or a hosted Kubernetes cluster like GKE (Google Kubernetes Engine), EKS (Amazon Elastic Kubernetes Service) or AKS (Azure Kubernetes Service). Rancher is able to manage all these clusters centrally. Especially user administration and RBAC (Role Based Access Control), policy and project management, resource management, backup and recovery of clusters, monitoring, logging and much more are covered.
As we have now seen, we are able to integrate multiple K8s clusters into Rancher. In our particular case, we don’t want to integrate a cluster from the big cloud supplier, but use our own hosts. So let’s take a look at what we need.
Requirements
The following servers all run CentOs 7. Of course you can also use other operating systems.
We used seven hosts. One is only used for rancher. Three are used as master nodes and another three are used as worker nodes.
| nunki[01:03] | 10.208.215.24[1:3] | Master-Nodes (etcd) |
| nunki[04:06] | 10.208.215.24[4:6] | Worker-Nodes |
| rana01 | 10.208.215.247 | Rancher |
Prerequisite
Docker needs to be installed on all hosts that are to serve as master and worker nodes in the cluster and on the host on which our rancher instance is running?runs. Once Docker is installed, you need to start the Docker daemon. Most Linux distributions use systemctl (systemctl start docker) to start services. If you don’t have systemctl, use the service command. If you want Docker to automatically start at boot (recommended) you should enable the docker service as well.
Further Setup
In this tutorial, we will not cover ‘SELinux’ configuration for Docker, so we disable it on every host. Edit the /etc/selinux/config file to set the SELINUX parameter to disabled, and then reboot the server. Execute getenforce to see the current mode of SELinux
Since we need certain ports for our Kubernetes environment, we deactivate the firewall completely for our tests. Of course this should not be done in production!
‘Firewalld’ is a complete firewall solution that has been made available by default on all CentOS 7.
- First, stop the Firewalld service with:
- systemctl stop firewalld
- Then Disable the Firewalld service
- systemctl disable firewalld
- To check the status of firewalld, run the following command
- systemctl status firewalld
We will run Rancher 2.0 in the container using the docker image rancher/ranche r:v2.2.3. To start it, we use the following command:
- docker run -d –restart=unless-stopped -p 80:80 -p 443:443 rancher/ranche r:v2.2.3
By means of parameter -d we tell the docker deamon that the container should run ‘detached’, in other words: in the background. –restart=unless-stopped allows us to automatically restart the container after a restart (the service must be enabled for this). With parameter -p we define ports, which can be used to access our container from the outside.
Create a k8s cluster with custom nodes
The following section describes the process of creating a new cluster. For this we call the Rancher web interface in the browser.
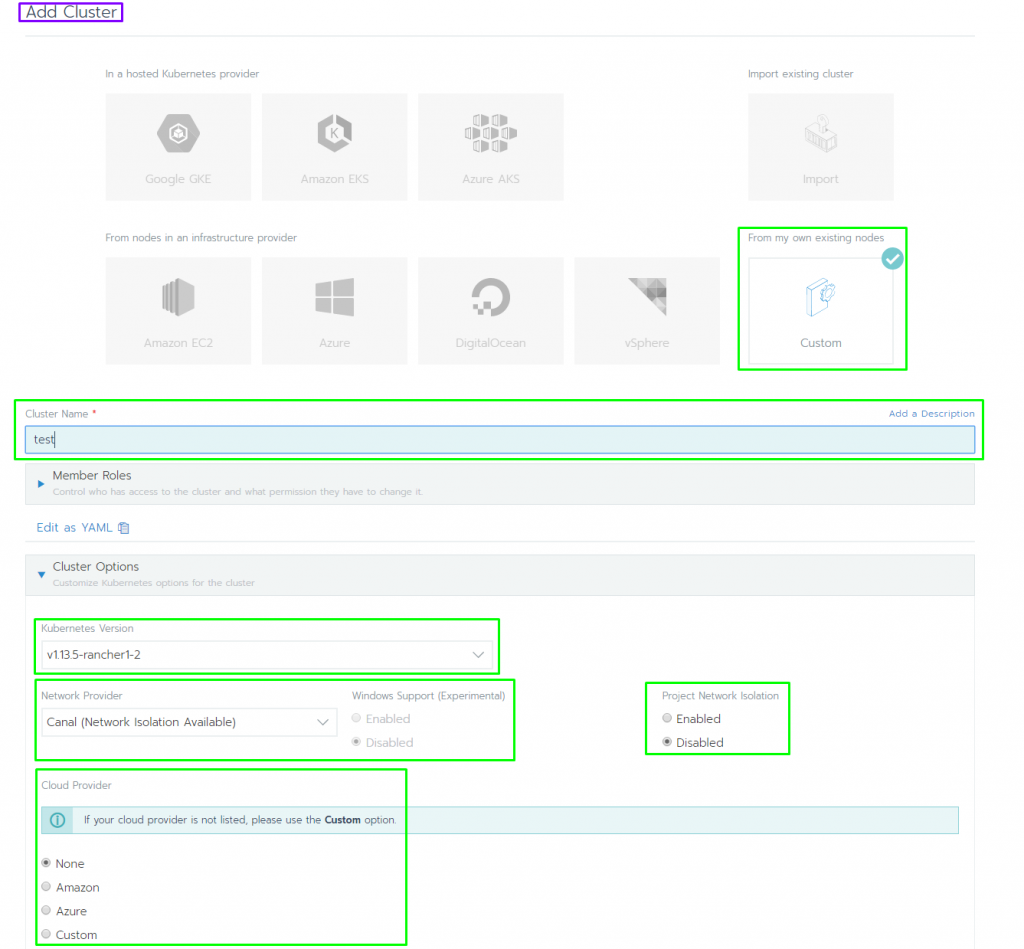
From the Clusters page, click Add Cluster

Add a new Cluster
- Choose Custom
- Enter a Cluster Name
- Use Member Roles to configure user authorization for the cluster.
- Click Add Member to add users that can access the cluster.
- Use the Role drop-down to set permissions for each user
- Use Cluster Options to choose the version of Kubernetes, what network provider will be used and if you want to enable project network isolation.
- Click Next
Assign nodes to roles
- Under Node select the role that certain nodes should fulfill. If, for example, the master nodes are to be created, only ‘Control Plane’ and ‘etcd’ may be selected.
- Optional: Click Show advanced options to specify one or more IP address(es) to use when registering the node, override the hostname of the node or to add labels to the node.
- Copy the displayed command to your clipboard.
- Log in to your Linux host using your preferred shell, such as PuTTy or a remote Terminal connection. Run the command copied to your clipboard.
- After all commands have been executed on your Linux host(s), then click Done.

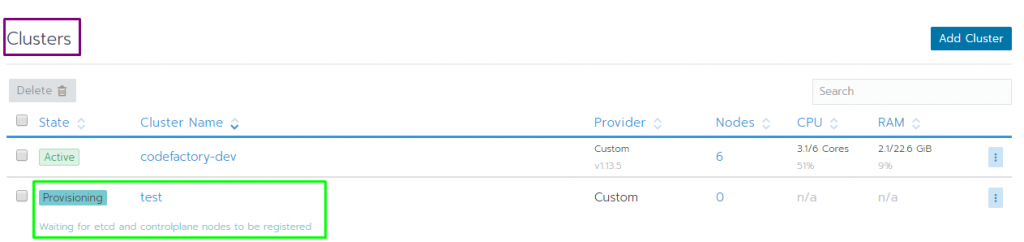
Result:
- Your cluster is created and assigned a state of Provisioning. Rancher is standing up your cluster.
- You can access your cluster after its state is Active.
Active clusters are assigned to two Projects, Default (containing the namespace default) and System (containing the namespaces cattle-system,ingress-nginx,kube-public and kube-system, if present).
In addition to the configured settings, the available resources can also be taken from the Cluster Dashboard.
It also shows the current workload of the nodes.
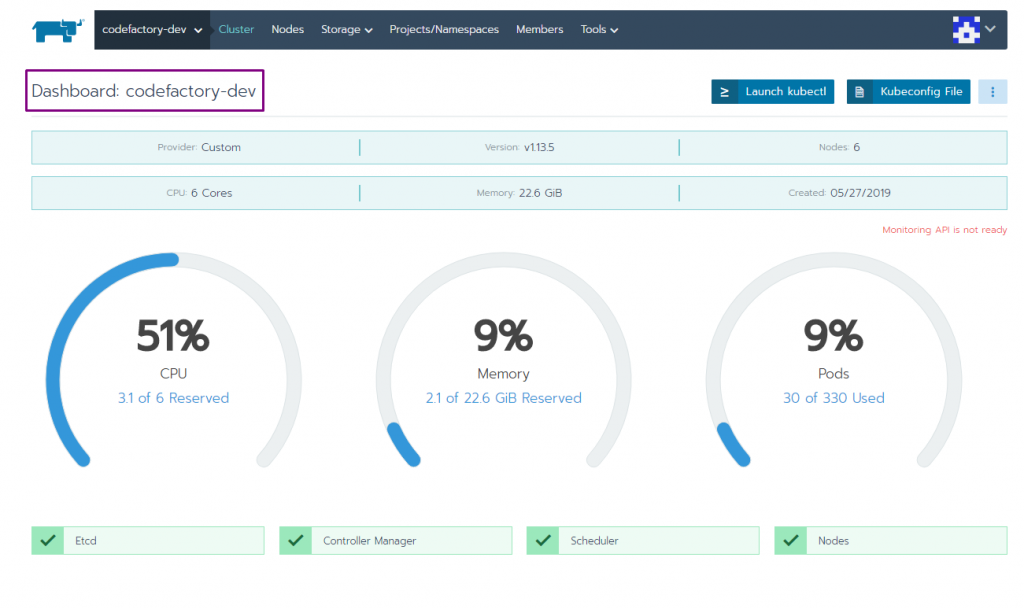
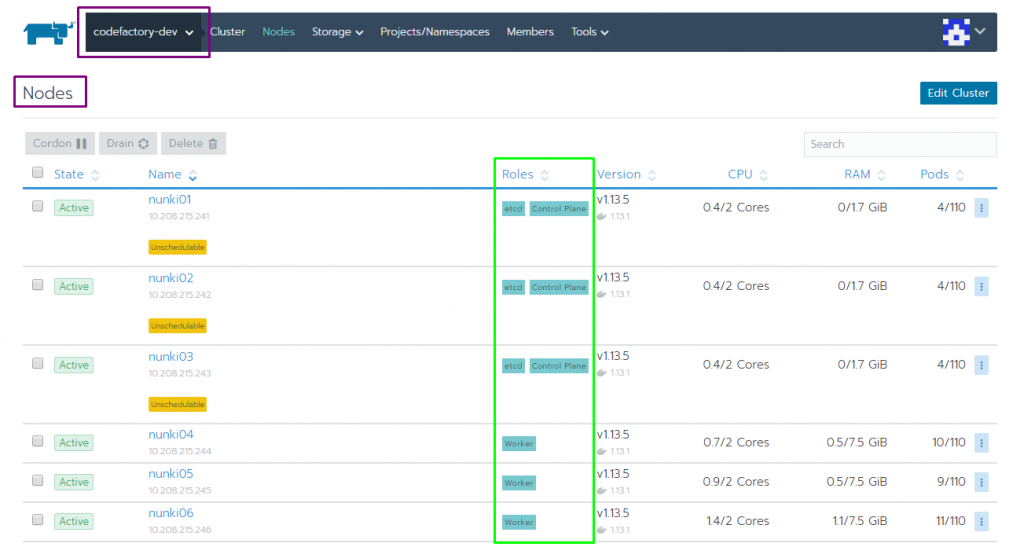
For more information about the used nodes, select Nodes.
The table shows the current status, assigned role, available resources and their utilization. Nodes can also be restarted or deleted in this overview.
In our example we selected 3 Master Nodes (Role ‘etcd’ and ‘Control Plane’) and 3 Worker Nodes.
As you could see, setting up a cluster is uncomplicated. Within minutes, a Kubernetes cluster with custom nodes can be created and managed within Ranger 2.0. In the Rancher web interface you are able to display all clusters, their projects and namespaces clearly.
You should try it out.
Leave a Reply
You must be logged in to post a comment.