Project idea
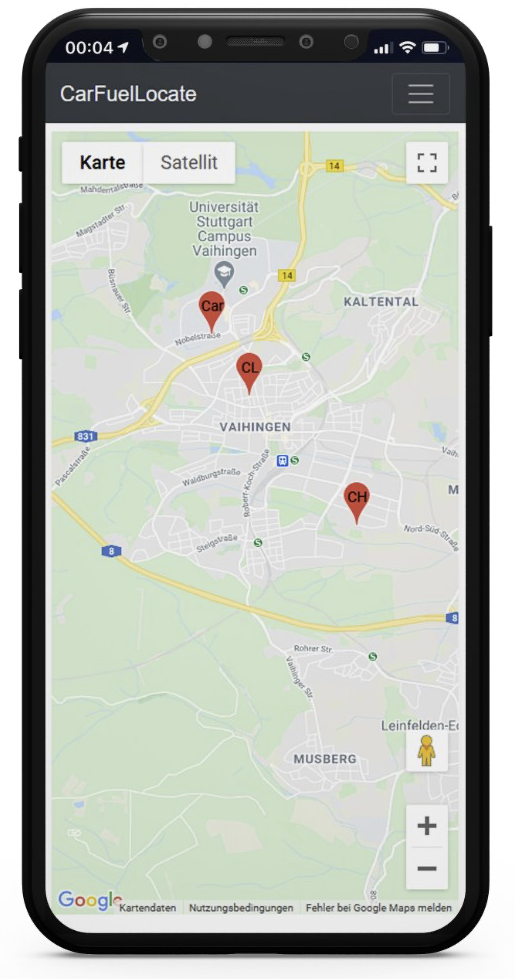
Have you ever been in the situation, that you parked your car somewhere in the city and some hours later, you couldn’t remember where you parked it? You may wish to have an application on your smartphone, which is able to locate your car. From this consideration, the development of CarFuelLocate started.
Goal
Using CarFuelLocate you are not only able to track the current location of your car, you are also able to track the fuel level of your car. Moreover you’re also able to locate the cheapest and the closest gas station, according to the matching fuel type.
Hardware
We equiped our car with a Raspberry Pi 3B to get the telemetry data of the car. We expanded the Raspberry Pi with a expension board, which made Bluetooth, UMTS and GPS connections through a serial interface possible. The retrieving of the vehicle data (e.g. fuel level) works through a OBD2 diagnostic device, which is connected to the Blutotooth interface of the Raspberry Pi extension board.
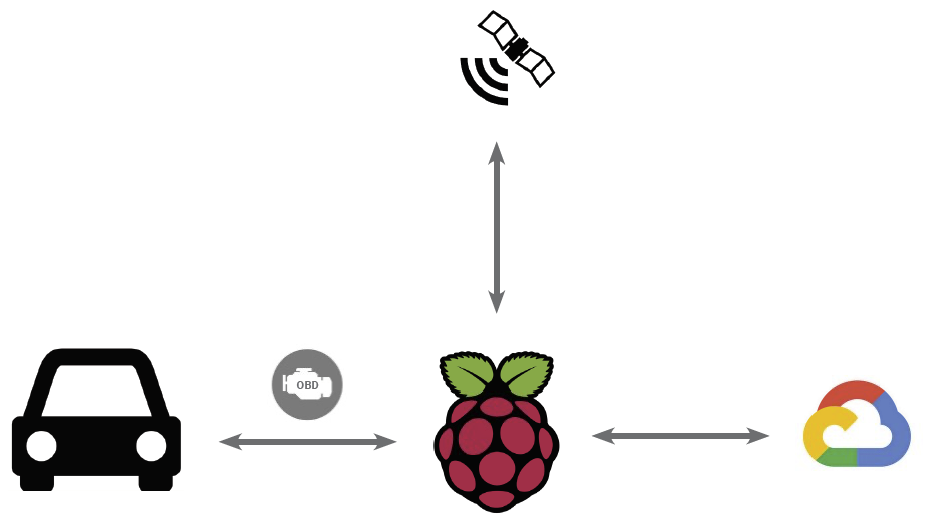
The processing of these data is made through a simple Python script, which is running on the Raspberry Pi, which sends the data to the Google Cloud Platfrom IoT Core, where it will be processed by a cloud function (we will look at this later).
Architecture and cloud components
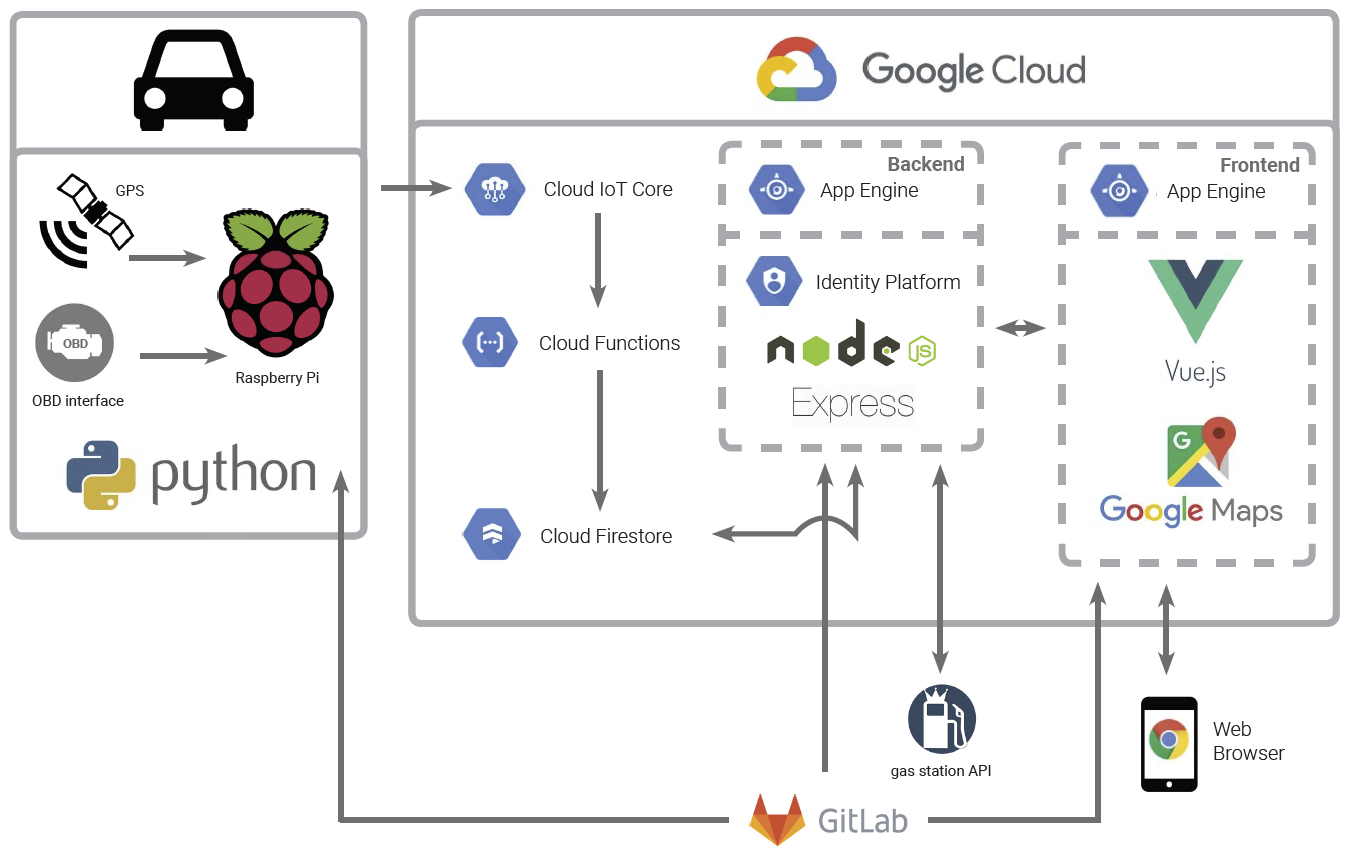
CarFuelLocate consists of multiple parts. The Raspberry Pi, a simple Node.js backend , a simple Vue.js frontend and several cloud services and apis.
Raspberry Pi
As already told, the Raspberry Pi collects the vehicle telemetry data and sends them to the Google Cloud IoT Core.
Cloud IoT Core and Cloud Functions
The Google Cloud IoT Core is a service that allows you to manage IoT devices and collect real time data of the devices. In our use case, it basically acts as an authentication service for the Raspberry Pi.
The Python script, running on the Raspberry Pi, sends it’s requests to the Google Cloud, where it is authenticated using the Cloud IoT Core. The request is served by a cloud function, which writes the data (e.g. the position of the car) directly into the Cloud Firestore database.
async function updateLocation(data,deviceId){
  const docRef = db.collection('location').doc(deviceId);
  await docRef.set({
    lat: data.lat,
    lon: data.lon,
  });
}
example code for a cloud function, saving the location to the database
When a user wants to connect his Raspberry Pi for the first time, he receives a token from the web application, which he has to enter into the Python application on the Raspberry Pi, which starts the registration.
During this process the Raspberry Pi generates a RSA keypair and appends his public key to the Cloud IoT platform, which assignes a individual device id, which is used to assign the device to a specific user.
Cloud Firestore
The Cloud Firestore stores all the user information, including the data sent by the Raspberry Pi (e.g. location) and the data, that is configurable by the user, through the frontend (e.g. fuel type).
The Cloud Firestore is accessed by the Cloud Functions and the Node.js backend.
Google Cloud Identity platform
We used the Google Cloud Identity platform as OAuth provider, so that users are able to login with their Google Account.
Node.js Express backend
The application consists of a simple Node.js Express backend, which handels the API requests by the frontend and handles the one-time Raspberry Pi user registration.
The backend is deployed in an App Engine, which is pretty easy becaue you basically just have to upload the code and the Google Cloud Platform does the rest. This gives us the possibility to focus on our code and the responsibility to operate the Node.js server rests in the hands of Google.
Vue.js frontend
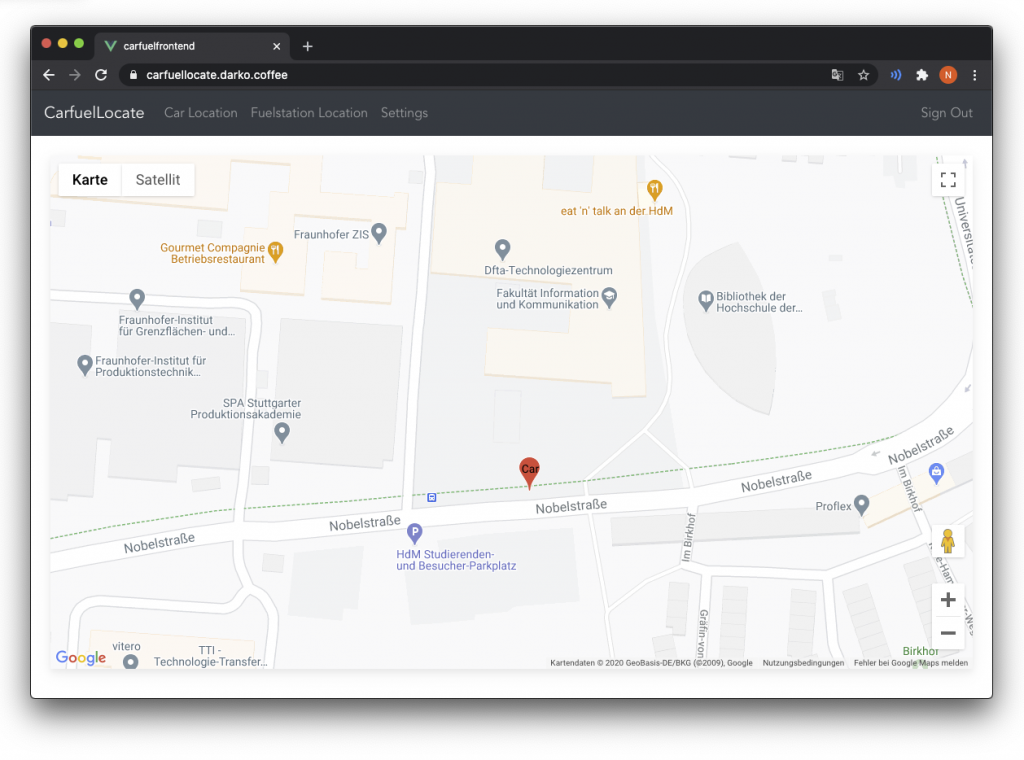
A simple Vue.js frontend serves the car related data (e.g. location, fuel level, cheapest gas stations) with a responsive web application.
The frontend is also deployed in an Google Cloud App Engine.
APIs
The application is able to show the cheapest and the nearest gas station. The backend is accessing the “Tankerkönig”-API to get the desired data about the gas stations. The API lists all gas stations in Germany, their position, and the price details.
The frontend uses the Google Maps API to display the car and the gas stations on a interactive map.
CI/CD
We used the HdM GitLab not only for version control, we used the CI/CD functionality to perform automated testing and an automated build and deployment process. We used a shared GitLab runner, which was offered by our university.
Our pipeline, that is triggered on each commit, consists of automatically launched tests and an automated deployment process, which deploys the App Engines to the Google Cloud Platfrom.
We developed on different branches. The development branches were deployed to different development App Engine instances. By merging the changes to the master branch, the changes were deployed to the production environment.
Challenges
During the development, we run into several challenges and learned a lot.
At the beginning we completly developed CarFuelLocate without the Cloud IoT Platfom. We defined a token on the Raspberry Pi which was than copied into the frontend of our web application. Doing this it was possible to send requests to the backend, by unauthorized clients. By brute forcing the token, an attacker would be able to manipulate the user data.
As we noticed our security problem, we switched to the Cloud IoT Platform. Now this kind of attack isn’t possible anymore. The individual device id is now assigned to a RSA keypair. If an attacker guesses the device id, he still isn’t able to manipulate user data, because he isn’t in possession of the RSA keypair.
Another attack that would be conceivable is that an attacker guesses the one-time token, that is shown the user, during the first-time device registration in the web application. So an attacker could connect his own client to the account of another persoen, during the period where the real user tries to connect his own Raspberry Pi. This could be solved by providing a confirmation query for the real user in the web application, asking whether he really wants to connect this Raspberry Pi to his account.
Google Cloud Platform
There is no specific point, why we used the Google Platform. Our decision is based on serveral points.
First of we learned a lot about the IBM Cloud and AWS in our Lecture Software Development for Cloud Computing and wanted to learn how other cloud providers work. Another point is, that we wanted to develop the whole project with one service provider and the Google Cloud Platfrom offers everything we wanted.
Alternatively we could have used Amazon Web Services and use their IoT platform, in combination with EC2 instances and a Amazon DocumentDB for our web application. Our project would also be able using the IoT platform of the IBM Cloud. Amazon and IBM doesn’t offer a map service (like Google Mpas), but we would still be able to use the Google Maps API in combination with the IBM Cloud or AWS, or we could have used OpenStreetMap.
There are many ways to develop a cloud based IoT application, our procedure is only one way.
Leave a Reply
You must be logged in to post a comment.