1. Introduction
If you listen frequently to podcasts you were probably at least once in the situation where you could not really remember where you heard that one line or sentence. Then you really want to be able to just google it only to find out that this exact podcast didn’t offer a transcription, because most of time this is time consuming and expensive and most podcast producers decide to skip it. There are already some online services that offer automatic transcription of audio files with the option of a manual overview, done by a live person at extra cost. The only problem is that these services are pretty expensive most of the time and rarely offer a search functionality for everyone.
Thats why I thought to myself: How hard can it be to build such an app, that transcribes and analyses podcasts automatically and offers a search endpoint to everyone?
2. Goals and Scope
So here’s the thing. I was really exited about the opportunity to dive into the cloud development. The hype around it was really big and every one was talking about how fast development of prototypes and even production ready applications has become, how you don’t need to think about server infrastructure, stacks etc. anymore. And this was really exciting for me personally, because I get at least 1 ~million dollar~ idea for an application per day and typically the process looks something like this:
I get really excited and motivated and start developing right away. Of course I start with defining the stack for the project and server infrastructure requirements. By the time I am done with the stack configuration and the server infrastructure is ready for the actual development I have lost interest and sometimes even forgot the core of the idea I had…
Thats why I set couple of goals that I wanted to achieve during the development of podcrawler and also set a certain scope, so that I can finish the project in time:
- Most importantly I wanted to see how fast I can develop a working prototype in comparison to the “usual” app development. I didn’t aim to build a production ready application.
- I wanted to get an overview of the 3 main cloud platforms – Google Cloud, AWS and IBM Cloud and see if there are any big differences or drawbacks. (I left Microsofts Azure out on purpose.. had terrible experience with it during a past project and knew I didn’t want to go back there)
- I also wanted to decouple the different services of the application as much as possible and try to make it as dynamic as I can.
See what’s the hype around Docker and Kubernetes all about!
3. Research
After I had a scope for the project ready I started with the research and planing.At that time I had very little idea how exactly everything would work together. I was only aware of the basic services I would need for the application to work, but had no idea how these services work, are paid for or which one is the best solution to my problems.
With that in mind I destructured the application in 6 main categories:
- Base – Programming Language, Stack etc.
- Speech-to-Text Service
- NLU or Natural Language Understanding Service
- Database and Search Service
- File Storage
- Authentication
and started to search for the “best” solution for each category.
* Spoiler alert : I basically scraped the whole project 3 weeks before the presentation and deleted everything. Thats why some of the planing had to be made twice..
The Base
As with every project I had to decide which programming language and framework would allow me to develop as fast and as easy as possible. Since one of my goals was to try out Docker and K8s I didn’t think much about that part, I just assumed that it would work good, because everyone is transitioning to a docker+k8s stack (which later proved to be a big problem for me). Most of the time I spent deciding whether to go with Node.js, because at the end it will be browser based app or to go with Python, because it is just easier to do NLU and Data Processing with. Initially I decided to go with Python, because I had good experience with it in Data Mining and structuring Data. Therefore as framework I took Django , because on paper it had everything I needed and even more in the form of Django packages. It seemed really good documented and at a point where you can consider it for a project and not think if you are going to hit the limits of it soon.
Speech-to-Text Service
You would think there is one obvious choice here, considering that Google is essentially the nervous system of the Internet at this point and normally I would agree. But the accuracy of the recognition and API options weren’t the only factors I had to consider. The main drawback, as with Amazon Transcribe, was the cost. Both Google and AWS allowed for only 60 free minutes per month of transcription. This may sound like enough for prototyping, but only as I was testing the accuracy on both of the platforms I used up 14 minutes respectively and I hadn’t even began with the development of the application…
On the other hand IBM Watson was offering 500 minutes per month at no cost which is a significant difference! And the difference in the accuracy in comparison to Google wasn’t that big! Sure, at times there were some wrongly recognised words, but the correct word was always in the alternatives array, which is part of the return object for each transcribed word. More on that in the section with the description of the service itself!\
Both Googles and IBMs Services offered great documentation and SDK with support for most of the popular programming languages. The Amazons documentation was a bit confusing at times and offered only python support.
Thats why I went with IBM Watson on the Speech-to-Text Service!
NLU Service
The situation with the natural language understanding service was similar. Google offers probably the best models but it is just too expensive and the free tier consists of around 5K Units per month for free. 1 unit here is basically a document consisting of less than 1,000 Unicode characters. This was really confusing for me first, but just consider that one test audio file of 3 minutes can contain up to 500 words, which means that you can reach your monthly limit with just a 30-40 min. long podcast. On the other hand IBM calculates the costs a bit differently, which makes it a lot more suitable for development. There extracting Entities and Sentiment from 15,000 characters of text is (2 Data Units * 2 Enrichment Features) = 4 Items and you have 30,000 Items free each month. And again, the price to quality ratio is probably even better.
Thats why I went with IBM again for this service.
Database and Search Service
Here is where things got a bit complicated. I had to consider that the average podcast length is about 40-50 min long, which means that the transcriptions would get pretty long. This was pretty important, because Django ships by default with SQLite and officially supports only relational databases. So I was worried that the performance of text search in a relational database wouldn’t be satisfying enough. And yes, I could’ve used different vendor like MongoDB for document based solution, but the problem here was that I had to basically decide that when setting up the project. Even the Django documentation warns about this :
When starting your first real project, however, you may want to use a more scalable database like PostgreSQL, to avoid database-switching headaches down the road.
At that point I also researched what cloud solutions were out there and besides Google Cloud Search I also found IBM Cloud Databases for Elasticsearch. Both sounded really promising but again, there were 2 big problems:
- Both seemed pretty hard, for me personally, to actually implement.
- Neither one of them had a free Tier plan and at this point I had blown almost all my credits from the student accounts, because I forgot to terminate different services in the process of testing them.
At the end the plan was to just worry about this when I get there.
File Storage
Storing files was another consideration I had to make. It wasn’t a big problem during the prototyping phase, but if the app was ever to be production testet, I needed a plan how to store big audio files and where. There were a couple of options, but the most considerable ones were Cloudinary, AWS S3 Bucket or some of the Google solutions, e.g. Google Drive or Google Cloud Storage.
At the end, when the application is ready to be testen in a production environment I will probably go with Cloudinary, because it will let me make file transformations with the REST Requests. This can prove handy if I wanted to reduce the quality of the uploaded podcast to save some space, or if I needed to change audio formats on the fly etc.
For right now I will be storing the raw uploaded files on the cloud, where the application is uploaded. Hopefully it will be enough for now.
Authentication
Probably the easiest decision I had to make in the planing phase. As I already mentioned Django is a pretty mature framework and has a really big community behind it. Therefore it also has the most of the common services e.g. registering users and authentication already programmed either in the framework itself or as a separate Django package ready to just be installed and used. Thats why I decided to go with django-allauth – an integrated set of Django applications addressing authentication, registration, account management.
Because I was interested in cloud authentication I also wanted to give the user the opportunity to login using their Google account with the help of the oAuth2.0 Service, provided by Google. And let’s face it: everyone has a google account and would probably prefer to just login with it, instead of taking the time to create a new one.
4. Development
With my motivation going through the roof I started development.
The plan was to separate the core services (Speech to Text, NLU, Frontend) in Docker containers and manage them with Kubernetes. The reason for that was that I wanted to make some extra data manipulation in python after I got the transcribed text from Watson and make the whole app architecture as dynamic as possible, in case I wanted to exchange the Speech-to-Text service down the line. At that point I already had a bit of experience with Docker from work, but I never had to build containers or do any initial configurations. Thats why I felt like I was starting from scratch and had to go through the documentations of both docker and kubernetes. Even though they are pretty well written I felt like the abstraction both system try to achieve is a bit too much, thus making simple task like for example adjusting the timeouts or memory of a simple php container a bit tedious.. (I know this because at one point I was considering to switch Django for Laravel – a php based web framework, because I found a pretty good configured container for it.) And of course it wasn’t long before I started facing the first big problems
First I had issues with the allocation of resources, because of the free tier plan. As I mentioned I didn’t have any credits left so the only option was to create a free tier cluster in IBM cloud which gave me 2 vCPUs and 4GB RAM. For some reason I was frequently getting missing resources errors.
AddContainer error: not enough cpus available to satisfy requestAnother issue I faced during development had to do with the way kubernetes handles the state of the application. Every time a new deploy occurs, the old containers are shut down and new ones are generated, which then replace the old ones. This led to the problem that all of the previously saved audio files were gone on every deploy, because I had a configuration error with the shared volumes in the docker containers and persistent volumes in kubernetes. At some point I found a configuration that worked for some reason and then just like that didn’t work anymore… This was especially frustrating because it happened at a point where I thought I finally began to understand kubernetes and docker.
Then I struggled with networking. I couldn’t make the cluster publicly available and took me a really long time to even get the different docker containers to be able to talk between each other.
Then I also had problems with Docker.. Every time I tried to customise a standard container to my needs I ran into problems with the compiling of the container. I can remember I needed some extra linux package for file manipulation on the Speech-To-Text container and it took me almost 2 weeks to get the configuration right and to be able to build the container without some dependencies errors.
Don’t get me wrong, I know that most of the problems I had were result of the lack of experience with docker or kubernetes, but I also found it really frustrating to get to the point where it all makes sense. And I just wanted to be able to speed up the developing of prototypes by skipping the server side work.
I also get that there are a lot of benefits to Docker and Kubernetes. I kind of saw that in all of the trouble I had to go through just to have some half working setup. I mean you can really make you application platform independent and test it everywhere, have the automatic scaling and management of your docker containers done by kubernetes, have a load balancer etc. But in my opinion the pain you have to go through if you are not an expert is only worth if you are building a big application that needs to scale automatically and be deployed everywhere AND have a really specific plan how you can achieve that. It certainly didn’t make any sense for my prototype, because in the end I felt like I was back to provisioning and maintaining a server the whole time. And this was exactly what I was trying to avoid in the first place…
On the other hand the only real work I had done with Django was to create the necessary boilerplate code for the framework to display a render a simple HTML page.. and it was in my opinion a lot of boilerplate code. This is also good, because it lets you tweak every little detail, but was not really something you would do, if you just want to build a prototype.
So after around 2 month of work I wasn’t getting anywhere with the core functions of the application and the fun and motivation ware gone.. in my rage I deleted everything (that’s why there are no screenshots or code from the initial plan), took a day off to cool down and basically started from scratch 3 weeks before the final presentation.
After I revisited my goals again and started to search for a different solutions for the base of the project I stumbled on Cloud Foundry. Cloud Foundry is basically a PaaS and its container-based architecture runs apps in any programming language over a variety of cloud service providers. At first it all sounded magical, because you just needed to select a runtime, e.g. Node, Python etc. and Cloud Foundry automatically scans your applications, takes care of all dependencies and deploys your application to a certain publicly available domain. After all the hustle I went through with kubernetes and docker, this sounded like a dream.. just look at the configuration file necessary to deploy an application:
---
applications:
 - name: podcrawler
   instances: 1
   host: podcrawler
   memory: 256M
and compare it to a docker compose configuration file. So I decided to first test the service before making the same mistakes as with K8s. I replaced the K8s cluster service with the Cloud Foundry one and deployed just a simple Express.js app. Therefore I needed to first install the ibmcloud CLI and make some basic configurations from the terminal like choosing a region and an API target endpoint. At the end it all worked fine and the deployment was really as easy as described. This is where my motivation came back and I sat down and restructured podcrawler around Cloud Foundry. The architecture right now looks like this:
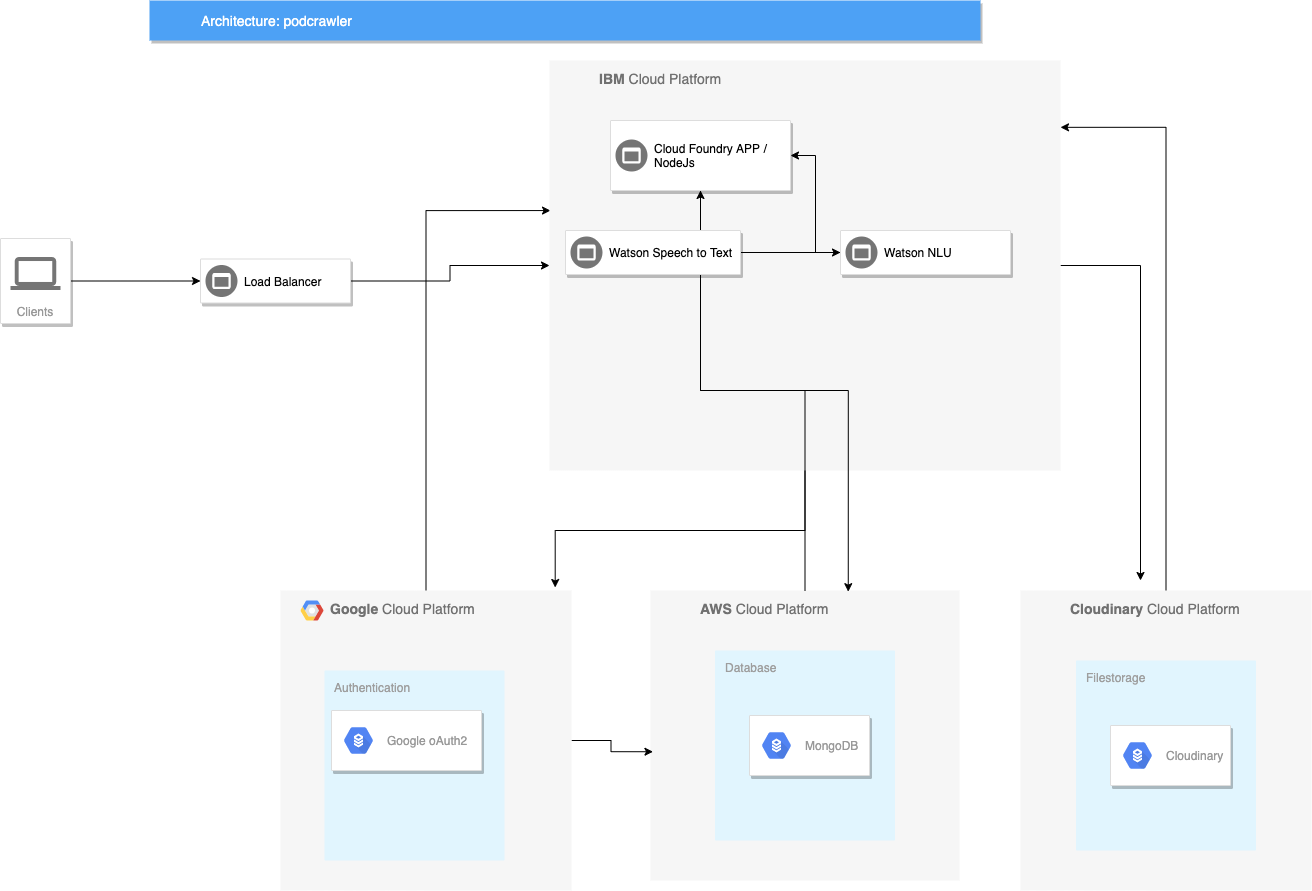
As mentioned above I ditched Django and replaced it with Express, because I found out I didn’t really need a full fledged framework. I just needed a basic routing and REST interface to talk to my cloud services. And so every core component of the application became a cloud service.
5. How everything works
So after 3 weeks of developing I had a working prototype and here is how everything works right now:
Database
In the end I decided to create a separate MongoDB cluster on AWS because of the following reasons:
1. Document based databases are typically more performant than the traditional relational databases, especially when it comes to whole text search.
2. Because MongoDB uses JSON syntax for the Schema it was really easy to populate the database with the JSON responses I got from Watson
3. MongoDB provides text indexes to support text search queries on string content. This was optimal for me, because I didn’t have to implement some sophisticated search service.
The integration of MongoDB with Express was also really easy thanks to mongoose:
const mongodb = async () => {
  try {
    const conn = await mongoose.connect(process.env.MONGO_URI, {
      useNewUrlParser: true,
      useUnifiedTopology: true,
      useFindAndModify: false,
    });

    console.log(`MongoDB Database connected: ${conn.connection.host}`);
  } catch (e) {
    console.log(e);
    process.exit(1);
  }
};
Then I only had to require and call the mongoldb() function in the app.js :
const mongodb = require('./config/database')
mongodb()
and I had a scalable database that I didn’t need to manage or alocate resources for.
Authentication
I decided to leave out the sign-up option for now and only offer authentication with a google account.
When you visit the application you are first greeted with a login screen

Here the user can authenticate directly with Google:
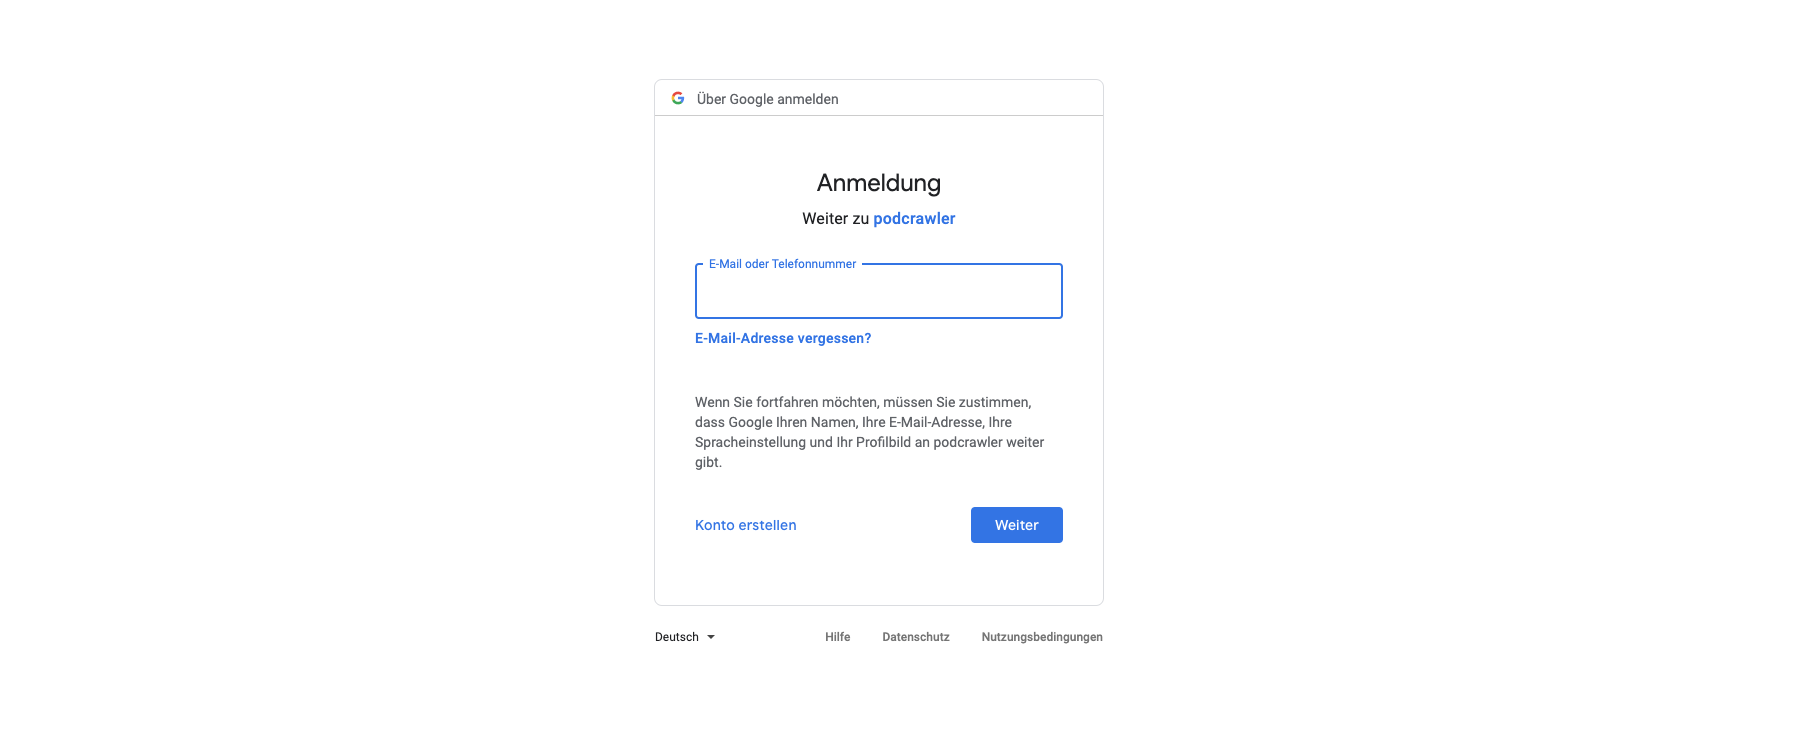
The authentication is done with Google’s oAuth2.0 Service. I created an instance on Google Cloud and used a middleware called passport to bind it with the Express framework. The passport middleware has the so called strategies for all kind of different authentication methods. Here is a link if someone is interested in the details. Basically every time someone calls the application express checks if the user making the request is already authenticated with the ensureAuth function, which implements passport’s req.isAuthenticatd() method. If the user is already signed in, the request is passed on. Otherwise the user is redirected to `/` where the login screen is rendered :
ensureAuth: function (req, res, next) {
        if (req.isAuthenticated()) {
            return next()
        } else {
            res.redirect('/')
        }
    }
...
router.get('/', ensureAuth, (req, res) => {
    res.render('login', {
        layout: 'auth',
    })
})
The ensureAuth is then set as second parameter to every get request to the application. This way if the user tries to call `/podcasts/upload/` for example, we always make sure it he is authenticated.
router.get('/upload', ensureAuth, (req, res) => {
  res.render("podcasts/upload", {
    name: req.user.firstName,
    lastName: req.user.lastName,
    image: req.user.image,
  })
})
The authentication with oAuth2.0 is done entirely by passport. I just call the passport.use method and set the strategy to GoogleStrategy :
passport.use(new GoogleStrategy({
        clientID: process.env.GOOGLE_CLIENT_ID,
        clientSecret: process.env.GOOGLE_CLIENT_SECRET,
        callbackURL: '/auth/google/callback'
    },
I also decided to save the session to the mongo database, because sometimes I accidentally closed the tab and had to login again every time this happened.
File Storage
For now I opted to just store the files on the server, but am in the process of binding Cloudinary. Maybe I will update the post in the future when this is done and go over the process.
Load balancing
After ditching k8s and docker I didn’t really implement a load balancer just because it is not necessary right now. If the application ever goes to production and grows big enough user base, I will probably have to consider docker and k8s again.
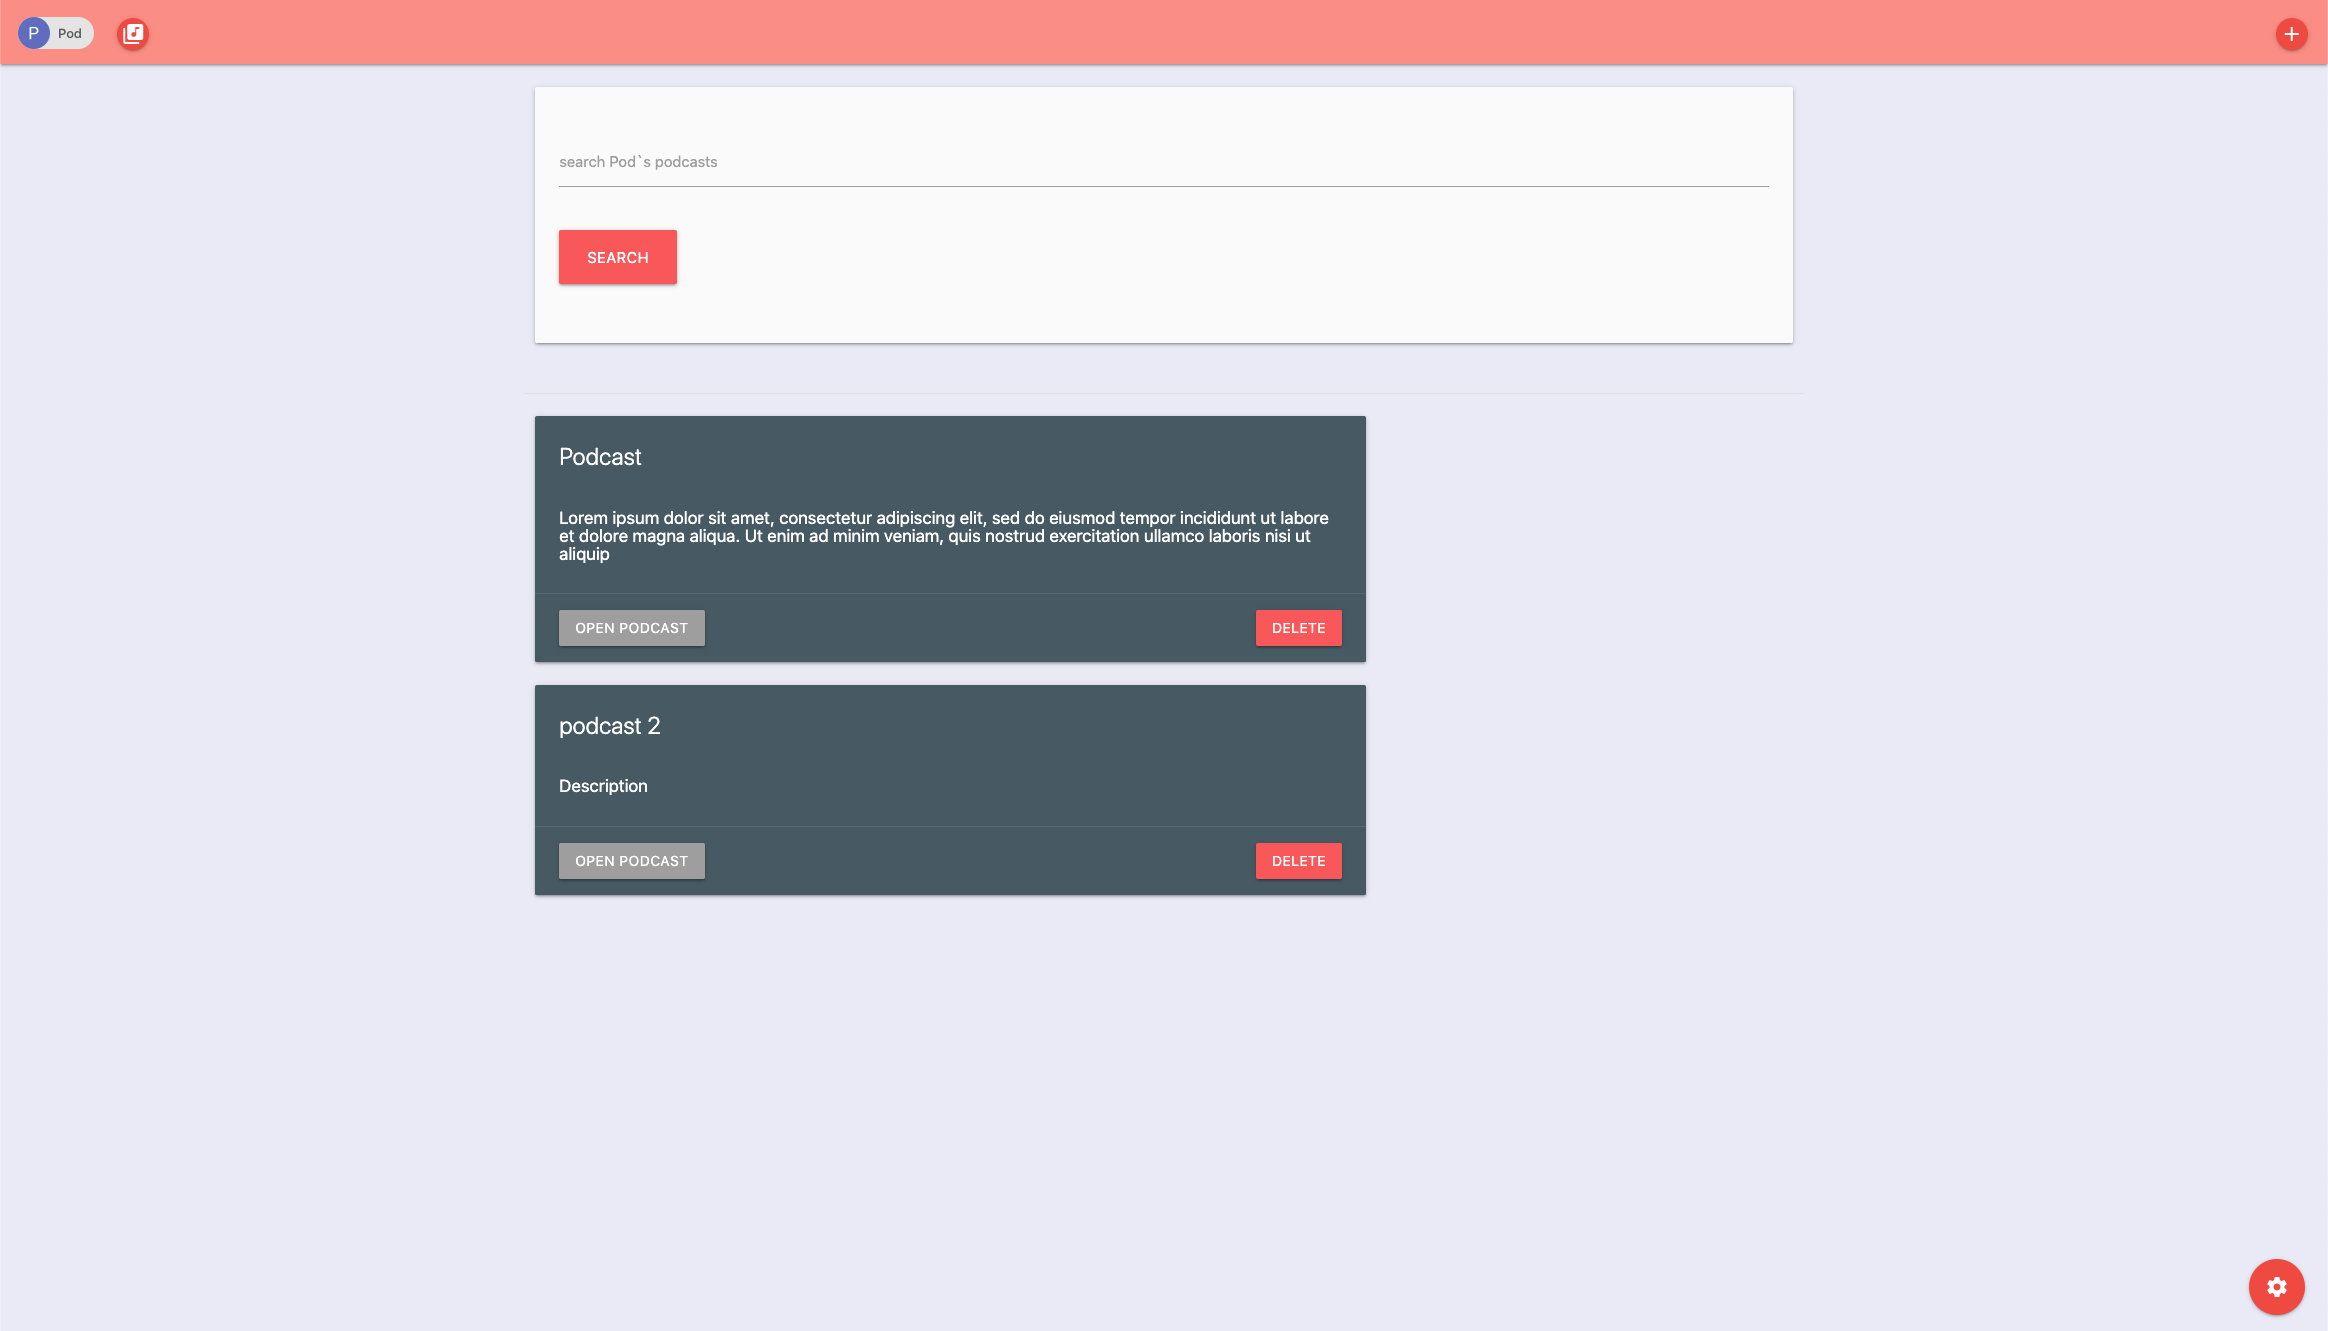
Application Flow
After a successful authentication the user is greeted with overview page, where he can see an overview of his uploaded and analysed podcasts and search through their transcriptions (the search fictionality is described in more detail in the sections below):
The core of the application is the automated transcription and categories and concepts extraction form the uploaded podcast. When uploading a new podcast I gave the user the option to add a custom title and description for the podcast, because everyone has their own way of sorting out information and I didn’t want to force some automatically generated descriptions.
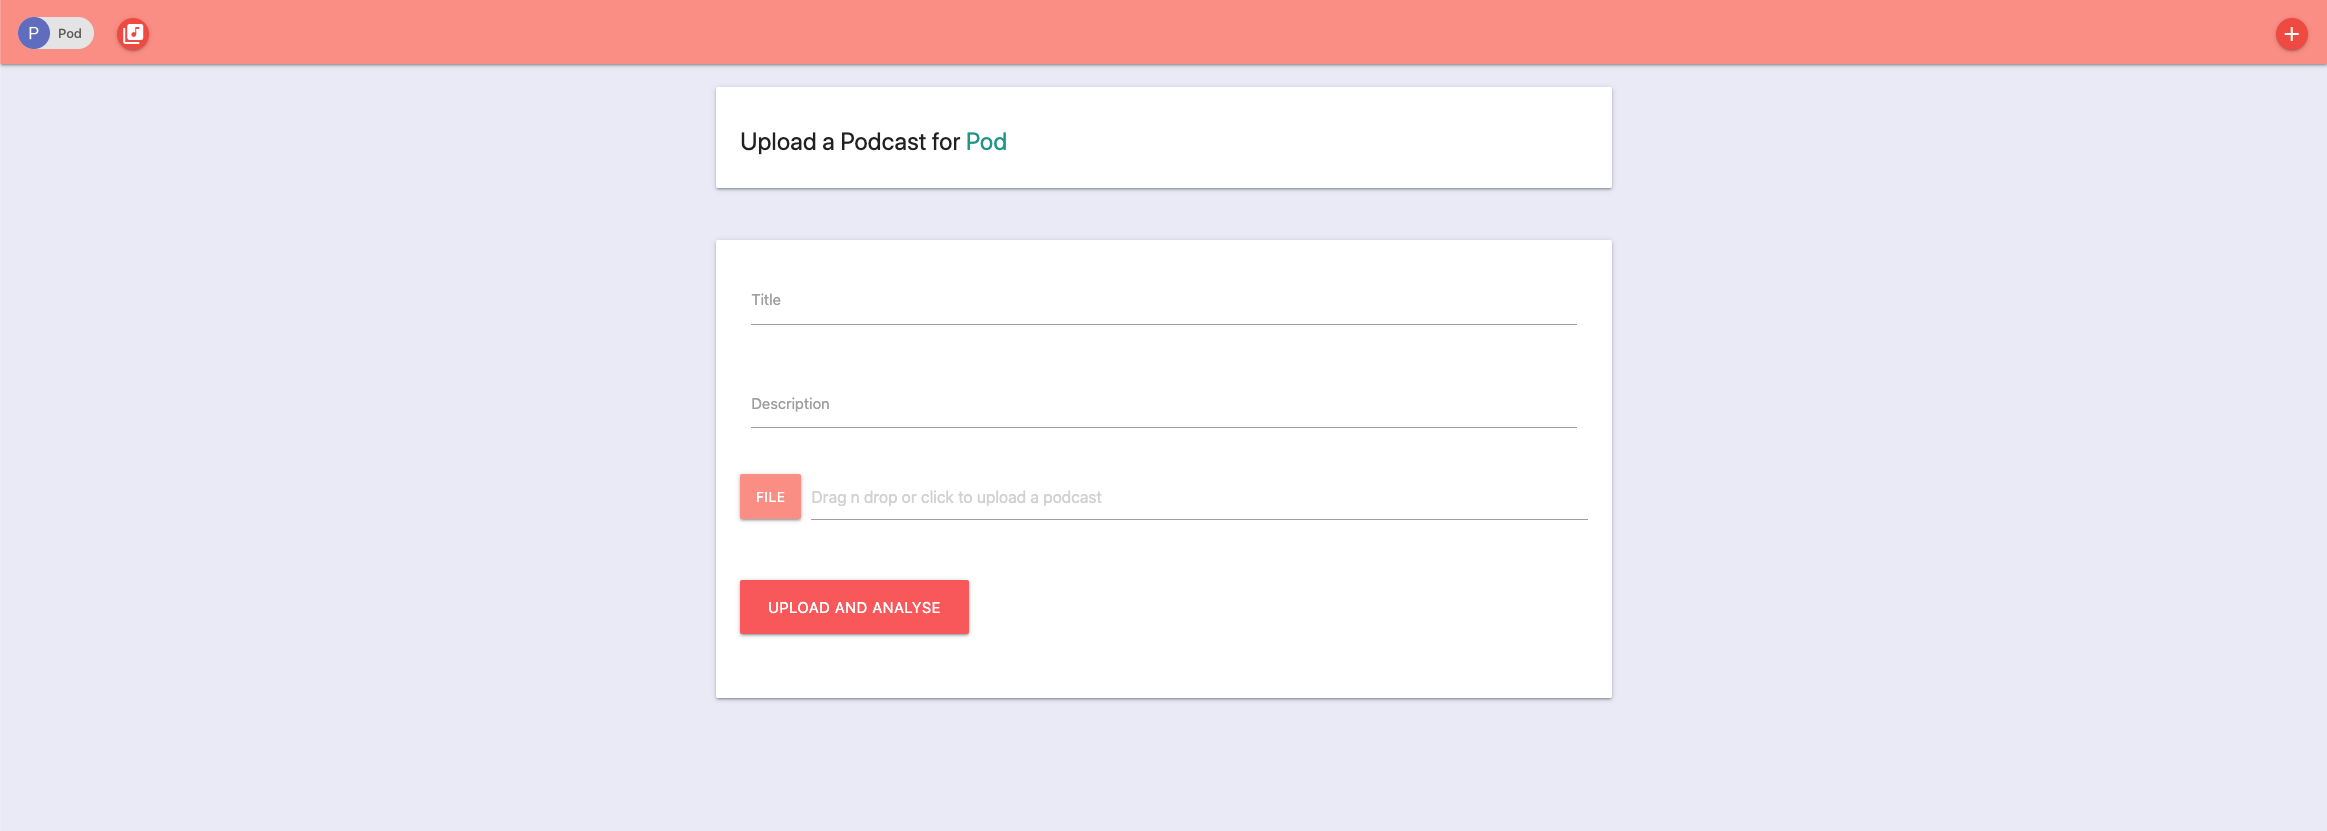
After the user fills out the filed and clicks on the upload and analyse button, he sends a post request to `/podcasts/upload`, which triggers the following process:
First I make sure that the user has uploaded a file
if (!req.files) {
      res.send({
        status: false,
        message: "No file uploaded",
      })
Then I get the file from the post request and save it on the server
let fileUpload = req.files.fileUpload
fileUpload.mv(filePath, (err) => {..}
In the process of saving I send the audio file to Watson for transcription. Here I define the `alternative` words threshold and tell Watson to also include the timestamps for every word in the response. The high threshold for the alternatives words is important, because I plan to implement a feature, where the application automatically saves an array of word alternatives for any transcribed word with a score less than 0.8. This way even if Watson doesn’t recognise a word correctly and the user doesn’t notice it, the correct word could be in the saved array and the search results should still be accurate.
 const recognizeParams = {
          audio: fs.createReadStream(filePath),
          contentType: "audio/mp3",
          wordAlternativesThreshold: 0.9,
          timestamps: true,
        }

speechToText
          .recognize(recognizeParams)
Once the transcription is ready and the results are available I send the transcribed text for analysis to the Watson NLU service
.then((speechRecognitionResults) => {
            const transcript =
              speechRecognitionResults.result.results[0].alternatives[0]
                .transcript;

            const analyzeParams = {
              features: {
                categories: {
                  limit: 3,
                },
                concepts: {
                  limit: 3,
                },
              },
              text: transcript,
            };
Here I request the top 3 Categories and Concepts for the transcribed text. I plan to use the Categories as taxonomies and automatically create filter options for the frontend. With the Concepts on the other hand I plan to generate connections on a higher level between the podcasts themselves. This way I can pretty easily create a recommendation system, when the user is searching for a specific phrase. The best way to understand the difference between Categories and Concepts is with an example – For example, a research paper about deep learning might return the concept, “Artificial Intelligence” although the term is not mentioned.
After the transcription and analysing is done, I forward the user to a review page, where he has the ability to manually check the generated data and edit it if necessary
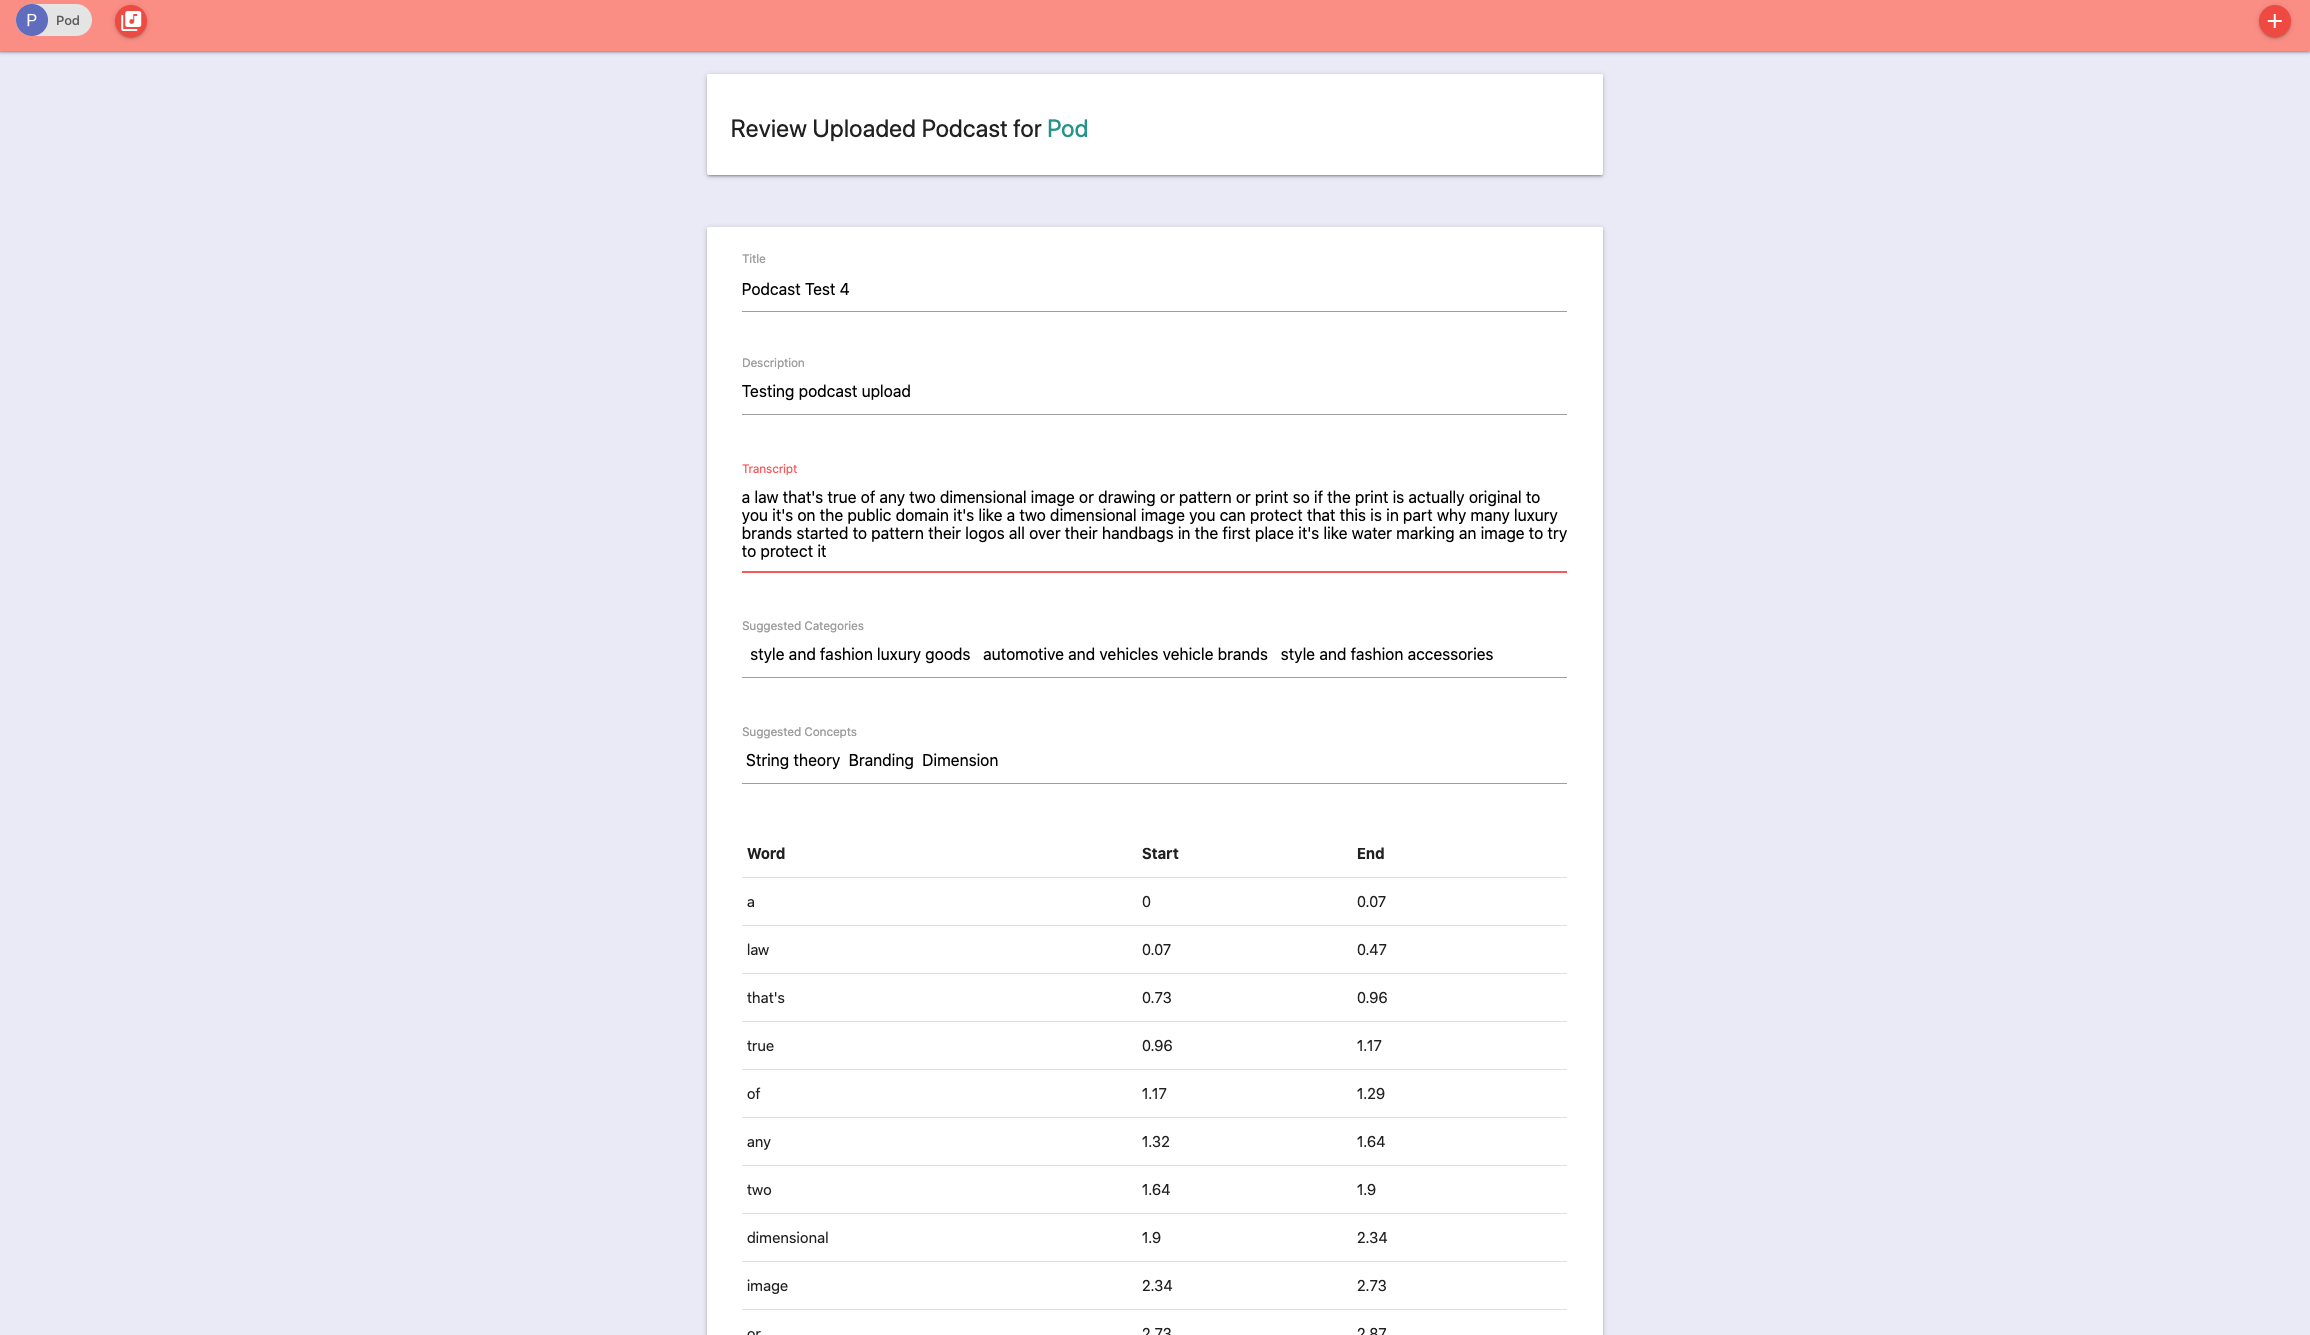
If everything is alright the user can then save the podcast in the database! And the best part here is that the saving is done with just one line of code:
const Podcast = require("../models/Podcast")
await Podcast.create(req.body)
The most important part here is to make sure that the input fields names correspond to the field names in the Schema of the model! For example the Schema for the Podcast model looks like this
const PodcastSchema = new mongoose.Schema({
  title: {
    type: String,
    required: true,
    trim: true,
  },
  description: {
    type: String,
    required: true,
  },
  transcript: {
    type: String,
    required: true,
  },
...})
And the input fields of the review form have the same name tags:
<input id="title" type="text" class="validate" value="{{title}}" name="title">
<label for="title">Title</label>

<textarea id="description" class="materialize-textarea" name="description">{{description}}</textarea>
<label for="description">Description</label>

<textarea id="transcript" class="materialize-textarea" name="transcript">{{transcript}}</textarea>
<label for="transcript">Transcript</label>
Search
Another important function of the application is the ability to search the transcribed text. As I already mentioned above, MongoDB provides text indexes to support text search queries on string content. In order to perform text search queries I had to set a text index on my collection
PodcastSchema.index({ transcript: 'text'})With the index set I could user the `$text` query operator to perform text searches. The $text operator will tokenize the search string using whitespace and most punctuation as delimiters, and perform a logical OR of all such tokens in the search string. So when the user posts a search request, I just call the find method on the Podcast model and search for the phrase they entered. I also sort the results by the relevance score that MongoDB provides for each search query
const podcasts = await Podcast.find(
      { $text: { $search: `${searchString}`, $language: "none" } },
      { score: { $meta: "textScore" } }
    ).sort({ score: { $meta: "textScore" } }).lean()
CI/CD
Because this is only a prototype (and also I didn’t have any time left) I didn’t really bother with CI/CD. For now I just set up some basic rules in Gitlab to make sure that no changes are merged into the master without an approved Pull-Request and deploy the application to Cloud Foundry manually. As I already said, after the initial configuration of the ibmcloud CLI I just need to use ibmcloud cf push . If in the future I decide to scale the project I will definitely implement a CI/CD solution. (Maybe with Jenkins)
Testing
Again, because my main goal was to just build a working prototype I didn’t really spend much time on testing either. After the decision to go with Node.js I installed Mocha and Chai for assertion testing.
6. TODOs
Of course I couldn’t achieve everything I planned, partly because of the problems with k8s and docker, but also because of my poor time management.
I still have to implement a file storage solution that can scale with project. This is something that can take a lot of time again, because I have no prior experience in it.
The lack of integration and functional tests is also something I will have to fix in the feature.
And if I still have the motivation, maybe I can upgrade the search functionality as I initially planned.
7. Conclusion
Despite the troublesome start and the months I lost, because of my frustration with docker and k8s I was still able to achieve the goals I set for myself. This speaks volumes about the speed of cloud development (if you have the experience, of course :D). At the end I think I achieved all the main goals I set at the beginning :
I was able to build a working prototype in couple of weeks (you should also keep in mind that I didn’t work on it all of the time).
I got familiar with the 3 main Cloud Platforms and got a deeper understanding how the cloud operates.
Leave a Reply
You must be logged in to post a comment.