A project by Antonia Dietz and Patrick Baumann
Introducing WaveBuilder
Did you ever sit at home, during a lonely autumn night, a glass of fine red wine in your hand, asking yourself, the question: What might two sine notes at frequencies 440 and 445 played at the same time sound like? Well, not anymore!
Introducing WaveBuilder™*: A (professional) student project doing exactly that and much more.
Using it is as simple as making a good ol’ cup o’ tea. Simply go to http://cloud-react-website-bucket.s3-website.eu-central-1.amazonaws.com, and enter your favorite frequencies with some other metadata, like bit depth, duration, and sample rate, to design your wav file the way YOU want to.
Afterward, you can listen to it, or share it with your friends (if you have any).
But behind this simple and immersive graphical user interface, is a rigid and in-depth architecture. Let us take you on a journey, to explore the processes and challenges that went into designing WaveBuilder™.
*(WaveBuilder is not an actual trademark)
A Serverless Sky – The Way To A Lambda-Based Cloud Architecture
We both had experience with Google Cloud and Microsoft Azure and, since AWS is a platform we both hadn’t worked with before, we chose AWS to develop the application.
The architecture of the program is an interplay between different AWS Lambda functions.
Though the use case of our application could be easily realized using a monolith architecture, we chose a serverless approach, due to us already having built monoliths in past projects and wanting to try something new. One of our goals also was to get a general feel of how the two approaches differ from each other.
Also, Lambda functions abstract most scalability issues away, which might be a problem since we were anticipating millions of requests per hour. (like google not)
The program’s core is a sine generator module written in Rust, which handles calculating frequencies and writing them to a wav file. A Lambda function using this module should receive requests and answer with the wav file.
We thus came up with a simple diagram, where we would have a small frontend web page, which sends a request to a sine generator Lambda function. Afterward, the sine generator function writes the wav file and stores it into an AWS bucket, from which it then can be downloaded.
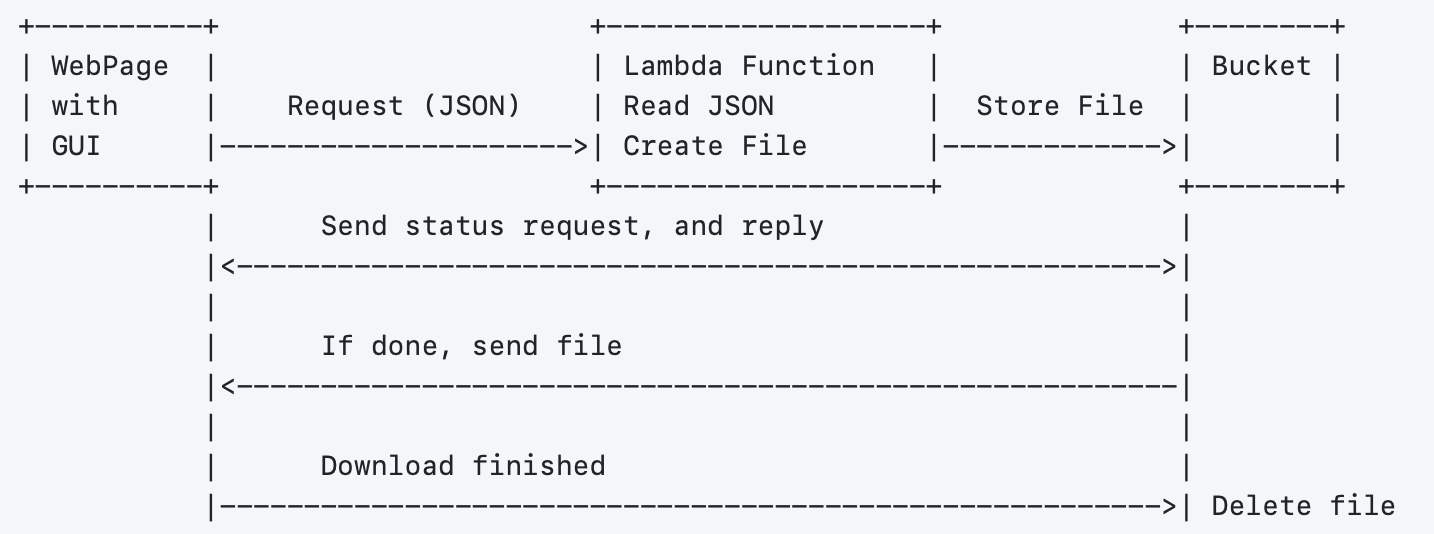
One problem was that creating a large wav file can take several seconds, which blocks the request, and might lead to a bad user experience. An early solution was to add a separate Lambda function, which checks if the file is already stored in the bucket.

This first approach, though, didn’t solve our problem. While a separate Lambda to check if a file is in a bucket, might be useful, this Lambda needs to know the id of the file it looks for. But said id is created by the sine generator function. We can not simply reply with an id, since the reply comes in the form of the return value of the function. And, if the function returns, it cannot create a wav file afterward, meaning we still face the issue of blocking the response until the file is complete.
We needed to separate the management of the id and the creation of the wav file. This led us to split the sine generator Lambda into two parts: One (referred to as main Lambda from now on) which takes the request, writes the metadata into a database, and invokes another Lambda (referred to as sine generator Lambda from now on) which creates the wav file. This allowed us to handle the request in a non-blocking way since the front end wouldn’t need to wait for a response on the Lambda which writes the wav file.
Also, since we didn’t want the user to access the bucket directly via an URL, we chose to add a wave delivery Lambda, which would send the file to the front end.
A database was not strictly necessary, but it provided an easy way to check if a file was already downloaded, and provide other useful information like the creation date of a file.
The following diagram presents the final architecture we came up with:

After some deliberation, we also thought it necessary to add a bucket cleaner Lambda, which deletes already downloaded or old wav files, based on a timed trigger. This was another place where the database proved useful since it gives us a very efficient way to query for files by date.
Components
Rusty Lambdas
The main Lambda, sine generator Lambda and bucket cleaner Lambda are written using the Rust programming language. One of the challenges using Rust for writing Lambdas is that the AWS SDK for Rust is still in developer preview. Luckily, it is pretty well documented, with lots of examples, covering basic use cases. These helped a lot while writing the functions. Also, the API to interact with AWS services is fairly simple, where creating a request to a service follows a simple builder pattern.
One of the challenges in general was fitting Rust’s very strict type system on the Lambda functions, which often needed helper functions to convert data types between each other.
Building a Rust binary is usually done with the Rusts package manager Cargo. But since we don’t build the binaries for our local machine, but for a Lambda function that will run on Amazon’s VMs, we need to compile it for the correct target.
Furthermore, the binaries need to be zipped before being uploaded and need to have the name “bootstrap.zip”.
Luckily, there is an extension to Cargo called Cargo Lambda, which takes care of choosing the correct target and naming conventions.
Cargo Lambda also provides a local testing environment, where we can invoke a Lambda function locally. This speeds up development by a significant amount since we don’t need to redeploy the Lambda each time we make a change.
Sine Generator
The single purpose of the sine generator Lambda is to create the wav file and store it into an AWS S3 bucket. It uses a separate module to instantiate a wav writer, which simply takes the request parameters and creates the file. One important lesson here was where the file needed to be written. Lambdas are “Serverless”, but even Lambdas need to run on a machine somewhere and have some access to the filesystem on said machine. Lambdas are only allowed to access a machine’s /tmp folder. Thus, all files had to be written into /tmp.
After writing the file, it gets stored in the bucket. The file name is the partition key, which was provided by the main Lambda.
Main
The main Lambda has two purposes: Insert the user request into a database and invoke the sine generator Lambda.
The first thing it does though is validate that the sent request parameters are valid. Otherwise, the sine generator Lambda might throw an error while creating a wav file.
For inserting an entry into the database, we also needed to create a partition key (similar to a primary key in a SQL database). This was done by simply taking the automatically created request id for invoking the Lambda, and adding some parameters of the user request to it. It also takes care of adding the request date into the database, in addition to the metadata of the wav file. We could have also used the date provided by the Lambda request, but this gave us more control over the format of the date string, which would make it easier to query the database later.
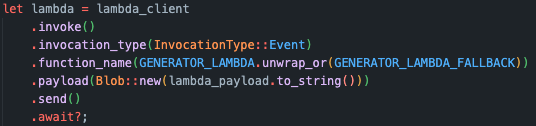
After storing the request in the database, the Main Lambda invokes the Sine Generator Lambda, with the request parameters provided by the front end and the partition key. One thing that is important to note here, is that Lambda functions can be invoked with different invocation types. By default, the Lambda function gets invoked synchronously, which means that it would block the main Lambda. Since we wanted the invocation to be non-blocking, we had to manually change it to the invocation type of event, which is asynchronous. One of the downsides of this is that the main Lambda wouldn’t get any feedback if something goes wrong with creating the file.
In response, we send the partition key to the front end, which it can use to look for the wav file in the bucket.
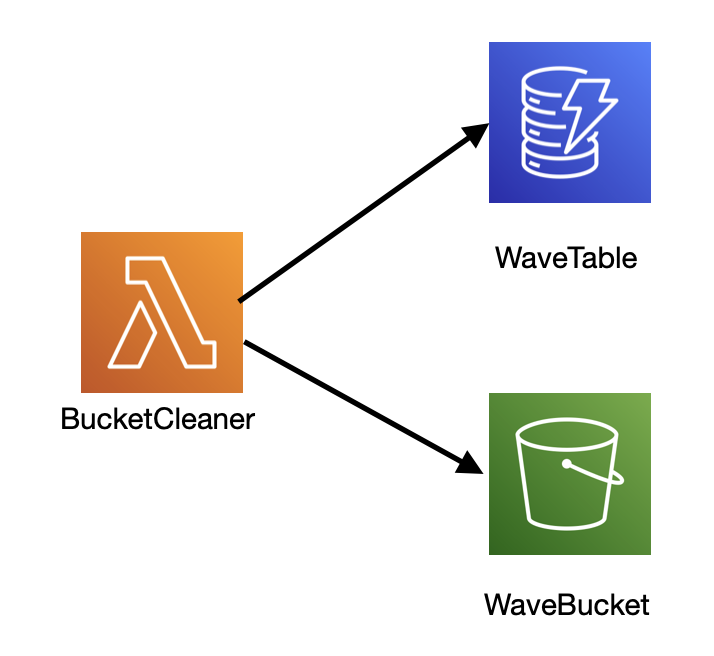
Bucket Cleaner
Since the created wav files are only to be downloaded once, we wanted to periodically delete all files that are already downloaded. To realize this, the Bucket Cleaner function is invoked by a periodical trigger. This works similarly to a cron job, where you specify an interval.
When triggered, the Lambda function queries the database for all files created between the last time it was invoked and deletes all the files that are marked as downloaded from the bucket. Afterward, it looks for older files, which are still in the bucket, but have not been downloaded, and deletes those, too. This is also necessary since a user can request a file, but then not choose to download it, even after it was created. We assume that if a file wasn’t downloaded after two days, the user chose not to download it.
The biggest challenge here was comparing dates since AWS uses its own dateTime module in Rust, which first needed to be converted into a more general format.
As a short note, it is also possible to simply set a deletion trigger for files in an AWS bucket, which would make this Lambda obsolete. For us though, this was a nice opportunity to interact more with the database, and invoke Lambdas indirectly by triggers. This in turn also led us to learn more about databases, which we’ll talk about in the section about the database.
Wave Delivery Service
As already mentioned in our architecture development, the wave delivery service Lambda’s responsibility should be the delivery of the requested wav file to the client. This allows the wav file storage bucket to be a private object with only the required access rights to the Lambdas.
Described in the form of a basic input output system, the wave delivery service should receive a GET request from the client with the following URL parameters:
https://path/to/lambda/API?request_id=xxx&file_id=xxx
The output should be a JSON response message with a parameter ‘status’ set either to “in progress” or “ready”, in the second case also somehow containing the file with the given file_id in the body.
Because the Lambda needed to handle HTTP messages, we decided to use a node.js template for the function.
The first challenge was to find a format that worked well for the transmission of a binary wav file. To keep consistency in the response messages and because we were very familiar with it in the HTTP context, we wanted to stick with the JSON format. Also at first, we didn’t know how to even change the message format that also depends on the Lambda’s API Gateway configuration, which will be discussed later.
After some experimentation, we tried converting a binary file to an integer array and transferring it like this as a parameter value, which worked well but was very inefficient. Additionally, even though HTTP typically doesn’t have a content size limit, we found out that an AWS Lambda has a transmission limit of 6 Megabytes and that only a fraction of a default-sized wav file (30 seconds) could be transferred with the described approach. After some research on how to encode binary files as strings, we became aware of the string base64 format.
As the name suggests, it encodes the binary on a 64 basis which means it takes every six bits of the stream and turns it into an ASCII character. This allowed the Lambda to transfer a file with up to 52 seconds duration with a sample rate of 8 bits, which was a huge increase.
A binary in the base64 format:

Luckily it was easy to test the changes with the AWS console where you can create incoming event messages manually, make test runs of the Lambda and see the corresponding output. This also helped with the other challenges we faced during the development of the function.
Another big question was, how to access the wav file bucket and the database through the Lambda. Besides the issue of access rights in AWS, it was necessary to become familiar with the ‘AWS-SDK’ which is initially a dependency package in the chosen Lambda template. It took a while to find the right documentation and apply the instructions correctly but in the end, we were able to get a wav file from the bucket and change the metadata of a file in the database. This also seemed to be more complicated due to the need for asynchronous programming with the async/await pattern to ensure the program was waiting for the requested data.

In retrospect, the development of the wave delivery Lambda was challenging because a lot of research on AWS Lambdas, the node.js AWS-SDK, and data formats was necessary. We also had to learn about testing, API Gateways, Access Policies, and other tools like CloudWatch for logging and viewing error messages.
Also, there still is the issue of transmitting files larger than 6 megabytes, which will be discussed in the following sections about the front end.
The Frontend
The most complicated way of deploying a static React website
For the user interface, we decided to use the React Framework. The main reason for that was that one of us already had some experience in that area and we didn’t want our focus to be on learning new frontend development tools but on the interplay between the individual components in the cloud.
The development of the frontend application itself was quite easy. It consists of two react components, the main App and the WaveForm component. While the WaveForm component is an HTML form element that contains all the required wav file parameters like sample rate, frequencies, and so on, the App component is responsible for the communication with both the main lambda and the wave delivery service.
The first big question we had was: What is the best and simplest way to host a website in the cloud? To answer that, it is important to understand the differences between static and dynamic website hosting. Static websites don’t support server-side scripting in contrast to dynamic websites, which doesn’t mean that there can’t be dynamic content on the client side as long as it isn’t related to requests to the hosting server. Although React is a framework allowing dynamic change of components, it is still by default based on client-side scripting and rendering, thus alone saying nothing about the website being static or dynamic.
Confusingly, in the beginning, we thought we had to run the website on an AWS EC2 instance which in retrospect could be seen as unnecessary effort because it is a heavy VM instance that needs to be configured. However, it is still a hosting possibility and proved a good learning experience for us.
First, the selection of a suiting VM image confronts you with a whole new set of questions. We wanted to go with a Linux-based system, but there was still the possibility to choose between a lot of distributions. Besides the common and known ones like Ubuntu or RedHat, there is also an AWS-owned distribution called Amazon Linux (AL) which is the default. We chose the AL image, directly leading to other issues.
For running our website, packages like npm, node and Nginx are required. Different distributions of Linux use different packaging systems, package managers, and repositories to install packages. AL doesn’t provide the needed node package in its configured repository, so you have to install it via curl and the node version manager. Although Nginx is provided, it has a slightly different configuration structure than in Ubuntu, e. g. missing the sites-enabled and sites-available directories.
Despite the AL image causing some new problems that we might not have had with another distribution, the following aspects list some advantages of the use of AL:
- optimized for use in the AWS cloud (e.g. comes with the AWS-CLI, optimized performance)
- long term support
- by default more secure e.g. by disabling remote root login
Another issue was the transport of the react production build from our local system to the remote server. Luckily, the SCP protocol which is based on the ssh protocol for secure connection to the server provides exactly the functionality needed. It allows you to transfer files via ssh with only one command by copying a local directory to a remote directory. Requirements are an ssh-key pair that you can easily create with the AWS console and access rights to the directories you want to upload your files.
scp -r -i "path/to/ssh/key" build/* ec2-user@ec2-3-73-73-52.eu-central-1.compute.amazonaws.com:/var/www/3.73.73.52/
While all of this functioned well, in the end after seeing the methods used by other students in the course, we chose a different approach:
The final deployed frontend is a React website production build stored on an AWS S3 bucket. A nice feature of the bucket is that you can enable static website hosting, which automatically delivers the stored files. As already indicated above, the main reason for choosing a bucket over a VM to host a static website is that it is far easier to configure. This also proved highly effective when we added infrastructure as code to our project, which is discussed later.
It is a give-and-take – communication between stateful and stateless components
The biggest challenges besides the deployment issues of the website were related to the communication between the frontend and the Lambdas. The procedure of the communication from a frontend point of view can be described like this:
- send a POST request to the main Lambda with the wav specifications in the body of the message
- wait for JSON response with the properties
request_idandfile_id - send GET request to the wave delivery service Lambda with the query parameters
request_idandfile_id - wait for JSON response with the property
statusand depending on the value also the propertyfileholding the file as base64 string:
- repeat from 3. (
status = “in_progress”) - break the loop, convert the file string and make it ready to download (
status = “ready”)
As you can see, the frontend is the active part, triggering the communication process and being responsible for keeping stateful information like IDs of requests and files. It hereby implements the busy waiting pattern by frequently asking for the file to be ready. This is necessary because the Lambda functions are not only designed to be serverless but also to be stateless, meaning they should not store any information beyond their runtime. Every instance of a wave delivery Lambda should respond the same way when triggered by the same request and just deliver what is asked for.
Coming back to the content size limit of the Lambdas, this creates a new challenge when we want to transfer files that are larger than 6 megabytes. To solve this we implemented a buffer mechanism that should download a file exceeding the size limit in several steps.
Because of the stateful implementation of the frontend, it would also have to be the one to hold the state of the fragments being downloaded and specify what part it needs next.
This resulted in adding parameter offset_num, counting the parts of the file that are already downloaded and a buffer array outside of the request loop, storing the fragments as buffers:
- send GET request to the wave delivery service Lambda with the query parameters
request_id,file_idandoffset_num - wait for JSON response with the property status and depending on the value also the property
fileholding the file as base64 string:
- repeat from 3. (
status = “in_progress”) - convert the file string and add it to the buffer array. (
status = “ready”) Then, depending on theisLastproperty:- repeat from 3. (
isLast = false) - break the loop, make a file out of the array and make it ready to download (
isLast = true)
- repeat from 3. (
On the Lambda side, the buffering mechanism is implemented by the isLast parameter which is sent with each response. To figure out its value, the Lambda has to make a request to the wav file bucket with every invocation and get the metadata of the file that also contains the ContentLength in bytes (as you can also see in the code picture of the wave delivery service section). In combination with the offset_num value in the request query and a hard-coded fragment length, the isLast field can be set and the byte offset can be calculated:

The S3 getObject() method accepts an argument specifying a certain range of bytes, which is very useful in this case.
To summarize, it was a lot of fun to find a solution to the 6-megabyte limit, requiring having a good overview of what each of the individual components is doing and how they interact. There were often problems that were repeatedly caused by something external like insufficient access rights. Logging helped a lot to find out where the errors occurred. In the future though, investing more time in some kind of testing infrastructure would probably solve a lot of the issues faster.
API Gateways & CORS
Another relevant component type in our application is the API Gateway. To simplify the component structure and the interaction between the instances, we have been leaving the API Gateways out of the picture up to this point. But actually, it is quite an important entity in the communication between the frontend and the Lambdas. API Gateways take HTTP requests and can manage and prepare data before forwarding them to e. g. a Lambda or an EC2 instance.
For example, an issue when invoking the Main Lambda via HTTP, was that the metadata for a wav file was sent as a string, even though it was in JSON format. After adding an API Gateway, it converted the metadata to JSON, which made it a lot easier to be parsed by the Main Lambda.
In the case of the wave delivery Lambda gateway, the URL query parameters are put as key-value pairs into a JSON event message which is then forwarded to the Lambda.
Though it seemed to work testing the gateways via curl, it didn’t show the expected results in the browser. We always had this error:

In our case, we needed it to enable Cross-Origin-Resource-Sharing (CORS) on the API gateway since no Access-Control-Allow-Origin header was present on the requested resource. But because it worked well via curl without this error we thought it had to work as well in the browser and just set the request’s mode to no-cors, hoping we wouldn’t have to deal with the CORS policy. Unfortunately, this leads to an opaque response, which is only useful if you are not interested in any content of the response, for example when only using it for caching purposes.
So we had to find out how to enable CORS via the AWS console, which solved the problem. But we still didn’t understand what exactly it was doing and what it had to do with the browser. So we refreshed our knowledge on the CORS topic:
- the frontend makes a request to the wave delivery Lambda, which has a different origin
- since the browser enforces the CORS protocol per default, the browser always sends an
originheader, containing the base URL of the frontend - the requested resource (our Lambda) needs to explicitly state, which other origins are allowed to access it, it does so by sending the
Access-Control-Allow-Originheader - if this header is not present, the browser will block the response from the requested resource
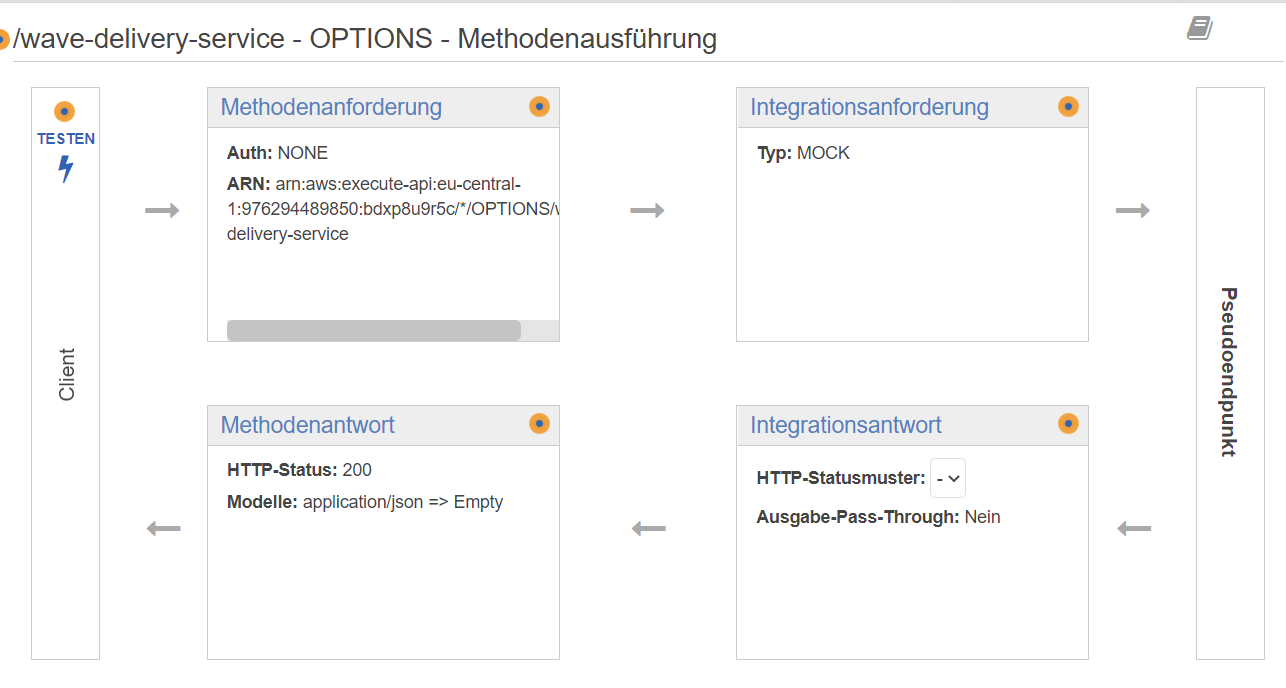
For some requests (e.g. PUT requests, which can cause side effects on the requested resource), the browser needs to make a preflight request, a so-called OPTIONS request, to find out which types of requests are permitted by the resource. For example, if we made a PUT request on the wave delivery Lambda, this request would fail if PUT wouldn’t be listed in the Access-Control-Allow-Methods header in the response to the OPTIONS request.
The OPTIONS method in the API gateway is realized through a mocked endpoint, just sending a back message with the required headers:
In the end, we knew why an API gateway was necessary in our case and that it had big advantages, although it takes some time to understand and configure the component.
Database
We store all requests in AWS DynamoDB, a NoSQL database. Entries in the database have the following format:
{
	id: string,
	date: string,
	is_downloaded: bool,
	request_id: string,
	specs: {
		wav_data: {
			volume: number,
			duration: number,
			frequencies: Array[number],
		},
		wav_spec: {
			sample_rate: number,
			number_of_channels: number,
			bits_per_sample: number,
		}
	},
	time: string
}
Data regarding the wav file (held by wav_data and wav_spec) might be useful if we want to create statistics about user requests in the future. But at the moment, they serve no specific purpose.
The partition key (id) is important since it is used by the wave delivery service Lambda to request files from a bucket (it is the actual filename as it is stored in the bucket).
The is_downloaded field is used by both the wave delivery Lambda and the bucket cleaner Lambda. The wave delivery Lambda uses it to verify that the file for the request wasn’t already downloaded. The bucket cleaner uses it to determine which files need to be deleted.
The creation_date field is important for the bucket cleaner Lambda: When the bucket cleaner Lambda makes a request to the database, we don’t want to query for all entries every time, since this will lead to larger and larger query result sets. We needed a way to make those queries as efficient as possible.
DynamoDB lets you define a so-called global index. Simply put, this gives us the opportunity to efficiently query for files that were created on a certain date. Without this, we would need to query for a file, then check the date and repeat this process for all files, leading to slow performance. Global indices also let us specify which parts of the entry we want to return. Since we only need the id, date, and is_downloaded fields for deleting a file, this provides another opportunity to query more efficiently, since the size of an entry will be smaller.
Deployment
Infrastructure As Code
For automating the setup of our infrastructure later and to bring everything we had done manually together, we decided to go with an Infrastructure as Code approach. Terraform was the obvious choice because both of us had used it before and we knew it had good documentation. An alternative would have been the AWS CloudFormation service, where you can declare your resources in a JSON or YAML syntax. Though you don’t have to worry about managing a shared state like you have to in Terraform, both approaches require other tools to automate applying changes to the infrastructure. With Terraform, we had an idea of how to do that.
Though it was a time-consuming process to turn all the components we had and their configuration into code, luckily it wasn’t that complicated. It also helped us get an even better overview of our system and the dependencies of the resources. While AWS access rights and roles have been a cross-sectional topic that we came up against all the time, it became even more relevant when declaring our resources.
Every Lambda has its own service role that can hold access rights to perform specific actions on a specific resource. While creating a Lambda via the AWS console automatically created a service role for your Lambda, you had to declare it explicitly in Terraform. We had also created custom tailored access rights for e.g. getting a file out of the wav file bucket or writing to the wav file database table, which now had to be written as code.

Here you can see the assignment of several access policies to the wave delivery service Lambda. During the coding process, we learned that we also had to attach basic execution rights to the service roles, which allows them to publish their logs to the CloudWatch service. This was also done automatically when creating a Lambda via the AWS console.
While the most errors during the setup of our infrastructure via Terraform occurred in the access rights section, there was one error due to misconfiguration that we first didn’t even associate with Terraform.
When using the user interface to create a large wav file, it randomly happened that the file wouldn’t be delivered to the client. To find a pattern in the behavior of the application we tried creating the same large file multiple times and found out that sometimes the requested file was missing in the bucket, even though we got a file_id back. So we traced it back to the sine generator Lambda, which sometimes did not finish its process. We could establish that through missing logging messages that should confirm the successful storage of a wav file in the bucket.

After some sleepless nights, one of us had the idea that the Lambdas automatically time out after a few seconds. That assumption was right, the Lambdas had a timeout of 3 seconds by default. But the probability of that causing the error seemed still absurd because, for that, the execution time of the Lambda for a file with the requested specification had to be exactly around the 3 seconds to fail about 50% of the time. But in fact, that was the case. The sine generator function has a wav file duration limit of 60 seconds, so the testing of large file creation was also basically limited to duration values between 50 and 60 seconds. That unfortunately always took around 3 seconds of execution time (with a sample rate of 8 bit). By setting the timeout to 30 seconds we solved the problem accordingly.
This was set before manually when creating the function via the AWS console. If you don’t specify the value in Terraform at all, it is set to the default value. Many of the errors showed us how important it is to read the documentation carefully.
Putting It All Together
The final step was to put everything together and deploy the application. We worked with CI/CD pipelines before using GitLab. But since this was a student project, we had to create our own problems and thus decided to try out something new by using GitHub Actions for our deployment.
GitHub Actions
GitHub Actions use so-called Workflows, which are run on triggers.
A trigger might be something general, like a push on a certain branch, or something more specific, e.g. changing a file with a certain name. As a simple example, we could specify a workflow to run only, when pushing on main and only files with the file name ending in *rs are changed. (You wouldn’t want to trigger a redeployment when updating a readme file).
A workflow runs several jobs, which may be dependent on one another or not. Each job then can have a series of steps, where you first set up some environment variables or install some programs in one step, in order to run those programs in a later step.
It is also possible to specify for each job individually if it is run on a VM provided by Github or on a local machine.
In order to run a job in a workflow on Github, a runner is needed. We had two options: Use a runner provided by GitHub or use a local runner, hosted on our own machine. There are advantages and disadvantages to each approach:
Using a runner on GitHub means that we don’t need to install anything on our own machine. Furthermore, the GitHub runner can be run at any time. A local runner needs to manually be started and only runs if our own machine is actually running. One of the advantages of using a local runner is that it has access to programs installed on the local machine. For example, building a Rust application requires Rust’s package manager Cargo. Using a GitHub runner, we would need to use a so-called action to install cargo. An action can be thought of similarly to a subroutine used in a workflow, which installs programs on the runner.
A quick side note, actions can be easily confused with GitHub Actions. The former refers to things that can be run as a step in a workflow’s job while the latter refers to the name of pipelines in Github.
This in turn slows down the deployment process, since we always need to install everything new, when starting the runner. Also, there might not be an action available for some use cases, which means we need to manually install the software in the workflow using commands like apt-get, etc.
When using a local machine, we just install everything we require once (and since we also develop everything on our own machines, the programs needed for deployment are most likely already installed). This simplifies the deployment process quite a bit, at the cost of flexibility.
For our case, we chose simplicity. (Although by the time this blog is online, we might have changed this, just out of curiosity 😉 )
Building The Rust Binaries
Our first goal was to build the Rust Lambdas. Building the functions itself is fairly easy, and can be simply done by changing into the directory of the Rust program and running the command “cargo lambda build”.
The hard part was building them fast.
Compile times with Rust can take a significant amount of time. Compiling a Lambda function from scratch could take up to 5-10 minutes, so doing this for three functions separately would have been really slow. Also, most Lambdas used the same dependencies, which get to be recompiled for every Lambda. If we used a dependency for the Lambda runtime in each Lambda function, we should only need to compile it once.
A solution to this was creating a Cargo workspace. This is fairly simple, as we only needed to specify the names of the Lambdas that need to be built in a cargo.toml file in the parent directory of the project. The big effect was that cargo figured out all the dependencies needed by all the Lambdas, and built each individual dependency only once. This change caused the compile process to only take roughly one-third of the time.
But it still took up to 10 minutes to compile everything which was still too long. The main thing slowing down the compile times was building the dependencies for the AWS SDK. But those should actually rarely change. What we wanted to do was to build those dependencies once and only rebuild them when we update to a new SDK version. Basically, most of the time, we only made a change to the Lambda functions, so those were the only ones that should be rebuilt.
After doing some research, we found out about a feature in Github Actions called caches. Caches allow us to store already built dependencies. A cache can be identified by a unique key, which needs to be created manually. Rust stores all information of its dependencies in a file called cargo.lock, which only gets updated when dependencies change. Our idea was to create a hash over the contents of the cargo.lock file and use it as part of our unique key. If no dependencies changed, the hash would be the same, resulting in a cache hit and downloading the cache onto the runner. Then, when starting to compile the Lambdas, Cargo would see the downloaded dependencies and not recompile them. Applying this change, the average compile times were as low as 1-2 minutes.
Sometimes though, the Lambda functions also wouldn’t change when a workflow was triggered. So we decided to add an additional hash over the contents of the three Lambdas to the key. The result looks like this:

The main key is built from the hashes over the cargo.lock and main.rs files. If a cache miss occurs for that key, we provide several restore keys: One where we first check if a cache is found for the dependencies. If we get a cache hit here, it means we don’t have to rebuild any of the dependencies. If that fails, we just check if any cache for the build process is available. This will cause some dependencies to be recompiled, but also only those, which have changed (cargo also detects which of the dependencies are different from the ones specified in its configuration). Afterward, we upload the built binaries as artifacts, so we can use them later in the Terraform job.
With all this in place, we were finally satisfied with the build process.
Terraform
The next step was the deployment of the whole AWS infrastructure using Terraform.
As mentioned, both of us had experience with Terraform before but had only used it in the context of GitLab. Terraform always needs to store a state of the specified infrastructure somewhere, in order to figure out which components have changed or need to be updated. Gitlab for example provides that sort of functionality itself, but when using GitHub, you have to find a different approach to state management. Fortunately, Terraform provides its own Terraform Cloud. There are also good instructions online on how to set up everything properly with GitHub, so this wasn’t a big problem.
One thing that caused us to trip here though was that for some reason when deploying the application, Terraform was unable to find any of the artifacts and directories needed. After some research, we found out that this was due to Terraform running its process separately in its own cloud. Meaning it was not our runner executing the deployment, and thus, all the files needed were missing. Luckily, this could be changed in the configuration of the Terraform Cloud. After setting it to run on our local runner, everything worked smoothly.
The Frontend
One of the issues when deploying had to do with the deployment of the frontend. The frontend files were to be stored in an AWS bucket, but we could only upload them into the bucket after the bucket was deployed.
Also, the frontend needed the URLs in order to invoke the main Lambda and wave delivery Lambda. Those URLs were only known after we deployed the infrastructure and they needed to be inserted when building the frontend, via a small build script. A neat thing is, that Terraform is able to know the URLs, so we can simply provide the whole script as an output from Terraform.

This meant that we first had to deploy the whole infrastructure with Terraform and then afterward build the frontend and upload it into the bucket.
Tests
The last thing to do was to run the tests when deploying the application (even though this is the first stage of the deployment process, we chose to add it last). Running the tests was similar to building the application, so we just had to make small adjustments to the build process to refactor it to a testing job.
A downside here was that we needed to recompile everything again since when deploying the application, we didn’t want to have any code regarding tests in the binaries, which could lead to binary bloat.
This also required us to add a separate cache for the test job.
Dealing With Component Names
Another thing that was important for us when deploying the application, was that we wanted to have a central place where the names for the Lambdas, buckets, databases, etc. would be stored. Since you can declare variables in the workflow file this seemed to be a suitable place to do so. Rust, React and Terraform allow for reading in environment variables during compile/build time. Thus, we simply specified variable names which would then be read in by each application. This helps avoid small bugs, where the name of a resource might be misspelled.
Some Pearls Of Wisdom
In conclusion, it has been a very exciting experience to work on this project. As we had planned it consisted mainly of architecture work, considerations about the communication between the individual components, and deployment concepts. Besides the scalability possibilities, it is an additional big advantage of the cloud component architecture that it becomes less important which tools you prefer to use to develop a component, as long as you agree on the interfaces.
In the end, our Lambdas are written in very different programming languages like Rust and Node.js, but everything works just fine due to joint resolution of how e.g. a database entry of a wav file has to look like, generic naming, or what information a request to a Lambda should contain. This has proved very effective for our collaborative work. Also, Being a team of only two people made communication quite simple. In addition, we benefited from very good documentation like for example Terraform but also recording our own considerations and decisions.
What would we do differently in the future? We guess it could increase the efficiency of our development process to invest a lot more time into testing. While learning how to do adequate testing would have been an additional effort for the project, with our afterward knowledge of the cloud concepts it might be worth the expense. It would make debugging easier and assure the quality of our code. Admittedly, we have been using the cloud as kind of a playground to try out new approaches in the cloud environment.
From an architectural view, we are quite happy with our solution. Even though we know, there isn’t just one way of doing it, especially when considering the variety of cloud concepts that exist. Every architecture decision has its advantages and disadvantages and you always have to balance the effects depending on the particulars of the application. Though this is a very vague response to the question, it is an important guideline to keep the solution as simple as possible.
Leave a Reply
You must be logged in to post a comment.