Certificates are everywhere. But they also expire. Who would want to have to issue new certificates for every device on the company infrastructure? Every year?
Not only is it time consuming, but also error prone. You could forget one device or how it is done. Therefore it is useful to invest time into automating this process. This article shows you how to set up a SCEP-Server for mikrotik-switches for easy certificate-enrollment.
Given:
- internal network infrastructure with mikrotik routers
Goal: - only access the webinterface via https (default is http)
- automate certificate enrollment with a small scep server
As an intern at trustsec IT solutions my task was to migrate the company network onto new devices. We will use solely mikrotik devices as managed switches from now on.
These devices are RouterBoards but we will use them as switches instead of routers. They come with a management webinterface which by default is accessible via http. For security reasons we want to close this port and only make it available via https. Therefore all the switches need certificates. As we do not want to have to repeat the process manually every year, this tutorial is about how to automate this with an SCEP-Server. SCEP stands for Simple Certificate Enrollment Protocol and is just what we want.
Using an SCEP-server is not the only way to achieve this on these devices. Mikrotik RouterOS comes with a few options:
- self-signed certificates
- let’s encrypt
- scep
You could also use tools like ansible or puppet to deploy the configurations and certificates, but as this are switches you will only configure once it seems to be a lot of overhead. It makes sense if you have a lot of devices or more than one network to take care of. But we have to manage only a handful of devices and only this network to setup.
So in this case, using a scep server was the best option. Following is a brief overview of strengths and drawbacks of the previously mentioned options: - self-signed certificates:
- every router could just sign the certificates themselves, directly on the device
- or you could make one router the source where the other routers can get their certificates signed
- it is easy and convenient. But from a security perspective you cannot be sure that you actually ended up on the device you wanted to access. Self-signed certs are more suitable for a test setup
- let’s encrypt:
- this option simple wasn’t feasible for us, because our devices will only be used as switches with no access to the outside network
- let’s encrypt works via a challenge on a public website. Security: it is not a good idea to expose your admin interface publicly over the internet
- scep:
- deploying a single scep server in the network
- as we are self-hosting, simply adding another service is no problem: plus having one central scep-instance has the additional benefit of a source of certificates in case other devices need certificates as well
- you can create your own CA and use it on your scep-server
- but: which one to use?
There are many SCEP-Options out there, or rather, there are big SSL-options out there like openSCEP, EJBCA or DogTag. Most offer many, many features besides SCEP. But we really only need SCEP at the moment. Luckily we found one which only is a scep-server, since this is all we need: micromdm-scep. You can either build from source or download the binaries from their release page. If you want to build from source you have to clone the repo and have a go compiler.
Setting up the scep-server for mikrotik
At first I worked with the downloaded release-files, but later switched to build them from source. You will find the description for this in the error section below.
For building from source you have to clone the repo. This part is also described on the github page, but I will not leave this as an excercise for the reader.
Compiling
Here are the steps from their page:
To compile the SCEP client and server you will need a Go compiler as well as standard tools like git, make, etc.
- Clone the repository and get into the source directory:
git clone https://github.com/micromdm/scep.git && cd scep - Compile the client and server binaries:
make
The binaries will be compiled in the current directory and named after the architecture. I.e. scepclient-linux-amd64 and scepserver-linux-amd64.
CA-Initiation
If you just want to test everything:./scepserver-linux-amd64 ca -init
If you want to add more information about the CA, aka not using the default values micromdm provides its the following with the details entered as you need them. You can also see their provided flags for more information.
./scepserver-linux-amd64 ca -init -common_name name -organization organisation -country countrycode -depot "path to depot"
Depot is the folder where the certificates and the CA information are stored. Default is depot, if you use another path you have to specify it.
Starting the scep-server
After initiating the CA you can start the server with./scepserver-linux-amd64
In default mode it will only sign certificates as tls-client.
As I needed a tls-server I had to pass another argument:./scepserver-linux-amd64 -sign-server-attrs
The server is now up and running and provides an http-endpoint where the certificates can be requested. By default it is on port 8080, by -port string you can use another port. If you want to add a challenge password its./scepserver-linux-amd64 -sign-server-attrs -challenge string
Requesting certificates from mikrotik
As the server is running now we can head over to our mikrotik router. In the GUI under System->Certificates you can add a new one. Important: mark tls-server under key usage! The mikrotik-switches are the servers, because we want to access them via the browser.
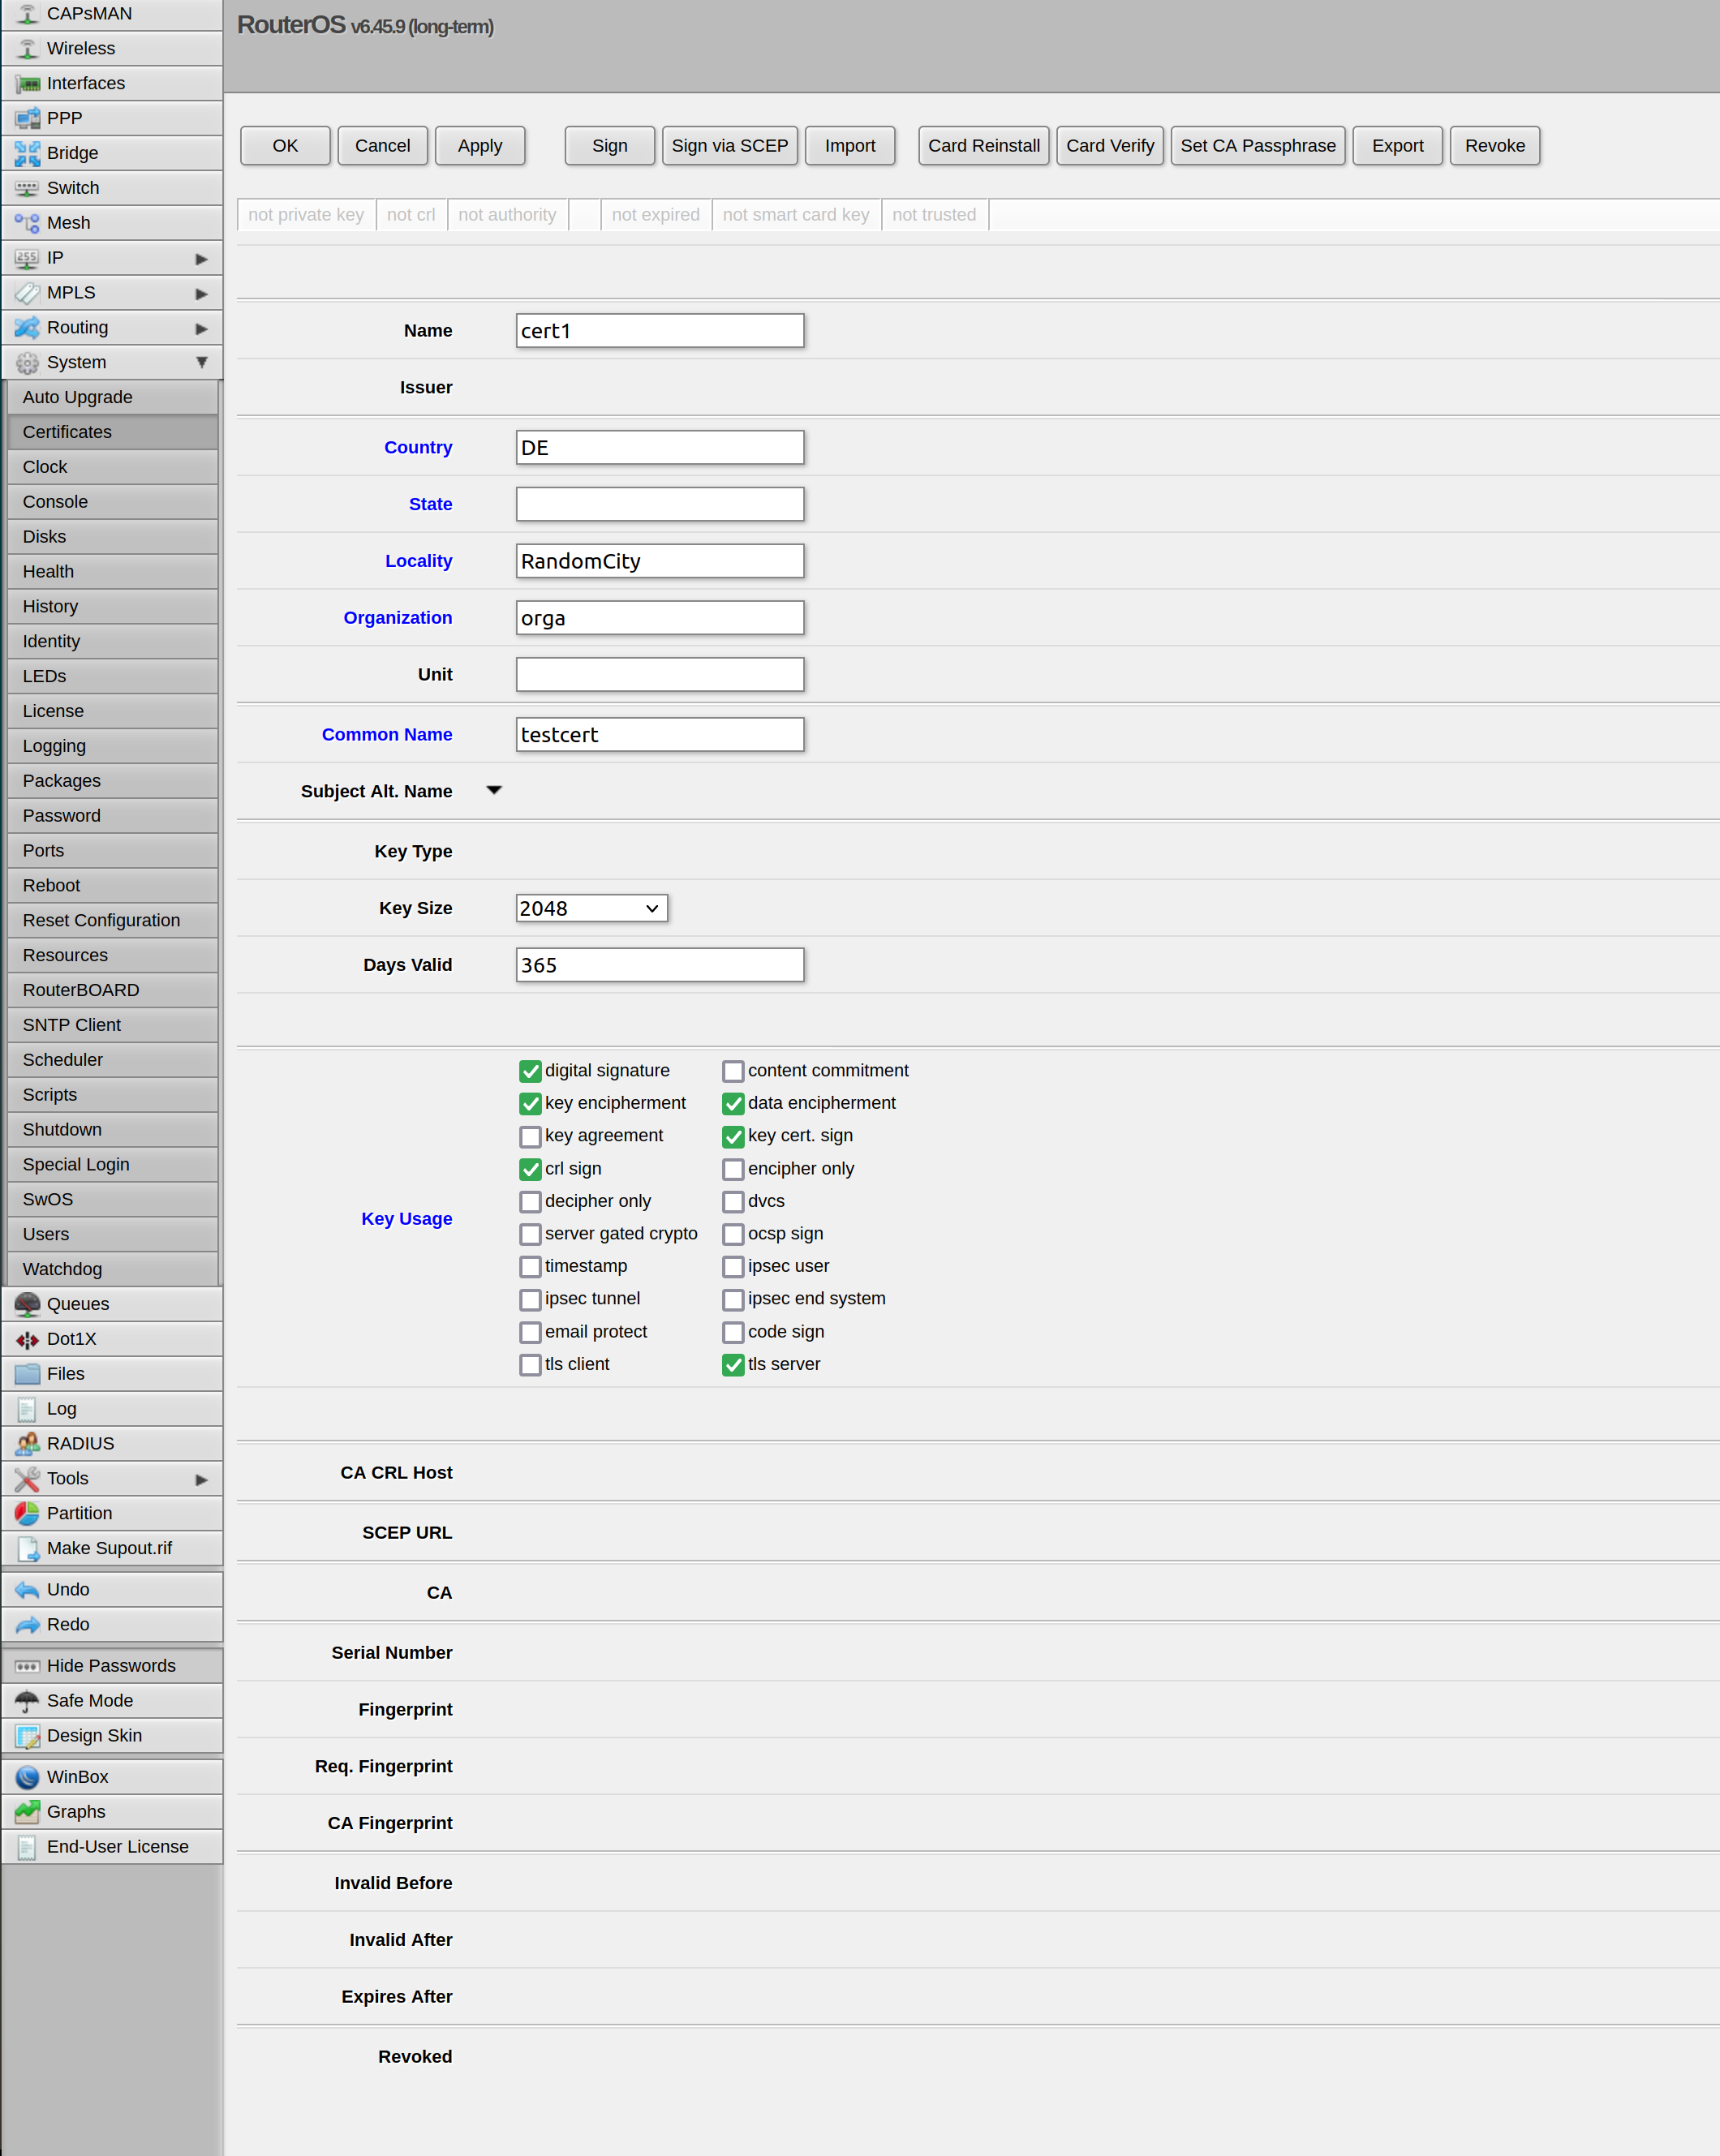
Click sign via SCEP. If asked to apply changes click yes.
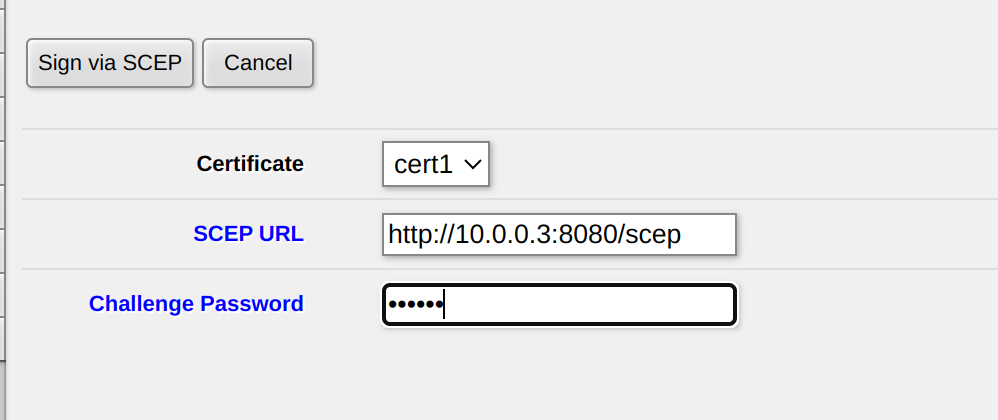
Enter the http-address to your server. It can either be localhost or in my case the IP from the private network that I set up on my computer for testing reasons. See more on this in the misc section of this post. You can see the status of the certificate. If it is signed with KT it means that it has a key and is trusted. KET means it is expired. The CA will also be downloaded to the router and is signed with a T.
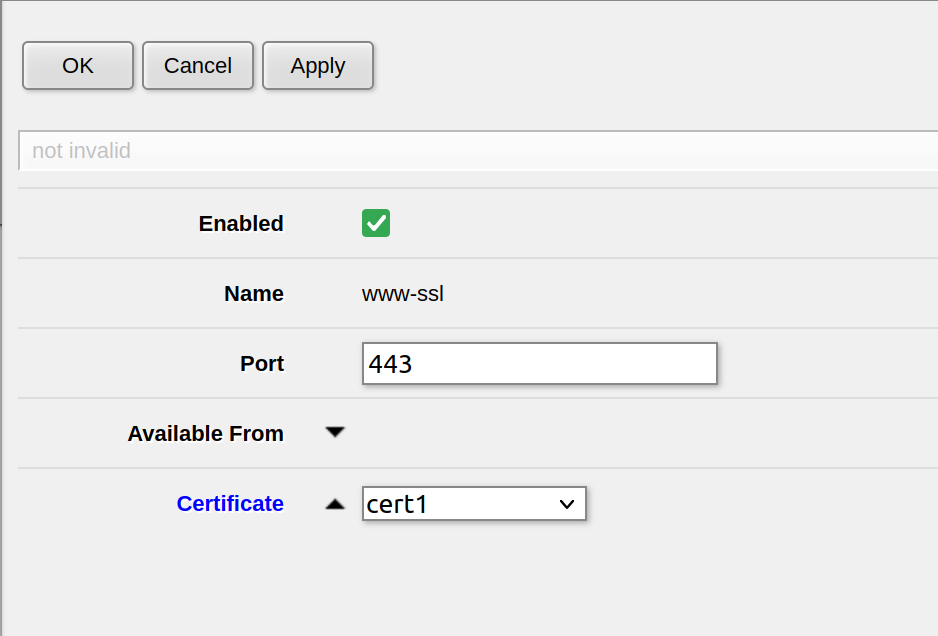
Enabling https
After the certificate is installed https is enabled by going to IP->Services and enabling www-https. Here you have to enter which certificate to use.
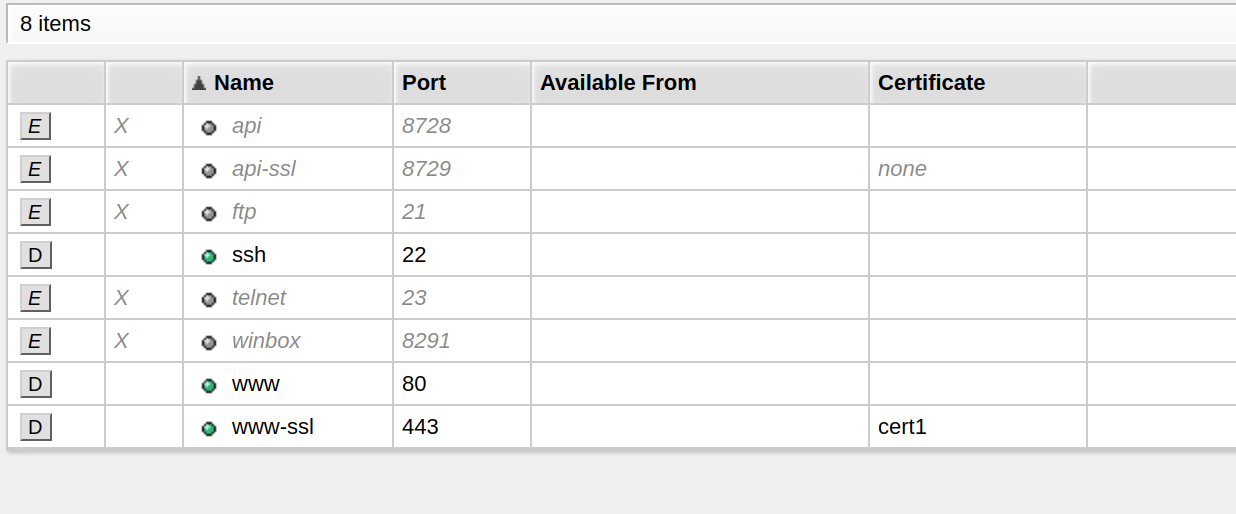
As I am still testing, www is enabled, but in production the http port will be closed.
You also have to add the CA to the trusted authorities in your browser. If you then go to the webpage you get the information that the connection is not secure but you can go on the page when you accept the risks. As you signed the certificates yourself you hopefully can trust yourself 🙂
On the terminal
The mikrotik switches also come with a terminal. You can either use the webconfig or winbox to open a terminal there, but you can also connect to your switches via ssh. This is a really handy way because clicking your way through the GUI can be very tedious. Using the cmd also have the benefit that you can write the configuration once and deliver it to all your devices.
The commands to request the certificates from your scep-server on the mikrotik-switch look like this:
/certificate add name="Server" subject-alt-name="altname" common-name="commonname.fully.qualified.com" country="DE" state="Baden-Wuerttemberg" locality="Stuttgart" organization="your organization" unit="Systems Administration" key-usage=digital-signature,key-encipherment,tls-server,tls-client days-valid=365

/certificate add-scep template=Server scep-url="http://your-server-IP1:8080/scep" challenge-password="YourSuperSecretPassword"

/ip service set www-ssl certificate=Server
Conclusion
With this, you have set up your scep-server for your mikrotik-switches. I hope you found this tutorial helpful. In the Error-Section and the Misc-Section you will find additional information of mistakes I have made, so that you don’t get stuck there.
Errors
I downloaded the binaries from the release page. At first I thought that would work fine because signing the certificates worked. But I always got errors that there is no cipher overlap. A deep dive into the code revealed that by default it would only sign for the keyusage of tls-client. Since this certificate should be used for webaccess to the webconfig, it needed to be a tls-server.
Therefore when starting the server the attribute -sign-server-attrs has to be added. But when starting the server with the release-binaries it said that the option was not implemented. So I cloned the repo from github, installed a go compiler and build it. With this version it finally worked. You have to be careful though: after I finally had a certificate with tls-server keyusage, I got another SSL-Error: that the issuer was already used. I generated so many CAs and certificates with duplicates that I got this error. As this were only for testing, I did not really care. I initiated a new CA with ca -init and this time I provided the proper name and finally it worked: I had a certificate for accessing the webfig via https!
Misc
Private Network
Working with network devices can be really challenging especially if you have to test them but don’t want to mess up the network for other people. Therefore I set up a small private network on an external interface.
I simply had an USB-C adapter and connected the router.
With ip addr add 10.0.0.3/24 dev enx5 I gave my computer an IP address just for this interface. You can find your own interfaces and the device names via ip aor ip addr showand use this in the command. I needed to run my own ntp-server as well, so I made it listen on the same interface as well. It is important that your mikrotiks have the correct time. If they don’t have connection to an ntp-server the certificates will be issued in the 1970 because that is when the computer time started 😉 and all certificates will be expired of course.
Accessing mikrotik
As it can be difficult to access the mikrotik via IP at first if DHCP for example is a bit tricky, I found the easiest way to access the routers via winbox, a tool provided by mikrotik. This only works on Windows, but you can run it on Linux with wine. I connected myself via the MAC-address of the device and changed the IP-address to one on my private network.
I also had my own isc-dhcp-server running, which listened solely on the interface on which I connected the mikrotiks. This was necessary because
Ressources
- https://github.com/micromdm/scep
Leave a Reply
You must be logged in to post a comment.