If you’ve ever attempted to accomplish anything in a German government office, you might feel like you’ve stepped into a time capsule. Fax machines? They’re still very much in use. Digital workflows? Not so much. But what if we told you there’s a new game-changer ready to revolutionize even the most tech-resistant corners of bureaucracy? Meet GuppyAI – your friendly, SMS-powered AI chatbot designed to help government workers upgrade their skills without the hassle.
Let’s be honest – technology and government don’t always mesh well. That’s where GuppyAI steps in to rewrite the story by putting cutting-edge AI within easy reach, using something as simple and familiar as SMS. Yes, you read that right – there’s no need for fancy apps or confusing interfaces. If you can send a text, you can use GuppyAI.
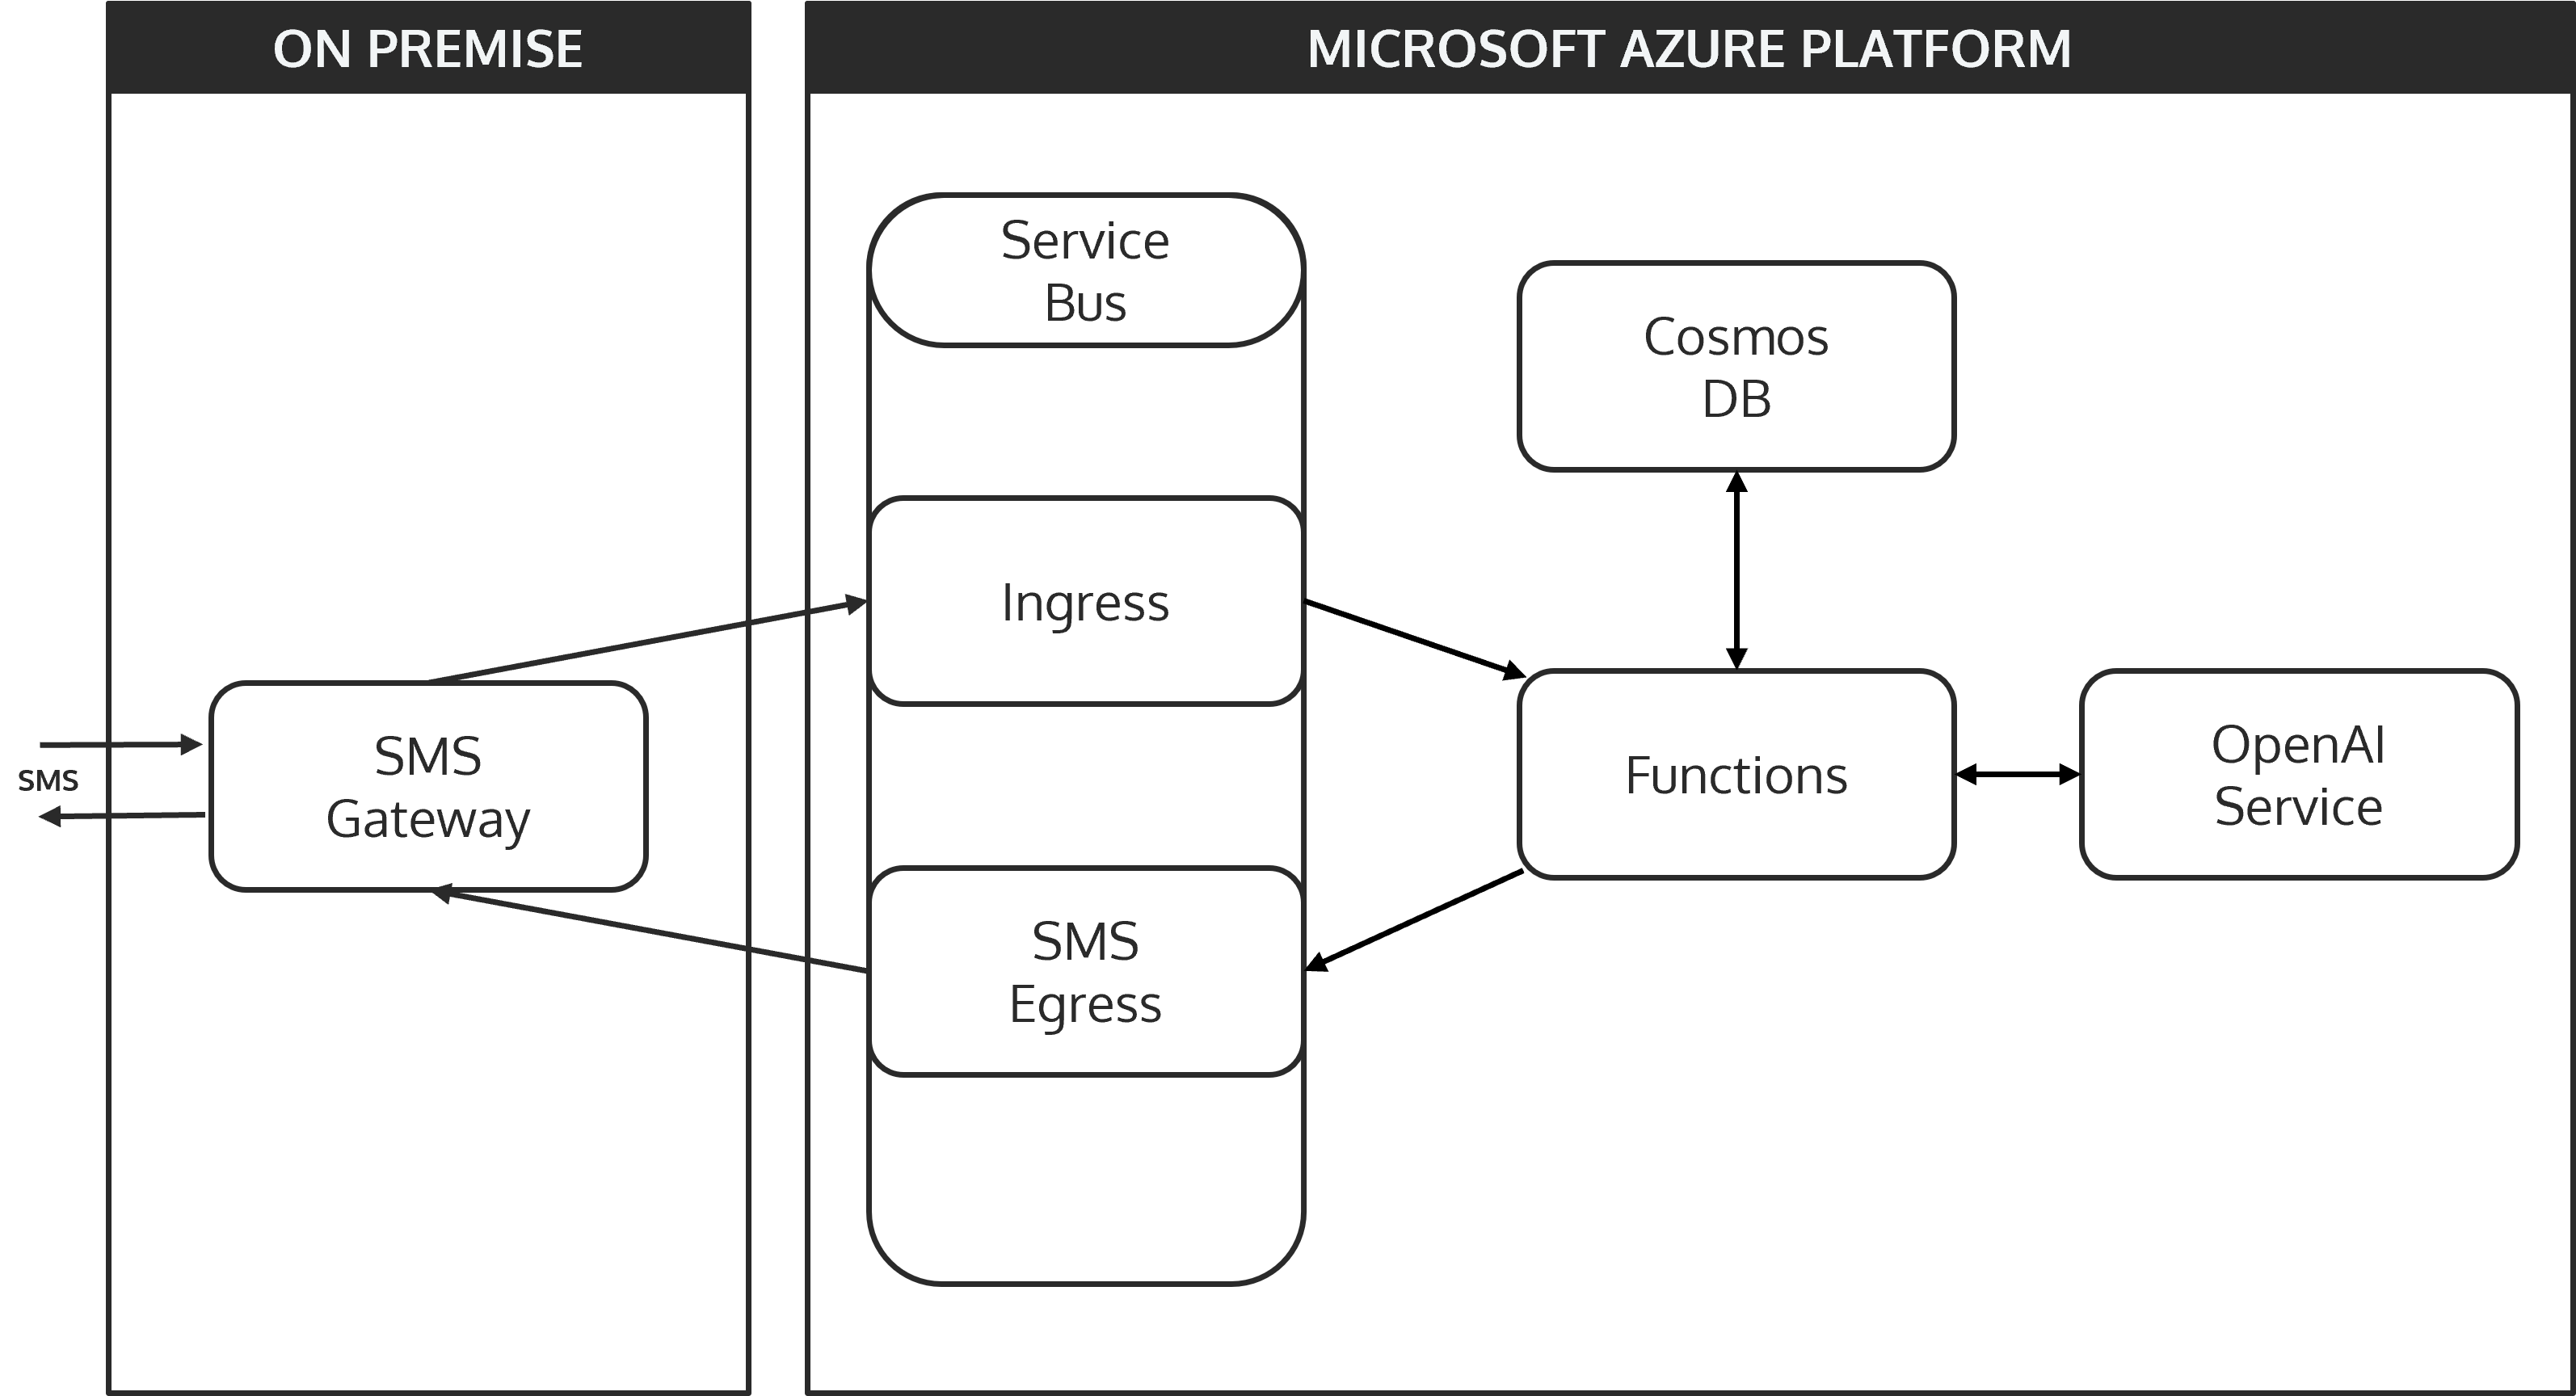
Behind the scenes, GuppyAI runs on state-of-the-art technology. We’ve integrated an on-premise SMS-Gateway with the Azure Cloud Platform via Service Bus, interacting with the ChatGPT 3.5 model through a sleek Node.js function app. Your conversations? They’re securely stored in CosmosDB’s NoSQL database for future reference. But don’t worry, we’ll delve into the technical details, the challenges we faced and all the other fun stuff later – just know that some serious innovation is at play.
If you want to go on a deep dive into our code, feel free take a look at our GitHub organization!
Architecture
At the heart of GuppyAI lies a flexible and adaptable architectural style known as hexagonal architecture, also referred to as the ports and adapters pattern. This approach is designed to keep the core business logic of an application isolated from the external systems it interacts with, making it highly modular and easy to extend. The idea is simple: the core (or the “hexagon”) represents the central business logic, while the “ports” and “adapters” are the external systems or interfaces that interact with this core.
In the context of GuppyAI, the Azure Function represents the core business logic. It handles the flow of data and decision-making, while all the connected systems – like the SMS gateway, Azure Service Bus, CosmosDB, and the AI API – act as adapters. These adapters can be swapped out or extended without significantly altering the core logic. This flexibility is a significant advantage for a project like GuppyAI, where the ability to easily add new message channels, change the persistence layer, or even replace the AI API is crucial for future development.
The hexagonal architecture naturally supports these needs, making it easier to evolve the system as requirements change or new technologies emerge. Whether it’s integrating an additional messaging platform like instant messengers or email, or transitioning to a different database or AI service, the architecture allows for seamless adaptation.
Information Flow
Guppy-AI’s information flow is made to be both simple and reliable. This is how it works:
- SMS Reception: An SMS message is sent by the user and received by the on-premise SMS gateway
- Message Queuing: The gateway forwards the message to the Azure Service Bus, where it is queued for processing.
- Function Trigger: The incoming message in the Service Bus triggers the Azure Function App. The function begins by persisting the user’s message in CosmosDB and retrieving the entire conversation history associated with that user.
- AI Processing: The complete conversation is then sent to the OpenAI API via the official Node.js library. The AI processes the input and generates a response.
- Response Handling: The AI’s response is stored in CosmosDB alongside the conversation history. The function then sends this response back through the Azure Service Bus to the SMS gateway.
- SMS Delivery: The SMS gateway receives the response from the Service Bus and sends it back to the user via SMS.
Scalability and Performance
GuppyAI’s architecture leverages the scalability of cloud-native services to handle a variety of workloads while remaining cost effective. Services such as the Azure Function App, CosmosDB, Azure Cognitive Services, and Azure Service Bus are designed to scale automatically based on demand. This ensures that the system can handle more traffic without requiring manual inputs.
The SMS-Gateway, which is constrained by the throughput of its GSM modem, is the bottleneck in this configuration. Despite this limitation, using zero-scaling services reduces operating expenses, making it a perfect solution for a proof-of-concept project.
One notable performance consideration is the cold start latency of the Azure Function App. When the function is inactive for a period, it can take 20-30 seconds to start up, introducing a delay in processing the first message. Once the function is active, the main performance constraint is the throughput of the GSM modem. Latency between cloud components is minimal, with most being located in the same geographical region except for the ChatGPT API, which is located in France.
Future Expansion and Upcoming Challenges
Looking ahead, GuppyAI’s architecture is well-positioned for expansion. The use of a pub-sub pattern in the Azure Service Bus makes it easy to add new communication channels, such as instant messengers or email, with minimal changes to the existing codebase. The architecture’s flexibility also allows for other potential improvements, such as the introduction of a logging system and the creation of a development environment to facilitate testing and debugging.
In terms of security, while it wasn’t a primary focus during the proof-of-concept phase, future iterations could benefit from placing components that don’t need internet access in a virtual private cloud (VPC) for enhanced security.
Overall, the GuppyAI architecture is robust, flexible, and ready to evolve as the project grows. While there are some areas for improvement, the current setup provides a solid foundation for bringing AI-powered chat services to even the most tech-resistant corners of the German government.
SMS-Gateway
The SMS-Gateway is the critical entry and exit point for all communications within GuppyAI, acting as the bridge between the traditional SMS protocol and our cloud-based AI system. Developed to run on a Raspberry Pi 3B with a GSM modem, this custom gateway manages SMS transmission and reception while connecting with the Azure cloud. We’ll get into the technical specifics of the SMS-Gateway’s development, the difficulties we encountered while implementing it, and its function within the larger GuppyAI architecture in this chapter.
The Elephant in the Room: Why not use Cloud Services for SMS?
When looking at our architecture, one might rightfully ask why we have used cloud services for any task in our use case but the reception and sending of SMS messages. This is were we will explain our partly dissatisfactory explanation on why we had to decide to not base this part of our application on cloud services.
Upon our initial research on how to send and receive SMS, we stumbled over numerous cloud services offering exactly the functionality we needed. Among them were services from the three big cloud providers AWS, Google or Microsoft Azure and many different specialized SaaS (Software-as-a-Service) products. However, with all of them there were a few caveats we as a group of three students could not overcome. Some only operated in the US, some required us to use a so called short code, which are the short phone numbers you often see when you’re getting 2FA messages from PayPal and the like – way too expensive for us! Others would require a waiting time of up to six months just to get the phone number assigned.
It was not too long until we figured, that what we wanted to achieve is not possible in the cloud with the resources we have at hands. So, there was only one possibility remaining: Running the service on premise and using a modem to send the SMS messages.
We knew this would not be easy as there were many unanswered questions:
What are modems we can consider for this? How do we communicate with the modem? Where do we get a mobile plan that offers what we need?
After some research, we found out about the AT standard. The AT standard is a command set we could use to communicate with the modem. As almost any generic USB Stick used for mobile internet reception contains a modem that supports this standard, we just bought the cheapest LTE USB Stick we could find, the Brovi/Huawei E3372-325.
While we waited for our LTE USB Stick to arrive we researched about mobile plans for IoT appliances. In this regard we had the same devastating outcome as with our research about SMS cloud services. IoT mobile plans are expensive, sometimes reserved for businesses and most of the time they only offer data connectivity.
We soon realized our best option would be to opt for a standard consumer mobile plan. The issue with this approach is that many mobile providers prohibit Machine-to-machine communication and similar use cases. Therefore, we chose a plan that would not prohibit our exact use case.
However, we cannot recommend anyone to implement our approach for a non-research work without first consulting the respective mobile phone company or a lawyer. It is only our personal, inexpert assumption that our use case is not covered by the actions prohibited by the terms of service of the mobile provider we chose.
What’s this Funny Dialect
Legal warnings aside, the next step on our journey was to learn about the AT commands we would need to use to send and receive SMS messages.
Some very useful resources for this topic were the following websites:
- AT-Commands for GSM devices (German)
- Nordic Semiconductors – nRF91 Series – AT Commands
- Teletonika AT Commands manual
With these resources we could get learn the basics of how AT commands work:
Every AT command starts with the letters ‘AT’. This is followed by the actual command.
The simplest of all commands probably is ATZ which just resets the modem. Actually, this command also is one of the rather odd ones. With most commands the ‘AT’ sequence is followed by a ‘+’ symbol. We could not definitively find out why this is but our theory is that the ‘+’ symbol indicates a command that one can retrieve information from.
One of those commands is AT+CMGF. It is used to set the format for incoming messages. In most modems there are two formats implemented.
The first one is PDU mode. You might know the term PDU (Protocol data unit) from other protocols like Ethernet. In the Ethernet protocol the protocol data unit would be a frame, in IP it would be a packet, in UDP a datagram. If you want to learn more about how a SMS PDU is structured and how to parse it, take a look at this developer’s guide from Siemens: Developer’s Guide: SMS with the SMS PDU-Mode
The second mode which comes in especially handy when manually interfacing with the modem is text mode where the PDU’s contents are displayed in a human readable way.
With commands like AT+CMGF there are multiple ways to interact with. If you just run it as is you will receive an error. Instead you have to specify how you want to use this command.
If you want to know what mode the modem is currently operating in you will have to append a question mark (AT+CMGF?), if you want to know what you could set it to, you would append an equality sign and a question mark (AT+CMGF=?) and if you desire to change the mode the modem is operating in you would do this with an equality sign as well (e.g. AT+CMGF=1 for setting text mode).
This short introduction was only the tip of the iceberg about sending and receiving SMS with a GSM modem, so we highly recommend reading the sources linked above.
Interfacing with the Modem
The first thing we did when both the modem and our SIM card arrived was to remove the SIM cards SIM-PIN. This would not only prevent us from forgetting the SIM-PIN, it would also remove the need to authenticate with the SIM card using AT commands when the SIM card is used in production.
This out of the way, we were eager to test out all the commands we learned in the preceding days only to come to a halt: “How do we communicate with the modem?”. We already knew, that we have to connect to it through a so-called tty-device which is short for “teletype device”. With Linux, these tty-devices are accessible through the /dev directory.
However, when plugging in the modem, no new devices were listed. The USB stick did not even provide us with a mobile data connection as it should – and does with other operating systems like Windows.
Further research taught us that a USB devices can operate in several modes. Our modem operated as a block device (like a normal USB stick to store data) by default – probably to provide access to the drivers for Windows. However, this mode was not of any use to us.
Gladly, we found this incredible blog post by Pavel Piatruk who dealt with the exact same USB Stick: Huawei E3372-325 ‘BROVI’ and Linux (Ubuntu).
He first developed a script that would switch the USB stick to HiLink mode allowing us to connect to the internet. This is probably the mode most users want the USB stick to operate in, however we are not the typical user in this case.
So, we were even happier about Pavel Piatruk’s work as we found out that he did a follow up where he successfully switched the USB stick to the STICK mode: Huawei E3372-325 ‘BROVI’ and Linux (Ubuntu) – Stick mode.
With his guide we created a udev rule to switch the usb stick to the right mode. udev is a program that will handle hotplug events. It runs rules located in /etc/udev/rules.d whenever a device is plugged in.
# udev rules by Pavel Piatruk (https://blog.tanatos.org/posts/huawei_e3372h-325_brovi_with_linux_stickmode/)
ACTION!="add", GOTO="modeswitch_rules_end"
SUBSYSTEM!="usb", GOTO="modeswitch_rules_end"

ATTRS{bInterfaceNumber}!="00", GOTO="modeswitch_rules_end"
GOTO="modeswitch_rules_begin"

LABEL="modeswitch_rules_begin"
ATTR{idVendor}=="3566", ATTR{idProduct}=="2001", RUN+="/usr/local/bin/brovi_modeswitch.sh  %k %p"
LABEL="modeswitch_rules_end"

SUBSYSTEM=="net", ACTION=="add",  ATTRS{idVendor}=="3566", ATTRS{idProduct}=="2001", NAME="wwan_brovi"
SUBSYSTEM=="tty", ACTION=="add", DEVPATH=="*:1.[24]/*", ATTRS{idVendor}=="3566", ATTRS{idProduct}=="2001", ENV{ID_MM_PORT_IGNORE}="1"
The above udev rules will run the script located at /usr/local/bin/brovi_modeswitch.sh every time a USB device with vendor id 3566 and product id 2001 (i.e. any USB device of the same make and model as we have it on hand) is added. It will also register the tty device ports with the tty subsystem.
#!/bin/bash
# This script is called by udev when a USB device is plugged in.
# It will switch the device to the correct mode for the device.

# Adapted from Pavel Piatruk (https://blog.tanatos.org/posts/huawei_e3372h-325_brovi_with_linux_stickmode/)

PATH=/usr/local/sbin:/usr/local/bin:/usr/sbin:/usr/bin:/sbin:/bin

usb_modeswitch -b $BUSNUM -g $DEVNUM -v $ID_VENDOR_ID -p $ID_MODEL_ID  -X
echo $ID_VENDOR_ID $ID_MODEL_ID ff > /sys/bus/usb-serial/drivers/option1/new_id

exit 0
In the /usr/local/bin/brovi_modeswitch.sh script the usb_modeswitch application is used to switch the USB device to STICK mode. Afterwards the “option” kernel module is notified about a new modem device being added.
The “option” kernel module is the kernel driver for modems of all sorts. To make the kernel load this module at every boot we need to create the text file /etc/modules-load.d/option.conf containing just option.
After a reboot, we’re all set and when plugging in the USB stick, it is launched in STICK mode.
For interfacing with the modem manually and trying out some AT Commands we used the socat application. socat is a command line utility with which one can establich bidirectional byte streams. Therefore it can be used to communicate through network sockets or – as it is required for our use case – to communicate with tty devices.
The USB stick provides three tty devices when in stick mode: /dev/ttyUSB1, /dev/ttyUSB2 and /dev/ttyUSB4. However, only /dev/ttyUSB1 can be used to communicate with the modem itself.
socat - /dev/ttyUSB1,crnlWith the above command we can open a connection to the modem. The ,crnl suffix tells socat that it should send the Carriage Return (\r) and New Line (\n) characters upon pressing enter.
NOTE: For communicating with tty-devices your user needs to be in the group dialout
^RSSI: 46

^HCSQ: "LTE",56,48,156,20

^RRCSTAT: 1

^RRCSTAT: 0
AT+CSQ

+CSQ: 24,99

OK

^HCSQ: "LTE",56,48,151,20
AT+CMGF?

+CMGF: 0

OK
AT+CMGF=?
^RSSI: 43

^HCSQ: "LTE",53,48,166,22

+CMGF: (0,1)

OK
In the above code block you can see an exemplary communication with the modem, where we asked for the current signal quality (AT+CSQ), the current message receiving format (AT+CMGF?) and what it could be set to AT+CMGF=?.
As you can see, the modem regularly sends status information like ^HCSQ: “LTE”,56,48,156,20 which shows parameters of the current connection.
However, at this point we were unable to send or receive SMS messages.
AT+CMGL=4

OK
Normally, the AT+CMGL=4 command should return the received messages. However, even though we sent messages to the phone number associated with the used SIM card, no messages seemed to appear.
Also, after a few tries, the modem just stalled and did not answer to our commands until we replugged it. We figured this and the mysterious status messages may be due to a process communicating with the modem without our knowledge.
So, we used lsof, a command line utility to monitor file access, to look for the culprit.
COMMAND    PID USER   FD   TYPE DEVICE SIZE/OFF NODE NAME
ModemMana 3743 root    9u   CHR  188,1      0t0  644 /dev/ttyUSB1
And every few seconds, they appeared: ModemManager was our culprit! ModemManager is an application that allows modems to be used by other applications. For example, for dialup connections – like with 56k modems in the 90s!
That’s not what we wanted. So, we just decided to turn off ModemManager using systemctl:
systemctl stop ModemManager
systemctl disable ModemManager
Now, we could successfully receive SMS messages:
AT+CMGL=4

+CMT: "SM",0
XXXXXXXXXXXXXXXXXXXXXXXXXXXXXXXXXXXXXXXXXXXXXXXXXXXXXXXXXXXXXXXXX
Hurray! After polling for SMS messages using the AT+CMGL=4 command, we received an CMTI-answer indicating a newly received message. In the next line, we could see the received PDU (censored for privacy reasons).
This confirmed that our approach could work and we just needed to interpret the gibberish the modem sends to us.
Implementing an SMS Gateway
Given the enormous effort required to receive messages, serialize and deserialize the PDUs, it was clear to us that we needed something to lift the weight of our shoulders. Something like a library that would do the heavy lifting. This is where Kent Gibson’s (aka. warthog618) library modem for Go comes into play.
With his library we were able to concentrate on our own business logic and let the library do all the interfacing work – at least that’s what we thought.
The first hurdle we had to take was receiving SMS messages:
handler := func(msg gsm.Message) {
    // handle message here
}
err := modem.StartMessageRx(handler)
In theory, we would just use the library’s StartMessageRx function and provide our own handler for GSM messages. However, the StartMessageRx function uses the AT+CNMI command to instruct the modem to print out received messages to the tty-device. The problem is that no matter what we tried, the messages were only printed out in a very unreliable manner.
Only receiving every third or fourth message was not feasible and thus we instead opted for polling the modem for new messages in a fixed interval.
err := modem.AddIndication("+CMT:", func(info []string) {
    log.Debug().Msg("Receiving message!")

    ...
}, at.WithTrailingLine)

for {
    select {
    case <-time.After(pollingTimeout):
        _, err := modem.Command("+CMGL=4")
        if err != nil {
            ...
        }
    }
}
Using the AddIndication function we can create a hook that is called whenever the symbols +CMT are read. +CMT signals that a SMS message is received and is followed by the PDU-encoded message which will be handed over to the handler function due to the option at.WithTrailingLine being set.
To actually receive any messages we do poll the modem for them with the command AT+CMGL=4 in a for loop.
The other part of interfacing with the modem is sending SMS messages. In a similar way we thought this would be as simple as just using the functions provided by the library.
if len(message) <= 160 {
	logger.Debug().Msg("Sending short message")
	_, err = modem.SendShortMessage(phoneNumber, message)
} else {
	logger.Debug().Msg("Sending long message")
	_, err = modem.SendLongMessage(phoneNumber, message)
}
Sadly, this wasn’t the case and this is due to the way SMS deals with long messages. If a message is too long to be sent in a single PDU, it is split up into multiple PDUs which are linked together through an identifier. However, the maximum length of a single PDU depends on the used character set.
For example, if a message does not contain any special characters like emojis, the GSM-7-bit default encoding is used which allows for up to 160 characters. If there are characters which cannot be represented in this encoding, the 16-bit UCS-2 encoding is used instead. With this encoding, only 70 code points (not characters!) can be sent.
So, how do we determine whether to use the SendLongMessage or the SendShortMessage method provided by the library? This algorithm would be rather complicated to implement. Therefore, we decided to also use the lower level APIs the library provides in this case:
numberOption := sms.To(phoneNumber)

pdus, err := sms.Encode([]byte(message), numberOption)
if err != nil {
    ...
}

var binaryPdus [][]byte

for _, pdu := range pdus {
    binaryPdu, err := pdu.MarshalBinary()
    if err != nil {
        ...
    }

    binaryPdus = append(binaryPdus, binaryPdu)
}

...

for _, binaryPdu := range binaryPdus {
    if _, err := modem.SendPDU(binaryPdu); err != nil {
        ...
    }
}
Using these lower level APIs we can deal with short or long messages exactly the same The sms.Encode function will just return a slice of PDUs which we will have to send. No matter, if we only need one PDU or twelve.
Cloud Infrastructure
The cloud infrastructure of GuppyAI is like the engine of a high-performance car – powerful, efficient, and finely tuned to deliver smooth performance. Just like every component of an engine is essential for driving the vehicle forward, our Azure services and Terraform – work seamlessly together to power GuppyAI’s intelligent messaging capabilities. In this chapter, we’ll “pop the hood” and examine how each of these elements contribute to our system.
Azure Service Bus
At the core of GuppyAI’s architecture is the Azure Service Bus, a reliable message broker that ensures smooth communication between the different components of our system. We chose Azure Service Bus primarily for its support of the pub-sub (publish-subscribe) messaging model, which allows us to efficiently manage load balancing. This capability ensures that messages are distributed evenly across available resources, preventing any single component from being overwhelmed.
Another significant advantage of Azure Service Bus is the availability of client SDKs, which meant we didn’t need to build and maintain a custom API for communication between the SMS-Gateway and the Azure cloud. This choice not only simplified our development process but also ensured that our system could easily scale and adapt as needed.
The Azure Service Bus also integrates seamlessly with Azure Functions, automatically triggering the functions when new messages arrive. This tight integration made development smoother and allowed us to focus on building the core logic of GuppyAI without worrying about the complexities of message handling.
Azure Function
Our Azure Function plays a pivotal role in our cloud architecture, acting as the brain of GuppyAI. Serverless computing allowed us to focus mainly on writing code without the overhead of managing and maintaining servers. For our project, this meant we could develop faster and with fewer resources, concentrating on what matters most: delivering a functional and reliable service.
One of the key reasons we chose Azure Functions was, that it allows for an usage-based payment model. This was a great option to keep operational costs down, especially in the early phases of development, because costs are only created when the function is run. Furthermore, there is no need for complicated load balancers or other external scaling methods because Azure Functions can scale automatically based on demand.
The ability of Azure Service Bus to trigger Azure Functions automatically was incredibly useful for us. This feature allowed for a streamlined workflow where messages from the SMS-Gateway would instantly activate the function, process the request, and generate a response. This seamless flow between services significantly simplified our architecture and reduced the potential for errors.
One-Click Provisioning using Terraform
We used Terraform to manage our cloud infrastructure. This tool allows us to define and provision our setup using code. We chose Terraform because we wanted to learn about and implement infrastructure as code (IaC).
We used Azure Blob Storage as a remote backend for Terraform’s shared state, ensuring that our infrastructure state is consistent and accessible across our CI/CD pipelines. This setup is crucial for collaboration, as it allows multiple team members to work on infrastructure changes without conflicts or inconsistencies.
Terraform authenticates against Azure using a service principal and a client secret, ensuring secure and reliable access to our cloud resources. In terms of configuration, we organized our Terraform files by service, with variables extracted into a main Terraform file. This modular approach made our setup cleaner and easier to manage.
Connecting outputs and inputs between Terraform resources was particularly important for handling connection strings and other sensitive information. By automating these connections, we reduced the risk of manual errors and ensured that our infrastructure is both secure and consistent.
However, working with Terraform for the first time wasn’t without challenges. The vast number of configuration options can be overwhelming, and our team had to invest significant time in learning how to use Terraform effectively. Despite these initial hurdles, the benefits of IaC, particularly in terms of repeatability and the ability to avoid bugs, made Terraform a valuable tool in our project.
Integration and Future Considerations
The use of cloud-native services has allowed us to build a cloud infrastructure that is both powerful and flexible. Each component plays a crucial role in ensuring that GuppyAI runs smoothly.
Looking ahead, we’re thrilled about the possibilities for scaling and improving our cloud setup like adding logging and monitoring strategies. Thanks to our flexible architecture, adding new features and services will be easy, making sure that GuppyAI is able to continue to evolve and improve.
CI/CD
Our CI/CD pipelines are the backbone of our development and deployment process. They handle everything from building the container for our Gateway to setting up the cloud infrastructure. Whenever there’s an update to the infrastructure or code, our pipelines automatically deploy the latest version of our function code. It’s like having a robot that constantly builds and improves our product!
Building, Testing and Containerizing our SMS-Gateway
As the gateway is run on an on-premise non-cloud infrastructure, it is inevitable that some manual labor is involved in deploying it. However, to save us tedious work when rolling out new versions, we have tried to automate as much as possible.
For this we used GitHub Actions for our CI pipeline – as with every other part in the project.
The CI pipeline had to solve two problems for us:
- Automatic testing of the application
- Building a container image for deploying the application
While the first problem was very easy to solve thanks to the many references about how to setup a simple Go CI pipeline with GitHub Actions, the second problem was a little more intricate.
Reason being that we insisted on not using Docker for any step in the development process as we do not support their current business model in regards to open source software. As a replacement we opted for using Podman for running the gateway and buildah for building it in our CI environment.
While there is a GitHub Action for Buildah that is maintained by RedHat, its documentation is sparse, especially when it comes to multi-platform container builds, which we needed for testing out the image on our AMD64 machines and deploying it on our ARM64 target machine. The issue of sparse documentation is only amplified by the rather low adoption of buildah in GitHub Actions.
- name: Buildah Action (arm64v8)
  id: build_image_arm
  uses: redhat-actions/buildah-build@v2
  with:
      image: my-new-image
      archs: arm64v8
      build-args: ARCH=arm64v8
      tags: ${{ env.REGISTRY }}/${{ env.REPO_LC }}:${{ env.RELEASE_DATE }}${{ env.REF_LC }}-arm64v8
      containerfiles: |
        ./Containerfile

- name: Buildah Action (amd64)
  id: build_image_amd64
  uses: redhat-actions/buildah-build@v2

...

- name: Push To GHCR
  uses: redhat-actions/push-to-registry@v2
  id: push
  with:
      image: ${{ env.REGISTRY }}/${{ env.REPO_LC }}
      tags: ${{ steps.build_image_arm.outputs.tags }} ${{ steps.build_image_amd64.outputs.tags }}
      registry: ${{ env.REGISTRY }}
      username: ${{ github.actor }}
      password: ${{ secrets.GITHUB_TOKEN }}
      extra-args: |
        --disable-content-trust

- name: Create and push manifest
  id: create_manifest
  run: |
      buildah manifest create ${{ env.REPO_LC }}:${{ env.RELEASE_DATE }}${{ env.REF_LC }} ${{ steps.build_image_arm.outputs.image-with-tag }} ${{ steps.build_image_amd64.outputs.image-with-tag }}
      buildah login -u ${{ github.actor }} -p ${{ secrets.GITHUB_TOKEN }} ghcr.io/guppyai/sms-gateway
      buildah manifest push ${{ env.REPO_LC }}:${{ env.RELEASE_DATE }}${{ env.REF_LC }} docker://${{ env.REGISTRY }}/${{ env.REPO_LC }}:${{ env.RELEASE_DATE }}${{ env.REF_LC }}
      buildah manifest push ${{ env.REPO_LC }}:${{ env.RELEASE_DATE }}${{ env.REF_LC }} docker://${{ env.REGISTRY }}/${{ env.REPO_LC }}:latest
Through trial and error we hacked together a CI pipeline that would build one image for AMD64 and ARM64 each, push them and then create a manifest which references these images as its architectural variations. While this adventure allowed us to learn about how multi-platform images are dealt with in OCI (Open Container Initiative) and Docker image registries, we hoped for a cleaner and more straight forward solution like it is already possible when using Docker.
  - name: Buildah Action
    id: build_image
    uses: redhat-actions/buildah-build@v2
    with:
        image: my-new-image
        archs: arm64,amd64
        tags: ${{ env.REGISTRY }}/${{ env.REPO_LC }}:${{ env.RELEASE_DATE }}${{ env.REF_LC }} ${{ env.REGISTRY }}/${{ env.REPO_LC }}:latest
        containerfiles: |
        ./Containerfile

  - name: Push To GHCR
    uses: redhat-actions/push-to-registry@v2
    id: push
    with:
        image: ${{ env.REGISTRY }}/${{ env.REPO_LC }}
        tags: ${{ steps.build_image.outputs.tags }}
        registry: ${{ env.REGISTRY }}
        username: ${{ github.actor }}
        password: ${{ secrets.GITHUB_TOKEN }}
Later on through meticulously studying the buildah action’s documentation we found out that we were actually overcomplicating things and this straight forward solution exists. One can just supply the commma-separated target architectures to the buildah-build actions and et voila: two images and a combining manifest are automatically built and specified.
Our Applications go Cloud – Automagically!
For deploying code to the cloud, we’ve created two separate CI/CD pipelines: one for building our infrastructure and another for our function code. This keeps things organized and helps us avoid mistakes. By managing each part independently, we can make changes without worrying about breaking the whole system.
On every push to the repository, our pipelines validate and build the necessary components. When changes are merged into the main branch, the respective pipelines trigger deployments, ensuring that our production environment is always up-to-date with the latest stable code.
Infrastructure Validation and Deployment
The infrastructure pipeline plays a critical role in maintaining the cloud environment for GuppyAI. To ensure that our infrastructure is free from configuration errors, we validate our Terraform configurations on every push using the terraform validate command. This step catches any potential issues before they can impact the production environment.
When changes are merged into the main branch, the infrastructure is automatically deployed to Azure. This process is handled by a GitHub Actions workflow that utilizes the hashicorp/setup-terraform and azure/login actions. These actions streamline the process of initializing Terraform and authenticating with Azure, allowing us to focus on the infrastructure code itself.
One of the key aspects of our infrastructure deployment is the management of secrets. We store service principal credentials in GitHub Secrets, which are securely injected into the action runs as environment variables. This approach ensures that sensitive information remains protected while still being accessible to the deployment pipeline. Configuration parameters are also managed through GitHub environment variables, keeping our repository clean and secure.
Initial Function Deployment
The initial deployment of the Azure Function is integrated into our infrastructure pipeline. As part of the infrastructure deployment process, the pipeline downloads the latest release of the function code from GitHub. This release is then deployed to Azure using the zip_deploy_file parameter in our Terraform configuration. This method ensures that our function is up and running as soon as the infrastructure is provisioned, without requiring any manual intervention.
Building, Testing, and Deploying the Function The function code pipeline is designed to ensure that every change to the application is thoroughly tested and reliably deployed. Our function is written in TypeScript, and the build process is managed using npm. The code, along with its dependencies, is packaged into a zip file, which is then ready for deployment.
To maintain high code quality, we’ve integrated unit tests using Jest into our pipeline. These tests are executed during the npm build process, allowing us to catch any issues early. Only if all tests pass does the pipeline proceed to the deployment stage.
On every merge to the main branch, the pipeline creates a new GitHub release. This release is named with a timestamp in the YmdHMS format, providing a clear versioning system that makes it easy to track deployments over time. The release is then deployed to Azure using the azure/functions-action, ensuring that our production environment always runs the latest tested code.
Bringing it all together
Now, that all applications are built and deployed automatically, what’s missing is the glue in between all of them. At this point our SMS-Gateway only provides an Echo service as a proof of concept that sending and receiving SMS messages works as intended.
Interacting with the Service Bus
So, in order to connect the SMS-Gateway to the cloud services we needed to publish our received SMS messages to the service bus ingress and needed to send messages published to the service bus egress to their respective receivers.
Message Format
However, beforehand we have to think about what we do want to publish to and receive from the service bus. In these messages we need the following information:
- The message’s content
- The sender’s address
We decided to embed the content in the messages body and provide the sender’s address as a user defined property with key address. These addresses will be encoded into a URI like follows:
<SCHEMA>://<ADDRESS>
For a phone number and SMS this could look like the following:
sms://+49123456789
Technology Choices
Because it is very easy to setup and use, we chose the official Azure Service Bus SDK for Go to interact with the service bus. In an actual non-research environment we would probably evaluate the use of a generic AMQP (Advanced Message Queuing Protocol) implementation to try to escape from vendor-lock-in.
type MessageHandler interface {
	Handle(Message) error
}
Conveniently, we have designed the gateway architecture in a way that allows to plug in so called message handlers to our broker. After being registered with the broker, a message handler’s Handle function will always be called when a new “Request”-type message is received.
Thus, to send messages to the service bus, we just needed to add a MessageHandler implementation for it. Messages received from the service bus can be published using our broker’s Publish function.
Setting up the Connection
senderConnectionString := config.String("servicebus.sender.connectionstring")
senderClient, err := azservicebus.NewClientFromConnectionString(senderConnectionString, nil)
if err != nil {
    return nil, fmt.Errorf("creating service bus sender client: %w", err)
}

receiverConnectionString := config.String("servicebus.receiver.connectionstring")
receiverClient, err := azservicebus.NewClientFromConnectionString(receiverConnectionString, nil)
if err != nil {
    return nil, fmt.Errorf("creating service bus receiver client: %w", err)
}
Before we can interface with the service bus we have to authenticate with it.
For this purpose we can use connection strings obtained from the Azure Service Bus Web Interface.
func (p *providerImpl) GetReceiver() (Receiver, error) {
	config := configuration.GetConfig()
	queue := config.String("servicebus.receiver.queue")

	return p.receiverClient.NewReceiverForQueue(queue, nil)
}

func (p *providerImpl) GetSender() (Sender, error) {
	config := configuration.GetConfig()
	queue := config.String("servicebus.sender.queue")

	return p.senderClient.NewSender(queue, nil)
}
Using the authenticated clients we can access the respective queues with a azureservicebus.Sender and azureservicebus.Receiver.
Receiving Messages
func (listener *Listener) Listen(broker messaging.Broker) error {
    for {
        ...

        messages, err = listener.receiver.ReceiveMessages(context.TODO(), 1, nil)
        if err != nil {
            log.Warn().Err(err).Msg("Could not receive messages from service bus!")
            return err
        }

        ...

        for _, message := range messages {
            if err := listener.handleMessage(message, broker); err != nil {
                return err
            }
        }
    }
}
azureservicebus.Receiver allows to receive messages using the appropriately named ReceiveMessages function. In our gateway application we just continuously poll the service bus egress queue for new messages.
After that the handleMessage function is called, which will parse the message, dead letter it if its format is invalid or abandon it if it cannot serve the provided schema. Latter is the case if the address for example has the schema email but the gateway only supports sending SMS messages.
Sending Messages
func (m MessageHandler) Handle(message messaging.Message) error {
	...

	err := m.sender.SendMessage(context.TODO(), toServiceBusMessage(message), nil)
	if err != nil {
		return err
	}

	return nil
}
For the other direction, azureservicebus.Sender provides us with a SendMessage function which can be used to send messages to the configured queue.
handler, err := servicebus.NewMessageHandler(sender)
if err != nil {
    return err
}

broker := messaging.NewBroker(handler)
This function is called inside a MessageHandler implementation which can then be used by our broker.
Debugging Azure Functions
In the development of GuppyAI, one of the most significant challenges we faced was debugging our Azure Function without attached monitoring tools like Application Insights.
Initially, we were met with the frustrating realization that our function wasn’t processing incoming messages, yet we had no clear indication of why this was happening. It wasn’t until we dove deeper into the issue that we discovered a misconfiguration in the Service Bus setup within the function, which was throwing errors and causing the failure.
Using Live Logs with Azure Functions VS Code Extension
To overcome these initial hurdles, we turned to the Visual Studio Code extension for Azure Functions provided by Microsoft. This powerful tool allowed us to manage our functions directly from within our code editor, making the debugging process significantly smoother. After authenticating with our Microsoft accounts, we could deploy, manage, and most importantly, view live logs relayed directly to the integrated console in Visual Studio Code.
These live logs proved invaluable. They allowed us to observe the crashes and error messages generated by the misconfigured Azure Service Bus, providing us with the insights we needed to correct the problem. The extension also offered access to log files related to the current deployment, which further aided in diagnosing and resolving the issues we encountered.
Running the Function Locally with Azure Core Tools
Despite resolving the Service Bus configuration issue, we encountered another subtle problem: a faulty query to our Cosmos DB. This issue was particularly tricky because it didn’t cause any crashes or throw error messages. Instead, it led to empty results when attempting to retrieve a user’s conversation, leaving us puzzled.
To tackle this, we disabled the Service Bus trigger in Azure and opted to run the function locally using Azure Core Tools. Running the function in a local environment allowed us to attach a debugger and gain a clearer view of the function’s operations. By attaching to the real infrastructure while running locally, we could trigger the function using the Service Bus and pinpoint the exact cause of the issue – the incorrect Cosmos DB query.
Lessons Learned and Future Improvements
From these experiences, we learned a critical lesson: besides testing code before it is being deployed, effective trace logging and monitoring are essential for efficiently identifying and resolving issues in a cloud-based system. Without them, diagnosing problems can be a time-consuming and frustrating process. Moving forward, we plan to integrate Application Insights into our setup. This will enable us to access detailed logs directly from the Azure web dashboard, streamlining our debugging and error detection processes and ultimately making the development of GuppyAI smoother and more efficient.
These improvements will not only save time but also enhance our ability to deliver a robust and reliable system, paving the way for future development and scaling of GuppyAI.
On-Premise Host Setup using Ansible
For deploying the – now automatically built – container, we decided to use Ansible. Ansible is a tool that interprets YAML configuration files, so called playbooks, as a description on how a target system should look when the playbook is applied.
The goal with using Ansible was that we would gain a way to turn a fresh install of Raspberry Pi OS on our Raspberry Pi 3B into a complete setup for use as a SMS-Gateway.
Therefore, we laid out our playbook into three parts: Preparing the host for running containers using podman (i.e. installing podman), preparing the host for the GSM modem and installing the gateway container so that it would automatically start on a reboot.
- name: Install podman
  hosts: raspberry
  become: true
  tasks:
    - name: Get podman and install it
      package:
        name: "podman"
        state: present
- name: Install configuration
  hosts: raspberry
  become: true
  tasks:
      - name: Copy udev configuration
        ansible.builtin.copy:
            src: "../files/udev/40-modem.rules"
            dest: "/etc/udev/rules.d/40-modem.rules"
            mode: 0644
      - name: Copy usb_modeswitch script
        ansible.builtin.copy:
            src: "../files/scripts/brovi_modeswitch.sh"
            dest: "/usr/local/bin/brovi_modeswitch.sh"
            mode: 0755
      - name: Disable ModemManager
        ansible.builtin.systemd_service:
            name: ModemManager
            daemon_reload: true
            enabled: false
            state: stopped
      - name: Add option kernel module (GSM modem driver)
        ansible.builtin.modprobe:
            name: option
            state: present
            persistent: present
      - name: Reboot
        ansible.builtin.reboot:
          reboot_timeout: 300
          msg: "Rebooting to apply configuration changes"
The first two parts involved using the package module to install podman on our system, installing the scripts, kernel module and udev rules for setting up our GSM modem and rebooting the device for the changes to take effect.
- name: Install application
  hosts: raspberry
  become: true
  vars:
    version: "240809223418feature_arm-images-arm64v8"
  vars_files:
    - vault.yaml
  tasks:
      - name: Pull application image
        containers.podman.podman_image:
          name: "ghcr.io/guppyai/sms-gateway:{{ version }}"
      - name: Re-create Gateway container
        containers.podman.podman_container:
          name: gateway
          image: "ghcr.io/guppyai/sms-gateway:{{ version }}"
          state: stopped
          recreate: true
          detach: true
          security_opt: "label=disable"
          device: "/dev/ttyUSB1:/dev/ttyUSB1"
          group_add: "dialout"
          env:
            GATEWAY_LOGGING_LEVEL: "info"
            GATEWAY_SMS_MODEM_BAUD: 115200
            GATEWAY_SMS_MODEM_DEVICE: "/dev/ttyUSB1"
            GATEWAY_SMS_MODEM_POLLING: 1s
            GATEWAY_SMS_TRACING: 0
            GATEWAY_MESSAGING_ALLOWLIST: "{{ messaging.allowlist | join(',') }}"
            GATEWAY_SERVICEBUS_SENDER_QUEUE: "{{ servicebus.sender.queue }}"
            GATEWAY_SERVICEBUS_RECEIVER_QUEUE: "{{ servicebus.receiver.queue }}"
            GATEWAY_SERVICEBUS_SENDER_CONNECTIONSTRING: "{{ servicebus.sender.connectionstring }}"
            GATEWAY_SERVICEBUS_RECEIVER_CONNECTIONSTRING: "{{ servicebus.receiver.connectionstring }}"
      - name: Install systemd unit for running application
        become: yes
        copy:
            src: "../files/systemd/gateway.service"
            dest: "/etc/systemd/system/gateway.service"
            mode: 0644
      - name: Enable and start application
        become: yes
        ansible.builtin.systemd_service:
          name: gateway
          daemon_reload: true
          enabled: true
          state: restarted
The second part first tells Ansible to pull the gateway’s container image, create a container using it and installing a systemd unit file for starting it on every boot.
Now, when looking at above snippet you might wonder what all those fancy curly braces mean. Let us introduce you to jinja2 templates and Ansible’s ability to use vaults. jinja2 is a templating language that allows one to include and manipulate variables through various functions like the join function above to concatenate the list of allowed addresses to a comma-separated string. This templating language is one aspect of why Ansible is so powerful. One other aspect of that are Ansible Vaults. Vaults are encrypted yaml-files containing variables that can be loaded into a playbook if you know the passphrase they have been encrypted with.
Using vaults, secrets can safely be stored in a git repository alongside the playbook they are used in – assuming the passphrases used to encrypt them are not compromised.
All of these features were very useful to our goal of having a reproducible environment we could build using a single command.
State of the Application
After connecting all of our services, the application is now automatically answering our SMS messages.

Well, sort of… the application still has problems with long answers. This is due to us configuring a very conservative token limit with OpenAI’s API to limit the amount of SMS messages we send.
However, even telling the LLM in our system prompt to keep its answers as short as possible, it would not always constrain to our character limit worth three SMS messages.
For an actual application this would not be a deal breaker as the limit is fully self-induced by us to reduce costs.
However, maybe resorting to another AI model trained to give short answers is worth looking into for this use case.
In this example conversation you can see another of our features in action: Commands.
Currently, we have integrated the STOP command that will just delete the entire conversation history from our database and allow you to start all over again.
This is especially helpful if you want to use prompts that alter the way you interact with GuppyAI – just as you know from other AI solutions like OpenAI’s ChatGPT.
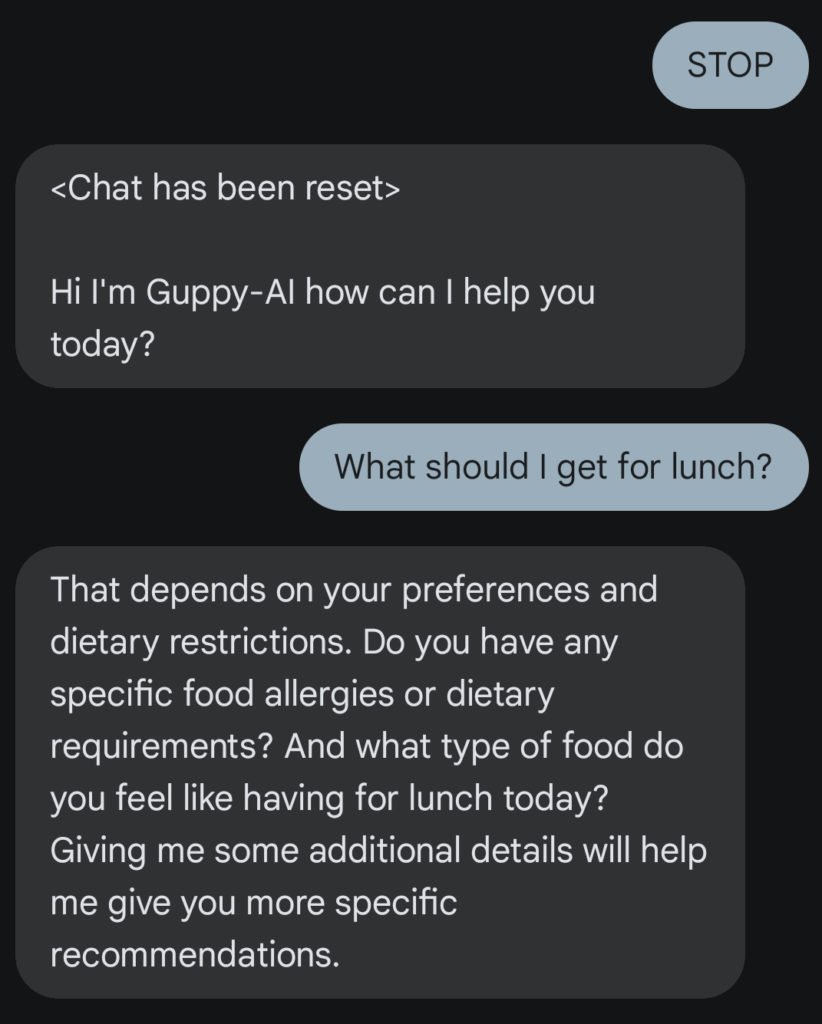
So, as you could see in these examples, GuppyAI behaves like any other AI assistant but with bringing AI to SMS we are able to reach far more people with this revolutionizing technology.
What could be next?
Looking ahead, GuppyAI is in a great position for expansion thanks to its flexible Hexagon architecture. Right now, we’re using a pub-sub pattern within the Azure Service Bus, which makes it super easy to add new communication channels without having to mess with the current setup too much.
If we were to further work on GuppyAI, our next step would be to implement a billing system to sustain our business.
Afterwards, we’d try to go beyond SMS and add new message channels. These could be instant messengers like Telegram, e-mail or even fax. This would help us reach a much wider audience without having to do a lot of heavy lifting on the code side.
But it’s not just about adding more ways to connect. We’d also plan to do some major upgrades to the system itself. As mentioned before, one of the big ones would be setting up a better monitoring system using Application Insights. This will make it easier for us to keep track of things and catch problems early, which means fewer headaches down the road.
Last but not least, we’d also be improving on our development workflow by adding a staging environment. This would allow us to really test and debug everything before rolling out new features.
It’s like having a sandbox to play in where we can make sure everything works perfectly before we go live. This is key to keeping things running smoothly as we’d continue to grow and adapt GuppyAI to new platforms and different use cases.
All in all this journey has been very educating and was way more involving and fun than we anticipated in the beginning. Especially the wide variety of topics we could cover in this project – from decade old protocols to IoT-like applications, cloud computing and infrastructure as code – was extremely intriguing.
Leave a Reply
You must be logged in to post a comment.