This blog post was written for the lecture “System Engineering & Management” (143101a) by Julia Bai, Frederik Runge and Dominik Seitz.
Introduction
The cryptocurrency market never sleeps. While traditional stock exchanges close, trading in digital assets occurs 24/7, characterized by extreme volatility where minutes decide between profit and loss. A comparable dynamic governs modern software development. The tension between a rapid time-to-market on the one hand and high system stability and quality on the other poses significant challenges, particularly for small development teams. This balancing act is further intensified, both positively and negatively, by the use of generative AI.
Within the scope of the “System Engineering & Management” module, this paper examines the practical example of the “Crypto Notifier Bot” to explore how an event-driven system, characterized by external dependencies, can be developed in a stable manner. The core of this investigation focuses on how professional paradigms such as “shift-left testing” and automated deployments can be effectively implemented even for MVP projects.
Motivation & Goals of the Project
The primary goal of the crypto bot is to eliminate the stress of manually monitoring price changes by providing automated notifications. The objective is to create a system that proactively informs the user, rather than requiring reactive queries. In doing so, the development of a standalone application was deliberately avoided. Instead, the bot meets users where their communication already takes place: in established channels like Discord and Telegram. Additional features are intended to complement the bot’s functional scope.
From an engineering perspective, the problem statement runs deeper. Developing such a system requires handling asynchronous data processing and ensuring the robust integration of external API dependencies. The central challenge was to design an architecture—within a small team lacking dedicated operations resources, that guarantees stable 24/7 operation while remaining agile.
The main objective is to develop a functional MVP that serves as an interface between fast-paced market data and the end user via Discord and Telegram. The associated learning objectives include the evaluation of communication patterns within the architecture, as well as the successful establishment of a sustainable testing strategy and a CI/CD pipeline.
Project Overview
The Crypto Notifier Bots are managed via commands. In their current states, the following available commands are the most important
/index “Bitcoin” – Get the current ticker price of a cryptocurrency.
/top 10 – Get the top X cryptocurrencies by market cap.
/list – Get a list of all supported cryptocurrencies (by the bot)
/set_vs EUR – Set your preferred currency, in which the value of the cryptocurrency should be displayed.
/add_fav(s) Ethereum Litecoin – Add one/multiple cryptocurrencies to your favorites. Can also be removed/dropped.
/list_favs – List the prices of your favorite cryptocurrencies
/add_notif Bitcoin USD above 50000 – Receive a chat notification once the price of the selected cryptocurrency hits the limit.
/chart Ethereum – Generate an interactive historical chart for the chosen cryptocurrency.
1 Development
1.1 Required Platform Setup
Since our software heavily relies on the external messaging platforms Discord and Telegram the first thing we did was to find out how custom bots should be created.
Discord has its own Developer Portal (https://discord.com/developers/applications), where one can log in with their regular Discord account and create an application that is classified as a bot. Further steps include giving the bot its public name, scopes (we chose application.commands), and permissions (like being allowed to read and send messages, attach files, create polls, etc., in whichever chat the bot lives). The next step was to manually add the bot to a server via an OAuth invite link. The reason we are communicating with the bot via a server and not private chat, is that global registration of newly defined commands takes up to one hour, while server-specific commands are available immediately.
The creation of a Telegram Bot happens in a Telegram chat with the Botfather (https://telegram.me/BotFather). In both cases, we need to add the generated tokens to our environment variables for further development.
We created bots for multiple development environments: Development, Staging and Production. The tokens for Staging and Production are stored in the GitHub secrets.
1.2 System Architecture Diagram
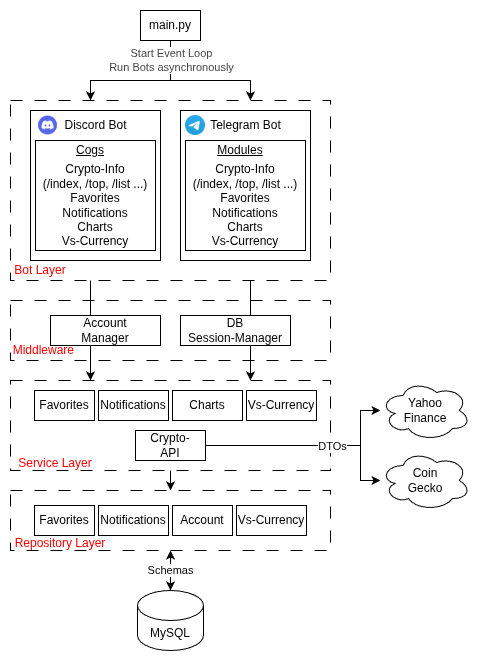
1.3 General Structure
During development, one aspect was clear from the beginning: We wanted the bots to behave in a similar manner, which is why we created services that return messages. The scope of the Bots and its modules are solely platform-specific tasks such as the registration of commands, providing autocomplete options e.g. in the form of a list of currencies, and actually sending response messages.
The platform-independent content/message of the responses is generated in the services, which do everything from processing the input parameters to gathering the necessary answer data from APIs or the database. This way, we avoid duplicate business logic for the messengers.
Our bot layer is also structured in a modular way that separates concerns and is easily extensible.
The different layers can access each other’s functionalities via Dependency Injection, e.g. the FavoritesRepository is injected into the FavoritesService, so it can access the correct table in the database. This has advantages such as better testability (because the injections can be mocked) and separation of concerns leading to cleaner code.
The middleware also exists to prevent duplicate code. During development, we recognized that almost every request needs to access some sort of data from the user’s account, e.g. its preferred currency or language setting. It also seemed sensible to automatically create and handle a session for each command.
A session in SQLAlchemy acts as a “holding zone” for all Python objects that come from or should be saved to the database. It should represent a Unit of Work, which in our case aligns with all the business logic that is executed after the user executes a command like /add_fav, which might do the following:
- Automatically create an account for user, if its the first executed command of the user
- Set some default account properties like language or currency setting
- Add a favorite cryptocurrency to the user’s account
If anything failed during this process, the session could be easily rolled back (reset) and no inconsistent data would be stored in the database.
1.4 Concurrency

In order to have both bots actively running concurrently, we use asyncio.
Our program runs in a single main thread, which is managed by an event loop. Whenever a task needs to be executed, such as processing a user request, the event loop picks it up. A crucial feature of this setup is that tasks voluntarily yield control back to the event loop whenever they need to wait for an I/O operation. When the wait is over or the job finishes, the event loop resumes the task.
This cooperative multitasking allows our program to accept and process user requests from both bots efficiently without blocking one another.
For example:
- User A calls /index Bitcoin via our Discord Bot
- User B calls /top 20 via our Telegram Bot.
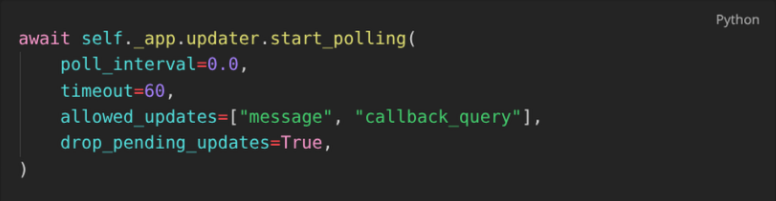
The event loop processes User A’s request until it gets to the point where it needs to fetch data from an external API, which looks like this:

While waiting for the data from the API, the event loop switches context to User B’s request, until that command needs its own data from the API:

Once the data from Request A is loaded, the event loop switches back to it, picks up right where it left off, and so forth.
In a later increment of our program, we also plan on making all of our database calls asynchronous.
An alternative approach to the asynchronous one would be Multithreading.
Here, each bot could have its own thread within our Python app. This would require further libraries but would prevent a bot from having to wait for the other bot’s asynchronous call. But since both bots share the same database, it could lead to race condition problems, e.g. if both bots write/read to the same table at the same time.
Another alternative would be a microservice architecture e.g. with Docker Compose. The bots would each be a standalone application that is placed in its own container. A common data source like a DB could be safely accessed via a message broker, to avoid race conditions. This would also allow one bot to completely crash without affecting the other ones at all. If we were to scale up the bots, this would probably be the architecture we would choose.
1.5 Receiving Messages
Another interesting aspect to look at is the way our bot program receives messages from its users.
The user generally sends data to the Telegram server, and our bot asks the Telegram API if any new commands were received in order to process them.
Short Polling is when our bot simply asks the Telegram API at a constant frequency (e.g. every second) if a new message for it has arrived. This is obviously very inefficient, especially if there aren’t a lot of users.
In our app, we currently use Long Polling:
We tell the Telegram Server to hold the connection to the bot open for 60 seconds, and to transmit all received messages to the bot during that time. After this period finishes and the connection closes, we immediately open up another one.
A more scalable alternative to this would be to use Webhooks to receive messages. In that scenario, we would have to set up a web server that listens for incoming HTTP requests at a specific public URL, and tell the Telegram API to send all of its received messages intended for our bot to this URL. Our bot wouldn’t have to constantly re-establish the connection (and keep it open) to the Telegram API. If we received a large number of messages, we could also place a load balancer in front of the webhook to distribute the messages to multiple instances of our bot.
2 Quality Assurance
2.1 Shift-Left Strategy and Test Pyramid
In a professional software project, quality assurance ideally does not begin after the implementation is complete. Rather, it is an integral part of the development process. From an economic perspective, this approach is justified by “Boehm’s Law,” which states that the cost of fixing a software defect increases exponentially the later it is discovered in the product life cycle. A defect resolved during the coding phase incurs only a fraction of the cost of a defect discovered during production (Boehm, 1981).
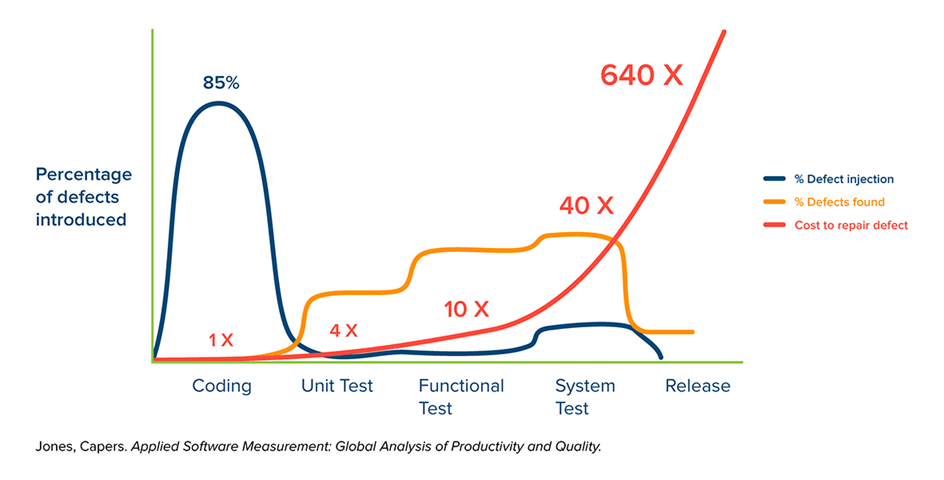
Fig. 1: Simplified representation of the time of defect injection, defect detection, and the cost of troubleshooting over the course of a typical software project without a “shift-left” approach.
To counter this progression, the project pursued a rigorous “shift-left” strategy. In this approach, testing activities are shifted to the “left” on the project timeline, i.e., into the early phases of development. Technically, this approach is differentiated into two layers within the project.
Dynamic quality assurance validates code changes at runtime via automated tests and shifts testing to immediately follow code creation, rather than waiting until the end of development.
Fig. 2: Simplified representation of the time of defect injection, defect detection, and the cost of troubleshooting over the course of a typical software project with dynamic quality management.
Static quality assurance attempts to enable even earlier defect detection through prevention. Using code analysis tools, structural integrity is verified before the code is ever executed.
Fig. 3: Simplified representation of the time of defect injection, defect detection, and the cost of troubleshooting over the course of a typical software project with both dynamic and static quality management in the code.
While the shift-left strategy dictates the timing of the testing, the classic test pyramid by Mike Cohn defines the distribution of test types. For the developed “Crypto Notifier Bot,” this model was specifically adapted. The foundation of the project’s pyramid consists not only of classic unit testing but is heavily expanded by static code analysis. The middle tier comprises integration tests, which validate the interaction with external interfaces (APIs, database).
In a deliberate departure from the standard, end-to-end (E2E) tests were not automated. Because external platforms like Discord block automated user bots, the overall pipeline is validated through manual acceptance tests.
By integrating tests into the workflow as early as possible, the goal is to prevent defects from slipping unnoticed into the main development branch. The primary objective here is to ensure that developers do not perceive testing as a burdensome chore at the end of the project. Instead, it should be viewed as an accompanying tool capable of ensuring a solid foundation for the further development of the MVP.
2.2 Prevention: Static Code Analysis
Since Python, as an interpreted language, often reveals type and syntax errors only at runtime, static code analysis forms the foundation of our shift-left strategy. The goal was to identify faulty code before it could even be committed.
The tools utilized included “Black” to enforce deterministic code formatting, and “Flake8” to check for PEP-8 compliance and logical oversights, such as unused imports or functions. “MyPy” extends Python with static type safety by enforcing type hints, which is intended to eliminate runtime errors caused by incorrect parameter passing.
Technical enforcement is automated via pre-commit hooks. These scripts locally block the commit process as soon as rule violations are detected by the tools. A key learning over the course of the project was the necessity of continuously adapting the established rules to our specific needs. If cleaning up commits takes longer than actually writing the code, it contradicts the objective of viewing testing as a helpful tool rather than an obstacle.
2.3 Dynamic Tests: Unit and Integration Tests
Dynamic quality assurance follows the classic test pyramid and is divided into isolated unit tests and integrative interface tests.
To validate the business logic, the project relies on “pytest”. A technical specificity of the architecture is its asynchronous processing, which necessitates the use of “pytest-asyncio” to render await calls executable within the test context. External dependencies are completely abstracted using mocking. This decouples the tests from volatile live data and eliminates latencies. Through the use of fixtures, a sterile environment is created for each test case. This approach ensures short execution times and serves as a safety net during code modifications.
Integration tests verify the interaction with external systems. To test database interactions performantly and without leaving residual data, an SQLite in-memory database via SQLAlchemy is utilized, which is discarded after each test run.
The connection to the external price-fetching API is tested using “vcrpy”. This tool records HTTP interactions during the initial call and replays them during subsequent tests. This type of mocking is known as service virtualization. It enables realistic testing of the API clients and the parsing logic without running into rate limits or depending on the availability of the third-party provider.
2.4 Stability and Resilience Under Load
A particular challenge in testing was the dependency on external crypto data sources (CoinGecko API, Yahoo). Since CoinGecko imposes rate limits of a maximum of 30 API calls per minute, classic load testing against the live system would be counterproductive and lead to temporary IP bans (CoinGecko, 2026).
Therefore, the quality assurance strategy was shifted from pure load tests to resilience tests. Instead of generating maximum load, the stability of the system in the event of external errors was validated. Using mocking, API timeouts were simulated to ensure that the bot does not crash, but rather applies an exponential backoff strategy.
To nevertheless verify the internal processing speed of the asynchronous architecture, a local load script was developed. This script simulated 200 concurrent user requests without actually calling the external API. This verified that the Python main loop does not block even during peak loads, and that response times for the end user remain stable (approx. 4 seconds for 200 users compared to 0.5 seconds for 10 concurrent users).
2.5 Limitations and Reflection
Despite the application of “shift-left” principles, the chosen quality strategy is subject to certain limitations. Driven by the application’s objective, automatable end-to-end (E2E) tests were omitted. Platforms like Discord and Telegram do not permit automated user interactions via test bots, such as those facilitated by “Cypress” or “Selenium”, and would quickly ban our bot as well. Therefore, these tests continued to be performed manually.
Another difficult problem to solve is the strong reliance on external providers and the consequent extensive use of mocking. While unit tests validate the internal logic, mocks merely freeze the status quo of the external API.
If the data provider changes its format unannounced, the tests will remain successful, whereas our production bot will fail. Likewise, due to the API’s rate limits, classic load testing under full load was only feasible to a limited extent via internal simulations during the MVP phase.
Methodologically, it became apparent that within the conflicting priorities of an MVP prototype, advanced shift-left approaches such as Test-Driven Development or Pair Programming were often deprioritized in favor of pure development speed. Consequently, quality assurance shifted from the design phase to the implementation phase.
Nevertheless, the course of the project confirms the initially stated thesis. The initial investment in the test infrastructure paid off. Particularly in the complex asynchronous architecture, the cost of change could be kept low, as type and logic errors were resolved through static analysis and unit tests before they could accrue technical debt. This early feedback strengthened the developers’ confidence in the code and enabled a faster time-to-market, since critical errors did not emerge only at the end of the development cycle.
Alongside preventive “shift-left” approaches, “shift-right” measures are equally important. Only through monitoring in live operation can the gap between successful tests and real user experience be closed. The technical enforcement of the quality gates defined here falls to automation, the implementation of which is described in the following chapter on the CI/CD pipeline.
3 Building a CI/CD Pipeline: From Zero to Automated Deployment
We have set up a fully automated CI/CD pipeline. However, our goal was not to build the most complex or feature-rich pipeline possible, but rather one that is realistic, secure, and maintainable for a small, resource-constrained project.
This led us to the following guiding question:
How can a secure, automated, and low-maintenance CI/CD pipeline be built for a small, resource-limited project without introducing unnecessary complexity?
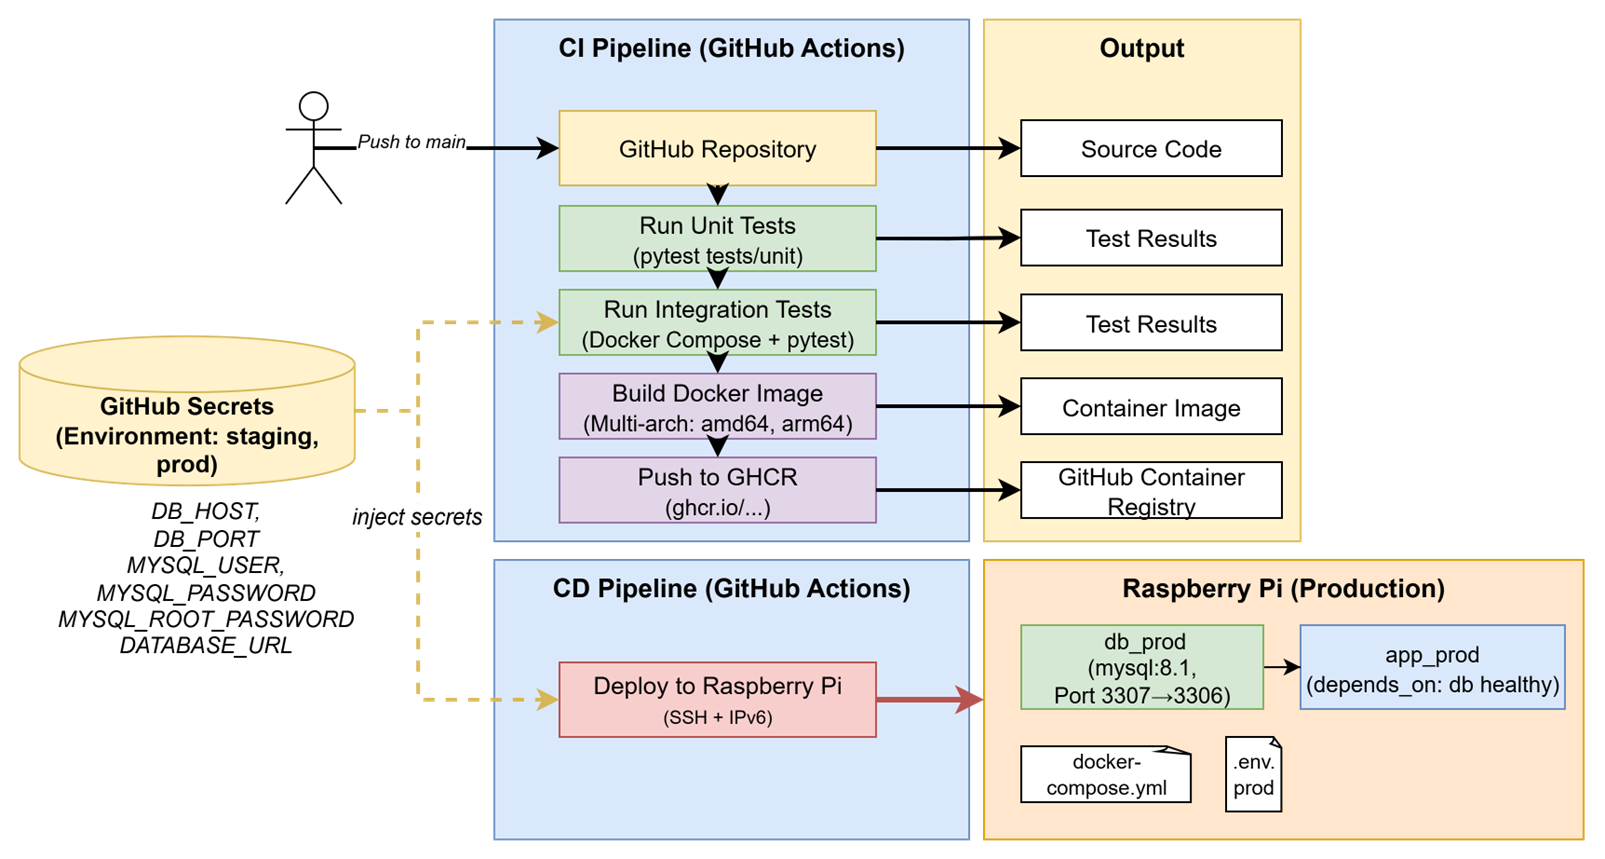
The following CI/CD Pipeline covers following process:
- Developers push code to the central repository
- Unit and integration tests run automatically
- A multi-arch Docker image is built and pushed to a Container Registry
- The Raspberry Pi production server pulls the latest image and restarts the container
This post walks through the entire setup process, from tool selection to deployment on a Raspberry Pi production server, and concludes with the main learnings we gained along the way.
3.1 Choosing the CI/CD Stack
To keep things simple, reliable and cheap, we built the pipeline entirely around GitHub Actions and GitHub Container Registry (GHCR). The complete setup consists of these components:
| Component | Tool | Purpose |
|---|---|---|
| Source Control | GitHub | Version control and workflow automation |
| CI/CD Tool | GitHub Actions | Runs builds, tests, and deployments |
| Monitoring | GitHub Actions | Build and deployment feedback |
| Secrets Management | GitHub Secrets | Secure storage for credentials |
| Container Registry | GitHub Container Registry GHCR | Stores and distributes Docker images |
| Tests | pytest | Framework to write tests |
| Dockerfile | Docker | Defines how the application environment and dependencies are built into a reproducible container image |
| Docker Compose | Docker | Defines how docker containers (services) interact and run together in a consistent environment |
| Production System | Raspberry Pi | Target System of deployments |
Several alternative solutions were considered but deliberately excluded to avoid unnecessary complexity and operational overhead.
- Jenkins would require a dedicated server, continuous maintenance, plugin management, and manual security updates, resulting in a significant administrative burden for a small project.
- Kubernetes, while highly powerful and scalable, introduces considerable setup and maintenance complexity. For a system consisting of only one to two services, this would be excessive and unjustified.
- Cloud-based virtual machines would provide limited additional benefit in our context. Since a Raspberry Pi is already available, reliable, and continuously operational, cloud hosting would mainly increase recurring costs without clear functional advantages. Cloud solutions would become more relevant only in a scenario requiring significant horizontal scaling.
Overall, this tool stack represents a secure and low-maintenance solution that aligns well with the constraints and goals of a small-scale project.
3.2 Continuous Integration – Building and Testing
The pipeline is triggered on every push to the main branch. It starts by running automated tests to verify that the code is ready for production.
Unit Tests
Unit tests are run on GitHub-hosted runners using:
python -m pytest tests/unit -v
Using python -m pytest ensures that the current directory is automatically added to sys.path, avoiding import errors between modules.
Integration Tests with Docker Compose
Integration tests validate how the app interacts with its database or other components. GitHub Actions starts a temporary test environment using Docker Compose. This Docker Compose file sets up a test environment with two services: a Python app container that runs the Crypto Notifier code, and a MySQL 8.1 database container. Health checks ensure that the app starts only after the database is ready.
Following commands build and start the containers using the .env.test configuration, then execute the integration tests inside the running application container.
docker compose -f docker-compose.test.yml --env-file .env.test up -d --build
docker exec crypto_notifier_app_test python -m pytest tests/integration -v
After the tests complete, the environment is torn down:
docker compose -f docker-compose.test.yml down -v
Overall, this setup provides an isolated integration testing environment where the app and database run together under realistic conditions. This approach keeps test environments short-lived, so that each run starts clean, ensuring no side effects or leftover data.
3.3 Building and Publishing Multi-Architecture Docker Images
CryptoNotifier runs on both local x86 machines and Raspberry Pi devices (ARM).
To support both architectures, we use Docker’s Buildx feature to create multi-architecture images:
docker buildx create --use
docker buildx build \
  --platform linux/amd64,linux/arm64 \
  -t ghcr.io/juliabb1/crypto_notifier:latest \
  --push .
The built image is published to GitHub Container Registry, authenticated via a Personal Access Token (PAT) with the following scopes:
write:packages→ to push new imagesread:packages→ to pull images on the Raspberry Pidelete:packages→ optional cleanup
This token is stored as GHCR_TOKEN in GitHub Secrets and used during the CI build process for authentication.
3.4 Continuous Deployment – Raspberry Pi
The production environment runs on a Raspberry Pi, which acts as the deployment target. To enable secure, automated deployments, the pipeline connects to the Pi via SSH using a dedicated deployer user.
Raspberry Pi Setup
- Enable SSH:
sudo raspi-config → Interface Options → SSH → Enable - Create a dedicated user:
sudo adduser deployersudo usermod -aG docker deployer - Set up SSH key authentication:
- Add the public key to
/home/deployer/.ssh/authorized_keys - Apply correct permissions:
chmod 700 ~/.ssh→ allowes the owner to read, write and execute, while removing all permissions for otherschmod 600 ~/.ssh/authorized_keys→ allows the owner to read and write the file, while no one else can access it
- Add the public key to
- Change SSH port and secure remote access:
- Change port in
/etc/ssh/sshd_configfrom22to2222 - Allow the port through your firewall:
sudo ufw allow 2222/tcpsudo ufw delete allow 22/tcp
- Change port in
- Restart the SSH service:
sudo systemctl restart ssh
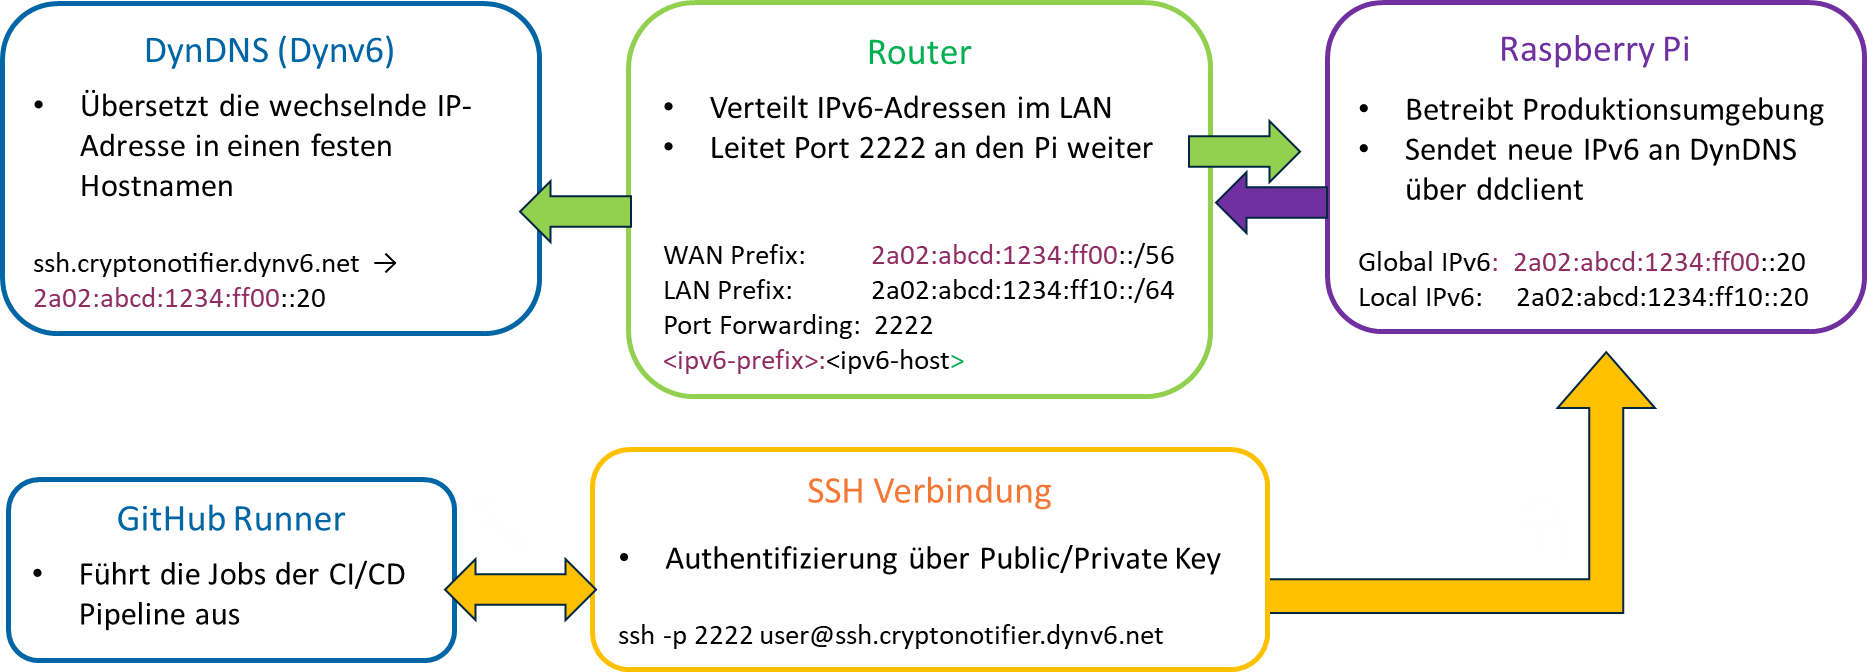
DynDNS Setup
To make the Raspberry Pi reliably accessible from outside the home network, we set up Dynamic DNS using Dynv6, ddclient, and a Fritz!Box router. This ensures that even when the internet provider assigns a new IP address, our domain name always points to the correct device.
First, we created a free Dynv6 account and registered a hostname. Dynv6 provides an API token, which allows devices to automatically update the IP address behind that hostname. On the Raspberry Pi, we installed and configured ddclient, a small background service that regularly reports the current IP to Dynv6. This keeps the hostname synchronized with our home network’s public address.
Finally, we set up port forwarding so that external requests on our chosen SSH port (2222) reach the Raspberry Pi inside the local network.
3.5 Automated Deployment with GitHub Actions
After the code passes all tests and the Docker image is built and pushed, GitHub Actions automatically deploys it to the Raspberry Pi. This process involves three steps:
- Copying the
docker-compose.prod.ymlfile to the Pi - Creating a
.env.prodfile with production GitHub Secrets - Pulling the latest image and restarting the containers
Excerpt from the CI/CD workflow:
name: Run deployment commands via SSH
uses: appleboy/ssh-action@master
with:
host: ${{ secrets.SSH_TARGET }}
username: ${{ secrets.SSH_USERNAME }}
key: ${{ secrets.SSH_PRIVATE_KEY }}
port: ${{ secrets.SSH_PORT }}
script: |
cd ~/crypto_notifier
cat < .env.prod
ENV=PROD
DB_HOST=${{ secrets.DB_HOST }}
DB_USER=${{ secrets.DB_USER }}
…
EOF
docker compose -f docker-compose.prod.yml --env-file .env.prod pull
docker compose -f docker-compose.prod.yml --env-file .env.prod up -d
This results in a fully automated deployment, triggered immediately after a successful CI build.
3.6 Learnings and Best Practices
Building this CI/CD pipeline taught us several valuable lessons:
- Test structure matters:
Separatingtests/unitandtests/integrationhelps developers focus on debugging errors and and maintain a clear testing strategy. - Use
python -m pytest:
Runningpytestas a module ensures that the correct Python interpreter is used and the project directory is properly added tosys.path. - Build once, Run on multiple platforms with multi-arch images:
Creating multi-architecture Docker builds ensures that the same image can run on different platforms like x86 and ARM without modification guaranteeing that the image tested in CI is identical to the one deployed on devices like Raspberry Pi. - Isolate environments and use environment-specific secrets:
Defining separate secrets for staging and production in Github Secrets improves security by ensuring that sensitive credentials are only accessible where needed. - Set up Protected Branches:
Direct pushes to themainbranch are blocked in our set up. Every change needs to pass a code review first. This guarantees that only verified code is deployed. - Run Unit Tests on GitHub Runner First:
We execute unit tests directly on the GitHub hosted Runner before starting the full Docker-based integration environment. This approach speeds up feedback for common code errors. - Keep test environments clean:
Always removing containers after tests prevents inconsistent states caused by leftover data or network conflicts. This makes test results more reliable and ensures that every run starts from a reproducible state.
4 Conclusion
This project demonstrated that professional software engineering principles can be successfully applied even within the constraints of a small-team MVP environment. Through a modular, asynchronous, and event-driven architecture, the Crypto Notifier Bot achieved maintainability while supporting continuous operation across multiple messaging platforms. The adoption of a shift-left quality strategy, combining static code analysis with automated unit and integration testing, reduced defect rates and improved development confidence, particularly in the context of asynchronous processing and external API dependencies. Although limitations remain most notably in the automation of end-to-end testing and reliance on mocked external services, the implemented testing strategies provided a safety net. The establishment of a fully automated CI/CD pipeline, including multi-architecture Docker builds and remote deployment to a Raspberry Pi, further enabled fast, reliable, and reproducible releases. Overall, the project confirmed that early investment in clean architecture, automated quality assurance, and deployment automation leads to lower long-term maintenance effort, increased system stability, and faster deployments, thereby validating the effectiveness of professional system engineering practices in agile MVP development.
Leave a Reply
You must be logged in to post a comment.