One stage. Two stages. THREE STAGES FOR DEPLOYMENT!— Count von Count on his deployment pipeline
Hi, it’s us agai n, the guys with the strange idea of using Sesame Street characters in a blog series about CI. Since we didn’t really cover the reasons, why you should use CD / CI, we want to catch up on that this time and therefore talk a bit about popular buzzwords like “Deployment Pipeline” and “Branching”. This might be especially useful, if you want to use the CI methodology for your next project but have to convince your team members of the benefits at first. This post is more abstract than the others, if you just want to get down to the Jenkins business you might skip it (although we don’t recommend it, since we put a lot of love into writing this).
Reasons for using CD or CI
At first we have to differentiate between CD and CI. The term Continuous Delivery got popular through the same-titled book by Jez Humble and David Farley (by the way it’s definitely worth a read). As they put it, they took the title from the famous Agile Manifesto, which states: „Our highest priority is to satisfy the customer through early and continuous delivery of valuable software“ – which is practically easier said than done. CD therefore describes a methodology on how to build software in a way, that it can be released to production at any given time. It combines development phase, quality assurance and the deployment process aiming for an overall more efficient development process with increased quality. Now CI comes into play. Martin Fowler puts it this way: “Continuous Integration is a software development practice where members of a team integrate their work frequently, usually each person integrates at least daily – leading to multiple integrations per day”[1]. Further he continues, that “each integration is verified by an automated build (including test) to detect integration errors as quickly as possible”.
Following this statement, CI is part of CD. This means that a better level of synchronization between the development team can be achieved, leading to less challenges during the deployment phase. To achieve this, three requirements must be met:
1. Tests need to be in place,
2. the build should be production ready at any given time
3. and there should be version control.
All this is realized by using a Deployment Pipeline, which breaks the build into different stages.
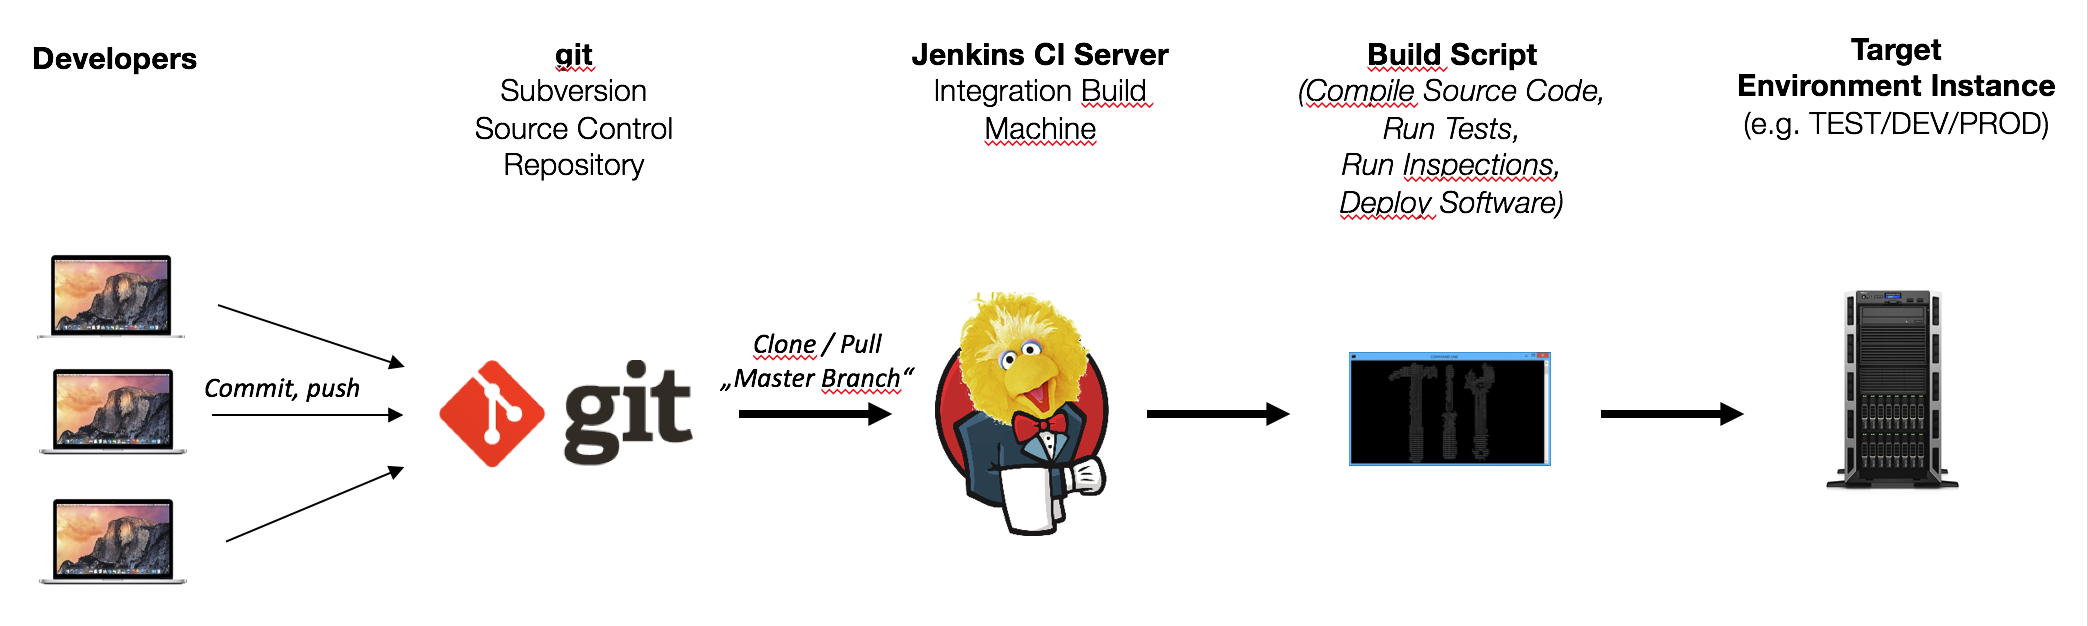
The Deployment Pipeline represents the different stages required for quality assurance. Automated and manual tests enable improvements in quality. These tests are being executed successively for every software version. Only if all tests have been successful, the code will be deployed to production.
The deployment pipeline
Development, Test and Production
For our post we would like to illustrate a common practice for different deployment environments. We are not going to implement these on a technical level, however we would like to give an exemplary approach. If you somehow become the CTO of a big company overnight, this could be useful for you. We are going to distinguish between three different stages called development, test and production.This setup is quite common amongst software developers, although the names might vary. Other names for the different environments may include, but are not limited to: staging, latest, deploy, preproduction or sandbox. Although there are different names for it, all environments have similar requirements.
Usually you want an environment that’s intended to be unstable, in our case this stage is called development. This is the initial stage where the code of the different developers will be integrated and it’s perfectly fine if this environment breaks – how often do you here something like this? Nobody should feel bad if he messes up here, because the motto should be “fail early, fail fast”. We just want to integrate the code as early as possible and get rid of small mistakes and obvious flaws.
The next stage called test usually involves some sort of approval. We assume that we have imaginary testers that check our application for us once a stable version is available. The idea behind differencing between the stages development and test is that developers like to break things, testers not so much. Our testers are not only imaginary but also very demanding and a little bit sensitive about their working environment (as testers are) so it would be advisable not to break this stage multiple times on a daily basis. So to make our testers happy and to provide them with a stable work environment we use the test stage.
And last but not least (for real) we have the production environment. This stage is the real deal! We suppose at this stage people actually are using what we put there, so it would be kind of awesome if our code works and has been tested once it is deployed here. Luckily with our deployment pipeline we already removed small flaws in development and major bugs in test, so it should be safe to deploy our code once it has been approved by our testers. If you have read until this point (and thanks if you did!) you should now have a basic understanding of deployment pipelines.
Branching
As we’ve mentioned in the beginning, we would also like to talk about branching a little bit. If you are using git you’ve probably heard of this term. Basically it is about separating your code into different enclosed parts (or branches) and merging them back together. Usually you are working on the master branch, but its also a common practice to have dedicated branches for different features, bugfixes or stable versions. This has the advantage of having a branch which represents a stable version and still be able to develop new features without breaking anything in production. Merging branches in git is as simple as running a single command in the shell. Depending on your requirements for branching, your model can become quite complex, as the image below of a popular branching strategy shows.
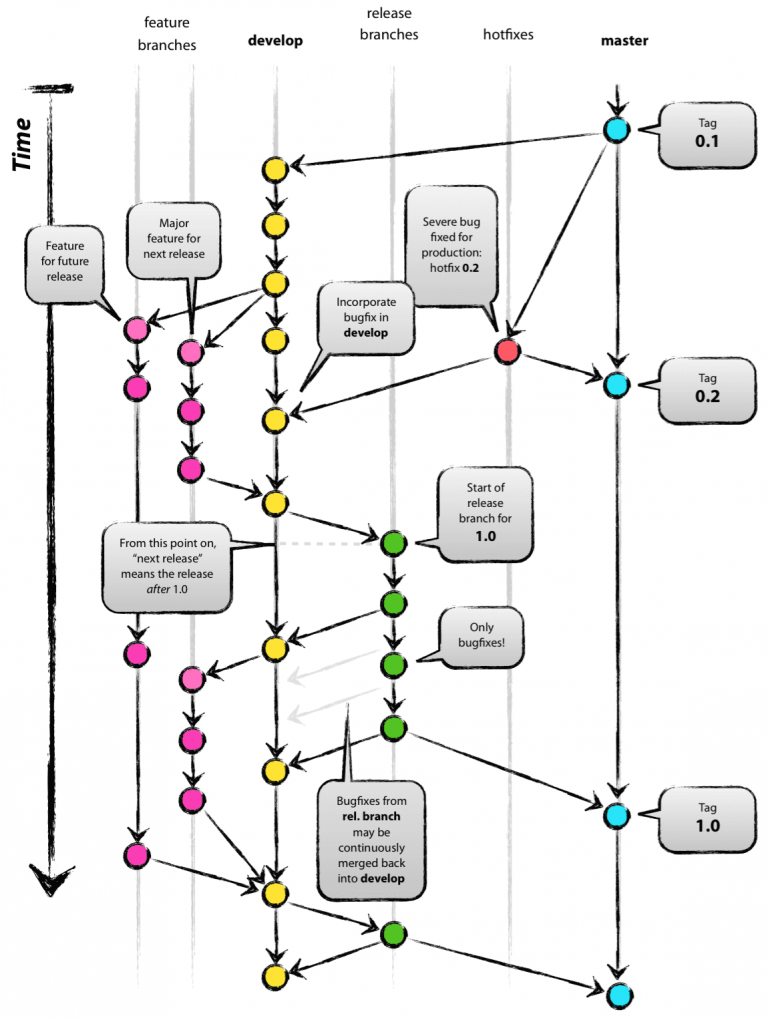 Source: http://nvie.com/posts/a-successful-git-branching-model/
For our blog series we thought about the advantages of branching in small academic projects and we agreed that this particular strategy is overall too complex and impractical. Still the author describes a simpler branching model, which can be applied for our requirements. Imaging working with a project group of five people on an university project. The professor is very demanding and wants to see the course project every week to provide feedback to the group. You have been lucky with your other team members, as they are very productive and they contribute a lot to the project. Unfortunately the work they deliver is sometimes a bit rushed and the version you should present every week often breaks. You think to yourself that it would be great if you could have your team contribute in the large amount they currently do and still be able to present a somewhat stable version regularly to the professor. If this is the case, the approach of using a flexible development branch and a stable master or demonstration branch might suit you.
 Source: http://nvie.com/posts/a-successful-git-branching-model/
Your productive team members can still push as much as they want in the development branch and as soon as there is a stable version you can quickly merge changes into the master branch. Your team members praise you for your knowledge about branching models and the professor is pleased with the stable demo versions. Good thing you read that one blog post with the strange sesame street characters, isn’t it?
What’s coming in the next episode?
As this post was rather abstract, in the next episode we will jenk’ things up and show you how to create jobs and deploy your code with Jenkins.
Blogpost by Thomas Derleth (td036), Jörg Einfeldt (je051), Marc Stauffer (ms445)
Read more about “Building jobs with Jenkins and Github” in our part 3 of the tutorial!
Leave a Reply
You must be logged in to post a comment.