Introduction
In the the course Software Engineering and Management and Interactive Media at Stuttgart Media University, we launched an interactive web application called Emoji College.
The following blog entry is a brief description of what is going on in this project. The main focus relies on the implementation of a continuous integration pipeline with TravisCI and hosting with AWS. As newcomers in dealing with AWS services it was not easy for us to get started. We have had to try a lot and have paid too much money for the services. Therefore it is our mission to explain the most important steps during the setup of AWS services easily and mention all the lessons learned. So far, there is no easy and understandable guide as we needed it.
Therefore this article is relevant to all who want to operate a Node.js application with TravisCI and AWS such as EC2 Instances and CodeDeploy.
Emoji.College
Users of social media and instant messengers know this phenomenon very well: Emojis are often misused in the respective context and can lead not only to disagreements in the communication, but also to hard-hitting misunderstandings.
Almost every teenager was able to experience the phase in which parents dared to take the first tentative steps in mobile communications and quickly made great progress with all kind of weird Emoji combinations. New technologies fascinate everyone and new features also want to be used. According to the old Microsoft Powerpoint principle: include all features such as animations which are given. But not only adults do mistakes with Emojis. Young people also have difficulties. Most of the Emoji are originated in Asia and the correct meaning is often not plausible for us. We often use false Emojis without knowing the original meaning.
Especially in fast-paced, written communication, it is distinctly important to communicate clearly, since the scope for interpretation is particularly large. Gestures and other human aspects of communication are no longer there. So the Emojis are more than just a yellow circle with a smiling face. It is the expression of bundled emotions that we desperately try to integrate into written communication.
So the correct use with Emojis has to be learned. www.emoji.college solves this problem and provides a quick quiz through most controversial Emojis with the association of a college/school environment. If you pass the quiz, you also graduate at Emoji College and get an individual certificate.
Technical aspects
The web application (emoji.college) consists of a client side user interface as well as a server side backend for the provision of the data and assets.
Server
Based on the JavaScript runtime Node.js with a MongoDB database we setup the server.
Instead of the common Express.js we use Hapi.js. This is also a Web Application Framework (WAF) for Node.js. It was developed by Walmart Labs and represents a good alternative to Express.js. The advantage of Hapi.js is that most of the modules are sponsored by large corporations, that is why, a continuous development can be expected. Also nearForm – the world’s largest Node Consultancy – mainly uses Hapi in its projects. Although the number of users compared to Express.js is low, high-quality enterprise applications are primarily implemented with security, performance and durability first.
Client
At the client side we worked with AngularJS, SASS and lots of features such as internationalization and request recovery. All this frontend stuff is bundled and processed with webpack and a bunch of plugins.
However, we do not want to deal so much with the technical subtleties of this special application, but rather generally describe how to set up the services that enable continuous integration. At each point, we look at our experience and say what you have to look out for.
Set up AWS & Travis CI
Why Travis CI:
Travis CI is probably one of the most easiest CI servers to get started with. Apart from being open source and free to host on your own infrastructure (above all if you are a student :)), Travis CI offers a SaaS version that allows free testing for open source projects. Setup is as easy as linking your GitHub account, giving the relevant permissions and updating the .travis.yaml file with your project specific requirements. So Travis uses GitHub webhooks to run your project’s test suite whenever you push new changes, demonstrating the health of a project’s code and answering the fundamental question, “Does this thing even work?”.
Which AWS services do you need?
Amazon Elastic Computer Cloud (Amazon EC2) is a web-based service that allows to run application programs in the Amazon Web Services (AWS) public cloud. EC2 enables developers to spin up virtual machines which provide compute capacity for IT projects and cloud workloads that run with global AWS data centers. So the entire project will be hosted on such an (EC2) instance.
To get an continuous integration/delivery service you need at least AWS CodeDeploy:
AWS CodeDeploy is a service that automates code provisioning for arbitrary instances, including Amazon EC2 and local servers. AWS CodeDeploy makes it easy to deploy quickly new features, avoid downtime during application deployment and simplify complex updates to your applications. You can use AWS CodeDeploy to automate software deployments, eliminating the need for error-prone manual operations. The service scales with your infrastructure, so you can easily provide code for one or thousands of instances.
To visualise the CI process, Amazon offers a service to illustrate the whole process with an GUI. It’s called CodePipeline. AWS CodePipeline is a continuous delivery service for fast and reliable application updates. CodePipeline develops, tests, and provides your code each time code is changed based on the models you have defined for the publishing process. This allows you to deliver functions and updates quickly and reliably. You can easily create a complete solution by using the pre-built plug-ins for popular third-party services such as GitHub. AWS CodeBuild is a pendant product from TravisCI. We decided to use Travis because the GitHub integration Service seems to be much better and we heard about the easy handling. So we just wanted to try it once. Of course you can use other AWS services such as CodePipeline or CodeBuild for the continuous delivery and its visualisation as well. The workflow is quite good.
In the following we explain the sequence and the interaction of the individual services in an illustration: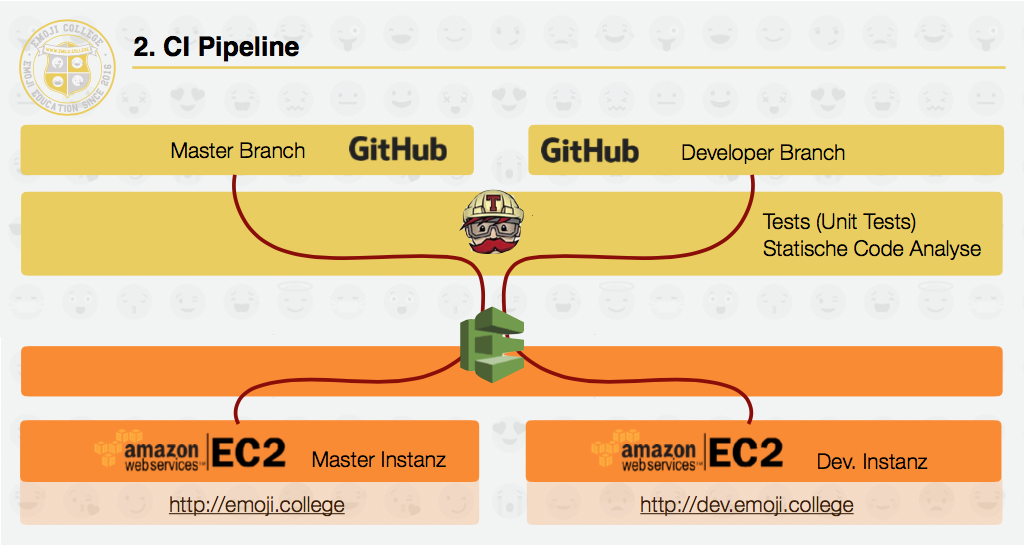
Steps to host on AWS
1. Configuration AWS
First thing you have to is to apply the IAM (Identity and Access Management) settings.

It is important to do this at the very beginning of the installation process in order to not get problems when granting rights later on.
Define: Users, Groups and Roles.
For users you have to download an Accesskey and a Secret Accesskey.
You can put users in groups. This makes sense if many users with different permissions/rights work with AWS.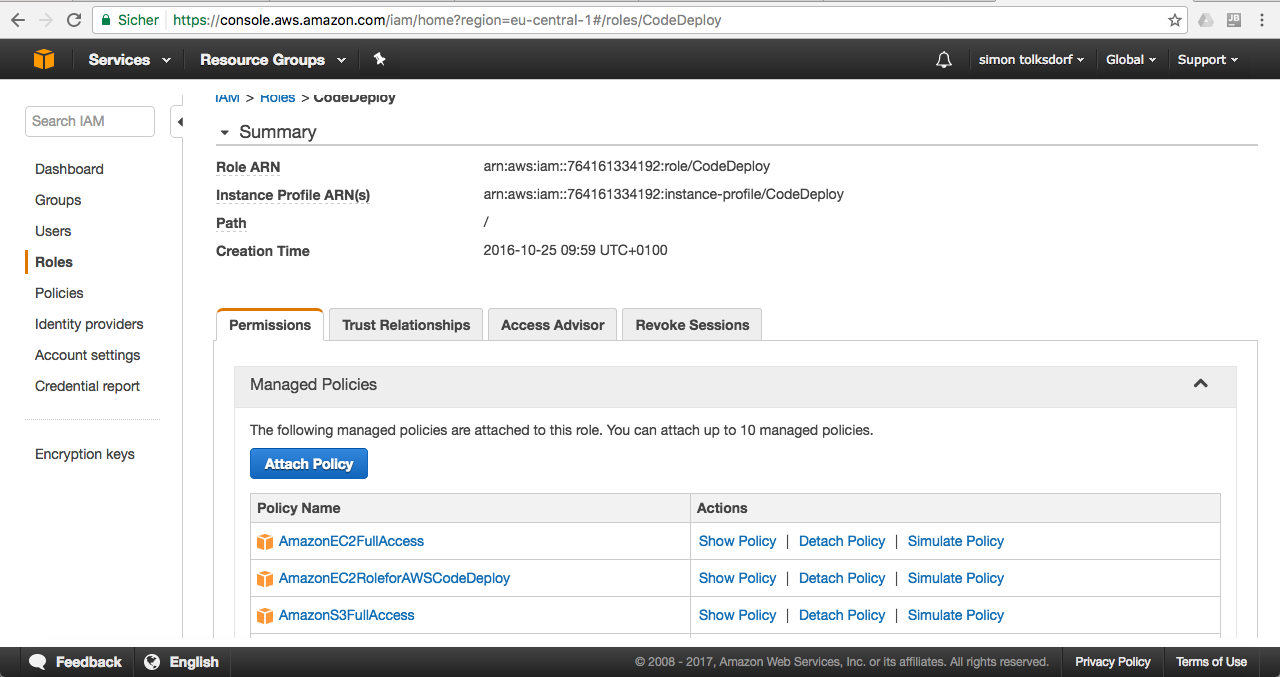
In our case we have only one role that grants access between EC2 and CodeDeploy. Its name is “CodeDeploy”. Check the Customer Policies for that and just check on the corresponding option for the permission.
The configuration of the Identity and Access Management are outsourced in a separate service. So if everything is set correctly there are no problems when setting up the actual services (EC2 and CodeDeploy). We can therefore dedicate ourselves to the establishment of the instance.
2. Configuration EC2 instances
The range of available instances is very large. You can choose different instances depending on the application. In our case the second smallest instance fits perfectly.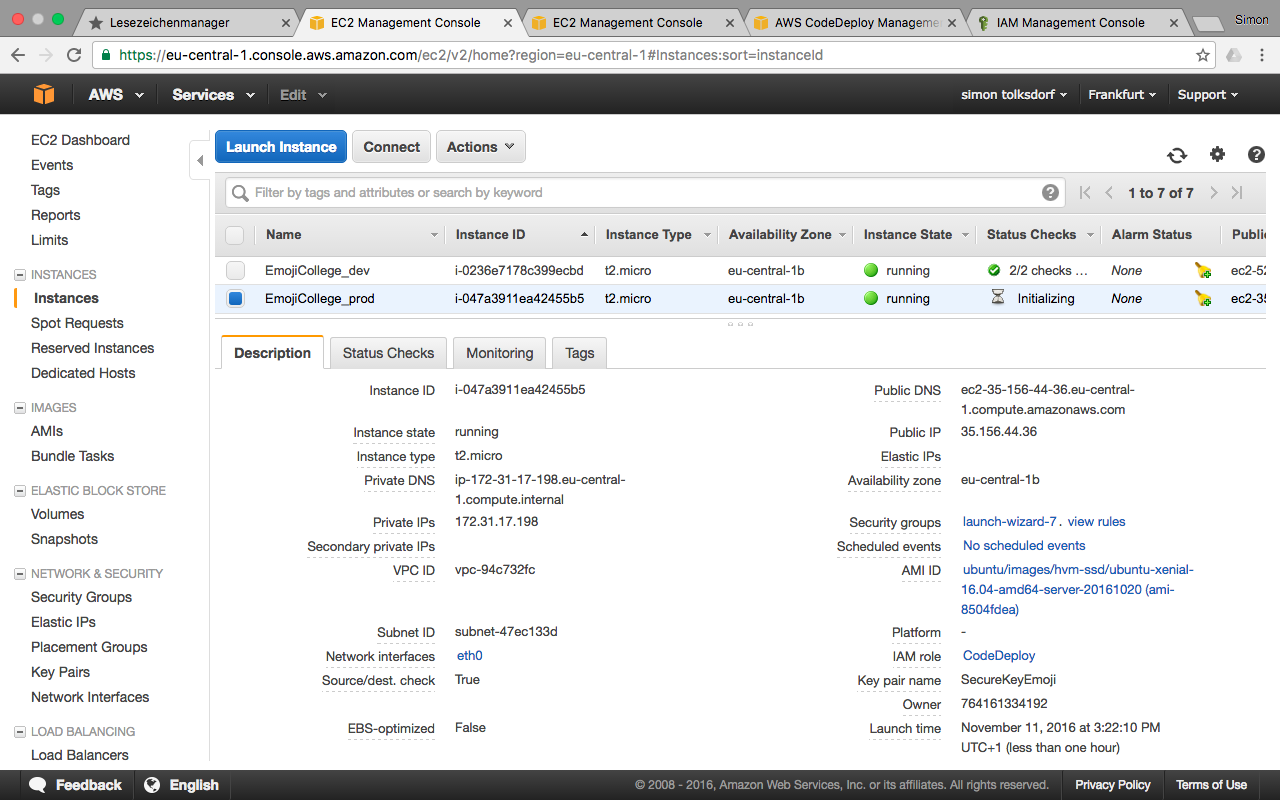
The instances are classified according to T2, M4, M3, C4, C3, X1 etc.
Each type is for its own application. This must be discussed in detail. We use the t2.micro instance. This offers us at least 1GB RAM and a vCPU with 2.5 GHz (Intel Xeon). The cost is 1.2 cents per hour.
Beware of the costs!
 The M4 instance with ssd memory and 8GB RAM costs about 10 ct/h and a small X1 instance with nearly 2000GB RAM costs already $13/h. If you start such an instance, a lot of money is accumulated very quickly. Be aware of what you start at any time, especially if you pay attention to money.
Speaking of costs. Next, you can select the virtual machine you want to install on the instance. Operating systems do not cost directly. They are charged by runtime of the instance. In our case, the price per hour increases to 1.7 Cents per hour by installing Ubuntu. Windows Servers are much more expensive.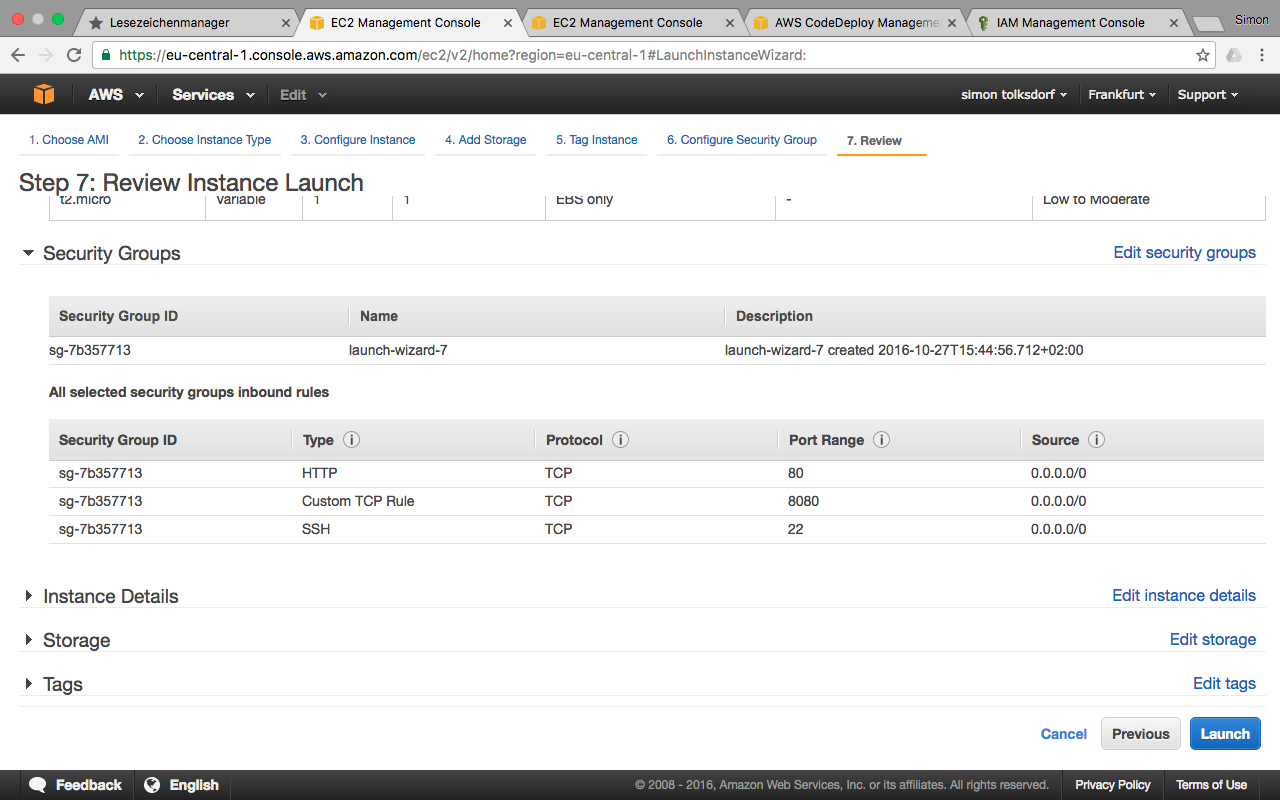
Next, create security groups. As with any server, the ports must be exposed here.
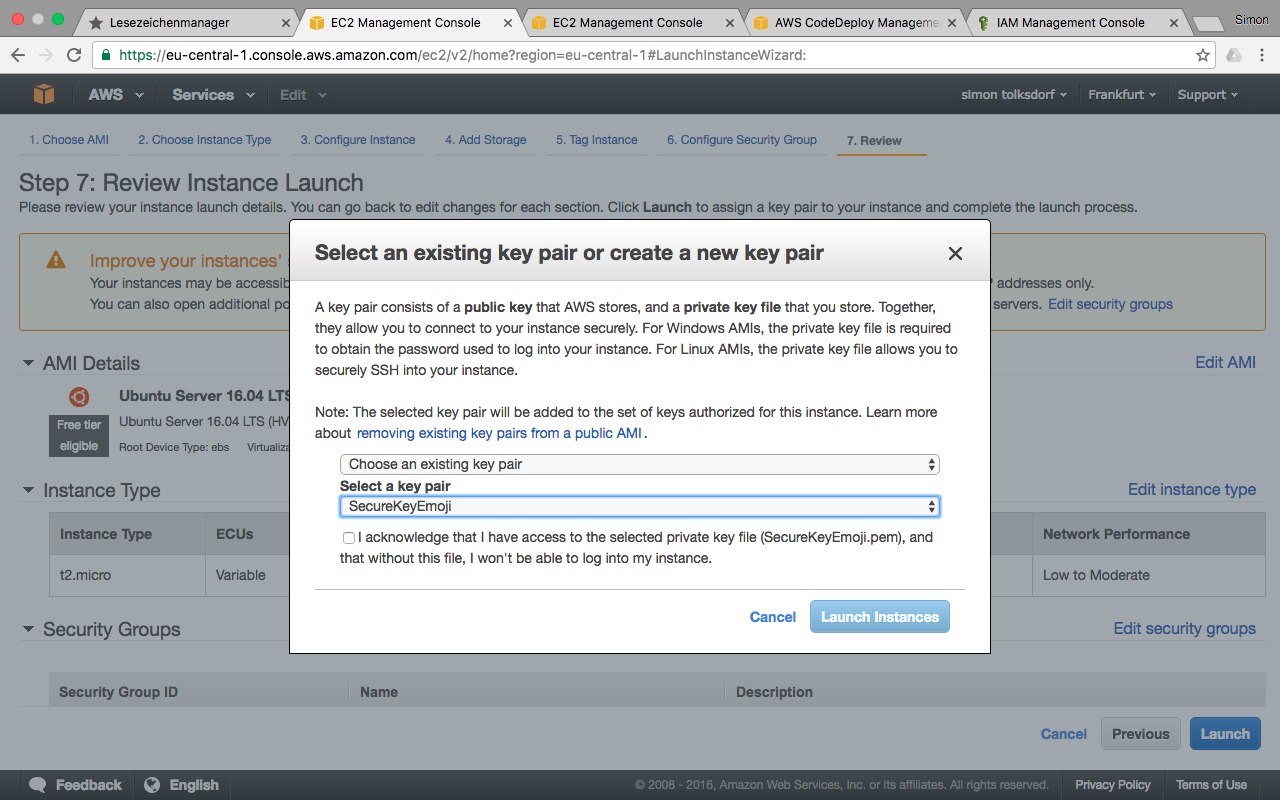
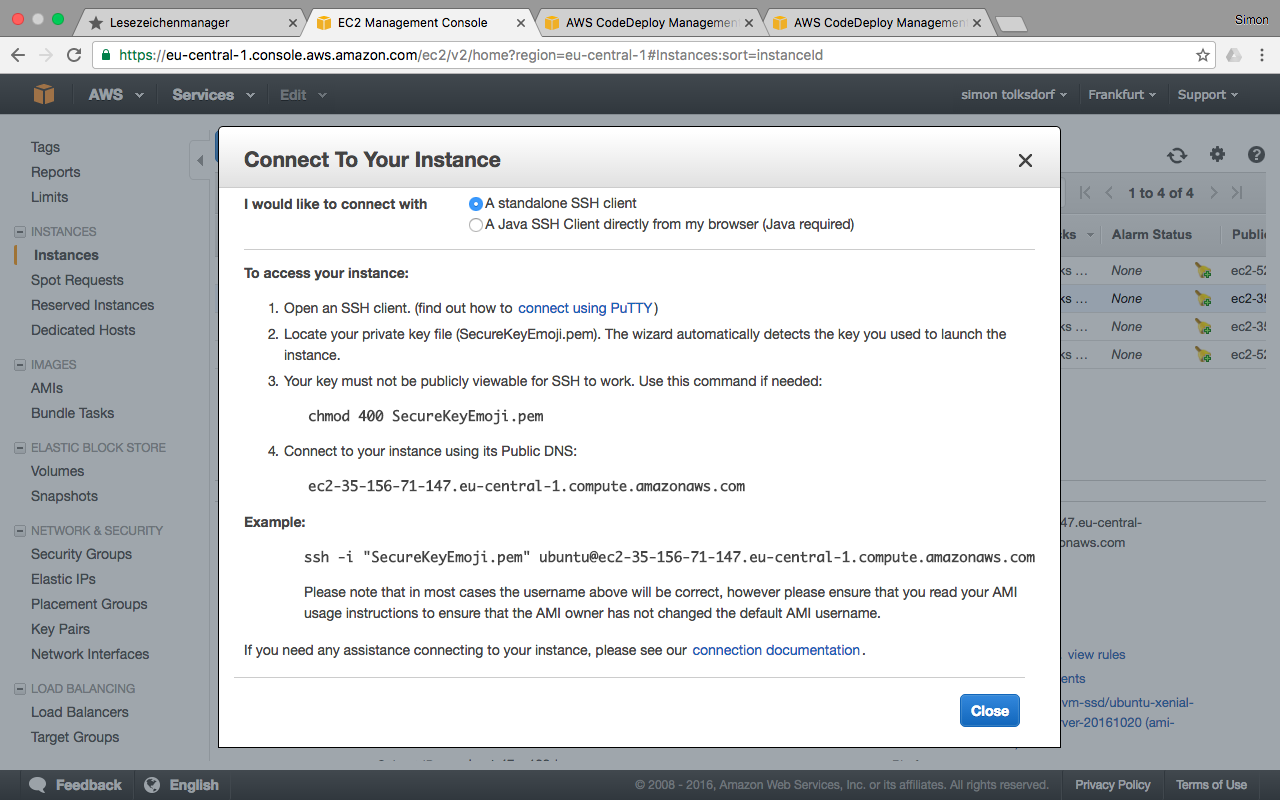
Next, apply key pair and download it. Now you can access the instance via ssh now. Amazon helps you connection via ssh. Press “Connect” for that information given in the screenshots.
Now the IAM role must be linked to the instance. If the only role created exists, it can be easily selected via the properties of the instance. In our case it’s “CodeDeploy”.
If you want to use your own IP address or domain we would suggest to set up the Elastic IP now. Then it will map it over the public IP given by AWS specific for the instance. To separate development and productive branch, we have created two t2.micro instances, each of them has been assigned a subdomain. Attention, every registered Elastic IP costs money. It’s not included!
Next, we will have a look, how to set up node.js and database on the just newly created instances.
3. Work on Server
The next steps are carried out via the shell input.
To install Node.js, we use the Node Version Manager. This allows to run several versions of Node.js on the server.
curl -o- https://raw.githubusercontent.com/creationix/nvm/v0.33.0/install.sh | bash
The database has to be installed next. You can install MongoDB by typing this command:
sudo apt-get install -y mongodb-org
We are running the application on port 8080. So you have to redirect port 80 to port 8080 to make it accessible from the outside. Run this command:
sudo iptables -t nat -A PREROUTING -i eth0 -p tcp --dport 80 -j REDIRECT --to-port 8080
Now requests to port 80 will get mapped/redirected to port 8080.
Another essential component that has to be installed is the CodeDeploy agent. The AWS CodeDeploy agent is a software package that, when installed and configured on an instance, enables that instance to be used in AWS CodeDeploy deployments.
A configuration file is placed on the instance when the agent is installed. This file is used to specify how the agent works. This configuration file specifies directory paths and other settings for AWS CodeDeploy to use as it interacts with the instance.
To install this agent you have to install ruby first. It has to be exact version 2.0!
Use the following commands:
sudo apt-get -y update

sudo apt-get -y install build-essential zlib1g-dev libssl-dev libreadline6-dev libyaml-dev

cd /tmp

wget http://cache.ruby-lang.org/pub/ruby/2.0/ruby-2.0.0-p481.tar.gz

tar -xvzf ruby-2.0.0-p481.tar.gz

cd ruby-2.0.0-p481/

./configure --prefix=/usr/local

make

sudo make install
Now you can start to install the CodeDeploy agent:
cd /home/ubuntu

wget https://aws-codedeploy-eu-central-1.s3.amazonaws.com/latest/install

chmod +x ./install

sudo ./install auto
Of cause you have to change the region of the running instance. We are running the EC2 instances in Frankfurt (eu-central-1)
Check the running status with:
sudo service codedeploy-agent status
If the AWS CodeDeploy agent is installed and running, you should see a message like:
The AWS CodeDeploy agent is running.
Now all requried systems are running on your instance. It’s time to set up Travis CI and and CodeDeploy.
4. Configuration CodeDeploy
4.1 Wizard
The configuration of CodeDeploy can now carried out by the step by step wizard.
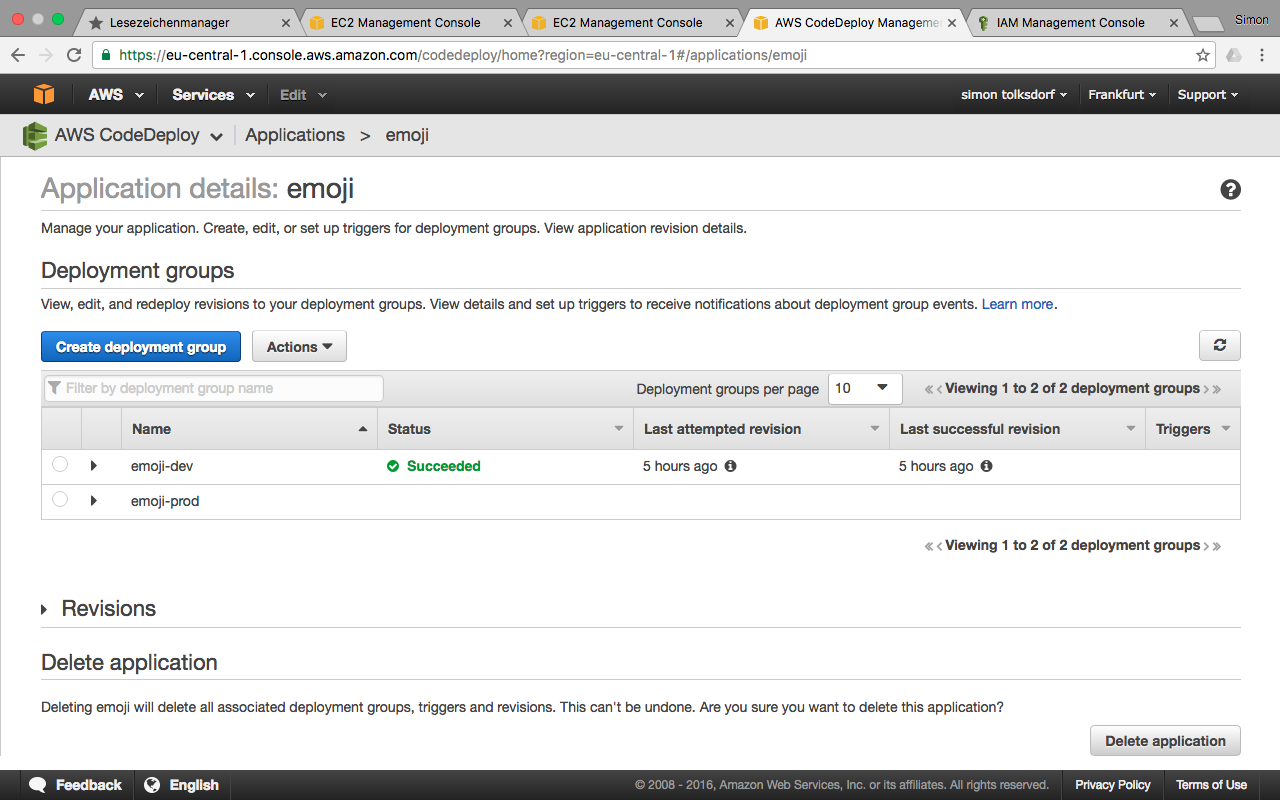
First create a deployment group and the corresponding application when necessary. If there is no application yet, it is possible to create the application while creating the deployment group. 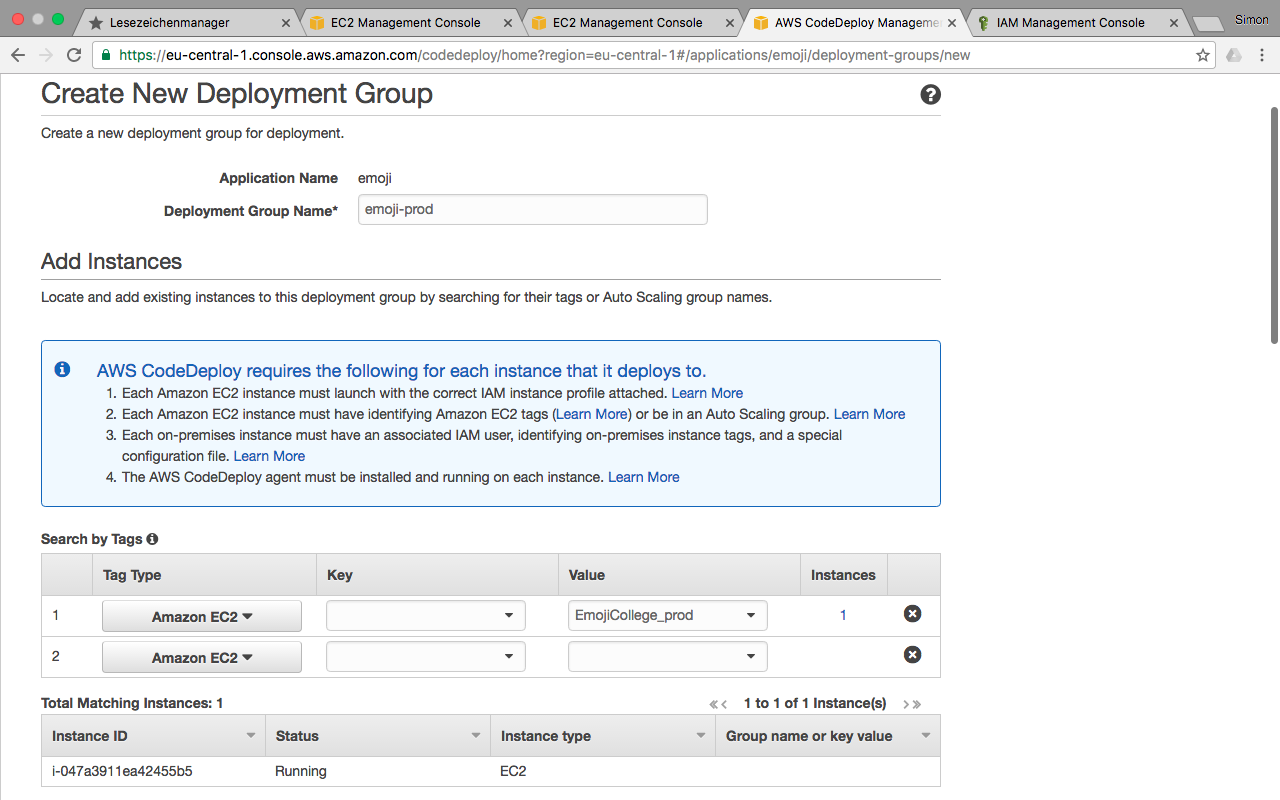
Furthermore, it is necessary to specify the instances to which you want to deploy your application. The available instances should be listed in the Value dropdown. The Tag Type is Amazon EC2. Here we show how the production instance links the corresponding EC2 instance with CodeDeploy to completely build the continuous integration pipeline.
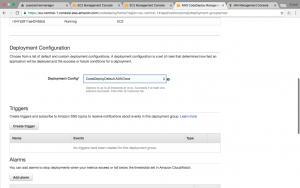 There are several deployment configurations, according to one’s means. All three configurations/strategies are described in the AWS documentation.
Because we use just one instance per stage/group, we chose the “AllAtOnce” strategy.
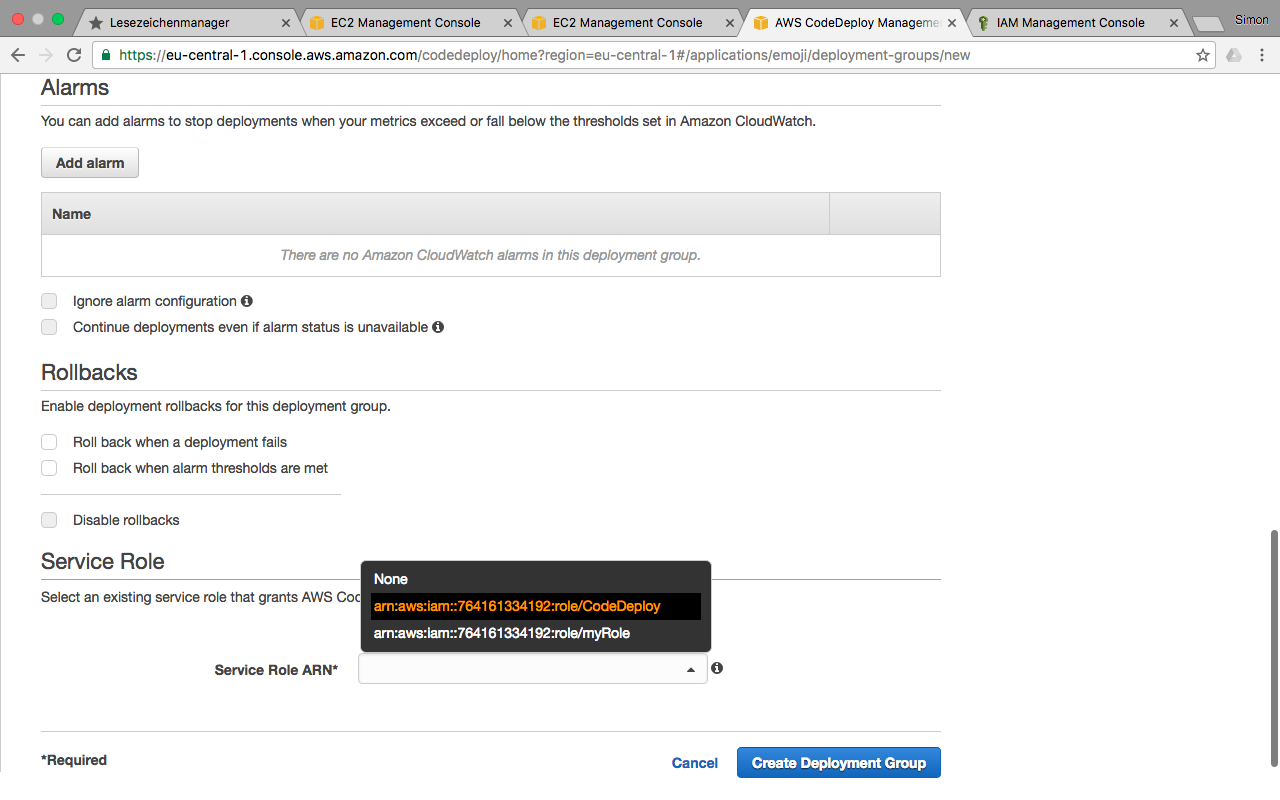
Last but not least link the corresponding IAM role from the very beginning of this tutorial as a service role. It is also possible to split the permissions/roles related to CodeDeploy and further stuff. Click on “Create Deployment Group” and TA-DAAAH!
The creation process of the deployment group is finished. Now proceed to the step – the setup of Travis CI – to complete the continuous integration pipeline.
If the deployment fails, not yet in Travis CI but in CodeDeploy, it is possible to inspect the error logs. Visit CodeDeploy > Deployments and click on the corresponding deployment id. With an further click on “view events” CodeDeploy enables to inspect hook specific error logs.
4.2 Configuration Files
The second part of the CodeDeploy configuration is defined in a configuration file called appspec.yml and some linked shell scripts for the deployment hooks.
version: 0.0
os: linux
files:
  - source: /
    destination: /home/ubuntu/emoji
permissions:
  - object: /
    pattern: "**"
    owner: ubuntu
hooks:
  AfterInstall:
    - location: /bin/hook-afterinstall.sh
      runas: ubuntu
In this configuration file it is specified that Linux is used as operational system. Furthermore, we copy all files of the repository root directory to the defined destination on the EC2 instance. Additionally we set our user “ubuntu” as owner of the copied files/directories. Last but not least there are several hooks. For Node.js application the AfterInstall hook is the most import. The hook is emitted if the copy process is finished. The hooks enable to define a shell script file and the executing user.
In our case the corresponding shell script looks like:
#!/bin/bash

cd /home/ubuntu/emoji/
npm install
npm rebuild
npm run build:client
npm run build:server
npm run go
This script just enters the respective directory, installs/rebuilds the npm modules, runs our build scripts and the server process. That’s it.
5. Working with Travis
Travis enables to configure the continuous integration in a fast and easy manner. The whole configuration is defined in your .travis.yml file based in the root directory. At the very beginning the used language (Node.js v6.X in this case) and some other basics are defined. The following lines of code are the core: the before_script, the script, the branches and the deploy part. The hook before_script is used to run some commands just before the literal commands. In our case all the npm module defined in package.json will be installed. Additionally docker-compose enables to run a simple mongo database as daemon. Afterwards some commands will be run to check the code quality with unit tests and static code analysis. The branches section defines that just pushes and pull requests on the listed branches will trigger this continuous integration pipeline.
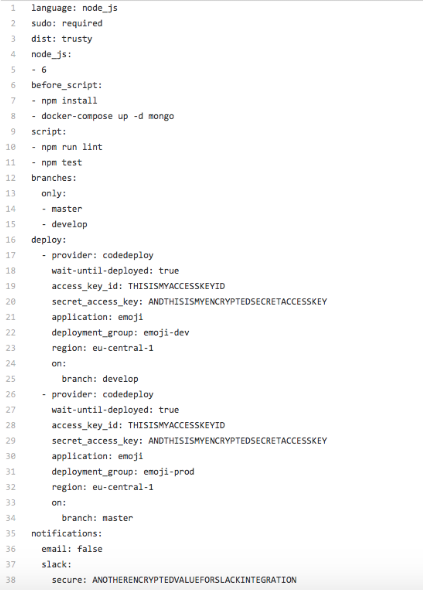
In case the of pushes (or merged pull requests) travis will continue with the deploy section. It is possible to clarify multiple deployment providers. Just because of Amazon EC2 as IaaS it is necessary to use codedeploy as provider. Add the credentials (secret key and secret access key) defined within the IAM service before, the region and even the name of the application respective the deployment group. The last-mentioned properties are related to CodeDeploy. Furthermore, it is allowed to restrict the branches per provider. Like in the code snippet above, use one Amazon EC2 instance per branch to induce stages. The last part related to notifications is not mandatory.
Finally visit travis (travis.org or travis.com, depending on the publishing state), connect your GitHub account and select the repository. That’s it.
Conclusion:
It is not necessary to use all AWS tools to set up a working and handy continuous integration and delivery. With this blog entry, we show that a combination of Travis CI and AWS is a good way to build a solid pipeline. Especially for small Node.js applications, this is a very good option because you can save money by dispensing with as many AWS services as possible. It is also a good start at AWS. The complex entanglements between the individual services are, in fact, unclear. We made the experience that by trying individual services very much money is consumed very quickly. Therefore, we recommend to set up the pipeline accordingly. It can be further extended with AWS products. There are some tools (for example CodePipeline) that enables to get more and more into and also facilitate the handling of larger projects.
Finally be aware of all the costs accumulating over the time and with every new service.
Use the billing section/service of the Amazon Web Services to get detailed insights.
Felix Heck | CS3 [fh092@hdm-stuttgart.de]
Simon Tolksdorf | CS3 [st067@hdm-stuttgart.de]
Leave a Reply
You must be logged in to post a comment.