Welcome to part four of our microservices series. If you’ve missed a previous post you can read it here:
I) Architecture
II) Caching
III) Security
IV) Continuous Integration
V) Lessons Learned
Continuous Integration
Introduction
In our fourth part of Microservices – Legolizing Software Development we will focus on our Continuous Integration environment and how we made the the three major parts – Jenkins, Docker and Git – work seamlessly together.
Jenkins
The very center of each Continuous Integration workflow is a CI server. In our case, we decided to use Jenkins – a java based open source automation server which provides a lot of plugins to support testing, building, deploying and any other kinds of automation. But before we take a closer look at our actual Jenkins and CI configuration, we first need to look at two other technologies in more detail: Git and Docker.
Git
As Martin Fowler suggests in his great and to this day still relevant article about Continuous Integration, we need to Maintain a Single Source Repository. In our case, Git will be the source code management system of our choice. When it comes to our Git workflow we do also stick to Fowler’s suggestions: Everyone Commits to the Mainline Every Day. Fine, so everyone committing to mainline every day it is. But operating with so many independent microservices the question arises: What exactly is our mainline? The answer to this question leads us to Git submodules.
Since microservices are by definition self-contained services and there is hardly any dependencies between them, we decided to manage each service source code in its own Git repository. This keeps change histories of each service clean and consistent. Furthermore, we keep all Docker and Jenkins configuration files concerning a microservice in its own repository which allows us to keep track of changes in configuration as well.
So far, so good. But as a developer you may want to pull all source code of all services to one single location on your local machine. At best without memorizing the repositories’ names or manually jumping into each directory to perform a pull. To achieve this goal, we defined all subrepositories – the repositories of the individual services – as Git submodules of one main repository. This results in two advantages:
Firstly, the entire source code can be pulled with one single command:
git submodule update --recursive --remote
Secondly, the particular Git repositories of the individual services still remain independent and easily manageable.
Docker
When we talk about microservices, topics like virtualization and containerization are essential. For containerization, we have decided to use Docker which became a big hype since its first release in 2013. Docker is an open-source software which enables the possibility to package applications in containers. By using Docker we want to reach high portability and to avoid various software installations on our application server for different deployments. Furthermore, Docker allows us to version and reuse components, scale the number of service instances according to the current load while simultaneously consuming less resources. Since many blogs and tutorials out there already show and discuss brilliantly what Docker is and how to install it and set it up, we will leave out this part. Moreover, we want to explain how we integrated Docker into our CI concept.
Jenkins and Git working together
Now after having introduced the three major components of our CI environment, let’s get down to the nitty-gritty: their interaction.
Let’s start with the interaction of Jenkins and Git. Sticking to Martin Fowler’s suggestions about CI, he furthermore recommends that Every Commit should build the Mainline on an Integration Machine. To be able to do so, Jenkins comes with the very handy support of so called webhooks. Webhooks can be regarded as non-standardized HTTP callbacks. Usually, they are triggered by an event. So, when an event occurs, the event source simply sends an HTTP request to the target’s URI configured for the webhook. There, the event invokes some predefined behavior. In practical terms, it means that we tell Git to notify our Jenkins server via a webhook on each Git push event. Jenkins in turn is able to follow Martin Fowler’s recommendation and initiate the corresponding build jobs on every single push to the repository.
Jenkins in Docker and Docker outside of Docker
Now let’s take a closer look on how Jenkins and Docker collaborate. As our goal is to containerize most of our components, it fits the mould to run Jenkins in a Docker container as well. So, Jenkins isn’t conventionally installed on the host system but runs within a Docker container which brings all the advantages of Docker like portability, reuse, resource consumption, minimal overhead, scalability, version control and so on with it. But it gets even better! Our jenkins-docker instance is able to build and run our microservices in Docker containers as well.
Accessing Docker within a Docker container can be done by using one of this two approaches: The first is called Docker-in-Docker (DinD) and the second Docker-outside-of-Docker (DooD). Spoiler alert: we used the latter one.
But nevertheless, let’s take a quick look at the Docker-in-Docker approach. As its name implies, this approach requires an additional Docker installation inside the jenkins-docker container itself. Furthermore, the Jenkins container would need to be run in --privileged mode for mostly unrestricted access to the host’s resources. Even though installing Docker within a Docker container might sound logically in the first place, the approach causes some significant drawdowns. Especially when it comes to Linux Security Modules and the nested usage of copy-on-write file systems. So even the official DinD developers themselves state that the approach was generally not recommended and limit its usage for only a few use cases such as the development of Docker itself. If you were interested in more details about DinD drawdowns in CI environments we would like to refer to Jérôme Petazzoni’s blog post Using Docker-in-Docker for your CI or testing environment? Think twice.
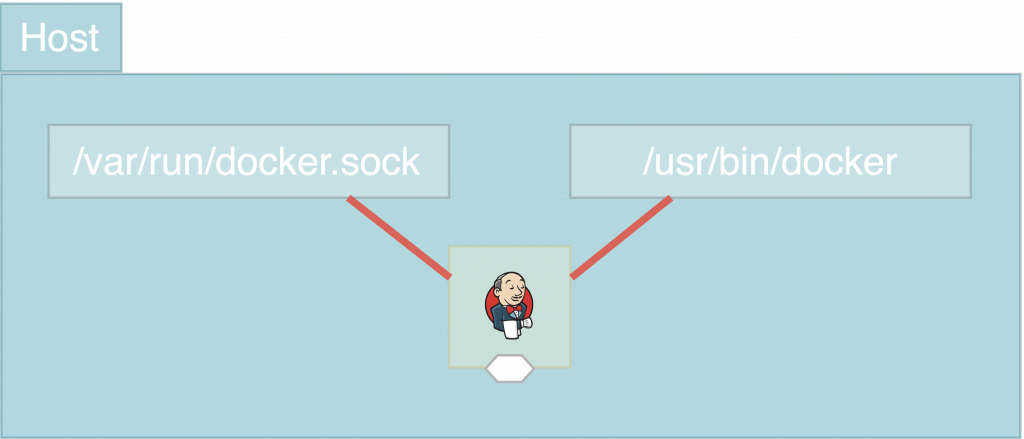
Since DinD does definitely not seem to be suitable for our use cases, we decided to use the Docker-outside-of-Docker approach. Even though it is not perfect as well, it suits our needs the best. For a first simple illustration of how DooD works, take a look at the following figure.

The basic idea of DooD is to access the host’s Docker installation from within the Jenkins container. But how can this be done? Basically, to achieve this the following two requirements must be met.
Firstly, the docker socket (/var/run/docker.sock) of the host must be accessible from within the Jenkins Docker container. This can easily be done by mounting and mapping it into the container using the -v flag or the docker-compose yaml keyword volumes. And while we are on it, let’s mount the Docker binaries (/usr/bin/docker) right along with it. To do so, we just need to add the following lines to our Jenkins docker-compose.yml file:
volumes:
  - /var/run/docker.sock:/var/run/docker.sock
  - /usr/bin/docker:/usr/bin/docker
That’s it. Docker socket and binaries of the host are now addressable from within the Jenkins container.
But what about the permissions? Well, this question leads us to requirement number two: In order to build docker images and run containers the jenkins user (running the process in the container) must be granted the appropriate permissions. But in this case, we cannot just map these like we did with docker socket and binaries. In docker there is no such thing like mapping of users or groups from docker host to docker containers or vice versa. Access from a container to a volume takes place with the user ID and group ID the running process was executed with. User names or group names are completely left out of consideration. But what does this mean in practical terms? Well, in order to access docker socket and binaries our jenkins user must run under the exact same group ID as the host’s docker group. We do so by adding the following lines to our Jenkins Dockerfile:
USER root
RUN groupadd -g 999 docker && usermod -a -G docker jenkins
USER jenkins
In our case, the group ID of the host’s docker group is 999. Pay attention that it may be different on other systems. To make this solution more portable, the group ID could also be extracted dynamically by using a script. But for simplicity sake this part is left out to your imagination. Alternatively, we also could have made the jenkins user a member of sudoers, but in this case all Docker commands would need to be prefixed with sudo.
Conclusively, in case you want to set up your own DooD Jenkins server quickly, this is how our docker configuration files look like:
docker-compose.yml:
jenkins:
   restart: always
   build: .
   container_name: jenkins_dood
   ports:
       - 8080:8080
       - 50000:50000
   volumes:
       - /var/jenkins_home:/var/jenkins_home
       - /var/run/docker.sock:/var/run/docker.sock
       - /usr/bin/docker:/usr/bin/docker
Dockerfile:
FROM jenkins
USER root
#TODO: Replace ‘999’ with your host’s docker group ID
RUN groupadd -g 999 docker && usermod -a -G docker jenkins
RUN apt-get update && apt-get -q -y install python-pip && yes | pip install docker-compose
USER jenkins
To run the container simply execute:
docker-compose docker-compose.yml build
docker-compose docker-compose.yml up -d
Overview
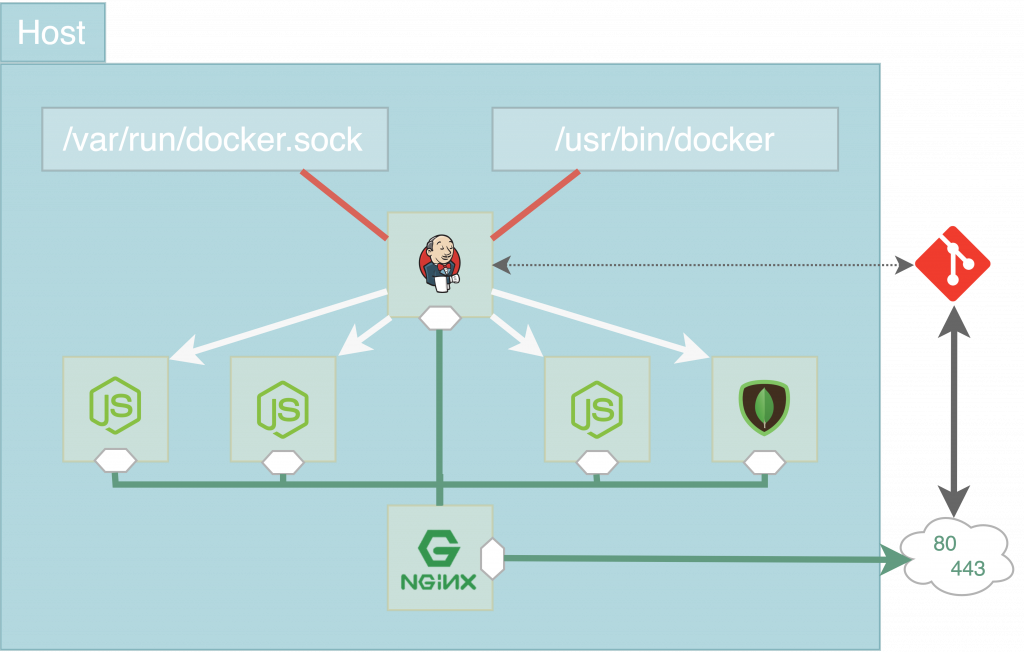
So let’s take a final look at how our CI environment looks like after having successfully set up and integrated our three major CI parts:

First of all, the Git repositories (organized as submodules of one main repository) comprise and keep track of the source code and all relevant configuration files. This includes the blueprints of each microservice docker image, which are kept and maintained as Dockerfile and docker-compose.yml files, as well as the particular Jenkins Job definitions described in Jenkinsfiles. As stated previously, the Jenkins automation server is the heart of the CI environment. It gets notified on each git push event via a webhook. Thanks to the Docker-outside-of-Docker approach Jenkins is able to access the host’s docker socket and binaries, build docker images and run containers. It executes the corresponding Jenkins jobs and subsequently the docker containers can be started, stopped, deleted or updated. Eventually the Nginx reverse proxy – also running in a docker container – maps the containers’ ports to the host’s open ports 80 and 443. Et voilà, there they are: your containerized microservices accessible from the outside world.
We hope this fourth part of our blog post gave you an insight on how Jenkins, Docker and Git could be set up to work seamlessly together to help you configure, run and manage your legolized microservice architecture productively.
In the last blog post we finish with a concluding review about the use of microservices in small projects and give an overview about our top stumbling blocks.
Continue with Part V – Lessons Learned
Kost, Christof [ck154@hdm-stuttgart.de]
Kuhn, Korbinian [kk129@hdm-stuttgart.de]
Schelling, Marc [ms467@hdm-stuttgart.de]
Mauser, Steffen [sm182@hdm-stuttgart.de]
Varatharajah, Calieston [cv015@hdm-stuttgart.de]

Leave a Reply
You must be logged in to post a comment.