Written by Verena Barth, Marcel Heisler, Florian Rupp, & Tim Tenckhoff

DevOps
Code Sharing
Building multiple services hold in separated code repositories, we headed the problem of code duplication. Multiple times a piece of code is used twice, for example data models. As the services grow larger, just copying is no option. This makes it really hard to maintain the code in a consistent and transparent way, not to mention the overhead of time required to do so. In the context of this project, this issue was solved by creating an own code library. Yes, a library with an own repository which not directly builds an executable service. But isn’t it much work to always load and update it in all the services? Yes it is – as long as you are not familiar with scripting. Therefore the build management tool gradle is a big win. It gives you the opportunity to write your own task to be executed, such like the packaging of a java code library as maven package and the upload to a package cloud afterwards. Good thing there is the free package host provider packagecloud.io around, which allows a storage size of 150MB for free. When the library was hosted online, this dependency could easily loaded automatically by the gradle dependency management.
By the use of this approach, the code development process could focus on what it really needs to – the development and not code copying! Also the team did more think about how to design the code to be more flexible, to be able to reuse it in another service. Of course it was an overhead of additional work, but the advantages outweigh. If the library is to be updated, this could achieved by an increment of its version number. Therefore all services can change only the version number and get the new software automatically updated.
CI/CD
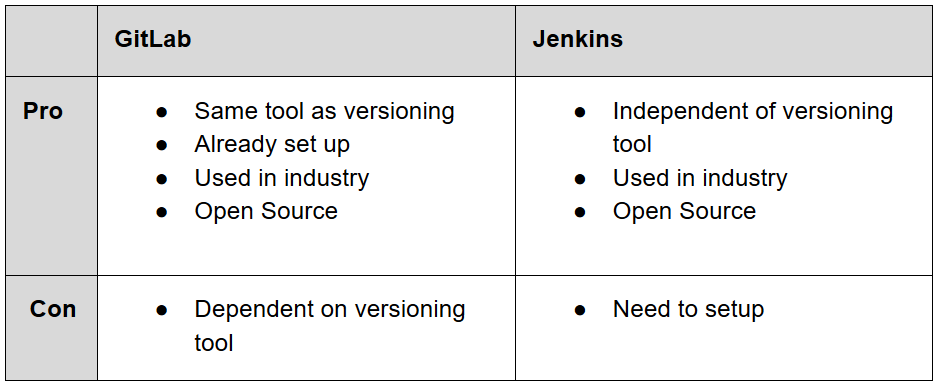
To bring development and operations closer together we set up a CI/CD-Pipeline. Because we wanted to have a quick solution to support the development as fast as possible by enabling automated builds, tests and deployments, we had to choose a tool very early. We came up with the alternatives GitLab hosted by our University or setting up Jenkins ourselves. We quickly created the following table of pros and cons and decided to use HdM’s GitLab mainly because it is already set up and contains our code.
Our first pipeline was created ‘quick and dirty’, and it’s main purpose was just to build the projects with Gradle (in case of a Java project), to run it’s tests and to deploy it to our server. In order to improve the pipeline’s performance we wanted to cache the Gradle dependencies which turned out to be not that easy. Building the cache as the official GitLab Docs described it did not work, neither the workaround to set the GRADLE_USER_HOME variable to the directory of our project (which was mentioned very often, e.g. here and here). The cache seemed to be created but was deleted again before the next stage began. We ended up pushig the Gradle Wrapper in our repository as well and using it to build and test our application. Actually it is recommended anyway to execute a build with the Wrapper to ensure a reliable, controlled and standardized execution of the build. To make use of the Wrapper you need to make it executable (see “before_script” command in the code below). Then you’re able to build your project, but with other commands, like “./gradlew assemble” instead of “gradle build”.
image: openjdk:11-jdk-slim-sid

stages:
 - build
 # [..]

before_script:
 - chmod +x gradlew
 - apt-get update -qy

build:
 stage: build
 script:
    - ./gradlew -g /cache/.gradle clean assemble

# [..]
In the end we improved the time needed from almost four to about two and a half minutes.
Having this initial version in use we spent some more time on improving our pipeline. In doing so we found some more pros and cons of the different tools we compared before and a third option to think about.
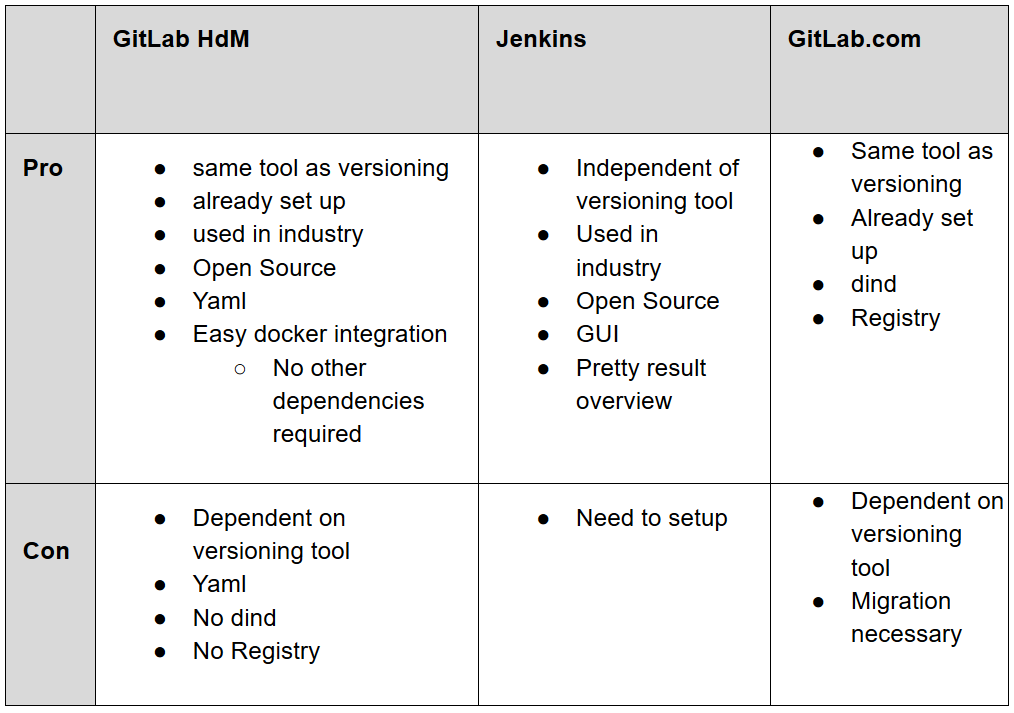
The main drawbacks we found for our current solution were, that HdM does not allow docker-in-docker (dind) due to security reasons and GitLab container registry is disabled to save storage. In return we read that the docker integration is very powerful in GitLab. The added option GitLab.com could solve both the problems we had with HdM’s GitLab. But we came up with it too late in the project because we were already at solving the issues and didn’t want to migrate all our repositories. Also company-made constraints might always occur and we learned from solving them.
Our GitLab Runner
To solve our dind problem we needed a different GitLab Runner because the shared runners provided by HdM don’t allow docker-in-docker for security reasons. Trying to use it anyway makes the pipeline fail with logs containing something like this:
docker:dind ...
Waiting for services to be up and running...
*** WARNING: Service runner-57fea070-project-1829-concurrent-0-docker-0 probably didn't start properly.
Health check error:
service "runner-57fea070-project-1829-concurrent-0-docker-0-wait-for-service" timeout
Health check container logs:
Service container logs:
2018-11-29T12:38:05.473753192Z mount: permission denied (are you root?)
2018-11-29T12:38:05.474003218Z Could not mount /sys/kernel/security.
2018-11-29T12:38:05.474017136Z AppArmor detection and --privileged mode might break.
2018-11-29T12:38:05.475690384Z mount: permission denied (are you root?)
*********
To use our own runner there are some possibilities:
- Install a runner on a server
- Install runners locally
- Integrate a Kubernetes cluster and install a runner there
Since we already have a server the first option is the easiest and makes the most sense. There are tutorials you can follow straight forward. First install the runner and then register the runner for each GitLab repository you want to allow to use this runner. The URL and token you need to specify for registration can be found in GitLab under Settings -> CI/CD -> Runners -> Set up a specific Runner manually. It is also help provided to choose the executor, which needs to be specified on registration.
We chose Docker as executer because it provides all we need and is easy to configure. Now the runner can be started with “gitlab-runner start”. To be able to use docker-in-docker some more configuration is necessary but all changes to the config file “/etc/gitlab-runner/config.toml“ should automatically be detected and applied by the runner. The file should be edited or modified using the “gitlab-runner register” command as described here. For dind the privileged = true is important that’s why it already occurred in the logs above. Finally Docker needs to be installed on the same machine as the runner. The installation is described here. We chose to install using the repository. If you don’t know which command to choose in step 4 of “Set up the repository” you can get the information with “uname -a”. We also had to replace the “$(lsb_release -cs)” with “stretch” as mentioned in the Note. To figure out the parent Debian distribution we used “lsb_release -a“.
Pipeline Setup
Now that we solved our docker-in-docker problem we can set up a CI pipeline that first builds our project using a suitable image and then builds an image as defined in a corresponding Dockerfile.
Each service has its own Dockerfile depending on it’s needs.For the Database service image for example we need to define many environment variables to establish the connection between the database and message broker. You can see it’s Dockerfile below.
FROM openjdk:8-jdk-slim

RUN mkdir /app/
COPY build/libs/bahnalyse-database-service-1.0-SNAPSHOT.jar /app
WORKDIR /app

ENV RABBIT_HOST 172.17.0.2
ENV RABBIT_PORT 5672

ENV INFLUXDB_HOST 172.17.0.5
ENV INFLUXDB_PORT 8086

CMD java -jar bahnalyse-database-service-1.0-SNAPSHOT.jar
The frontend Dockerfile is splitted in two stages: The first stages builds the Angular app in an image which inherits from a node image version 8.11.2 based on the alpine distribution. For serving the application we use the nginx alpine image and move the dist-output of our first node image to the NGINX public folder. We have to copy our nginx configuration file, in which we define e.g. the index file and the port to listen to, into the new image as well. This is how the final frontend Dockerfile looks like:
# Stage 1 - compile Angular app

FROM node:8.11.2-alpine as node

WORKDIR /usr/src/app
COPY package*.json ./
RUN npm install
COPY . .
RUN npm run build

# Stage 2 -  For serving the application using a web-server

FROM nginx:1.13.12-alpine

COPY --from=node /usr/src/app/dist /usr/share/nginx/html
COPY ./nginx.conf /etc/nginx/conf.d/default.conf
Now let’s look at our gitlab-ci.yml file shown below:
image: docker:stable

variables:
  DOCKER_HOST: tcp://docker:2375/
  DOCKER_DRIVER: overlay2

services:
  - docker:dind

stages:
  - build
  - test
  - package
  - deploy

gradle-build:
  image: gradle:4.10.2-jdk8
  stage: build
  script: "gradle build -x test"
  artifacts:
    paths:
      - build/libs/*.jar

unit-test:
  image: gradle:4.10.2-jdk8
  stage: test
  script:
    - gradle test

docker-build:
  only:
  - master
  stage: package
  script:
  - docker build -t $CI_REGISTRY_IMAGE:latest -t $CI_REGISTRY_IMAGE:$CI_COMMIT_SHA .
  - docker login -u token -p $IBM_REGISTRY_TOKEN $CI_REGISTRY
  - docker push $CI_REGISTRY_IMAGE:latest
  - docker push $CI_REGISTRY_IMAGE:$CI_COMMIT_SHA

server-deploy:
  only:
  - master
  image: kroniak/ssh-client
  stage: deploy
  script:
  - echo "$CI_SSH" | tr -d '\r' > pkey
  - chmod 400 pkey
  - ssh -o stricthostkeychecking=no -i pkey root@bahnalyse.mi.hdm-stuttgart.de "docker login -u token -p $IBM_REGISTRY_TOKEN $CI_REGISTRY && docker-compose pull bahnalysebackend && docker-compose up --no-deps -d bahnalysebackend"
Compared to our first version we now make use of suitable Docker images. This makes the jobs faster and the file clearer. Most of the first parts are taken from this pretty good tutorial, so we’ll keep the explanations short here. At first we specify docker:stable as default image for this pipeline. This overrides the one defined in the runner configuration and can be overridden in every job again. Using the “services” keyword we also add docker-in-docker to this image. The variable DOCKER_HOST is required to make use of dind because it tells docker to talk with the daemon started inside of the service instead of the default “/var/run/docker.sock” socket. Using an overlay storage driver improves the performance. Next we define our stages “build”, “test”, “package” and “deploy” and then the jobs to run in each stage.
The gradle-build job now uses the gradle image with the version matching our requirements. This includes all the dependencies we need to build our jar file with “gradle build”. We use the -x test option here to exclude the tests because we want to run them in a separate stage. This gives a better overview in the GitLab UI because you see what went wrong faster. Using “artifacts” we can store the built jar file to the specified path. There it gets available for other jobs as well as downloadable from the GitLab UI.
In the test stage we simply run our unit tests using “gradle test”. This needs to compile again because we excluded the tests from the jar in our build task.
In the package stage we create a Docker image including our jar file. Using the “only” keyword we specify that this should only happen in the master branch. The first line of the “script” block uses a backend Dockerfile mentioned above in the root directory of the project (specified by the dot at the end of the line) to create the image.
For the following steps to work we need to solve our second problem: the absence of the GitLab Container Registry in HdM’s GitLab. A registry is a storage and content delivery system, holding named Docker images, available in different tagged versions. A common use case in CI/CD is to build the new image in the pipeline, tag it with something unique like a timestamp and as “latest”, push it to a registry and then pull it from there for deployment. There are alternatives to the registry integrated in GitLab we will discuss later. First let’s finish the explanations of the yaml file. We followed the just described use case of the registry. As something unique we chose the commit hash because the images get saved with a timestamp in the registry anyway. It is accessible using the predefined environment variable $CI_COMMIT_SHA. We also defined environment variables for the login credentials to the registry so that they don’t appear in any files or logs. Using environment variables like the name of the image can also help to make the registry easier exchangeable because this file could stay the same and only the variables would need to change. They can be defined in the GitLab UI under Settings -> CI/CD -> Environment variables.
In the deploy stage we used a public image from docker hub that has ssh installed so that we don’t have to always install it in the pipeline what costs time. A more secure solution would be to create such an image ourselves. We login to our server using a ssh key saved in the CI_SSH environment variable. Then run the commands on the server to login to our registry, pull the latest image and start it. To pull and start we use docker-compose. Docker Compose is a tool for defining and running multi-container Docker applications. It is mainly used for local development and single host deployments. It uses a file by default called docker-compose.yml. In this file multiple services can be defined with the Dockerfiles to build them or with the name including registry to get them from as well portmappings and environment variables for each service and dependencies between them. We use the –no-deps option to restart only the service where the image has changed and -d to detach it into the background otherwise the pipeline never stops.
Choosing a Registry
Since we cannot use the registry integrated into GitLab we considered the following alternatives:
- Set up our own registry
- Use docker hub
- Use IBM Cloud Registry (or other cloud provider)
The first approach is described here. Especially making the registry accessible from outside e.g. from our pipeline make this approach much more complicated than the other solutions. So we discarded this one.
Instead we started out using the second approach, docker hub. To login to it the $CI_REGISTRY variable used in the gitlab-ci.yml file should contain “index.docker.io” or it can just be omitted because it is the default for the docker login command. Besides the ease of use the unlimited storage is its biggest benefit. But it has also some drawbacks: You get only one private repository for free. To use this repository for different images makes it necessary to distinguish them using tags what is not really their purpose. Also login is only possible with username and password. So using it from a CI pipeline forces a team member to write its private credentials into GitLab’s environment variables where every other maintainer of this project can read them.
For these reasons we switched to the IBM Cloud Registry. There it is possible to create a user with its own credentials only for the pipeline using the IBM Cloud IAM-Tools or just creating a token to use for the docker login. To switch the registry only the GitLab environment variable $CI_REGISTRY needs to be adjusted to “registry.eu-de.bluemix.net” and the login needs to be updated, too (we changed from a username and password approach to the token one shown in the file above). Also the amount of private repositories is not limited and you get another helpful tool on top: Vulnerability-Checks for all the images. Unfortunately the amount of free storage is limited. Since our images are too big we got access to HdM’s paid account. So to minimize costs we had to ensure that there are not too many images stored in this registry. Since logging in to IBM Cloud’s UI and removing old images manually is very inefficient we added a clean-up job to our pipeline.
The possibilities to such a clean up job work are quite limited. There is no simple docker command for this, like docker login, push or pull. Probably the most docker-native way is would be using the docker REST API as described here. But this is only accessible for private cloud customers at IBM. The other approach described in the mentioned blogpost is deleting from the filesystem what is even less accessible in a cloud registry. So we have to use an IBM Cloud specific solution. Some fellow students of us had the same problem and solved it using the IBM Cloud CLI as described in their blogpost. We were looking for a solution without the CLI-tools for IBM Cloud and found a REST API that could do the job which is documented here. But for authorization you need a valid bearer token for which to receive in a script you need to use the CLI-tools. We chose to use this API anyway and ended up with the following additional job in our gitlab-ci.yml file:
registry-cleanup:
  stage: deploy
  script:
  - apk update
  - apk add curl
  - curl -fsSL https://clis.ng.bluemix.net/install/linux | sh
  - ibmcloud plugin install container-registry
  - apk add jq
  - ibmcloud login --apikey $IBM_API_KEY -r eu-de
  - ibmcloud iam oauth-tokens | sed -e 's/^IAM token:\s*//g' > bearertoken.txt
  - cat bearertoken.txt
  - >-
      curl
      -H "Account: 7e8029ad935180cfdce6e1e8b6ff6910"
      -H "Authorization: $(cat bearertoken.txt)"
      https://registry.eu-de.bluemix.net/api/v1/images
      |
      jq --raw-output
      'map(select(.RepoTags[0] | startswith("registry.eu-de.bluemix.net/bahnalyse/testrepo")))
      | if length > 1 then sort_by(.Created)[0].RepoTags[0] else "" end' > image.txt
  - >-
       if [ -s image.txt ] ;
       then
       curl -X DELETE
       -H "Account: 7e8029ad935180cfdce6e1e8b6ff6910"
       -H "Authorization: $(cat bearertoken.txt)"
       https://registry.eu-de.bluemix.net/api/v1/images/$(cat image.txt) ;
       else
       echo "nothing to delete" ;
       fi
We run it at deploy stage so it could run in parallel to the actual deploy job if we had more than one runner.
First we install the required tools curl, IBM Cloud CLI and jq. This should be done by creating and using an appropriate image later. Then we login using the CLI-tools and get a bearer token. From the answer we need to cut off the beginning because it is (sometimes) prefixed with “IAM token: “ and then write it into a file. Curl is used to call the REST API with the headers for authorization to set and receive all the images available in our registry. We pipe the output to jq which is a command line tool to parse JSON. We select all the images with the same name as the one we just created. If there are already more than two we sort them by the created timestamp, grab the oldest one and write its name, including the tag, to file. If there are only two or less of these images we create an empty file. The –raw-output option of jq omits the quotes that would be around a JSON output. Finally we check if the file contains an image and delete it via API call if there is one. Somehow the else block, telling that there is nothing to delete, doesn’t really work yet. It is probably something wrong with the spaces, quotes or semicolon, but debugging a shell script defined in a yaml file is horrible so we’ll just live with our less talking pipeline. The yaml format also makes the >- at the beginning of a command necessary, otherwise the yaml is invalid. In our case an error like “(<unknwon>): mapping values are not allowed in this context at line … column …” occurred.
Conclusion
Our aims for the implementation of the application Bahnalyse was to play around with modern technologies and practices. While learning a lot about architectural patterns (like SOA and microservices), cloud providers, containerization and continuous integration, we successfully improved the application’s architecture.
We found out that the pure implementation of architectural principles is hardly possible and rarely makes sense. Although we initially wanted to split our monolith up into several microservices we ended up creating a SOA which makes use of both, a microservice and services which are composed or make use of other services. To put it in a nutshell, we can conclude there might never be a complete roadmap on which architecture or technology fits your needs the best. Further, a microservice architecture is not the universal remedy, it also entails its drawbacks. In most cases you have to evaluate and compare those drawbacks of the different opportunities available and decide which really succeeds your business case.
Outlook
Further points to take a look at would be improving our password management. Currently we save our credentials in GibLab’s environment variables which offers a security risk, because in this way every maintainer working at our project with GitLab is able to see them. We want to avoid this e.g. by outsourcing it to a tool like a Vault by HashiCorp. It is a great mechanism for storing sensitive data, e.g. secrets and credentials.
Another thing to focus on is the further separation of concerns into different microservices. A perfect candidate herefore is the search service of which the frontend makes use of to autocomplete the user’s station name input. It’s independent of any other component and just sends the user input to the VVS API and returns a collection of matching station names.
Finally deploying Bahnalyse to the cloud would be an interesting thing for us to try out. We already figured out which cloud provider fits our needs best in the first part of our blog post series. The next step would be to explore the IBM Cloud Kubernetes service and figure out the differences between deploying and running our application on a server and doing this in the cloud.
Leave a Reply
You must be logged in to post a comment.