by Jannik Igney [ji016] & Timothy Geiger [tg079]
1. Introduction
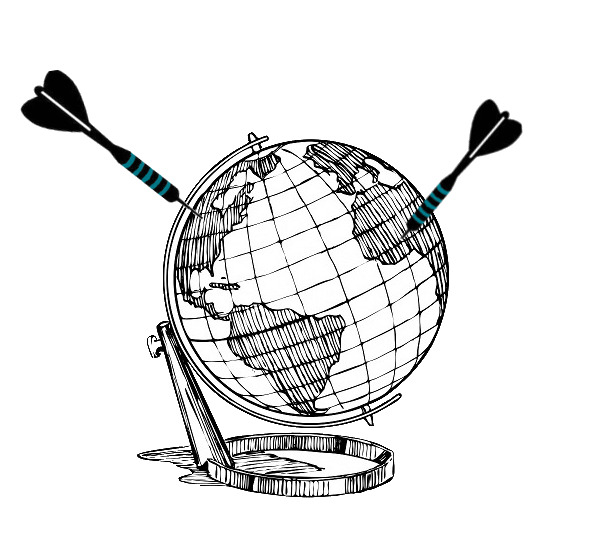
For our course “Software development for cloud computing” we developed a little multiplayer browser game named “GeoDarts”. Goal of the game: Guess where cities are located in Germany on a map and be closer than your opponents. Goal of our project: We wanted to learn what it takes to bring an application like that to the cloud and test different solutions for this task. Also we wanted to get some first hands-on experience with different technologies including socket.io, Vue.js and Mapbox. There were many highs and lows and many lessons-learned in our process. In the following we will describe some of the problems we encountered in different areas, along with the solutions we found for them – and the new problems arising from these solutions…
To get a rough impression of what our game looks like:
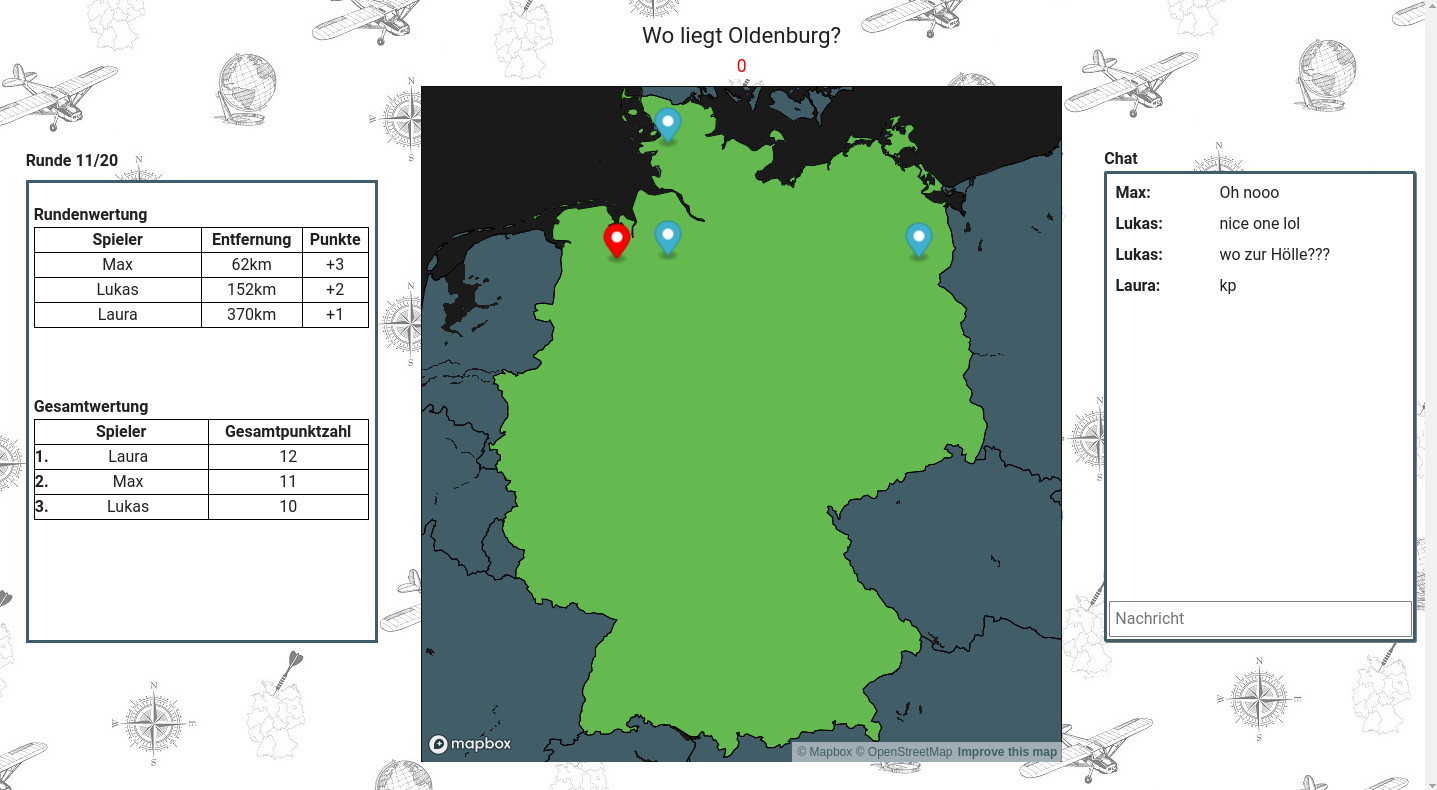
The blue markers are the ones set by the players, the red one is the solution. The player that is the furthest away gets one point, the next one two points and so on. If two players have the same number of points in the end, their total distance will decide.
2. Technologies
For the application itself we decided to work with Node.js, Socket.io and Vue.js.
2.1 Why NodeJS
We decided to use NodeJS for our backend because we already worked with it in the lecture Web Development 2. Therefore, we were able to start working on the game right away without having to deal with a new programming language and framework. Popular alternatives would have been Django or Flask. However, both frameworks require advanced knowledge in python that neither of us has. Another alternative that is becoming more and more famous is Deno. Deno was programmed by the same developer who also developed NodeJS. He wanted to improve some things in Deno that he didn’t like in NodeJS. You can write code for Deno with Javascript or Typescript. Even though we have no experience in Typescript, we have heard almost only good things about the programming language. Unfortunately, it has two major downsides. It has a relatively small community and you cannot use npm. Whereas NodeJS has a huge community. You will hardly find any question about NodeJS that has not been asked and answered before. This saves you a lot of time and headaches when debugging.
2.2 Why socket.io
In the beginning, we didn’t know how to implement a real-time game. After some research we came across a technology called websockets. Websockets allow communication in both directions. That means not only can the client send data to the server, but the server is able to send data to the client as well. Websockets work like this: you open a TCP connection and leave it open until you don’t need it anymore. In NodeJS you can implement websockets in different ways. We chose one of the most prominent solutions: Socket.IO. It is very easy to start with. With only a few lines of code, you already have a functional application running. It is also widely used and you can find many learning materials. And these were not even all features. Unfortunately. By the time we were at a very advanced stage of development, we had learnt about features that we didn’t know before. However, these features were not very advantageous for us. We will see later why.
2.3 Why Vue.js
Similar to Node.js we had some first basic experience with Vue.js but never did a major project with it. That’s why we wanted to use this opportunity to deepen our knowledge of Vue.js. Many concepts of Vue.js are quicker to learn than with competitors like React. Also there’s great support from a large community – perfect conditions for some experimenting.
3. Architecture and program flow
In the beginning our application just consisted of a single Node.js express server, communicating with clients via socket.io. At some point we decided that we would like to be able to horizontally scale the app and have multiple instances available. The reason for that decision was of course not that we feared our server might collapse under the traffic generated by hundreds of thousands of excited users of our game, we simply wanted to gain some first experience in the topic of scaling and find out what solutions there are and what problems they come with.
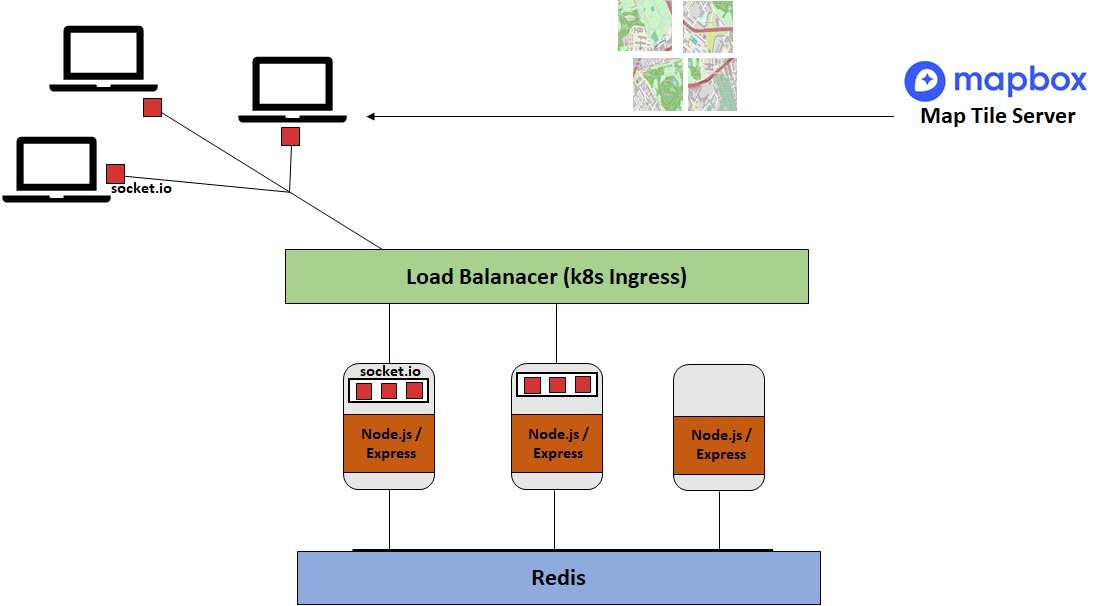
So the below graphic shows the architecture we ended up with. Redis and Node.js are deployed in seperated Kubernetes Services. In order to make use of multiple Node.js instances we first had to overcome quite a few obstacles and still did not achieve a perfect solution, as described further below. However, we learned a lot in this fight and in the end that was our most important goal.
Once the client has loaded the page all further communication with the server happens via the websocket. The following chart illustrates the flow of events from creating a new game to transmitting the final results:

4. How to get a map?
One of the core requirements for a geography game like ours, is of course embedding an interactive map. Since most developers will probably come across the big topic of maps sooner or later, so we were glad to use this as an opportunity to take a first look into some of the related technologies. First thing we learned was that maps that are integrated in websites are usually not one big piece of data but a raster of single tiles, put together like pieces of a puzzle. That way only the required areas of a map need to be loaded, e.g. when zooming in. Traditionally these tiles were served as images (“raster tiles”), but considering that you need new tiles for every zoom level and that every image is a huge bunch of data you might end up with a very slow map that is not much fun to use. Also with raster tiles, though you can add custom features to the map later, you can not style single layers of the map, because there is just that one layer. That’s why most providers for map services support another technique by now: vector tiles. With this approach, the tiles are not images made of pixels, but vector data, an exact geometric description of every element in the map which can then be rendered in the browser. The main advantages are shorter loading time (smaller data size), smoother zooming (no need for multiple tilesets for different zooming levels) and easy customization of the specific layers. Though this technique involves higher requirements on the client’s browser and hardware it is considered the superior approach for many use cases nowadays. That’s why we decided to go with vector tiles, though probably if we had to start over, we would try to do it differently.
When it comes to the question of what technologies to use, there are many alternatives for both client side libraries (e.g. leaflet, mapbox gl) and map tile providers (mapbox, Google, OpenStreetMaps). In our case it was important to be able to style the map, so that we could remove all labels and features except country borders and give single countries their own colour. Mapbox is a big platform for all kinds of map services including an extensive map style editor called Mapbox studio. So we decided to try this, since Mapbox also offers a large community and good tutorials. Mapbox hosts vector tiles for free as long as you stay under 50.000 requests per month. No need to worry here.
We were happy with Mapbox since it is fairly easy to use and fulfilled all our demands. However, with the knowledge we have now about how displaying maps works, we would probably try to solve the problem completely differently: The most important advantage of vector tiles is good performance even with heavy zooming and jumping around on a multilayer map. However, the map that we needed for our game neither has many layers nor is there any zooming or changing position. That’s why we probably could have rendered the map from a simple geoJSON file, e.g. with the library d3.js. A geoJSON describes all features of a map in JSON format and can be used as a starting point for vector tiles. Due to our low requirements on the map, we probably wouldn’t have needed vector tiles and could have done without the dependency to mapbox.
5. Frontend development – SPA = Single Page Application or Socket Problems Ahead
Writing the frontend of our application with Vue.js was a new experience for us in different respects. Even though it is really easy to create a first outline of a page with Vue.js, it still takes quite some time to get behind concepts like the lifecycle hooks and communication between components, but also usage of the development server or UI Libraries.
All these things go beyond the scope of this post. A more general aspect of frontend frameworks like Vue.js, is that what you get is an SPA, a Single Page Application, which opens up new possibilities and is better in terms of performance, but it also changes some very basic assumptions that you might be used to if you come from developing old school static web pages like us. The most important one is probably that your components are being reused on the client side without reloading them from the server again. That sounds like no big deal but at many points it can cause some quite confusing errors if you forget about it. The fact that your entire frontend is now stateful of course has some big advantages like being able to store data and objects and keeping open a permanent socket connection, you just shouldn’t forget that unlike in a static frontend, jumping between different URIs won’t reset that state, because the page is not reloaded from the server. For instance if you use a timer in your component and you don’t kill it when leaving the component it might not start anew but just keep running when revisiting that page. At one point it took us a long time to figure out why certain actions happened twice. Every chat message we sent, appeared twice in the chat. Eventually we found out that our listener functions of the websocket were mounted again every time a component was reloaded because we didn’t destroy them. We handled this by writing a wrapper function for socket.addListener(), which first removes all listeners for that specified event and then adds the new one. Another approach would be to use the vue-router’s beforeRouteLeave hook to remove listeners when leaving the current route.
Another point where we needed to adapt our stateful application to the stateless platform web is the game flow. We needed a purely frontend mechanism that makes sure that a user can only access those subpages that represent the phase of the game that he is currently in. For example when the results are displayed we don’t want players to be able to navigate back into the game view. We don’t want them to see the game view of a game they have not joined. For that purpose we created a room token that is stored in a vuex store when the player successfully joins a game and deleted when the game is over. By this token the components can verify that a user is actually allowed to enter the component he navigated to.
6. Backend Introduction
This chapter is about roughly explaining how our backend works. We will take a closer look at the backend later when it comes to scaling because many decisions for certain technologies and techniques only came up through scaling. Therefore, it would not make much sense if we were to look at it right now.
Before we started the development, we thought about how to make it possible for players to play the game at the same time in different rooms. With techniques that we knew up to that point, we couldn’t find a solution. So we did some research. After a while we came up with Socket.IO. Besides being able to develop real time applications, socket.io also offers the possibility to create such rooms that we need for our game. So how does it work? If a player wants to create a new game, we just create a new room in socket.io with a unique Id in order to distinguish the rooms. Now a second player wants to join the game. To join the room from before, all he needs is the unique id. That’s it. Now we can create rooms and join them. But how can we address only the players in a specific room? With socket.io this is done via events. We can emit events from the server side to the client and the other way around. An example: Player ‚A‘ wants to send a message to all other players in the same room. So he emits an event called ‚sendMsg’ with the message as parameter. The server receives this event and tries to determine the room the socket is currently in. Afterwards, the server itself emits an event named ‚receiveMsg‘ with the same message as before as a parameter with the determined room as destination. Every client connected to the server listens to this event. But since the event is only sent to the sockets in the same room, only these sockets receive the event. The received message can then be displayed in the chat. Once you understand the logic behind it, it is actually quite simple. Our entire client-server communication then works with these events. Socket.io also saves us some work. It automatically deletes the rooms that are no longer needed. This is the case when no player is left in a room.
However, one problem remains. How do we store data? For example, what about the points you win during the game? If we were to store the scores on the client side, you could manipulate your score. What about the cities that are randomly selected by the game at the beginning and then queried during the course of the game. If we would save the cities on the client side, one could simply read the coordinates. That’s not what we want. So this is not a solution that comes into question for our game. This means we have to store the data on the server side. But how? In the end we decided to use Redis. This was not always the case. But more details about this will come later when we talk about scaling.
What is redis? Redis is an in-memory data structure store. We can easily store data structures like strings, lists and sets. It stores data with an associated key. So if we want to access a data set, we simply do this through the matching key. However, there is a problem with Redis. Unlike socket.io, the data here gets not deleted when all sockets in a room are disconnected. So if we did nothing, our database would be filled with unnecessary data. When we first noticed the error, there were about 1,000 entries in the database without a game running. The number of entries in Redis is easy to determine. You go to the Redis console and enter ‘keys *’. This will give you all keys stored in Redis. But how did we solve the problem? Our solution is to make the keys dependent on the room or the player. Each socket in socket.io has a unique socket id and each room has a unique room id as mentioned before. We use these IDs to store the data. We simply rename the keys. A key that stores the players name of a player with the socketId=12345 would then be: ‘12345:playername’. Now you just have to get all keys starting with ‘12345’ at the disconnect event and delete them. In Javascript it looks like this:
This way we delete all player data, so no unnecessary data remains in Redis. Furthermore, we check in the disconnect event whether the player was the last player in the room. If so, we also delete all room data with the same method. But now we use the room id instead of the socket id. This way we can avoid memory leaks.
What had also cost us a lot of time was generally programming with Redis. The code became very complex very quickly. You had to read the code again and again to understand what individual parts of the code did. Of course that’s something nobody wants to have. The fact that the readability of the code worsened very quickly was because Redis works with callbacks. If you want to get one entry, it looks like this:
This does not look very complicated yet. But if you have a lot of queries that depend on each other, as we do, the whole thing looks a lot more complicated:
In order to understand what’s going on here, you really have to pay attention. After a while we found out that such a thing is called ‘Callback Hell’. It is caused by coding with complex nested callbacks. Each Callback takes the previous result as an argument. Fortunately, you can easily solve this in Javascript with promises respectively with async and await. To have a little less work, we used the npm package “async-redis”. You just have to be careful that you can only use await in async functions. Now we can easily rewrite the above example to make the code more readable:
7. Infrastructure vs. Platform as a service
When our application had reached a certain level, we started thinking about ways to deploy it to the cloud. Using AWS EC2 Instances seemed to be a quite straightforward approach to us since we could operate on a common Linux VMs and wouldn’t have to give too much control to some black box. So we created a Linux Ubuntu instance, added some rules to its security group (AWS implementation of a virtual firewall) and installed the software we needed, like our Node.js runtime. By that time we already knew that we would need a separate redis server that allows us to have multiple instances of the app available. Therefore we created another EC2 instance running redis and connected our app instance with it via the internal IP address. This worked fine but we saw some problems. First of all, hardcoding the IP of our redis server for the connection did not seem like a great idea in respect to flexibility and exchangeability. Also we realized that having to connect to our instances via ssh in order to monitor and operate the application is quite annoying. We came to the conclusion that maybe we should try some solutions that are more in the field of orchestration and platform as a service. That’s why we took a look into Cloud Foundry and kubernetes in the ibm cloud environment.
Cloud Foundry seemed to be a good choice at first, since deploying our app itself was done very quickly after choosing our version of Node.js as a runtime and then pushing our source code to the platform with the help of a simple manifest.yml file. However we couldn’t figure out how to set up a redis-server as a separate service which our app could connect to. The longer we tried to make any sense of the CF documentation the more confusing and frustrating it became, so eventually we decided to focus on kubernetes, which was a good decision. Though Docker and Kubernetes turned out to be very complex for beginners as well and they required a lot of research, we found the documentation and tutorials to be really helpful and got a clearer understanding of how things actually work over time. So our summary for kubernetes is “powerful and complex but well explained and consistent in itself”
Apart from the different technical purposes of AWS and kubernetes and apart from all their pros and cons, we noticed huge differences in the way things are explained and presented to first-time users. With AWS we constantly felt that it’s mostly about advertising and selling a product. Kubernetes on the other hand as an open source platform really seems to want its users to understand the underlying technical concepts. As developers we liked that spirit way better than the commercial one and that’s also why we chose not to work with Amazon’s PaaS solution Elastic Beanstalk for a start.
8. Scaling with Kubernetes
So what is this chapter about? As already mentioned in the chapter ‘Backend Introduction’, many decisions we made in the backend are based on problems we encountered during scaling. These difficulties occurred due to the fact that we weren’t sure at the beginning whether we wanted to scale the game. We then decided to scale the game after all. But the backend version at that time was not designed for scaling. That’s how all these problems came up. For example Redis. In the beginning we had a completely different way of storing data. We only decided to use redis later when we experienced difficulties with the old method. And this is exactly what this chapter is about. We will discuss the problems that arose while scaling a version that was not designed for scaling. So let’s start with the Kubernetes deployment, because without a deployment there are no bugs to talk about.
8.1 Docker
In order to deploy our game in Kubernetes, we first have to create an image of our game. This is done via Docker. In order to write our own dockerfile, we first had to take a closer look on how docker works. Each time we build our image, docker steps through the instructions in the dockerfile and executes them in the specified order. Every instruction in that file then creates a new image layer. This mechanism allows image layers to be cached. Therefore when Docker steps through the instructions one after the other, it checks if a layer has changed. If nothing has changed, docker uses the cached image layer. Otherwise the instruction gets executed and all subsequent layers are not cashed anymore, because something could have changed. Best practice would be to order your image layers from the less frequently changed to the more frequently changed.
That’s why our first instruction is the node image. It is rarely changed and rather big. We use the alpine image from Node because it is faster, smaller and more secure compared to the other versions. Furthermore, we don’t need the advantages of the other images, such as ‘apt’. Here is a little size comparison from the latest version (14.11):
| stretch | 345,2 MB |
| buster | 322,65 MB |
| stretch-slim | 57,8 MB |
| buster-slim | 51,54 MB |
| slim | 47,33 MB |
| alpine | 28,33 MB |
However the image is only available locally on our computer. So we still have to publish it somehow. This can be done with the help of a registry. There are many different registries. One of the best known is the one from docker itself, which we then decided to use: Dockerhub. Alternatively, cloud providers like AWS and IBM also offer such registries.
8.2 Kubernetes
Since we now have an image of our game, we can now deploy our application into Kubernetes. Kubernetes is a popular container orchestrator. It was first released by Google, but is now part of an open source community.
In the beginning it was very difficult to get into Kubernetes, because there were many new concepts. But once we understood the basics, we were able to apply what we had learned very quickly.
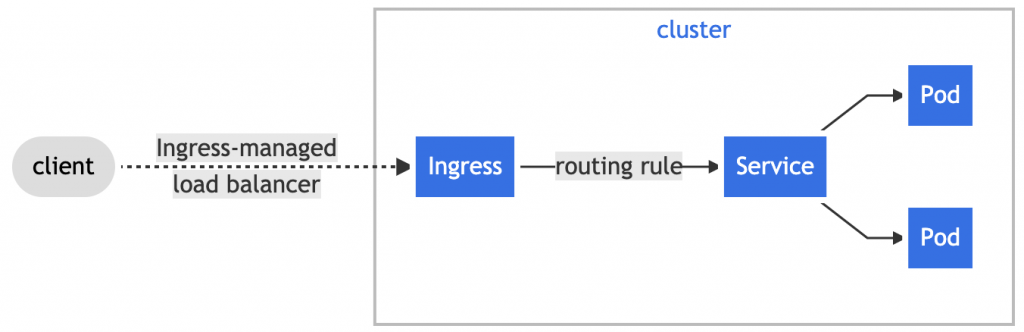
A Pod in Kubernetes is the smallest unit of deployment. It can run one or more containers. Technically, a Pod can be deployed directly into kubernetes. However, we mostly use controllers to deploy a Pod. There are different types of controllers: Deployments, ReplicaSet, StatefulSet, … In our case we chose Deployment because it can manage several identical pods. Here we can specify how many instances we want to have and which image we want to use.
Next we need a Service. A service is an endpoint to a set of pods. It is a persistent endpoint in the cluster to connect to the Pods.
Finally, Ingress. Ingress manages external access to the services in a cluster. Here you can enter additional routes that lead to other backends. But in our case there is only one backend.
In summary, we now have the following structure:
https://kubernetes.io/docs/concepts/services-networking/
8.3 Problem Solving
Now comes the really interesting part, which helped us the most in understanding scaling. Determining why our app is not doing what we wanted it to do. In this blog post we want to focus on 3 problems. The first problem is about data storage and the other two are about websockets and socket.io.
This brings us to the first problem: data storage. We have already mentioned Redis as our final solution. But how have we stored the data before that? In the simplest way possible. We stored our data as JSON objects in an array. Here is a simplified version of a room JSON object:
As you can see, we store the RoomID. Before a player can join a room via Socket.IO, we first step through the array in which all rooms are stored. Only if the room with the specified RoomID exists, the socket is allowed to join the Socket.IO room. However, when we scaled the game, we noticed some strange logs. Apparently, a room couldn’t be found. As a result the socket wasn’t able to join a game. Yet we were sure that the room must exist. Therefore, we did a little research. After some time, we realized the mistake: Let us assume we have 2 instances. Alice visits our website. She gets forwarded to instance 1. Now Alice creates a new game, which results in a room object being stored on instance 1. Afterwards Bob wants to join the game. He gets forwarded to instance 2. The server tries to find the room Alice has just created. Since the room was saved on instance 1, the server can’t find it. As a result Bob can’t join the game.
As you can see, we have made the mistake to store our data per instance. Such an application is called a stateful application. Every instance has a different state. One possible solution would have been to edit our Ingress Controller. In the Ingress Controller you can add paths that point to different backends. In our example from above, the paths would have been ‘/instance1’ and ‘/instance2’, each pointing to a different backend. For example a game is created on instance 1 with the roomID=12345. Now the invitation link would look like this: “/instance1/invitation/12345”. Every player who now joins room 12345 gets automatically forwarded to instance 1. However, this solution has a few drawbacks. Firstly, instance 1 must know its name: ‘instance1’. This has proved to be quite tricky. With a little more time, however, we would have figured that out. Yet there is still another problem. Let us suppose we add 5 additional instances. But how does the ingress Controller know? Somehow the new paths have to be added. One would have to add them manually. We could have possibly replaced the ingress controller with Traefik. Traefik, from our understanding, has the feature to automatically detect such new paths. But we didn’t bother with that any longer, because Traefik became very quickly very complex. Finally there is also a third drawback to the solution. We don’t really want the players to know which instance they are on. We just want it to be some kind of a black box for the players. Therefore, the solution was out of question.
Our solution to the problem was actually quite simple. We have turned our stateful game into a stateless game. We simply connected a database to ensure that every GeoDarts instance has access to the same data. So it does not matter which instance you are forwarded to. As mentioned above, we chose Redis. MongoDB would have been an alternative. We wouldn’t have had to reprogram as much, because we already saved the data as JSON objects. We just had to change the “location” where we saved the data. However, deleting the data after a disconnect with MongoDB would have been much harder. In addition, Redis also has a significant advantage when it comes to websockets, which we will address in a moment. But first we have to create a Redis Service in Kubernetes. We do this through the following YML file:
Now to the second big problem, websockets. Again let’s assume we have 2 instances and 2 players: Alice and Bob. Alice gets forwarded to instance 1 and bob to instance 2. Both players join the same socket.io room with the same roomID. Everything seems fine. At least on the first sight. Although we have not received any error messages, it’s still not working properly. For example, if you tried to start the game, the game only started for some players. And if any of the remaining players then clicks on „start game”, the game will be started for all other players where the game has not yet started.
After several frustrating debugging sessions, we finally figured it out. Websocket connections are stateful. This makes them not so easy to scale. But lets first look at what went wrong. As Alice wanted to join the room on instance 1, the join event was only emitted on instance 1. The same applies to Bob. When he wanted to join the room, his join event was also only emitted on instance 2. So Alice didn’t receive the event because she is on instance 1.
This problem can be addressed by using an Adapter. This Socket.io technique allows us to pass messages between processes and to broadcast events to all clients. We use the socket.io-redis adapter, which takes advantage of the pub/sub function of Redis. When Bob now tries to join a game, the other instances now also get informed about this event with the help of Redis. Ergo the event gets emitted on all instances.
Now to the last problem. From time to time we got this error message on the client side:
Error during WebSocket handshake: Unexpected response code: 400To understand why this error occurs, we need to look at how socket.io establishes a connection. Since socket.io 1.x.x the fallback algorithm has changed to an upgrade approach. By default, a long-polling connection is established first, then upgraded to “better” transports like websockets. Long polling almost works everywhere. That’s why the connection gets established this way.
Though this feature can be quite useful, in our case it was the root of our problem. As the socket.io documentation says:
“If you plan to distribute the load of connections among different processes or machines, you have to make sure that requests associated with a particular session id connect to the process that originated them.”
However, since we use a load balancer, this is not always the case. A brief reminder: With websocket connections, players remain on the prozess/instance they were first redirected to. With Long Polling, though, it’s different. Every time you make a new request, you will be randomly redirected. The player must be lucky that the long polling request gets always forwarded to the same process until Long Polling gets rejected and the websocket connection is used.
There are two solutions. The first solution would be to use Sticky Connections/Sessions. Sticky Sessions is a feature that allows a loadbalancer to route requests to the same process they were first routed to. Though this solution is proposed by socket.io, we decided not to use it. We have tried to stick to the 12 factor app during the development and it does not allow sticky connections. In the end, we decided to use the method socket.io doesn’t recommend: disabling Long Polling. Socket.io does not suggest this, because long polling is one of the biggest advantages compared to other web sock implementations. In that case, the socket.io documentation proposes to maybe consider using raw Websockets. And we have to agree with it. In retrospect, it would have made more sense for us not to use socket.io.
8.4 Target achieved?
Now that we have successfully scaled our game, we have realized something. The load doesn’t get distributed as much as we hoped. Back when we only had one instance, everything was forwarded to this one instance. It was responsible for storing data, emitting events and calculating game stuff. Now, after scaling, this hasn’t changed. There is still only one process responsible for everything. Now it just doesn’t happen on the GeoDarts instances anymore, but rather on the Redis Service. Now Redis stores data and emits events. Only the calculations remain within the geodarts instances. The problem has simply moved to the back. This is somewhat sobering.To solve the problem we could have used Redis replication / Redis cluster. It allows replica instances to be exact copies of a master instance. However, we stopped here. We have noticed that when we’ve just solved one problem, the next one follows. The difficult thing is always to say when you’re done, because there are always things you can improve. But we felt that our project had come to a point where we were able to tell so.
Leave a Reply
You must be logged in to post a comment.