Netflix, stackoverflow and Linkedin are just a few of the companies activly using the Elastic Stack. Use cases include performance and security monitoring or log analytics. [1] The Elastic Stack consists of different products with the most popular ones being Elasticsearch, Kibana, Logstash and Beats. This article will introduce the different products and explain the architectural concepts behind Elasticsearch that make it the scaleable and high available search engine which it is today.
The Elastic Stack
The Elastic Stack can be used for different use cases. Some of the popular ones are performance and security monitoring or log analytics. It consists of different products which are open source and can also be used on their own. To get a better understanding of the Elastic Stack, the following introduces the various products.
Elasticsearch
The core product of the Elastic Stack is Elasticsearch which is a distributed, highly available RESTful search and analytics engine. Its main task is to store data which is done document oriented and uses the JSON format. That means that “data entries” are called documents which can be compared to rows in a table of a relational database. Documents are stored in so called Indices which can be compared with a table of a relational database.
To handle search requests, Elasticsearch uses an inverted index which makes full-text search queries very fast. The inverted index maps every term that exists in all documents of an index and stores the associated documents with it. It works on a per field level. With that, every full text field of a document in an index, has an inverted index. Terms are the results of the analyzer which analyses every document before indexing it. For an example we take a look the following document:
Document1:
{
 "description": "This is a test"
}
A simple analyser would split the string “This is a test” into single terms while lowercasing them: [“this”, “is”, “a”, “test”]. After that, all terms that the inverted index does not yet contain are added with a reference to the new document. Terms already present in the inverted indexed are also updated with the new document reference. If this document would be the first, the inverted index would look like the following:
| term | document |
| this | 1 |
| is | 1 |
| a | 1 |
| test | 1 |
To wrap it up, Elasticsearch stores data as documents inside indices and uses an inverted index for fast full-text searches.[2, 3]
Logstash
Logstash is a data processing pipeline which can ingest, transform and send data to defined outputs like Elasticsearch. It exist multiple modules for Logstash to integrate different intput sources and outputs. E.g. it is possible for Logstash to read from Kafka topics.
Beats
Beats are light weight data shippers that read and generate data and send it to a defined output. The Output can be Logstash which could enhance the data via transformation rules and finally send it to Elasticsearch. It is also possible to directly send the data to Elasticsearch or to Kafka.
Kibana
Kibana is a web application used to visualize the data stored in Elasticsearch. It makes it possible to query the data in a more user friendly way and also comes with posibilities to create dashboards and more.
Overview
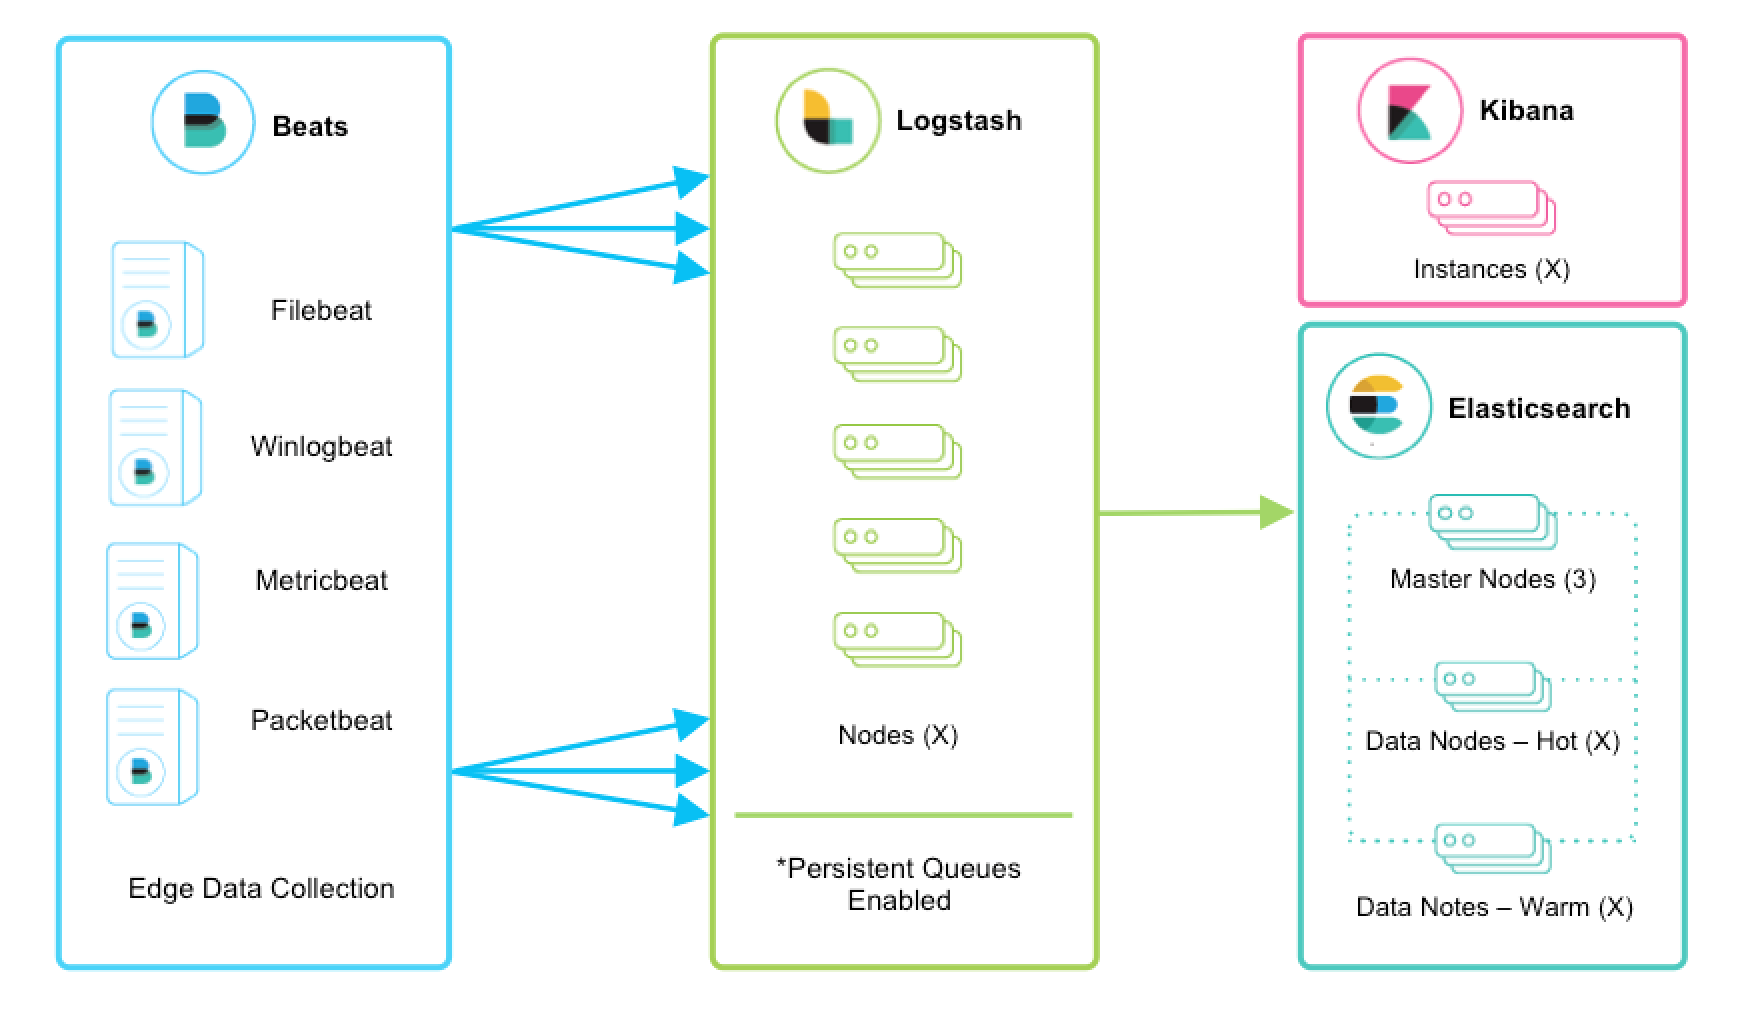
When the Elastic Stack products are combined, a system can be created that collects (Beats), transforms (Logstash) and ingests data into Elasticsearch which can then be analyzed (Kibana).
Elasticsearch Architecture
Now that we have a good understanding of the core concepts behind the Elastic Stack, we have a look at the architecture of Elasticsearch. Elasticsearch provides the posibility to run multiple nodes as a cluster to increase capacity. The first concept we have a look at, is sharding which is one of the reasons Elasticsearch is extremly scalable.
Sharding
Sharding is a concept that is not only used with Elasticsearch. It is a concept that is often used with databases. First lets understand why we need sharding. Imagine we have 1 TB of data to store in a database but we only have hosts (nodes) with 500 GB disk space. Sharding allows to split the whole dataset into smaller parts (called shards) that can be stored independently on different nodes. In Elasticsearch terms a shard holds a subset of all the documents of an index while a document only exists in one of the shards. But sharding does not only solve disc space problems, it also allows parallel operations which increase performance. By default, Elasticsearch creates 1 shard (Version 7.11). [4] The coresponding shard for documents that are indexed is calculated the following way:
shard_num = hash(_routing) % num_primary_shardsWith _routing being the _id field of the document by default. [5] If you looked closely at the formula, you may noticed that we take the modulo from the number of primary shards. In Elasticsearch we have two types of shards:
- Primary shards
- Replica shards
Primary shards are used to index new documents. After a new document has been indexed it is copied to the corresponding replica shard.
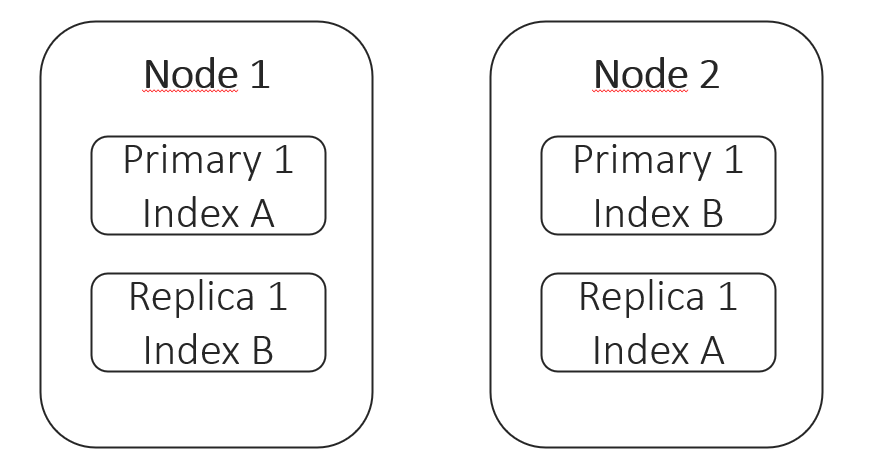
Replica shards (replicas) are added to provide high availability in case a node or shard fails. They also bring another benefit as a side effect, which is an increase in search performance. Replicas are just copies of primary shards and will be allocated on a different node than the primary counterpart. That ensures, that even if a node fails, the shard data can be found on another node which will then be promoted to be the new primary shard. By default Elasticsearch creates one replica per shard. As documents are stored on primary and replica shards, both of them can be used for search queries and with that, replica shards can increase search performance.[6][7] The below picture illustrated A 2 Node cluster with two Indices (A, B). Each Index has one primary shard and each primary shard is replicated with one replica shard.
Hot-, Warm-, Cold-Nodes
Architectures with hot-, warm- and cold nodes are called multi-tier deployment architectures. Hot-, warm- and cold nodes are usefull for efficient hardware utilization and work best with time series data like logs. This is because the older the log data, the less it will be searched. This can be mapped with different hardware requirements. Furthermore it is uncommen for log data to receive update requests. To utilize our hardware the best, we handle indexing requests only on hot nodes which also hold the latest data. Because of that, hot nodes should be powerful nodes with high CPU and SSD storage. Warm nodes hold data that is already not frequently queried (e.g. few weeks old logs). Therefore they don’t need as much CPU or fast storage as warm nodes. Cold nodes hold the rest of the data that is mostly not queried. To further decrease cluster costs, we can get rid of replica shards for cold nodes and use snapshots instead which are kept in object stores like AWS S3, Microsoft Azure and the like. Elasticsearch 7.12 will introduce a frozen tier where data can be stored for the rest of its life and only a snapshot is necessary. [8] Usage of the hot-, warm- and cold architecture is configured with Elasticsearch’s Index Lifecycle Management (ILM policies). Additionaly, nodes in the cluster must be labeled as hot, warm or cold.[9]
Split Brain
To understand the split brain problem, we first take a closer look at nodes. All started instances of Elasticsearch are called a node. Nodes can be connected to form a cluster, but it is also possible to only run one node which would be a one node cluster. Nodes can have different roles which are related to tasks the node is responsible for. Some of the node roles are the following:
- master
- data
- data_hot / warm / cold
Nodes with the data role (or in multi-tier deployments specialised data roles) are used to store the shards which contain the documents. They also handle operations like CRUD, search, and aggregations which can be very I/O-, memory-, and CPU-intensive.[10]
Another important role is the master role. Nodes given the master role, can be elected to be the master node of the cluster. At any time there is only one master. The master node handles the cluster management. It knows about every node in the cluster, creates and deletes indices and decides on which nodes a shard should be deployed.
For a cluster it is important that a master node is running and has enough resources to perform its tasks. Because of that it is a good practice to seperate master nodes from data nodes. For a cluster to be high available, it requires at least three master-eligible nodes.[10] This is because of the split brain problem.
To understand the split brain problem, we imaging to have only two master nodes, A and B. As we plan for high availability, we want our cluster to work, even if the master node fails or loses connectivity to other nodes. In that case, another master-eligible node should be promoted to be the new master.
The minimum votes for the new master election can be set with a variable. In this case it could be set to 1 or 2 (as we have at most 2 master nodes).
Lets imaging node A is the current master and the connectivity to node B goes down. If the min_votes variable is set to 1, node B will elect itself as the new master, but node A will also stay as a master, as both think they are the only master / master-eligible node left. In this situation we have a split brain scenario which leads to cluster inconsistency.
The other possibility was to set the min_votes variable value to 2, but in this case, our cluster would go down as none of the two nodes can be elected as master.
Therefore it is important to have an odd number of master-eligible nodes and the min_votes variable set to (num_masters / 2) + 1. An example would be 3 master eligible nodes with a min_votes variable set to 2. [11]
Running the Elastic Stack
As an example we want to monitor NGINX webserver logs. For that we first need to install and run Elasticsearch. It is also possible to run Elasticsearch with a Docker container. Below is a simplified docker-compose file to run Elasticsearch and Kibana.
version: '2.2'
services:
  elasticsearch:
    image: docker.elastic.co/elasticsearch/elasticsearch:7.10.2
    container_name: es
    environment:
      - node.name=es01
      - cluster.name=es-docker-cluster
      - discovery.type=single-node
      - bootstrap.memory_lock=true
      - "ES_JAVA_OPTS=-Xms512m -Xmx512m"
    volumes:
      - esdata:/usr/share/elasticsearch/data
    ports:
      - "127.0.0.1:9200:9200"
    networks:
      - elastic

  kibana:
    image: docker.elastic.co/kibana/kibana:7.10.2
    container_name: kib
    ports:
      - "127.0.0.1:5601:5601"
    environment:
      ELASTICSEARCH_URL: http://es:9200
      ELASTICSEARCH_HOSTS: http://es:9200
    networks:
      - elastic
    depends_on:
      - elasticsearch

volumes:
  esdata:
    driver: local

networks:
  elastic:
    driver: bridge
After Elasticsearch and Kibana are up and running we can continue to install and configure our data collector. As a collector we chose Filebeat which is one product of the Beats family. Filebeat is used to parse log files but can also receive logs via Syslog. In our case we want to collect logs from NGINX which are written to a log file. Filebeat comes with multiple modules for different applications. Those modules already have parsers to create meaningful documents out of log entries. To parse NGINX logs, we use the NGINX module. Filebeat could also be run inside a docker container and also read logs from other containers, but if NGINX runs on the host, we can also install Filebeat on that host (e.g. with apt package manager). After Filebeat is installed we need to configure it. Configuration is done via yaml files and a simple configuration could look like the following:
filebeat.config:
  modules:
    path: ${path.config}/modules.d/*.yml
    reload.enabled: false

filebeat.modules:
  - module: nginx

output.elasticsearch:
  hosts: 'elasticsearch:9200'
The nginx module will search for nginx logs at the default location, but module configuration can also be customized.
Before we can run Filebeat, we need to run the setup command (which loads index templates, ILM policies and dashboards). After that we are ready to run Filebeat which will harvest logs from nginx, sending them directly to Elasticsearch. From there on we can create custom Dashboards in Kibana or use the prebuild ones to analyze the logs.
Sources
[1] https://logz.io/blog/15-tech-companies-chose-elk-stack/
[2] https://medium.com/elasticsearch/what-happens-when-a-document-is-indexed-in-elasticsearch-16b7ae3415bc
[3] https://www.elastic.co/guide/en/elasticsearch/reference/current/documents-indices.html
[4] https://codingexplained.com/coding/elasticsearch/understanding-sharding-in-elasticsearch
[5] https://www.elastic.co/guide/en/elasticsearch/reference/current/mapping-routing-field.html
[6] https://www.elastic.co/de/blog/optimizing-costs-elastic-cloud-replica-shard-management
[7] https://codingexplained.com/coding/elasticsearch/understanding-replication-in-elasticsearch
[8] https://www.elastic.co/guide/en/elasticsearch/reference/7.12//data-tiers.html
[9] https://www.elastic.co/blog/implementing-hot-warm-cold-in-elasticsearch-with-index-lifecycle-management
[10] https://www.elastic.co/guide/en/elasticsearch/reference/current/modules-node.html
[11] https://qbox.io/blog/split-brain-problem-elasticsearch
Leave a Reply
You must be logged in to post a comment.