
This series of blogposts will focus on the effects on response times when performing different tasks running on a variable number of docker containers in a virtual machine.
What will be the performance differences running a small or large number of containers on the same machine? These posts will function as a step-by-step tutorial, enabling everyone to reproduce our studies.
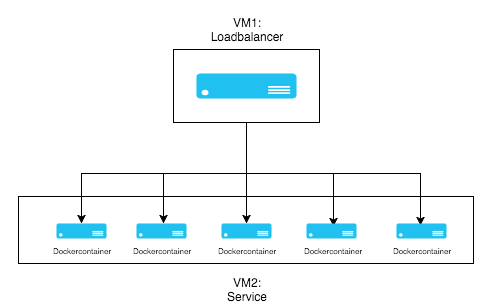
In production one of the most scaled services are webservers. Therefore, we want to focus on stress testing a self hosted website that is being load balanced and running in a varying number of Docker containers.
We will be using two virtual machines running Ubuntu 14.04 LTS within VirtualBox (version 5.0.10 r104061). One functions as the loadbalancer whereas the other houses the services.
The loadbalancer is set up without Docker, since it would create additional overhead and we don’t want to scale up to multiple balancers. The service machine runs a varying number of Docker containers that provide the service.
First of all, download Ubuntu and install it on both virtual machines. A tutorial on how to do that can be found here. Then, we have to make sure the two machines can communicate with each other. Normally, it is sufficient to just put them into the same network by creating a network bridge to attach them to your local network:
- right click the virtual machine
- got to settings → network
- select ‘bridge adapter’ within the ‘attached to’ dropdown menu
- repeat the first three steps for the second machine
However, during our studies we were connected to the eduroam network of our university, which makes the setup slightly more complicated because you won’t get a DHCP address for your virtual machines.
Therefore, you have to create two network adapters. The first is configured as a NAT interface, which connects over your local PC to the internet. The second one is configured as an internal network to allow communication between the VMs.
- goto VirtualBox settings → network
- create a new NatNetwork (the name doesn’t matter)
- create a new Host-Only Network (the name doesn’t matter)
- right click each virtual machine and goto settings → network
- set adapter 1 to “NAT Network” and select the created NatNetwork
- set adapter 2 to “Host-only Adapter” and select the created Host-only Network
- launch your virtual machines and edit your network interface configuration:
- get your local ip using
ip a(e.g. 192.168.1.80) sudo vi /etc/network/interfaces- insert the following text at the bottom:
auto eth1
iface eth1 inet static
address <your ip>
netmask <your netmask>
- get your local ip using
- to apply the changes, restart your virtual machines and type ip a to see if the changes took effect
In the next post we will look at setting up nginx and Docker. Klick here to go the the next Part: https://blog.mi.hdm-stuttgart.de/index.php/2016/01/07/more-docker-more-power-part-2-setting-up-nginx-and-docker/
Leave a Reply
You must be logged in to post a comment.