Microservices – Legolizing Software Development V

Welcome to the final part of our microservices series. If you’ve missed a previous post you can read it here:

I) Architecture
II) Caching
III) Security
IV) Continuous Integration
V) Lessons Learned

Lessons Learned

Respect for Stumbling Blocks

Hopefully you have enjoyed our blog posts and have learned a lot. We answered following questions in our last four posts

  • How to build a microservices architecture?
  • How to use the advantages of caching with microservices?
  • How to secure microservices and handle authentication between them?
  • How to set up a seamless Continuous Integration workflow for microservices combining Jenkins, Git and Docker?

Continue reading

Microservices – Legolizing Software Development IV

Welcome to part four of our microservices series. If you’ve missed a previous post you can read it here:

I) Architecture
II) Caching
III) Security
IV) Continuous Integration
V) Lessons Learned

Continuous Integration

Introduction

In our fourth part of Microservices – Legolizing Software Development we will focus on our Continuous Integration environment and how we made the the three major parts – Jenkins, Docker and Git – work seamlessly together.

Continue reading

Microservices – Legolizing Software Development III

Welcome to part three of our microservices series. If you’ve missed a previous post you can read it here:

I) Architecture
II) Caching
III) Security
IV) Continuous Integration
V) Lessons Learned

Security

Introduction

Today we want to give you a better understanding of the security part of our application. Therefore, we will talk about topics like security certificates and enable you to gain a deeper insight into our auth service.

Continue reading

Microservices – Legolizing Software Development II

Welcome to part two of our microservices series. If you’ve missed a previous post you can read it here:

I) Architecture
II) Caching
III) Security
IV) Continuous Integration
V) Lessons Learned

Caching

The microservice structure can generate a heavy communication between many services. Worst case scenario is a long tail of dependencies, resulting in a high latency of the response for the initial request. This can get even worse, e.g. if the services were running on different servers placed in various data centers. Even if some requests can run parallel, the response time for the initial requested service will take at least the answering time of the tail it depends on.

Continue reading

Microservices – Legolizing Software Development I

Welcome to our five-part series about microservices and a legolized software development. We’d like to share our lessons learned about architecture, development environment and security considerations with you. We will also explain some issues we stumbled over and what solutions we chose to solve them.

I) In the first part, we present an example microservice structure, with multiple services, a foreign API interface and a reverse proxy that also allows load balancing.

II) Part two will take a closer look on how caching improves the heavy and frequent communication within our setup. [read]

III) Security is a topic that always occurs with microservices. We’ll present our solution for managing both, authentication and authorization at one single point. [read]

IV) An automated development environment will save you. We explain how we set up Jenkins, Docker and Git to work seamlessly together. [read]

V) We finish with a concluding review about the use of microservices in small projects and give an overview about our top stumbling blocks. [read]

Continue reading

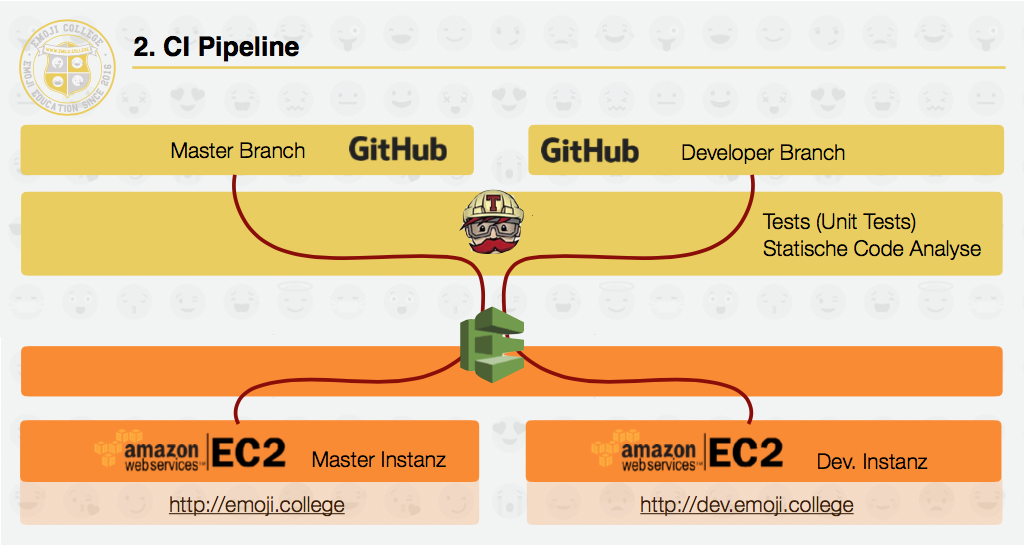
Continuous Integration with Travis CI and Amazon Webservices

Introduction

In the the course Software Engineering and Management and Interactive Media at Stuttgart Media University, we launched an interactive web application called Emoji College.

www.emoji.college

The following blog entry is a brief description of what is going on in this project. The main focus relies on the implementation of a continuous integration pipeline with TravisCI and hosting with AWS. As newcomers in dealing with AWS services it was not easy for us to get started. We have had to try a lot and have paid too much money for the services. Therefore it is our mission to explain the most important steps during the setup of AWS services easily and mention all the lessons learned. So far, there is no easy and understandable guide as we needed it.

Continue reading

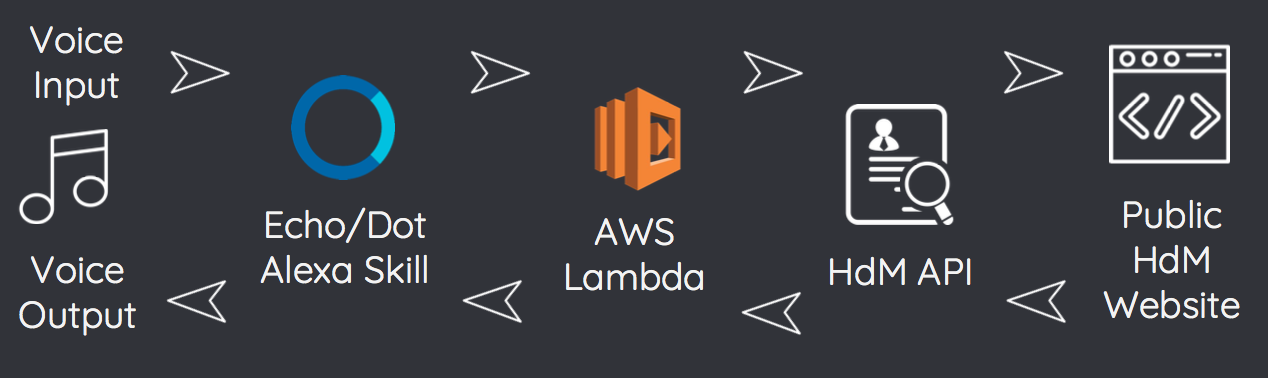
Building an HdM Alexa Skill – Part 2

Decisions, Developed Modules and Implementation

If you missed the first part you can catch up by reading it here.

In the second part of our blog post series, we first describe what decisions were made in the course of the development process, then we show which code we actually had to develop on ourselves and finally we give an overview on how we implemented the skill.

So let’s get started with how we ended up from the inital idea of developing a chatbot to the development of an Alexa Skill.

Continue reading

Automate deployment with the Unreal Engine using the Unreal Automation Tool (UAT)

The Unreal Engine 4 from Epic Games is a powerful tool to create any type of game or even application, however the implemented automation and build system is barely documented, if at all. This post will show the necessary steps to build, cook and package a game using the Unreal Automation Tool (UAT)  and gives a brief overview over the somewhat hidden tools.

Continue reading

Scheme Interpreter

Introduction

In the the course Software Engineering and Management and Design and implementation progressed programing languages at Stuttgart Media University, I developed an own Interpreter.


About the Interpreter

The syntax of this interpreter is based on the „lips“ family, a programming language which is structured in lists (definition). This type of programming language is very simple to understand and fast implemented. An element of a scheme list exist of two part the first is the „CAR“ – the value of the list and the second part is the „CDR“ the link to the “CAR” of the next list element. If the list element is the last in the list than the value of “CAR” is Null. For more Inforamtion have a look to dr. racket or the origin of car and cdr.


Projekt Setup

  • Programing language: C
  • Compiler: Clang
  • Environment: Eclipse CDT
  • Continues delivery: Jenkins
  • Version control: Git
  • Repository: https://github.com/HannesBuchwald/HbScheme


Development

The project was developed with the test-driven development approach. Befor a function is implemented a test has to be written for it. This approach improves the quality of the code a lot comapre to just straitforward coding without a testing structure. Aswell it was used Jenkins for contunius delivery.  For this project only the standart “C” libiries where used. Therefore, played continues integration not a big role in this porject.


Develop Enviroment

All the code was developt in the Eclipse CDT envornment. This is an environment for C/C++, it includes all code “highliting” alswell as a debug function and compiling envornment. For this project the Clang compiler was used. Aswell it is possible to compile the project with the standart GCC compiler.


 Version control and continues delivery

Git was used for version control. The source code is hosted on the github server as a public project. To simplify the branches it is used two branches. A master and a develop branch. The active development take place on the develop branch. The continue delivery process was set up, that for every new git commit on the develop branch the build and deploy process in Jenkins was triggered. This was very easily set it up through the “GitHub hook trigger for GITScm polling” option in the project configuration in on the Jenkins server. When the build process was passed successful and Jenkins was able to execute the program than the Jenkins merged this stable commit to the origin master branch. With this simple process it was ensure that only a stable version of the program is on the master branch. As well I had Jenkins set up that I receive an email if the build is fail.


How to built execute a c project in Jenkins

This project was built with make. make is great tool with a simple syntax to describe the build steps of program. Because of the small size of this project it was enough to use one Makefile for the build description. The below code is a extract of the important part of the Makefile for this project. As you can see in with a very few lines or description a the hole program was build.

## Compiling files

OBJS=hbscheme.o hbscheme_test.o \

     reader.o memory.o \

     utils.o


## Clean up

clean:

        rm -f $(OBJS)


## include main header file to all files

$(OBJS): hbscheme.h


## Linking all object files togehter

$(APPLICATION): $(OBJS)

        $(CC) $(DEBUG_FLAGS) -o $(APPLICATION) $(OBJS)


## run make with "make all"

all: $(APPLICATION)

To start this file also it needs only to cammands as you can see below.

# build hbScheme

make all


# run hbScheme

./hbScheme

This shell script commands where set up the project configuration in Jenkins. Now the Jenkins server could run the Makefile, after pulling the project and compile build and execute the program.


Testing

Also in C, there are many ways to do testing. For this project I only us unit and function tests. As mentioned earlier this is a very small standalone program, also there is no GUI implemented in. Integration and GUI testing are not needed. I played around with quite some c test frameworks, but in the end I wrote my own test cases and let them run before start the program. But why I did not use a test framework. I had a closer look a googletest. This framework is written in C++ and used from many others to do unit testing for c project. But for me it was to complicate to test C code with a C++ framework. I set it up in the eclipse environment and there is runs OK. But I had big issues to get it run in my Jenkins set up. So I decided to write all the test cases in strait forward c function and execute it after the program init its environment so I can do beside the unit test also function tests. For me this was a very simple but efficient way of testing. If a test fail the program will stop and the error will be print out on the command line.

If it comes to Jenkins test report, ok this approach does not have a nice reporting like the xUnit plugin provides, but a simple print on the command line is enough for this size of program. When Jenkins is trying to build, and execute the program, the build process will fail if a test is failing. The reason where the test is failing is printed out on the command line, therefor I know where to debug. And if the build is failed there is also no merge to the master branch. So, there I had all the time a stable and executable version on the master branch is even the version on the develop branch is not. For sure the version on the master branch is only as stable as the test coverage. But with this problem every program should deal with. How to find the bug, which is outside the test range?

The below testfile shows a snipet of the console print after Jenkins build compile and run sucsessfull a version of the program.

...

clang    -o hbScheme hbscheme.o hbscheme_test.o reader.o memory.o utils.o
[hbScheme] $ /bin/sh -xe /var/folders/jt/r5k6nm0s74x547q27c824nym0000gn/T/jenkins5853669811710938112.sh
+ ./hbScheme


**** Start (UnitTest) ****
Done (a2l Test)
Done (Integer TAG and Check Test)
Done (True/False TAG Test)
Done (Symbol TAG Test)
**** Done (UnitTest) ****

**** Start (PerformanceTest)**** 
time to add 10000 new symbols: 650ms 
time to lookup 10000 existing symbols: 414ms
**** Done (PerformanceTest) ****

Welcome to our (incomplet) scheme

 > git tag -l jenkins-hbScheme-66 # timeout=10
 > git tag -a -f -m Jenkins Build #66 jenkins-hbScheme-66-SUCCESS # timeout=10
Pushing HEAD to branch master of origin repository
 > git --version # timeout=10
 > git push https://github.com/HannesBuchwald/HbScheme HEAD:master -f
Sending e-mails to: hannes.buchwald@gmail.com
Finished: SUCCESS

This snipet below shows a console print of a not sucessfuly build version. In line 13 is seen the output from the faild test case.

...

clang    -o hbScheme hbscheme.o hbscheme_test.o reader.o memory.o utils.o
[hbScheme] $ /bin/sh -xe /var/folders/jt/r5k6nm0s74x547q27c824nym0000gn/T/
jenkins8977720403703204312.sh
+ ./hbScheme


**** Start (UnitTest) ****
hbscheme_test.c:37 assertion failed: a2l error/var/folders/jt/
r5k6nm0s74x547q27c824nym0000gn/T/

jenkins8977720403703204312.sh: line 3: 21054 Abort trap: 6           ./hbScheme

Build step 'Shell ausführen' marked build as failure
Build did not succeed and the project is configured to only push after a 
successful build, so no pushing will occur.
Sending e-mails to: hannes.buchwald@gmail.com
Finished: FAILURE

Result

Simple is better than complicated. I tried a lot with powerful test frameworks and blown up build processes. And in the end a small Makefile and simple test functions with no overhead test framework had brought me so far that I can continue to finish this this project will less effort. This was also my first time I used Jenkins. Even when the start was a bit rough. I think it is worthy even for a small project to set up this development process. Now I have all the time a very up to date stable version of the program. And because of the automation mechanism I do not have to spend time for it.


Hannes Buchwald (hb052@hdm-stuttgart.de)