Decisions, Developed Modules and Implementation
If you missed the first part you can catch up by reading it here.
In the second part of our blog post series, we first describe what decisions were made in the course of the development process, then we show which code we actually had to develop on ourselves and finally we give an overview on how we implemented the skill.
So let’s get started with how we ended up from the inital idea of developing a chatbot to the development of an Alexa Skill.
Decisions during Development
As just mentioned, we initally had the idea of developing an ordinary chatbot. To realize this we wanted to use the Facebook Messenger API, which would have led to a typical text in- and text output. Chatbots are new and exciting, but we wanted to use a whole new concept of interaction, which was possible by using the Alexa Voice Service (AVS).
The AVS enables companies and developers to implement Alexa – the intelligent assistant of Amazon – on external hardware. In this case external means the hardware does not need to be from Amazon itself, but can be any capable hardware. (I’ll explain in a second why this was important to us.) Using the AVS there is a voice interaction with the software and to realize this interaction, it requires to build an Alexa Skill.
The reason we wanted to implement Alexa on an external hardware, was due to our inital requirement to use the skill as an information point within our university. Since we aimed for an affordable and portable hardware solution, we decided on using a Raspberry Pi. The Raspberry Pi is a minicomputer which is usually equipped with a linux OS (operating system). A detailed guidance on how to implement Alexa on external hardware including, inter alia, the Raspberry Pi has been offered by Amazon itself. So we followed this guide and at first it worked fine, yet the only snag was to adjust the service to German language. The reason for this was that AVS development was not available for German market up until then, so we could not use our German speaking skill on the external device. (Funfact: AVS development is available for German market since February 7th 2017.)
For this reason we decided to use Amazon’s own hardware for skill development (e.g. the Amazon Echo resp. the Echo Dot) as it could have already been used with German language. One Amazon Echo was provided from HdM as a test device during development (for which we are very grateful). Yielding advantages were, that we could test the skill live by speaking with it and in addition everyone with such a device could independently test the skill at home. Furthermore we did not have to set up the hardware on ourselves and thus we could focus on skill development.
Developed Modules
We already often mentioned the term skill development, but which code did we actually develop? Basically, we developed two Node modules. The HdM Client, which communicates with the API of the HdM website to get information and the HdM Alexa Skill, which is a point of intersection between the HdM Client and the device using our Alexa Skill. We published the HdM Client as a node package on npm so other HdM students can use it in future. A guidance on how to use the client can be found here at npm. The code of the HdM Alexa Skill (and also the client as a node package) is running on AWS Lambda (Amazon Web Services). How we put everything together and what Lambda exactly is, will be considered in the next chapter.
Implementation
For implementation of our Alexa Skill we used the Alexa Skills Kit and AWS Lambda.
The Alexa Skills Kit enables companies and developers to apply, configure and publish new Alexa Skills. The Alexa Skills Kit can be found at Amazon’s Developer Console. The Developer Console has got a GUI (graphical user interface) and thus can be configured relatively easy. When applying a new skill there are three different types of “variables” that have to be configured: Intent(s), slot type(s) and sample utterances. Sample utterances are interrogative clauses, which Alexa will be able to understand. They imply a certain intent and usually contain a slot type. The intent is the name of a query, that is sent together with the slot type to a Lambda function (what a Lambda function is will be clarified in the next paragraph). The slot type is a variable (e.g. the name of the lecture or lecturer), which is included in a sample utterance. To connect the Alexa Skill with the Lambda function the ARN (Amazon Resource Name) of a already created Lambda function is used. So let’s now have a look on what AWS Lambda and Lambda functions are.
AWS Lambda is a “serverless” data processing service, which executes code on incoming events. The code, which is executed is called Lambda function. Lambda and AWS itself (like Amazon’s Developer Console) have also got GUIs and thus can also be configured rather easily. For our German skill we used a Lambda function within a server located in Ireland. Reason for this was that the Alexa Skills Kit, which is used as function trigger, was (and is to the present) not available for other European server locations (e.g. Frankfurt or London). The code, which is executed on Lambda is the earlier mentioned node modules we developed (the HdM Alexa Skill and the HdM Client). To distinctively connect the Lambda function and the Alexa Skills Kit the application ID of the skill (from the Alexa Skills Kit) is additionally entered. For development we were able to use Lambda in free tier, but also as the skill will eventually go online, we won’t reckon it will cause a lot of costs. In a webinar of Amazon a speaker said, even if one has got a very successful skill (what means a few million invocations per month) one just pays about 10 USD per month (information without engagement). As we are not expecting to have a few million calls per month, it is very unlikely that we have to pay a lot for our Lambda function.
A step-by-step guide on how to deploy the HdM Alexa Skill by using the Alexa Skills Kit and AWS Lambda can be found at our Bitbucket repository.
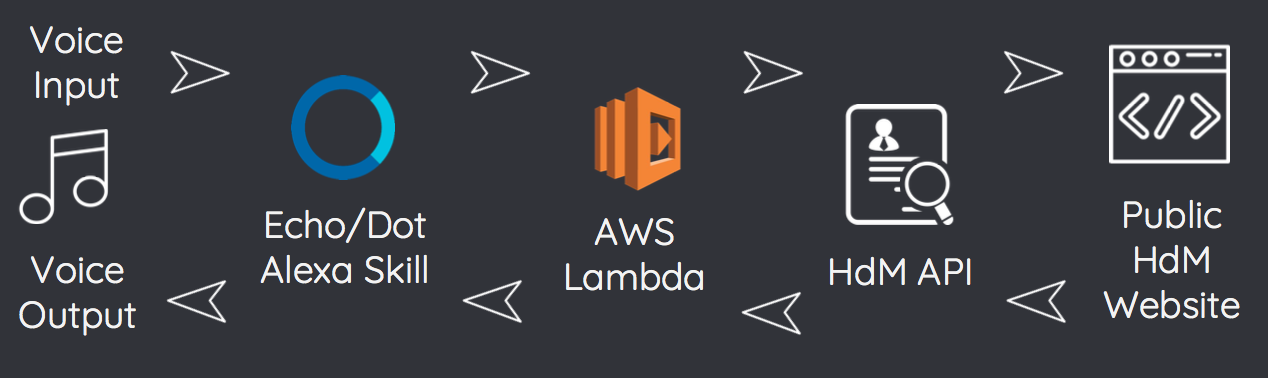
Now finally let’s have a look on what the data flow of a query would look like. As you can see in the picture below at first there is a voice input. The Alexa device with our skill (hopefully) recognises the spoken sample utterance correctly and sends the implied intent and involved slot type to the Lambda function. The function then addresses the HdM API by using the client. After that the API reads out the relevant public information of the HdM website by using a simple text parser. The gathered information goes back the same way, yet the Lambda function puts the received data in an appropriate answer text, which is eventually echoed to the user by the Alexa device.
We hope we could give you an insight on what hitches we had during the Alexa Skill development and how we eventually put everything together. We also hope we could tease you for our upcoming blog posts, in which we will have a closer look on what techniques we used for code development and how we set up the continuous integration system. So stay tuned!
Have you already had any experience in developing an Alexa Skill? Share it with us by leaving a comment in the commentary section below! We are looking forward to seeing you in the next part of our blog post series!
Leave a Reply
You must be logged in to post a comment.