Welcome to part three of our microservices series. If you’ve missed a previous post you can read it here:
I) Architecture
II) Caching
III) Security
IV) Continuous Integration
V) Lessons Learned
Security
Introduction
Today we want to give you a better understanding of the security part of our application. Therefore, we will talk about topics like security certificates and enable you to gain a deeper insight into our auth service.
TLS Certificates with Let’s Encrypt
Let’s start with certifications. We use TLS encryption with Let’s Encrypt certificates. What is TLS? Well, TLS (Transport Layer Security) is the successor of SSL and is used to enable a secure data transfer on the internet. There are a lot of different certificates available, but we have chosen the Let’s Encrypt certificates because of following reasons
- The certificates are free of charge
- Creation, validation, signing, installation and renewal can be done automatically
- It is accepted by all common browsers
Another plus: Software clients can be used for the installation process and for all other mentioned steps above which reduces the work and complexity considerably. Although Let’s Encrypt is a quite young certificate authority (launched in April 2016), at the time of writing this blog entry there are more than 30 clients.
For example, let’s take a quick look at the most widespread Let’s Encrypt client called Certbot.
Installation on an Ubuntu 16.04 server is as easy as typing:
sudo apt-get install letsencrypt
For obtaining standalone certificates you would simply type:
letsencrypt certonly --standalone -d example.com -d www.example.com
And for automatically renew your certificates:
letsencrypt renew
Of course, there are far more advanced commands as well. But as you can see, it is neither difficult nor expensive anymore to enable TLS encryption for your web application.
Auth Service
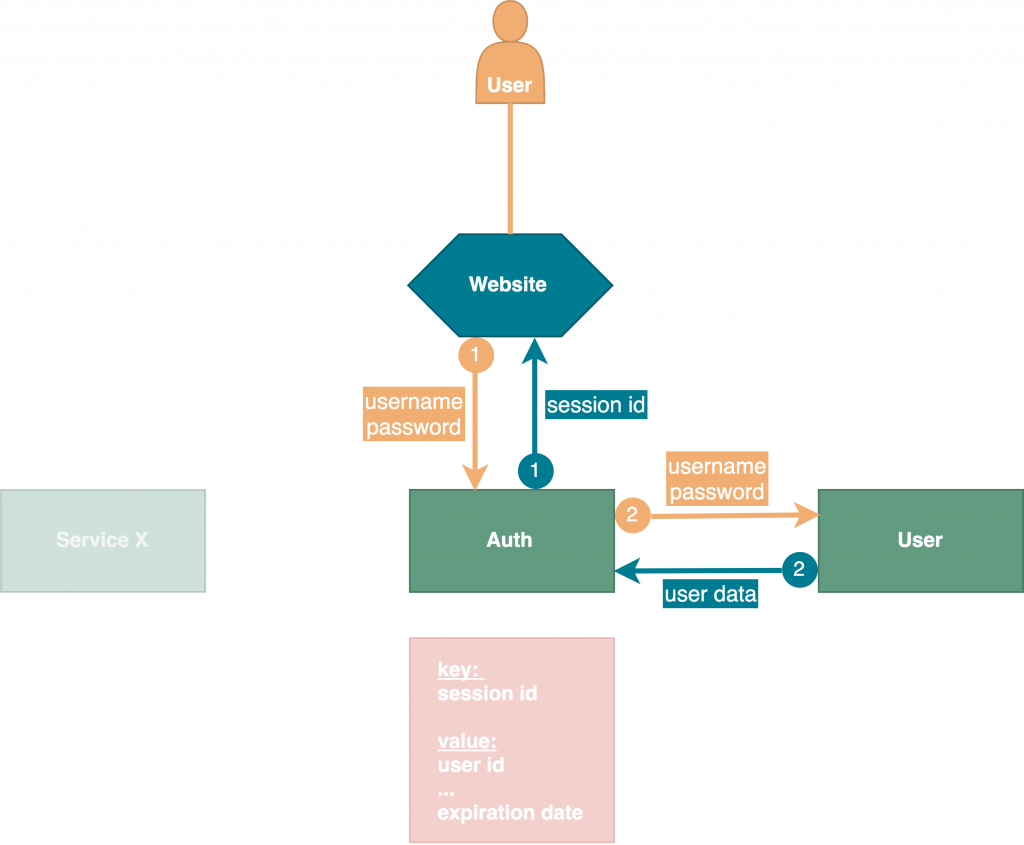
We wrote in our first blog post about authentication of services and a short explanation of the auth service. Basically authentication takes place in three major parts: login, communication and logout. Now it’s time to gain a deeper insight according to the following graphics.

Let’s start with our first use case – login. As you can see we use the key-value store Redis to save our session IDs together with our user data in-memory. Firstly, user logs in by sending a post request to auth service with username and password as body parameters. Then auth service sends a request to User service with these credentials in order to verify if user exists and gets user data as successful response. After that, a new express-session key will be generated and saved with user data as value along with an expiration date into Redis database. Last step is to send a response to the requesting client with the session ID in header.

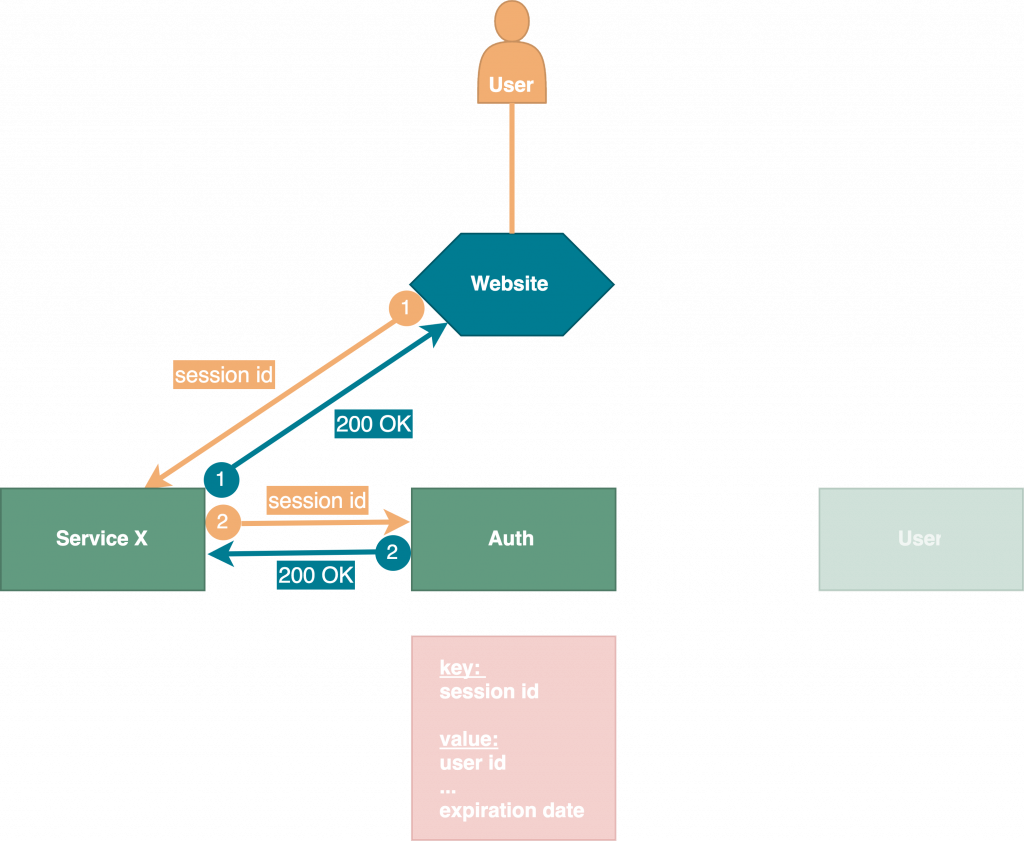
After a successful login all following interaction between client and service X will be carried out like displayed in the figure above. Each request from client to a service X needs to be verified by auth service in order to get back a valid response – consequently there is a great number of requests which has to be answered by one service, the auth service. Therefore, we use HTTP caching to optimize the great number of requests. You can read all about our implemented caching strategy in blog post two. Once a key is expired, auth service will contact all services to delete their cache which brings us to our third use case – the logout.

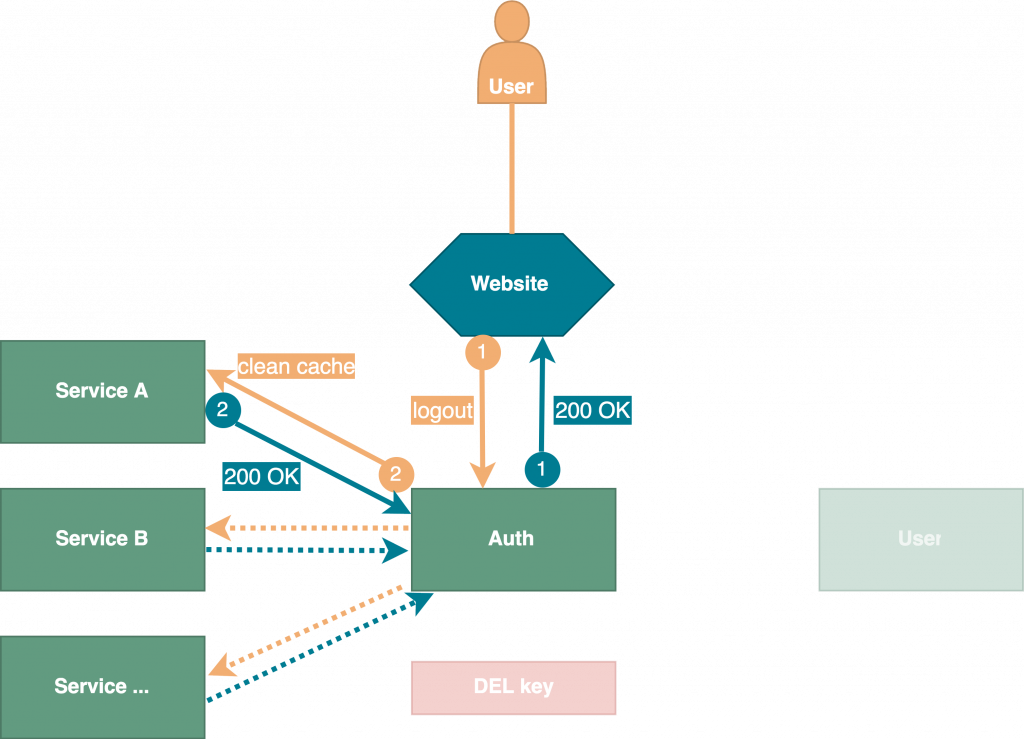
So far, so good. But what if a user logged out before session expiration date? In such case, the implemented caching strategy would lead the services to assume that the session was still valid, respectively would keep them from rechecking the session’s validity. To cover this use case, we designed and implemented our logout strategy as follows: To log out, a user’s client must send a request to auth service. Then auth service deletes the key and the value in Redis database if the key exists and notifies all registered services to clean their caches. In doing so we can assure, that our caching strategy will not have any negative effects on security. Currently we are using a configuration file with all registered services. In the future, this approach will be replaced with a service registry like Consul to reduce maintenance on server side.
An automated development environment will save you. In the next blog post we explain how we set up Jenkins, Docker and Git to work seamlessly together.
Continue with Part IV – Continuous Integration
Kost, Christof [ck154@hdm-stuttgart.de]
Kuhn, Korbinian [kk129@hdm-stuttgart.de]
Schelling, Marc [ms467@hdm-stuttgart.de]
Mauser, Steffen [sm182@hdm-stuttgart.de]
Varatharajah, Calieston [cv015@hdm-stuttgart.de]


Leave a Reply
You must be logged in to post a comment.