Building serverless architectures is hard. At least it was to me in my first attempt to design a loosely coupled system that should, in the long term, mean a good bye to my all-time aversion towards system maintenance.
Music information retrieval is also hard. It is when you attempt to start to grasp the underlying theoretical framework and submerge yourself into scientific papers which each yield a different approach for extracting some feature out of digital audio signals. It is a long way until MFCC starts to sound natural. I have been there.
As a proof-of-concept project, I decided to build a scalable serverless web service for analyzing music in different ways and exposing the results through an API. The priorities were to keep the system simple and make new track submissions as straight forward as possible. There already exist very mature workhorse web services that solve this problem gracefully and provide great amounts of valuable data: The Echo Nest and AcousticBrainz APIs are notorious examples. Many other popular APIs like those from Spotify or MusicBrainz rely upon such services.
As a cloud platform I chose Amazon’s AWS, although I have not really compared functionality with other leaders in the market as are IBM Cloud (formerly IBM Bluemix), Google Cloud Platform or Heroku. I also chose Python as the Lambda function runtime as it has become such a popular language for the data mining community.
Like a film spoiling you the end of the story in the beginning, here is a pretty diagram of the final cloud architecture I built with CloudCraft:
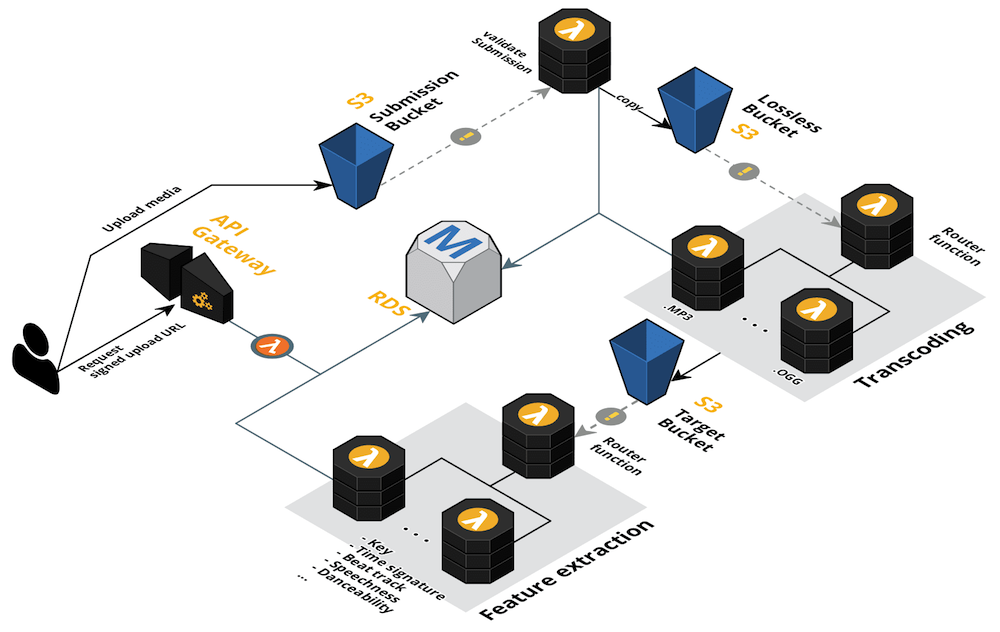 The system basically consists of a large pipeline with three processing steps:
- Submission validation
- Transcoding
- Feature extraction
In each step the system communicates with a database at some point, such that later on the API only has to fetch pre-computed data. I used Swagger to define the API, which has integrations with Amazon API Gateway such that the API keeps in sync with the definition file.
Now, let’s take a look at the start of the data flow: the user. This user represents anyone allowed to push media to our collection. As it should be as easy as possible to submit data, the submission should be just a plain audio file. We can then extract the metadata and with it validate the submission. It is the responsibility of the user to provide complete metadata with each file that is submitted.
Through an endpoint, which we are calling /upload, the user can send a POST request and receive a signed URL. This signed URL holds a reference to a resource in a S3 bucket called submission bucket. The user can proceed to upload the audio with a (multipart) PUT request and repeat the process for each file to be submitted. The links expire after a configurable time. A very good outline of the setup needed to do this can be found in a blog post from Kevin Sookocheff. I also set up the S3 bucket to delete any object older than a week.
Validation
As soon as the audio file has been uploaded, an event is triggered to which a Lambda function validateSubmission is subscribed. This function attempts to read the file and extracts the audio tag containing the metadata using the Python package mutagen. It then validates the metadata for completeness. More importantly, it has to check if the audio media has been submitted already. To do this, one could compute a hash value of the file and check if it is already in the database. However, the user could still submit the same track in another format or submit a slightly shorter or longer version of the file. This is not what I want.
A great solution is the use of acoustic fingerprints. These basically function like normal fingerprints in the sense that fingerprints of different recordings of the track resemble the source fingerprint according to the quality of the recording. More importantly, they are much lighter than the audio file itself, and as such they can be used in queries via our API. I used the chromaprint library for this task. If you want to know more about how acoustic fingerprinting works, the author of the library wrote a nice post describing his approach.

There are different options for comparing fingerprints. An acoustic fingerprint is in essence a black and white bitmap. The easy approach would be to calculate the distance of two fingerprints as the number of bit differences. However, this stops working as soon as the fingerprints are not aligned. I used a technique that is used in image processing for real-time template matching (find instances of a template in an image) which is called fast normalized cross-correlation. It yields a matrix of correlations for each possible alignment, from which I take the maximum value. The algorithm resulted being very robust for recordings of the same track in different formats and of different lengths. It is still to prove if it performs well on noisy or live recordings, or recordings with missing chunks of data. For our submission validation step, this is not really important, but becomes relevant for later search queries. I created another Lambda function (which is not visible in the diagram above) called searchByFingerprint for fingerprint comparison, which yields a list of matches that surpass a specific correlation threshold.
Getting back to the submission validator, after it has validated the track metadata, it computes its fingerprint and invokes the searchByFingerprint function. If there are no matches, the track metadata along with its fingerprint is added to the database and the track is copied to a lossless/source bucket. The original object in the submission bucket can then be deleted.
Transcoding
The pipeline proceeds in a similar fashion: a bucket triggers a tree of Lambda functions before the next bucket is used. In the transcoding step I wanted to convert the lossless tracks into several different lossy target formats. This is an application for the fanout messaging pattern. At this point we can choose to configure S3 to send an event to either a SNS topic or a Lambda function. The SNS topic is a communication channel which exists in the context of a publisher/subscriber setting. While the Lambda function can send messages in a more flexible way, the SNS is more easy to scale, as one only has to subscribe to the topic. For transcoding I chose a Lambda function because the number of target formats I wish to convert to is bounded and I can avoid parsing any SNS messages. In my fanout messaging setup, a “router” Lambda invokes all converters. For the converters I use one single Lambda function that accepts a parameter for the target format instead of using one Lambda for each. The reason for this is that I use ffmpeg for all conversions, being the swiss knife of audio and video processing. As my code looks mainly the same except for some codec and format settings, there is no need to duplicate the code and make my architecture more convoluted than it already is. The different instances of my Lambda function are run in parallel in any case.
Feature extraction
In the final step, I again use a fanout pattern with a Lambda forest to compute the audio features. There is a humongous number of features to extract from an audio track, including musical features like the key, mode or time signature and perceptual features like speechiness, danceability or instrumentalness. There are different libraries for computing these features. The main candidates are librosa (Python) and essentia (C++ with Python bindings).
Closing thoughts
All and all, even if there is a long way until the final architecture consolidated, the result is rather simple. The system is based on a few buckets and a sequence of intermediary Lambda functions which persist computed values in a database. You could as well take just one bucket and use prefixes (folders). Secondly, the transcoding and feature extraction steps could be done in parallel. One thing to definitely try out would be the use of a Step Functions state machine as a layer above our Lambda functions, which makes the execution flow more clear and easier to monitor.
The initial setup can be a big pain nevertheless. As the overhead of maintaining a collection of tightly coupled functions is shifted to the administration of communication between components, one finds oneself tweaking permissions back and forth until the system can start to itself. I must say that the AWS console, as pretty and well A/B tested it may be, is not meant to be used in the long run (it is not even a console as you know it, but a dashboard). The page for the Lambda configuration is rather heavy. The permission management is not realisable without clicking through several configuration wizards. One may as well not close any new tab in the browser at all because one would potentially have to load it again minutes later. The 10-Minute tutorials from the AWS homepage seems to be directed towards a UI-centric audience that wants to use the AWS console to design systems, not to implement them. This pitfall is what cost me a lot of time later on when permission management and VPC configuration started to cause me headaches.
I realized I had to use the AWS CLI if I ever wanted to get close to deploying my Lambda functions in a CI/CD fashion. This is when bash scripts came in handy to upload and update the code. However, I was still depending on the console (e.g. for permission management). I had thought of using CloudFormation, which offered a declarative and centralized approach for all of AWS components, but it didn’t seem to improve my workflow considerably. Too late into the game I discovered the serverless framework. It was everything I had expected from cloud architecture design. All configuration is contained in a single configuration file (YAML or JSON) and is extensible with the use of plugin extensions. Deployment of the entire system is done with the call of one single command. If you are just getting started with AWS, I would recommend not to spend much time on the AWS console after going through some tutorials and building your first prototype with serverless. When you have to compile your binary libraries yourself (as I had with chromaprint and some other dependencies) to use them in your Python Lambda functions, you can do so with a plugin called serverless-python-requirements, which runs a docker container with the AMI Linux image and extracts the libraries for you. I ran an AMI instance and compiled the static binaries myself, which you may have to do in the event that the plugin fails to run (if you ever find frustration in this task, this article or this article may help). Building serverless architectures is hard, but it helps to have a workflow that makes configuration less painful.
Finally, if you ever try to do fingerprint comparison, it is certainly more efficient to use a database extension to handle this task in your database before you see yourself fetching all fingerprints from the server and splitting the work in batch Lambda calls. This is what the creator of chromaprint did for his AcoustId web service (link to the Git repo).
Leave a Reply
You must be logged in to post a comment.