As a part of the lecture “Software Development for Cloud Computing” our task was to bring an application into a cloud environment. When we presented our software project MUM at the Media Night in our 4th semester, we talked with a few people about dockerizing MUM together with a whole email server configuration. While brainstorming a project idea for the lecture, we remembered these conversations. And since Docker by itself would not have fulfilled all of our requirements, we decided to create a Kubernetes cluster that would house a complete email server environmen and would be even easier to install. That way we could learn more about containerization and how clustering with Kubernetes works.
How Does Email Work?
First of all, we need to make a small trip to the world of emails to better understand what we actually wanted to do.
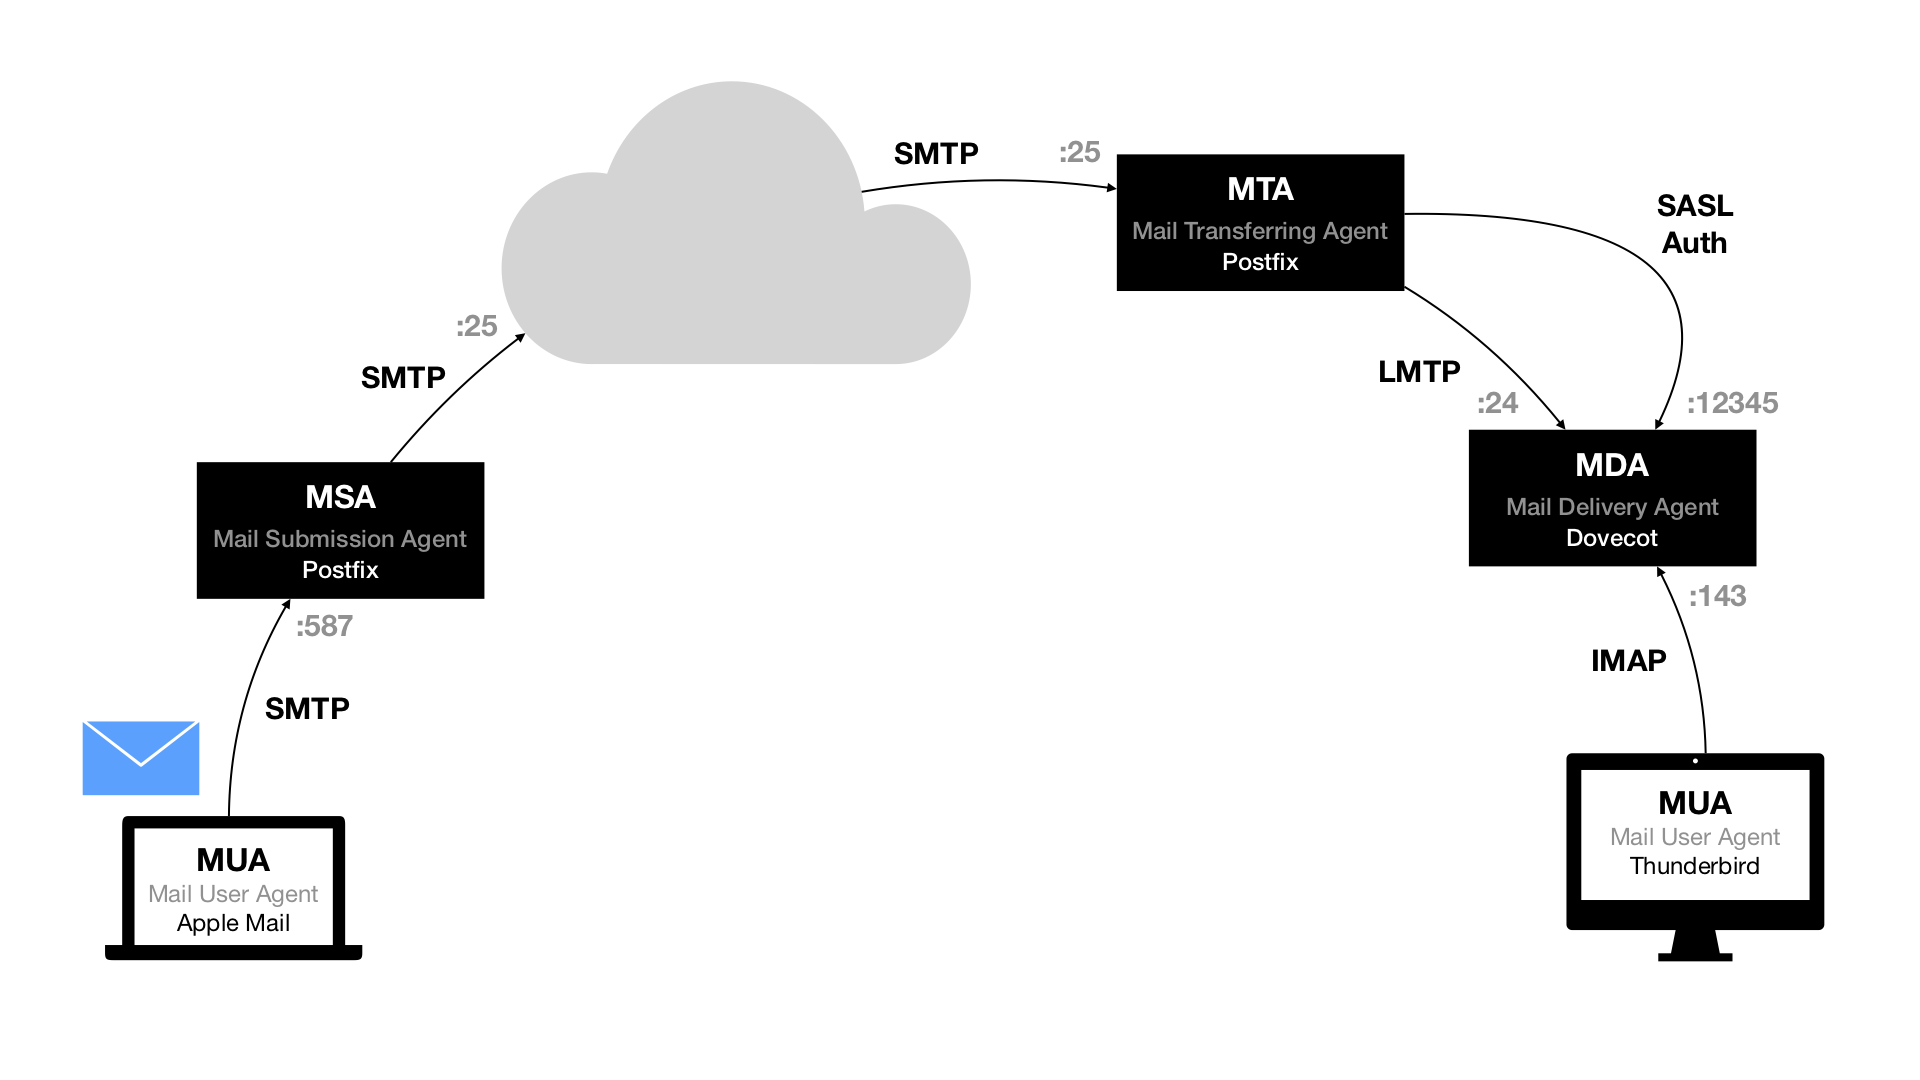
When you want to send an email to your friend Alice (alice@example.com), you will send it to your Mail Submission Agent (MSA) using the protocol SMTP. Your MSA (or another server of your email provider) will then try to figure out where it should send emails for the domain example.com. It does that by looking up the DNS MX record for the domain. It will then try to connect to that address on port 25 using SMTP.
Let’s say on Alice’s end there is a typical setup of the two applications Postfix and Dovecot. The server running Postfix will act as the Mail Transferring Agent (MTA) and answer on port 25. It will then look up the address alice@example.com in its database to figure out whether to accept or to reject the email. After accepting, Postfix will forward the email to Dovecot – Alice’s Mail Delivery Agent (MDA), which will store it as a new email until Alice checks her emails. The connection between Postfix and Dovecot uses the protocol LMTP. When Alice uses her Mail User Agent (MUA) to check her emails, she logs into the MDA using the IMAP protocol.
There is a lot more going on and we could look at that in detail, but it will suffice to understand the very basics for our purposes.
If you want to dive in deeper, we can recommend two books by Peer Heinlein, unfortunately they are only available in German: “Das Postfix-Buch – Sichere Mailserver mit Linux” and “Dovecot – IMAP/POP3-Server für Unternehmen und ISPs”
User Management for Email Servers
Now, if you administrate an email server and you want to manage your users, there are a bunch of options. You could simply write them in a file or create UNIX users for them on your system. However, if your setup is larger than a few users that might not be feasible. In this case, you could write them into a database or use something like LDAP, which is a user directory service you will find in most large companies anyways.
Still, it can be very tedious to set up and maintain any of these options. That’s why – about a year ago – we decided to make it a little bit simpler for mid–size setups. In an attempt to make email user management as easy as possible, we created MUM.
MUM is a web-based user management tool. It works with the popular open-source packages Postfix and Dovecot since they can share one MySQL/MariaDB database for their lookups.
With MUM it is very easy to create new users and give restrictions to them as well. With self-deactivating aliases we implemented a feature that is perfect for fire-and-forget registrations, e.g. to download something on the web.
In bigger and more complex systems you sometimes have to combine several tools. MUM provides so called integrations. With these you can run any shell command you want to on a certain event triggered by MUM. This makes MUM super flexible in any environment.
If you want to know more about MUM’s features you can take a look at our documentation.

Create a new user 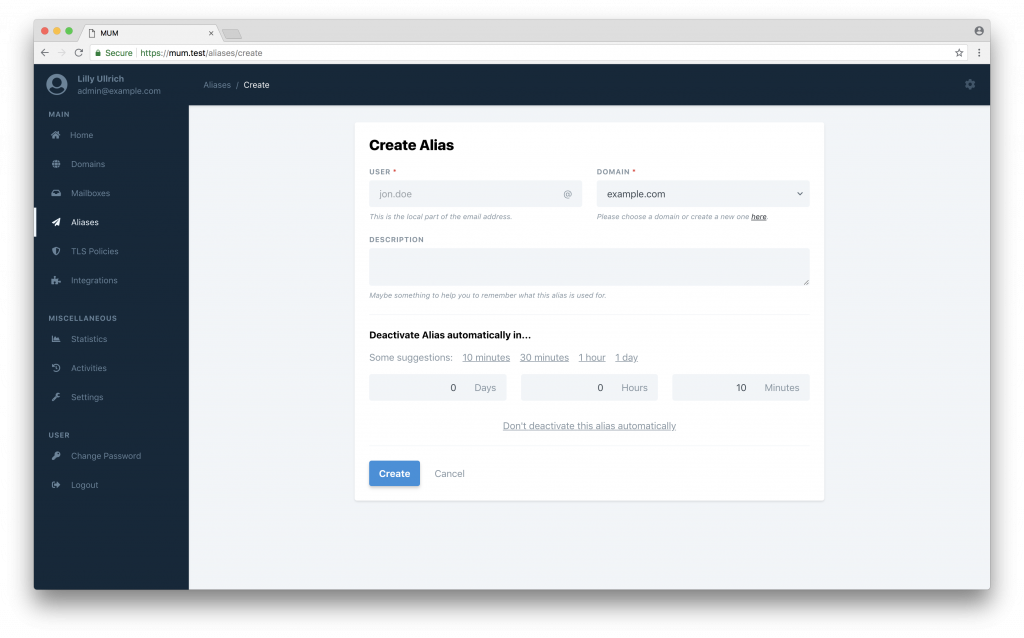
Self-deactivating aliases 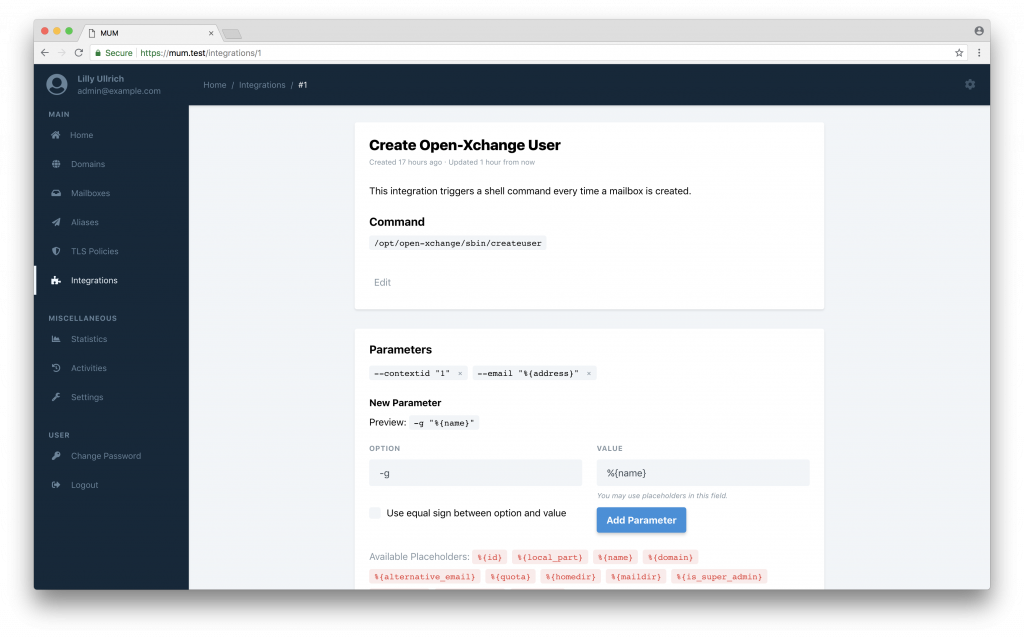
Integrate third-party tools 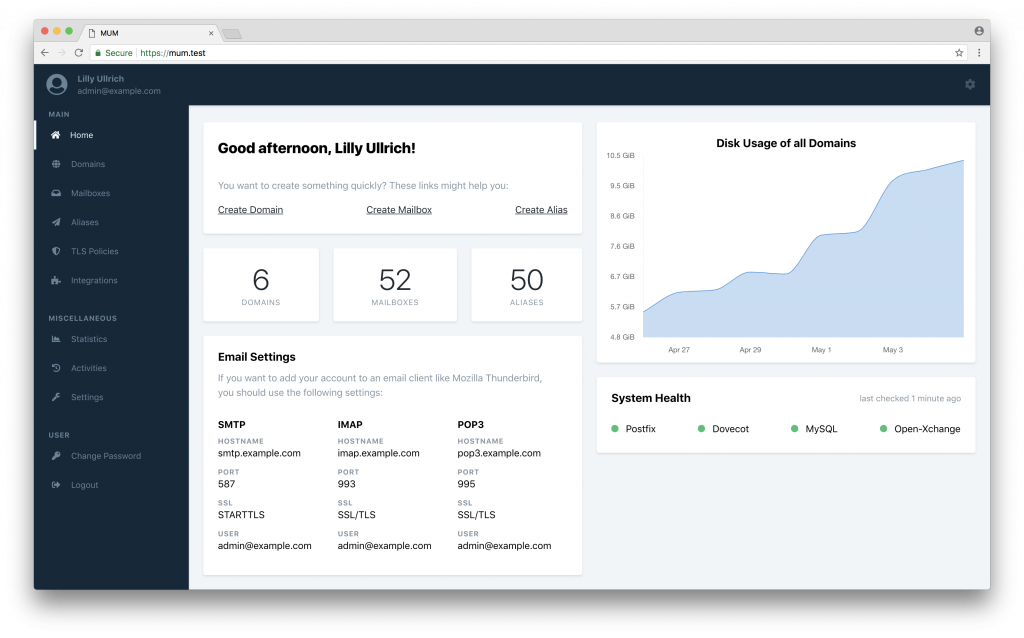
Overview of our dashboard
Kubernetes
For understanding everything that follows we might take a quick look at Kubernetes. Kubernetes describes itself as an “open-source system for automating deployment, scaling, and management of containerized applications”. Its approach is to make it easier to scale your applications by containerizing them, for example by using Docker.
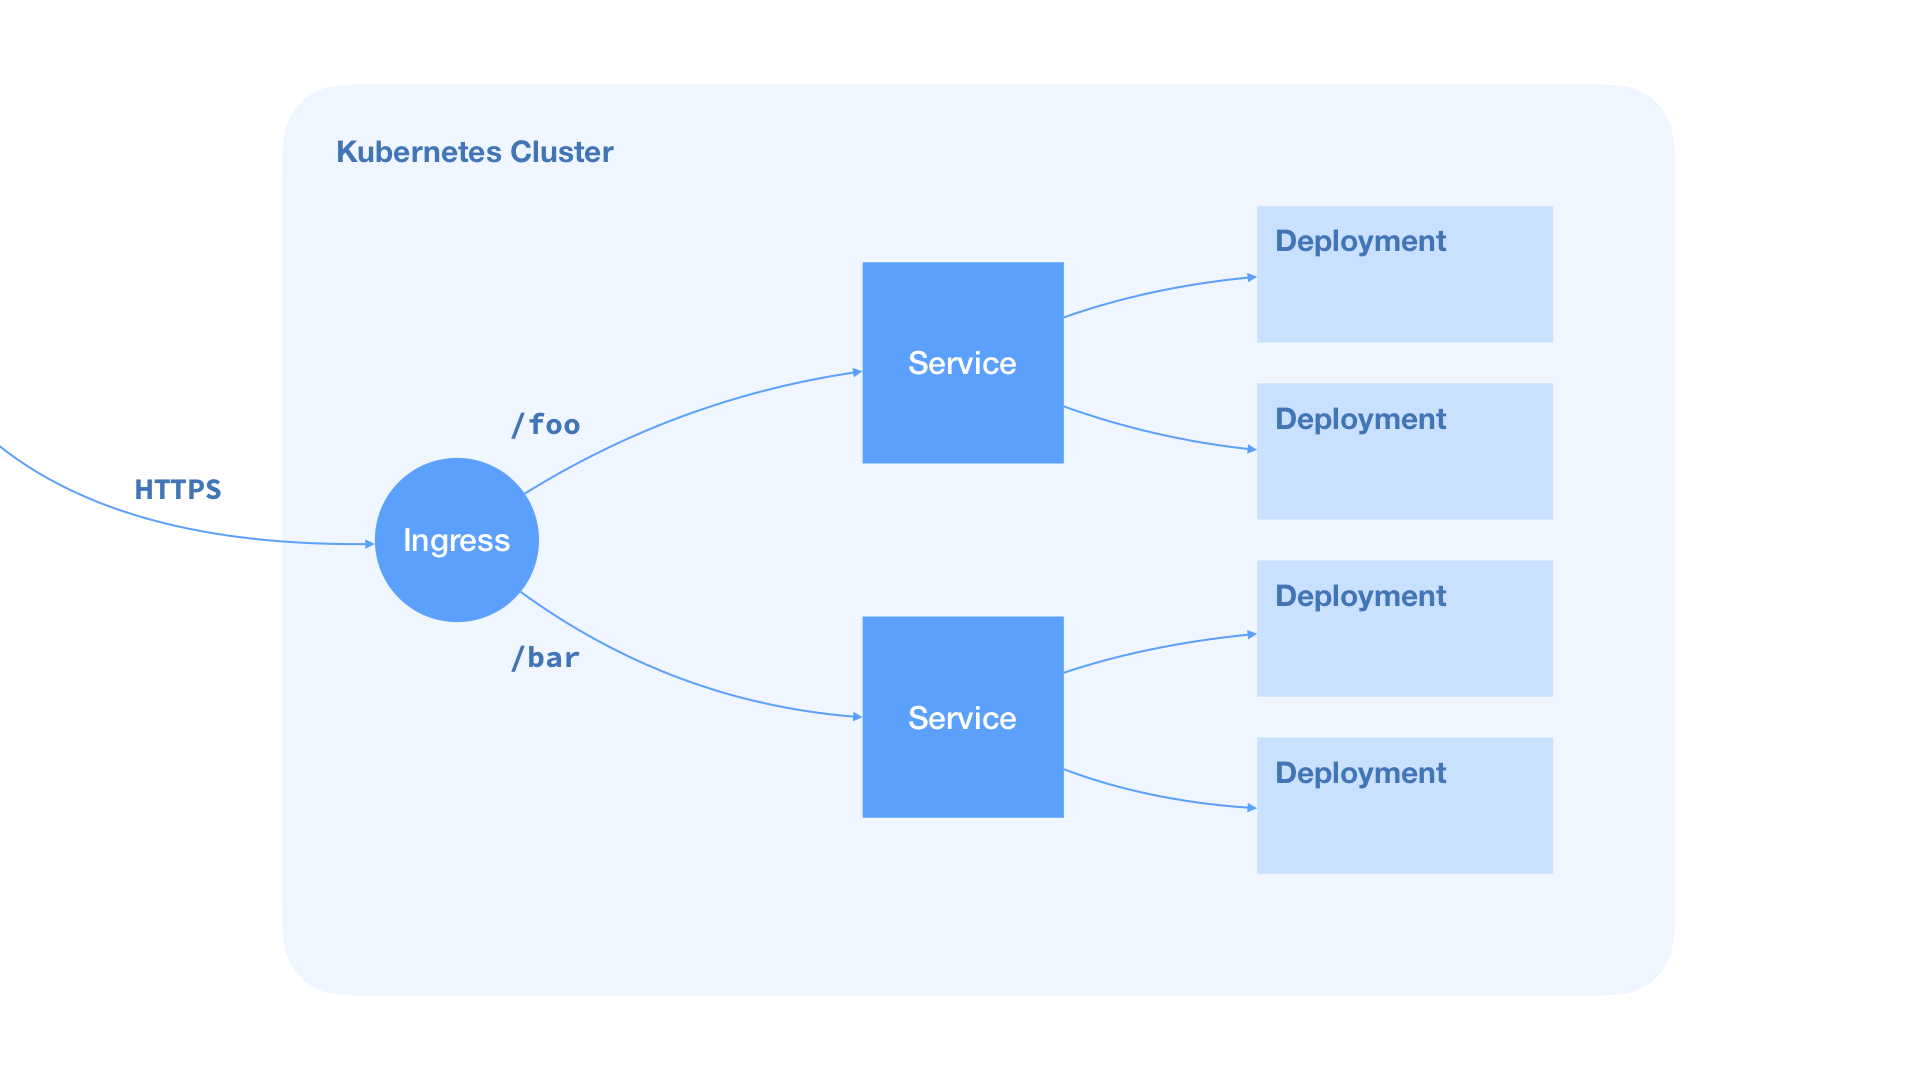
A Kubernetes cluster is structured like this:
All containerized applications are running in so-called Pods. The common sense is that one Container is deployed into one Pod.
For each Pod you have to define a Deployment that contains the Pod’s configuration data like the used container image or environment variables. If your Pod has to communicate with other Pods, you should define a Service. The Service contains information about used ports and protocols.
In front of all Pods is an Ingress object. An Ingress object can be understood as a load balancer that takes HTTP requests and transfers them to the appropriate service, where a Pod is listening for incoming requests.
To describe the setup and the behavior of a cluster in certain situations, you have to create .yaml files for everything that should be part of the cluster.
If you have a lot of different applications running in your cluster and you need to use the real-time deployment names to publish your cluster, the file handling can be very difficult.
Due to this, we decided to use Helm. With Helm, you can use one file for all of your application-specific configurations that can affect all or some of your Deployments.
Bringing It Together
Since we wanted to deploy a complete email server setup, we needed to create deployments for MUM itself, for Postfix and Dovecot – and for the database powered by MariaDB to unify the user data of all Services.
For every one of these components, we created Helm charts to make the deployment easier. Since we use Helm charts, we get versioning of our deployments for free, thus we can roll back a version easily if a problem occurs.

The diagram above shows a simplified version of our MUM cluster.
As you can see, multiple ports for multiple protocols need to be opened from the outside. The cluster has to be able to speak HTTPS on port 443, SMTP on port 25 and IMAP on port 143. Any connection to one of these ports needs to be routed to the matching Kubernetes Service.
These Services are single-entry points for our deployed Pods, since they could theoretically be scaled to multiple instances. For HTTP connections, we can use an Ingress object or a load balancer of the cloud provider. TLS termination can be done there, so no need for extra configuration in the MUM Deployment. For SMTP and IMAP connections that’s a little bit different, but we will go into detail on that later. Cluster-internal communication is pretty forward since all Pods and Services are in the same network.
Problems We Faced
Environment Variables
For MUM, we implemented the whole configuration with environment variables. Due to personal credentials and settings, the values have to be changeable. Putting the .env file in the Docker container did not seem like a good idea. Kubernetes provides two solutions for this.
On the one hand you can create a ConfigMap. In a ConfigMap you can create key-value pairs with the names of your environment variables. In your deployment, you just pass the whole ConfigMap as a configmapRef at envFrom in your container configuration.
apiVersion: v1

kind: ConfigMap
metadata:
  name: mum-config
  namespace: default
data:
  APP_NAME: "MUM"
  APP_ENV: "production"
  APP_DEBUG: "false"
  APP_URL: "https://minikube.local"
  TIMEZONE: "Europe/Berlin"

  LOG_CHANNEL: "stack"

  BROADCAST_DRIVER: "log"
  CACHE_DRIVER: "file"
  SESSION_DRIVER: "file"
  SESSION_LIFETIME: "120"
  QUEUE_DRIVER: "sync"

...
For confidential data like database logins or application keys, you can use so-called Secrets. When creating a new Secret, you have to make sure to encode every value with Base64. When defining an environment variable in the container configuration, you can pass a secret value as a secretKeyRef.
apiVersion: v1
kind: Secret
metadata:
  name: db-secret
  namespace: default
type: Opaque
data:
  mariadb-root-password: ""         # Change this value!
  mariadb-replication-password: ""  # Change this value!
  mariadb-password: ""              # Change this value!
You’ll have to deploy the ConfigMap as well as your Secret before you deploy your actual Helm charts, otherwise the containers won’t be able to start.
Real-Time Database URL
All containers (Dovecot, Postfix and MUM) have to connect to a MariaDB database. We deploy the complete Kubernetes cluster (created by Helm) in one step. So we need to get the hostname of the database dynamically.
Deploying the Database first, parsing its IP address in the Cluster, putting the credentials into the secrets and then deploying the other three Pods is very complicated and makes no sense. In this case, Kubernetes creates a new Pod for the database which might have a completely different hostname and none of your other Pods could connect to it anymore.
To make all of this easier and less complex, we used the templating capabilities of Helm. With Helm, you can use templating to generate the hostname of a Service using the Release name. This hostname may then be passed into a Pod as an environment variable
apiVersion: apps/v1
kind: Deployment
metadata:
  name: {{ include "mum.deployment.name" . | quote }}
  namespace: {{ .Values.namespace | quote }}
spec:
  template:
    spec:
      containers:
      - name: {{ include "mum.deployment.name" . | quote }}
        image: "{{ .Values.mum.deployment.image.repository }}:{{ .Values.mum.deployment.image.tag }}"
        imagePullPolicy: {{ .Values.mum.deployment.image.pullPolicy }}
        env:
        - { name: "DB_HOST", value: {{ include "mariadb.service.address" . | quote }} }
Connecting Postfix With The Database
2019-07-25T11:13:32.290190+00:00 listening-rabbit-
postfix-556c449c4f-448cn postfix/trivial-rewrite[128]: warning:
virtual_mailbox_domains: mysql:/srv/sql/domains.cf: table lookup
problem
Even though the database connection was configured in Postfix, table lookups did not work and initially we couldn’t figure out what the problem was. We were sure that the credentials and the server name were correct because other Deployments were able to connect. After hours of debugging and searching the web, we finally figured out that KubeDNS and the chroot environment of Postfix didn’t work together properly.
The solution was to copy the file /etc/resolv.conf into the chroot environment at /var/spool/postfix/etc. The reason this simple operation solved our headache is that the file contains information about where to look up DNS names – which should be KubeDNS. Unfortunately, even though the file should be copied over automatically into the chroot path, that did not happen for some reason. After adding the copy command into our start script, everything worked like a charm.
Load Balancing
Ingress objects are an easy way to load-balance incoming traffic and terminate TLS traffic, so the Pods behind it can communicate per HTTP. Unfortunately, that only works for HTTP connections, not for SMTP or IMAP. Since we apparently skipped that important part of the Kubernetes documentation at the beginning, we were a little bit surprised to find that our email traffic could not be routed through our Ingress object.
We solved this problem by marking the Postfix and Dovecot Services as a LoadBalancer Service. That means, an external load balancer of the cloud provider can hook into the TCP ports exposed by the Nodes directly. That way, we can still have multiple Pods for these Services. The downside is that we have to terminate TLS inside the Pods themselves. But since the Ingress object loads the TLS certificate and private key from a Secret, we can do the same in our Postfix and Dovecot Pods.
What We Liked and What We Didn’t
Something that is really cool is how easy it is to deploy existing Helm charts. Essentially, this can be done with one shell command. And if you want to install your cluster multiple times on multiple instances, this is where Helm charts start to shine.
However, reading and modifying existing charts can be very frustrating because of all the “curly bracket” noise. Sometimes it is hard to read charts because most values are outsourced using complex template syntax.
Also, the documentation of Kubernetes was quite good, which helped a lot when we tried to understand the different available components, their specifics and their differences.
Helm’s documentation on the other hand is filled with incoherent or unspecific gibberish and didn’t help us very much. To be fair, there is no real standard for writing Helm charts and everyone seems to do it a little bit differently, so it may be more difficult to write a good documentation for it.
What really did cost us a lot of time was the fact that is was a lot harder than we expected to set up Docker images for existing software that wasn’t designed for it, like Postfix or Dovecot. Setting up communication between Pods inside the Kubernetes cluster was another time consumer because of the separate internal network, which made debugging more difficult. Actually, debugging our containers and their connections inside the Kubernetes cluster probably occupied most of the time we spent on this project.
Future Improvements?
Firstly, when the cluster boots its containers, the MUM container tries to migrate the database before the database container itself is ready to accept connections. Since MUM cannot successfully migrate, the HTTP response status code for the readiness and liveness probe requests by Kubernetes will not be 200 OK, so the container will be killed and another one will be started until the MariaDB Pod is ready. This can happen about 2–3 times.
Of course, this behavior is not desired. A solution could be to delay the migration execution and the readiness probes. Another idea we had was to execute the migrations within a Job that would run after Helm upgrades – but we would still need to ensure that the database Pod is ready when it executes.
Secondly, it would be nice to add some dynamic configuration to the Postfix and Dovecot Pods, for example which DNS blacklists to use. A ConfigMap with some Shell scripting should probably do the job.
Thirdly, we would love to play around with scaling – the biggest advantage of Kubernetes. This feature would enable any email server setup to grow instantly from a few users to a few thousand. Unfortunately, we didn’t have enough time for that before our semester was over. Maybe we will find time for that in the future, though.
Lastly, to have a complete email server environment that is usable in the real world, two important components are still missing in our cluster:
Spam detection and DKIM signing. Both of these issues could be solved with Rspamd, a powerful spam filtering software. Rspamd is – among other things – capable of spam filtering and DKIM signing. To add it to our cluster, we would need to create a Docker image and a suitable Helm chart. Next, we would need to integrate the new Rspamd Pod into the current Postfix configuration, so that emails will be relayed to Rspamd both when sending and receiving.
If you are interested in our project, make sure to visit our GitHub account. MUM itself, all Dockerfiles and Helm charts are available as open-source repositories if you want to take a closer look.
Authors:
Martin Bock — martin-bock.com, @martbock
Max Merz — merzmax.de, @MrMaxMerz
Leave a Reply
You must be logged in to post a comment.