Play Connect 4 here
Annika Strauß – as324
Julia Grimm – jg120
Rebecca Westhäußer – rw044
Daniel Fearn – cf056
Introduction
As a group of four students with little to no knowledge of cloud computing our main goal was to come up with a simple project which would allow us to learn about the basics of software development for cloud computing. We had decided a simple game would do the trick. And to make it a little more challenging it should be a two player online game. First we thought of Tic Tac Toe but that seemed too simple. Then we took a look at the Chinese game of Go, but that was too complicated. In the end we agreed on Connect4. Not too simple. Not too complicated.
Getting started / Prerequisites / Tech Choices
In our first group meeting we sat down and brainstormed on all the requirements, features and technologies we would require to realize the game. We also tried to avoid coming up with too many additional features that would be nice to have but exceed our possible workload. The main focus was to get something running in the cloud.

Our version of Connect Four therefore should have a simple user login, so that one can play a game session with other players, interrupt the game and come back later to finish where one left off, which also means game sessions need to be saved between two players. We thought about matching players via a matching algorithm, in order to ensure that players of about equal strength get matched, but then we realized that was way too much effort and our focus really should stay on getting something done. So we decided on simply make it a random match up, or adding friends and connect via a friend list, since this is a study project, not a commercial game.
Of course we don’t really assume that millions of people are going to play our game at once, but we want to learn about scalability, so we are going to act as if no one has ever played it before and everyone in the world is going to act like it’s the new Pokémon Go. In reality it will probably just be the four of us and whomever we show it to.
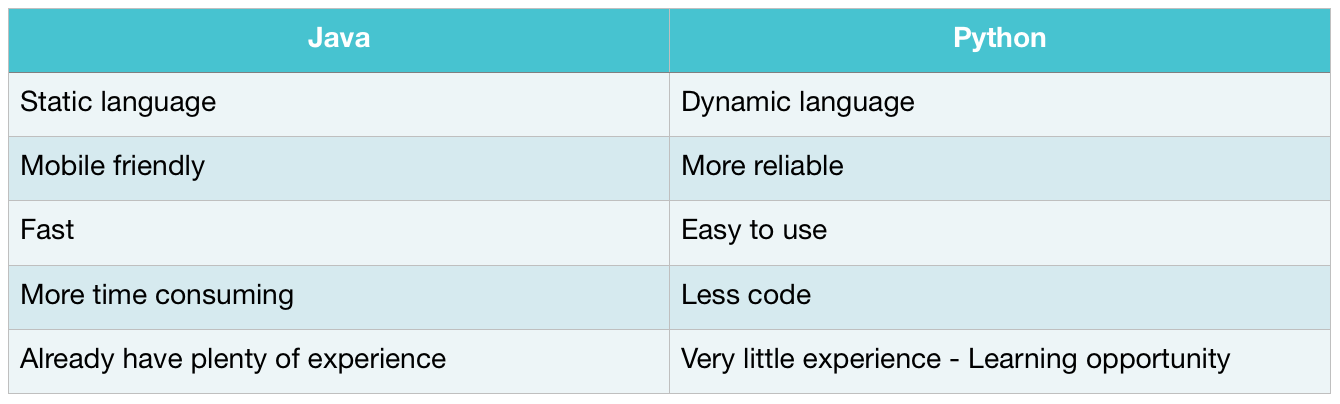
We already knew beforehand that we would want to program the game in Python, simply because it is getting pretty popular in the web application field and we want to get some experience with it. Also, we finally want to learn something other than Java. But we also want to make sure Python actually is a good choice, so we’re going to check the pros and cons just to be sure and possibly decide on something else later.
We also agreed that we want to use a NO-SQL Database for saving game sessions, simply because they can store arrays and we want to get more experience with it. Again, we must check first if it’s a viable option.
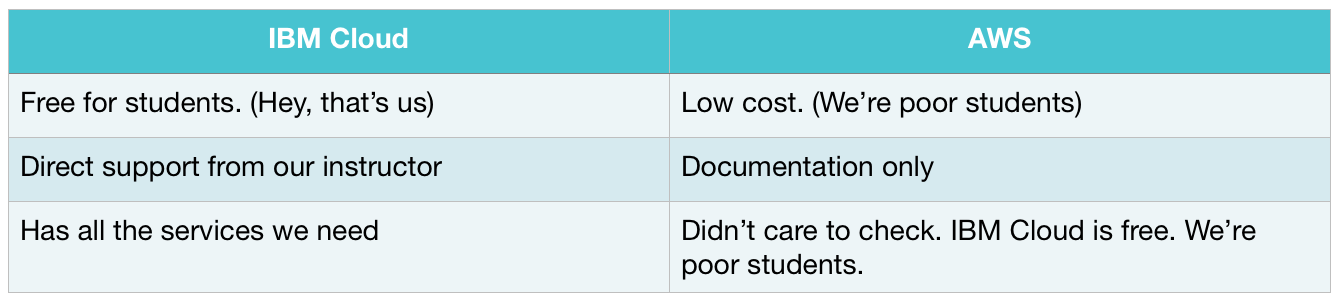
Next question we needed to ask, is what infrastructure, what platform would we put this on. AWS? Our own hardware? IBM Cloud? What are the options there? Also, what requirements does our game bring with it for the platform? Do we need micro services? Should we use Docker? How is the scalability going to be handled? So many questions. It was time to ask the Master for some wisdom. So we talked to lecturer Thomas Pohl, who gave us some very useful insights.
Luckily for us IBM Cloud is available for free for students. And as Thomas works for IBM and has plenty of experience with it, it’s kind of a no brainer to go with IBM Cloud. As we found out, IBM Cloud already provides a great deal of infrastructure and platform, all handled by IBM, which allows us to simply focus on deployment. The service we are looking at in particular is called Cloud Foundry. It handles all the scaling, load balancing and everything automagically for you in the background, so that we can focus on simply getting our game running. It comes with a great variety of tools for almost any technology requirements we desire.
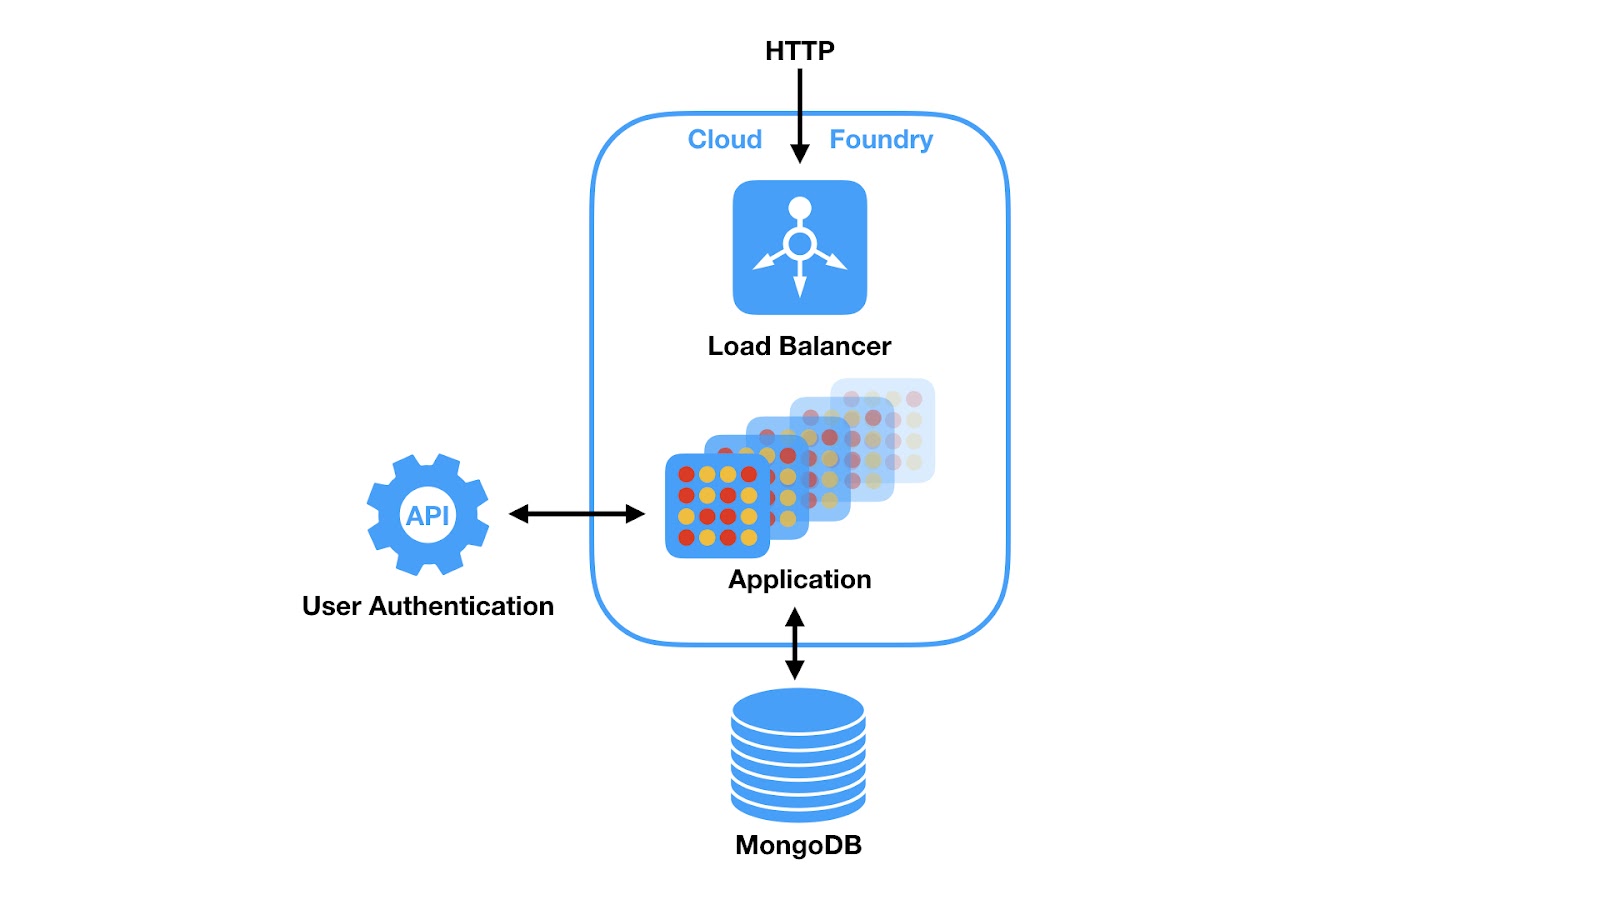
This is definitely the sandbox we want to be playing in. With some help from Thomas we came up with this relatively simple architecture:
So what exactly do we require from the cloud foundry? To answer this we first need to ensure we have all the technology choices figured out. Meaning, programming language, database, user login authentication and so on.
First we’ll start with the programming language. Python. Is it a good choice?
To get a clear impression of whether or not to use Python some research is necessary. After reading some online articles and watching some videos, we came to the conclusion that it is a good choice. Why? Similar to Java, it is an interpreted language and is easy to use. It is portable and has a huge library and lots of prewritten functions. The main drawback is that it is not too mobile friendly, but we’re not worried about that. And it is so simple, that other languages may seem to tedious in comparison. But it will get the job done quickly and it is simple to maintain. Debugging works very well, it has built in memory management and most importantly, it can be deployed in Cloud Foundry. So, Python is definitely a winner. Other languages may also be a good choice, but the point is not to find the best language, but to confirm that Python is not a bad choice. Cause, we want to learn Python, and we just want to be sure it’s not a waste of time. And from what I’ve read, Python is a pretty good choice.
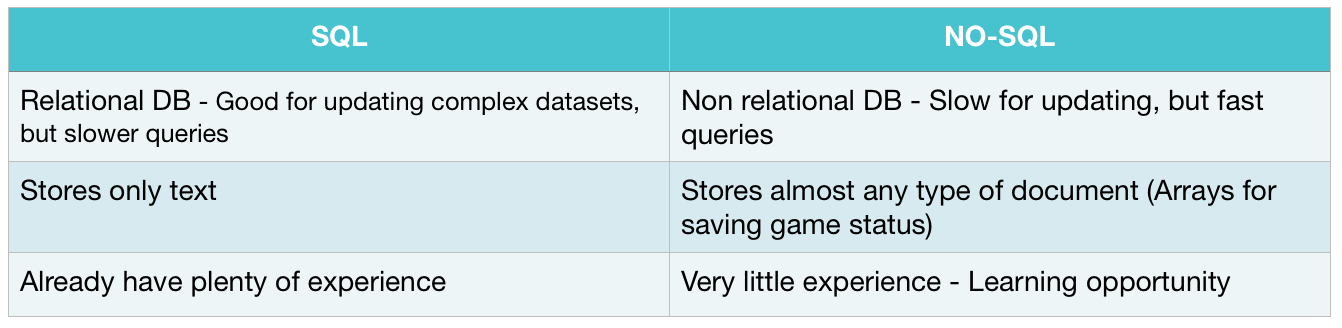
SQL or NoSQL? We want to use NoSQL, but does that make sense? To answer this question we need to have a look at what kind of data we are actually storing and what the advantages and disadvantages are of using NoSQL and see how it compares to SQL.
SQL is great if one has complex data that is very interwoven and a write would mean updating several different places, which SQL manages well by merely linking the data via relations instead of duplicating it. NoSQL stores all relevant data in one place, which makes reading really fast, but making any changes can mean, having to replace all duplicates of the data. So, NoSQL is efficient if changes only need to take place in one area.
Now, the data we are storing is basically just a game session. This mainly consists of two users, which will not likely change. Then the game state, which only changes in the saved game. And once the game is done, the entire game session no longer needs to be stored anyway and can probably be deleted.
The player data will be coming from a UserDataBase supplied by App ID, a user login service provided by IBM. Feeding this data into either DB Type should be no problem. But the main reason for using a NoSQL Database remains arrays. As we will be storing the game progress in form of arrays, getting them translated into something a normal SQL database could handle would be way too tedious and NoSQL can handle storing arrays no problem.
We’ve also just touched on the topic of handling user accounts. As already mentioned IBM provides a called App ID. Rather than using a social media login service such as facebook provides or worse, coming up with a whole system on our own, we were very happy to discover this tool already existed in the IBM cloud foundry. So we gladly decided to use that.
Getting the show on the road. Sort of.
Now that we had decided on all of our technical resources it was time to actually make it all. So, we all created our IBM Cloud accounts and started setting everything up. Now we had to look around Cloud Foundry and figure out where and how we would find all the services we needed and which ones were the right ones for us. Our main services needed to be:
a place for the main python app to live – Python Cloud Foundry
a NO-SQL database – Cloudant
a user login manager – AppID
Everything was relatively simple to find and set up. Our main app would be living in the Python Web App with Flask. A basic web serving application. For the NO-SQL database would use IBMs Cloudant. For the login of users we set up AppID. Now, I’m not going to go into detail on how we set it up, since it was pretty simple and anyone with a basic understanding of clicking through a webpage could have done most of this.
Everything we needed was in place. Our little playground was ready. Now came the really fun part. Actually writing the code. And with it, all the problems we needed to overcome, which would help us learn the ins and outs of cloud computing.
Random Problems we encountered
Merging Cloud Foundry Python Server with our Python-Flask Server
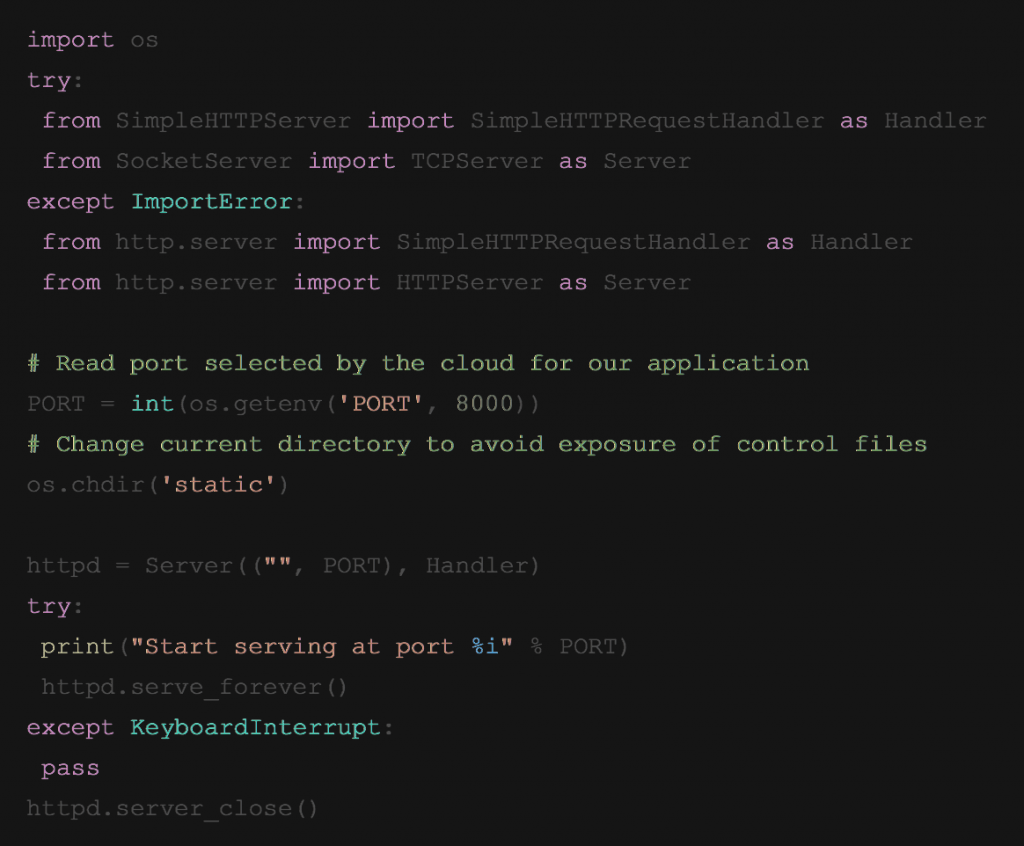
IBM Python Cloud Foundry delivers the following server.py:
We wanted to load our Flask Templates instead. How to do that? The server.py sets the folder “static” as the starting point, which contains the static index.html. But just putting the path onto the templates is not enough, as Flask is initalized with app.run(). Could we just replace server.js with a Python-Flask server? What on the server.js do we need so that the server still runs in the cloud.
We picked out the port and added it in our app.js (Python-Flask server).
Read port selected by the cloud for our application:

Adding the port in the app start:

So we added this in the first row:
Success! It worked!
Couldn’t start the app from the Cloud anymore
The app wouldn’t start anymore after pushing it to the cloud. We got an error message: “[errno 99] cannot assign requested address in namespace”.
This meant that our app couldn’t be found under the URL in the cloud. The mistake was that when we loaded locally we were using “localhost:8000”, but in the cloud, that doesn’t work of course. What was the correct address in the cloud? Adding host=’0.0.0.0′ into app.run solved the issue. Now we could run the app from the cloud and locally.
Explanation
If you bind localhost or 127.0.0.1 it means you can only connect to the service locally.
10.0.0.1 cannot be connected, as it is not ours. We can only connect to IPs which belong to our computer.
We CAN bind 0.0.0.0 though, because this means, all IPs are on our computer, so that every IP can connect to it.

Templates not found!!!
While two of us were working with Visual Studio Code, the templates for the front end html stuff were working quite nicely locally. But one of us was using PyCharm. And PyCharm did not know where the templates were and kept saying, wrong path, template not found.
On our quest for answers we were victorious and found ProfHase85 in one of the threads on stackoverflow.com. We followed his wisdom and did as he said: “Just open the project view (View –> Tool Windows –> Project). Once there, though shalt right-click on your templates folder. Not left-click. Not double-click. And most certainly not center-click. No. Though shalt right-click on it. There you will find Mark as Direcory and from there you will find the Template Directory. It is there, that thee will find salvation. There you will set the path of your template and all shall come to life.”
So, that worked great. Thank thee, ProfHase85.
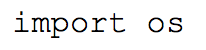
The NO-SQL Cloudant DB
When getting our Cloudant DB running we immediately ran into several problems. When we tried to create the DB, as it said in the tutorial from IBM, nothing happened. We then found that the code checks to see if the instance is a cloud instance. And we were trying to run the code locally. So we needed to push our code first and run it from the cloud.
The we needed to enter the domain name in the manifest.yml, which took us a while to find, which turned out to be eu-gb.mybluemix.net.
Then everything decided to freeze anytime when the password was being prompted. Apparently we made a mistake when we created the DB when configuring the authentication method. We said to only use IAM. So we went back and created the database again, and during setup the authentication method to use both legacy and IAM. Now we also had our in our service credentials and creating the DB and connecting to the Cloudant service finally worked.
Using the DB statically as well as dynamically
Now we were able to use Cloudant locally and in the cloud and could add static data in form of documents to our DB. The next problem we were facing was getting data like the username out of the user input into the document and making that data accessible again. Unfortunately our course on accessibility didn’t help in this case.
Unfortunately the documentation on what is possible with Cloudant didn’t seem to be very expansive.
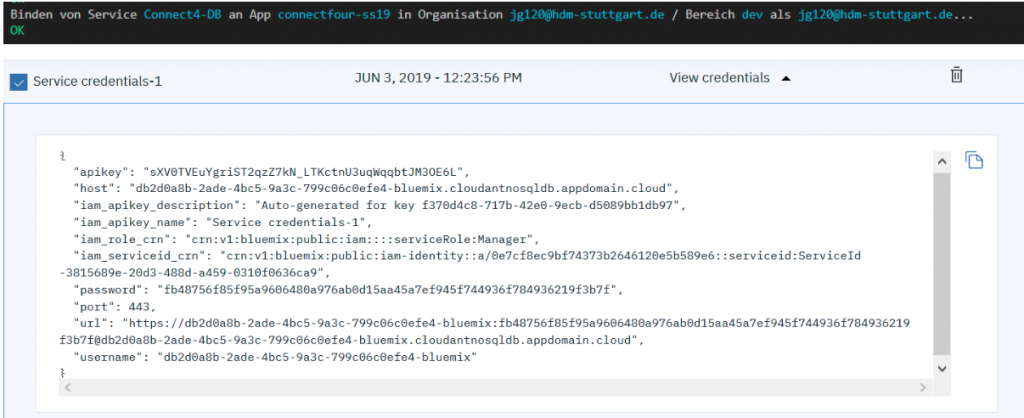
Functions such as checking if a file exists were only possible locally, but not from the Python-Cloudant extension in the cloud. After several days of trying around we finally had the idea that maybe it was the accessibility functionality that was causing this. Maybe we needed to use IAM to access the Cloudant DB from the Python-Cloudant extension.
After a small issue with finding the right username we tried to connect using:

But were greetet with: Error: type object ‘Cloudant’ has no attribute ‘iam’
IAM requires at least Python-Cloudant version 2.9.0 and for whatever reason the version had in our requirements was 2.3.1. Problem solved. Connection finally established.
And then the next problem came flying along. When updating a file:
409 Client Error: Conclict document update at document.save()
What? OK. More reading up to do. Went and read through this article:
https://developer.ibm.com/dwblog/2015/cloudant-document-conflicts-one/
This didn’t bring us much further, but it seemed to be better to use document.updatefield() rather than trying to go directly into the DB, in order to avoid simultaneous calls.
How to sort data in CloudantDB
Three SQL programmers went into a NO-SQL bar.
They came back out after five minutes because they couldn’t find a table.
In Cloudant data is stored in completely independent documents. This makes everything more flexible, but also very cluttered and difficult to differentiate when reading. Without any kind of sorting, all data needs to be searched for a specific ID.
For our project we needed the following data structures:
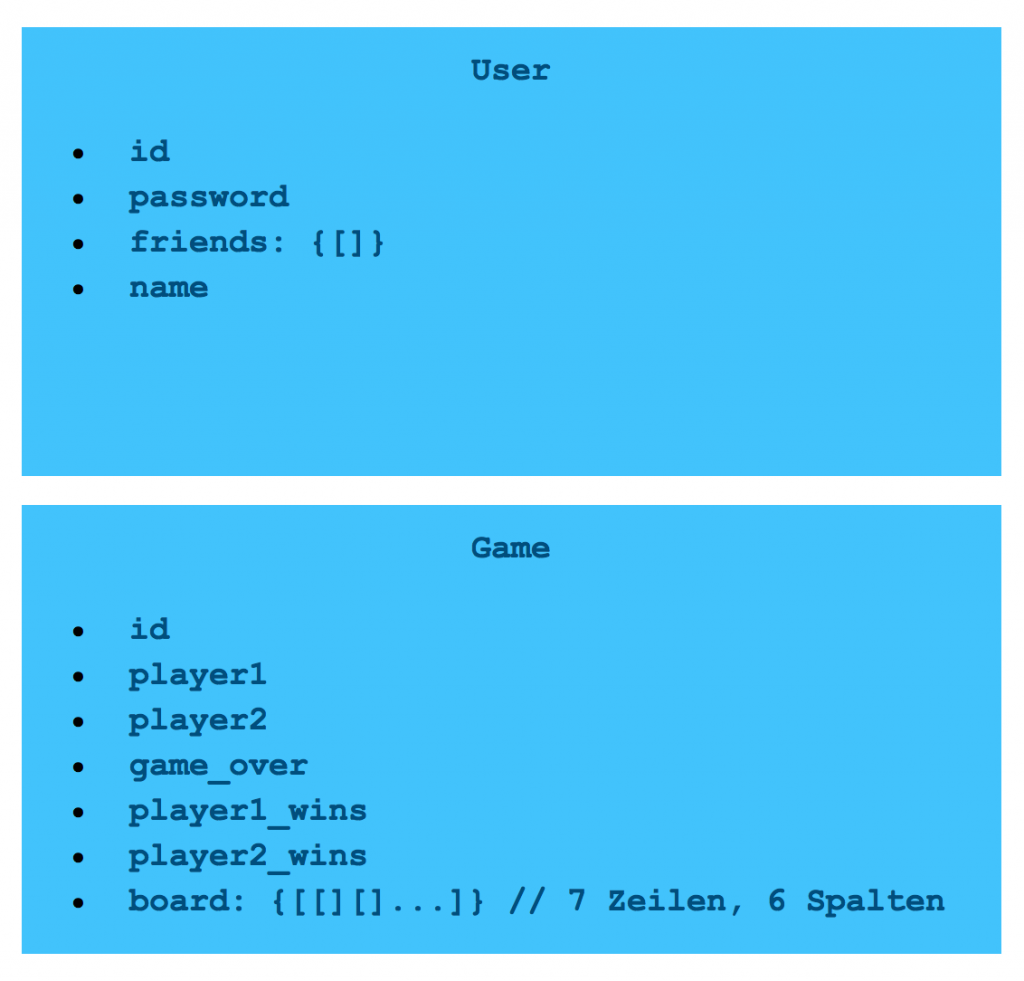
We had to differenciate between users and game sessions. How could we accomplish this in Cloudant?
Use views?
A view makes a query quick and easy. But anytime a document gets updated, so does the whole view, which is counterproductive with big data sets.
Partitions?
We found out, one can create a partitioned DB in Cloudant, whereby naming the ids as follows:
<partition>:<documentid>
In our case:
games:gameID123 and users:userAbc
This way one can add the partition to the queries, resulting in much better search performance. And also the DB looks a lot tidier.
Search query example:

And that was that.
AppID – The “simple” user login service for web apps
IBM offers a nice little web app called AppID. Easy to integrate. Made for the cloud. Great security features. Easy, right? Well, they have all the code you need for Java or node.js. But not Python. So, a few more lines of code, research and effort. How hard can it be?
AppID is based on OIDC (OpenID Connect). Since we used Python we needed to fall back on Flask-pyoidc. This module is a OIDC client for Python and the Flask framework which interacts with AppID for authentication.
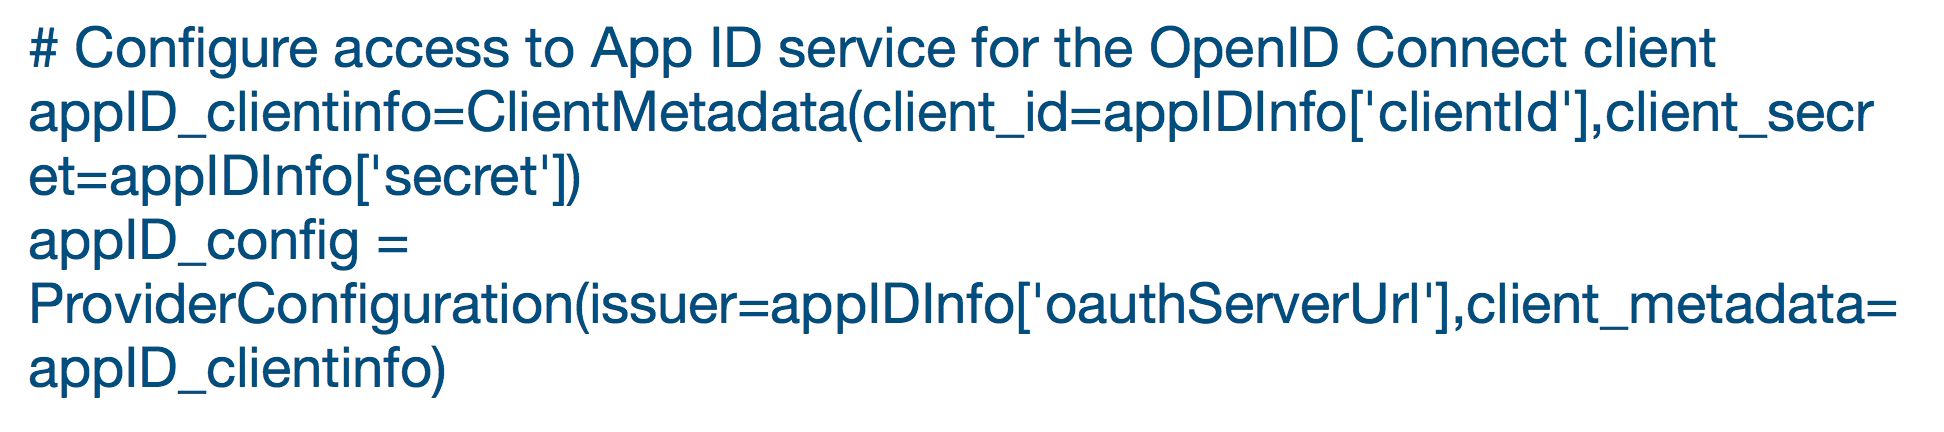
Configuring the OpenID Connect Client
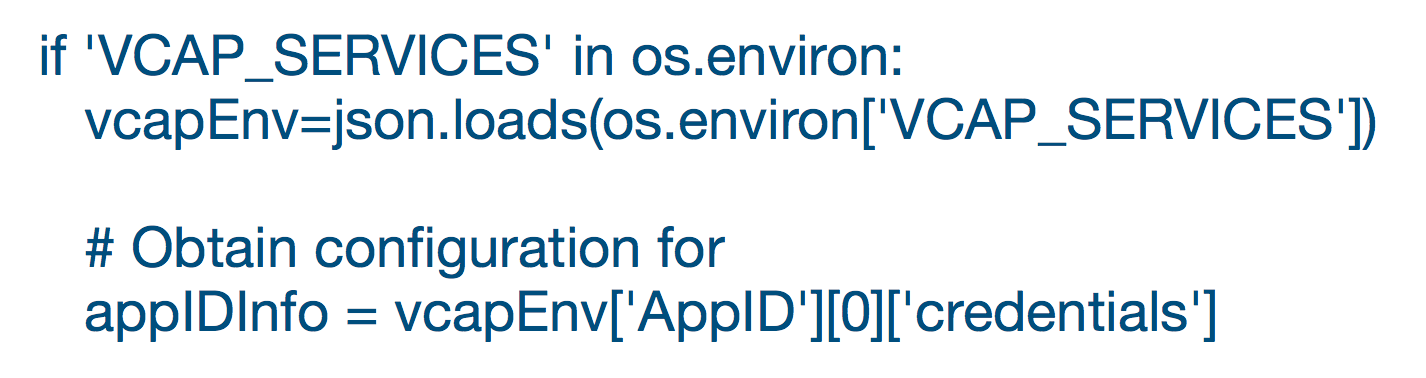
The metadata in “appIDinfo” serves as input for configuring the OIDC client.
Securing Web Routes
After configuration the OpenID client can be used to secure single pages or sections (“Routes”) of the web-app. This is achieved by attaching a decorator to the rout definition:
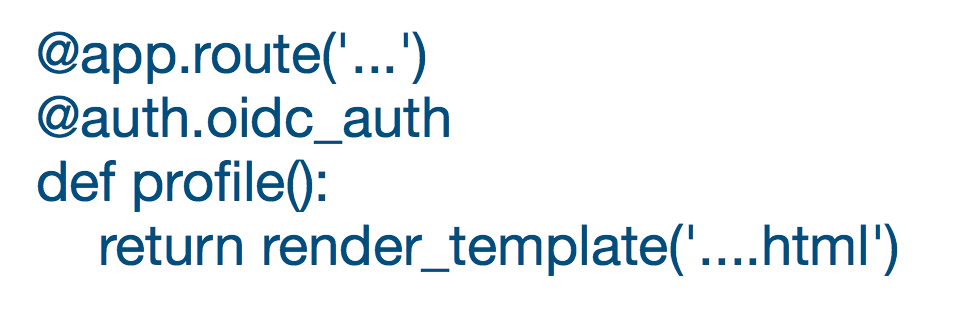
“@auth.oidc_auth” ensures that the code only gets executed for authenticated users.
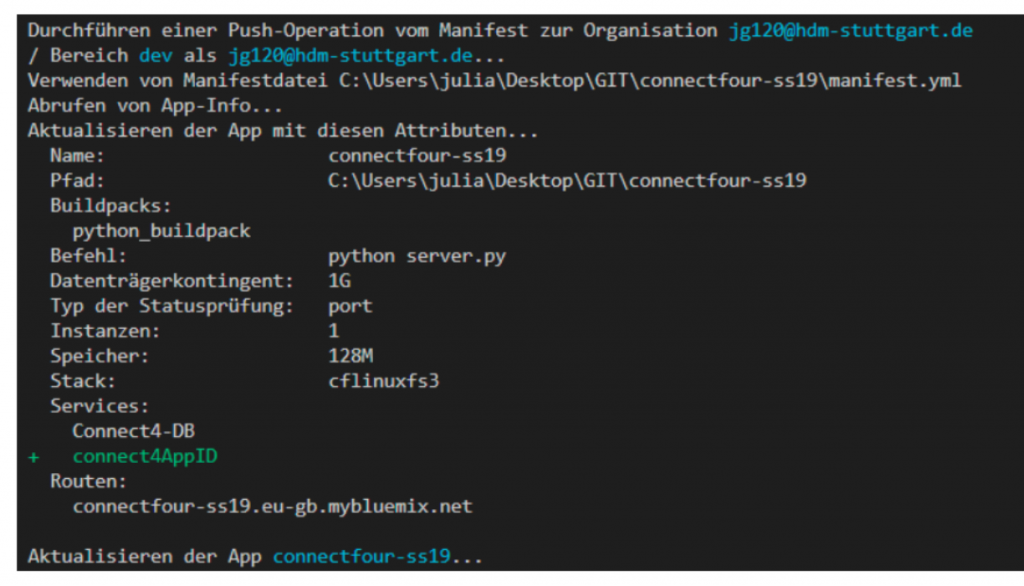
The first problems with using AppID already arose with establishing a connection. First we tried connecting with a direct approach via the create button, which show a connection in the browser, but not when pushing the app to the cloud. So, we created the service again directly in the project via the command line. And voila. The next test push got a connection.
Creating an instance of the AppID service
We connected to “ibmcloud resource service-instance-create connect4AppID appid lite eu-gb”. After that an alias of the service instance is created in Cloud Foundry. Then we had “ibmcloud resource service-alias-create connect4AppID –instance name connect4AppID
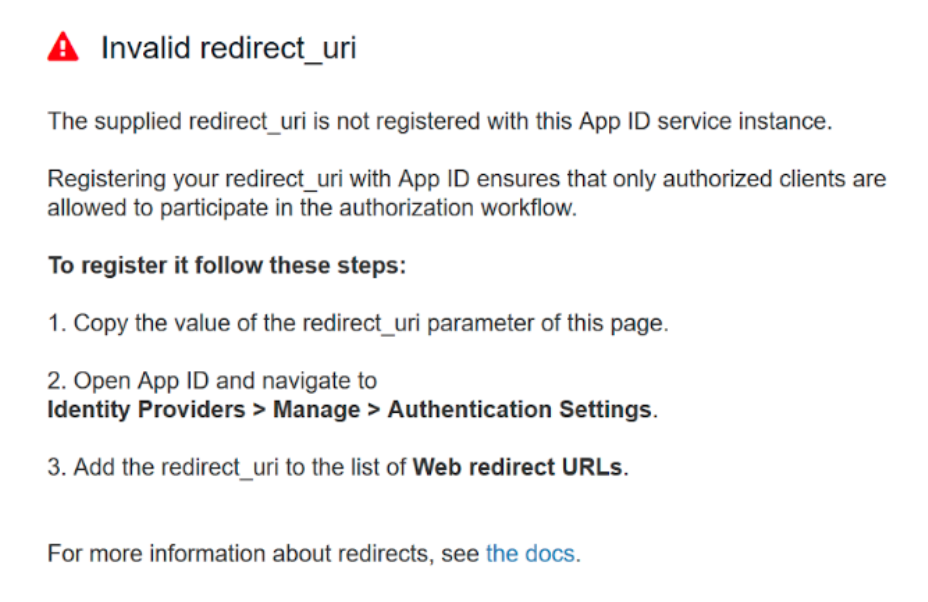
And we had a finally established a connnection between our app and the AppID service. Seemed like things were coming along. But then of course we encountered the next problem. Turns out the redirect_uri doesn’t work with secured connections.
And then the next problem was that the AppID login widget was probably not going to work with our Python-Flask app either. So, we decided not to use AppID after all. Instead we created our own user login in python.
Sometimes something that looks like plug and play turns out to be plug and pray. And in this case our prayers weren’t heard. But now we know that one needs to thoroughly check the capabilities of these services before trying to implement them.
The heart of the game/Game Engine
Probably the most challenging part of creating this game was writing the main application, as the first slew of questions arose. How do you write a game for two players? How to connect the database? How do make it refresh when a player makes a move so the opponent can see it? How do make taking turns work, so the opponent is blocked from making another move?
Reloading the window after a player made a move
After some online research we figured out we could use a socket server to handle the multiplayer functionality. But that seemed like way too much overhead as it meant possibly having to learn an entire new framework.
The first issue we needed to takle was getting the web page to update/reload for both players, anytime one made a move.
With Python-Cloudant one can listen to changes in the DB, but unfortunately this loop blocks all other actions in Python. Were cloud functions maybe the answer? They are like serverless event listeners. The function gets triggered when a watched event occurs. And fortunately the was even a quickstart template available from IBM Cloud. You can create an action sequence and a trigger on the DB. We would need to call a Flask template in the cloud function. But it was unclear if that was possible. So we tried a Python-Cloudant only approach instead. Same as before, but this time asynchronous. That way the feed can run continuously and listen for changes in the DB.
But now the problem is that the asynchronous loop, which is waiting for changes in the DB, cannot be executed at the same time as the return render_template and is blocking. Which also means that it’s blocking server side, which is causing the website to freeze.
According to a post on stackoverflow threading is a better solution. One can deamonize a thread and thereby make it run in the background.
But, then it was time for a new approach. Getting a better understanding. What is a feed? What is a trigger? Several documentations and coffees later we finally came up with a proper solution.
The Solution to Cloud Functions
After enough reading we finally uncovered the proper way to do this.
Under cloud.ibm.com/functions/actions select “Trigger”
1. Create new Trigger. Select a premade Cloudant Trigger. Select your DB and the actions selected in the next step will be triggered anytime something changes in the DB.
2. Create the actions, which are supposed to be triggered.
3. Create a sequence, which executes the actions in order.
4. Add the actions to the sequence.
5. Add the sequence to the trigger.
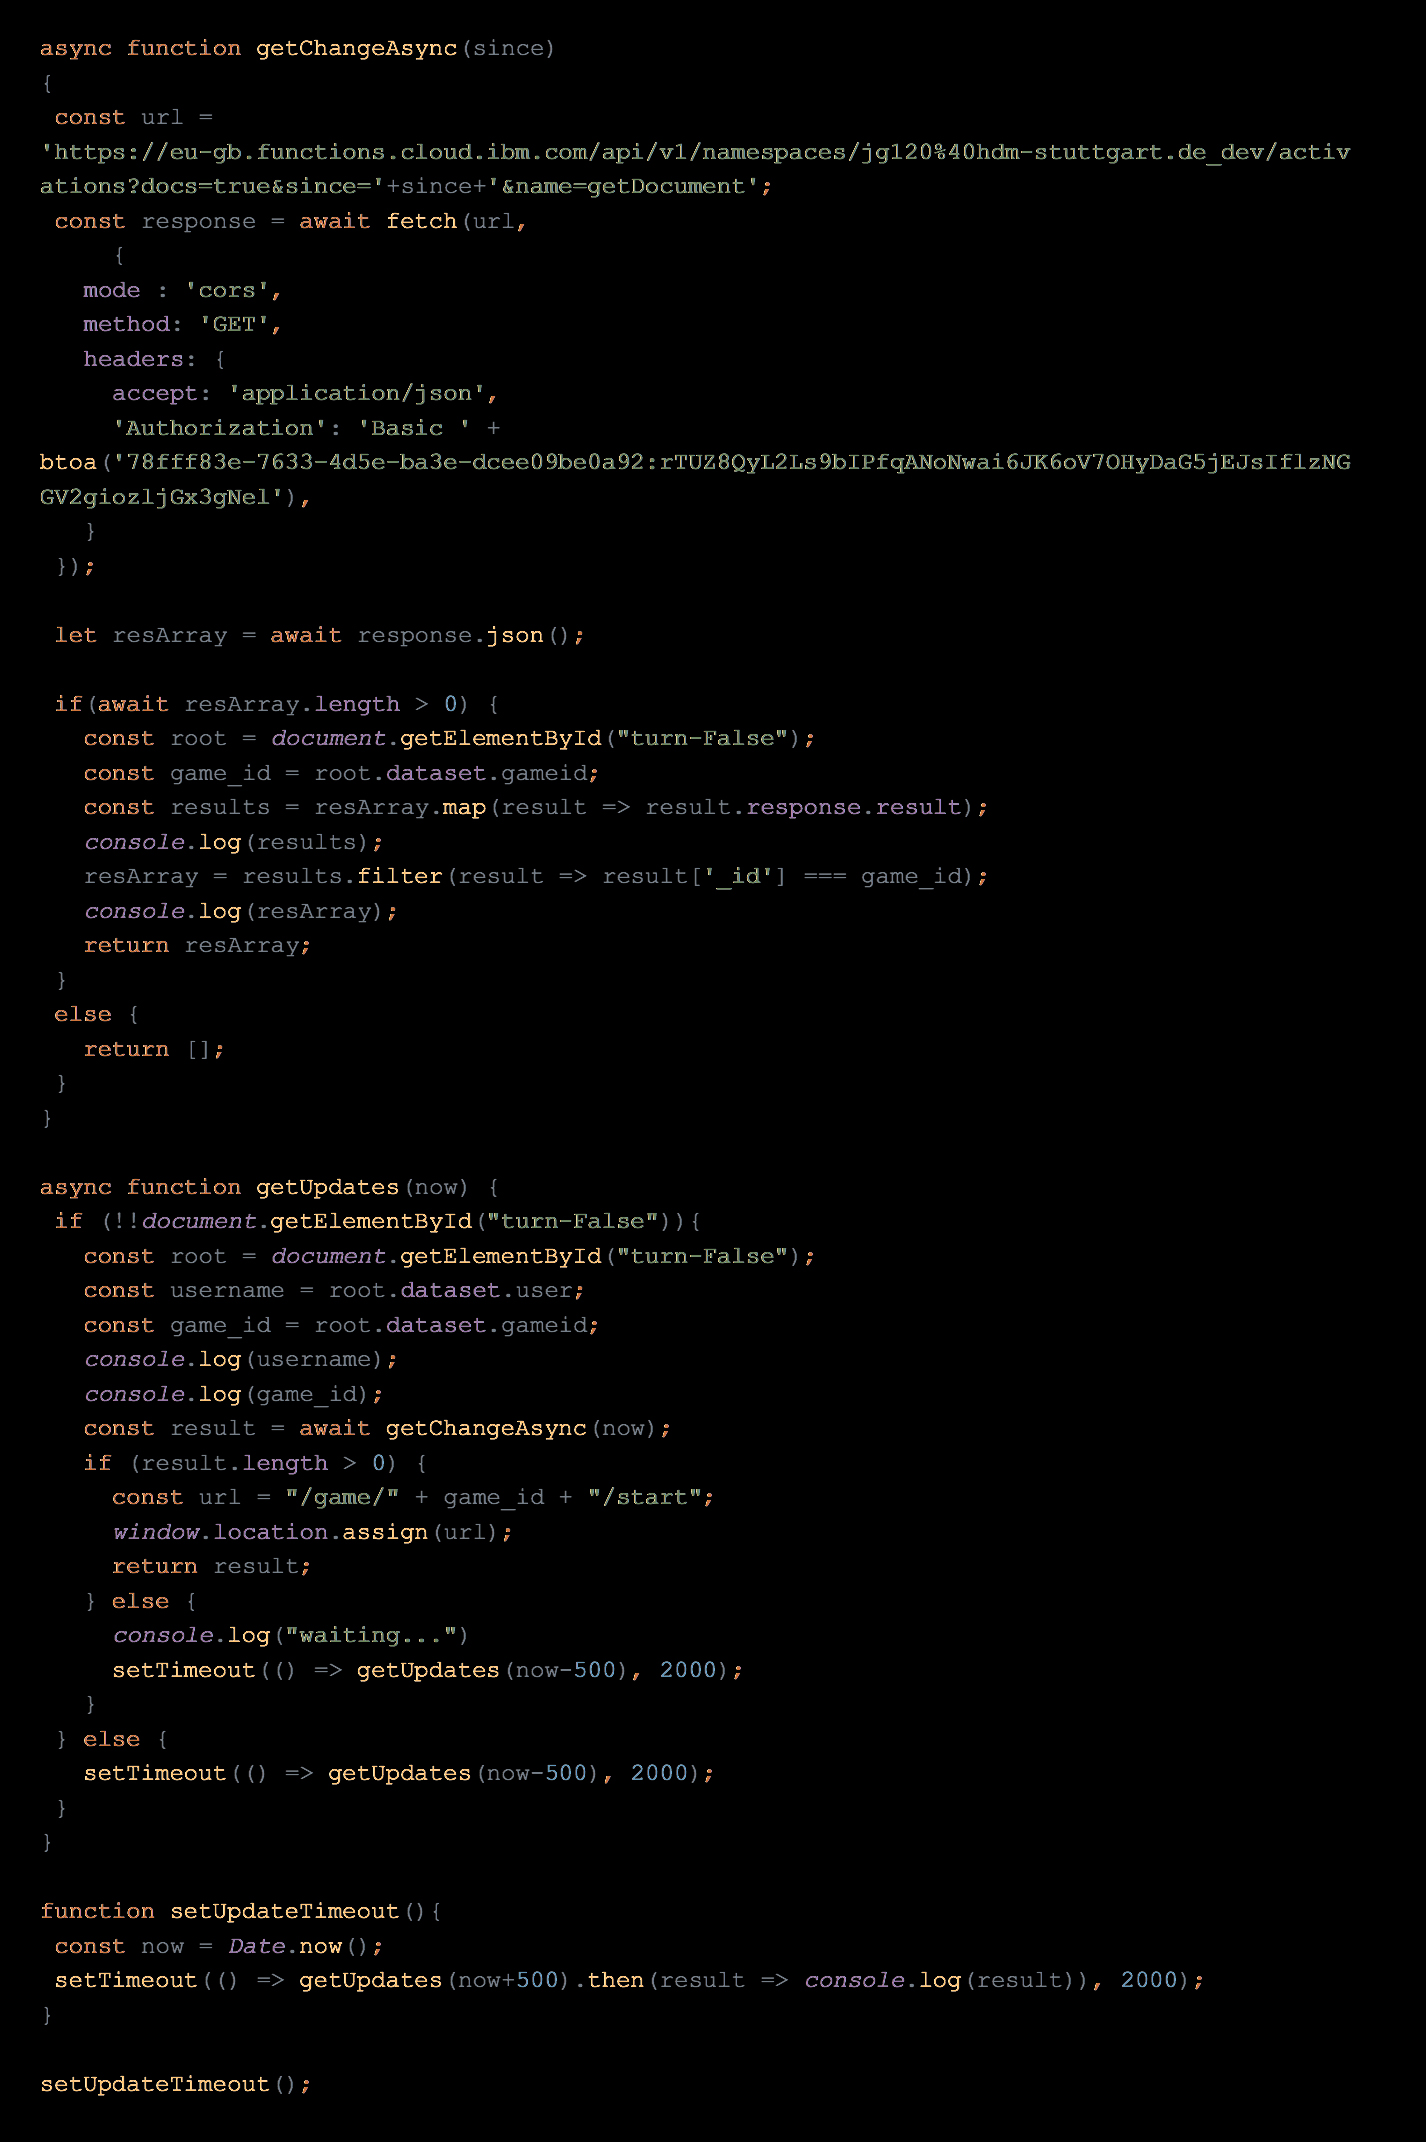
6. Call the API link from getDocument in Javascript: wait with Async await and recursive timeout functions till the trigger gets triggered. If the DB change occures during the current game, the waiting players window gets reloaded.
As we’ve never done anything with async await, cloud functions or APIs we definitely learned a lot getting this done.
Javascript code:
The Architecture
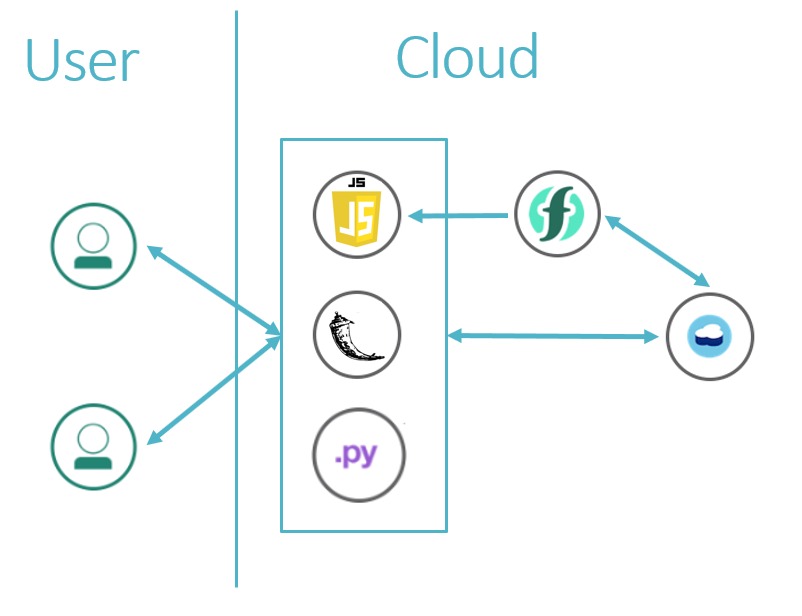
In the end, this is what our final architecture looked like. As seen in the square, our main app is comprised of Python-Flask, which handles all the python code and displaying the front-end view. The python code itself is the game engine and also handles all the back end connectivity. Javascript supports front end interactivity and listens to cloud functions. The cloud functions are bound to the DB and are set to trigger when changes in the DB occur. Javascript then reloads the web page to display the current state of the game. The DB contains the user data and current game sessions and is continuously updated by the main app. And the users sit in front of the web browser and enjoy all the magically appearing fun on their screen, without a clue of how much blood sweat it takes to make that magic happen.
Conclusion
What can one say? Everything always sounds so simple and easy in theory. But when it comes down to it, one often gets stuck on little things. Some choices we made in the beginning were good, some were quite challenging and some lead to dead ends. When we started out, we had only developed software for local use on computers or mobile devices. The closest we’ve gotten to something like cloud computing was maybe getting something to run over a network. It is quite challenging getting everything to run in the cloud. It’s a whole new game. Similar, but different rules. And even with all the services provided by IBM, we still ran into many obstacles. Especially when developing locally and then trying to make it work in the cloud.
Also, getting all the different types of technology to work together is pretty tricky. Only with experience will one get good at it. Because you won’t know if the service can provide the functionality one requires until you try it. And often we needed additional features or functions we didn’t think of beforehand. Aspects we didn’t consider. The software technologies we’ve encountered may be very powerful, but with great power comes great confusion. But that is where progress happens. Not when everything is going smoothly, but when one is faced with difficult challenges. And we’ve had plenty.
I would say that this project, this course, has been one of the most beneficial in our studies at the HdM. We had the opportunity to get our hands dirty, with expert guidance in a safe environment. The experience we’ve gained is priceless. Our understanding of cloud computing and our ability to develop software for such has progressed several levels. And since this was our main goal I would have to say that our project was a complete success.
Leave a Reply
You must be logged in to post a comment.