If you have not read the first part, we recommend that you read it first. It covers the topics sandboxing and isolation using Linux kernel features. In this part we go one step further and show more tools — based on part one — that are used and find their way into a modern operating system.
Containerization
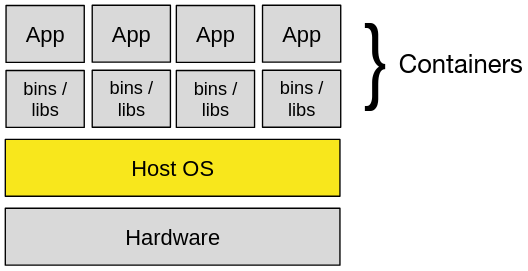
Container technology in application development has long been established. Containers make applications less tied to the runtime environment in which they run. They also only have a small overhead and the performance is close to bare-metal. Another benefit of containers is fast provisioning and deployment, the reproducible image build and especially the reduction of hardware and energy costs. Basically, hardware still matters in any case. Containers do not have their own Kernel, all of them rely on the underlying host system on which those are installed. This is also called operating system virtualization with containers.
Containers are considered resource-efficient, easily scalable and quickly replaceable. Due to the fact that containers run on the underlying host system this means that every single one also shares the same host kernel through the container engine. In general, they have several isolated user spaces. They look like real computers, but they are not. Instead of virtualizing all the physical hardware, containers only virtualize the software stack sitting on the kernel — this increases performance. This also means that only the data and peripherals that have been assigned to a container can be seen by it — which can be considered as a sandbox method. Therefore, not every containerized application should have access to hardware components like the block device, CPU or LAN. In this context, container runtimes are generally based on the kernel features, such as namespaces (UTS, IPC, etc.) to isolate or virtualize system resources, cgroups for resource limitation and other virtual environment methods.[1]
LXC
Source: https://blog.mi.hdm-stuttgart.de/wp-content/uploads/2023/08/containers.png
With this background, the focus is initially on container virtualization through LXC (Linux Container) a low-level container runtime using liblxc.[2] LXC makes use of multiple security kernel features brought up in the first blogpost. As mentioned before, the underlying approach of a shared host kernel also applies here.
LXC sits in the middle of an isolated chroot and a virtual machine. This allows system resources at the host operating system level to be divided in a process-oriented manner.[3] Security was not at all considered in the early development of LXC, so the following problems may occur: LXC supports all the security features of the Linux Kernel but uses bad default configuration options and some features like capabilities are not even turned on by default. When a container throws a fatal system error this also occurs on the host (as it’s the exact same kernel) — which can lead to a kernel panic.[4]
Source: https://blog.mi.hdm-stuttgart.de/wp-content/uploads/2023/08/8C8g.gif
From kernel version 3.12 and LXC version 1.0, it is possible to start an LXC container using a different user ID (UID) than the root user (UID = 0). A few variables have to be set in the configuration file like this:
## Config for all container
# /etc/lxc/default.conf
## Config for existing container
# /var/lib/lxc/your_containername/config

## Container
lxc.uts.name = your_containername
lxc.idmap = u 0 100000 10000
lxc.idmap = g 0 100000 10000
lxc.rootfs = /var/lib/lxc/your_containername/rootfs
lxc.tty = 2
lxc.pts = 1024
lxc.console = /var/log/lxc/your_containername.console

## Capabilities
# Drop all capabilities for a more security focused container
lxc.cap.drop = mac_admin mac_override sys_admin sys_module

## CGroups
# Deny all devices
lxc.cgroup.devices.deny = a
# ... and allow only specific devices
lxc.cgroup.devices.allow = c 1:3 rwm # /dev/null
lxc.cgroup.devices.allow = c 1:5 rwm # /dev/zero
lxc.cgroup.devices.allow = c 1:8 rwm # /dev/random
lxc.cgroup.devices.allow = c 1:9 rwm # /dev/urandom
lxc.cgroup.devices.allow = c 5:0 rwm # /dev/tty
lxc.cgroup.devices.allow = c 5:1 rwm # /dev/console
...

## Limits
lxc.cgroup.cpuset.cpus = 0,1
lxc.cgroup.cpu.shares = 2048
lxc.cgroup.cpuset.cpus = 2
lxc.cgroup.memory.limit_in_bytes = 1024M
...

## Filesystem
lxc.mount.entry = proc proc proc nodev,noexec,nosuid 0 0
lxc.mount.entry = sysfs sys sysfs defaults,ro 0 0
...

## Network
# lxc.network.type = empty
lxc.net.0.type = veth
lxc.net.0.flags = up
lxc.net.0.link = br0
lxc.net.0.hwaddr = FF:00:00:FF:00:00
lxc.net.0.ipv4 = 10.2.3.4
…
Docker
In addition to LXC, Docker containerization is used for a closer look. LXC focuses on containers for complete operating systems, Docker has its focus on modular containers for individual and rather lightweight applications.
![]()
Source: https://www.docker.com/company/newsroom/media-resources
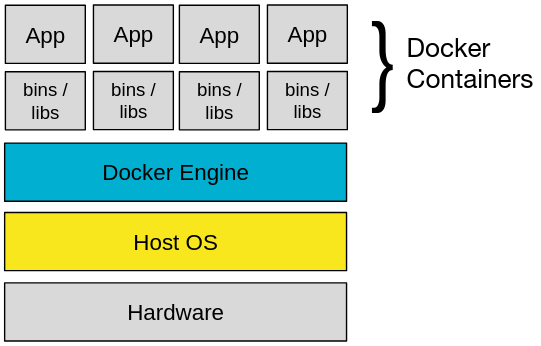
In the early stages of Docker, it was based on LXC. Nowadays it uses the runC and containerd runtime. Furthermore, in contrast to LXC, Docker has a container engine sitting in between the host operating system and its containers. The Docker Engine provides a simple tooling and feature approach with distribution, orchestration, networking and much more for building and containerizing applications.[5]
Thus, Docker still shares the same weaknesses as LXC. It uses a root-owned daemon by default. Binaries in Docker containers by default run in a root-privileged mode and the containers are executed with all capabilities. Therefore, only authorized users should have access to it and for additional security, the capabilities should also be restricted to a bare-minimum. A Dockerfile contains commands to build a Docker image. In the Dockerfile first a new group and a new user with an ID equal or greater than 1000 are created.
FROM alpine:latest
WORKDIR /app
RUN addgroup -g 1000 -S app && adduser -u 1000 -S app -G app
COPY --from=builder /app/bin/server .
USER app
CMD [ "/app/server" ]
In addition to the Dockerfile, the docker-compose.yml exists. This contains services to manage the Docker image. In order to restrict the container capabilities, all capabilities are first dropped and only those that are actually required are granted (allow list-approach).
version: "3"
services:
  demoapp:
    build:
      context: ${DEMOAPP:-.}
      dockerfile: Dockerfile
    restart: unless-stopped
    ports:
      - "80:80/tcp"

cap_drop:
  - ALL

cap_add:
  - NET_BIND_SERVICE
  - CHOWN
  - SETUID
  - SETGID
Virtualization
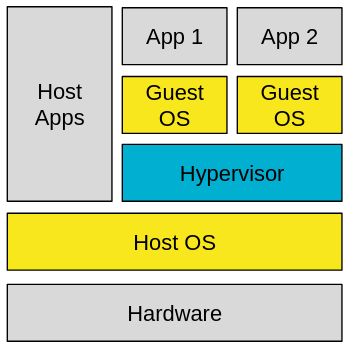
Containers make applications more independent of the environment in which they are run. While all containers share the kernel of their host, VMs contain their own kernel. This means with a kernel panic, the underlying host kernel does not crash. The concept of virtualization has existed for a very long time — longer than containers — and those techniques were used primarily in mainframes before they found their way to the personal computer.
Unlike containers, in VMs, hardware must be virtualized. This of course has a negative impact on performance. The main advantages of virtualization, which differ from containers, last that they are fully isolated which makes them more secure. For workloads that require a non-Linux operating system or a specialized Linux kernel, virtualization remains the only option. Virtualization thus offers the possibility of testing different operating systems using different kernels with little effort.[1]
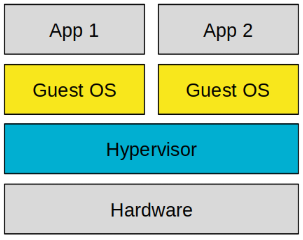
Hypervisor
The hypervisor — also known as the Virtual Machine Monitor (VMM) — creates and manages virtual machines within a system. Typically, a hypervisor provides all interfaces within the virtual machines. It’s a software layer between the native hardware or the host operating system and the virtual machine that interacts with this resource. At the same time, it provides an abstraction layer that prevents drivers from directly accessing the hardware. This ensures that different operating systems do not interfere with each other. A distinction is made between two different types of hypervisors: type 1 and type 2. In the previous sections we looked at architectures with an underlying host operating system. So let’s start with the type 2 hypervisor.[1]
Type 2
A type 2 hypervisor is based on a native operating system and uses all resources that are available to it. The host OS provides the virtual environment for the hypervisor that also includes the virtualized driver for network, storage and other controllers. This is for example provided through libvirt, a virtualization API. Two of the main players in the VM-business are VirtualBox and VMware.[1]
Type 1
A type 1 hypervisor acts directly on the native hardware. Without the overhead of an operating system on top of it, the overall system hence consumes fewer resources than a type 2 hypervisor. The main difference to type 2 is that a type 1 hypervisor needs its own drivers for the hardware. Main players using type 1 are Hyper-V, KVM and Xen.[1]
We have now illuminated mechanisms for more security through isolation using various kernel features on containers and virtual machines. Now it’s time to get to know the first of two operating systems that consists almost entirely of virtual machines.
Qubes OS
![]()
Source: https://www.qubes-os.org/
Qubes OS appeared with its first release on the wider distribution market back in 2012.[6] The idea behind Qubes OS differs from classic operating systems: It’s a free and open source security-oriented desktop operating system that promises to provide security through isolation. In Qubes OS, isolation is achieved through virtualization and various system-specific security concepts. The isolation starts with individual processes so that the underlying system is not directly affected by a security vulnerability. Qubes OS aims to prevents vulnerabilities from causing malicious software to take control of the whole machine.[7]
Instead of using a monolithic kernel as a basis, Qubes OS is based on the Xen hypervisor (type 1). On top of the hypervisor sits the AdminVM aka. the dom0 interface. In Xen is dom0 a privileged domain which controls the domU domains. These domains are virtual machines and called qubes in Qubes OS. Those qubes could consist of Fedora, Whonix, Debian or Windows. These VMs are completely separated from each other which Qubes OS calls “separation through isolation”.[7]

Source: https://www.qubes-os.org/news/2017/10/03/core3/
So all qubes are separated from each other. The AdminVM controls an X server with a window manager (xfce) based on the GUI VM. Here the individual qubes can be started. They bind all the qubes, with different levels of trust divided into colors.[8] If a new qube needs to be created, e.g. for online banking, the Qubes VM Manager can be used for an overview and to create, edit or delete it.
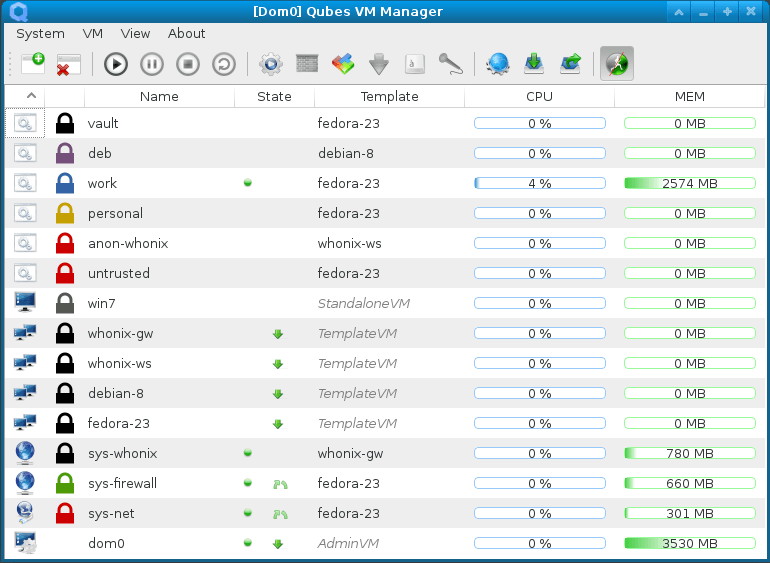
Source: https://blog.mi.hdm-stuttgart.de/wp-content/uploads/2023/08/qubes_manag_large.png
The following screenshot shows how to start a specific application of a certain qube by a few mouse clicks from the taskbar.
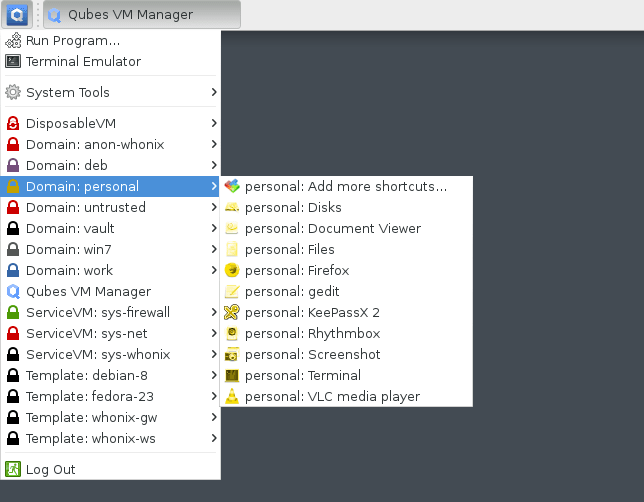
Source: https://blog.mi.hdm-stuttgart.de/wp-content/uploads/2023/08/qubes_menu-1.png
While working, a file should be opened via e-mail or via the file manager. However, this file is not trustworthy, but it can still be opened in a DisposableVM without any major concern. A DisposableVM is a qube in which questionable data can be viewed in more detail. If the file contains a virus and the qube is compromised, it is not so destructive for the whole system or the qube where we are working. Closing the disposable qube will completely delete this temporary created VM.
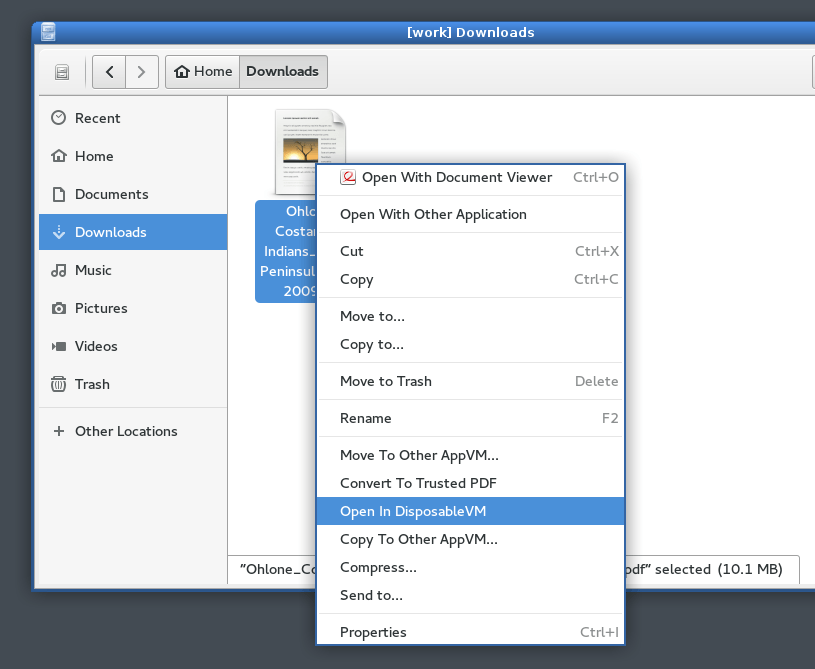
Source: https://blog.mi.hdm-stuttgart.de/wp-content/uploads/2023/08/qubes_pdf1.png
On the whole, Qubes OS makes use of the Xen hypervisor and its own tools, which makes it easier to handle various isolated VMs. The encapsulation and separation of the individual qubes make you feel a little more secure.
“Of course, consolidating servers like this is like putting all of your eggs in one basket. […] The reason virtualization works however, is that most service outages are not due to faulty hardware, but due to bloated, unreliable, buggy software, especially operating systems.” [1]
Fuchsia

Source: https://github.com/fuchsia-mirror
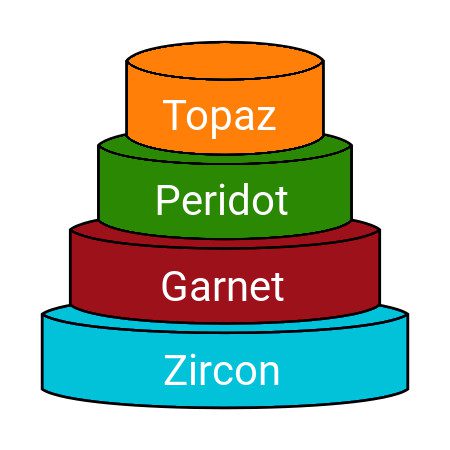
While Qubes OS is based on Xen hypervisor with isolation through virtualization, Fuchsia relies with the Zircon microkernel on a capability-oriented distribution. The Zircon kernel is primarily designed to run on “32-bit or 64-bit ARM cores to 64-bit X86 processors”. [9]
Source: https://www.googlewatchblog.de/2018/03/zircon-topaz-fuchsia-google/
The lowest layer starts with the Zircon kernel, which is the interface between hard- and software. Fundamentally, this is detached from the entire Fuchsia OS. The next layer is Garnet, which manages the drivers and communications between the above layer and Zircon. Peridot is the first application layer, where application management, provision and the synchronization of the data happens. At the top of that sits Topaz, which is the GUI layer. [10]
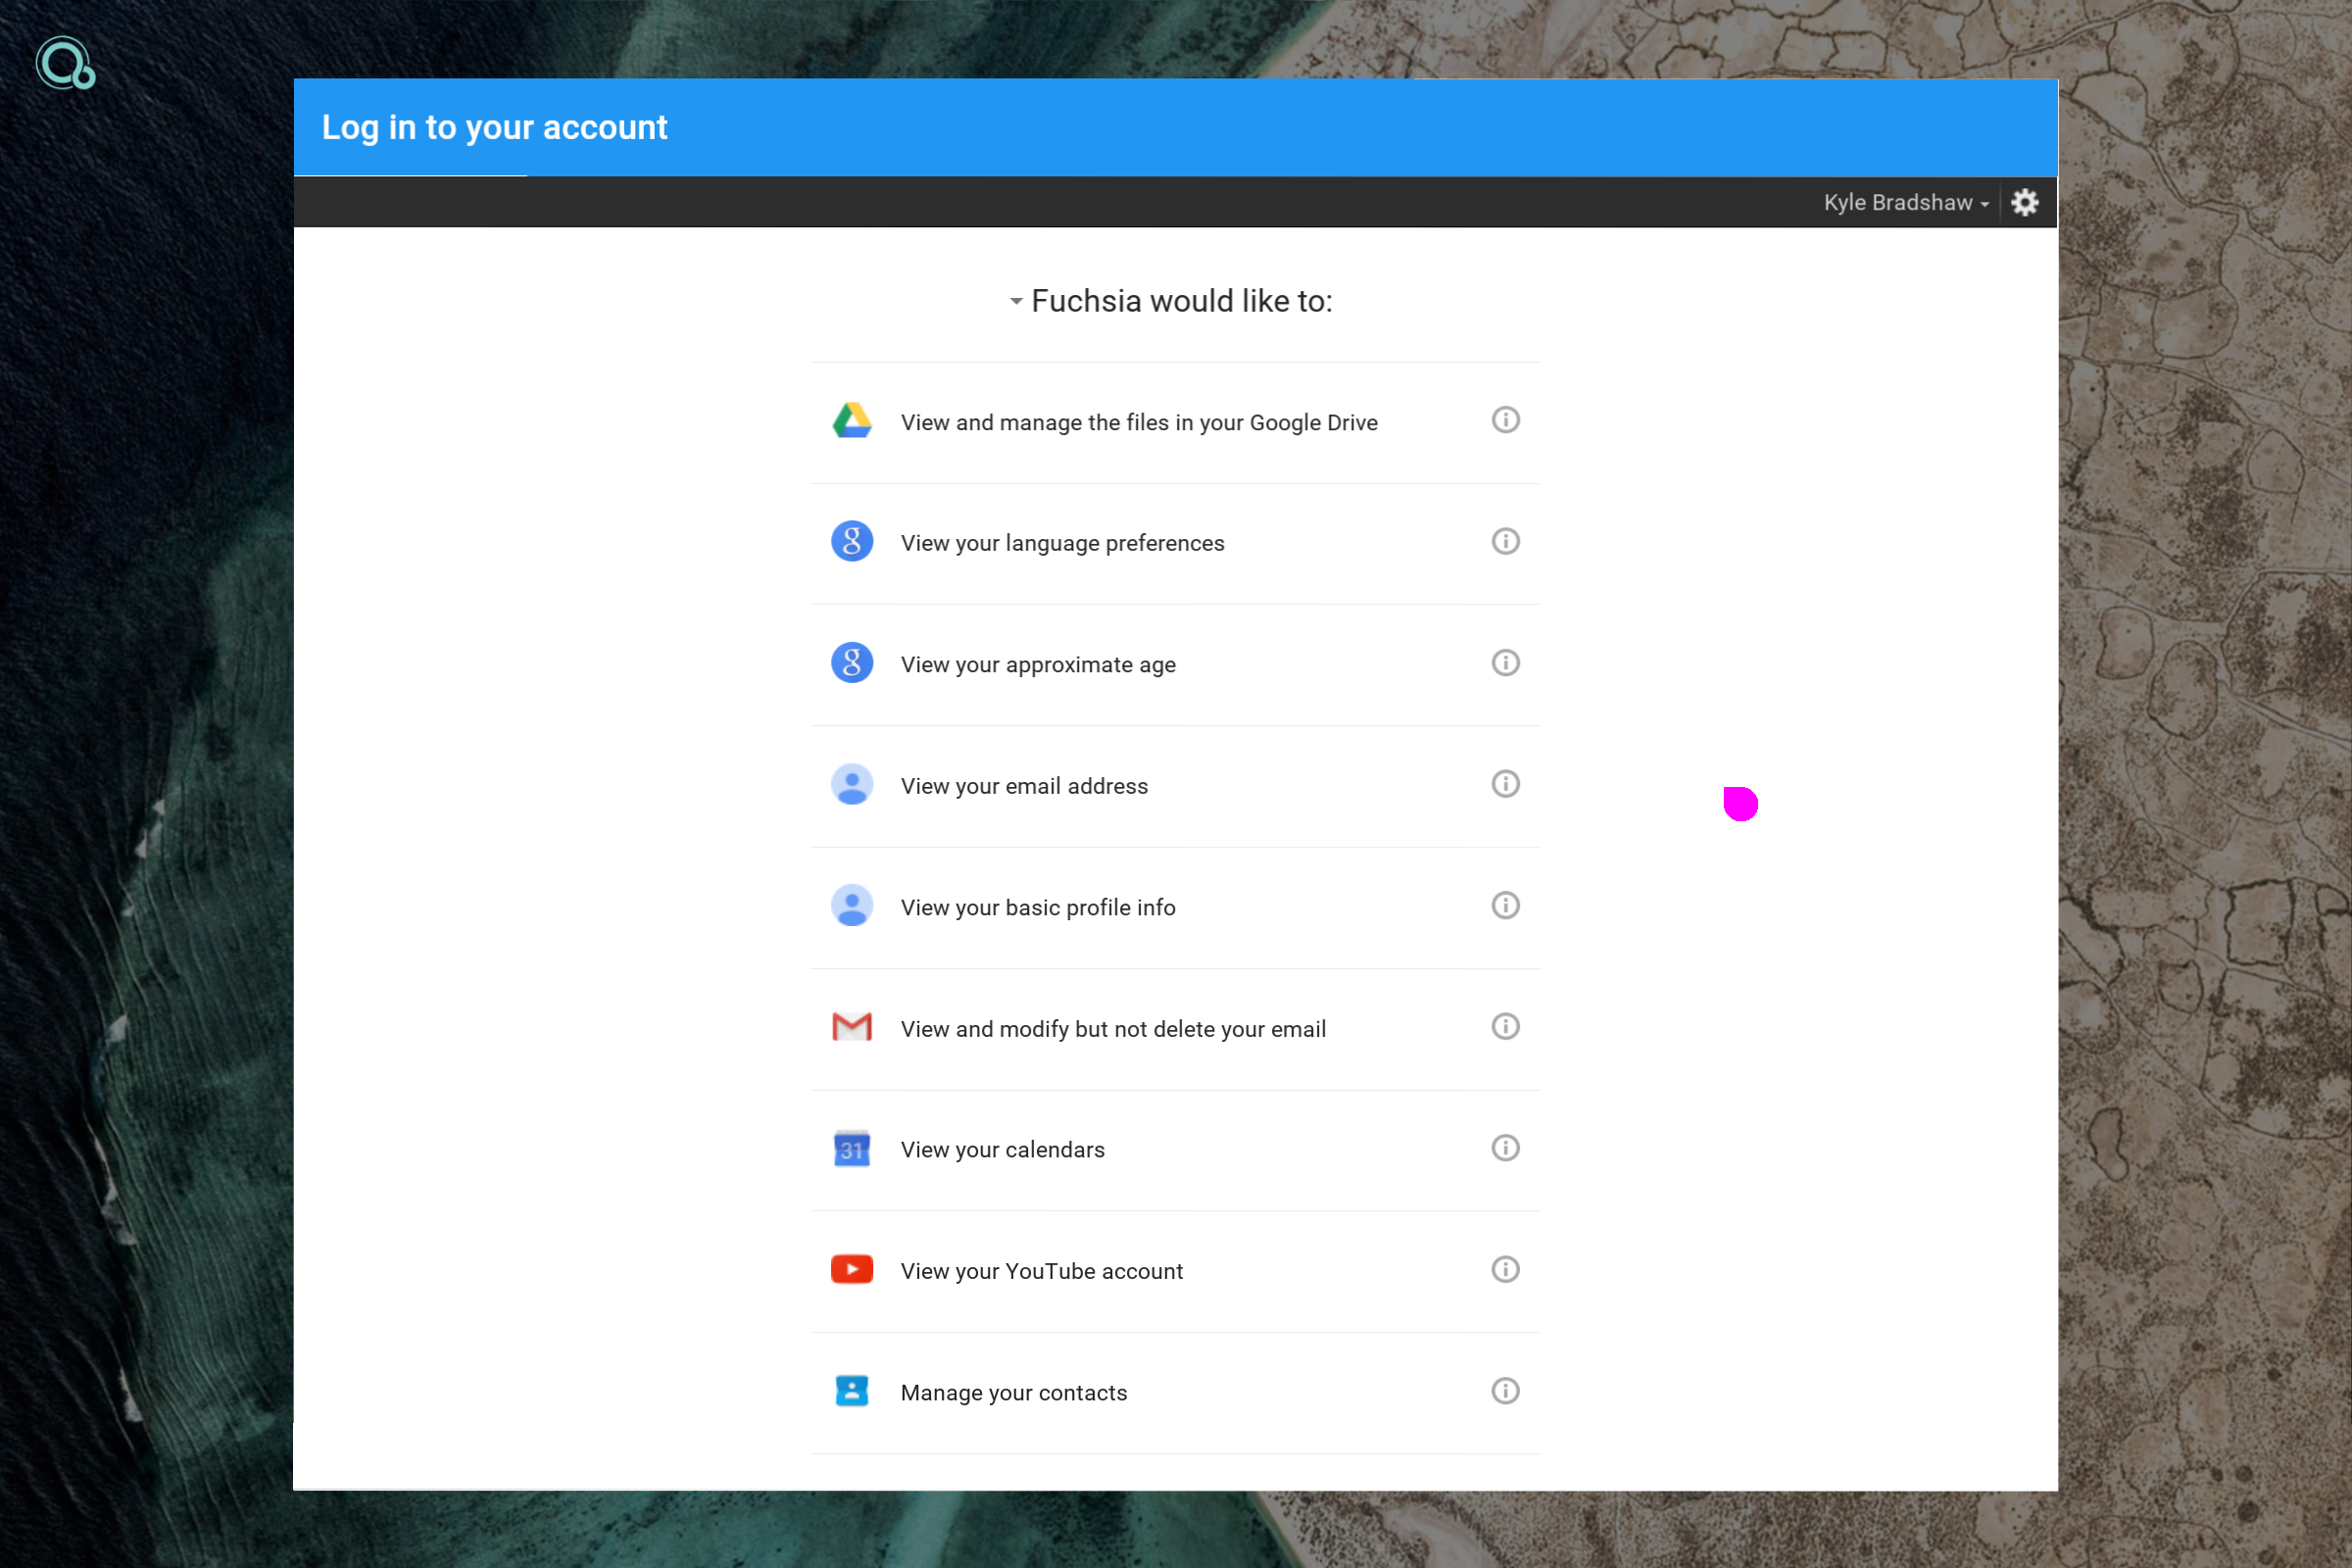
Source: https://blog.mi.hdm-stuttgart.de/wp-content/uploads/2023/08/fuchsia-google-account-permissions.png
With the focus on security and isolation they note that on “Fuchsia, a newly created process has nothing. A newly created process cannot access any kernel objects, cannot allocate memory, and cannot even execute code. Of course, such a process isn’t very useful, which is why we typically create processes with some initial resources and capabilities.” [11] Most of the capabilities must be exposed or offered in a component manifest.[12] The main capabilities components are:
- Event capabilities
- Directory capabilities
- Protocol capabilities
- Service capabilities
- Storage capabilities [13]
To offer a service to a child component, an entry in the component manifest could look like:
{
  "offer": [{
    "service": "/svc/fuchsia.example.ExampleService",
    "from": "self",
    "to": [{
      { "dest": "#child-a" },
      { "dest": "#child-b" },
    }],
  }],
}
Source: https://fuchsia.dev/fuchsia-src/concepts/components/v2/capabilities/service
Conclusion
Through security vulnerabilities in hardware and software, malware can get onto the operating system. We have learned about various kernel features to make an operating system more secure. These include security mechanisms such as the isolation of software components for the secure execution of computer applications in an encapsulated system environment. This sandbox model is originally used to run untrusted code, unreliable software, or to open questionable documents. The basic idea is that no program (process) can access data outside its sandbox. One approach is to create an operating system based on security through isolation with virtual machines (which is far from lightweight). Another approach is a capability-based operating system using a microkernel called Zircon, which is still under heavy development. Beyond that, Theo de Raad states that “You are absolutely deluded, if not stupid, if you think that a worldwide collection of software engineers who can’t write operating systems or applications without security holes, can then turn around and suddenly write virtualization layers without security holes.” [14] At least these techniques make us feel more secure.
Sources
All links were last accessed on 2020-09-08.
- Andrew S. Tanenbaum. 2009. Modern Operating Systems (3rd. ed.). Pearson Education
- https://github.com/lxc/lxc
- https://linuxcontainers.org/lxc/introduction
- https://linuxcontainers.org/lxc/security
- https://docs.docker.com/get-started/overview/
- https://www.qubes-os.org/doc/supported-versions/
- https://www.qubes-os.org/faq/
- https://www.qubes-os.org/doc/
- https://lwn.net/Articles/792465
- http://www.googlewatchblog.de/2018/03/zircon-topaz-fuchsia-google/
- https://fuchsia.googlesource.com/fuchsia/+/refs/heads/master/docs/concepts/framework/sandboxing.md
- https://fuchsia.dev/fuchsia-src/concepts/components/v2/component_manifests.md#expose
- https://fuchsia.dev/fuchsia-src/concepts/components/capabilities
- https://marc.info/?l=openbsd-misc&m=119318909016582
Leave a Reply
You must be logged in to post a comment.