
by Benedikt Gack (bg037), Janina Mattes (jm105), Yannick Möller (ym018)
This blog post is about getting started with your first large-scale software project using DevOps. We will discuss how to design your application, what DevOps is, why you need it, and a good approach for a collaborative workflow using git.
This post consists of two parts. Part one is this article which is all about finding out which topics you should consider thinking about when starting with DevOps for your own project as well as a basic introduction to these topics and recommendations for further reading. The second part is our “getting started” repository which contains a small microservice example project with additional readme-files in order to explain some of the topics above in practice and for you to try our workflow on your own.
This post is a summary of knowledge and experience we collected while accompanying and supporting a larger scale Online Platform project called “Schule 4.0” over the period of 6 months in DevOps related topics.
Link to our example repository: https://gitlab.com/curiosus42/cc-getting-started-example
What is Software Architecture?
The Software Development Life Cycle
Before we can talk about Software Architecture, we have to talk about the life cycle of a typical software project, because a successful software project involves a lot of planning, consists of many steps and architecture is just one of them. Furthermore, actual coding is a late step in the process and can be quite time consuming when not planned properly. Without further ado, let’s have a look at a typical Software Development Life Cycle:
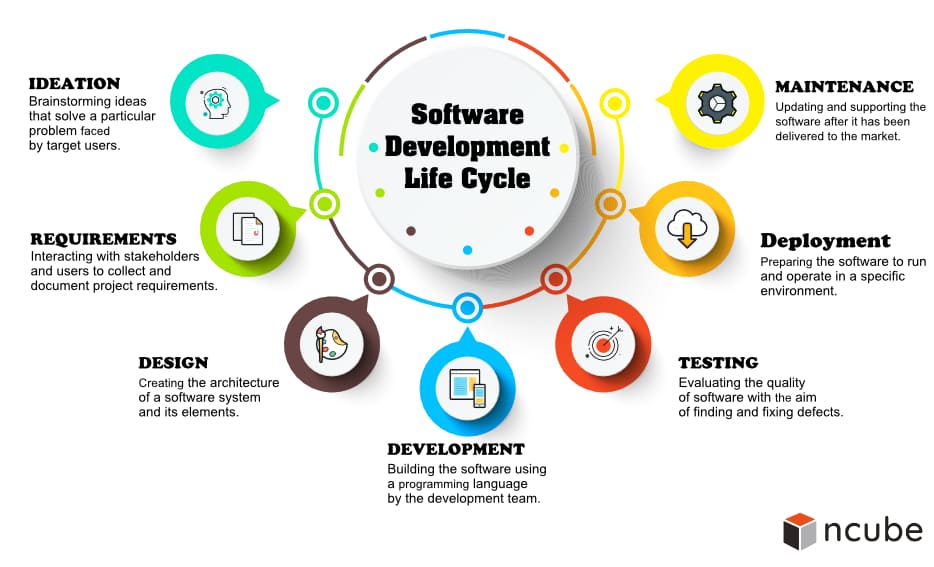
The first two steps, “Ideation” and “Requirements”, basically mean thinking about your project from a business and user perspective. Technical details are not important and might even be inappropriate, as you should involve all members of your small team in the process and not all of them have the technical knowledge. Also, don’t forget to write everything down!
In the Ideation phase, after you brainstormed ideas, we recommend creating a Use Case Diagram which shows how the users can interact with your software. You can learn more about that here.
Furthermore, we also recommend creating a requirements catalog for the requirements phase. You can download our template with this link. When you’re done thinking about your project and want to start with the technical stuff, but can’t describe your platform requirements in detail, why don’t you go with a more agile project life cycle? Just make sure you thought about your goal and how to achieve it beforehand.
Planning done? Then let’s start with designing your application, especially Software Architecture.
Difference between design patterns and architectural patterns
If you are familiar with the term Design Patterns like the Singleton and Iterator pattern in software development, don’t confuse them with the term architectural patterns. While design patterns are dealing with how to build the important parts of your software, the defining components, architectural patterns are all about how these parts are organized and playing together.
“[software] Architecture is about the important stuff. Whatever that is.”
Ralph Johnson (Fowler, 2003)
So, what you’re going to think about in the design process heavily depends on what you define as important components and which architectural style you choose. Just remember that developing is mostly filling in the blanks and applying some design patterns for whatever you came up with in the design phase or, to put it short, implementing your software architecture.
Which architectural pattern to choose?
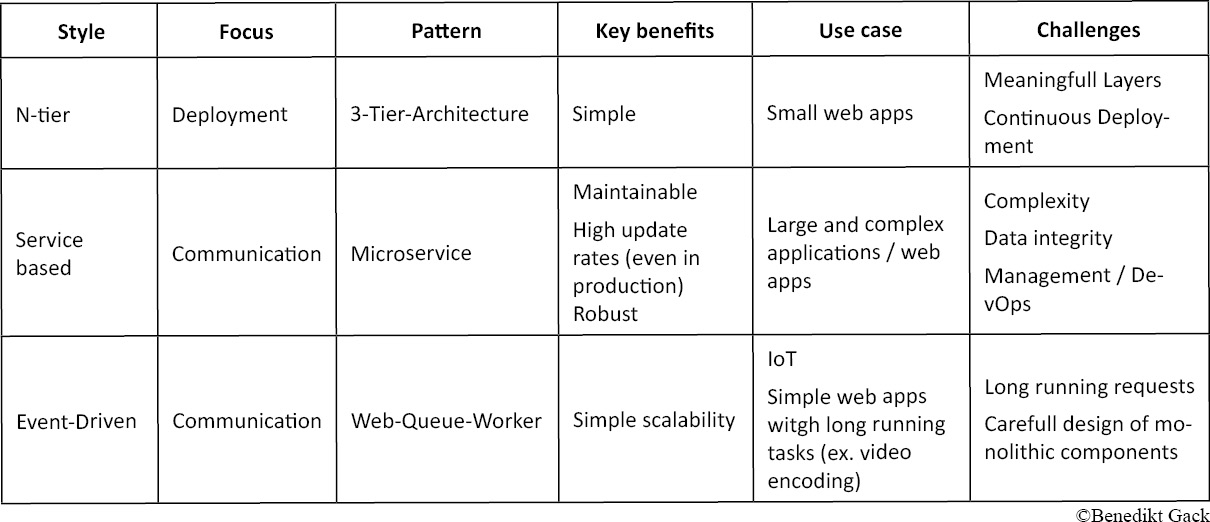
3 architectural styles – There is always a trade-off
There are many architectural patterns to begin with. In order to understand what these patterns are all about, here is an introduction to the three major architectural styles. These styles describe the overall idea behind different groups of patterns. Note that it is possible to mix these styles together for your own use case.
N-tier:
N-tier applications are typically divided in X different logical layers and N physical tiers. Each layer has a unique responsibility and can only communicate with its layer below, but not the other way around.
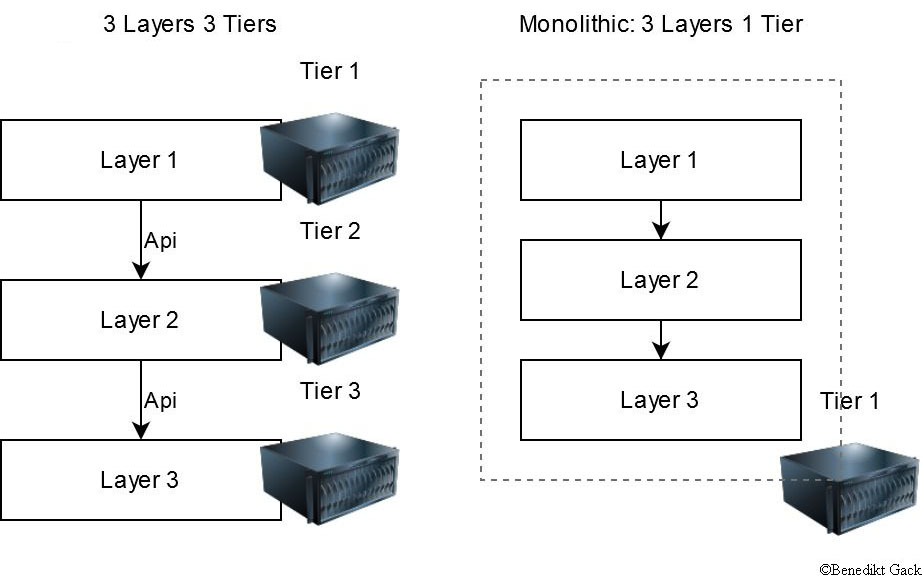
A typical architecture for web applications is the Three-tier-architecture which is described in detail below, but you could also go with a monolithic approach and separate your one tier application into different logical layers, like most game engines and the Windows NT platform architecture do (user and kernel mode).
This style is the developer friendliest and easy to understand if you feel comfortable with monolithic software development. The challenge is to end up with meaningful logical and physical layers and to deploy small changes or features while the platform is already running, which could lead to rebuilding and deploying a large part of the application. If the application is split up into multiple layers, deployment is made easier, but there is a high risk that some layers are unnecessary and are just passing requests to the next layer, decreasing overall performance and increasing complexity.
Service based
In this architectural style, the application is split into multiple services, which communicate through a network protocol over a network. Each service is a black box with a well-defined interface, serves only one purpose, most likely a business activity, and can be easily designed for its purpose, for example by using different technologies like programming languages. These services are working by either chaining – service 1 calls service 2 which calls service 3 – or by one service acting as a coordinator. A typical modern implementation is the Microservice architecture, which will be covered in detail later.
Key benefits are:
- maintainability: changes will only affect one specific service, not the whole application
- scalability: each service can be load balanced independently
- reusability: services are available system wide and in “Schule 4.0”, we often ended up reusing an already existing service as a template
The service based style is by far the most difficult architectural style. A big challenge is specifying your services to keep them as decoupled as possible from others, which is strongly dependent on the design of the service APIs. In addition it is much more complicated dealing with not only one but many applications.
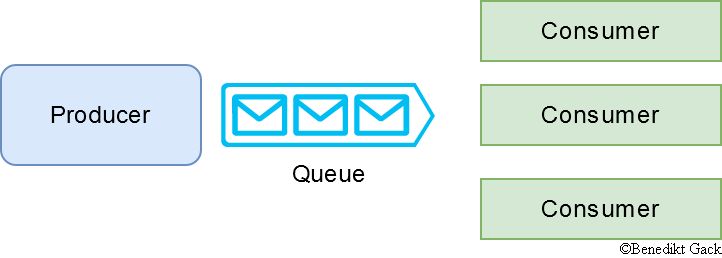
Event-Driven
This style consists of two decoupled participants, producer and consumer. The producer creates an event and puts it in a queue, typically on behalf of an incoming request from a client, and one of the available consumers consumes the event and processes it. Pure event driven architectures are mostly used for IoT scenarios, but there are variations for the web context like the Web-Queue-Worker pattern.
Their clear benefit is high and simple scalability and short response times. A challenge is how to deal with long running tasks which demand a response, and when to favor direct shortcuts instead of a queue approach.
Architectural patterns in detail
The Three Tier Architecture
This before mentioned architectural pattern is of the N-tier architecture style and consists of three tiers and three layers. This architecture is very common and straightforward when developing simple web applications. The example below is for a dynamic web application.
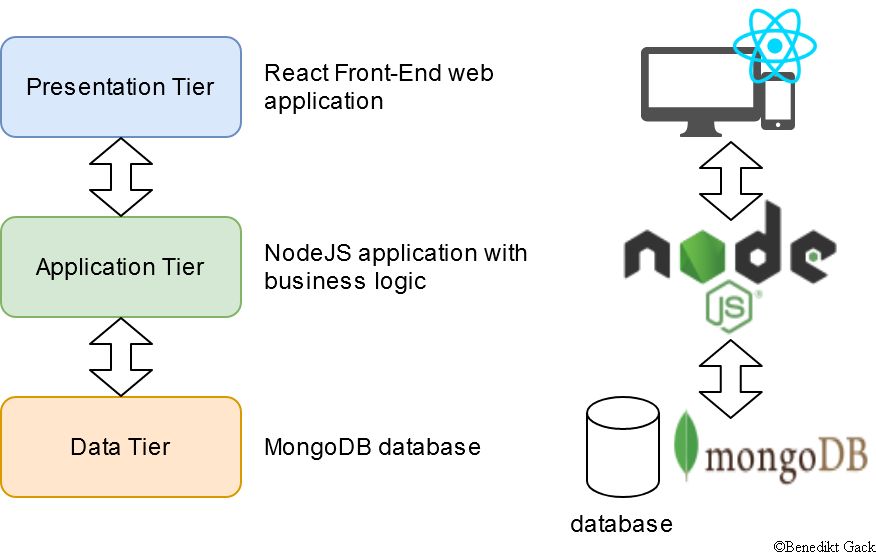
The topmost layer is the presentation layer, which contains the user interface displaying important information and communicates with the application layer. Whether or not you need a web application or just static web pages, the layer solely runs on the client tier (desktop pc or mobile device) or requires a web server to serve and render the static content for the client. The application tier contains your functional business logic, for example the REST API for receiving and adding user specific dynamic content like shopping cart items, and the last layer, the data tier, stores all data which needs to be persistent.
In the example graph above, the react web application is served by a small web server and runs on the client devices. Next, the NodeJS application exposes a REST API to the client and talks to the mongo document database. The node app and the database are typically deployed into different tiers, most commonly a virtual machine and a dedicated database server or service.
Microservices
A microservice architecture is by far the hardest choice. This style is most often used by massive tech enterprises with many developer teams in order to run their large-scale online platform and allowing for rapid innovation. There are many big platforms like Amazon.com, Netflix and eBay that evolved from a monolithic architecture to a microservice architecture for many good reasons, but most likely none of them really apply to your project for now. To be honest, none of the reasons applied to our project “Schule 4.0” either, which only consisted of five developers, but in the never-ending river of new technologies we were able to find technologies that made things much easier, convinced us to at least give it a try and made things turn out great in the end. Those technologies will be discussed later.
The core idea is to have multiple loosely coupled services which expose an API. The biggest difference to normal service oriented architectures is that in a microservice architecture, each microservice is responsible for its own data and there is nothing like a centralized data tier. That means that only the specific service has access to its data and other services cannot access it directly other than via the service API.
Key benefits:
- Highly maintainable, rapid innovation and development
- Developers can work independently on a service
- Services can be deployed independently
- Services are typical small applications and therefore easy to understand
- Testability: small services are easy to test
- Availability: Errors in one service won’t affect other services
- Dynamic technology stack
- You can pick whatever technology you want whenever you want
Drawbacks:
- Services are products and not projects: Each developer is responsible for their code over the whole life cycle
- Highly distributed system
- Requires to deal with continuous integration and deployment (which will be covered below)
- Nightmare without containerization or virtualization
Domain Driven Design
Many challenges can be avoided by carefully designing your microservice application. A helpful method for designing your application is the Domain Driven Design approach and its notion of bounded contexts. The idea is that the most important thing is your core business, what your application is about. Our goal is to model the core business as different contexts and designing the architecture after that. In order to do that, here are some tips:
After finishing with your requirements analysis you can start defining the domain of your application. Imagine your project as a company. What is your company about? What are its products? We will call that your domain and the products your contexts.
Let us continue with a simplified example of the “Schule 4.0” model. The platform domain is all about teachers sharing content with their students in the form of pins, boards and exercises. With this knowledge we can already distinguish three contexts:
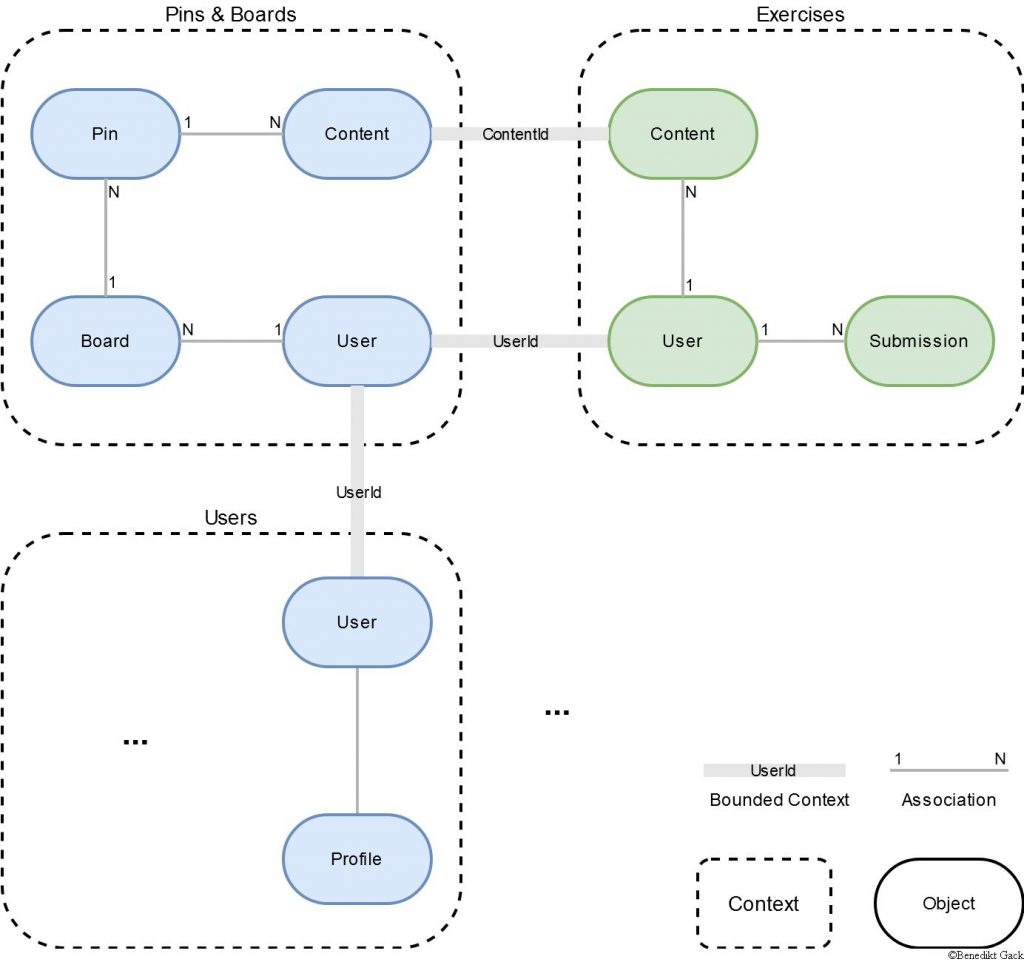
These contexts consist of different objects which have relationships. For example, a Board can contain multiple Pins and a User can own multiple Boards. Every context can be implemented as its own microservice. The crucial point later is how the services are connected to each other. Remember, all the data is physically separated into different services but needs to be logically connected in order to query data. That is where the bounded contexts appear.
Note in the graph above, that the User object can be found in multiple contexts. The object itself is most likely modelled differently in each context, but the overall idea of a user stays the same. The different User objects are explicitly linked together over the UserId attribute. Because the concept of a User is shared across multiple Contexts, we can query all data related to the current user.
Communication in a Microservice architecture – GraphQL Federation
After we have modelled the domain of our application, everything is connected logically, but we still cannot request and change data, because we did not define the service APIs yet. We considered two options:
- Specifying a RESTful API for each service using HTTP
- Specifying a Graph API for each service using GraphQL
Do a mixture of both
Note: We do not recommend doing a mixture of both. Historically speaking, there are many solutions migrating from REST to Graph, but starting from scratch there is no need for that.
Regardless of which API flavor you choose, the data is still spread over multiple services. For example, if you want to display the dashboard for the current user, pin and board data, exercises and user data need to be collected from different services. That means the code displaying the dashboard needs to interact with each service. It is not a good idea to leave that task to the client application, due to various performance and security reasons. In general, you should avoid making the internals of your backend publicly available.
That is why all microservice architectures are equipped with an API Gateway, which is the only entry point to your backend. Depending on the use case, it aggregates data from different services or routes the request to the appropriate service.
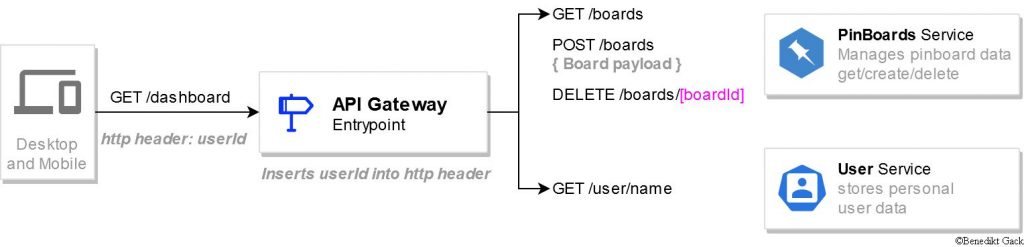
The services expose simple http endpoints to the gateway for manipulating and retrieving data. The gateway itself only exposes an endpoint for retrieving the dashboard for the current user. The UserId will be included in the requests by the client. In order to create and to get specific boards, the gateway needs to be expanded with further endpoints, which might be routed directly to the underlying service.
In conclusion, there is nothing wrong with this approach, especially considering that there are great tools like Swagger which help building large REST APIs, but you still have to design, manage and implement the service APIs and the Gateway API separately.
The second option is different. The idea is to design a data graph which can be queried and manipulated with a language called GraphQL. Imagine it like SQL, but instead of talking to a database you send the statement to your backend.

The following pseudo example query me (name) boards (id, title) returns the name of the current user and its boards as a JSON object.
With GraphQL, the client can precisely ask only for the data it needs, which can reduce network traffic a lot. The best part is that you already possess a data graph if you have created a domain model beforehand. You just have to merge the different contexts and attributes of the same objects to one coherent graph.
It gets even better: By using Apollo GraphQL Federation, most of the implementation for your Graph API is done automatically. For this to work, you only have to define the data graph for each service, which are just the contexts from your domain model, and setup the GraphQL API Gateway. The implementation is straightforward:
- Write down your service graph in the GraphQL Schema Definition Language (SDL)
- Implement the Resolvers, which are functions for populating a single attribute/field in your graph
- Note: instead of requesting every field from the database separately, you can request the whole document and Apollo GraphQL generates the resolvers automatically
- Implement the Mutation Resolvers, which are functions for updating and creating data
- Tell the GraphQL API Gateway where to find its services
The Gateway then automatically merges the service schemas to one coherent schema and automatically collects the requested data from the implementing services. It is even possible to reference objects in other services and the Gateway will combine the data from different services to a single object.
GraphQL Federation – Limitation
As good as Apollo GraphQL Federation sounds on paper, it is not an all-round solution. In reality, you will always have to climb many obstacles no matter which decisions you make.
One technical limitation you might come across is when you try to delete a user. To do so, you have to decide which service defines and implements the deleteUser mutation. It is not possible (yet?) to define the same mutation in multiple services.

Because deleting a user also involves deleting its referenced pins and boards, the PinBoards service needs to be notified through an additional API, which is only accessible internally and not exposed to the client API.
Furthermore this additional API makes testing your service more complicated. Testing will be covered in detail in our example repository.
Architecture summary
Git Workflow
In a successful project, the simple cooperation is one, if not the central point for success. What is more annoying than merge-conflicts or accidentally pushed changes that cause the program to crash… But we can make arrangements to not have problems like this during our project – let’s start:
Tools
First we go to our collaboration-platform, reachable under https://gitlab.mi.hdm-stuttgart.de/, or the official gitlab page and register a new project. Give it a name and register the members of the project.
For the local development you all need a tool to make your git commits, push them, pull the others and so on….
For Windows systems and commandline-lovers we recommend the git bash from https://gitforwindows.org/. If you better like to click and see what you do you can use https://www.sourcetreeapp.com or the implementations from e.g. IntelliJ or VSCode to see what you do and organize your collaboration via git.
Settings
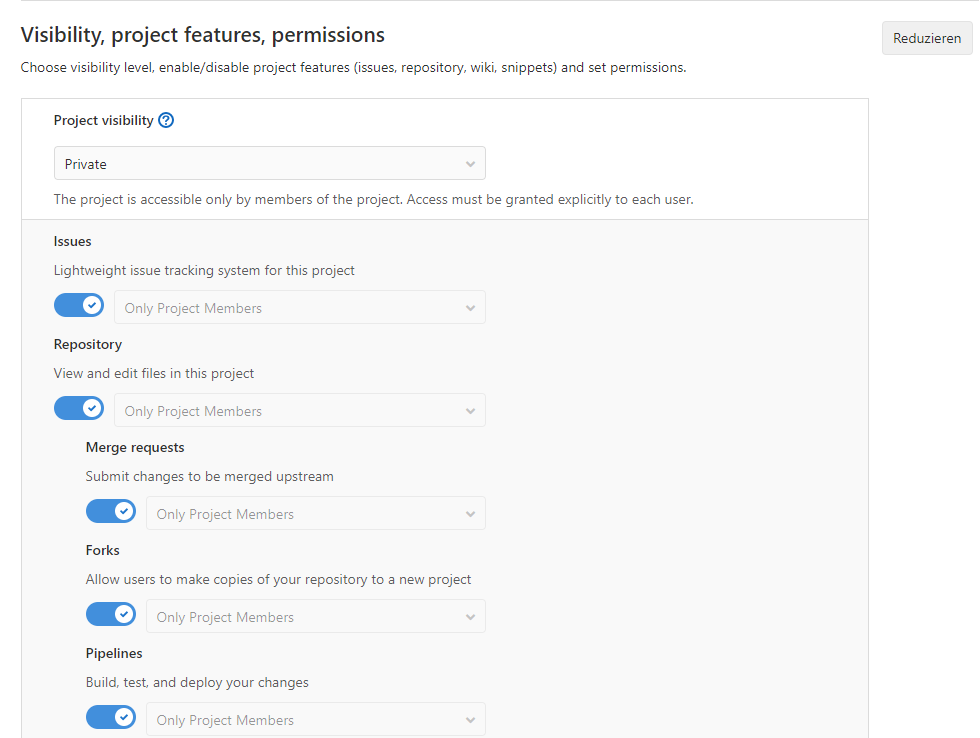
In our git repository, we first go to the project settings and activate Merge Requests and Pipelines. Afterwards the navigation sidebar has two new entries.
Workflow
The following step-by-step instruction will give you a good workflow to work together with the configured git-Repository.

- Locally checkout the master (or Develop-branch) via git checkout master or in Sourcetree.
- Create a new branch and name it sensefully. A good way to hold your repository clean is to sort it in directories by naming it like your abbreviation and the feature or fitting bug-ticket if you, for example, use the ticket-system in gitlab.
- Let’s start coding, fixing bugs, developing new features, testing your code without crashing the master and only locally on your machine.
- If your local changes are working as wanted, commit your changes with a namingful commit-message. Beware of committing wrongly changed files. If you do not want to use Sourcetree you can do it with the command git commit -a -m “commit-message” .
- Then push your changes on your branch with Sourcetree or with git push origin <feature-branch> .
- Go to the web interface and create a new merge-request. You can add not only a commit-message but more text, screenshots and files to visualize your changes to your team members.
- Inform your team members so they can look at your changes, comment them, leave suggestions and finally approve it if all is fine.
- Merge your feature-branch to the master or develop-branch if other team members gave their approvals.
- If all tests are green and the build is ok, you can delete your extra branch to not leave so much data-waste.
To work successful with this model, think on some points:
- branch new branches always from master
- do not commit or push manually to the master
- before a merge request merge the newest master to your feature-branch
- not to much branches at the same time
- small feature branches, no monsters…
- name your branches senseful
CI & CD Pipeline
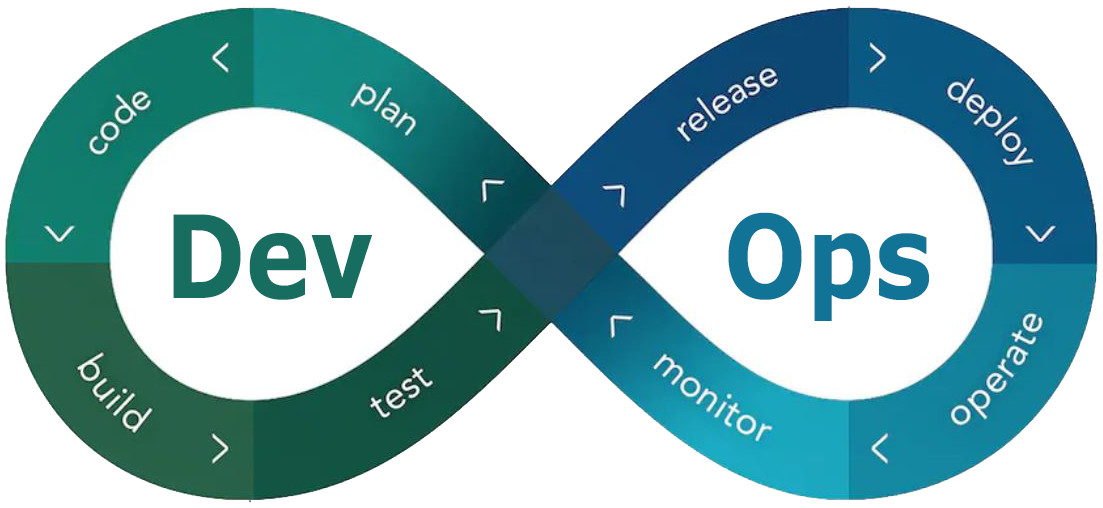
What is DevOps?
The term DevOps is derived from the idea of agile software development and aims to remove silos to encourage collaboration between development and operations. From this principle the term DevOps = development + operation is derived (Wikipedia, 2020).
To achieve more collaboration, DevOps promotes a mentality of shared responsibility between team members. Such a team shares responsibility for maintaining a system throughout its life cycle. At the same time, each developer takes responsibility for his own code, i.e. from the early development phase to deployment and maintenance. The overall goal is to shorten the time between the development of new code until it goes live. To achieve this goal, all steps that were previously performed manually, such as software tests, are now fully automated through the integration of a CI/CD pipeline.
The full automation allows a reduction of error-prone manual tasks like testing, configuration, and deployment. This brings certain advantages. On one hand, the SDLC (Software Development Life Cycle) is more efficient, and more automation frees team resources. On the other hand, automated scripts and tests serve as a useful, always up-to-date documentation of the system itself. This supports the idea of a pipeline as code (Fowler, 2017).

Source: Akamai (2020).
The structure of the CI/CD pipeline is defined within a YML file in a project’s root and formulates so-called actions, action blocks, or jobs. Pipeline jobs are structured as a block of shell commands which allow, for example, to automatically download all necessary dependencies for a job and automatically execute scripts. A pipeline contains at least a build, test, and deployment job. All jobs are fully or partly automated (GitLab CI/CD pipelines, 2020). A partial automation of a job includes manual activation steps. The benefits of a pipeline integration are, among others, an accelerated code cycle time, reduced human error, and a fast and automated feedback loop to the developer himself/herself. In addition, costly problems when integrating new code into the current code base are reduced.
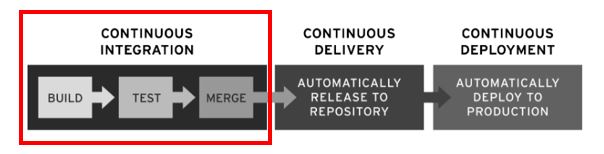
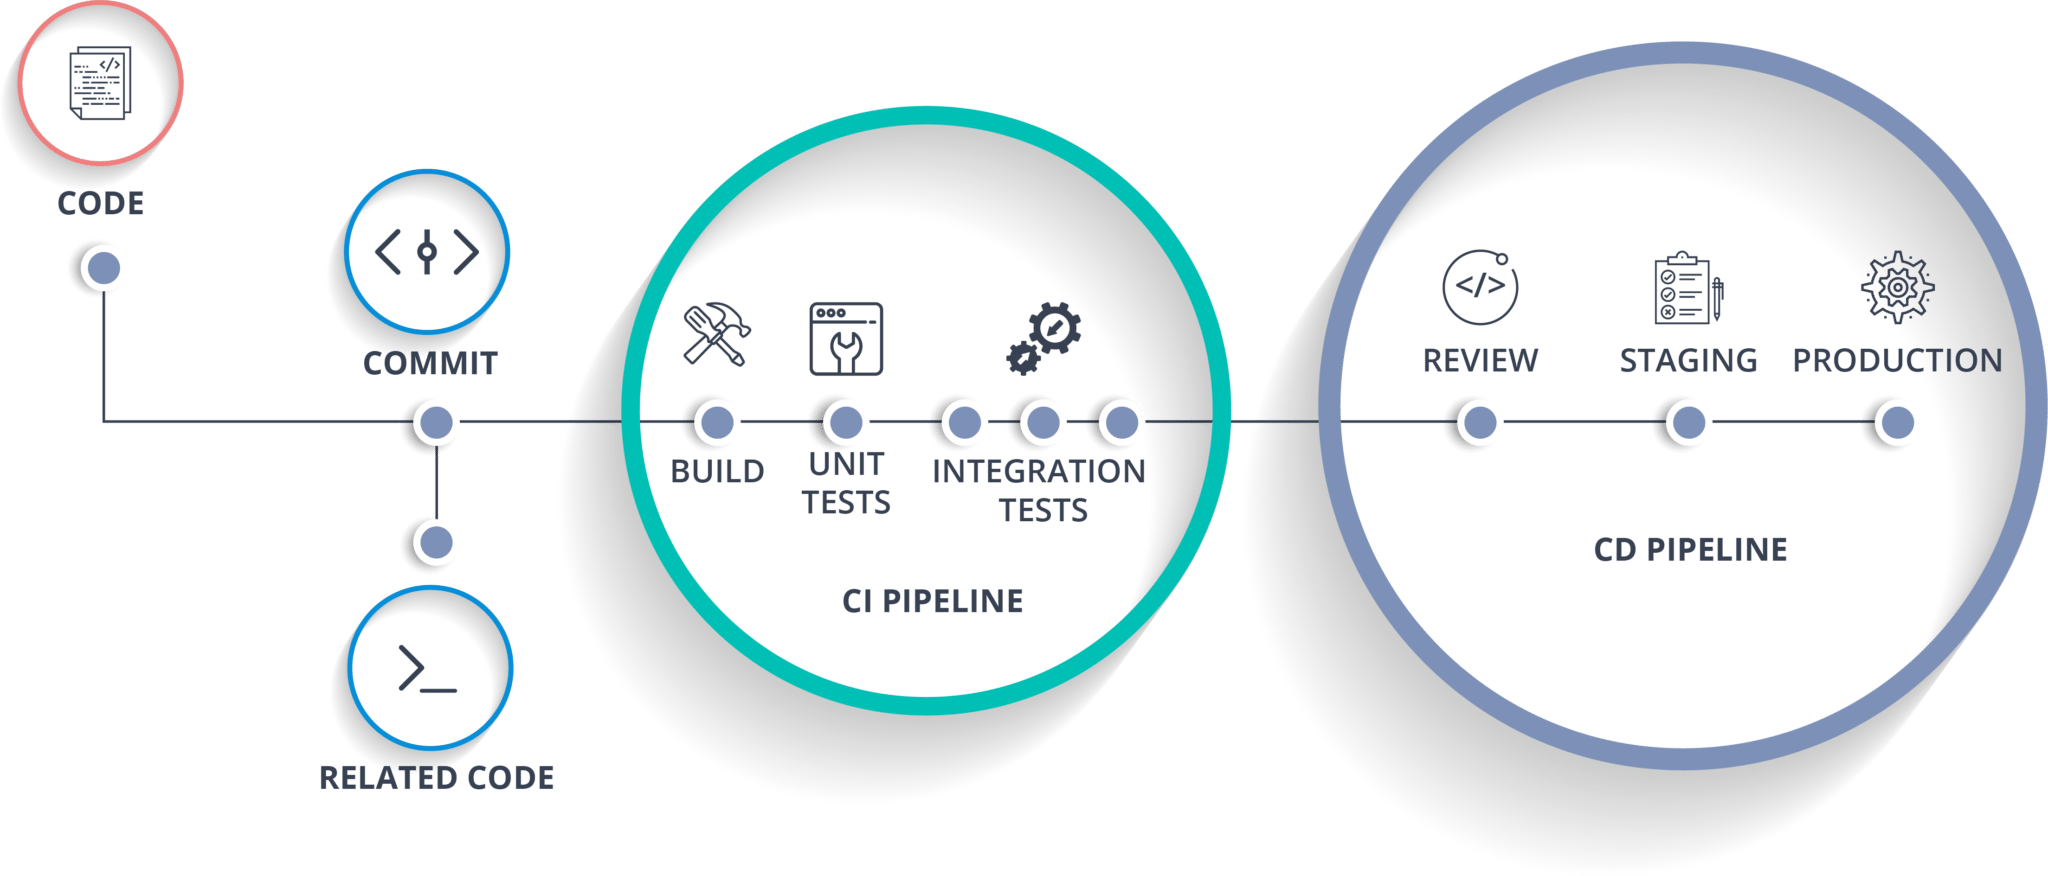
A pipeline is the high-level construct of continuous integration, delivery, and deployment. The jobs executed in a pipeline, from a code commit until its deployment in production, can be divided into three different phases, depending on the methodology to which they can be assigned. These are the three continuous methodologies:
- Continuous Integration (CI)
- Continuous Delivery (CD)
- Continuous Deployment (CD)
While Continuous Integration clearly stands for itself, Continuous Delivery or Continuous Deployment are related terms, sometimes even used synonymously. However, there is a difference, which is also shown in Figure 4 and will be further explained in the following.
Source: RedHat (2020)
What is Continuous Integration (CI)?
The term Continuous Integration can be traced back to Kent Beck’s definition of the Extreme Programming (XP) process, which in turn is derived from the mindset of agile software development, which not only allows short cycle times but also a fast feedback loop (Fowler, 2017). Within such a software practice, each member of a team merges his/her work at least daily into the main branch of a source code repository. All integrations are automatically verified by an automated build which also includes testing and code quality checks, e.g. linting, to detect and fix integration errors early. This approach allows a team to develop software faster and reduces the time spent manually searching for and identifying errors.
Further, each team member bears the same responsibility for maintaining and fixing bugs in the software infrastructure and for maintaining additional tools such as the integrated CI/CD pipelines. Furthermore, a pipeline is not static but has to be monitored, maintained, and optimized iteratively with a growing codebase. To achieve high-quality software products, everyone must work well together in a team culture free of the fear of failure (Fowler, 2017).
Source: Memegenerator, Yoda (2020)
Some important CI Principles
Continuous Integration is accomplished by adhering to the following principles:
- Regular integration to the mainline: New code needs to be integrated at least once per day.
- Maintaining a single-source repository: Keep a stable, consistent base within the mainline.
- Shared responsibility: Each team member bears the same responsibility to maintain the pipeline and project over its complete lifecycle.
- Fix software in < 10min: Bugs have to be fixed as fast as possible by the responsible developer.
- Automate the build: Test and validate each build.
- Automate testing: Write automatically executable scripts and keep the testing pyramid in mind.
- Build quickly: Keep the time to run a pipeline as minimal as possible.
- Test in a clone: Always test in the intended environment to avoid false results.
What belongs in a Source Code Repository?
As the source code repository builds the base for the pipeline, it is important to keep it as complete as possible in order to be able to fulfill CI jobs. As such a source code repository for a CI/CD Pipeline should always include:
- Source code
- Test scripts
- Property files
- Database schemas
- Install scripts
- Third-party libraries
Why Containerize pipeline jobs?
Some of you may have come across this problem before – “Defect in production? Works on my machine”. Such costly issues with different environments on different machines (e.g. CI/CD server and production server) can be prevented, by ensuring that builds and tests in the CI pipeline as well as the CD pipeline are always executed in a clone of the same environment. Hereby it is recommendable to use docker containers or virtualization. For virtualization, the use of a virtual machine can be enforced by running a Vagrant file that ensures the same VM setup throughout different machines. In short, automating containerized jobs standardizes the execution and ensures that no errors slip through due to different environments in which build, and tests are executed.
Further, by combining the CI/CD Pipeline with docker, an integration between CI and CD is enabled. Advantages are that the same database software, same versions, same version of operating system, all libraries necessary, same IP addresses, and ports, as well as the same hardware setting, is provided and enforced throughout build, test as well as deployment.
Source: Memegenerator, (2020)
How to identify CI Jobs?
To identify pipeline jobs, you should, together with the team, consider which manual steps are currently performed frequently and repetitively and are therefore good candidates for automation. Such repetitive tasks can be for example testing, building, and deployment, as well as the installation of shared dependencies, or even clean-up tasks to free memory space after a build was executed. The number of jobs can be expanded as desired but must remain self-contained. This would mean, for example, a unit test job contains only the necessary dependencies, shell commands, and unit test scripts that are needed to fulfill the unit test job.
Further, when defining the structure of a pipeline, it is important to not integrate any logic into the pipeline. This means that all logic must be outsourced into scripts which then can be executed automatically by the pipeline. Furthermore, pipelines need to be maintained and updated over the life cycle of a project to always keep it up-to-date and prevent errors. This means that pipelines also travel the whole software development life cycle (SDLC).
How to integrate Testing?
As already mentioned in the section above (see chapter 1 – Microservices) – When writing test scripts, it is important to look at the entire test pyramid, from automated unit tests to end-to-end tests. These test scripts then can be integrated into a CI pipeline’s test jobs.
Overall, testing is very important to avoid later costs due to time and cost-effective bugs and downtimes in production. When testing architectures, such as microservices, care must be taken to test the individual services not only independently of each other, but also in their entire composition. The challenge in this case is that there are also dependencies between the individual services.
Furthermore, an integration with a real database must also be tested. Since databases are not directly mapped into source code, it makes sense to formulate them in scripts against which tests can be executed. Overall it makes sense to not only mock a database but also test with real database integration.
Source: RedHat (2020)
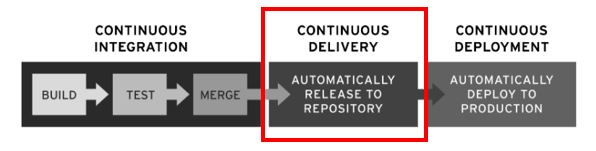
What is Continuous Delivery (CD)?
The term Continuous Delivery is based on the methodology of Continuous Integration and describes the ability to deliver source code changes, such as new features, configuration changes, bug fixes, etc., in a continuous, secure, and fast manner to a production-like environment or staging repository. This fast delivery approach can only be achieved by ensuring that the mainline code is always kept ready for production and as such can be delivered to an end-customer at any time. From this point on an application can be quickly and easily deployed into production. With this methodology, traditional code integration, testing, and hardening phases can be eliminated (Fowler, 2019).

Source: Memegenerator, Yoda (2020)
The Five CD Principles
The five principles are also valid for the other methodologies.
- Build quality
- Work in small batches
- Computers perform repetitive tasks, people solve problems
- Relentlessly pursue continuous improvement
- Everyone is responsible
(Humble, 2017)

Source: RedHat (2020)
What is Continuous Deployment (CD)?
The term Continuous Deployment implies a previous step of Continuous Delivery where production-ready builds are automatically handed over to a code repository. In conclusion, Continuous Deployment also builds on the methodology of Continuous Integration.
Continuous Deployment implies that each commit should be deployed and released to production immediately. To this purpose, the Continuous Deployment block in the pipeline includes the automation of code deployment via scripts to enable continuous and secure deployment. This follows the fail-fast pattern, which makes it possible to detect errors that have slipped into production through the automated test blocks which lead to an unhealthy server cluster. By implementing the fail-fast pattern, an error is easily correlated with the latest integration and can be quickly reversed. This pattern keeps the production environment downtimes to a minimum while code with new features goes live into production as quickly as possible. In practice, this means that successful code changes, from a commit to the branch to going live will only take a few minutes (Fitz, 2008).

Source: GitLab (2020)
Automated rollbacks and incremental deployments
Even if automated end-to-end tests against a build in a CI pipeline might have passed successful, unforeseen bugs might occur in production. In such case an important capability of pipelines is the possibility of automated rollbacks. In case of an unhealthy state of deployed code in production, a fast rollback allows to return to the last, healthy working state. This includes automatically reverting a build. Another option is incremental deployments, which are deploying new software to one node at a time, gradually replacing the application to gain more control and minimise risk (GitLab, 2020).
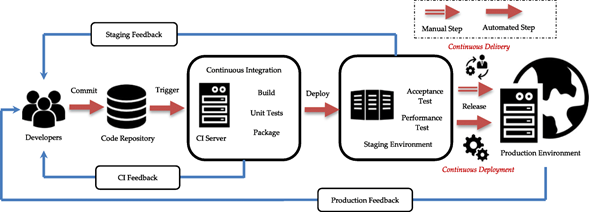
The relationship between Continuous Integration, Delivery, and Deployment
The following graph gives a quick overview of the workflow from the completion of a new feature in a working branch until its reintegration into the mainline. The following figure 11 gives a high-level overview of the workflow depicted in a pipeline.
Source: SolidStudio (2020)
When a new code feature is committed to a remote feature branch, the CI will carry out an automated build. Within this build process, the source code of the feature branch will automatically be checked for code linting and compiled. The compilation is linked to an executable and all automated tests are run by the pipeline. If all builds and tests run without errors the overall build is successful.
Bugs or errors encountered throughout the CI pipeline will make the build fail and halt the entire pipeline. It is then the responsibility of the developer to fix all occurring bugs and repeat the process as fast as possible to be able to commit a new feature and merge it into the mainline to trigger the deployment process. Figure 12 shows such a CI/CD workflow between Continuous Integration, Delivery, and Deployment (Wilsenach, 2015).
Source: Whaseem, M., Peng, L. and Shahin M. (August 2020)
Why did we pick the GitLab CI/CD Pipeline?
In total there are many products, from Jenkins, GitHub actions, DroneCi, CircleCi, to AWS Pipeline, etc. on the market. They all offer great services for DevOps integration. After research some free tools, we decided to stay with GitLab for the university project “Schule 4.0”, as Gitlab itself is a single DevOps tool which already covers all steps from project management, source code management to CI/CD, security, and application monitoring.
This choice was also made to minimize the tech stack. Since the university already offers a GitLab account on its own GitLab instance for source code management and issue tracking, we felt it made most sense to minimize the use of too many different tools. Therefore, sticking with one product to integrate a custom CI/CD Pipeline into our project meant having everything in one place, which also simplifies the complexity of the toolchain and furthermore allows us to speed up the cycle time.
What is a GitLab Runner?
To be able to execute and run a CI/CD pipeline job, a runner needs to be assigned to a project. A GitLab runner can be either specific to a certain project (Specific Runner) or serve any project in the GitLab CI (Shared Runner). Shared runners are good to use if multiple jobs must be run with similar requirements. But in our case, as HdM has an own GitLab instance (at https://gitlab.mi.hdm-stuttgart.de/), a Specific Runner installed on our own server instance was the way to go.
The GitLab Runner itself is a Go binary that can run on FreeBSD, GNU/Linux, macOS, and Windows. Architectures such as x86, AMD64, ARM64, ARM, and s390x are supported. Further, to keep the build and test jobs in a simple and reproducible environment it is also recommendable to use a GitLab runner with a Docker executor to run jobs on your own images. It also comes with the benefit of being able to test commands on the shell.
Before installing a runner, it is important to keep in mind that runners are isolated machines and therefore shouldn’t be installed on the same server where GitLab is installed. Further, in case of the need to scale out horizontally, it can also make sense to split jobs and hand them over to multiple runners, installed on different server instances which then are able to execute jobs in parallel. If the jobs are relatively small, an installation on a Raspberry Pi is also a possible solution. This comes with the benefit of more control, higher flexibility, and very important – fewer costs.
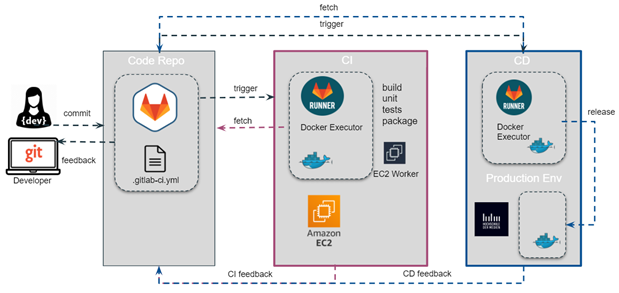
Source: Own graphic
For the project “Schule 4.0” we chose the architecture in figure 13 with two independent runners on two different machines. For this purpose, two runners were installed on an AWS EC2 Ubuntu 20.04 and in a VM on the HdM server instance to run the jobs for CI and CD separately.
Challenges and Limitations
The reason for the decision to split CI and CD jobs up was less due to horizontal scaling but the fact that the HdM server used for the deployment is located in a virtual, private network. Due to this isolation of the network, it is not possible to deploy directly from outside the network. Since there were no permissions on the HdM server for customizations, the resulting challenges could be circumvented with a second runner, installed in a VM on the target machine.
Further, it is important to isolate the runner, as when installed directly on a server, which also serves as a production environment, unwanted problems can occur e.g. due to ports that are already in use or duplicate docker image tag-names between the actual build jobs and already deployed builds which can cause failure and halt the pipeline.
To reduce costs, which in our case amounted to 250 US$ (luckily virtual play money) on our educational AWS accounts, in only 2 months, the CI runner was also temporarily installed on a RaspberryPi 3 B+ with a 32 GB SSD card. Hereby it is important to state, that often slow home network speed and large jobs have an impact on RaspberryPi’s overall performance and can make build and testing jobs slow. This is okay for testing the pipeline but takes a too large amount of time when developing in a team. Therefore, to speed things up, the runner for the CI jobs was later again installed on a free tier AWS EC2 Ubuntu instance.
How to install a GitLab Runner?
To install a GitLab runner two main steps need to be followed:
Where to install a GitLab Runner?
A GitLab Runner can be installed on any suitable server instance e.g. on an IBM or Amazon EC2 Ubuntu instance by using the AWS Free Tier test account or an educational account. The following provides further information on how to getting started with AWS EC2.
Another possibility is to install a runner on your own RaspberryPi. The RaspberryPi 3B+ we used has a 32GB SSD card and uses the Raspbian Buster image which can be downloaded from the official distribution. Be aware that it might cause issues following the standard runner installation on GitLab as the RaspberryPi 3B+ uses a Linux ARMV7 architecture. A good tutorial to follow can be found on the blog of Sebastian Martens. After its installation, the Runner will work even after completely rebooting your Raspberry Pi.
- Runner intallations on an AWS EC2 instance
Advantages
- Better network speed than in a private home network.
- Faster build times.
- Easy and quick setup of an instance.
Limitations
- High costs for services, even with a free tier selection.
- Limitations in server configurations were due to free or educational accounts, e.g. memory < 10GB, limitations on server location that can lead to latency and time outs.
- The server can be over configured and become unhealthy – all configurations are lost if no backup/clone of the instance has been made.
- AWS offers quite complex and ambiguous documentation
In contrast to using a paid service, a more cost-effective solution may be to install the GitLab Runner inside a virtual machine on the HdM server, or on an own RaspberryPi or any other services.
2. Runner installation on a RaspberryPi
Advantages
- Full flexibility over available software and software versions
- Costs are lower compared to leased servers including root access
- Access data to the target infrastructure is available in the local network
Limitations
- Takes longer to execute the pipeline
- Local home-network speed can slow job execution down due to images, dependencies, git repository, etc. that need to be downloaded
- Not well suited for the execution of very large jobs
- It is recommendable to take a RaspberryPi 3 or even newer
How does the GitLab Runner work?
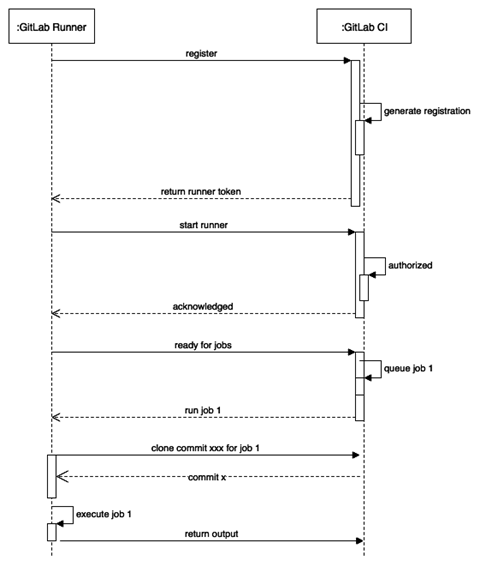
To better understand how a GitLab Runner picks up jobs from the CI pipeline, assigns and returns the build and test results to a coordinator, the following sequence diagram in figure 13 will be explained in more detail.
Source: Evertse, Joost (August 2019, p. 56)
A Specific Runner, as used in our project, executes all jobs in the manner of a FIFO (First-in-first-out) queue. When the GitLab Runner starts, it tries to find the corresponding coordinator (the project’s GitLab server) by contacting the GitLab URL that was provided when the runner was registered. When the Runner registers with the registration token also provided at registration, it will receive a special token to connect to GitLab. After a restart, the GitLab Runner connects and waits for a request from the GitLab CI.
A Runner registered to a source code repository listens for change events in a particular branch, which causes the runner to fetch and pull the GitLab repository. The runner then fetches and executes the CI/CD jobs defined in the .gitlab-ci.yml file for the Gitlab server. The build and test results, as well as logging information, are returned to the GitLab server, which then displays those for monitoring purposes. If all jobs were executed successfully each job in the pipeline receives a green symbol and the push or merge onto a branch can be completed.

Source: Own GitLab project pipeline

Source: GitLab (2020)
How to build a GitLab CI/CD Pipeline?
A GitLab CI/CD Pipeline is configured by a YAML file which is named .gitlab-ci.yml and lies within each project’s root directory. The .gitlab-ci.yml file defines the structure and order of the pipeline jobs which are then executed sequentially or in parallel by the GitLab Runner.
Introduction to a Pipeline Structure
Each pipeline configuration begins with jobs that could be seen as a bundled block of command-line instructions. Pipelines contain jobs that determine what is needed to do and stages, which define when the jobs should be executed.
stages: <br># ------- CI ------ <br> - build <br> - quality
- test # ------- CD ------
- staging - production
The stages use the stage-tags to define the order in which the individual pipeline blocks/jobs are executed. Blocks with the same stage-tag are executed in parallel. Usually there are at least the following stage-tags:
- build – code is executed and built.
- test – code testing, as well as quality checking by means of linting, etc.
- deploy – deploy the code to production.
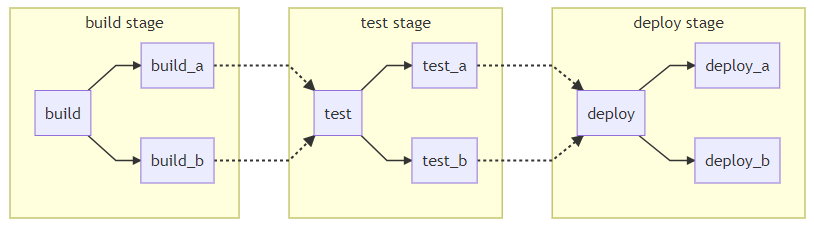
The Pipeline Architecture
Source: GitLab Docs (2020)
The architecture shown in figure 20 is not very efficient, but easiest to maintain. As such it is shown, in combination with the following .gitlab-ci.yml file example, as a basic example, to understand the construction of a pipeline’s architecture. By defining the relationships between jobs a pipeline can be speeded up.
# default image
image: node:alpinestages:
- build - test
- deploy
# —– CI —— #build_a:
stage: build
script: - echo "This job builds something."
….build_b:
stage: build
script: - echo "This job builds something else."
….test_a:
stage: test
script: - echo "This job tests something."
….test_b:
stage: test
script: - echo "This job tests something else.“
….
# —– CD —— #deploy_a:
stage: deploy
script: - echo "This job deploys something."
….deploy_b:
stage: deploy
script: - echo "This job deploys something else."
….
Structure of a job
The basic structure of the individual jobs/blocks within a pipeline includes the block name, and subordinate stage with stage tag, script tag with the executable scripts/commands. Each job must also contain a tag for the selected runner (here: gitlab-runner-shell). This structure can easily be extended.
job_name:
stage:
- stage-tag
script:
- echo "Do something important."
tags:
- gitlab-runner-shell
Jobs can be initiated in different ways. This depends on the tags which are assigned to the individual jobs. For example, it can make sense to not fully automate a job. In this case, a job e.g. deploy job, gets a tag for a manual job and thus forces the job to wait for manual approval and release by a developer.
job_name<br>...<br>when: manual <br> only:
- staging
- merge_requests
…
How to optimize a Pipeline?
Efficiency and speed are very important when running the jobs through a CI/CD Pipeline. Therefore it is important to think not only about the architecture but also consider the following concepts to speed things up.
- Host an own GitLab Runner: Often the bottleneck is not necessarily the hardware, but the network. Whilst GitLab’s Shared Runners are quick to use, the network of a private cloud server is faster.
- Pre-install dependencies: Downloading all needed dependencies for each CI job is elaborative and takes a lot of time. It makes sense to pre-install all dependencies on an own docker image and push it to a container registry to fetch it from there when needed. Another possibility is to cache dependencies locally.
- Use slim docker images: Rather use a tiny Linux distribution for images to execute a CI job than a fully blown up one with dependencies that you might not even need. In our project we therefore used an Alpine Linux distribution.
- Cache dynamic dependencies: If dependencies need to be dynamically installed during a job and thus can’t be pre-installed in an own docker image, it makes sense to cache those. Hereby, GitLab’s cache possibility allows to cache dependencies between job runs.
- Only run a job if relevant changes happened: This is very useful, especially for a project that makes use of a microservice architecture. For example, if the front-end changed, the build and test jobs for all the others don’t need to be run as well. Such behavior can be achieved by using the only keyword in a job. The following gives a short example.
job_name:
…
only:
changes:
– apps/example1/**/*
– shared-dependencies/**/*
…
More detailed information can be found in the Example Repository’s README files.
Useful tools to be considered for building a GitLab CI/CD pipeline
Avoid syntax errors by the use of CI Linting. In order to avoid syntax errors and to get things right from the start, GitLab offers a web-based linting tool, which checks for invalid-syntax in the gitlab-ci.yml file. In order to use the web-based linting tool, simply add the extension -/ci/lint to the end of your project’s URL in GitLab.
As DevOps and CI/CD is a quite popular and complex topic we also want to introduce some further possibilities to optimize your DevOps, some are the following:
- CI with Linting & Testing – Drone CI
- Deployment with Jenkins
- Linting with Sonarqube
- Monitoring and Logging with GitLab CI/CD
Part 2 – “getting started” repository
When you’re done getting comfortable with the topics, it is time to see an example implementation of the theory above. Head over to our “getting started” repository containing a microservice application and further explanations.
Link to our example repository: https://gitlab.com/curiosus42/cc-getting-started-example
Conclusion
DevOps is a big buzzword for many complex tools and things that can make your project easier to work with. It´s a long way from a simple project idea until you have a working infrastructure, but it will help you to work easier and more efficient on your project in the future. For all the described tools and use-cases there are so many alternatives you can use.
On a good software-project all the sections above are important. How to design your software, how to work together, how to make the development-workflow more easy to use and bring your project from your local machine to a reachable server.
With this blogpost and the additional repository content you have an overview about the possibilities with a bunch of instructions on how you can start with DevOps in your project.
Further Reading…
Architecture
Getting started with your project
Software Development Life Cycle: A Guide to Phases and Models
https://ncube.com/blog/software-development-life-cycle-guide
Why software architecture matters
Is High Quality Software Worth the Cost? – Martin Fowler
https://martinfowler.com/articles/is-quality-worth-cost.html
Testing Strategies in a Microservice Architecture – Toby Clemson
https://martinfowler.com/articles/microservice-testing/
Best resource for microservice related topics with examples
Microservice patterns – Chris Richardson
https://microservices.io/patterns/The 12 factors that really matter when developing software
https://12factor.net/
Git Workflow
Git Workflow: https://www.atlassian.com/de/git/tutorials/comparing-workflows/gitflow-workflow
CI/CD Pipeline
Continuous Integration:
Definition of Continuous Integration – Martin Fowler
https://martinfowler.com/articles/continuousIntegration.html/
Continuous Delivery:
Continuous Delivery – Martin Fowler
https://www.martinfowler.com/bliki/ContinuousDelivery.html
Architecture – Jez Humble https://continuousdelivery.com/implementing/architecture/
Principles – Jez Humble
https://continuousdelivery.com/principles/
Continuous Deployment:
Continuous Deployment Blog – Timothy Fitz http://timothyfitz.com/2009/02/08/continuous-deployment/
GitLab CI/CD:
Rollbacks – GitLab Docs https://docs.gitlab.com/ee/ci/environments/#retrying-and-rolling-back
Incremental Rollouts – GitLab Docs https://docs.gitlab.com/ee/ci/environments/incremental_rollouts.html
CI Runner – GitLab Docs
https://docs.gitlab.com/ee/ci/runners/README.html
Pipeline Linting – GitLab Docs
https://docs.gitlab.com/ee/ci/lint.html
CI/CD Job Logging – GitLab Docs
https://docs.gitlab.com/ee/administration/job_logs.html
Containerization and virtualization:
Docker: https://www.docker.com/
Docker integration – GitLab Docs
https://docs.gitlab.com/ee/ci/docker/README.html
Vagrant virtualization – Vagrant
https://www.vagrantup.com/
Runner installation:
AWS EC2 Instance
https://aws.amazon.com/de/getting-started/
Runner installation on RaspberryPi – Sebastian Martens
https://blog.sebastian-martens.de/technology/install-gitlab-runner-on-raspberry-pi/
GitLab Runner
https://docs.gitlab.com/runner/
List of References
Software Architecture
- Demchenko, M. (2019) Software Development Life Cycle: A Guide to Phases and Models [BlogPost]. Available at: https://ncube.com/blog/software-development-life-cycle-guide (Accessed: 12 September 2020)
- Fowler, M. (2019) Is High Quality Software Worth the Cost [BlogPost]. Available at: https://martinfowler.com/articles/is-quality-worth-cost.html (Accessed: 19 September 2020)
- Fowler, M. (2003) Who Needs an Architect [Article] Published by the IEEE Computer Society. Available at: https://martinfowler.com/ieeeSoftware/whoNeedsArchitect.pdf
- “JD” (2009) Architectural Styles [BlogPost]. Available at: http://shapingsoftware.com/2009/02/09/architectural-styles/ (Accessed: 26 September 2020)
- Richardson, C. (unknown) A pattern language for microservices [Blog]. Available at: https://microservices.io/patterns/ (Accessed: 24 July 2020)
- Fowler, M. (2014) Microservices [Article]. Available at: https://martinfowler.com/articles/microservices.html (Accessed: 16 August 2020)
- Microsoft Press (2017) Cloud Application Architecture Guide [E-Book]. Available at: https://azure.microsoft.com/en-in/campaigns/cloud-application-architecture-guide/
CI/CD Pipeline
- Fitz, T. (2008) Continuous Deployment [BlogPost]. Available at: http://timothyfitz.com/2009/02/08/continuous-deployment/ (Accessed: 05 June 2020)
- Fowler, M. (2017) Continuous Integration [BlogPost]. Available at: https://martinfowler.com/articles/continuousIntegration.html (Accessed: 27 May 2020)
- Fowler, M. (2019) Software Delivery Guide. [BlogPost]. Available at: https://martinfowler.com/delivery.html (Accessed: 30 May 2020)
- GitLab (2020) Rollback [Online]. Available at: https://docs.gitlab.com/ee/ci/environments/#retrying-and-rolling-back (Accessed: 15 June 2020)
- GitLab CICD Pipeline (2020) Rollback [Online]. Available at: https://docs.gitlab.com/ee/ci/pipelines/ (Accessed: 15 June 2020)
- Humble, J. (2017) Continuous Delivery Principles [Article]. Available at: https://continuousdelivery.com/principles/ (Accessed: 12 June 2020)
- Wilsenach, R. (2015) DevOpsCulture [BlogPost]. Available at: https://martinfowler.com/bliki/DevOpsCulture.html (Accessed: 30 May 2020)
- Wikipedia, The Free Encyclopedia ( 22 September 2020) DevOps [Online]. Available at: https://en.wikipedia.org/wiki/DevOps#cite_note-Mala_2019_p._16-1 (Accessed: 23 September 2020)
Images and Tables
- ncube (2019) Software Development Life Cycle [Online] and Agile Methodology [Online + cropped]. Available at: https://ncube.com/blog/software-development-life-cycle-guide (Accessed: 14 August 2020)
- Akamai (2020) DevOps bei Akamai [Online]. Available at: https://www.akamai.com/de/de/solutions/performance/devops.jsp (Accessed: 20 September 2020)
- GitLab (2020) Introduction to CI/CD with GitLab [Online]. Available at: https://docs.gitlab.com/ee/ci/introduction/ (Accessed: 19 September 2020)
- GitLab Docs (2020) Pipeline Architecture [Online]. Available at: https://docs.gitlab.com/ee/ci/pipelines/pipeline_architectures.html (Accessed: 05 June 2020)
- Joost, Evertse 2 August 2019, Mastering GitLab 12, Packt Publishing, London.
- Memegenerator, Yoda (2020), Yoda to have continuous integration-continuously integrate you. must. Available at: https://memegenerator.net/instance/61700213/yoda-to-have-continuous-integration-continuously-integrate-you-must (Accessed: 19 September 2020)
- RedHat (2020) DevOps. Was versteht man unter CI/CD? [Online]. Available at: https://www.redhat.com/de/topics/devops/what-is-ci-cd (Accessed: 19 September 2020)
- SolidStudio (2020) Beneftis of CI/CD Pipelines? [Online]. Available at: https://www.redhat.com/de/topics/devops/what-is-ci-cd (Accessed: 10 September 2020)
- Whaseem M., Peng L. and Shahin M. (August 2020) ‘An Empirical Study of Architecting for Continuous Delivery and Deployment’, Journal of Systems and Software [online]. Available at: https://www.researchgate.net/publication/343712437_A_Systematic_Mapping_Study_on_Microservices_Architecture_in_DevOps, 170 (Accessed: 15 July 2020)
Leave a Reply
You must be logged in to post a comment.