
An article by Annika Strauß, Maximilian Kaiser, Danial Eshete and Leah Fischer
The project and its scope
This blog post was created as part of the lecture System Engineering and Management. The purpose of the lecture is to convey a basic knowledge about Continuous Integration, Continuous Delivery, automation and testing processes, as well as working with containerized applications, cloud-based services and cloud infrastructures. The following article is supposed to document our approaches to the project, our experiences and finally the lessons learned.
- The project and its scope
- Docker
- AWS Cloud Services
- Development Strategy & CI/CD
- Conclusion
- Bibliography
Prior knowledge
The development team approaches the project with little knowledge of cloud services and infrastructure. Furthermore, no one has significant experience with containers and/or containerized applications. However, the team is well experienced in web development and has good knowledge of technologies such as NodeJS, Python or HTML/CSS.
Learning goals
Taking the groups skills and the lecture content into account the learning goals of the project were formulated as following:
- Working with the cloud and its scalable infrastructure (Amazon Web Services)
- Containerizing, publish and deploy applications (Docker)
- Designing a CI/CD process and defining corresponding development strategy
The project: Idea and goal
The basic idea of the project was to design a basic framework for a web app that is scalable and supported by a well-defined development process. In addition, the testing and deployment of the app should be automated through a CI/CD process. The overall goal is to create a setup that a development team can then use to develop the actual app. This means that all major components are connected, the CI/CD pipeline is working and the development strategy is defined. This setup is then able to be scaled to the needs of the running application i.e. adding more backend or frontend instances on demand. The big advantage of only developing a basic setup is that we can take advantage of the free contingents and free price plans that many paid services offer.
Our assumed app for which the setup was developed is a web page for a collaborative rating of restaurants. Following is the scope of functionalities listed which the webapp should cover once it has been developed:
- On the homepage different/random restaurants are presented in an overview. The restaurant data is provided via an YELP api endpoint.
- Users have an account to manage their lists
- Users can create/rename/delete their lists
- Users can add restaurant (shown on the homepage) to a list or remove them
- Users can rate and comment Restaurants on their lists
- Users can add/remove other users (by their username) to a given list. These users can also rate and comment on the restaurants on this list.


Note: It was not the goal of this project to develop the outlined web application. The purpose of the above description and functionality was to understand the scope, requirements and needs that such an application would have and to help create a suitable setup.
Architecture
In the following section, we discuss how we tried to define and design a suitable architecture for our framework. First, we think about the requirements we face, then we try to estimate characteristics that might influence the choice of technologies and services we want to use, and finally we present the concept we finally developed.
Selecting the right components and services
A very challenging part of this project was the selection of the appropriate technologies, services, components and tools to use. However, this selection had to be made for planning the architecture of our system.
Infrastructure
Since it was already determined in the learning goals that AWS shall be used as the cloud technology, no decision was needed here.
The advantages and disadvantages of using AWS will be discussed in a separate section.
Container technologie
When it comes to application containerization, Docker is the first thing that comes to mind. The team defined the use of the very popular and free Docker technology as the learning goal of the project. Alternatives such as microservices or content delivery networks were not considered for this reason.
The advantages of using Docker will be discussed in a separate section.
Continuous Integration and Continuous Deployment (CI/CD)
Similar to infrastructure and containers, we decided beforehand to use Jenkins as a CI/CD tool, because it is a very common choice.
Again, advantages and disadvantages of using Jenkins will be discussed later.
Backend
We required a simple and easy way to provide backend API endpoints for the frontend application. There are plenty of options out there like Spring, Struts or Express to name only a few. We chose to use Django, a high-level Python web framework, because of its simplicity, its model-view-presenter scheme, is scalability, the included web server, the simple Python syntax our team members are used to and because it’s a popular, free and open source project.[1]
Frontend
Again, there are very many popular frameworks, such as Angular, Vue, React and more. Since all of them meet our (quite limited) needs, we picked React because none of us had worked with it before, and we wanted to try something new. It’s fast, flexible, easy to learn, comes with a lot of helpful development tools and uses reusable components. Of course, it’s free to use, too.[2]
Database
First, we had to decide whether to use a relational or non-relational database. We require our database more likely to scale vertically scalable (rows) than horizontally (columns) and we plan to use structured data with a few applications accessing it. That’s why we decided to use a classic SQL database. In the end, we chose one of the most popular SQL databases currently, MySQL.
External services
To not only use services provided by AWS, we wanted to include external services as well.
User management is a key feature of the assumed Foodadvisor application, but is nothing that is implemented quick and secure by an inexperienced team. So it was a logical step to outsource this task and include an external service. Our choice fell on Auth0. Auth0 handles the complexities of secure authentication and offers a free plan for applications with less than 7000 user accounts.
A second candidate for an external service was the source of restaurant data. We did not want to create fake restaurant data, but use real and live data. Some research led us to select a yelp API that provides JSON formatted restaurant data for a city of our choice.
Version control
To manage the project code base, a version control system was essential. Since every team member already had a GitLab account and is experienced in using GitLab, this system was used for simplicity (alternatives would have been GitHub or Subversion).
Estimations about traffic, payloads and costs
In order to plan appropriately, one must be aware of the scope of the project and ask the right questions before starting to design an architecture. The choice of components and technologies, as well as the final architecture itself, depend heavily on the fundamental assumptions we make about our system:
- What kind of service/website do we offer?
- How many users do we want to reach (per day/month/year)?
- How much inbound/outgoing traffic do we have to expect (per view/second/hour/month)?
- How much data do we have to store?
- What is our budget we can spend on infrastructure and maintenance?
- How important is availability/consistency/scalability?
Below we have made these considerations for the Foodadvisor application. We took TripAdvisor as a reference and derived different scenarios in which our app is designed for 1%, 0.1%, and 0.001% of TripAdvisor traffic (we decided to go with ). First we made some basic assumptions about the app and then used them to estimate properties which were important for the planning and designing of the architecture.
Assumed size of a restaurant item:
title, short description text (max. 300 chars), image (max. 1MB), Rating = ~1,2MB
Assumed size of a homepage view:
10x restaurant item + all other homepage website data = ~15MB
Assumed size of stored restaurant data:
500 new restaurant items per year + application = 500 ⋅ 1,2MB + application = ~600MB
Assumed traffic per day (1% TripAdvisor traffic scenario):
- Operating regions: Europe and USA
- Visits pro Monat: 150.000
- Average estimated revenue (ads on website): 1 USD per thousand views
150.000 ÷ 1.000 = 150 USD per month - Inbound traffic: ~40 new restaurants per month ⋅ 1,2MB = ~48MB per month
Outgoing traffic: 150.000 views per month ⋅ 15MB = ~2,25TB per month
Taking these numbers, we can calculate the following expenses when we plan to work with Amazon Web Services (AWS). Using AWS Pricing Calculator one can easily configure a concret setup and estimate its costs. When scaling the final application, meaning adding new instances, prices will obviously rise in total. The below calculations apply to one set of instances – the minimum set of components required to assemble the Foodadvisor application.
- CloudFront Europe price (monthly): 108.98 USD
- Amazon EC2 Reserved instances: 21.02 USD
- Amazon EC2 On-Demand instances (17hours/day): 20.82 USD
- The free AWS contingent provides 30GB of free Elastic Block Storage for EC2 instances per month: This is not assumed to be exceeded – no costs expected
- Amazon RDS MySQL (1 instance: 1 vCPU 3.75 GiB): 64.70 USD
- yelp api: free
- Auth0: free
As long as we stay under a load of 17 hours/day, the best choice is to work with Amazon EC2 Reserved Instances. However, since we expect users from Europe and the US, and 150,000 visits per month means about 5,000 visits per day, we expect to exceed the 17 hours/day load. Therefore, Amazon EC2 Reserved Instances are the better choice for our scenario. Due to the basic configuration we implemented (see next section), the free contingent of AWS products was sufficient for our needs. Since we did not want to spend money and could not generate enough traffic to justify purchasing additional and redundant resources beyond the free contingent, we could not really test the scaling in the final setup.[3]
Conceptual design of the app
By taking into account all the previous considerations, the following architecture resulted for our application. The destic components will be explained later in a separate section. Following is a brief description of the setup and how the components interact with each others:
- Code is managed in a GitLab Repository
- A Jenkins server on AWS is responsible for the CI/CD process: Testing the applications, building Docker images and deploying them to Docker Hub.
- Backend and frontend, each containerized by Docker, are deployed by Jenkins to an AWS Elastic Beanstalk environment which uses the AWS Elastic Container Service as a foundation.
- Elastic Beanstalk automatically scales an application by starting additional EC2 instances, running the same Docker images within the same environment. We call this an ECS Cluster.
- Elastic Beanstalk provides Elastic Load Balancing by default
- Each Docker container runs on an AWS EC2 instance
- The Django Backend stores application data in a MySQL database, realized by an AWS RDS instance (this has not been realized in the project yet, instead we used the python built in database SQLite to speed things up) and provides API endpoints for the frontend application.
- The React frontend is provided with restaurant data directly by the yelp API and user authentication is handled by Auth0.

Docker
As already mentioned, we have decided to containerize our application. To achieve this, we used Docker. It is a free software to isolate applications through container virtualization. This simplifies the deployment of applications because containers, which contain all the necessary packages as files, can be easily transported and installed.[4]
Docker has many advantages attached to it. Consistent and isolated environment is one of them. However, rapid application development and easy scalability and flexibility should also be mentioned. In the case of our planned application, we decided to use Docker to separate the frontend from the backend, as we planned to have several backend services all running in separate containers. This allows us to always run the same containerized application, regardless of the developer’s setup and infrastructure. Thereby eliminating the common issue where a newly implemented feature only functions on the own machine. Sentences like “But it works on my computer…” are therefore no longer needed.[5]
It is possible for Docker to create images automatically by reading the instructions from a Dockerfile. A Dockerfile is a text document which contains everything a user could call on the command line to assemble an image. The following figure shows the backend Dockerfile of our project.[6]
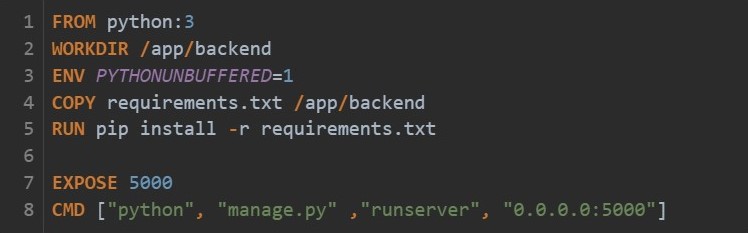
The FROM statement is used to initialize a new build level and set the base image for subsequent statements. The WORKDIR statement specifies the working directory for all statements that follow it in the Docker file. The ENV statement sets the environment variable to a value. In our case, PYTHONUNBUFFERED is set to 1 so that Python output is sent directly to the terminal without being cached first, allowing you to see the output of your application in real time. The RUN statement executes all commands in a new layer above the current screen and transfers the results. The COPY statement copie any new files or directories from the defined source and adds them to the container’s file system. The EXPOSE statement tells Docker that the container is listening at runtime on the specified network ports. The primary function of a CMD command is to provide instructions to an executing container. In our case, the application is launched.[6]
Docker Compose
Since the application involves multiple containers, we used the tool Docker Compose for defining and running Docker applications with multiple containers. By using Compose, we were able to configure the services of the application in one YAML file. After that, you can create and start all services from your configuration with a single command. The following figure shows the file docker-compose.yml for our application. In the file, the two services for the frontend and the backend are defined.[7]
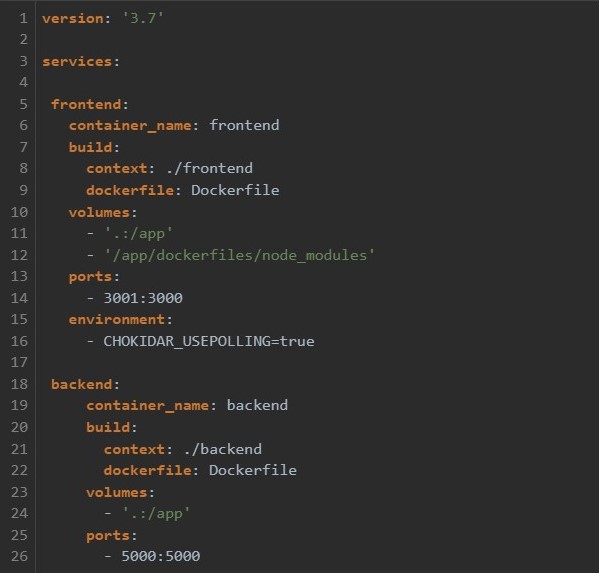
With the command docker-compose build in the command line, the docker images of the frontend and backend are built and can be executed after they are completed. A Docker image is a file used to execute code in a Docker container. It is similar to a snapshot in virtual machine environments.[7, 8]
Container Registry
To store and distribute container images, a container registry is used. As with most technologies, there are various providers. Since we use Docker, the first thing that came to mind was Docker’s container registry itself. Docker Hub provides a place to easily create, manage and deploy container applications. However, since we also planned to use AWS services, the Amazon Elastic Container Registry (Amazon ECR) was also a possible option. To come to a decision on which container registry to use, we compared the two using the following table.[8, 9]
| Amazon ECR | Docker Hub | |
| Repository | Public and Private | Public and Private |
| Pricing | Storage: 0.10 USD per GB | 0 USD |
| Authentication | AWS IAM | Password or Access Token |
| Immutable Images | yes | no |
After considering this difference, we decided to go with DockerHub. Of course, a big part of the decision was based on the fact that DockerHub is free of charge for us, since this is a student project. Once you have created a DockerHub account, you can simply upload the created images to the registry via the command line. The command docker push <image name> is used for this.
Personal experience
Our personal experience working with Docker for the first time was fairly positive. There are many documentations and tutorials on the Internet that give you an initial orientation on how to Dockerize your application. In our opinion, this also has a negative effect, because you quickly lose track of what exactly is necessary for your own project and what is rather irrelevant.
Things got more complicated when we tried to use Docker with Elastic Beanstalk. Due to outdated versions and several guides that were not up-to-date and correct, we lost a lot of time. But we will get to that later in this blog post. First, we would like to take a closer look at AWS Service in general and Elastic Beanstalk in particular.
AWS Cloud Services
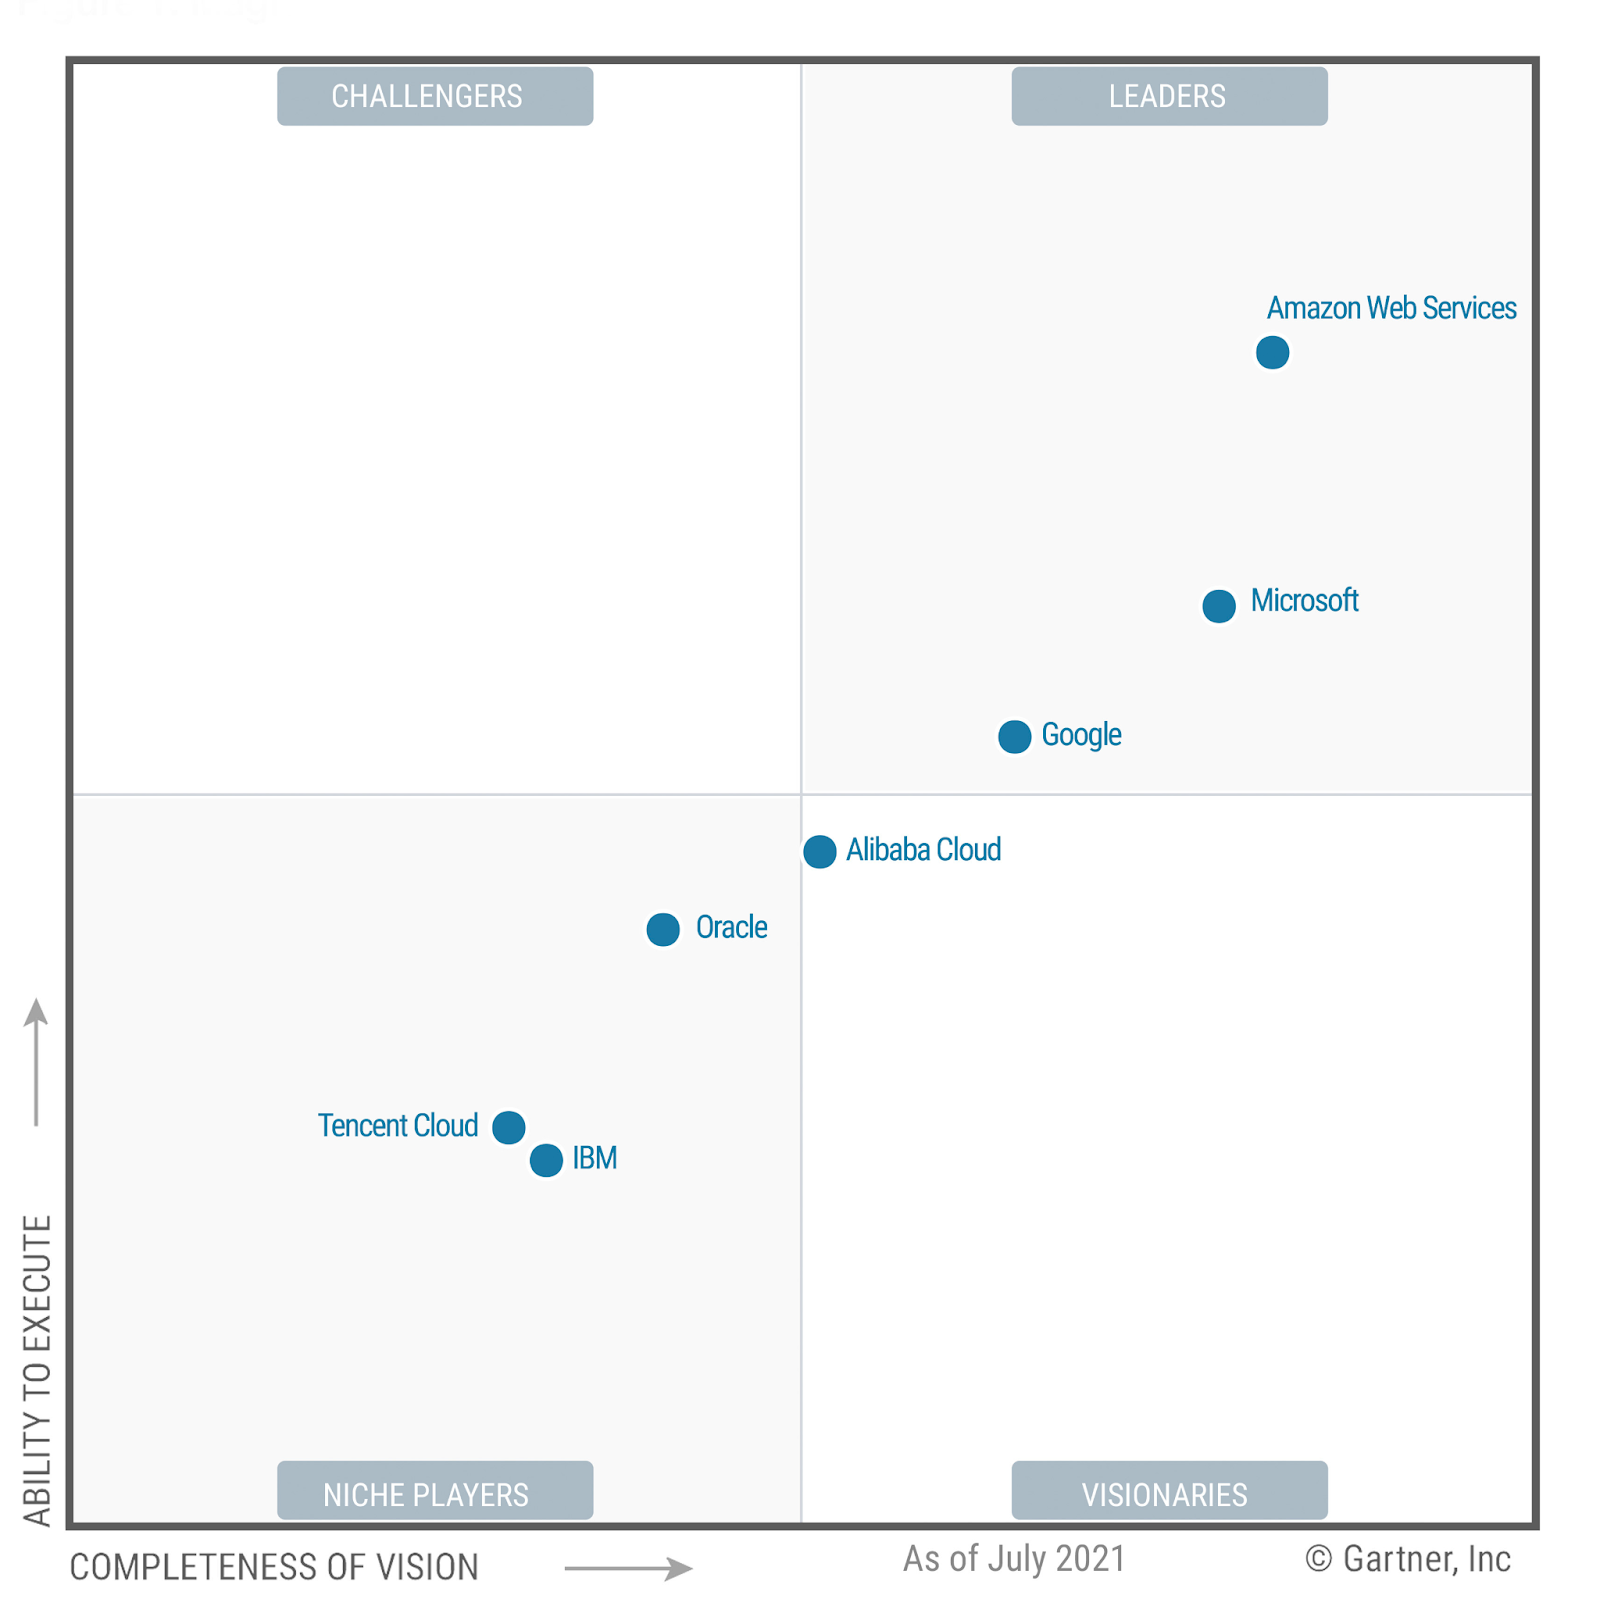
Amazon Web Services (AWS) is the world’s broadly adopted cloud platform, offering over 200 fully featured services. AWS has the most services and capabilities than any other cloud provider – from infrastructure technologies like compute, storage and databases to emerging technologies like machine learning and artificial intelligence, data lakes and analytics, and the Internet of Things. This will make it faster, easier and more cost-effective to migrate existing applications to the cloud and develop almost all types of applications. As of 2021 AWS is the Cloud Infrastructure & Platform Services provider leader in Ability to Execute and Completeness of Vision.[11]
AWS also has the deepest functionality within those services. Furthermore AWS is designed to be the most flexible and secure cloud computing environment available today. AWS uses IAM to securely control access to AWS resources. With the help of IAM Users and IAM Groups we have the capability of assigning different capabilities to different users inside of AWS Ecosystem.[11]
AWS Identity and Access Management (IAM)
IAM is used to achieve a differentiated access control to the entire AWS platform.
An AWS IAM user is a structure that is created in AWS to represent the person or application that uses it to interact with AWS. IAM is used to control who is authenticated (signed in) and authorized (has permissions) to use resources. A user in AWS consists of a name and credentials.[12]
When an AWS account is created, it has full access to all AWS services and resources in the account. This identity is called the root user of the AWS account and is accessed by logging in with the email address and password. The root user is not to be used for daily tasks, instead, it is the best practice, that the root user should be used to create the first IAM user with administrator privileges. Then lock down the root user credentials securely and use them only to perform a few account and service management tasks.
The IAM User Group is a group of IAM users. User groups define the permissions of multiple users, which can make it easier to manage the permissions of those users.
To make it easier to manage the permissions among ourselves we created IAM Group for Developers. By prohibiting specific permissions to this IAM Group, the root user was also able to lower the risk of possibly ranking up server costs.
AWS Elastic Compute Cloud (EC2)
Amazon Elastic Compute Cloud (Amazon EC2) offers scalable, virtual computing environments, called instances for the AWS Cloud.
It is one of AWS’ most well-known services and offers an easy accessible way to run applications on the public cloud.
EC2 pricing is based on the hours and size of an instance, region, and operating system. Since we plan to use the smallest available machines (t2.micro: 1 vCPU and 1GiB RAM), using the Amazon Linux 2 OS, we can take advantage of the AWS free contingent. However, this limits the performance of our final application.
EC2 instances are the workhorse of our setup, since they should run the Docker containers, containing our application.[13]
AWS Simple Storage Service (S3)
S3 is an object storage service which we will mention at that point for the sake of completeness. We did not explicitly add any S3 storage by ourselves.
It stands out with great scalability, availability, security and performance in general and is widely used implicitly by other AWS services like Elastic Beanstalk (see next section).[14]
AWS Security Groups
Security Groups are not to be confused with IAM Groups. The security group acts as a virtual firewall for our EC2 instances to control inbound and outbound traffic. Inbound rules control incoming traffic to our instances, and outbound rules control outgoing traffic from our instances. We can specify one or more security groups when we start an instance. If we do not specify a security group, Amazon EC2 uses the default security group. We can add rules to each security group that allow traffic to or from the associated instances. We can change the rules for a security group at any time. New and modified rules are automatically applied to all instances that are associated with the security group. When Amazon EC2 decides whether to allow traffic to an instance or not, it evaluates all rules from all security groups that are associated with the instance.[15]
AWS Elastic Container Service (ECS)
AWS ECS is a highly scalable, fast container management service that simplifies running, terminating, and managing containers in a cluster. We only used ECS in the context of auto scaling our Beanstalk environments.[16]
AWS Elastic Beanstalk (EB)
AWS Elastic Beanstalk is an easy-to-use service for deploying and scaling web applications and services that leverages Amazon EC2 and S3. It’s built upon AWS ECS and uses managed containers that support Node.js, Java, Ruby, Docker and more. Elastic Beanstalk automatically handles the deployment details-provisioning capacity, load balancing, auto-scaling, and monitoring application health. While we retain full control of the AWS resources powering our application and can access the underlying resources at any time. We only pay for the AWS resources needed to store and run our applications, there is no additional charge for Elastic Beanstalk.
Elastic Beanstalk is the fastest and simplest way to deploy our application to AWS. We can use the AWS management console, the AWS CLI, a Git repository, or an integrated development environment (IDE) like Eclipse or Visual Studio to upload our application. Elastic Beanstalk builds our docker image using your uploaded source code, and then it is deployed to EC2 instances running in an Elastic Beanstalk environment.[17]
Elastic Beanstalk Command Line Interface (EB CLI)
The EB CLI is a command line interface for AWS Elastic Beanstalk that provides interactive commands that simplify creating, updating and monitoring environments from a local repository. To install EB CLI Git, Python and virtualenv needs to be installed on the machine.
Autoscaling Groups / ECS Clusters
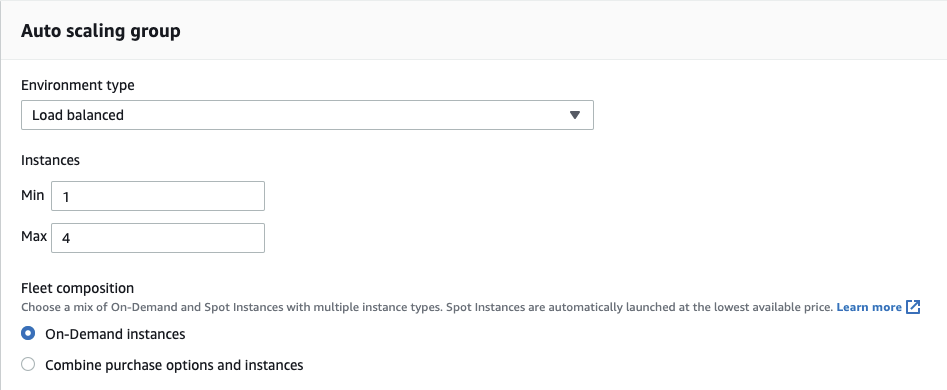
Elastic Beanstalk enables automatic scaling of an application. An Elastic Beanstalk environment contains a so-called Auto Scaling group, which manages the EC2 allocated instances. If load balancing is configured, Auto Scaling automatically adds or terminates new EC2 instances as needed, within a defined range of instances.
Our application is configured to use 1 to 4 instances for example. When needed, Beanstalk launches additional on-demand instances for our backend environment and encapsulates them in an ECS cluster.
At the same time, Auto Scaling also ensures that at least one instance of the application is always running.[18]
Elastic Load Balancing
When a load balancer is enabled for an Elastic Beanstalk environment, Elastic Beanstalk automatically creates an Elastic Load Balancing load balancer. This load balancer distributes traffic among the individual instances of the environment. Elastic Beanstalk manages this load balancer completely independently, including security management and termination.
Alternatively, a load balancer can be shared across multiple Elastic Beanstalk environments. This saves costs, but conversely requires a bit more responsibility in managing the load balancer.
Our application has load balancing enabled for the backend environment on a test basis, with a simple classic load balancer configured for HTTP.
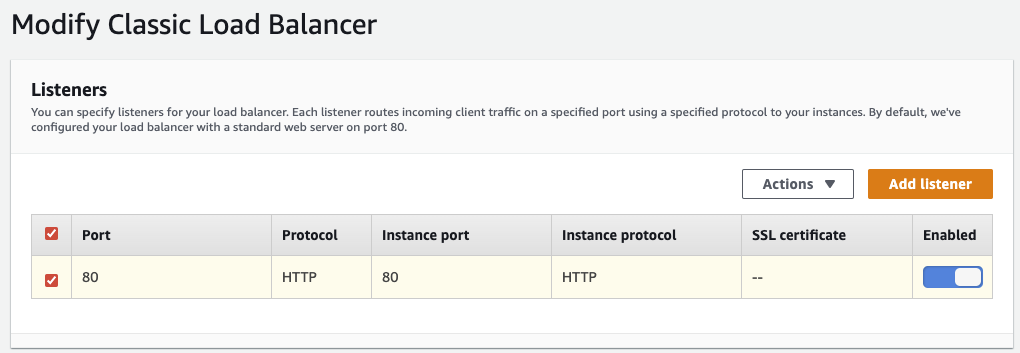
To enable load balancing, the auto scaling group of the Elastic Beanstalk environment must be configured to use the load balanced environment type instead of the single instance type, which is default.[19]
Working with EB CLI
The Elastic Beanstalk Command Line Interface (EB CLI) is a command line interface for AWS Elastic Beanstalk that provides interactive commands that simplify creating, updating and monitoring environments from a local repository. It is an alternative to the Elastic Beanstalk console for everyday development and testing cycles. We use EB CLI to create connections between the directory and the EB environment. It allows us for finer control over the environment. EB CLI does lots of background work to magically put everything in the right place. Furthermore, EB CLI helps us to easily auto deploy through the pipeline. Setting, deploying, monitoring and terminating an environment is done very easily using simple commands on the command interface using the EB CLI.
The first step to create an environment using the EB CLI is entering the command eb init. This command initializes the current directory as a Elastic Beanstalk Environment. During this process, the EB CLI prompts for several configurations such as which region the environment will be created, the credentials, the platform (Docker), the application name and the correct key pairs. This information is used to create the desired environment.
An application in Elastic Beanstalk is a resource that contains a set of application versions (source), environments, and saved configurations that are associated with a single web application. Each time you deploy your source code to Elastic Beanstalk using the EB CLI, a new application version is created and added to the list.[20]
A very useful feature Elastic Beanstalk offers is the possibility to test your configured environment locally, using the command eb local run. We used this to test our environment before we tried to deploy it.
Application deployment with Elastic Beanstalk
Once the init command successfully finishes, there will be a new directory in the project folder called .elasticbeanstalk which contains the generated configurations. Using eb create can create our new environment and deploy the project.
After the successful deployment the terminal will display the Environment details as follows:
Environment details for: EB-foodadvisor-backend.env
Application name: EB-Foodadvisor-Backend-Env
Region: eu-central-1
Deployed Version: app-141029_145448
Environment ID: e-um3yfrzq22
Platform: 64bit Amazon Linux 2014.09 v1.0.9 running PHP 5.5
Tier: WebServer-Standard-1.0
CNAME: tmp-dev.elasticbeanstalk.com
Updated: 2022-02-29 21:54:51.063000+00:00
Printing Status:
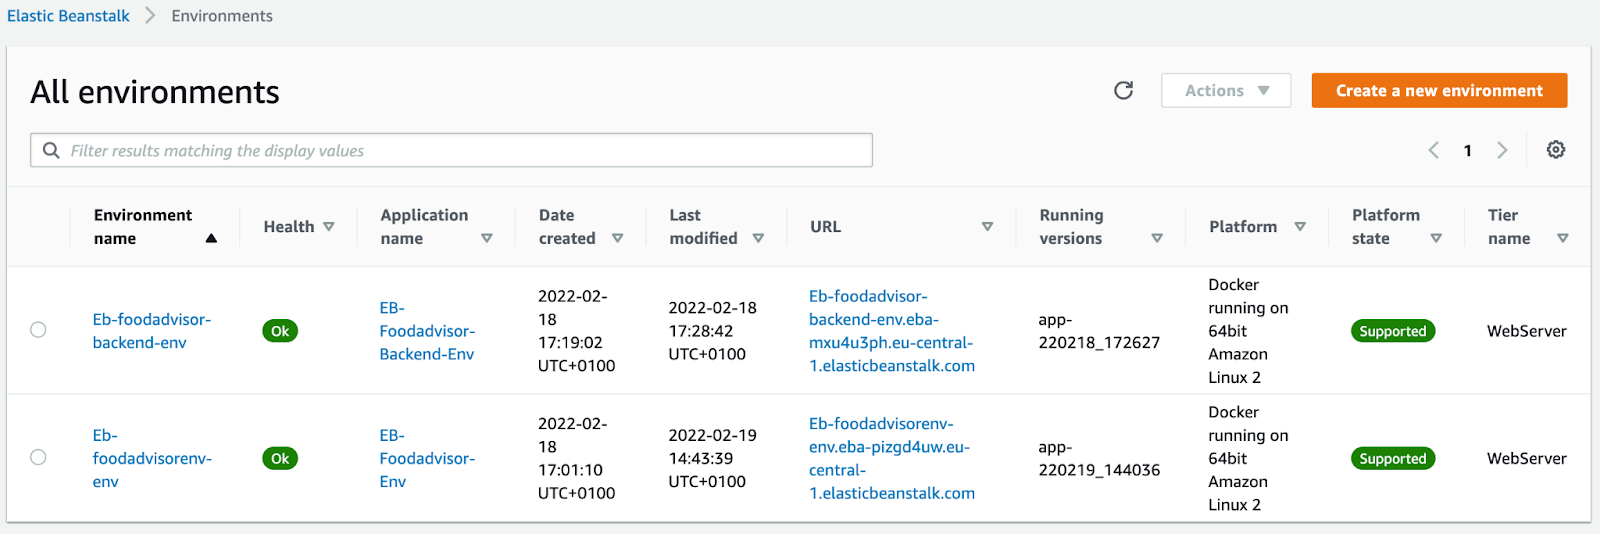
...On the Elastic Beanstalk service in the AWS management console, we can see the new application being created like below. It should take a few minutes for the application to be created.
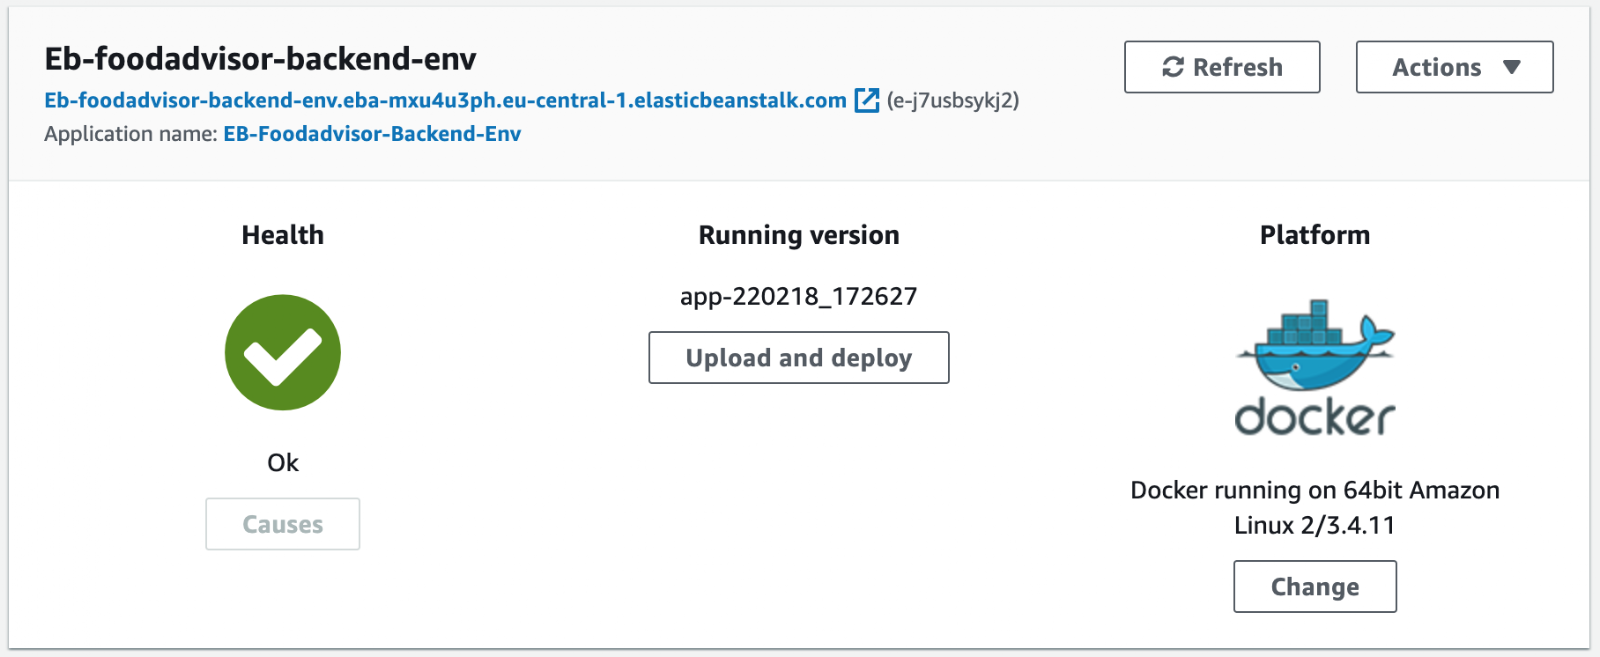
Since we are going to use an Elastic Beanstalk environment for backend and frontend, we have to configure, initialize and deploy both of them as separate environments. Below you can see how it looks when you have deployed two environments.
Deploying Docker containers on Elastic Beanstalk
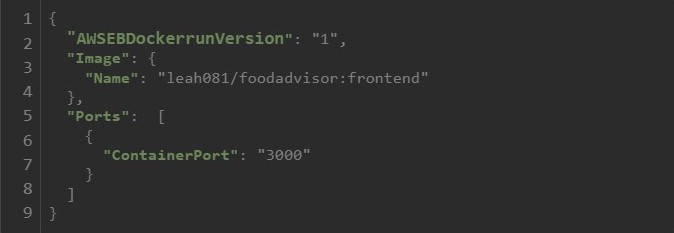
In order to deploy a Docker container to an Elastic Beanstalk environment via EB CLI, a special configuration file is required, the Dockerrun.aws.json file.
Since deploying multiple containers to a single Elastic Beanstalk environment is deprecated, we create one of these files for each of our containers. So in the end, each of them were deployed to their own Elastic Beanstalk environment.
The Dockerrun.aws.json contains essentially the same set of elements as the docker-compose file, but must be written in JSON and therefore has a different syntax.
Our Dockerrun.aws.json are fairly simple and include only the necessary elements as shown below: Which Elastic Beanstalk Docker environment type are we using (AWSEBDockerrunVersion), the container we want to deploy (since we want to use our Docker images from Docker Hub we use the property Image and Name here but you could also configure a local container) and the port the Applications should be exposed on (Ports and ContainerPort properties).[10]
AWS Relational Database Service (RDS)
Eventually, the SQLite database, coming with python and which is currently used for simplicity by our django backend will no longer be able to meet requirements. When scaling our (backend) application, which means that the auto scaling group would add additional instances to our backen beanstalk environment, the database needs to scale with it. However, since the SQLite database is bound to the application itself each instance would have its own database. So it would be more convenient and more consistent if each instance could access the same scaling database. To achieve this, we would include AWS RDS. Not only does it simplify the creation, management and scaling of a relational database, but also offers a wide range of available database engines like PostgreSQL, MySQL, MariaDB, Oracle and more. In a fictiv scenario, where traffic increases in such a way that we would need additional backend instances to answer incoming requests, we would set up a RDS instance of a MySQL database to hold our data. That database can then be automatically scaled on its own and is not bound to the number of backend instances accessing it.[21]
Lessons Learned
We had to first create an overall overview over the whole AWS ecosystem and all the possibilities we have of realizing our ideas. Since we had never worked with AWS Elastic Beanstalk or any of the other AWS services before, it was quite a task. The huge offer of services and the confusing UX was not always ideal because we couldn’t understand everything and it hindered us to find the service we actually needed. It didn’t help that nearly everything costs money. So we had to use the lowest services which were free to try out.
Especially our EC2 instance running the Jenkins server suffered from this drawback. Because of the very limited compute power installing and running applications takes a lot of time if it works at all. Unfortunately, this led to many issues when trying to install dependencies, run tests or deploy freshly built images to Docker Hub. We often had to reboot the Jenkins instance because it did not respond anymore.
We learned that in order to transfer data from the Internet to an EC2 machine and vice versa, the security groups assigned to the instance must contain certain rules, i.e. if the security group does not explicitly allow ssh connections, no such connections can be established. Also, developers must have the correct IAM permissions (either for themselves or for their IAM group) to manage the AWS cloud or connect to an EC2 instance.
Another problem when trying to deploy the elastic beanstalk was the very few and not very specific error messages that were prompted. We had a hard time finding out what the actual problem was. Furthermore, we struggled with selecting the correct EB platform type. While we first thought we should go with a EB Docker Multi-container setup for which there are lots of tutorials to find, we had to switch to a Single-container setup. One of the issues with EB Docker Multi-container setup is that it is depreciated.
The way Elastic Beanstalk handles auto scaling and load balancing was surprisingly easy to set up (although a productive configuration would need a deeper dive into the many available options) and only a matter of minutes.
Development Strategy & CI/CD
We decided very early on how our optimal workflow for the project would look like. This is not only about Continuous Integration as an approach to automate build and test, but also specific workflows around the whole lifecycle from defining an issue to deploying it.
CI/CD
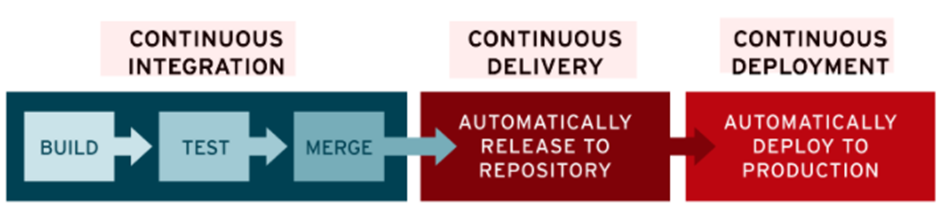
CI/CD provides continuous automation and monitoring across the entire app lifecycle, from integration and testing to deployment and implementation phases. These interrelated practices are often referred to as the “CI/CD pipeline”.[22]
Continuous Integration
Automation process for developers where new code changes for apps are regularly developed, reviewed and merged into a common repository. → Many teams find that this approach leads to significantly fewer integration issues and allows the team to develop cohesive software faster.[22]
CI Best Practices by Martin Fowler and how we implement them [23]:
- At least one integration per developer every day
- automated self-testing builds → with jenkins
- Failed builds must be fixed IMMEDIATELY
- Test in a Clone of the Production Environment → for simplicity reasons, we will not do that in our student project yet since we would need to run more instances on AWS that need resources that would cost us money. Our CI/CD runs tests directly in the jenkins master instead. (But for the vision of a large scaling production environment we would need to use a development clone with exactly the same conditions as production.)
- fast builds (for fast feedback and to enable the developers to make small commits) → we use Watchdog Builds for fast integration and Nightly Builds for deployment (more info later)
- Transparency: everyone can see if a build fails or was successful. → everyone needs to be able to see the jenkins console. but for a better implementation of this practice we would need some kind of alarm everyone immediately sees. Some offices use traffic lights or other creative solutions on this. But since homeoffice got more of the rule, probably automated emails would be the best go to solution here
Continuous Delivery
App changes made by a developer are automatically tested for bugs and uploaded to a repository (such as GitHub or a container registry).[22]
Continuous Deployment
Extends the benefits of Continuous Delivery by automating the next phase of the pipeline as well (deploy to production).[22]
Jenkins vs Gitlab CI
| Jenkins | Gitlab CI |
| 16.000+ stars on github → way more commonly used | 2.012 stars on github → But on other platforms, they are head-to-head |
| We want to learn jenkins because some of us need to work with it in the near future | We use gitlab anyway → everything centralized at one place |
| Self-hosted | (self-) hosted by HdM |
| Usually overhead for smaller Projects since we have to set it up by ourselves | Dashboard for performance metrics |
| Higher EC2 cost for parallel Jobs | Auto-Scaling CI runners [24] |
For our project scope, Gitlab CI would have probably been the better choice, since it has autoscaling and we would have everything at one place. But we all wanted to learn how to work with Jenkins since it is still more commonly used and that’s why we chose it despite the pros of Gitlab CI.
“Freestyle” vs. Pipeline in Jenkins
What are „Freestyle“ Jobs in Jenkins?
Freestyle Jobs establish just a simple Continuous Integration by defining sequential tasks in the application lifecycle. They don’t support continuous delivery and development or more complex jobs like pipelines do.[25]
What is a Jenkins Pipeline?
The Jenkins Pipeline Plugin enables so-called Pipelines that trigger Jenkins jobs via simple text scripts. The scripts use a pipeline domain-specific language (DSL) which is based on the Groovy programming language.
As already mentioned, Jenkins pipelines support not only Continuous Integration, but also Continuous Delivery and Deployment by a highly configurable Jenkins file. Further advantages are [25]:
- Durability: Pipelines can survive both planned and unplanned restarts of the Jenkins controller.
- they can be paused
- Pipelines can fork or join, loop, and operate in parallel.
- they can restart from any saved checkpoint, so you don’t need to run the whole thing again.
- The Pipeline plugin supports custom extensions to its DSL (domain scripting language) and there are several other plugins that make integration for jenkins pipelines easier.
Steps, Nodes and Stages in Jenkins
Steps: Single Tasks as part of sequences.
Nodes: Any computer (controller or agent) that is part of the Jenkins installation.
- „controller“: the basic installation of Jenkins on a computer
- „agent“: a computer set up to offload particular projects from the controller. Every agent needs to have the required dependencies for the jobs installed. (→ we didn’t use agents for simplicity and cost reasons.)
- „executor“: An “executor” is a computational resource for compiling code (Thread). It can run on controller or agent machines, either by itself or in parallel with other executors.
Stages: a conceptually distinct subset of tasks performed through the entire Pipeline. Can be composed of one or multiple steps (f.e. „build“,“test“ & „deploy“) [25]
Watchdog and Nightly Builds
“Watchdog Builds”: For a good implementation of CI, it is essential that the pipeline initially runs fast to test the code, regularly committed by every developer, and merge it. For this purpose we use so-called „Watchdog Builds“ that can run multiple times a day on every commit with fast feedback for the developers.[26]
For this purpose we only run a simple CI Pipeline.

“Nightly Builds”: The automated Build & Delivery then runs every night on the Jobs that were newly merged to the specified branch. However this approach should not be used to deploy to the production environment as this should always be supervised. Also testing tasks that take a very long time, like dependencies and security issues, can be run with the nightly builds. Since we don’t have a productive Release yet, we deploy to our master to demonstrate the Jenkins workflow. In our case the Deployment also involves pushing the frontend and backend Images to DockerHub.[26]
Advantages of using Watchdogs and Nightly Builds:
- Agents don’t block during the day
- developers get fast Feedback from watchdog tests
- guaranteed latest status in the morning (pull once in the morning)
- no overhead caused by multiple deploys per day, per developer.
Jenkins setup and configuration
We ended up hosting our own Jenkins server on an EC2 instance within our AWS Cloud. The setup took quite some time because we needed to install plugins and dependencies which our jobs needed later.
Jenkins offers many useful plugins to make this a more convenient process. For example, installing and using NodeJS was very easy with the appropriate plugin.
Automated job triggers from GitLab
The above described CI/CD process requires automated job triggers, which start Watchdog builds when a new push is sent to GitLab. There are different ways to realize this like webhooks in GitLab or Jenkins but the preferred way of doing this is the Jenkins GitLab integration plugin. When configured correctly, it allows a two-way-communication between GitLab and Jenkins. GitLab can start a job by a defined trigger (Push, Merge-Request and so on) and Jenkins can send back build status information.
While defining, setting up and starting the Jenkins jobs by hand worked fine, we couldn’t establish a working two-way-connection between Gitlab and Jenkins. While Jenkins could log into GitHub, it didn’t work the other way around, which consequently meant that GitLab didn’t trigger jobs automatically. We assume that this is due to an incorrect/missing configuration of the security group associated with the EC2 instance running Jenkins.
Development Strategy
We also defined a development workflow with conventions on how to track issues and a git branching strategy for the purpose of a highly scalable project.
Issue Tracking
To define the issues, we would like to work with a Kanban Board to collect and pull our tasks. To have everything in one place, we decided to use the gitlab board for that. We also defined rules for commit messages and branch-naming, that connect the commits to the tasks.
Branching Strategy
We started up using a very simple branching strategy with just the permanent master branch and temporary feature branches that are merged into the master as soon as they are done (also called trunk based branching). For further development of the large scaling app, we were looking into more complex branching strategie like the Git Flow branching strategy and comparing it to the lighter GitHub Flow.
Git Flow with “release”-concept
We would be working with releases that contain a specified amount of features. Then if those are working on the development environment – which is an exact clone of the master – they would be deployed to the production environment. With git-flow we would additionally have a release branch between, from which a set of features is finally deployed to the Master as a new release.
The concept of “release” doesn’t really fit into the concept of continuous deployment, as the deploys only happen every release, which is typically several weeks apart. This is anyways still applicable for a continuous delivery strategy, where only deploys to develop are continuous and very frequent.[27]
GitHub Flow
GitHub Flow is a much simpler strategy, actually not that different from what we are doing right now. Instead of working with releases, this is a continuous deployment approach, where every feature which is tested and reviewed (via merge request) will be pushed to the master branch and immediately deployed to the production environment.[28]
Decision
| Git Flow | Github Flow | |
| Continuous Deployment | no (Continuous Delivery possible) | yes |
| Complexity | high | low |
| Team size | medium | small |
| production stability | stable | higher risk |
When we have our first initial productive environment working, we would prefer to have another permanent branch for development, because pushing every feature directly to the master could destroy the productive environment on which we envision a lot of permanent user traffic. Because of that we want to make sure that we have a stable productive environment. Also we are planning for a highly scalable Project so the team size should also be scalable. As Github Flow only makes sense for smaller Teams or maybe for maintenance of an otherwise finished project it is ultimately not our choice. That’s why we chose to compromise on the Continuous Deployment side and only do CI/CD on the develop environment so no real “deploy” to production but to develop. We then will use a Jenkins Pipeline anyway to deploy the Releases to production, it will just not be as “continuous/frequent” as with a feature branching strategy like Github Flow.
Naming Strategy
We defined the following naming conventions for our commits and feature branches, so that they would be directly connectable to the matching tickets. Naming conventions help the developers to maintain the code, so anyone who reviews the code can connect the commits to an issue. It can also help to understand where unexpected changes might come from or to solve conflicts.
Branch name: Start with feature/bugfix/test, Issue Id, Issue Name, seperated by ‘-’
Example: “feature–2–test-issue”
Commit message: Issue URL | Issue Titel | Description
Example: “https://gitlab.mi.hdm-stuttgart.de/mk374/foodadvisor-sem-ws21/-/issues/5 | Set up CI/CD Pipeline | Set up a Jenkins CI/CD Pipeline with minimum stages/steps for initial test.”
The whole process
Our Goal was to plan and set up everything described in this article, so that the development teams could start this process from here. The whole development and CI/CD process we planned for the implementation of our Project is visualized below.
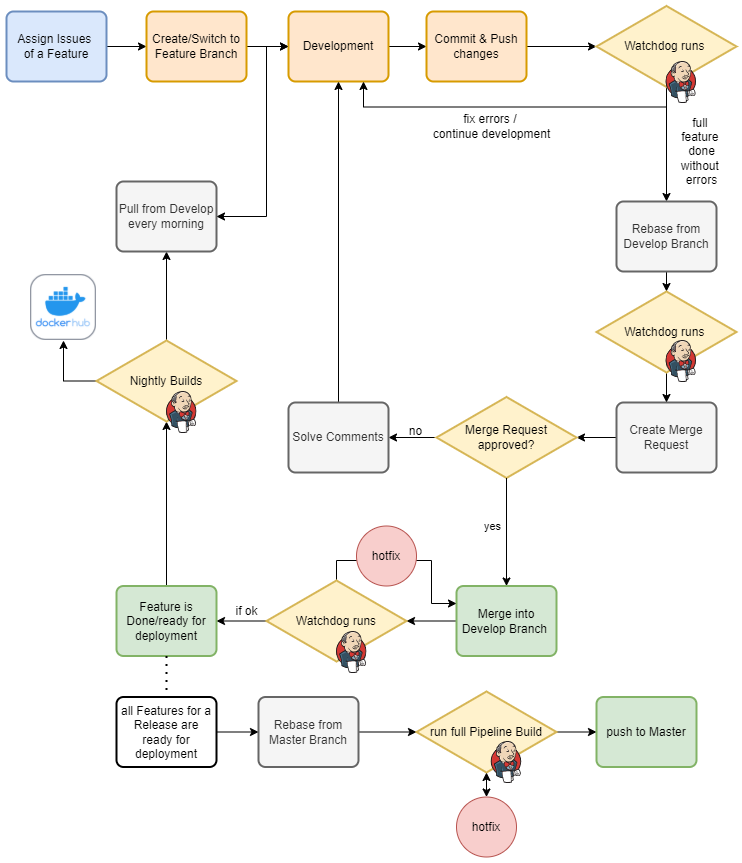
Branching Conventions for highly scaling large teams
Working on a lot of different features in parallel and probably also having multiple team members working on the same feature or related features, merge conflicts get more common in larger teams. To prevent merge conflicts, frequent merges are essential, but also to ensure that no critical bugs are merged.[29]
We defined our process so that developers can (and should) commit multiple times a day, which triggers a Continuous Integration “watchdog” Pipeline. If this runs without errors, the feature can be merged to develop after a quick review. To make sure that every team member works off from a freshly tested current state every day, these merges have to happen at the end of the day. Our Pipeline runs nightly Builds that tests the whole thing again and also deploys the frontend and backend images to DockerHub every night. By requiring everyone to pull from develop every morning and to merge their work to develop every end of the day, we ensure a continuous workflow with minimal merging conflicts. For this to be possible, features/issues need to be small and independent from each other.
Lessons Learned
Development Strategy
Rules must not only be defined, but also be followed. Focusing on getting the integration on docker and AWS to work we forgot about our beautifully defined commitment rules and task boards. This is not that dramatic since we didn’t really start the development-phase yet. But at least up until now we (the developers) should follow the defined development strategy precisely. A solution might be to designate a responsible person to make sure everybody understands and follows those rules.
Jenkins
- Not as easy as we thought: jenkins machine needs all dependencies for the build
→ if you want agents, dependencies for the jobs that should run on them need to be installed on every single one (also if the are supposed to be dynamic) - The Jenkins machine needs to run a lot of expensive tasks and some seem to be too much for just one free EC2 instance and the machine dies.
- F.e. node.js plugins that make the installation process easier
- Jenkins file code snippets can be generated by a syntax generator
- Our jobs run on the same machine as the jenkins runs so we have no agents, just the controller →
- can’t run two jobs at the same time
- jobs have to be thrown away so it doesn’t get cluttered.
- as already mentioned, the machine can’t handle it and dies
- tests don’t run on a real clone of the master (architecture-wise), so we don’t have an absolutely waterproof testing result.
Conclusion
Our final conclusion of the entire project is rather positive. In our eyes, we achieved all major learning goals and we learned a lot in general. Although we thought we could realize more features, we’re happy with the final result in the end.
We intensively worked with the AWS cloud and got to know its services, advantages, disadvantages, potential and limitations. We focused on working with containers and had a deep dive into Elastic Beanstalk and the work with EC2. While the general setup was quite easy to accomplish thanks to the great AWS documentations, we had a hard time configuring the network communication and security permissions for our system. Once we figured out what needed to be configured, it was not a major problem to implement it, thanks to the AWS documentation or one of the many tutorials on the Internet.
We made great experiences working with docker and we now share the hype for (docker) containers. Wrapping our applications into a docker container and publishing them to Docker Hub was an easy but satisfying task because it worked for each team member and was understood by everyone very quickly. Problems started when we wanted to deploy docker containers to Elastic Beanstalk. However, this was not a problem caused by docker but by counterintuitive and contradictory tutorials about how and whether or not deploying multi-container applications (which is deprecated) on Elastic Beanstalk. When we finally found the correct way to do it (one container per Elastic Beanstalk environment), deployment was super easy using Dockerrun.aws.json files.
Although we didn’t really have a chance to benchmark our designed development strategy and our implemented CI/CD pipeline, we think that we really benefited from designing/realizing them. Especially having automated build and test pipeline turns out to be a feature we don’t want to miss in feature projects. In retrospect, we should have used the GitLab Runner instead of Jenkins, because we got a lot of network connectivity problems between our self-hosted Jenkins server and GitLab. However, using Jenkins was one of the learning goals, and we gained experience setting up Jenkins, defining and executing jobs, and connecting Jenkins to a version control system. So overall, we are also happy with the way this part of the project turned out.
Bibliography
All links were last accessed on February 27, 2022.
[1]: https://djangostars.com/blog/why-we-use-django-framework/
[2]: https://www.peerbits.com/blog/reasons-to-choose-reactjs-for-your-web-development-project.html
[3]: https://calculator.aws/#/addService?nc2=h_ql_pr_calc
[4]: https://www.docker.com/resources/what-container
[5]: https://www.geeksforgeeks.org/why-should-you-use-docker-7-major-reasons/
[6]: https://docs.docker.com/engine/reference/builder/
[7]: https://docs.docker.com/compose/
[8]: https://docs.docker.com/get-started/overview/
[9]: https://cloudonaut.io/amazon-ecr-vs-docker-hub-vs-github-container-registry/
[10]: https://docs.aws.amazon.com/elasticbeanstalk/latest/dg/single-container-docker-configuration.html
[11]: https://aws.amazon.com/what-is-aws/
[12]: https://docs.aws.amazon.com/IAM/latest/UserGuide/introduction.html
[13]: https://docs.aws.amazon.com/AWSEC2/latest/UserGuide/concepts.html
[14]: https://docs.aws.amazon.com/AmazonS3/latest/userguide/Welcome.html
[15]: https://docs.aws.amazon.com/AWSEC2/latest/UserGuide/ec2-security-groups.html
[16]: https://docs.aws.amazon.com/de_de/AmazonECS
[17]: https://aws.amazon.com/de/elasticbeanstalk/
[18]: https://docs.aws.amazon.com/elasticbeanstalk/latest/dg/using-features.managing.as.html
[19]: https://docs.aws.amazon.com/elasticbeanstalk/latest/dg/using-features.managing.elb.html
[20]: https://aws.amazon.com/de/rds/?p=ft&c=db&z=3
[21]: https://docs.aws.amazon.com/elasticbeanstalk/latest/dg/eb-cli3-configuration.html
[22]: https://www.redhat.com/de/topics/devops/what-is-ci-cd
[23]: https://martinfowler.com/articles/continuousIntegration.html
[24]: https://www.lambdatest.com/blog/jenkins-vs-gitlab-ci-battle-of-ci-cd-tools/
[25]: https://www.jenkins.io/pipeline/getting-started-pipelines/
[26]: https://cloudogu.com/de/blog/cd-mit-jenkins-pipelines-teil-2-performance-optimieren
[27]: https://nvie.com/posts/a-successful-git-branching-model/
[28]: https://lucamezzalira.com/2014/03/10/git-flow-vs-github-flow
[29]: https://www.perforce.com/blog/vcs/best-branching-strategies-high-velocity-development
Leave a Reply
You must be logged in to post a comment.