A variety of today’s applications require careful handling of user data. However, especially in student projects, due to time constraints or the focus of the project, there is a tendency to neglect or only superficially implement authentication and handling of user data.
In the context of our project for the lecture ‘System Engineering and Management’ we have decided to create a hosting provider. Users should be able to book and start Docker container instances via a CLI application. For this project, it was important for us to integrate comprehensive Identity and Access Management (IAM) for our users.
What is Keycloak!?
Keycloak is an open-source software for identity and access management developed by Red Hat. It provides a comprehensive solution for authentication, authorization, and user management for web applications and services. Essentially, Keycloak functions as a Single Sign-On (SSO) solution, allowing users to authenticate once and then access multiple applications and services without needing to log in again.
Why did we decide to use Keycloak for IAM?
One of the main reasons why we chose Keycloak over other identity and access management systems is the fact that Keycloak is open-source and therefore free of cost. Since we already operate our own server for hosting the Docker instances, we can also host our Keycloak server on it. Another reason is the huge amount of features offered by Keycloak, which we may not fully utilize at the moment but could become relevant in future (larger) projects. Therefore, we wanted to gain experience with Keycloak already at this stage. Given that Keycloak is maintained by Red Hat and not just a community project, we have great confidence in the software.
How do we utilize Keycloak in our application?
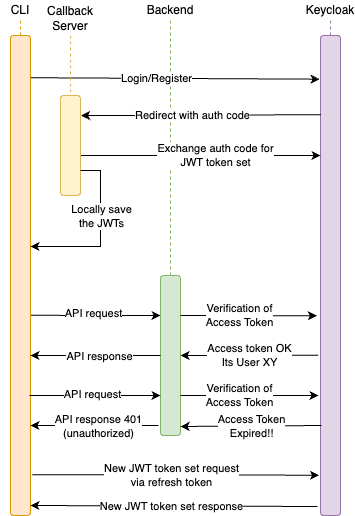
Since Keycloak provides a pre-built web interface for login, registration, and logout, we have decided to utilize this web-based OpenID Connect authentication flow. The concept behind it is as follows:
- The user wants to log in or register via CLI. To do this, a local callback web server is started, and the browser is automatically opened with the corresponding Keycloak interface.
- After successful login or registration on the Keycloak web interface, the browser is redirected to the local callback server. An authentication code is passed as a URL parameter.
- The CLI or the callback server can request a Token Exchange using the authentication code. The authentication code is exchanged for a JWT Token Set. This typically consists of an Access Token, used for API requests against the backend, and a Refresh Token, which can be used when the Access Token expires to request a new JWT Token Set from Keycloak.
- The CLI stores the Token Set locally on the device for future use.
- When a request to the backend is made, the tokens are read again. If no tokens are present, it means the user is not logged in. The backend uses these tokens to identify the user.
- In the case of an expired token, the CLI can use the Refresh Token to obtain a new Token Set from Keycloak and retry the request to the backend.
Using Keycloaks SPI to listen to events
In the implemented hosting provider application, user-related data such as the username, email address, and password are stored in Keycloak. Additionally, the application includes a simple payment model: Each user has a balance that can be topped up and is used to bill the services used by the hosting provider. These user-specific balance information is not stored in Keycloak but in a separate Amazon DynamoDB.
A user is able to self-register using the keycloak web interface. Also there might be the case where a user contacts us in order to get his account deleted. In this context, depending on the event performed, it was necessary to create or remove a corresponding balance instance for the respective user in DynamoDB. The central challenge is to ensure that the data in both Keycloak and the standalone Amazon DynamoDB are consistent and data integrity is maintained.
How can we fix it?
Approach 1: One solution could be the interval-based checking of the data in Keycloak and the separate database to detect and correct inconsistencies. This approach has two disadvantages though: Firstly, the update between Keycloak and the database does not occur in real-time but only at predefined intervals. Furthermore, the data synchronization between Keycloak and the database leads to long-term performance issues if the application is expected to be used by many users.
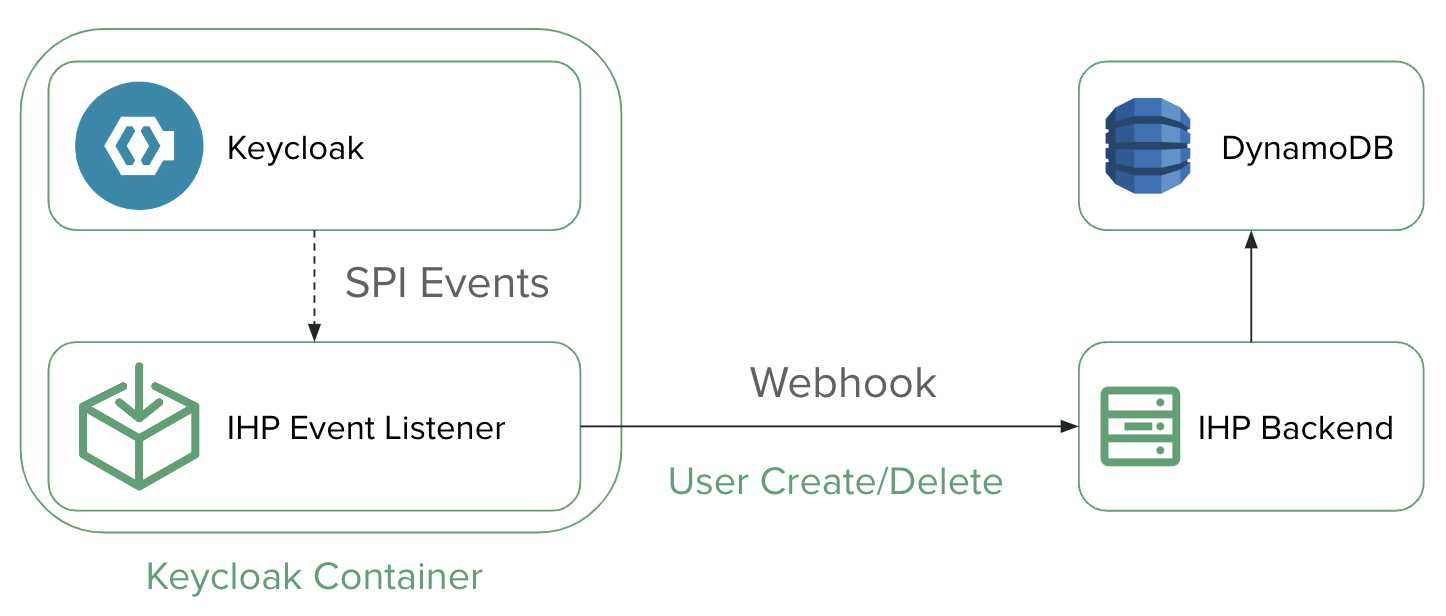
Approach 2: In addition to the interval-based solution, there is also a way to react in real-time to events such as the creation or deletion of a user. Keycloak provides Service Provider Interfaces (SPIs) which serve as interfaces for extensions or customizations.
Regarding our hosting provider service, an Event Listener SPI is used to react to specific Keycloak events and perform logging. This approach circumvents the performance problem of the first approach and also offers a real-time solution instead of an interval-based one. This results in the following flow:
- A new user is created or deleted in Keycloak manually or via the CLI application.
- A SPI event is triggered, which is captured by an event listener.
- These events are transmitted to the backend via webhooks.
- The backend responds accordingly to the events and creates or deletes a balance instance in the database for the respective user.
Learnings and Tips for Reimplementation
- Public Client: When creating the frontend client in the Keycloak Admin interface, the “Client authentication” slider under the “Capability config” section should be disabled. This makes the Keycloak client accessible to the public, which is necessary or sensible for a frontend, as a secret required for verification against Keycloak cannot be kept secret within the frontend. There is relatively little information available on how to create a public client, as these options have changed over time.
- Protection against Phishing: To secure the client against phishing attempts, Valid Redirect URIs should definitely be set. In our case we used http://127.0.0.1/* and https://127.0.0.1/* preventing redirection to an external web server via a phishing link, which could intercept the auth code.
- Dynamic Port for the Callback Server: While developing the CLI or the callback server, we noticed that instead of using a static port for the callback server (e.g., 8080), it’s better to assign a dynamic port. This is not a problem for Keycloak because no port needs to be specified in the Valid Redirect URIs (all ports are valid). It’s important that the callback server be created (and ideally already started) to be able to provide the redirect URL for the login request.
Conclusion
The integration of Keycloak into our CLI application for launching Docker container instances on our server has proven to be extremely beneficial. By using Keycloak, we were able to implement a robust Identity and Access Management (IAM) system that provides our users with secure and user-friendly authentication without the need to develop our own IAM service, saving us a lot of time. Additionally, by utilizing the Keycloak Event Listener SPI with our hosting provider, we ensure efficient management of user data through real-time synchronization between Keycloak and the separate database. We are confident that our experience with Keycloak will not only benefit us in this project but also in future projects.
Should you have any further questions, we are available through the comment function and welcome feedback and suggestions. Also check out our other blog posts about monitoring, zero-log and loki hooks for monitoring and terraform.
Leave a Reply
You must be logged in to post a comment.