Our Sales Pitch
Ever wished your content creation could be as fun and effortless as a dance party with your favourite tunes? Welcome to TotalStudio—the ultimate playground for writers and creators that turns brainstorming into a breeze!
At TotalStudio, we’ve crafted a sleek platform where you can whip up and publish articles faster than you can say “Content is King!” Our SvelteKit-powered frontend is not just pretty to look at—it’s built to handle your wildest ideas with grace. Write, edit, and publish with ease, then export your masterpieces to PDF or other formats with just a click.
And with our smart cloud architecture, you’ll enjoy lightning-fast performance without breaking the bank. TotalStudio is as cost-efficient as it is speedy, ensuring that your creative process stays smooth and affordable.
Visit our demo at https://d2spl1yrrqijog.cloudfront.net/
Welcome to Total Studio
Ready to dive into the world of effortless content creation? Let’s get you started in just a few easy steps:
1. Sign In🚪
First things first, sign in using your Google account. It’s quick and easy—just a couple of clicks and you’re in! (Don’t worry, we’ve got more authentication options coming soon. Stay tuned!)
2. Create Your Masterpiece📝
Now, it’s time to unleash your creativity! Click on the “+ Create New” button to start a new content page. Give your page a snazzy title, and start crafting your beautiful content.
3. Spice It Up with Images und Tables🌟
Want to add some visuals or a snappy table to your page? Simply type "/" while writing, and you’ll get a list of components to choose from. Search for the image or table component, and voila—your content is now even more fabulous!
4. Save your Work💾
Feeling happy with your creation? Hit that Save button and give yourself a pat on the back! You’ll now see your shiny new post in the content table.
5. Share with the World🌍
From the content table, you can preview your post in HTML or download the PDF version, ready to be shared across any platform you like. Your masterpiece is now ready to take over the world (or at least the internet)!
And that’s it! You’re now a TotalStudio pro. 🎉 Happy creating!
Architecture
We chose AWS as our cloud provider for this project based on our positive experience with it in the past. Having used AWS before, we were familiar with its services and capabilities, which made the decision straightforward. AWS offered the scalability and security we required and integrated smoothly with other tools we were using, like SST. Additionally, the robust support and comprehensive documentation provided by AWS were invaluable. Given our previous success and familiarity with AWS, it was a logical choice that allowed us to concentrate on developing our project rather than navigating a new platform.
When we first envisioned TotalStudio, our top priority was designing the perfect cloud architecture for our MVP. We started by sketching out a straightforward diagram, mapping out the essential components needed to bring our project to life.
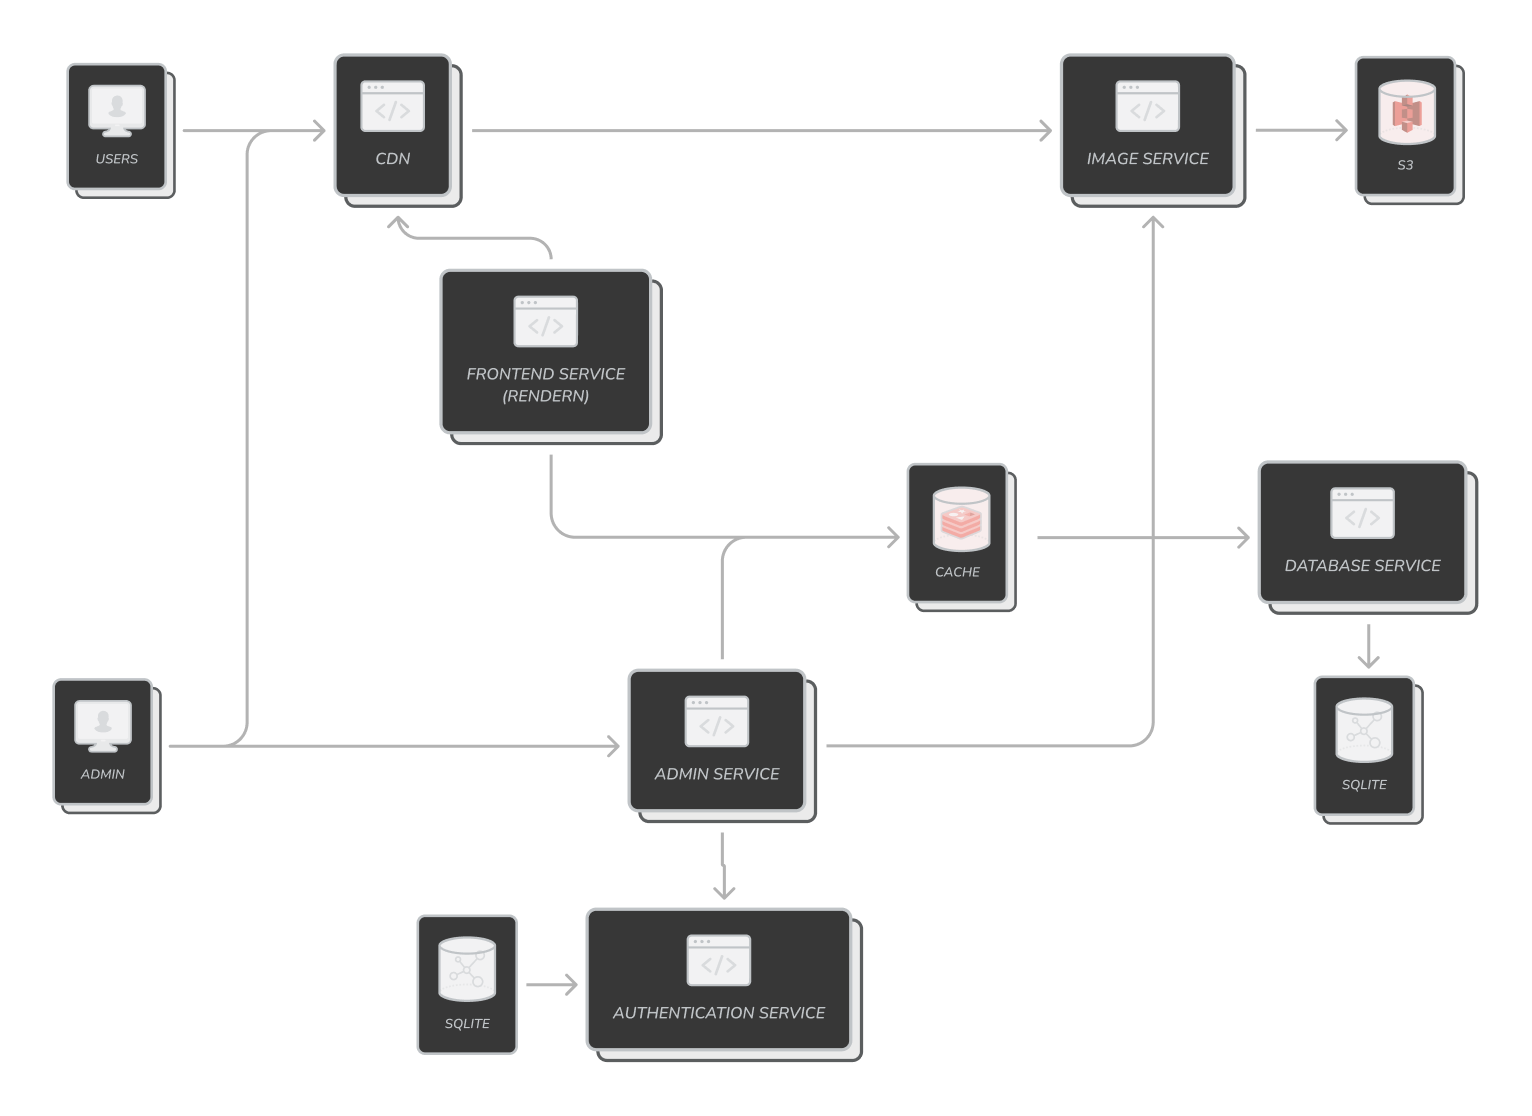
In our initial diagram, we had two key players: the user, who enjoys the content, and the admin, who makes all the magic happen by publishing and creating content through our admin service.
As we rolled up our sleeves and started building and testing our components, we realized we could simplify our setup. After a lively discussion with our professor, we had a lightbulb moment—why not ditch the traditional database and use an S3 bucket to store our content instead? This clever switch allows us to offer a conflict-free editing experience, where multiple admin users can simultaneously edit a page, and our CRDT (Conflict-Free Replicated Data Type) gracefully merges their changes. It’s like a synchronized dance routine for content, minus the stepping on each other’s toes!
So for our final architecture we came up with the following diagram:
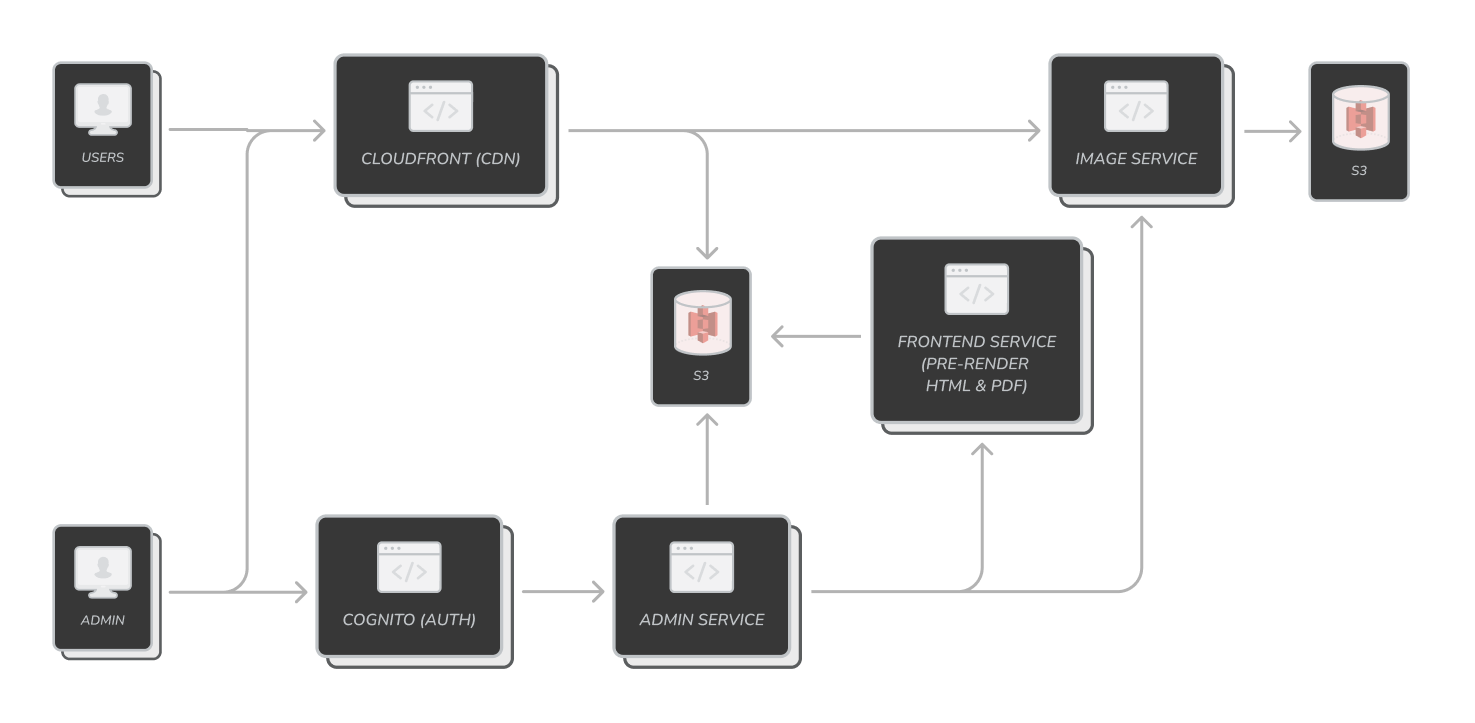
As you can see, while building our App we found some opportunities to shrink our Architecture and remove some complexity.
Infrastructure as a Code
When we kicked off our cloud project, one of the first big decisions was selecting the right infrastructure-as-code (IaC) tool. The options were plenty, with Terraform being a strong contender, alongside other tools like AWS CloudFormation, Pulumi, and Serverless Framework. But after weighing the pros and cons, SST (Serverless Stack Toolkit) won us over. Here’s why we made that call—and why we’re excited about it.
The Journey Through Terraform and Other IaC Tools
We began our project by experimenting with Terraform, a widely-used tool known for its flexibility and support for multiple cloud providers. Terraform allowed us to define our infrastructure in a declarative way, and its mature ecosystem of modules and plugins was appealing. However, as we dove deeper into the project, we encountered some challenges.
Terraform’s flexibility came at the cost of complexity. Managing state files, dealing with complex syntax, and handling dependencies between resources became increasingly difficult as our project grew. We also experimented with other IaC tools like AWS CloudFormation and CDK (Cloud Development Kit), but found that while they offered more AWS-specific features, they still required a lot of boilerplate code and didn’t provide the seamless developer experience we were looking for.
Why SST Stood Out
SST emerged as the clear winner for several reasons:
- Developer Experience: SST abstracts away much of the complexity associated with AWS infrastructure, allowing us to focus on writing application code. Its local development environment, “Live Lambda Development,” lets us run and debug our Lambda functions locally, which drastically speeds up our development cycle.
- First-Class TypeScript Support: Since our project uses TypeScript extensively, SST’s built-in support for TypeScript was a huge advantage. This allowed us to define our infrastructure and application logic in the same language, reducing context switching and errors.
- Seamless Integration with AWS Services: SST is built specifically for AWS, which means it provides deep integration with AWS services like Lambda, DynamoDB, and API Gateway. This tight integration allowed us to build and deploy our serverless application quickly without needing to manage low-level configurations.
- Simplified Deployments: With SST, deploying our infrastructure and application is straightforward. It automatically handles complex tasks like managing AWS resources, packaging Lambda functions, and creating CloudFormation stacks, making deployments reliable and hassle-free.
- Scalability: SST is designed to scale with your application. As our project grows, we can easily add new services or features without having to refactor large parts of our infrastructure code.
Conclusion
In the end, SST won us over with its developer-first approach, seamless integration with AWS, and ability to simplify complex infrastructure tasks. While Terraform and other IaC tools are powerful and have their own strengths, SST provided the best balance of ease-of-use, flexibility, and power for our cloud project. For anyone working on AWS-based applications, especially those leveraging serverless architectures, we highly recommend giving SST a try. It has truly made our cloud development experience smoother and more enjoyable.
Components
Backend – The Editor 🔙
Our journey started with a need to build a markdown editor that was both flexible and framework-agnostic.
In the early Stages we tried multiple All-in one editors and toolkits to find something that we like.
We tried Editors like Tip-Tap, Slate and even shortly thought about reinventing the wheel and building our own solution.
But with each Editor we choose there were either some complex, not so straightforward API design, or problems with getting the Data in standard format like JSON, since many Editors output Raw HTML, which didn’t fit our UseCase.
As the Course is about Cloud Development and not Editor Development, we wanted something easy to use, with a good starting point and open design to add features and work with the data.
Ultimatly we chose Milkdown, a versatile editor kit builder that operates independently of any frontend framework. Milkdown’s design aligns perfectly with our goal of keeping things simple, using vanilla JavaScript, and staying as close to the browser’s native capabilities as possible.
Switching the Project from React to Svelte
Initially, we began our project with React, leveraging Next.js as a Framework, as some Editors we tried only provided React support. However with Milkdown, we quickly encountered a challenge: React’s virtual DOM approach clashed with Milkdown’s direct manipulation of the DOM. This mismatch led to significant complexity in integrating Milkdown with React.
Rather than building complex wrapper components, we decided to pivot to SvelteKit. Svelte’s philosophy of compiling away to vanilla JavaScript made it a natural fit for Milkdown, which thrives on direct DOM manipulation. The transition was surprisingly smooth, we refactored the entire project to SvelteKit in just one day. This decision not only simplified our integration but also aligned better with our goal of creating a lightweight and efficient editor.
Providing Collaboration Using CRDTs 👯
One of our key features was to enable real-time collaboration, similar to what you see in Google Docs. To achieve this, we integrated a CRDT (Conflict-free Replicated Data Type) library, specifically Y.js, into our editor.
Initially, we explored Automerge, another CRDT option. However, Automerge’s implementation in Rust via WebAssembly introduced deployment and bundling challenges that proved difficult to overcome. While Y.js may have slightly lower performance and a less developer-friendly experience (DX) in our opinion, it stood out for its extensive documentation and first-party support with ProseMirror, the engine behind Milkdown.
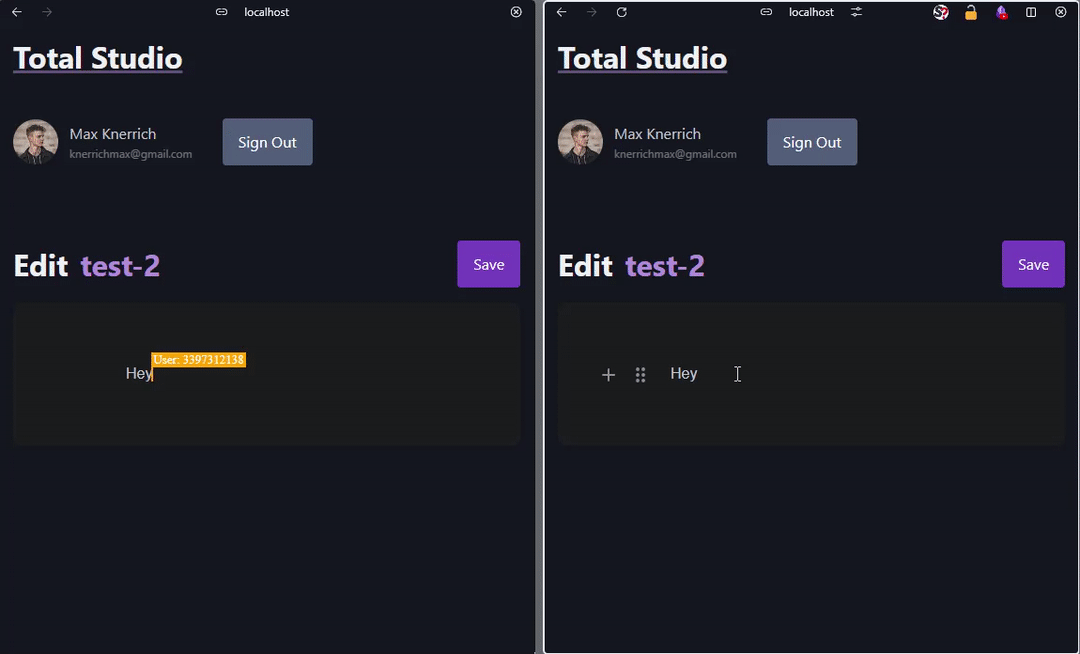
With a CRDT, including Collaboration is Plug and Play, as it handles all complex merging and manipulating the data with the help of internal merging rules.
export function setupCollab(crepe) {
    ...
    const doc = new Doc();
    const wsProvider = new WebsocketProvider("YOUR WEBSOCKET SERVER ADDRESS", 'milkdown', doc);

    editor.editor.action((ctx) => {
        const collabService = ctx.get(collabServiceCtx);
        collabService.bindDoc(doc).setAwareness(wsProvider.awareness).connect();
    });
}
Implementing CRDT-based Collaboration into the editor was straightforward. We only needed to create a new Y.js Document, and bind it to the collabService exposed from Milkdown, which handles all the necessary events to update its internal state to reflect the Y.js document.
The only thing we now needed was an WebSocket Server, which handles the connections and relays the messages between the clients.
That wasn’t a problem during local development, as creating a WebSocket server can be done by Node.js, but we faced significant hurdles when deploying to production.
As in a serverless Environment you can’t just open a WebSocket server in your Node.js instance and call it a day.
Theoretically, SST supports the creation of an WebSocket Server using AWS API Gateway and Lambda Functions to handle the connection and sending of messages.
const collab = new sst.aws.ApiGatewayWebSocket('MyWS');

collab.route('$connect', 'src/functions/connect.handler');
collab.route('$default', 'src/functions/default.handler');
collab.route('$disconnect', 'src/functions/disconnect.handler');
collab.route('sendMessage', 'src/functions/sendMessage.handler');
Creating the necessary Infrastructure was just 5 lines of code in our sst.config.ts file, but we couldn’t get the Handler Functions to work.
As SST recently updated to version 3, with its engine switched from AWS CDK and CloudFormation to Pulumi introducing major breaking changes, this left us without up-to-date documentation, as most of it was still referencing v2.
This made it impossible for us to find a solution, and as we didn’t want to sidestep SST and role our own Deployment, we focused our time on other features.
Possibly downgrading SST to version 2 would have helped us to implement the Collab feature, but this would required a complete rewrite of our infrastructure, which we chose to avoid.
Also downgrading to v2 would vendor lock us in into AWS, as v3, with Pulumi as its underlying Engine, supports all major Cloud Providers.
We plan to revisit this implementation once SST v3 documentation & ecosystem matures.
Markdown as our central File Format🪐
Initially, we considered storing user content in individual SQLite databases. However, since Milkdown natively works with Markdown, we realized that compiling Markdown to save it into a database would introduce unnecessary complexity. Instead, we decided to save the raw Markdown files directly to Amazon S3. This approach simplified our backend logic and allowed us to leverage Markdown as the central file format across our application.
Also with the use of Markdown we can eliminate the vendor lock in for our users, as Markdown is an open standard, so they could theoretically download the raw Markdown files and own their content.
Image Service 🖼️
Milkdown offers hooks to manage image uploads, which we configured to store images in S3.
crepe = new Crepe({
	root: document.getElementById('editor'),
	featureConfigs: {
	'image-block': {
		async blockOnUpload(file) {
			return await imageUpload(file);
		},
	...
});
Inside of the imageUpload() function we just send the image to a lambda function using fetch, witch then
uploads the image to an S3 Bucket and returns a CloudFront URL.
While we considered adding features like automatic image resizing and compression, we ultimately decided to focus on our core features for the MVP. These enhancements, while valuable, were deemed niche and not critical to our initial release.
Authentication – Why Google OAuth?🤔
We picked Google OAuth for a few key reasons:
1. Trust and Familiarity: Let’s face it—most users already have a Google account. By choosing Google OAuth, we made the login process familiar and convenient. Users don’t need to create yet another account and password, which means less friction and more engagement.
2. Security: Google’s OAuth is known for its robust security measures. It provides a reliable way to authenticate users without us having to handle sensitive credentials directly. This peace of mind was a big plus as we wanted to ensure TotalStudio was secure from the get-go.
3. Integration and Ease of Use: Google OAuth comes with detailed documentation and support, making it a solid choice for integrating authentication into our app. It’s also widely used, so finding resources and troubleshooting issues was easier.
Our First Steps into OAuth🛠️
Even though we knew Google OAuth was a great choice, implementing it was a whole new adventure for us. We hadn’t worked with OAuth before, so there was a bit of a learning curve. We had to wrap our heads around the OAuth flow, manage tokens, and ensure everything was set up correctly.
Deployment
Deploying TotalStudio is remarkably simple thanks to SST. We use a single command to manage the entire deployment process:
npx sst deploy --stage productionThis command triggers SST to:
- Read the Configuration: SST parses our configuration file to understand the setup.
- Create Resources: It provisions the necessary S3 buckets and deploys our SvelteKit application.
- Deploy Code: Our latest changes are pushed to the cloud, and the setup is updated accordingly.
Managing Development and Production Stages
SST also provides us with a clear overview of our development and production stages through its web console. This visibility ensures that we can easily monitor and manage our application’s deployment status across different environments. We deployed our project manually due to our small team size of 2 people but we could have also set up automatic deployments with ease because of the way SST is designed.
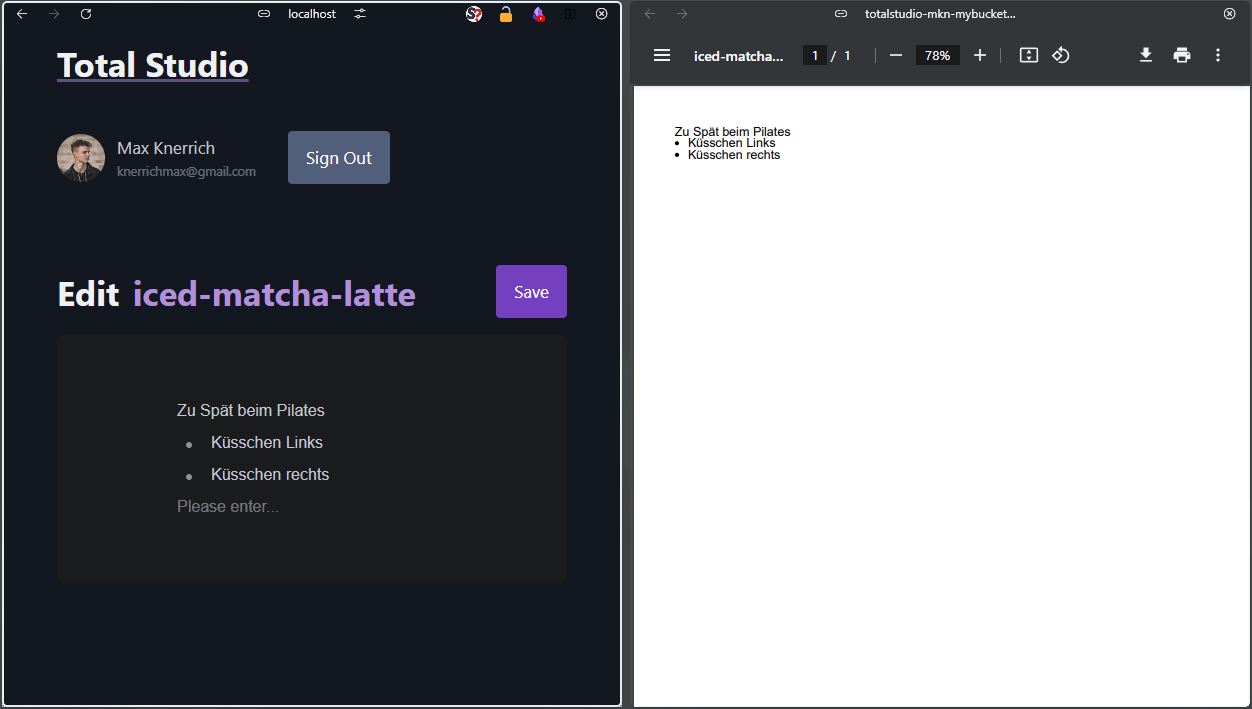
Frontend – Creating the Viewing Experience 👁️
Whenever a Markdown document is saved to S3, we generate both HTML and PDF versions, making the content easily shareable and accessible to anyone. To accomplish this, we utilized the Unified ecosystem with Remark to transform Markdown into HTML and PDF formats.
export async function generateHTML(markdown, title) {
const html = await unified()
	.use(remarkParse)
	.use(remarkRehype)
	.use(rehypeSanitize)
	.use(rehypeStringify)
	.process(markdown.toString());

//Wrapping the generated HTML with an Document Template to include CSS
const doc = `
	<!DOCTYPE html>
		...
		${html}
		...
	</html>`;

	return doc;
}

export async function generatePDF(md) {
	const processor = unified().use(markdown).use(pdf, { output: "buffer" });

	const doc = await processor.process(md);
	const pdfBuffer = await doc.result;

	return pdfBuffer;
}
With this prerendering concept we minimize the load time for the viewer, as the file is already available for him in a S3 Bucket, distributed around the World using CloudFront.
The Unified ecosystem’s flexibility means we can easily extend support for additional formats in the future. For instance, Remark offers a plugin to convert Markdown to DOCX. The HTML conversion process was straightforward, but we encountered some limitations with the PDF generation. The Remark PDF plugin is still in beta and has only been under development for a few months, resulting in missing features like image support.
Also we had some problems with the remark-pdf plugin, as it is using a WASM (Web Assembly) package under the hood. This leads to similar problems we already experienced with Automerge, as WASM packages in serverless don’t work as expected, as they sometimes are larger than maximal size of a Lambda Function. In local development however, the PDF export works like a charm.
What we learned
As we embarked on our journey through cloud development this semester, we quickly discovered that navigating the cloud is anything but straightforward. Here’s a playful look at the insights and lessons we gained while building TotalStudio and diving deep into the world of cloud architecture.
The Cloud is Not One-Size-Fits-All ☁️
Our first big realization was that there isn’t a single, perfect solution for cloud architecture. Initially, we thought there might be a “one-size-fits-all” approach. However, we soon learned that cloud architecture is more like a buffet—there are countless options, and the right choice depends on the specific needs of your project.
By rethinking our architecture, we discovered that sometimes less really is more. Opting for a simpler setup not only made our project easier to manage but also more efficient. We learned that stripping down unnecessary components and focusing on the essentials can lead to a cleaner, more effective solution.
A World of Services and Tools 🌐
We dove into a vast ocean of cloud services and discovered a treasure trove of tools that can be leveraged for building robust cloud architectures. From Lambda functions and S3 buckets to DynamoDB and API Gateway, the array of services was impressive.
What really opened our eyes was how these services could be abstracted and managed using Infrastructure as Code (IaC) tools. Tools like SST allowed us to define our infrastructure in a way that was both manageable and scalable. The AWS console, initially overwhelming, became much more navigable once we understood how IaC could simplify our setup.
From Cloud Overwhelm to IaC Mastery 🧑💻
Our initial foray into cloud development was, to put it mildly, a bit chaotic. We struggled with the complexity of AWS and its myriad services. However, as we got our heads around IaC tools and their capabilities, we began to master the art of cloud management.
Configuring resources and deploying our application became much more intuitive. SST’s straightforward configuration and deployment commands turned what was once an overwhelming process into a streamlined workflow. It was like discovering the cheat codes for cloud development!
The Challenges of Authentication 🔐
Another eye-opener was the challenge of implementing authentication. We underestimated how crucial and complex it could be. A simple authentication system is not just a feature; it’s a foundational element that impacts security and user experience. Getting it right was essential, and we learned that building a secure and reliable authentication system is no small feat.
Learning to Iterate and Improve 🔄
We also learned the importance of iteration. Our first attempts at developing TotalStudio weren’t perfect, and that’s okay. Cloud development is an iterative process, and refining our architecture and code was part of the journey. Each iteration taught us something new and brought us closer to our goal.
Using WASM with Serverless is not mature👶
As already stated we had problems with two of our npm packages, Automerge and remark-pdf, as they use WASM packages to do their heavy lifting. We still haven’t figured out how to include WASM packages into Node.js Lambda Functions, which is why the PDF feature only works in local development.
Where to go from here – Improvements👷
As already stated future improvements around the Image Service and the Collaboration Feature can be done.
Also the User Experience of the Interface can be improved by including some loading states, animations and contextual help, but that was not the focus of this course.
Also in the future we could expand the Collaboration even further. As right now you can only collaborate using the same Account, we could include a file based permission system for Users, to enable Multi Author Editing.
Leave a Reply
You must be logged in to post a comment.