When it comes to Docker, most of us immediately start thinking of current trends like Microservices, DevOps, fast deployment, or scalability. Without a doubt, Docker seems to hit the road towards establishing itself as the de-facto standard for lightweight application containers, shipping not only with lots of features and tools, but also great usability. However, another important topic is neglected very often: Security. Considering the rapid growth of potential threats for IT systems, security belongs to the crucial aspects that might decide about Docker (and generally containers) being widely and long-term adopted by software industry.
Therefore, this series of blog posts is about giving you an overview of the state of the art as far as container security (especially Docker) is concerned. But talking about that does not make so much sense without having a basic understanding of container technology in general. This is what I want to cover in this first part.
You may guessed right: Altogether, this will be some kind of longer read. So grab a coffee, sit down and let me take you on a whale ride through the universe of (Docker) containers.
In medias res
The approach I chose is about confronting you with a demo before I start telling you about anything related to Docker or containers. Don’t hesitate to perform the following commands on your own machine if you’ve Docker already installed. If not, here’s a detailed guide on how to get it up and running on Ubuntu Linux. Guides for other platforms are also provided. In order to check if everything is working fine, type the following command and hit Enter:
$ docker -v
Docker version 1.11.2, build b9f10c9
Got it? Ok, then we can straight move on and directly launch a first Docker container. For now, don’t worry about having no idea of what you’re doing. Simply keep moving forward and everything will become clear sooner or later.
$ docker run -i -t ubuntu:latest /bin/bash
What you should see now is a prompt like the one shown in the following listing. Type ls and see what happens:
root@9d4e8c9d2af1:/# ls
bin dev home lib64 mnt proc run srv tmp var
boot etc lib media opt root sbin sys usr
So far, so good. I’ll bet you, there’re many questions which came up while you were following these instructions until now. Taking the risk to get you even more confused, let me shortly answer some of these:
Q: “In Listing 2, you used a quite complex command in order to run a Docker container. What exactly do these commands and options mean?”
A: “In a nutshell, we told Docker to create a container on top of an Ubuntu user space (ubuntu:latest), attach a terminal (-t) , open up an input stream which consumes our keyboard input (-i) and finally start bash in a new process (/bin/bash). As a result, you got that prompt after container startup was finished. We’ll soon talk about what exactly is going on under the hood.”
Q: “As soon as I typed ls on that prompt, what I saw was the structure of an ordinary Linux file system (Listing 3). So we actually started a VM with docker run , didn’t we?”
A: “No, you launched a container instead of a virtual machine. Creating a new virtual machine also means booting a complete and independent OS kernel. But this is not what has happened here. You rather spawned a new process on your host system running Docker. As for the file system, you’re right: Our container indeed operates on his own one. We’ll cover this in the next section.”
Q: “The container prompt we saw in Listing 3 looks kind of weird and unfamiliar. What’s behind that?”
A: “The numbers and characters after the @ tells us about the container ID. Every Docker container is assigned a distinct identifier. Don’t care about the root for now, we’ll come back to this later. However, I can forestall that this is indeed the current user attached to this container session.”
Q: “Maybe I should have asked this right at the beginning: What exactly can I do with containers and why should I ever use them?”
A: “The point of containers is that they allow you to run applications, web servers, databases etc. in a lightweight, isolated environment provided by a process instead of a virtual machine. You certainly noticed that starting a Docker container is a matter of seconds. Have you ever tried that with a virtual machine? Another aspect is storage. The memory consumption of a single container process is within the range of a few megabytes, whereas a VM needs several gigabytes. So containers are not only faster, but also save lots of resources. “
Before becoming a little more precise about what I chucked at you so far, let me close that first introduction with a short and succint definition of what a container is. I will refer to this below from time to time:
“A container can be considered a special kind of isolated environment for at least one single process. Although all containers running on the same host share the available physical resources as well as the kernel services of the host OS, they’re fooled to exist exclusively as a standalone system and therefore are not even aware of other processes outside their ‘world’ or being virtualized at all. Their greatest advantage over conventional virtual machines lies in their ability to be multiplexed over a single OS kernel, whereas a classical VM usually boots its own one.”
-Me
Container file systems
We’ve already seen that a Docker container seems to have its own Linux file system. Look around in your container from above a little bit and you’ll soon be convinced that it really is an independent file system rather than the one of your underlying OS, no matter you’re running your Docker host in a virtualized environment or directly on hardware. However, didn’t we keep hold of a container being merely a process and not a complete OS? Why should a single process even have its own file system?
According to the definition we established above, what containers want to achieve is providing an isolated environment for its inherent processes. Amongst others, what this means is that all the services running in a container may not have any dependencies on the Docker host. This is exaclty what a dedicated filesystem per container gives us. It enables us to install the software and run the services we want, without having to worry about potential conflicts when it comes to other applications as well as their dependencies.
Working on a container’s filesystem
In order to examine how this works, we’ll install and setup an Apache web server with just a few steps:
# Running a container with port 80 exposed (syntax is: -p $HOST_PORT:$CONTAINER_PORT)
$ docker run -i -t -p 80:80 ubuntu:latest /bin/bash

# Update mirrors and install Apache (inside the container)
root@123b456c:/# apt-get update && apt-get install apache2

# Start Apache server (inside the container)
root@123b456c:/# service apache2 start
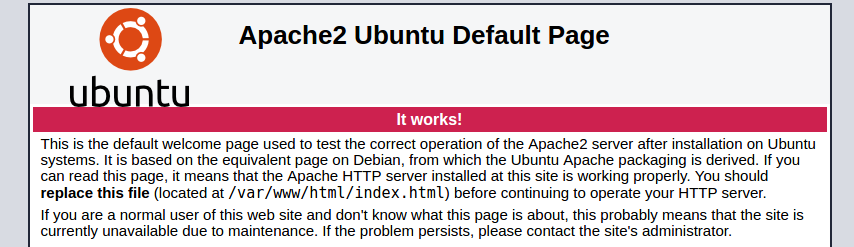
Mind the usage of the -p option with the first command in Listing 4. In order to expose any services hosted by a container, Docker requires the according container port to be mapped on a free port of the Docker host. In this case, we took port 80 of the container (where Apache is available on) and bound it to the same port on the host. As long as a free host port is elected, the choice of which one to use is completely up to you. After container startup, open up your favorite browser and either type http://localhost or http://{VM IP} if you’re working on a virtualized Docker host. If Apache welcomes you by saying “It works” (see screenshot), well … then it everything works.
Container filesystem internals
At this point, we’ve understood that each Docker container comes with its own filesystem, where all kinds of software can be installed without interferfing with other containers or the Docker host itself. However, it must be considered that everything that’s installed into a container makes it increase in size. Let’s take the opportunity and check the size of the Ubuntu user space we’ve used so far:
# List all the available Docker images (details will be provided later)
$ docker images

# The size of our Ubuntu image is shown in the last column (the rest can be ignored for now)
REPOSITORY      TAG         IMAGE ID        CREATED         SIZE
ubuntu          latest      321def123       11 weeks ago    120.8 MB
The docker images command returns a list of every Docker image currently available on our Docker host. Docker image? Well, speaking honestly, a Docker image de facto is nothing but another designation for a container filesystem established by Docker itself. Subsequently, when diving deeper into container filesystems, I will preferably refer to them as images. Coming back to the current subject, our Ubuntu image has a magnitude of 120.8 MB.
Now, imagine what might happen if you keep on installing more and more software on top of that filesystem. Eventually, it would be several gigabyte in size. Thinking of a bunch of different Docker images for various intended uses existing on the same hard drive, a container system’s advantage over a VM in terms of storage would diminish more and more. In order to avoid such an expansion and maintain its efficiency, Docker works as follows:
- Each Docker image reduces the dependencies it ships with to an absolute minimum.
- Docker uses a special storage driver called AUFS (Advanced Multi-Layered Unification Filesystem) in order to minimize storage redundancy.
Reduction of dependencies simply means that the OS user space (i.e. image) a container is based on (Ubuntu in our case) includes only a few of the binaries, configurations etc. an ordinary Ubuntu installation would. This can be easily demonstrated using the example of ping :
# Inside our container
root@123b456c:/# ping www.docker.com

# Oops, something went wrong ...
bash: ping: command not found
I think this first point was quite easy to understand. The second one is slightly harder.
Getting familiar with AUFS
As we’ve already learned, AUFS is short hand for Advanced Multi-Layered Unification Filesystem. The interesting thing about this is that standard filesystems as you may know them are neither multi-layered nor have the characteristic of unifying anything. Indeed, AUFS works in a different way from ordinary filesystems you may know, for example ext4.
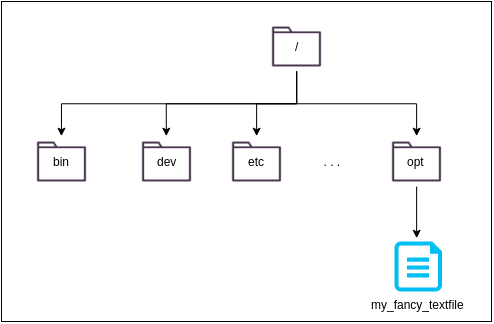
So let’s get into this and foremost talk about what is meant by multi-layered. For the first step towards understanding this, remember the layout of a normal Linux filesystem. Under its root directory (/), there’re all the directories as specified by the Filesystem Hierarchy Standard (FHS) (see Listing 3). Going further, imagine that you now add a simple textfile named my_fancy_textfile to the /opt directory:
This scenario sounds kind of simple in the first place. However, what happens if we introduce an additional contraint by assuming the original filesystem to be immutable or rather read-only? How to add anything to an immutable filesystem?
A feature called Copy-on-Write (CoW) answers this question. The first solution for this issue that comes to your mind might be to create a fresh copy of the immutable filesystem and modify it, leaving the original one untouched. The CoW mechanism relies on a much smarter approach, taking only the parts of a filesystem which are affected by one or more changes made by the user and copy them to a new so-called layer. The first layer everything starts with always is the unaltered filesystem. In this way, duplicating unmodified files or directories and subsequently wasting lots of storage can be avoided. By the way: This is exactly how testing Linux distributions works, when booting them from a flash drive or CD-ROM without immediately install<ing them. All the changes made to the initial (read-only) OS image residing on the volume are stored in a temporary layer and are gone forever after shutdown.
Take a look at figure 3, which illustrates the CoW mechanism in a graphical manner. It all starts with a plain and unmodified Linux filesystem (layer 1). As soon as we add our sample textfile, AUFS recognizes that /opt has changed and that a new file called /opt/my_fancy_textfile has been inserted. This and only this modification is recorded by AUFS in the form of a new layer (layer 2). Everything else may remain in layer 1, since it hasn’t changed at all. In case we would have modified an already existing file like /etc/hosts, AUFS would have copied the original file from layer 1 and would have stored the updated version in layer 2. That’s where the notion of Copy-On-Write is coming from.

As a consequence, the filesystem we see when navigating through a container is a composition of multiple layers. On container startup, all necessary layers are stacked one upon the other, which gives the user the impression of working on a single consistent directory hierarchy. An overhead projector poses a very demonstrative analogy for better understanding how this works: Think of the layers as several sheets lying about each other on the projector. Then, what you see on the wall is a combination of the content of the individual sheets without realizing that the result is formed by several elements being arranged on different levels. That’s exactly how a multi-layered filesystem works.
Also mind that the order of all the layers on the filesystem stack is very important! Remember that CoW tracks any modification inside a new layer. If all assicoiated layers would be arranged in random order, the updated version of a file may be shadowed by an older one, making the user think that his changes are gone. Therefore, AUFS needs additional metadata to stack layers by timeliness correctly.
Oh, and what about deleting files or directories? With CoW as a purely additive approach, how can this be handled? Because CoW is only capable of adding files or directories (and not to remove them), AUFS manages this with whiteout files. Figure 4 shows how AUFS would deal with the deletion of the /etc/hosts file (which is nonsense, nobody would ever do that). It creates a new file with the same name and additionaly adds a .wh prefix to it. Such a whiteout file serves as a marker which shadows a file and prevents it from being visible in the topmost filesystem layer. Thereby, AUFS creates the illusion of a file actually been removed.

Unification – from layers to filesystems
As for the functionality of AUFS, there’s still one point missing. We’ve already understood the notion of layers and stacking them in order to create the illusion of a single hierarchy of directories. Yet, I didn’t talk about what stacking means in a technical sense so far.
Let’s start with how the individual layers are managed by AUFS. When it comes to Docker, every layer is stored in it’s own directory. All layer directories in turn reside in the /var/lib/docker/aufs/diff directory, as shown by the next figure:

As the graphic points out, the particular layers of an AUFS filesystem are also called branches. In order to get them stacked, all the branches are brought together at a single mount point. This principle is called a union mount. The only aspect the AUFS storage driver must pay attention to is the order of the layers. As I already mentioned before, AUFS makes use of additional metadata to get the layers into the correct order.
How to implement containers
If you’re an attentive reader, you might have read about a container layer in figure 5. Now that you finally have the necessary comprehension of what a Docker image is, we can take the last step towards containers. Although the definition I introduced above precisely describes what a container is, we still have no idea of how they’re implemented and created. To keep it simple: A container is nothing but an additional layer created on top of a Docker image. In contrast to the layers of the underlying image, the container is not read-only, but can also be written.
It should now be clear what exactly happend when we applied the docker run command (see Listing 2): Under the hood, Docker took the read-only Ubuntu Docker image and created an additional read-write-layer on top of that. It takes at least a single process in order to create a container. That’s why we told Docker to run the /bin/bash command in a process as soon as container creation is finished. With a new container in hands, you can now install additional software, create or delete files etc. with all your steps being stored by the container layer. As soon as you’re done, a container can be committed, meaning that the existing read-write-layer becomes the topmost read-only layer of a new image. This image can in turn be used to create another container.
AUFS – Advantages
At this point, we have a much better understanding of Docker containers and images. We saw that they’re based on the AUFS storage driver, using CoW to keep memory consumption as small as possible. However, there’s still more that AUFS can do to reduce the storage overhead for Docker images.
In the section above, I explained that containers can be used to modify existing Docker images by adding additional read-write-layers on top of them, forming a new image after a commit. The resulting image can again be used to launch yet another container. A good example is the official nginx Docker image. This one as well as many other images can be found at Docker Hub, a public repository hosted by Docker where users as well as organizations can publish and share their images with the community. Because the nginx web server requires several OS services for being able to do its job (e.g. a TCP/IP stack), it is built upon the official Debian Docker image, which makes perfectly sense. By reusing a base image that already ships with common services, there’s no need to re-implement or rather reinstall them over and over. On the one hand, the reuse of images comes with great advantages for Docker and their infrastructure, since they don’t have to store the same content millions of times.
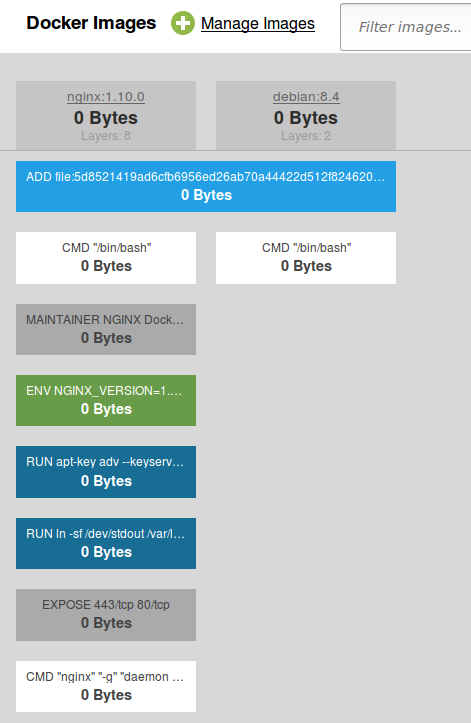
On the other hand, Docker users also benefit from this approach. Pertaining to our nginx example, imagine there’s already an up-to-date Debian Docker image present on your local machine. If for any reason you decide pull the nginx image from Docker Hub, your Docker host recognizes that the Debian image is already available instead of downloading it again. Actually, Docker does not only perform a comparison by image but rather by individual image layer. This makes Docker’s reusage strategy even more efficient. A very nice tool for inspecting Docker images with all their layers can be found on https://imagelayers.io (give it a try, it’s amazing!). The following screenshot shows it in action, visualizing image layer reusage between the nginx and Debian Docker image:
Furthermore, Docker even reuses images present on the host when creating containers. Remember we’ve learned that the individual layers of each image reside in their own directory. Because they’re read-only, they can be referred by an arbitrary number of containers at the same time.
Stepping further
Phew, there’s much to say talking about AUFS. So at least, we gained a basic understanding of how Docker containers are really working. Yet, this is not everything. Indeed, we know lots of details about a container’s internal structure, filesystem, storage and how they’re created by means of layered images. But what about isolating containers against their host OS? Although we made the first step with dedicated container filesystems which provide self-contained environments, we still have no idea about how to manage their access to the host’s resources like the networking services. This is what we’ll cover next.
Namespaces
So far, we’ve learned how container processes can be captured into their own hierarchy of directories, where they’re able to manage their own dependencies, configurations and so forth. However, what happens if a container process needs to trap into the shared OS kernel in order to communicate over the network or performing disk I/O? This is not a trivial question, since simply giving up isolation at this point insults the notion of containers being self-contained process execution units.
The approach of the Linux kernel is based on so-called namespaces, giving each container an individual and unique view on several global resources. Thereby, containers on the same host can be prevented from getting in each others way when trying to access their mount points or services on the internet. But let’s not get ahead of ourselves.
The mount namespace
I’m pretty sure you know that on every Linux filesystem, there’s exactly one root directory /. So let me ask you something: Remembering that all Docker image layers are located under /var/lib/docker/aufs/diff as part of the host filesystem, how can every container have its own root directory? And how comes the directory names inside their AUFS filesystem do not get into naming conflicts with the host filesystem?
For understanding this, think of how Linux manages filesystems and their locations. It actually makes use of mount points to do that. What mount points do is they assign a path to a disk partition, making the partition’s filesystem a part of the original one. You can check that on your own by opening a terminal on your Docker host and type mount. One line of the output might look like this:
$ mount
/dev/sda1 on / type ext4 (rw, relatime, errors=remount-ro, data=ordered)
This tells us that in my case the filesystem root is located on the /dev/sda1 partition. All the mount points on a Linux system are stored inside a single structure, which can also be viewed as an array.
With that knowledge, implementing mount namespaces is fairly easy. Everything a container system has to do is asking the kernel for a copy of its mount point structure by performing a system call and attach it to a container. In other words: A new container gets its own mount namespace. From then on, a container may add, remove or alter mount points, without the original host structure being ever affected, since each container has its own copy.

Subsequently, binding a container to its own root directory solely requires to mount the container’s AUFS filesystem under / by adding an appropriate entry to its mount namespace. If necessary, this can also be done with other partitions on hard disks or flash drives.
Mind that this approach is different from what chroot does! According to the Arch Linux wiki, it’s crucial to understand that chroot has never been designed as a security feature. Consequentially, there’re well-known workarounds covering how to break out of a chroot environment. That explains why using chroot was never really an option for Docker and containers in general.
The PID namespace
Another global structure which has to be protected from container access is the process tree. At the root of the process tree is the init process, which initiates the Linux user space as soon as the kernel is ready. It always gets assigned 1 as its unique identifier, aka PID (Process ID). Under Linux, every process can have 0 up to n child processes, but only one parent process (with the exception of PID 1 which does not have a parent).
Why is that concerned with containers? The point is, that any process in Linux may inspect other processes or even kill them, assumed that is has the required privileges. It’s kind of obvious that processes inside a container should never get the chance to cause some damage on the host by manipulating anything that exists outside the container. For that reason, as soon as a container is created, container systems like Docker perform a special clone() system call, instructing the kernel to create a new PID namespace. It does that by forking a new process and using it as the root of a new sub-tree or PID namespace (see figure 8).

The essence of these sub-trees is that they’re not created in the middle of nowhere. In fact, each PID namespace simultaneously remains part of the old process hierarchy. As you can see in figure 8, there’re three processes with two PIDs, with process 8,1 as their root. All the processes on the outside of the new PID namespace refer to the container processes by their PIDs 8, 9 and 10. But inside the container, they are known by the PIDs 1, 2 and 3. As a consequence, the container processes have no idea of actually living in a sub-tree of a much greater hierarchy. Concurrently, the outer processes regard them as an ordinary part of the original process tree without having any knowledge of their “inner” PIDs. In this way, container processes can be stopped from accessing any other process on the host, whereas the outer processes can still control them. This can be very important in case a container consumes much more resources than it should (maybe due to an attack). In that case, an external process may kill the container and prevent it from knocking out the entire host system.
The network namespace
We’ve already learned how Docker employs namespaces to restrict a container’s access to global resources like mount points and the process hierarchy. Nevertheless, there’re still more parts of the host system we need an abstraction layer for, e.g. the network interface. One reason for this is that each container should be able to use the full range of ports without getting into conflicts with other containers or the host OS. Consider a container running an Apache web server on port 80 as we’ ve met above. If a second container wants to run an nginx web server on the same port, an error would be raised, since port 80 is already blocked by the first container. Moreover, containers should be able to communicate with services running inside other containers, no matter they reside on the local or a remote host. It seems clear where this leads to: Every container requires his own network interface that must be managed transparently (i.e. a containers isolation and self-reliance has to be maintained).
However, simply attaching a unique network interface to a container is not enough in this case. Remember the behavior of mount and PID namespaces: In both cases, there’s no link from the child namespace to its parent. Only with PID namespaces the parent tree is always in control of child namespaces, but not the other way around. This is important because bidirectionally routing packages between containers and their host requires both parent and child network namespaces to know about each other and being connected in some respects.
Figure 9 illustrates the flow of network traffic between the global network namespace and its childs. You can see that a container can reach the internet as well as other containers on the same host by means of a special routing mechanism on the Docker host.

So how does that work? Maybe you already noticed that there’s a new network interface on your host since you’ve installed Docker, bearing the name docker0. As soon as a new container gets started, Docker creates a pair of virtual network interfaces. One of these interfaces is connected to the host’s docker0 interface, while the other one gets attached to the new Docker container. Do you remember the principle of a cans phone? That sort of analogy describes the machnism very well. So, the docker0 interface acts as some kind of networking switch, either navigating traffic between containers and the internet or even between different containers on the same Docker host. Consider that there’s no direct link between the docker0 interface and other interfaces like eth0 or wlan0. Instead, Docker establishes special routing rules for communicating with these interfaces and thus reaching the internet. If you’re interested in examining this more in detail, this blog post by Peter Roßbach and Andreas Schmidt is a good point to start.
Control groups
The last core feature Docker containers are built upon is another Linux kernel feature called control groups (in short: cgroups). What cgroups gives us is the ability to put hardware resource limits as well as access restrictions on a entire collection of processes instead of just a single one.
To make it clear to yourself why this is absolutely necessary, think of an arbitrary process that, for some reason, starts consuming and binding more and more of the available phyiscal resources like memory or disk space. It seems obvious that killing the process immediately is the right thing to do here. However, there’s one point that’s often forgotten when working under Unix environments: If a process calls fork() and the resulting process also does (which is called double-forking), the process emerging from the second fork may escape from the control of the hierarchy’s topmost process (which did the first fork). As a consequence, stopping the original process in case of misbehavior of one of its children may not have the desired outcome, since it does not exercise control on any child processes arising by a great number of nested forks. Instead, there’s a high risk they keep on running, making a reboot inevitable.
The cgroups feature provides a solution for that problem, by merging a collection of processes into a logical group, which is exposed in the form of a virtual filesystem and therefore easily accessible. The point is that no matter how often a process or its children fork, there’s no way for them leaving the surrounding cgroup. In case any process inside a cgroup starts running amok, it’s perfectly sufficient to kill the entire cgroup and you can be sure that the problem is solved. Moreover, cgroups also allow for supplying the with resource limits or access restrictions in advance. In this way, the cgroup’s behavior can constantly be checked against a custom and fixed set of conditions, making it easy for the system to distinguish a healthy cgroup from a misbehaving one.
Conclusion
Admittedly, this was lots of information for a single blog post. However, considering what we talked about somehow demystifies Docker containers and provides us with the awareness that when examining the core principles separately, they’re not so hard to understand. Furthermore, we now have the basics to look at containers from another perspective and analyze how their underlying technologies relate to security. This will be covered by the next blog post of this series. See you soon!
Sources
Web
- Poettering, Lennart: Rethinking PID 1 (April 30, 2010), http://0pointer.de/blog/projects/systemd.html (last access: August 06, 2016)
- Docker Inc.: Docker Overview (2016), https://docs.docker.com/engine/understanding-docker/ (last access: August 06, 2016)
- Docker Inc.: Docker and AUFS storage driver in practice (2016), https://docs.docker.com/engine/userguide/storagedriver/aufs-driver/ (last access: August 06, 2016)
- Wikipedia: Copy-on-write (August 05, 2016), https://en.wikipedia.org/wiki/Copy-on-write (last access: August 06, 2016)
- Roßbach, Schmidt: Docker entschlüsselt: Netzwerk (July 06, 2014), http://www.infrabricks.de/blog/2014/07/06/docker-entschlusselt-netzwerk/ (last access: August 06, 2016)
- Ridwan, Mahmud: Separation Anxiety: A Tutorial for Isolating Your System with Linux Namespaces (n.d.), https://www.toptal.com/linux/separation-anxiety-isolating-your-system-with-linux-namespaces (last access: August 06, 2016)
- archlinux Wiki: chroot (June 03, 2013), https://wiki.archlinux.de/title/Chroot (last access: August 06, 2016)
Papers
- Grattafiori, Aaron: Understanding and Hardening Linux Containers (NCC Group Whitepaper, Version 1.0, April 20, 2016)
Leave a Reply
You must be logged in to post a comment.