By Alexander Allerdings, Philip Betzler, Robin Deeg and Niklas Werth.
Introduction
As part of the lecture “System Engineering and Management”, we worked on a project in cooperation with IBM (in particular with Plamen Kiradjiev, C.T.O. Industry 4.0, Thomas Pohl, IBM Software Architect and lecturer at the HdM (System Engineering and Management), and Francis Powlesland, Cloud Application Architect) to visualize Industry 4.0 data in real time using a configuration-based approach. This project aims to avoid needing a web developer every time there is a modification in the data. The result will later be published as an open source project.
IBMs existing solution was not based on configuration files and required developers to make changes, such as adjusting or adding new machines or machine information.
The successful result of this project is available in a GitLab repository at the following link:
ATTENTION! THE PROJECT WILL BE MOVED WHEN ITS RELEASED AS OPEN SOURCE PROJECT!
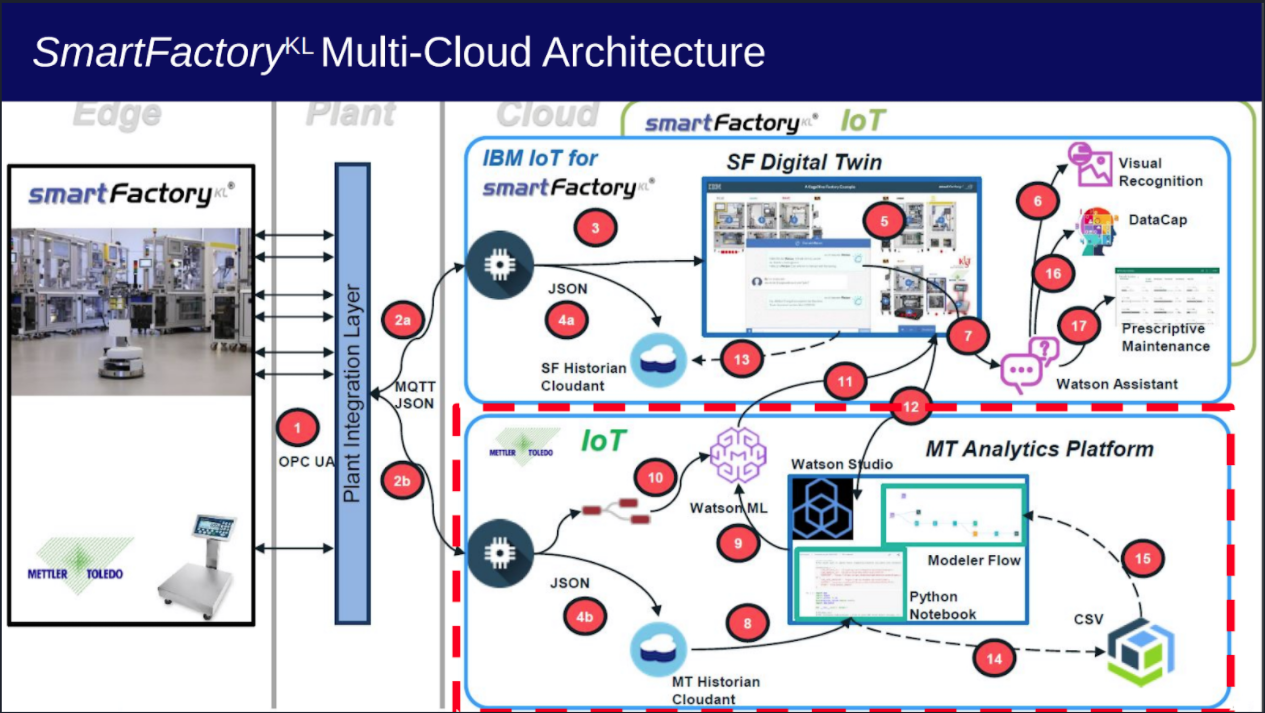
Figure 1 shows an exemplary environment in which the project might run later on. It refers to the architecture of the SmartFactory Kaiserslautern prototype, which was presented at the “Hannover Messe” in 2019. The SmartFactoryKL is a technology initiative of research and economy supported by the German government.
For us, the two left areas “Edge” and “Plant” are most interesting, because we access the information that is important for this project from the “Plant” area at the “Plant Integration Layer”.
Requirements from IBM
Since the project was being worked on in cooperation with IBM, a number of requirements the project should include were defined in several discussions in order to increase the chance that the overall solution would actually be used productively at IBM.
These requirements were described as follows:
- Scalable backend
- Dockerized
- Real-time data processing
- Config based
- Carbon Design Frontend
Project requirements
In addition to the requirements defined by IBM, it should also be possible to query and read in the data supplied by the machines. Figure 1 shows several areas. The “Edge” area contains various machines that can exist several times in a factory. The “Plant” area exists once per factory and contains a “Plant Integration Layer”. A “Plant Integration Layer” is the instance through which all information and messages in a factory run. Specifically, it consists at least of an OPC UA Broker at the intersection to the machines from the edge level, an MQTT Broker at the intersection to the cloud instances and a programme that transfers the messages from one broker to the other and transfers them to the corresponding protocols.
The backend of our application should connect to this MQTT Broker from the “Plant Integration Layer” in order to receive the information about the machines. The third part of the SmartFactoryKL architecture refers to the cloud applications, which are not relevant for this project.
Therefore, we formulated further requirements for the project:
- MQTT connection
- Processability of variable message designs
In addition, the requirement “Config based” was extended to enable the reading of configs from the file system or from configuration databases
The complete requirements looked like this:
- Scalable backend
- Dockerized
- Real-time data processing
- Config based
- Filesystem
- Database
- Carbon Design Frontend
- MQTT connection
- Variable message designs processable
First approach
Based on the defined requirements, an initial solution was developed which is shown in Figure 2.
The individual components were placed in different Docker containers. To support the development of the application, we wanted to use our own MQTT Broker that would provide us with periodic data.
The web server should read in a config at startup either via a file system or via a configuration database. This config defines which MQTT Broker is connected to, which machines, with which parameters, are displayed in which way and how information should be extracted from the MQTT messages. Subsequently, the required websites are hosted and a connection to the MQTT Broker is established.

Since the storage of information was not intended in our first approach, we planned to additionally integrate a historical database at a later stage.
This option is discussed in more detail in the chapter “Outlook”.
Technologies used
Since none of our team members had any significant experience in the field of web development, we first looked at various technologies to get an overview of common frameworks, to be able to make an objective selection.
Backend Technologies
For the backend, the web server frameworks Spring, Flask, Django and NodeJS were considered.
The special features that emerged from the research are listed below:
Spring:
- Java
- Multithreading
- Good microservice support
- Dependency Injection
- Provides unit and integration testing
Flask:
- Python
- More suitable for smaller applications
- Simple and flexible, modules easy to integrate
- Easy to learn
- Good microservice support
Django:
- Python
- More suitable for larger applications
- Keeps the complexity of configurations low
- JavaScript frameworks can be added
NodeJS:
- JavaScript and TypeScript
- Single threaded event loop
- Asynchronous functions
- Non-blocking I/O
- Scales strongly
- Many frameworks are available
In consideration of these special features we choose NodeJS, because we could expect the greatest increase of knowledge here, the good scaling was a requirement for our project and IBM could offer the most help.
In the next step we were having a look at frameworks to use in NodeJS. Many different frameworks were considered, but in the end the main decision was between ExpressJS and NestJS. The special features of these two frameworks are also listed below:
ExpressJS:
- JavaScript
- Provides rapid development of NodeJS applications
- Easy to set up and modify
- Easy management of static files
- Easy connectable to databases
NestJS:
- TypeScript possible
- Based on ExpressJS
- Extends advantages of ExpressJS
- Contains a CLI
- Automatically good structuring
- Good documentation
- Contains many standard modules
- Simple testing
- Intended for monoliths or microservices
After weighing up these points, we chose NestJS as the framework for NodeJS. One decisive point was the possibility to use TypeScript, a typified subset of JavaScript. Another point was the much clearer automatic structuring of NestJS compared to ExpressJS. The good documentation of NestJS and the availability of standard modules were also decision criteria for us, as they should simplify the development. In addition, NestJS also offered the possibility of having a contact person through IBM for questions and thus receiving assistance.
With the exception of the “good” documentation, the points listed above were also noticeable during development, but for our taste the documentation has a too granular structure and in some cases did not provide a deep insight into functions.
Frontend Technologies
For the selection of the frontend technology, the three frameworks Angular, React and Vue were compared, as these technologies are all supported by the Carbon Design, which was defined as a requirement by IBM.
React was already roughly known to us and provides poor documentation, so we excluded this technology. When researching Angular, we realised that it offers a lot of features, but also has a steep learning curve. Vue seemed to be a better alternative and was also unknown to us so far, so that a great learning progress was to be expected here as well. In addition, we were interested in having a closer look.
The advantages of Vue.js are listed below:
- High performance
- Flat learning curve and good documentation
- Support from IBM
These advantages proved their worth during development and the help from IBM was delightful during the development of the frontend.
Connection between frontend and backend
There are two different approaches for the connection between frontend and backend. The first approach is regular Http requests to see if something has changed. This is a polling approach. The second approach is websockets. Websockets allow a “push” approach, where a callback function is called when messages are sent, but a connection must first be established and held. For these reasons, our decision was to use the Http request approach for static data, while we chose websockets for the MQTT information.
Development phase
Based on the consideration of the backend and frontend technologies and further findings during the preparation for the implementation, a second, final solution approach for the implementation of the project was developed. This approach is shown in Figure 3.

The tasks and responsibilities of the programmes in the distributed system are:
Webserver:
- Hosts website
Website:
- Requests static data from websocket server
- Displays data from websocket server
Websocket server:
- Reads config
- Connects to Plant Layer Integration Bus (MQTT Broker)
- Provides static information via RestAPI
- Sends dynamic (MQTT) messages to relevant connected websites
The differences to the first approach are:
- The addition of a separate web server to host the website.
The second web server was added to more clearly separate the tasks in terms of their frequency to improve scalability.
- Distinguishing website requests in terms of static and dynamic information and thus dividing them into Http Rest Requests and Websockets.
Frontend
Vue.js is a progressive framework, which means that you can start with a very small project and gradually grow to a large project. For example, you can also integrate Vue into an existing HTML page and thus slowly grow from a website with static content to a website with dynamic content. Since we wanted to build a single page application from the beginning anyway, we decided to build a completely new project with the Vue CLI. The Vue CLI takes care of most of the configuration work and delivers a pre-configured Vue Single Page Application, which allowed us to quickly start developing our frontend.

The starting point of our Vue app is the main.js file as shown in Figure 4, where you can also see the structure of our Vue app. Globally used plugins are integrated in the main.js file. In our app these are the CarbonComponentsVue and ChartsVue from the CarbonDesign. Moreover, Vue itself and the Vue-Router, which is specified in router/index.js, are imported here. So that the Carbon components can be used later in our own Vue components, they are first imported and then integrated into our Vue app with Vue.use(). After the plugins have been integrated, the Vue App is started with new Vue().
We have implemented all our Vue components as so-called single file components. With these, the JavaScript, HTML and CSS code is in one file instead of being split over several files, which increases clarity. The file is divided into three parts. The template part is responsible for the representation, i.e. the HTML code. The script part contains the JavaScript code and the style part contains the CSS styling. All single file components have the file extension .vue.
The App.vue contains the header element, which can be clicked to go to the Home component. It also contains the router-view element, which is used to inject the called component.
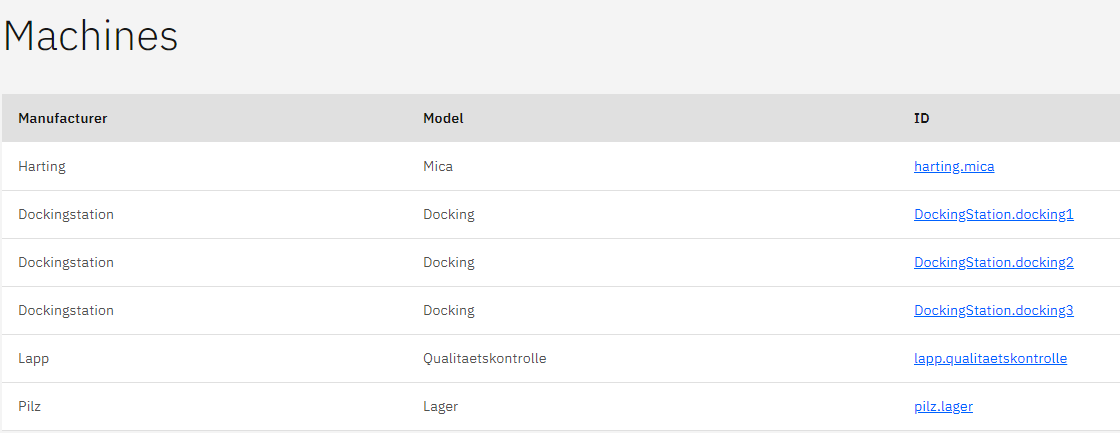
The Home component displays all machines in a table. The machine data is loaded from the REST API of the backend; the data is retrieved with the Axios-http-client whenever the component is mounted (see The Vue Instance — Vue.js). By clicking on the id of a machine, the router is set to a link to the machine component with the id of the machine.
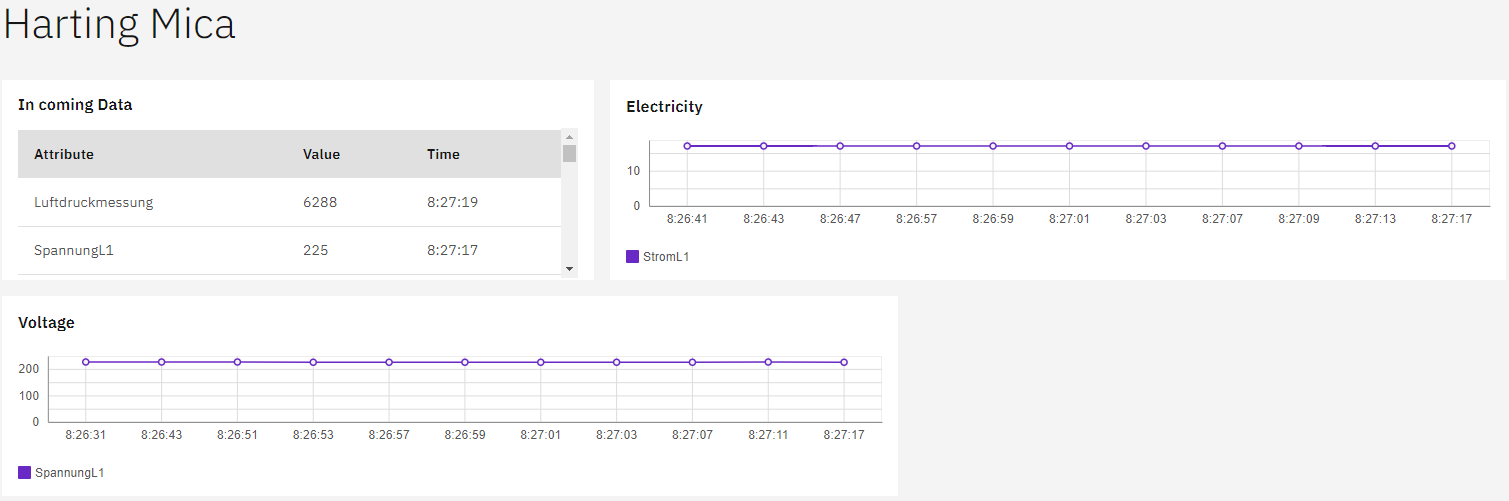
The Machine component, on the one hand, uses the socket connection to receive the dynamic data of the machine and, on the other hand, it uses Axios to request the configuration data of the diagrams. Based on the configuration data for the diagrams, these are displayed and the dynamic data from the socket connection is passed on to them. The Machine component also loads the diagram components Line.vue, Gauge.vue and Table.vue.
The diagram components use the Carbon Design diagrams and process the raw data of the socket connection so that it can be displayed in a meaningful way and pass it on to the carbon chart components.
Carbon Design
We were able to easily implement the carbon design in our application thanks to Carbon Components Vue. In a few places, we had to add spacing ourselves. Carbon Design offers four different design themes, we chose the g10 theme and integrated it via an scss file. These design themes mainly change the appearance of the application through their colours. We have chosen the g10 theme because it offers a light grey background on which the white tiles and the diagrams with their white background come out well.
Backend
At the moment, the backend consists exclusively of a websocket server.
Since the backend is more extensive than the frontend and we do not want to go beyond the scope of this blog post, we will not go into the individual classes in such detail here, but briefly describe the tasks of the websocket server, the NestJS classes and the design patterns used.
The tasks of the websocket server in this project are:
- Reading in config files
- Connecting to MQTT Broker
- Starting the RestAPIs and websockets
- Answering the static Rest calls
- Filtering incoming MQTT messages for relevance
- Sending the MQTT message to all affected clients
A web server can be created quickly through the NestJS CLI. The standard includes a controller class that orchestrates tasks and typically represents routes, a service class that implements more complex functions for a controller class and a module that groups related controller- and service classes. There is also a main script that starts the entire server.
More modules were added to structure the responsibility with the websockets and the RestAPIs. Furthermore, these were filled with further controller and service classes. Other classes that could ideally be reused in the second, optional, part of a historical time series database were kept out of the scope of a NestJS-bound implementation.
This part describes the MQTT client integration, reading the config files and filtering whether an MQTT message should be forwarded.
In general, the design patterns of dependency injection, the controller pattern and the singleton pattern were used. The design patterns are described below.
Design patterns used in the backend
Dependency Injection:
Describes the passing of dependencies through functions or via the constructor. It is chosen to simplify testing and to simplify the dependencies within a project. It also allows us to write a second programme with minimal changes that can manage data in a time series database.
Singleton Pattern:
The singleton pattern ensures that there can only be one instance of a class and that all classes that use an object have the same object. This is useful for controller classes or limited resources so that the right object is always used.
Controller Pattern:
The controller pattern describes an architecture structure in which messages always run via a central instance. This reduces the dependency between the classes and improves the definition of clear tasks.
Configuration files
To define the behaviour of the websocket server, config files were used which are structured as follows:
All configs:
All config files contain two parameters:
- Version
Defines the config version - Type
Defines the type of config file
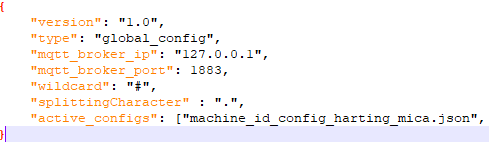
Global config:
Describes all things that need to be defined only once.
Examples of entries in the config are:
- MQTT Broker IP and port
- Wildcard parameter
- Splitting Character Parameter
Defines character (“.”) used to split key in subkey list (“hello.world” to [“hello”, “world”]) - List of all other active configs
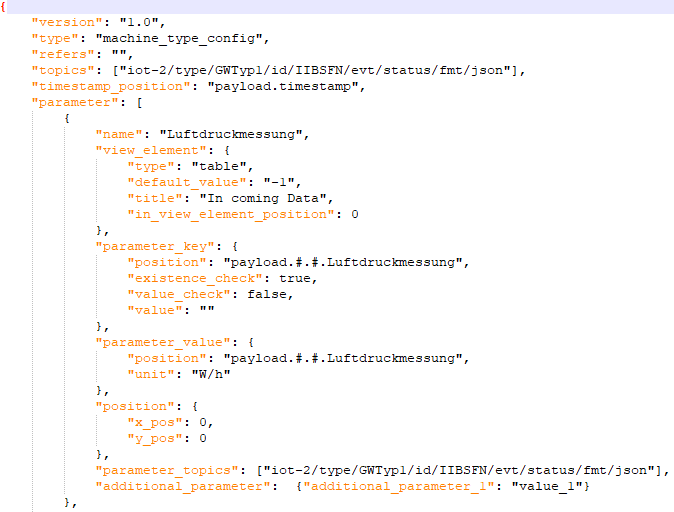
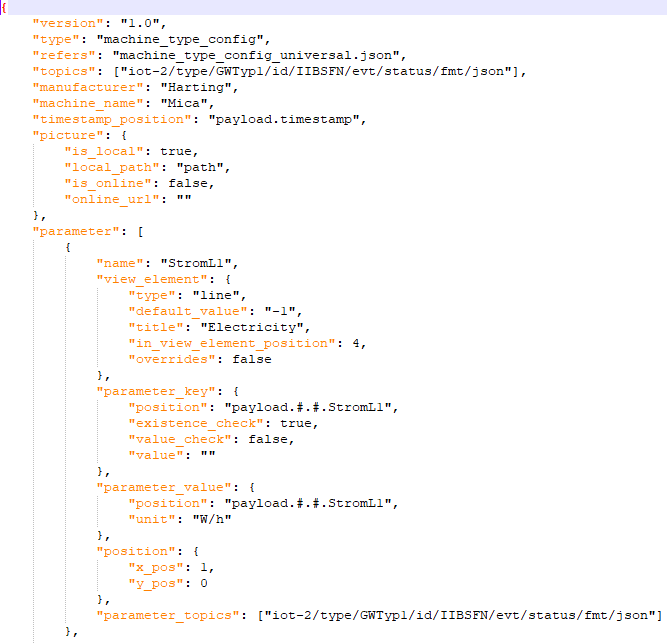
Machine type config:
Example Information this config may contain:
- Refers
Points to other machine type config or machine id config, from which it inherits values - Topics
Describes MQTT topics important for machine - Parameter
Contains name, display element, position of key and value in MQTT message - Machine name
- Manufacturer
Machine id config:
Inherits from Machine type config.
Additional example information this config may contain:
- Global id
Unique identification of the machine (also used by the website)
- MQTT id
Position and assignment of the MQTT message to the machine
Production line config:
Example Information this config may contain:
- Global id
Unique identification of the machine (also used by the website) - Machine positions
List that assigns positions to machines on a production line
The exact documentation of the backend and the configs will be available in the corresponding Git Wiki when the open source project is published. Pictures of example configs can be found on the end of this blog post.
Testing
For our unit tests, we used the test framework Jest for both the backend and the frontend. This made it easy for us to test our applications.
In the frontend, we mainly tested the functions that prepare the data for the different chart types. Since these functions were included as computed properties in the Vue components and were therefore not easily testable, we outsourced them to extra methods that we could easily test. In addition, redundant code for sorting the data was moved to an extra helper file and also tested.
In the backend, there are tests for almost every functionality, mainly focussing on reading and processing the configuration files.
Result
The (interim) result of the project is a small distributed system that fulfils the previously set requirements, with the exception of reading config files from a database. In comparison, the previously defined list of requirements:
- Dockerized ✓
- Scalable ✓
- Config based ✓
- Filesystem ✓
- Database ⎼
- Carbon Design Frontend ✓
- MQTT Client ✓
- Variable message designs ✓
- Real-time data transmission ✓
The following screenshots of the website visualise our result:

What we are particularly proud of
Even though the whole project is something we can be proud of, there are a few points we are particularly proud of:
- Inheritable config Files:
Config files of the type Machine Type or Machine ID can reference other files, so that the complexity of the configs is kept low. In conjunction with the wildcard character, basic configs can be created for completely different machines that have the same parameters!
- Adaptable to different MQTT messages:
Since the message format of the MQTT messages can be different, we have found a solution in the configs to simply adapt the config to the desired format and also pull information from messages that are highly space-optimised.
- Consistently implemented scalable approach:
Throughout the project, all technologies and implementations were chosen so that the result scales well.
- Visible effects of the config files on front- and backend:
With small changes to the config files, the displayed website can be completely redesigned!
Lessons Learned
Within the framework of this project we got an overview of the basics of different technologies and frameworks and were able to deepen our knowledge in the selected technologies. An excerpt from the list of newly learned technologies is:
- Docker
- Kubernetes
- MQTT
- Basics:
- Flask
- Django
- Spring
- NodeJS
- JavaScript
- TypeScript
- Websockets
- SocketIO
- NestJS
- Swagger
- Vue.js
As we were all new to web development, we encountered some problems during the development process:
- Unknown task at the beginning
- Unknown and new subject area
- Many technologies had to be investigated and appropriated
- Partly more Github issues than StackOverflow issues, which suggests a young or highly volatile field
- Partly inexplicable problems even for IBM Dev Support
- MQTT message structure optimised for space consumption and not for readability
- High effort for testing distributed systems
Especially because the project was not the easiest, we had the opportunity to learn a lot of new things and to grow beyond ourselves. On the one hand, we will pay more attention to communicating directly and clearly with the client in the future (agile project management methods might be suitable for this).
This would also improve our internal work, as we would be able to clearly define interfaces at an early stage. Errors could also have been prevented at an early stage through test-driven development with more complex tests.
Outlook
With the publication of this blog post and the completion of the System Engineering lecture, the project is not over yet, it will be continued as part of an innovation project and published as an open source project.
The set goals of the further project process are:
- store historical data with time series database
- Image support
- Read config from File DB
The optional goals of the further project process are:
- Interface customisation via frontend
- IBM IoT MQTT client integration
Summary
In the System Engineering lecture, we carried out a project in cooperation with IBM for the configuration file-based visualisation of Industry 4.0 data in real time. This project is already successful, but will be continued as part of an innovation project and published as an open source project. We have learned a lot and are happy to have tackled and solved a real world problem.
A very special thanks for the support to Plamen Kiradjiev, Francis Powlesland and Thomas Pohl!
Appendix


Leave a Reply
You must be logged in to post a comment.