This is part one of our series on how we designed and implemented a scalable, highly-available and fault-tolerant microservice-based Image Editor. The series covers the various design choices we made and the difficulties we faced during design and development of our web application. It shows how we set up the scaling infrastructure with Kubernetes and what we learned about designing a distributed system and developing a production-grade Kubernetes cluster running on multiple nodes.
Part 1 of this series will explain the application itself and the design choices we’ve made.
Part 2 will show how we went from a basic Docker Compose setup to running our application on our own bare-metal Kubernetes cluster.
The complete source code and configuration files along with setup instructions for our project can be found in GitLab.
Motivation for the project
There are many different techniques for image editing. Machine learning methods especially allow for a plethora of fancy modifications. AI-based up-scaling of an image’s resolution, transferring the style of one image to another or using Google’s DeepDream to enhance the patterns of an image to a dream-like psychedelic appearance – these are just a few examples of what can be done.
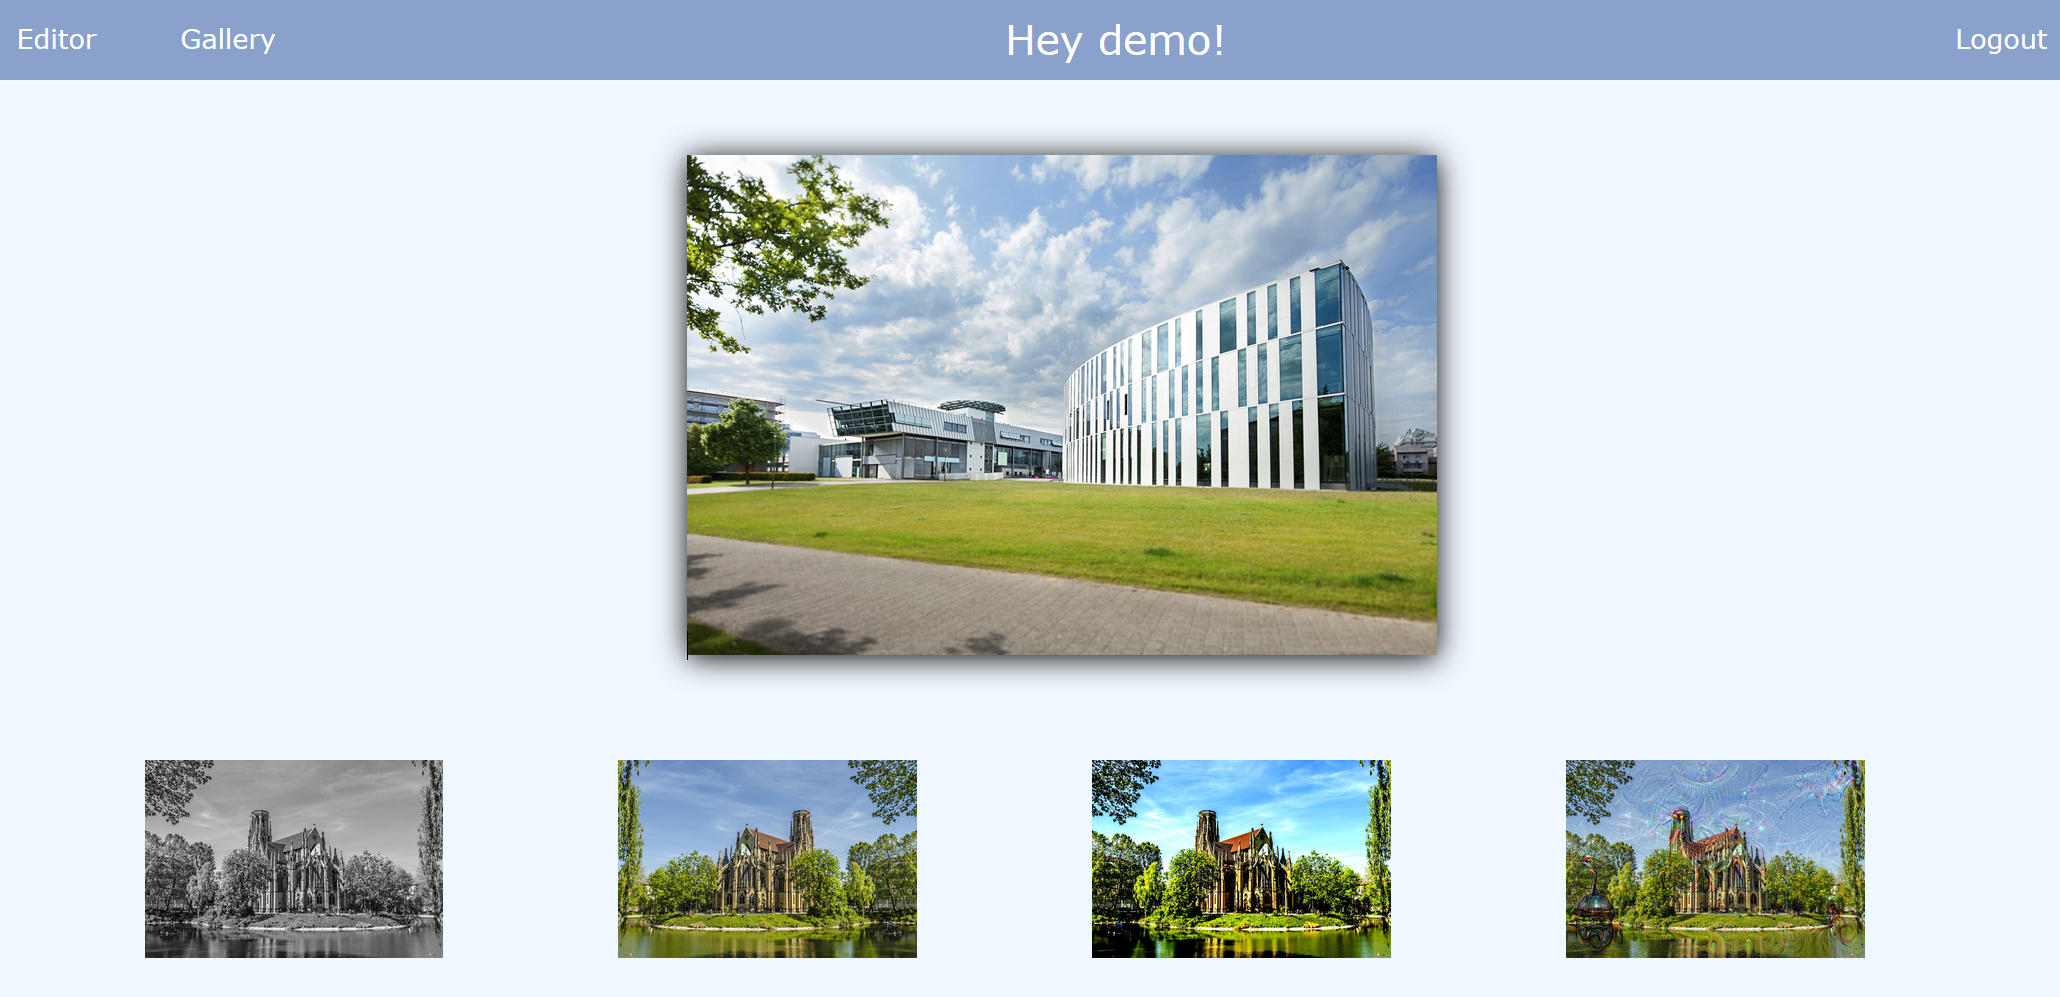
This image shows a photo of our university buildings that has been enhanced with Google’s DeepDream algorithm. It has been converted with our system.

On the Internet, there is a lot of (mostly client-side) web applications available that can apply basic operations to images (grayscale, mirror, blur etc.). In contrast, there are only so many apps out there that offer “advanced” algorithms, and usually only one at a time. One problem here is the resource limitation on the client-side. Some algorithms require far too much computational power to run inside a web browser so it has to be done server-side. This leads to the following question: How do we design an architecture for a web app that
- can handle resource-heavy computation,
- can be scaled to meet increasing demand,
- offers an extensible suite of algorithms, ML-based or otherwise,
- allows to add, remove and update functionality without much effort,
- provides one simple web interface for the user, to access all of this.
To start off, let us define some functional requirements for the web app. These include:
- The user can create an account for the web app and log in with his credentials.
- The user can upload pictures and perform various modifications on them, using one of the provided algorithms. This works whether the user is logged in or not.
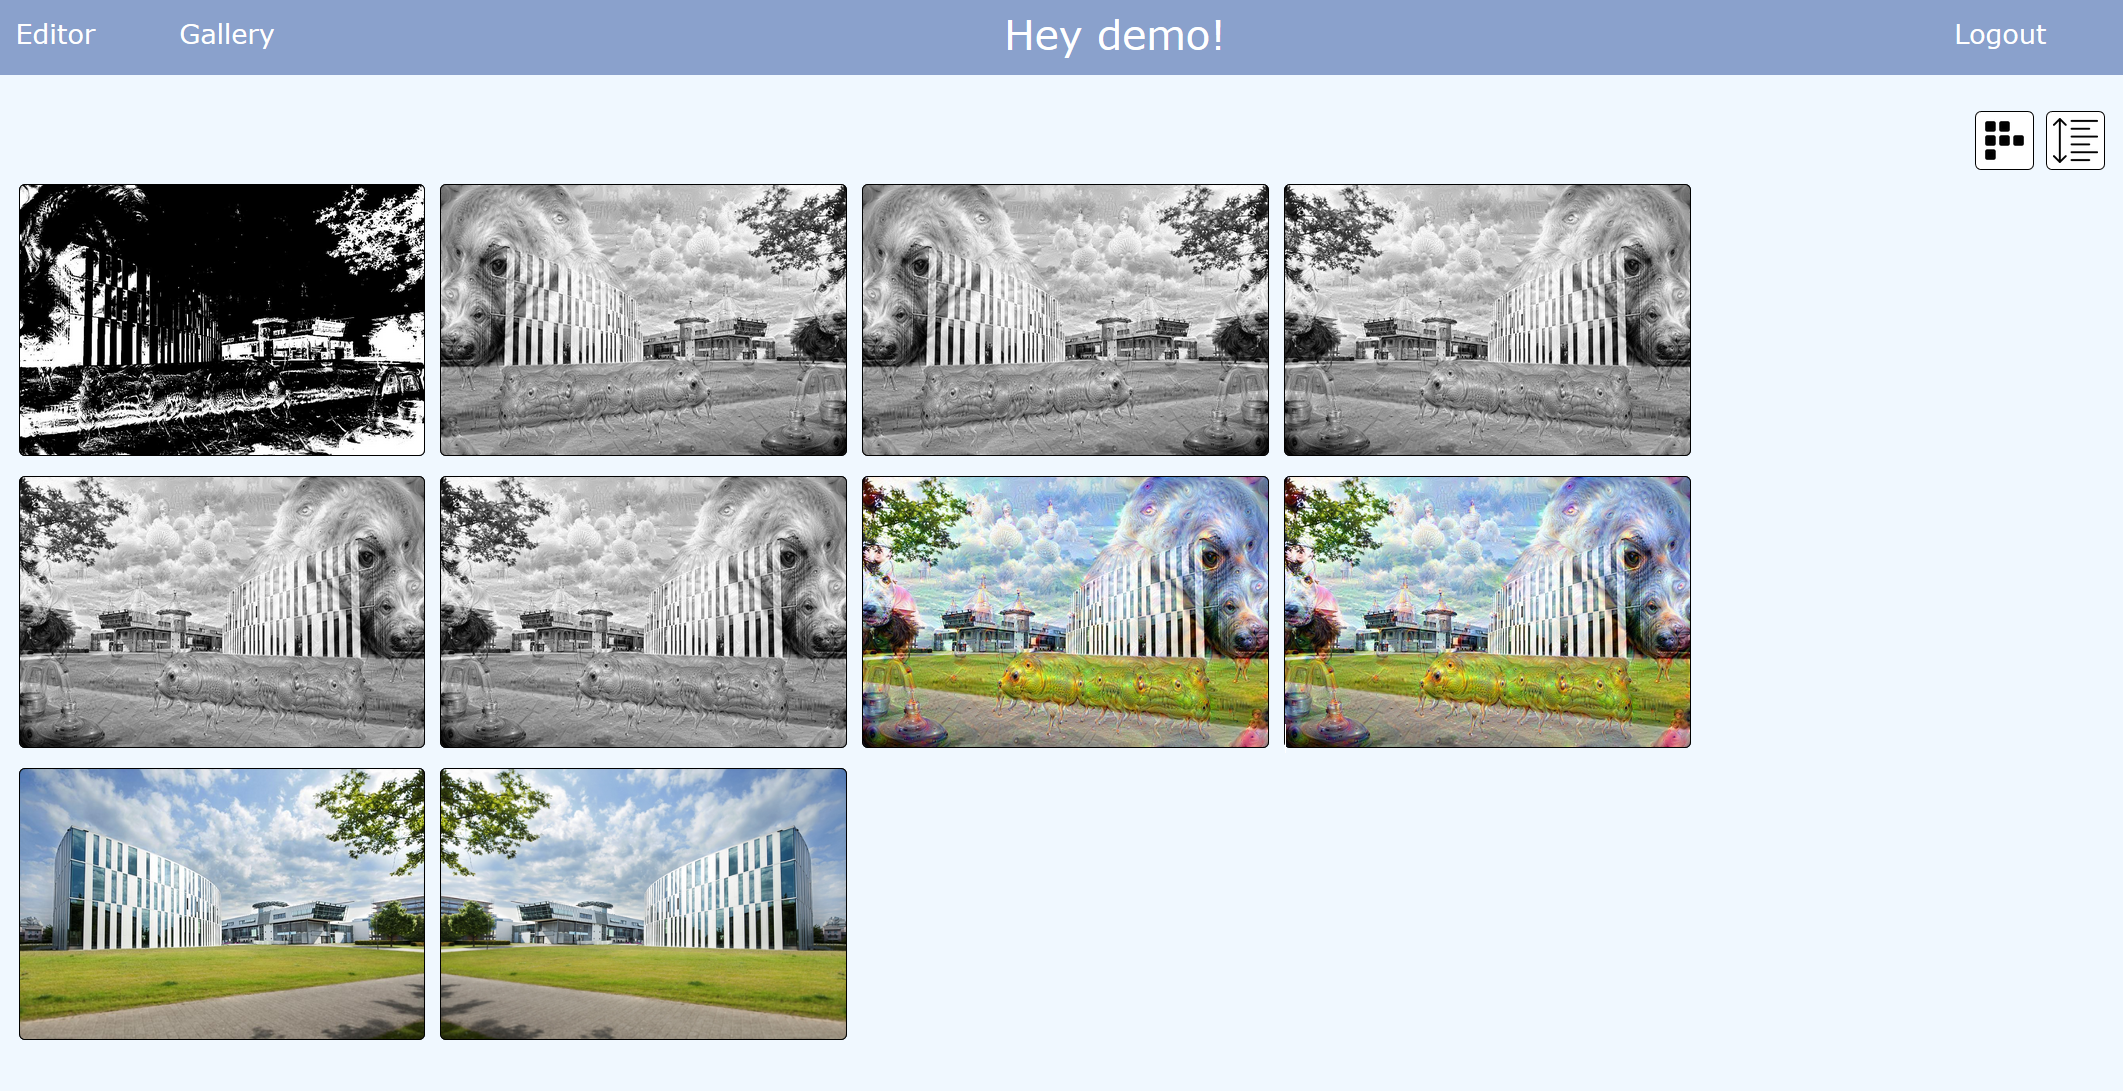
- If the user is logged in, the system automatically saves uploaded and converted images to later retrieve and display them in an image gallery.
For the app we chose a basic design which serves these requirements as shown below (the login and register pages are not shown).
The following screenshot shows the image editor page with the four exemplary “converters” our app provides a:
- DeepDream converter
- Grayscale converter
- Flip-horizontal converter
- Contrast converter
The converted images as well as the original image will be saved automatically and can be viewed in a gallery as long as the user is logged in (see below).
While the app itself has a simple design, the tricky part in the implementation was working with long running conversions. The frontend should not idle and keep the connection open for a long time so we had to figure out a solution. We decided to solve this problem with polling and a separate microservice for state handling. More on this solution and the architectural choices we made will follow shortly.
As well as the actual web app we wanted to build a reliable and fault-tolerant system on the server-side. It should be able to reliably scale and serve many users and image conversions at once. From a technology perspective we wanted to learn more about
- designing a distributed system from scratch. Focusing on fault-tolerance, reliability and a scaling infrastructure,
- designing the architecture for said distributed system and finding out which components are necessary,
- using a microservice-based architecture as a basis for development,
- working with build automation, i.e. CI/CD pipelines,
- learning to build infrastructures with Docker and especially Kubernetes as state-of-the-art tools to build distributed systems and a scaling infrastructure,
- test how well our ideas translate into reality.
Next up we explain the architecture of our application and the various design choices we made.
System architecture
As you might have guessed from the title, we chose Kubernetes as our main tool. Kubernetes is great for managing systems that are highly available and scale automatically, but only if you do it right. Of course, Kubernetes itself cannot save you from bad design and might even exacerbate problems rooted in your application’s architecture. Designing the architecture alone consumed a large chunk of the time we spent on this project, so it makes sense to take the time here and discuss it in detail. This is what we came up with:
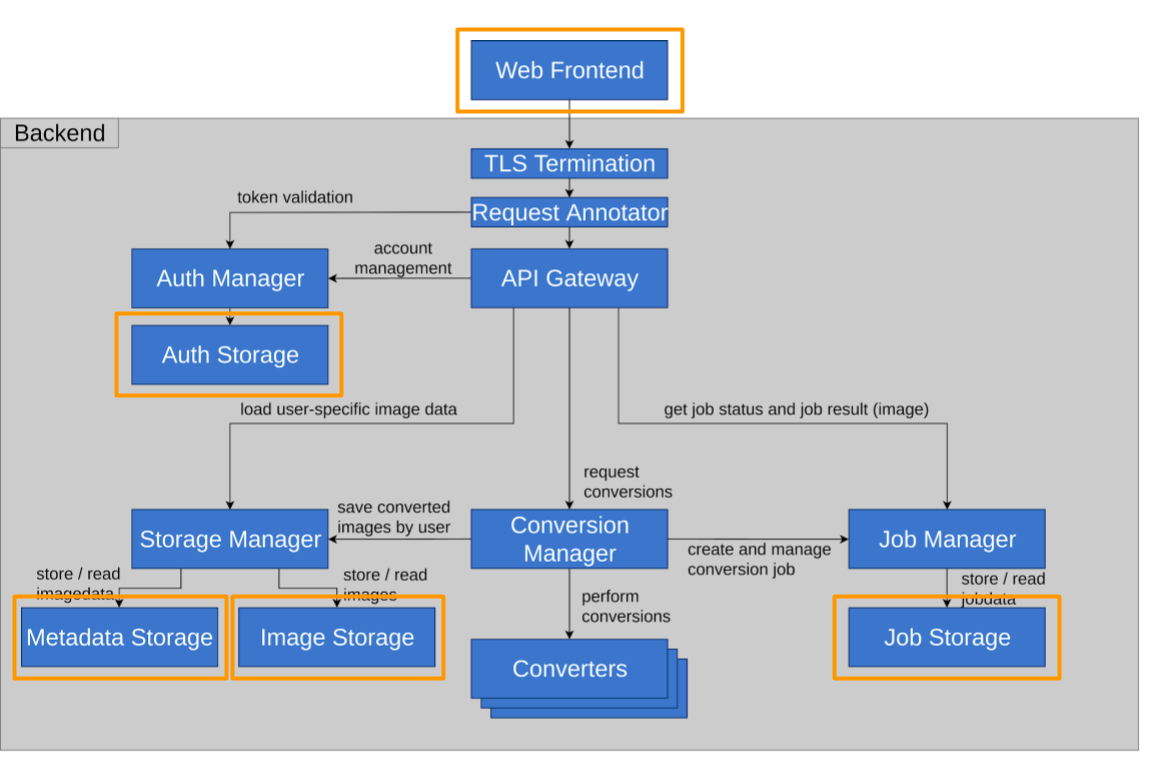
Architecture diagram
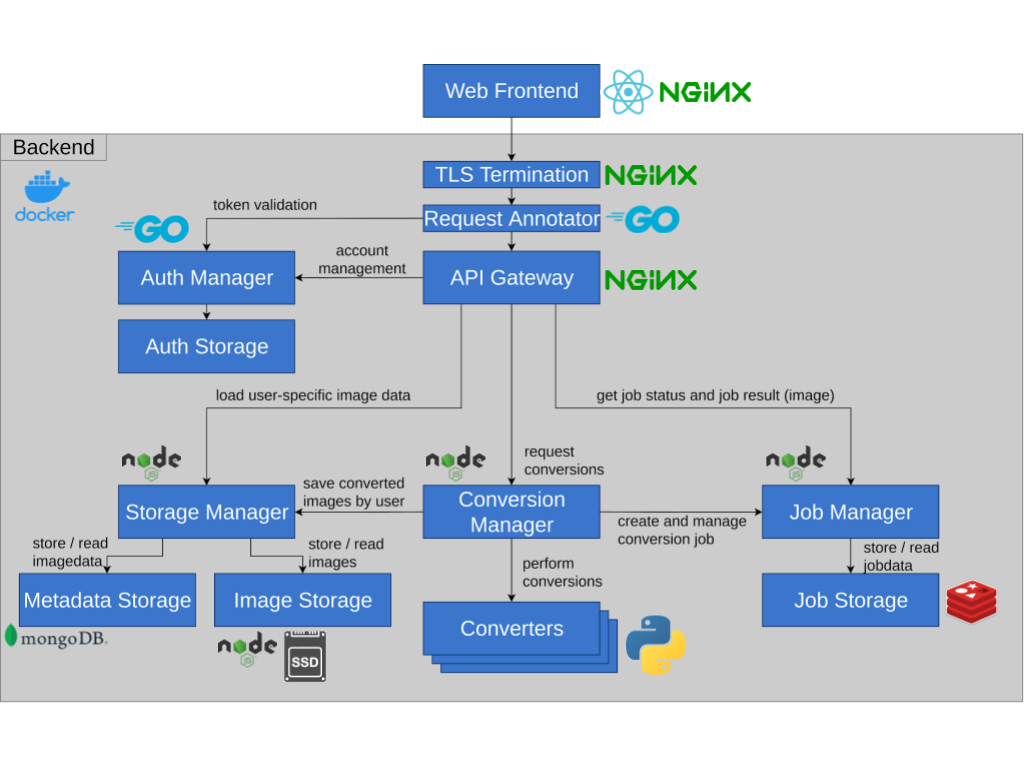 Behold: Our architecture. As you can see, there are a variety of services in various different programming languages and technologies. The technologies were chosen based on personal preference, as well as suitability for their given task (Node.js is great for asynchronicity, the most popular machine learning libraries are written for Python, etc.)
A short list of the most important services is as follows:
- Converters do the actual number crunching. A converter always performs an IO operation: Image in, image out. They are the most primitive structure, architecture-wise.
This is by design, to make them easily manageable. - The Conversion Manager is an intermediary that takes requests, starts conversions and sends the results to Job Manager and Storage Manager.
- The Job Manager keeps track of jobs. It saves their status and eventually the converted image in the Job Storage. Jobs are ephemeral: They reside in the Job Storage for 100 seconds, after which they are deleted.
- The Storage persists finished images that can be shown to the user in a Gallery. It is comprised of three services: Storage Manager, Metadata Storage and Image storage.
- The central gateway functions are provided by three services:
TLS Termination handles encryption between client and backend (all traffic inside the backend itself is currently unencrypted). The Request Annotator adjusts requests and responses. For example, if the user is authenticated, it adds anX-Authenticated-UserHeader which grants it access to more functions. Finally, the actual API Gateway which distributes requests to the service endpoints. - The Auth Manager handles user authentication and management. It is queried by the Request Annotator for token validation (JWT).
We will omit a detailed description of each service. Let’s just say that:
- Most services communicate through HTTP interfaces.
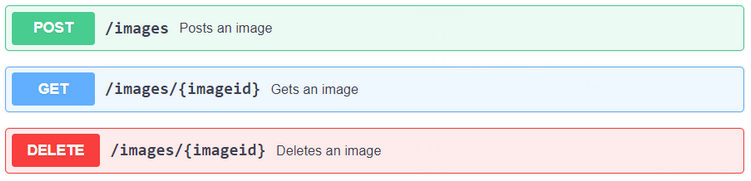
- APIs are specified for every service such that they can be replaced.
This is especially important for converters. - APIs are documented with Swagger/OpenAPI (example: Image Storage).
Request sequence
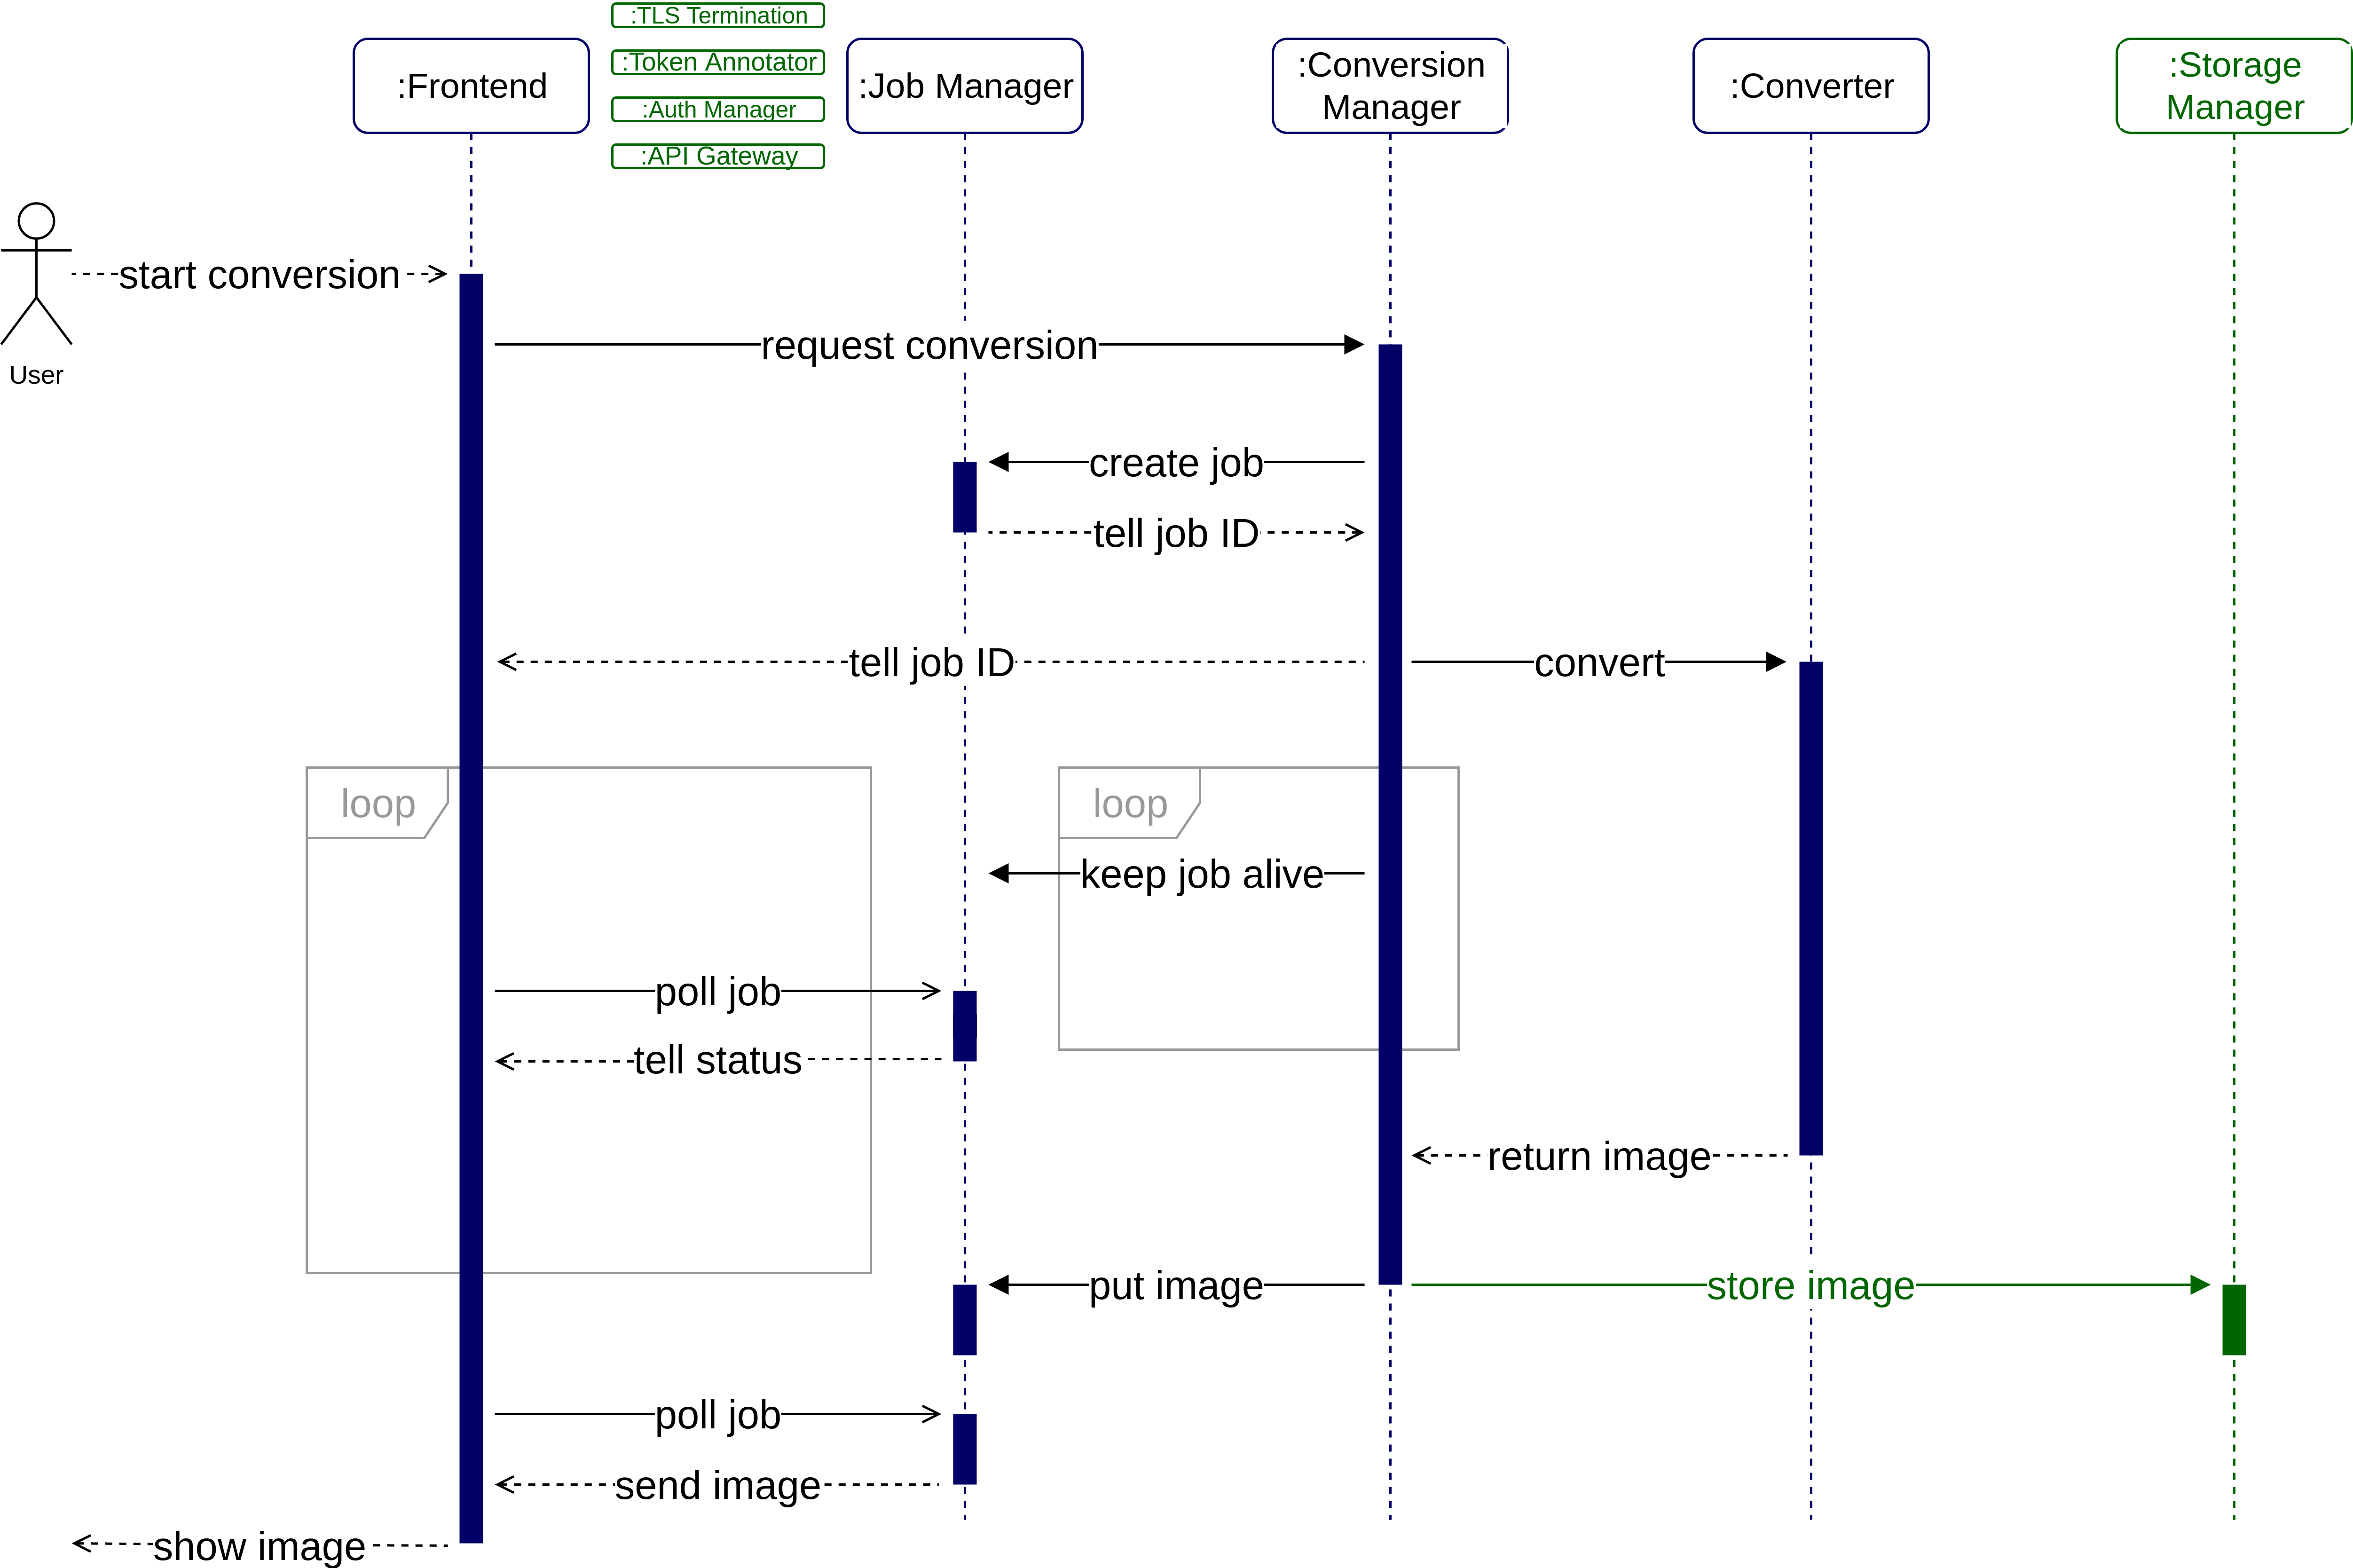
The figure above shows the flow of a successful request sequence. Please note that any communication excluding the web frontend can be considered “internal”, i.e. it never leaves our network and takes place entirely over HTTP.
Let’s say a user wants to convert an image with DeepDream – this is what happens:
- The user chooses an image and conversion algorithm, then clicks start on the web frontend.
- The web frontend sends an HTTP POST request to the Conversion Manager.
That request includes the image in its body. - The Conversion Manager (CM) sends an internal HTTP POST request to the Job Manager which creates a new job and placeholder in the job storage. The response contains a unique job ID. The new job lives for 100 seconds (when not refreshed) after which it will be deleted.
- The CM responds to the web frontend with the job ID.
The connection between web frontend and CM is closed. - The CM now sends an internal HTTP POST request to an instance of the chosen converter service.
- The converter instance starts converting. This may take milliseconds or several minutes, depending on algorithm and image size (technically conversions can take an indefinite amount of time. However, we only allow images up to a size of 5MB. It probably won’t take a day but we didn’t test for this).
- While the conversion is in progress (connection CM → converter is open), the CM starts sending heartbeat messages to the Job Manager (HTTP PATCH). This prevents the Job Manager from deleting the job after 100 seconds.
- The converter finishes the conversion, the response body contains the converted image.
- The CM sends the image via HTTP PUT to the Job Manager internally. This operation also ends the heartbeat. The converted image resides in the job storage for 100 seconds waiting to be retrieved by the web frontend.
- As soon as the web frontend receives the job ID (step 4), it starts sending periodic HTTP GET requests to the Job Manager (polling) to learn about the status of the job.
The response will always return one of the following HTTP status codes:- 200: The job is completed (image is in the response body).
- 202: The conversion is currently underway.
- 404: The job is (no longer) available (job too old or never existed).
- 5xx: The converter returned an error.
- The web frontend receives the converted image in the response from the Job Manager. It stops polling. The converted image is presented to the user on the web UI.
There is one variation if the user is logged in: In this case the web frontend sends a valid auth token with the request (step 2). If this token is present, the CM internally sends the image to the storage manager as well, including the user ID. The storage manager saves images permanently, they are not deleted after 100 seconds. The web frontend can always get back to the image (HTTP GET with user ID to the storage manager).
The green components ”TLS termination”, “token annotation”, “auth manager” and “API gateway” are minimized in this sequence diagram, for brevity’s sake. In reality, every request must pass through this entry layer.
What happens when…
To get another perspective, let’s see what happens if a request doesn’t run as smoothly as intended. Consider the following scenarios:
- A CM instance tells its client the ID of its new job then crashes.
- The client finds the job in the Job Manager.
After 100 seconds, the Job Manager returns 404.
- The client finds the job in the Job Manager.
- A CM instance tells its client the ID of its new job. It starts a conversion then crashes.
- The client finds the job in the Job Manager.
After 100 seconds, the Job Manager returns 404. - The converter may not notice. It completes the request but the response is lost.
- The client finds the job in the Job Manager.
- A user starts a conversion, then closes the browser before the conversion is completed.
- user is not signed in: The image gets converted but never requested from the Job Storage.
- user is signed in: The user can find the converted image in the gallery.
Key concepts
Microservices
This was our first important design choice. Since our initial goal was to get acquainted with Kubernetes, building a microservice-based architecture was pretty much a given. Still, let’s take a minute to appreciate why that would be a good idea and what that decision entails.
In a microservice-based architecture, each service is technically a standalone program. Ideally, each microservice performs one task w.r.t. some business requirements.
Microservice instances aren’t restricted to share the same context or even host but can be spread across multiple machines. A helpful analogy (at least for us) was to compare microservices to classes in object orientation, with objects being service instances — except our “objects” are only loosely coupled through HTTP and can exist anywhere.
Microservices are the right choice for us because we want to
- scale our app horizontally,
- replicate critical components to achieve high availability,
- use different programming languages for different components
(suitability and personal preference of the developer), - design our architecture around our own business requirements.
They also come with a couple of caveats because we must
- manage proper routing between service instances,
- make sure that service instances can actually be deployed independently, if possible,
- free blocked resources as soon as possible by
- avoiding synchronous calls,
- not keeping connections open,
- reducing “state” in our services.
State
Our services produce data. This data must be stored somewhere.
In the previous section we decided to not rely on open connections. That is especially important as some requests can take a long time to yield a response (to be fair, DeepDream would be a lot faster if we got it working on our GPU cluster). An open connection blocks a port on the host system and also a bit of memory. But if we close every connection immediately – how does the caller find its partner again? How does a client get its converted image when it is done?
- Our first idea was to simply keep the connection open until the call received its response. We’ve already established why this design is bad.
- Our second idea was to let instances “know each other”, i.e. to save identifying information directly in the service instance. That way, any thread in one instance could find the other thread in the other instance that it called, even after the connection is closed. This was a terrible idea. Imagine trying to scale down as demand subsides but not being able to as in every instance you want to shut down there are threads with unique IDs waiting to be called again. You could work with timeouts but the result would still be messy and inefficient.
- Our third idea, which we finally stuck with, was a content-centric design. There are some dedicated services for holding state (read “model” or “data layer”), everything else is completely stateless. By stateless we mean:
- A thread in a service instance is created on request, performs its task and is closed again. It isn’t meant to be called twice. No other thread in any other service instance depends directly on this specific thread or instance.
- The service does not save any data persistently. After a thread in a service instance has completed its task, it is terminated and no information about it remains in the service instance. A service instance that has completed n threads is identical to one that has completed n+1 threads.
Let’s look at an example: A client speaks to a Conversion Manager instance. The conversion manager instance provides it with an image and tells it what to do with it. The CM instance then returns a job ID in response. From that point on, the client will only ever query some random Job Manager instance about the status of its job ID. The client never has to talk to this specific Conversion Manager instance ever again.
The thing to take away here is that microservices aren’t always guaranteed to be “independently deployable”. There is a difference between a service that requires “some random instance” of another service to be present and a service that requires a specific instance! Only the former case allows deploying and destroying service instances on demand.
 In our architecture we have now almost eliminated long-running requests. There is one notable exception to this, though. The connection between the conversion manager and the specific converter is actually kept open for the full duration of the conversion. While this goes against our better judgement, it is a trade-off between two conflicting requirements:
First, we want to close connections as early as possible. This would be easy enough if we had the Converters send their finished images to the Job Manager directly, we could close the connection between CM and Converter immediately. So why the detour?
The problem is that we really want our converters to remain modular and primitive. Otherwise, we would need to add boilerplate code to every new converter we want to create. While this is an inconvenience on its own, it is even less acceptable if different converters are also implemented in different programming languages.
Given enough time, we could probably come up with a better solution, but for now we will stick to just having an open connection.
Domain driven approach
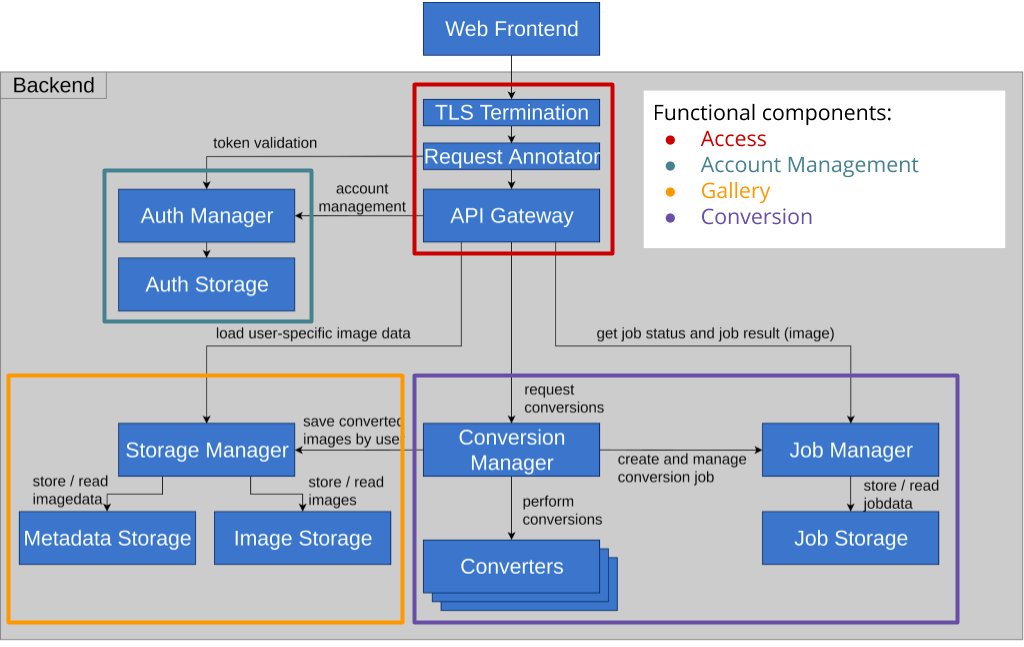 One great thing about microservice-based architectures is that services can be modeled according to business requirements. To understand how this domain driven approach works, we divided our backend into four basic functional components: Access, Account Management, Gallery and Conversion. We excluded the Web Frontend from this part of the discussion because it is mostly there for convenience. You might as well use cURL.
- Access incorporates the services required to access any of the provided functions.
- Account management allows users to create and manage accounts. Users with an account have access to extended functionality.
- The gallery is a feature that is available to registered users only, giving them access to their previously saved images.
- The conversion is the core of the application. Users can edit images with it. This functionality is accessible by everyone.
 The graph above illustrates the logical dependency between the different domains. Ideally, the technical implementation should follow the same rules. That is to say, it should not create more dependencies between services than there are already there logically. This has implications for the reliability and availability of our application:
If all instances of a service fail, it becomes completely unavailable. This breaks the entire functional component it belongs to. For example, if all Auth Manager instances fail, users will not be able to log in. Since access to the gallery depends on account management, it will also become unavailable. Conversion however should be unaffected by this. The CM shouldn’t care if the Authentication Manager is there or not.
This finally poses the question: Can we define any “critical” components, which we have to strengthen against failure more than others? On one hand, without basic access to our network, nothing else works. On the other hand, even losing half of our functionality by losing gallery or conversion capabilities, would be completely unacceptable to us. Thus we decided that every service is “critical” and must be hardened against failure and replicated multiple times.
Of course, this section has been very hypothetical – reality might turn out very differently! So how about we try to break our app a little and find out, if it actually works the way we designed it? No worries, we will revisit this in part 2 – stay tuned!
This concludes the theoretical part of our endeavor, but before we start our deep dive into Kubernetes itself, we should speak a little about our methodology as well.
Implementation
Overview of our repository
We used the GitLab service generously provided by the HdM. Our GitLab group consists of a separate repository for every microservice as well as an overarching repository called “Infra”. The Infra repository is the “master” that is used to combine all microservices and start the application as a whole. The other repositories are embedded into the Infra repository as Git submodules. This is handy, as Infra can point to any commit of a submodule that it needs.
CI/CD pipeline
As well as learning to work with Kubernetes, one of our goals was learning to work with CI/CD pipelines for build-automation and automated testing. Because GitLab natively offers support for CI/CD workflows we decided to use its native functionality for it. Once implemented, the pipeline was triggered on any commit to the repository. That way, every developer was able to see if his changes have broken something.
The focus was on learning how to work with a CI/CD system and how to integrate some tests into the workflow. Therefore, the tests are only at a basic level. As a last step of our CI/CD development we implemented integration tests on top of the pipeline that ran the entire cluster.
Our implementation consists of two parts:
- The building and testing of each microservice in its own repository.
- Combining the built microservices starting the cluster as a whole and running integration tests on it.
Let’s begin with the first part. Because we use a separate repository for each separate microservice, each module has its own .gitlab-ci.yml file and therefore gets built and tested separately.
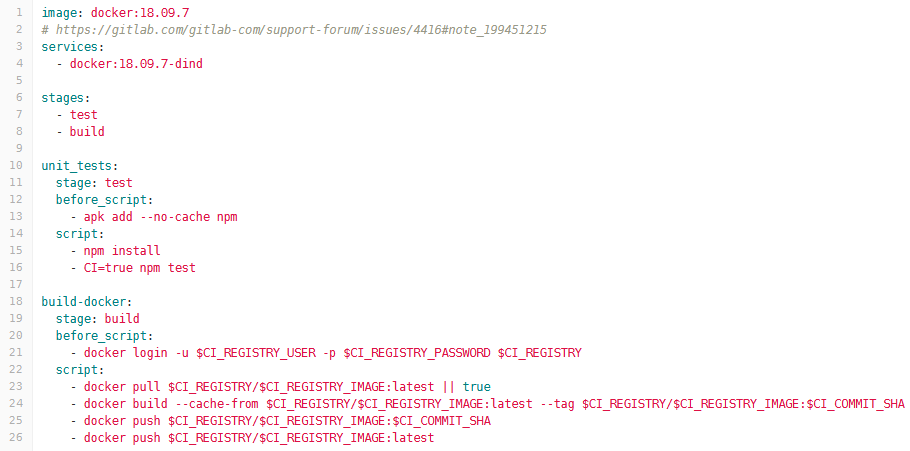
This pipeline consists of the following steps for each microservice:

- The build step builds the microservices, downloading dependencies, compilation (if necessary) and wrapping everything to a Docker container.
- The test step then tests the microservice with unit or frontend tests.
- Finally the Docker container gets pushed to our Docker registry.
The following screenshot shows the configuration we used for the frontend microservice. You can see two different stages with the build stage also containing commands for pushing to our Docker Registry. Passwords are aliased through configuration variables so the passwords are not visible in plain text.
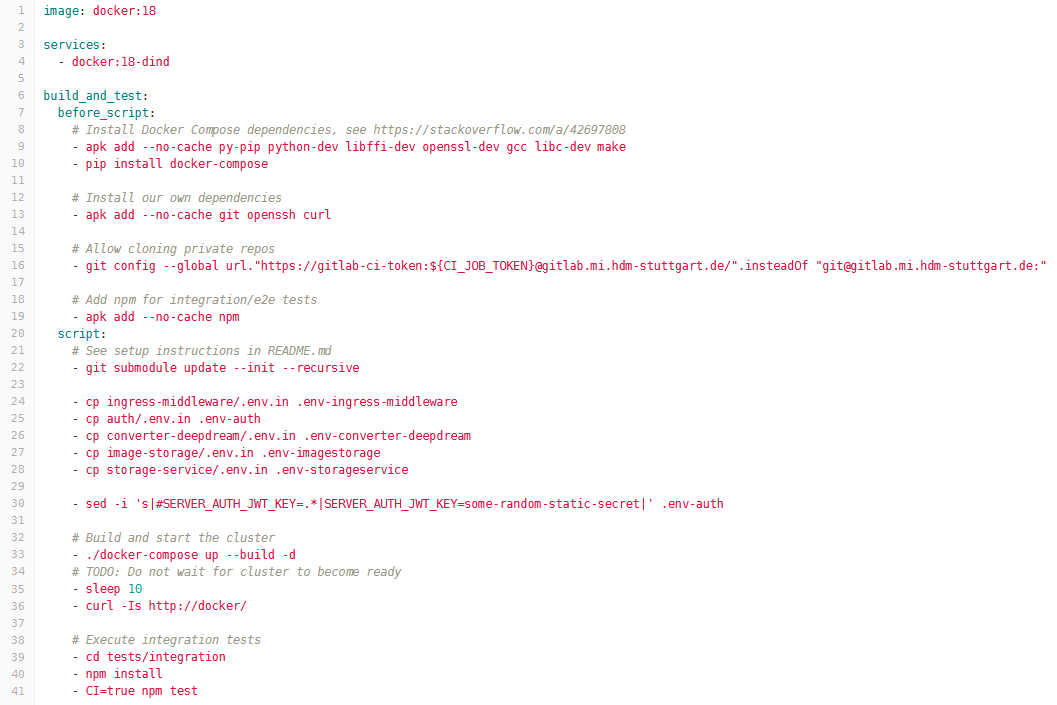
The second pipeline runs on a single repository, namely infra that includes all our microservices as Git submodules. This implementation combines all microservices, builds the entire cluster and starts it. Finally, integration tests are executed against the running cluster with all services available. This pipeline also consists of three steps:

- The build step combines all microservices and prepares them for the following step.
- Then all the microservices get started and the cluster is running.
- Integration tests are executed against the running cluster.
In our implementation, all these three steps are executed in a single stage. The tricky part here is the usage of Docker in the build process. Because we use that, each stage would be executed in a clean environment without past history. However, our integration tests would need to be executed against a running cluster. For this reason all pipeline steps have to be executed in one script as shown in the .gitlab-ci.yml configuration file below.
We do not have a setup for automated deployment. Instead the deployment process must be triggered manually, at which point the Docker images get pulled from our Docker Registry. We then tell the cluster to load specific images and instantiate them. While trying to automate deployment we faced severe difficulties with access rights. At this point we decided to shift our priority away from automated deployment and to focus on Kubernetes.
Where we are now
So far, we have:
- discussed our architecture and the decisions that went into its design,
- implemented an automated building pipeline of our microservices with CI/CD,
- created an actual web application that works.
Our next step is now to turn it all into a scalable cluster using Kubernetes. It’s high time we explore how we did that – let’s dive into part 2!
Leave a Reply
You must be logged in to post a comment.