This is part two of our series on how we designed and implemented a scalable, highly-available and fault-tolerant microservice-based Image Editor. This part depicts how we went from a basic Docker Compose setup to running our application on our own »bare-metal« Kubernetes cluster.
Part 1 of this series explains the design choices we’ve made to get here.
The complete source code and configuration files along with setup instructions for our project can be found in GitLab.
In this post we will dive into Kubernetes and Helm — the package manager for Kubernetes — and how we went from a basic microservice deployment with Docker Compose to a fully working and production-ready Kubernetes cluster with K3s and k3sup.
Initially, while we were developing our various microservice components (see our previous blog post), we decided to package each service to a Docker container. This went quite smooth as we already had some experience in working with Docker. We ended up with 11 Dockerfiles, one for every of our microservices: auth manager, conversion manager, the two converters (converter-deepdream and converter-basic), job manager, the image storage and storage service, web frontend, the TLS terminating proxy, the request annotation proxy and the API gateway.
A Dockerfile describes the steps required to build and package one or multiple apps into a Docker image. Docker images can be instantiated to a Docker container which then runs the application(s).
FROM golang:alpine AS builder

WORKDIR /auth

RUN apk add --no-cache make

COPY ./config/ ./config/
COPY ./server/ ./server/
COPY ./vendor/ ./vendor/
COPY ./go.mod ./go.mod
COPY ./go.sum ./go.sum
COPY ./main.go ./main.go
COPY ./Makefile ./Makefile

RUN make

# ---

FROM alpine:latest

WORKDIR /auth

RUN addgroup -g 1000 -S auth &&
    adduser -u 1000 -S auth -G auth

COPY --from=builder /auth/bin/server .

USER auth

CMD [ "/auth/server" ]
(Exemplary illustration of a Dockerfile leveraging multi-stage builds, taken from auth/Dockerfile)
To orchestrate our various Docker containers we decided to use Docker Compose, a tool which amongst other features helps in making some capabilities of Docker available to configure via a simple docker-compose.yml file, for example to launch containers in a specified order, define their service dependencies, manage port mappings and implement a restart policy.
version: "3"

services:
  auth:
    build:
      context: ${AUTH:-.}
      dockerfile: Dockerfile
    image: waa.edu.rndsh.it:5000/auth:latest
    restart: unless-stopped
    ports:
      - "8443:8080/tcp"
    env_file:
      - ${AUTH_ENV:-.env}
    cap_drop:
      - ALL
(Exemplary illustration of a docker-compose.yml file, taken from auth/docker-compose.yml)
This was great for our development setup which allowed our developers to work independently of each other by running the entire application on their local development machine without any external dependencies.
Once the backend of our application became usable with a web frontend, we decided it was time to make the app available on a public server so it could be used by our testers — finally it was time to explore Kubernetes!
Diving into Kubernetes
At first, Kubernetes was quite intimidating to us when we only knew a bare minimum of what it can be used for. It was a beast we needed to tear apart and explore the parts each on their own.
The official Kubernetes documentation and tutorials already gave a good introduction to what Kubernetes does and doesn’t try to achieve.
To deploy our application on Kubernetes, we first needed to move from our Docker Compose files to the equivalent Kubernetes Resources.
Introducing Kompose, the official Docker Compose to Kubernetes converter
While exploring the repos of the Kubernetes GitHub organization, we found a tool which helps in migrating existing Docker Compose files to Kubernetes: Kompose. The procedure was quite straightforward:
$ kompose convert --chart --controller=deployment -f docker-compose.ymlWe ran this command for each of our 11 docker-compose.yml files. Out came a total of around 30 Kubernetes resource files. Kompose did its job impressively well! The tool not only reliably converted the well-known Docker Compose directives image, ports and restart, but also converted less frequently used directives such as env_file, cap_drop / cap_add and even volumes to the equivalent Kubernetes syntax / resource type counterpart. It was super helpful and gave a headstart into becoming familiar with resource files — the first step into mastering the Kubernetes-Fu.
Unfortunately, some changes to the resource files as produced by Kompose were still required. The version of Kompose we were using wasn’t completely compatible with the then-recent release of Kubernetes which we used inside Minikube. We also dropped all references to io.kompose — they were no longer of any to us since we were already experienced enough to manage the files on our own.
We needed to add a imagePullSecrets policy to every Deployment resource and configure the referenced Docker Registry secret as we are pulling the Docker images from our own login-protected registry:
imagePullSecrets:
- name: regcred
(Excerpt of auth/kubernetes/auth/templates/deployment.yaml. The two lines instruct Kubernetes to use the regcred secret to authenticate to the Docker Registry before pulling the image.)
$ kubectl create secret docker-registry regcred
  --docker-server=waa.edu.rndsh.it:5000
  --docker-username=$REGISTRY_USERNAME --docker-password=$REGISTRY_PASSWORD
(Configuring the regcred secret via command line)
Once the resource files were adjusted, it was time to test them — we needed a Kubernetes development cluster.
Setting up a private Kubernetes development cluster with Minikube
Minikube probably is the most widely used one-node Kubernetes cluster solution for development. And it became quite clear why: it was super easy to set up; With only a single command and a bit of time for the bootstrapping process we had a Kubernetes development cluster up and running on our local machines.
# Create and launch Minikube VM
$ minikube start --memory='10240mb' --cpus=8
😄 minikube v1.7.3 on Darwin
✨ Automatically selected the virtualbox driver
💿 Downloading VM boot image ...
🔥 Creating virtualbox VM (CPUs=8, Memory=10240MB, Disk=20000MB) ...
🐳 Preparing Kubernetes v1.17.3 on Docker 19.03.6 ...
💾 Downloading kubeadm v1.17.3
💾 Downloading kubelet v1.17.3
💾 Downloading kubectl v1.17.3
🚀 Launching Kubernetes ...
🌟 Enabling addons: default-storageclass, storage-provisioner
⌛ Waiting for cluster to come online ...
🏄 Done! kubectl is now configured to use "minikube"
Minikube even automatically merged its kubeconfig to ~/.kube/config and switched the kubectl context accordingly — we were ready to get started!
# Check cluster version
$ kubectl version --short
Client Version: v1.17.3
Server Version: v1.17.3

# … success!
As a first step, to check whether our Kubernetes resource files were producing the desired state in our cluster, we kubectl apply‘ed all of them as follows:
$ find . -name '*.yaml' -not -name 'Chart.yaml' -not -name 'values*.yaml'
  -exec cat {} ; -exec echo '---' ; | kubectl apply -f -
configmap/auth-env created
deployment.apps/auth created
service/auth created
deployment.apps/conversion-manager created
service/conversion-manager created
deployment.apps/converter-basic created
service/converter-basic created
configmap/converter-deepdream-env created
deployment.apps/converter-deepdream created
service/converter-deepdream created
deployment.apps/frontend created
service/frontend created
configmap/imagestorage-env created
deployment.apps/imagestorage created
service/imagestorage created
deployment.apps/ingress-backend created
service/ingress-backend created
ingress.networking.k8s.io/ingress-frontend created
configmap/ingress-middleware-env created
deployment.apps/ingress-middleware created
service/ingress-middleware created
configmap/jobmanager-env created
deployment.apps/jobmanager created
service/jobmanager created
configmap/storageservice-env created
deployment.apps/storageservice created
service/storageservice created
We could see all our microservices spin up inside the cluster using kubectl get events --all-namespaces -w — in real-time!
After a while, all deployments were READY (verified with kubectl get all -o wide --all-namespaces).
To access the inside of the cluster from outside (our host machine), we needed to enable the Minikube ingress addon via minikube addons enable ingress. Minikube then made our application available to the world outside of the cluster.
minikube ip shows the IP of the Minikube cluster, and curling it returned our web frontend (🎉). To our surprise, the app0 was already working fine — just as on our Docker Compose-managed cluster:
$ curl -Is $(minikube ip) | head -n1
HTTP/1.1 200 OK
It was time to extend the resource files with more awesome features.
0: all services without additional dependencies such as a database
Making the Kubernetes application highly-available
While skimming through the whole Kubernetes documentation, we compiled a list of interesting directives we wanted to implement for our resource files. Amongst them were the readinessProbe and livenessProbe directives for Deployment resources.
By default, when the most basic unit of Kubernetes — a pod — has launched, Kubernetes will instantly begin to route traffic to it, even if the application running inside the pod is not ready to handle any traffic yet. This would make requests reaching such an “unhealthly” pod return a 502 Bad Gateway response.
That’s where readinessProbe comes into play. It defines a check which needs to complete successfully before Kubernetes routes any traffic to the pod. For each of our deployments we created such a directive to instruct Kubernetes to either wait for a TCP port to become available or for a HTTP server to return a 2xx response at a specified path:
readinessProbe:
  httpGet:
    path: /
    port: 8080
    periodSeconds: 2
(Exemplary configuration of a readinessProbe directive commanding Kubernetes to wait for a HTTP server on port 8080 of the pod to become available and answer a request to / with a 2xx response before beginning to route traffic to the pod. Taken from frontend/kubernetes/frontend/templates/deployment.yaml)
Similarly, livenessProbes are used to check if a pod is still running correctly. Once a liveness check fails for a specific number of times (the failureThreshold, default: 3, source), Kubernetes automatically deletes (“restarts”) the pod and removes it from its internal service Load Balancer so traffic doesn’t reach it any longer.
Those two directives are configured in no more than 10 lines — Kubernetes handles the rest of all the magic!
Next, it was time to configure minimum and maximum hardware resource limits for our deployments. Setting those limits was super easy, too:
resources:
  requests:
    memory: "256Mi"
    cpu: "0.4"
  limits:
    memory: "512Mi"
    cpu: "0.8"
(Exemplary configuration of a resources directive, taken from converter-deepdream/kubernetes/converter-deepdream/templates/deployment.yaml)
requests specifies the minimum hardware resources required to run a pod, while limits configures the maximum amount of hardware resources available to a pod. The values were initially either chosen arbitrarily or by looking at the output of kubectl top pods which gave a rough estimate of how the values needed to be configured.
The memory limit can be expressed in various units (megabyte, gigabyte, etc., see here), while the definition of the cpu unit is a bit more complex:
Quoting the documentation, one “cpu”, in Kubernetes, is equivalent to:
– 1 AWS vCPU
– 1 GCP Core
– 1 Azure vCore
– 1 IBM vCPU
– 1 Hyperthread on a bare-metal Intel processor with Hyperthreading
We played around a bit with various numbers and ended up configuring 0.1 – 0.8 units of cpu for our services.
A scary discovery was that Kubernetes pods — just like Docker containers — are run with root privileges by default. We reconfigured our deployments accordingly to run the pods as non-root:
securityContext:
  capabilities:
    drop:
      - ALL
  allowPrivilegeEscalation: false
  runAsUser: 18443
(Excerpt of auth/kubernetes/auth/templates/deployment.yaml, allowPrivilegeEscalation: false and runAsUser: 18443 prevent running the pod with root privileges)
As a last step, to make the number of pod replicas of a service scale up or down automatically based on their current load, we created a HorizontalPodAutoscaler resource for every microservice:
apiVersion: autoscaling/v1
kind: HorizontalPodAutoscaler
metadata:
  name: conversion-manager
spec:
  scaleTargetRef:
    apiVersion: apps/v1
    kind: Deployment
    name: conversion-manager
  minReplicas: 2
  maxReplicas: 8
  targetCPUUtilizationPercentage: 50
(Exemplary illustration of a HorizontalPodAutoscaler resource, taken from conversion-manager/kubernetes/conversion-manager/templates/hpa.yaml)
This basic file defines a minimum and maximum number of running replicas of a pod, and a CPU threshold (targetCPUUtilizationPercentage) which tells Kubernetes when to launch a new, or terminate an existing pod instance.
Now that the Kubernetes development cluster was running fine on a single node with Minikube, we needed a staging / production cluster with more than just one node.
Entering bare-metal Kubernetes cluster solutions
There are a number of solutions available to obtain access to a production-grade Kubernetes cluster. Probably the most basic way is to simply get a Managed Kubernetes cluster from Google Cloud’s Kubernetes Engine (GKE), Amazon AWS’ Elastic Kubernetes Service (EKS), Microsoft Azure’s Kubernetes Service (AKS), IBM Cloud, DigitalOcean or one of the other countless providers.
Other solutions encompass:
- custom Kubernetes operating systems such as Talos or k3OS
- setting up and managing a cluster with kubeadm — the official tool to set up Kubernetes on bare-metal
- other solutions previously talked about in another blog post
… all of which, unfortunately, were not of an option to us. Installation of custom OS images (for Talos and k3OS) were not allowed on the three machines we were given access to by our university, kubeadm was too complex as we’d need to explore Kubernetes in a depth more than desired, and managed Kubernetes cluster solutions either required a credit card, or the student accounts were too constrained for our application in regards to hardware resources. We tried hosting our cluster in an AKS — just to see how easy it would be. It was indeed quite straightforward to deploy our cluster there (using a mix of both Azure’s web UI and the official az CLI tool), but the hardware limitation of just four Azure vCores (limit for student accounts) quickly spoiled any fun; We couldn’t even create replicas of all our services.
In need of another solution we stumbled upon K3s, a lightweight, certified and API-compliant Kubernetes distribution. K3s is actively developed by Rancher, a company dedicated to making Kubernetes easier to use. Other software from Rancher was introduced on this blog before (click).
K3s and k3sup
K3s promises to spin up a production-ready Kubernetes cluster in around 30 seconds. This looked really promising, given that setting up, maintaining and grasping the inner workings of a cluster created by kubeadm would probably take us countless of hours or even days.
K3s is packaged as a single, static binary with no more than 40MB in size which can even be run on SoCs like the Raspberry Pi.
If this wasn’t already great enough, we found a wrapper around K3s aptly named k3sup which made installing K3s to multiple nodes even simpler.
We wrote a small shell script and had a 3-node Kubernetes cluster up and running — on our own machines — in just 20 lines!
#!/usr/bin/env bash

set -eufo pipefail

MASTER=$(dig +short -t a sem01.mi.hdm-stuttgart.de)
SLAVES=(
  $(dig +short -t a sem02.mi.hdm-stuttgart.de)
  $(dig +short -t a sem03.mi.hdm-stuttgart.de)
)

# Set up “Master” node
k3sup install --ip $MASTER --sudo=false --cluster
  --context k3s-sem --local-path ~/.kube/config --merge
  --k3s-extra-args '--no-deploy traefik'
# Configure firewall to allow access with kubectl
ssh root@$MASTER -- ufw allow 6443/tcp

# Set up “Slave” nodes
for SLAVE in ${SLAVES[*]}; do
  k3sup join --ip $SLAVE --server-ip $MASTER --sudo=false
done
To distribute load across the three cluster nodes (sem01, sem02, sem03), we installed sem00 — a load balancer running nginx as a reverse proxy — in front of them:

The k3sup install command run above created a new context in ~/.kube/config which we switched to with kubectl config use-context k3s-sem.
A kubectl version --short confirmed that the cluster was running:
$ kubectl version --short
Client Version: v1.17.3
Server Version: v1.17.2+k3s1
Just as before with Minikube, we applied all resources files as a quick check to see whether the cluster was handling the resource files as expected. It was0 and autoscaling was working perfectly fine too after producing some load on the cluster.
0: after deploying an nginx ingress controller using helm install nginx stable/nginx-ingress --namespace kube-system --set rbac.create=true --set serviceAccount.create=true --set podSecurityPolicy.enabled=true --set controller.replicaCount=3 --set controller.autoscaling.enabled=true --set controller.autoscaling.minReplicas=3 --set controller.autoscaling.maxReplicas=9. We decided against using traefik as the default ingress controller installed by K3s.
$ curl -Is sem0{0,1,2,3}.mi.hdm-stuttgart.de 2>/dev/null | grep HTTP/
HTTP/1.1 200 OK
HTTP/1.1 200 OK
HTTP/1.1 200 OK
HTTP/1.1 200 OK

# All nodes and the load balancer are working fine! 🐳
Helm: Managing multiple application deployments the easy way
We now each had a Minikube development cluster running on our local machines and a single, public production cluster running on the three sem0x servers.
Maintenance tasks such as microservice upgrades would always need to be performed on both clusters the same way, so that the development and production clusters would match. After a while this became cumbersome, especially as both clusters had slightly different configurations applied — different ConfigMaps, different autoscaling parameters and different hardware resource constraints.
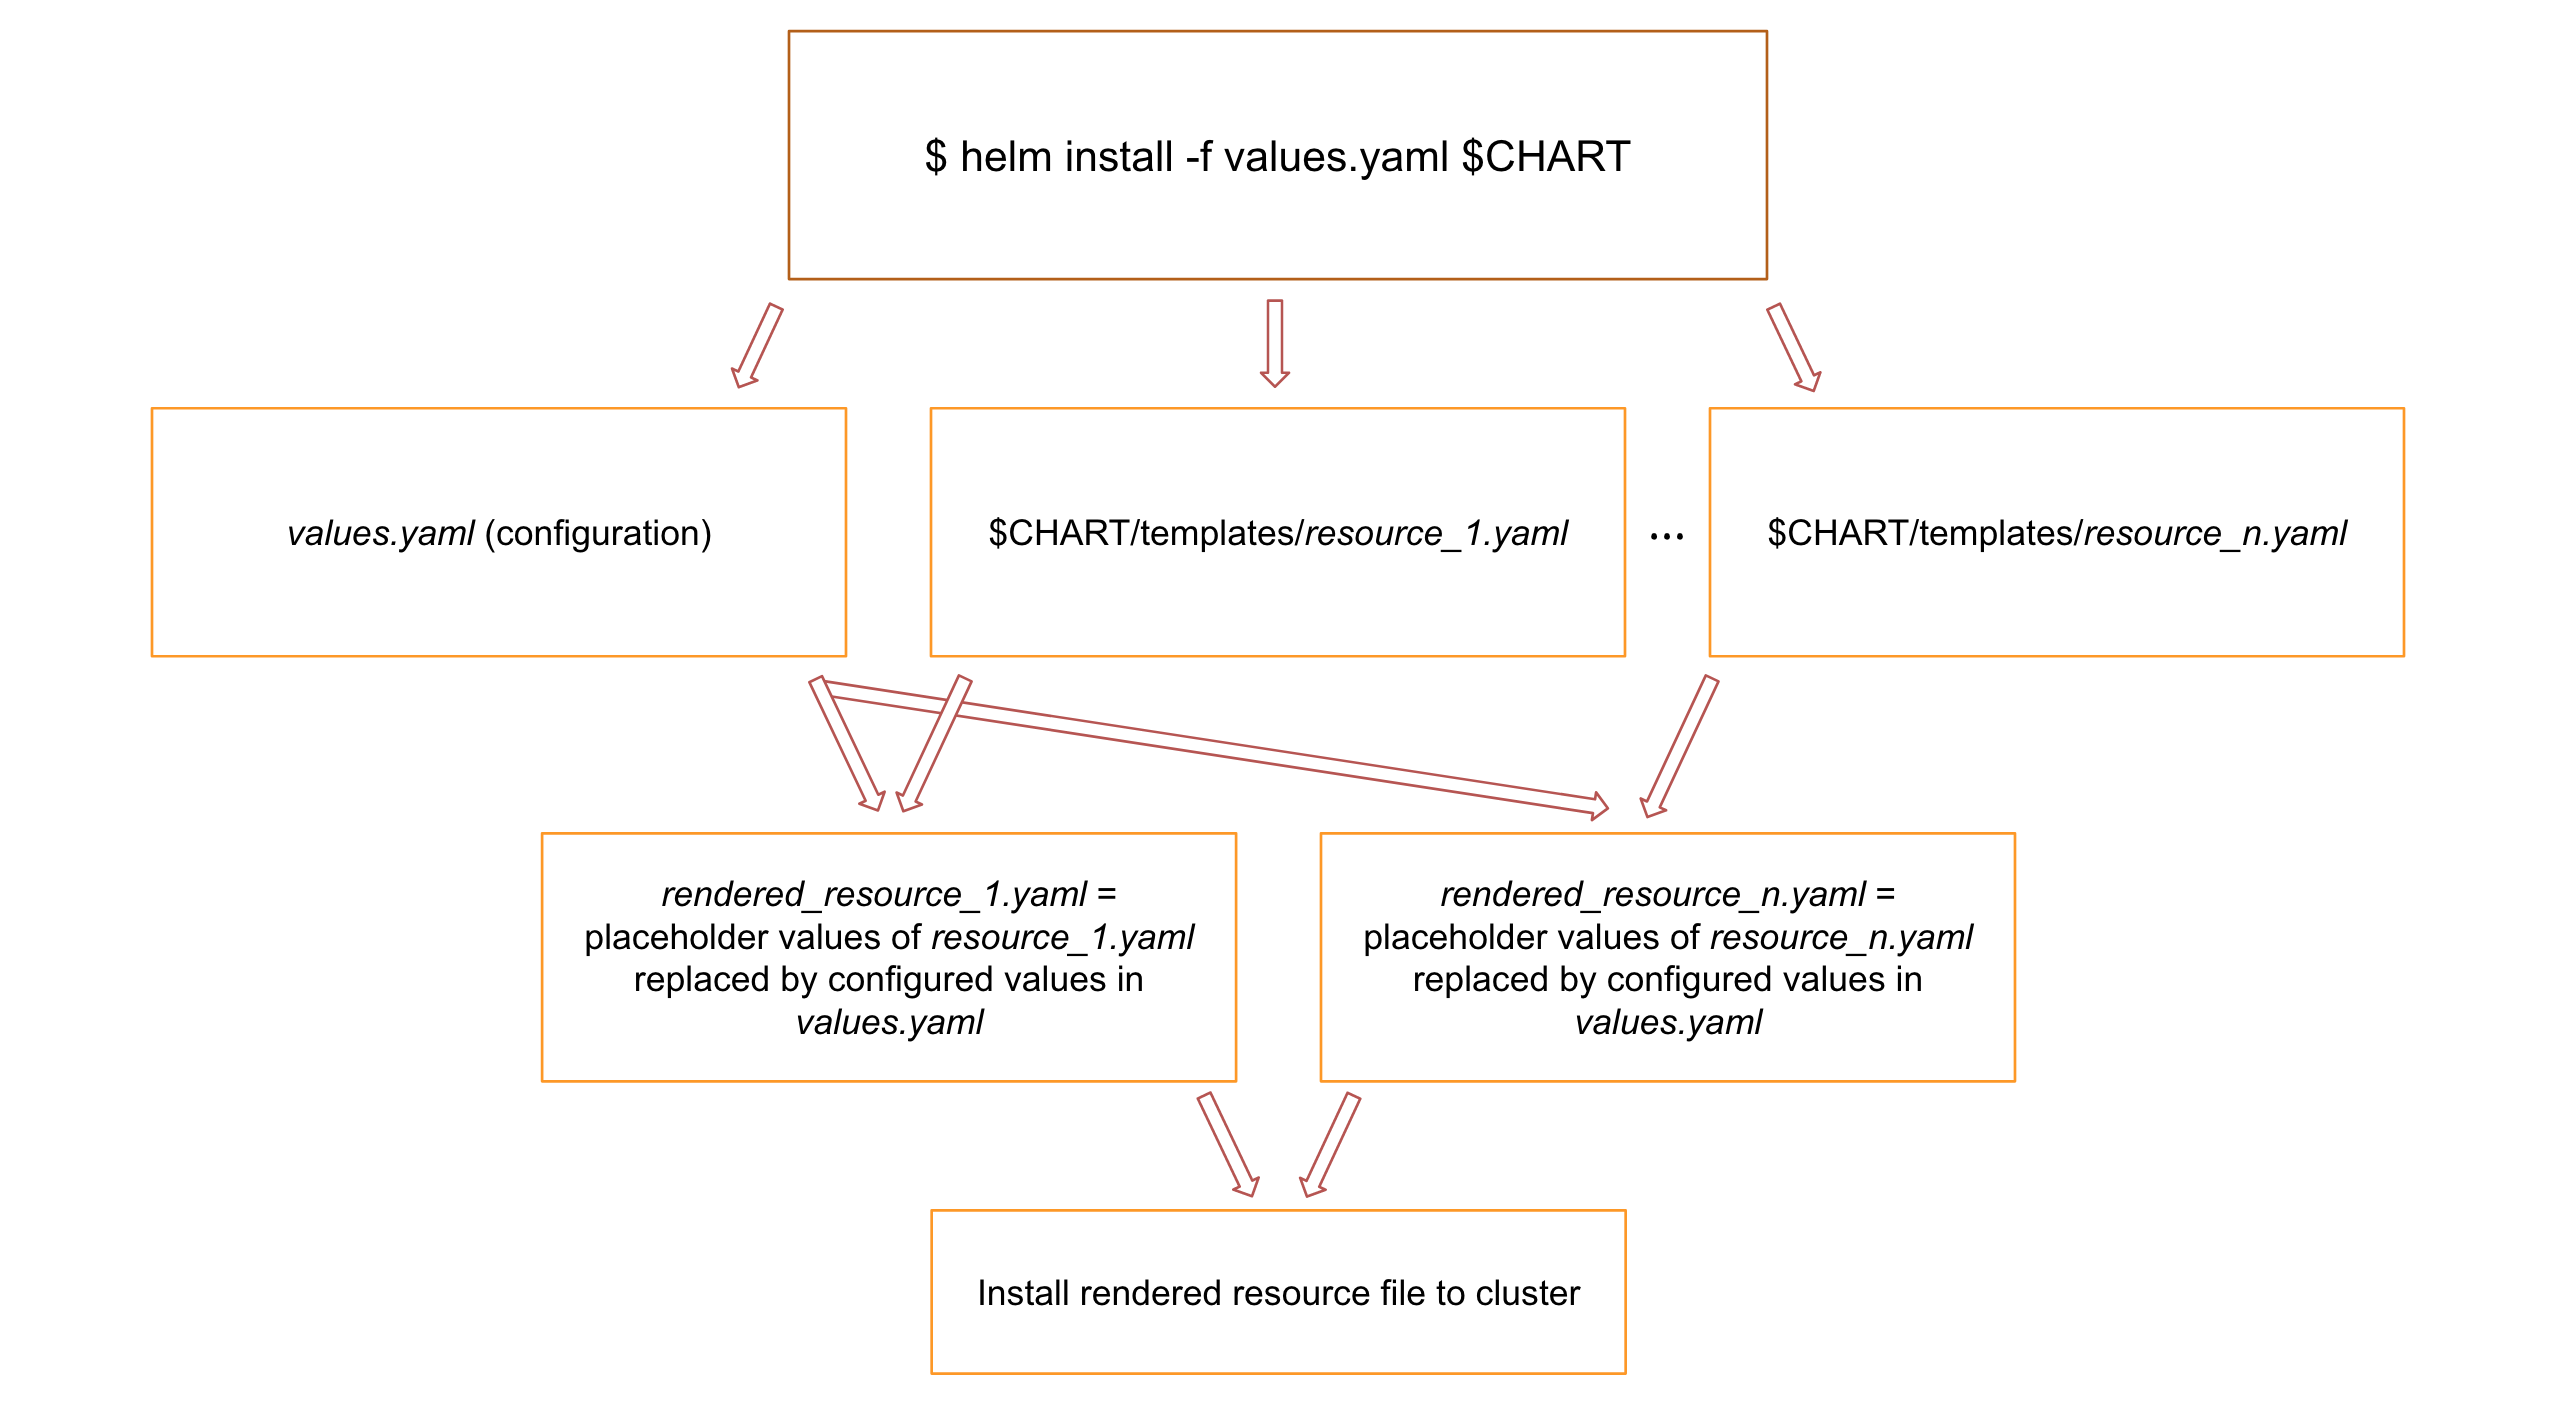
This is where Helm — the package manager for Kubernetes comes in handy. It extends Kubernetes resource files by the Go template syntax: hardcoded values in those resource files can be replaced by a placeholder value in double-curly-brace syntax. This placeholder will eventually be replaced by Helm’s template renderer with the appropriate values as specified in a values.yaml configuration file. Upon rendering, Helm also installs the rendered resource file to the Kubernetes cluster.
Helm makes it easy to upgrade or downgrade a specific service (= package = chart) to a different software release.
And the best: most of the work was already done for us by Kompose (see above), which created a Chart.yaml file (as required for every Helm package / chart) and set up the correct directory structure for it.
The Chart.yaml file, amongst other directives, must contain the name of the package name, the version of the packaged software, the version of the package itself, an optional package description and the package’s dependencies:
apiVersion: v2
name: storageservice
description: Storage Service
version: 0.0.1
appVersion: 0.0.1
dependencies:
- name: mongodb
  version: ">= 7.7.0"
  repository: "https://kubernetes-charts.storage.googleapis.com/"
- name: imagestorage
  version: "*"
  repository: "file://../../../image-storage/kubernetes/imagestorage"
(Exemplary illustration of a Helm Chart, taken from storageservice/kubernetes/storageservice/Chart.yaml)
Once the values of the resource files which we wanted to be configurable were templated, installing the entire application on our cluster became a no-brainer:
# Build Helm Charts (dependencies)
$ helm dep build

# View Helm's rendered resource files
$ helm install --dry-run -f values.yaml waa ./

# Install Helm Charts
$ helm install -f values.yaml waa ./
Noteworthy Helm packages
A lot of software packages are already available as a Helm chart. The Helm Hub lists just a few of them.
We played around with some packages, all of them deployable to the cluster with a simple helm install:
- Istio, a service mesh that connects, monitors and secures pods/containers
- chaoskube — which we’ll demonstrate later on — used for fault injection
- cert-manager, used for automatic certificate management with issuing sources (CAs) such as Let’s Encrypt
- Kube-Scan, a risk assessment tool
- MongoDB and PostgreSQL, used to create replicated databases
- Redis, to deploy a replicated key-value store
Fault injection
Now that we had a supposedly production-grade cluster running (which we didn’t really believe), we tried to break it by manually and automatically injecting faults.
The first attempt (which already made the cluster go kaput) was to simply shutdown / reboot one of the three sem0x nodes; the cluster stopped responding to some request for more than half a minute. A complete node failure is probably the worst of what could happen since it makes all pods on the node unavailable. It turned out that K3s set timeouts too generous for our use case (for example here).
Drastically reducing the timeouts as explained here, here and here — in some cases from 60 seconds (!) to only 4 — was enough to reduce the request stall in case of a complete node failure; Requests would no longer hang for more than 30 seconds but only a mere few which was tolerable.
Crashing all pod instances of a service
Crashing entire nodes was easy so what would happen if all instances of a pod crashed? We’ve alluded to this possibility in part 1 already. Following the idea of domain driven design, we argued that account dependent capabilities should be independent from freely available ones. Either should be unaffected if the other becomes unavailable. During presenting this idea in class, there arose the question Well, do you _actually_ test for that? What if there are dependencies you didn't think about? So let’s find out if our idea holds up to reality!
Testing for this is quite fun: Simply kubectl delete all deployments and ReplicaSets of a given domain. This will automatically terminate all corresponding pods. Then check if everything else still works as intended. As it turns out, freely available services — namely image conversions — are indeed independent from account dependent services. The same is true vice versa.
Account management is itself independent from the gallery functions but the gallery can’t be accessed without the former. Finally, without the ingress component, nothing can be accessed (who would’ve thought?). In short: Yep, it works just as advertised!

Still, our conclusion stands: Better not let it get so far that every single instance of a service is down.
chaoskube: Entering the world of automatic fault injection
What would happen if not a node, not a whole service, but only single pods running on a node crashed?chaoskube, as per its description, periodically kills random pods in your Kubernetes cluster. Installed with
helm install chaoskube stable/chaoskube --set rbac.create=true --set rbac.serviceAccountName=chaoskube --set dryRun=false --set interval=30s, chaoskube kills one pod every 30 seconds. More pods are killed by providing an additional replicas configuration, e.g. --set replicas=5 to kill 5 pods on every run.
While chaoskube was randomly destroying pods in our cluster, we ran ab, the Apache HTTP server benchmarking tool, to automatically test various functionality of our application (e.g. the conversion of images and the login) over a longer period of time under moderate load (with -c 100 for 100 concurrent requests and -n 1000000 to issue a total of 1 million requests).
The application continued to work as expected as long as not all instances of a service were terminated by chaoskube and not a pod which was currently processing a request was killed. In those two cases, a 502 Bad Gateway response was returned to the client (which is fine since the outtake couldn’t be handle in any other way except by busy-waiting for a pod-instance to become available again before responding to the request). Fail-fast was the corresponding design pattern we wanted to adhere to.
Take-Aways
- Kompose: 👍, super helpful for Kubernetes beginners, saves quite some time when converting lots of files
- Minikube: 👍, one-command-bootstrap of development cluster, nothing more to say except that it’s near crucial for development
- k3s / k3sup: 👍, one-command-bootstrap of “production-ready” cluster, more tests need to be made to validate this statement
- Helm: 👍, installing highly-available components to a Kubernetes cluster has never been easier. It really is the package manager for Kubernetes.
Outlook
As much as we’ve learned — so far we have only seen the tip of the eisberg. There are many more things to try and questions to ask:
In order to run load tests that provide meaningful results, one would need to invest in stronger hardware. Also, ab (the HTTP benchmarking utility we used) can hardly represent real-world loads caused by actual users. This entire area could well be worth another blog post in the future.
We considered using a service mesh for our project. Service meshes like Istio, Linkerd and Consul can provide many useful capabilities that could help us improve our application immensely.
For example, we could use Istio to improve security (use encrypted data transfer between the pods), control traffic flow to our services, manage versions, monitor the entire network using the provided Grafana integration and more — all of this without coding it into the services themselves. It even offers fault injection capabilities. Unfortunately, with our limited hardware resources we never managed to get Istio running; Istio has a substantial resource footprint on its own. It thus remains on our bucket list.
The last few years have seen the creation of many new tools and concepts that apply established software engineering methods to machine learning applications. Projects like TensorFlow Serving (written before about on this blog), Cortex or Pachyderm (as discussed in this post) promise to offer improved ways to tackle version management, data provenance, reproducibility, monitoring and more. We did not use any of them — that is not to say we didn’t consider it, it was simply out of scope. In fact, we very much treat the converters as black boxes.
Now that our app has a general working frame it would be great to revisit this aspect and to use those tools to add many more awesome image converters!
Leave a Reply
You must be logged in to post a comment.