In recent years, since the Internet has become available to almost anyone, application and runtime security is important more than ever. Be it an (unknown) application you download and run from the Internet or some server application you expose to the Internet, it’s almost certainly a bad idea to run apps without any security restrictions applied:
Unknown (untrusted) applications from the Internet could well include some malware trying to steal data from you. Server applications can even be attacked remotely by triggering security vulnerabilities such as buffer overflows, file inclusion bugs and what not.
While most solutions such as using multiple devices (or using a dedicated device for each process you would normally run on your PC) are impractical and cumbersome to use, other techniques such as application sandboxing — which we will explore later on — exist.
The problem here is that applications (by default) can access data and use operating system functionality they should better not be able to use; The trojan horse you just downloaded can easily access your photos and other kinds of sensitive data stored on your PC or inject itself to your browser and steal money while you’re performing some bank transactions over there. The server application you expose to the Internet can run arbitrary code after a buffer overflow was triggered in it and pretty much cause the same harm as any other kind of malware.
(Source: https://xkcd.com/1957/)
This is the first of two posts on the security of modern operating systems. This part lays and explains the groundwork of security in the Linux Kernel.
Part two shows how the security mechanisms introduced in this post can be combined to create containerization platforms such as Docker and OS-level application isolation techniques such as LXC; It as well introduces other kinds of isolation techniques such as virtualization.
Sandboxing
The idea behind application sandboxing is simple: A sandboxed application (which in fact is a process) is isolated from all other processes running on a PC. It can only cause harm to anything inside its sandbox and this sandbox should only include the bare-minimum data and functionality required to run the application.
Probably the sandbox in most common use (and even active on your PC right now) is inside your browser! Modern browsers such as Firefox isolate all tabs from one another and only allow communication between them through specially crafted communication interfaces.
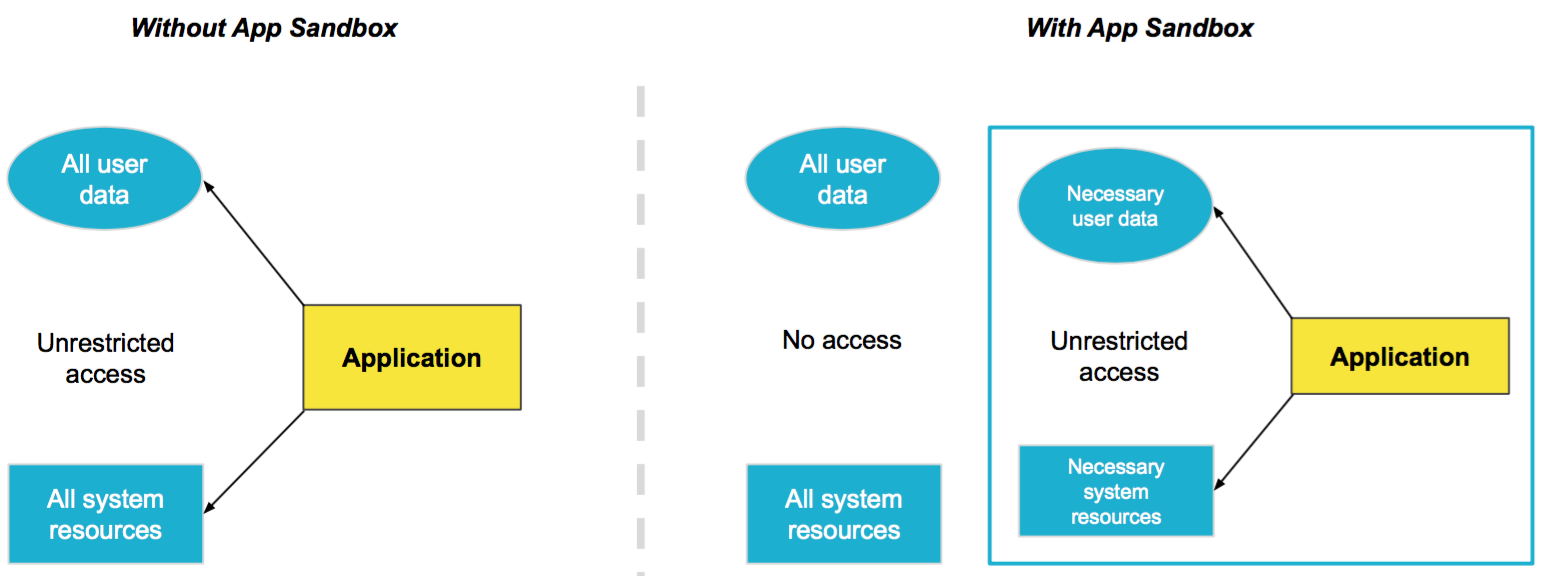
Sandboxing — if implemented correctly — is a great solution to the problem from our introduction in that it allows to use a single PC for running multiple processes without any security implications.
But how is sandboxing actually achieved in modern operating systems? Let’s find out!
Security in the Linux Kernel
Most servers on the Internet use Linux as their operating system kernel and modern containerization platforms such as Docker currently only run on Linux, Linux is open source and has the most active development community and companies behind it (source 1, source 2). That’s why we want to take a deeper look into its inner workings and explore the security mechanisms provided by Linux.
chroot — change root
One of the features to sandbox applications (which by the way is supported by almost all UNIX-descendants, including BSD and System V) has been in Linux since its inception — chroot.
chroot is a system call allowing the kernel to set the apparent root directory of a process; chroot-jailed processes see a different file system view than other processes.
Let’s take a look at the following file system view to better illustrate how a chroot actually works. Suppose you have the following files on your drive:
/
├── bin
│   ├── sh
│   └── …
├── dev
│   ├── null
│   └── random
├── home
│   ├── artur
│   │   └── arturs_file
│   └── leon
│       └── leons_file
└── root
In order to create a chroot jail for a process with a different file system view, such a “view” must exist. This simply means all necessary files required to launch an operating system such as Debian must exist in some sub-folder on the file system. This might look as follows (see the chroot folder):
/
├── bin
│   ├── sh
│   └── …

├── chroot # <-- This is where our chroot-ed process will "live"
│   ├── bin
│   │   ├── sh
│   │   └── …
│   ├── dev
│   ├── home
│   │   └── peter
│   │     └── peters_file
│   └── root

├── home
│   ├── artur
│   │   └── arturs_file
│   └── leon
│       └── leons_file
└── root
Let’s spawn a new /bin/sh shell and chroot it to /chroot:
# These three commands are required to mount all the
# necessary virtual file systems to the chroot jail.
$ sudo mount -o bind /dev /chroot/dev
$ sudo mount -o bind /proc /chroot/proc
$ sudo mount -o bind /sys /chroot/sys

# This command spawns a new /bin/sh shell and chroot's
# it to /chroot
$ sudo chroot /chroot /bin/sh

# From now on we’re using the new shell inside the chroot jail

# Quick verification…
$ tree /home
.
└── peter
└── peters_file

# Success! The shell we're using right now can't see
# "artur"s and "leon"s home!
A chroot-jailed process can create new files only in his jail:
# From the chroot-jailed process…
$ touch /testfile
Our file system now looks as follows:
/
├── bin
│   ├── sh
│   └── …

├── chroot
│   ├── bin
│   │   ├── sh
│   │   └── …
│   ├── dev
│   ├── home
│   │   └── peter
│   │     └── peters_file
│   ├── root
│   └── testfile # <----- The new file

├── home
│   ├── artur
│   │   └── arturs_file
│   └── leon
│       └── leons_file
└── root
chroot-capable directories can either created by hand or automatically by tools like debootstrap. debootstrap can be used to easily set up a Debian system:
$ sudo debootstrap stable /chroot https://deb.debian.org/debian/
I: Target architecture can be executed
I: Retrieving InRelease
I: Checking Release signature
I: Valid Release signature
I: Retrieving Packages
I: Validating Packages
I: Resolving dependencies of required packages...
I: Resolving dependencies of base packages...
I: Checking component main on https://deb.debian.org/debian...
I: Retrieving libacl1 2.2.53-4
I: Validating libacl1 2.2.53-4
I: Retrieving adduser 3.118
I: Validating adduser 3.118
I: Retrieving libapparmor1 2.13.2-10
I: Validating libapparmor1 2.13.2-10
I: Retrieving apt 1.8.2
I: Validating apt 1.8.2
# …
I: Configuring systemd...
I: Configuring ca-certificates...
I: Base system installed successfully.

$ ls -la /chroot/
drwxr-xr-x 17 root root 4096 Jun 21 08:31 .
drwxr-xr-x  1 root root 4096 Jun 21 08:30 ..
lrwxrwxrwx  1 root root    7 Jun 21 08:30 bin -> usr/bin
drwxr-xr-x  2 root root 4096 May  2 16:39 boot
drwxr-xr-x  4 root root 4096 Jun 21 08:30 dev
drwxr-xr-x 48 root root 4096 Jun 21 08:31 etc
drwxr-xr-x  2 root root 4096 May  2 16:39 home
lrwxrwxrwx  1 root root    7 Jun 21 08:30 lib -> usr/lib
lrwxrwxrwx  1 root root    9 Jun 21 08:30 lib32 -> usr/lib32
lrwxrwxrwx  1 root root    9 Jun 21 08:30 lib64 -> usr/lib64
lrwxrwxrwx  1 root root   10 Jun 21 08:30 libx32 -> usr/libx32
drwxr-xr-x  2 root root 4096 Jun 21 08:30 media
drwxr-xr-x  2 root root 4096 Jun 21 08:30 mnt
drwxr-xr-x  2 root root 4096 Jun 21 08:30 opt
drwxr-xr-x  2 root root 4096 May  2 16:39 proc
drwx------  2 root root 4096 Jun 21 08:30 root
drwxr-xr-x  3 root root 4096 Jun 21 08:30 run
lrwxrwxrwx  1 root root    8 Jun 21 08:30 sbin -> usr/sbin
drwxr-xr-x  2 root root 4096 Jun 21 08:30 srv
drwxr-xr-x  2 root root 4096 May  2 16:39 sys
drwxrwxrwt  2 root root 4096 Jun 21 08:31 tmp
drwxr-xr-x 13 root root 4096 Jun 21 08:30 usr
drwxr-xr-x 11 root root 4096 Jun 21 08:30 var
chroot forms the basis of every application sandbox in that it enabled different processes to see different files. However, chroots by themselves do not provide any security against malicious attacks. This is due to the fact that the root user inside the jail has the same user id as the root user outside of it. Escaping a chroot jail without any additional restrictions is quite easy!
If implemented correctly, a chrooted process can not see files outside of its chroot, yet a malicious or misbehaving application can still harm the system by e.g. exhausting the system’s hardware resources or accessing network interfaces when they shouldn’t — additional security mechanisms are required to prevent that!
namespaces
Support for namespaces was added to the Linux Kernel back in 2002. namespaces affects which system resources a process can see and interact with. As of the most recent Kernel v5.8, this includes the following 8 system resource types:
- Interprocess Communication (
IPC)- Controls which processes can IPC with each other (using shared memory — SHM)
- Network (
net)- Controls which network interfaces a namespace uses
- Mount (
mnt)- Controls which mounts are available to a namespace
- Process ID (
PID)- Controls which processes a namespace can interact with
- UNIX Time-Sharing (
UTS)- Controls which system hostname a namespace uses
- User ID (
user)- Controls which users a namespace can interact with
- Time (
time)- Controls which system time a namespace uses
- Control group (
cgroup)- Controls which hardware resources a namespace can use
Every process on a Linux system must be part of one namespace and it can use all system resources which are available to that namespace.
Consider the following graphical illustration where we have two net namespaces. One of them, aptly named No_Network having access to no network interface and another namespace, named With_Network, which has access to the lo0 and eth0 network interface:
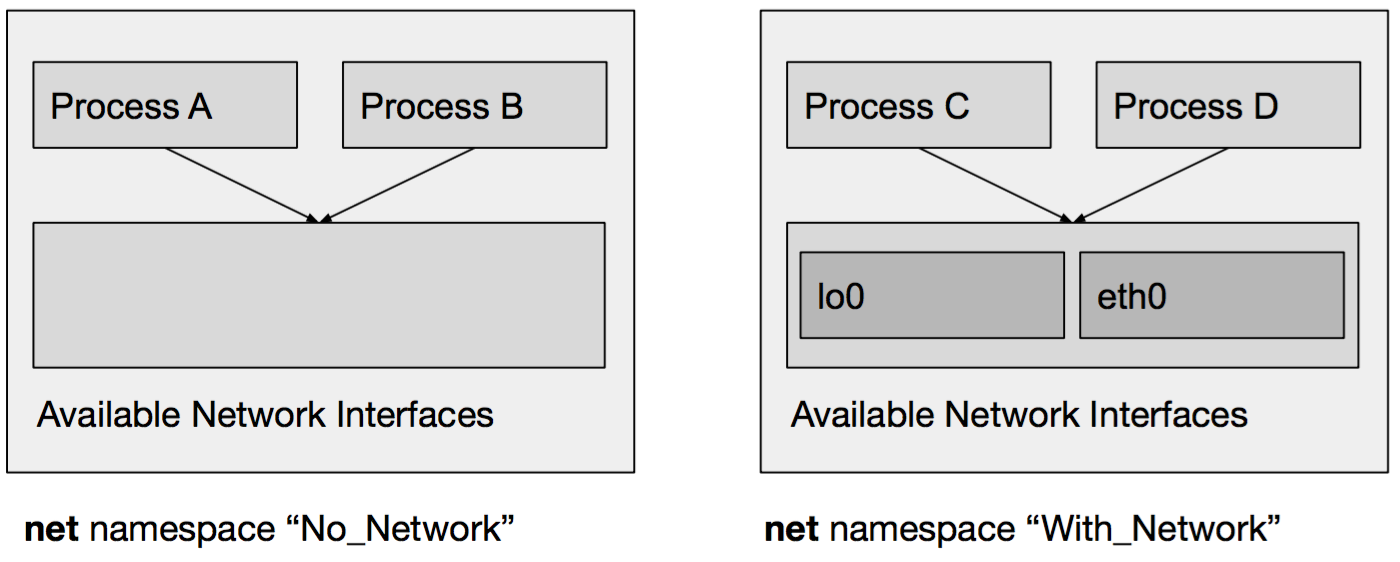
Process A and B use the No_Network namespace so they are not allowed to do any network-related activities.
Process C and D on the other hand are in the With_Network namespace, so they do have access to the lo0 and eth0 network interfaces.
Internally, in the Kernel, each namespace is identified by a namespace ID. This ID can be shown for each process by viewing the proc file system’s ns file:
$ ls -l /proc/$$/ns
lrwxrwxrwx. 1 root root 0 Jun 21 11:43 cgroup           -> 'cgroup:[1111111111]'
lrwxrwxrwx. 1 root root 0 Jun 21 11:43 ipc              -> 'ipc:   [2222222222]'
lrwxrwxrwx. 1 root root 0 Jun 21 11:43 mnt              -> 'mnt:   [3333333333]'
lrwxrwxrwx. 1 root root 0 Jun 21 11:43 net              -> 'net:   [4444444444]'
lrwxrwxrwx. 1 root root 0 Jun 21 11:43 pid              -> 'pid:   [5555555555]'
lrwxrwxrwx. 1 root root 0 Jun 21 11:43 pid_for_children -> 'pid:   [5555555555]'
lrwxrwxrwx. 1 root root 0 Jun 21 11:43 user             -> 'user:  [6666666666]'
lrwxrwxrwx. 1 root root 0 Jun 21 11:43 uts              -> 'uts:   [7777777777]'

#                                                                       ^
#                                                                  Namespace ID
Let’s create our own UTS namespace to use a different system hostname for a new process — and only for this process!
# The hostname of our system is "debian"
$ hostname
debian

# View the "uts" namespace ID of our current shell
# ($$ refers to the current shell's process ID)
$ ls -l /proc/$$/ns | grep uts
lrwxrwxrwx. 1 root root 0 Jun 21 11:43 uts              -> 'uts:   [7777777777]'

# Using the "unshare" command, spawn a new "bash" shell
# in its own and newly created "uts" namespace:
$ unshare --fork --uts chroot / bash

# From now on we’re inside the new namespace

# View the "uts" namespace ID of our freshly spawned bash.
# Note: it is a different ID!
$ ls -l /proc/$$/ns | grep uts
lrwxrwxrwx. 1 root root 0 Jun 21 11:44 uts              -> 'uts:   [8888888888]'

# Set the hostname inside the new bash:
$ hostname HELLO-UTS

# Verify that it was set correctly
$ hostname
HELLO-UTS

# Exit the bash we just spawned
$ exit

# From now on we’re back again to the old namespace.
# Verify that we got back our old hostname:
$ hostname
debian

# … nice!
cgroup — Control groups
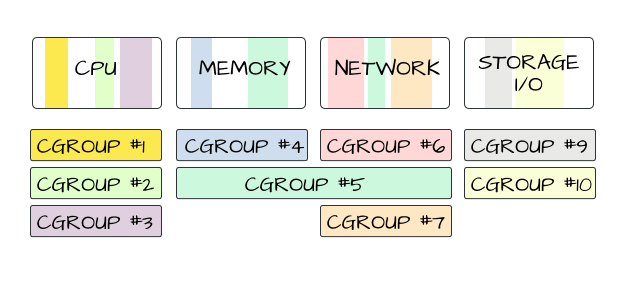
Control groups (abbreviated cgroups) are another kind of system resource namespace but they are the most powerful one, so they deserve their own section! Support for cgroups was added to the Linux Kernel in 2008.
cgroups allow to specify which hardware resources a process can use, this includes the following hardware resource types:
– CPU
– RAM
– Storage I/O
– Network I/O
– etc.
Additionally, certain cgroups can get a higher priority than others (this is how the nice CLI app works). cgroups also allow to measure their resource usage which can be used for billing of shared computation resources, e.g. as done by VPS providers.
 (Source: https://mairin.wordpress.com/2011/05/13/ideas-for-a-cgroups-ui/)
Let’s see them in action and create our own cgroup!
# Each cgroup needs a name, we call ours "DEMO"
$ CGROUPNAME=DEMO

# To create a new cgroup, simply issue the following command
$ sudo mkdir /sys/fs/cgroup/memory/$CGROUPNAME

# We limit the RAM usage of our cgroup to 1 KB,
# so we write 1000 (bytes) to the following file
$ echo 1000 | sudo tee /sys/fs/cgroup/memory/$CGROUPNAME/memory.limit_in_bytes

# Add our own process ID to the new cgroup
# ($$ refers to the current shell's process ID)
$ echo $$ | sudo tee /sys/fs/cgroup/memory/$CGROUPNAME/cgroup.procs

# Try to launch "ls"
$ ls -a
Killed

# Whoops, our shell was killed due to the memory constraints
# we just defined! Let’s grant some more memory!

# Increase RAM usage of our cgroup to 1 MB.
$ echo 10000000 | sudo tee /sys/fs/cgroup/memory/$CGROUPNAME/memory.limit_in_bytes

# We need to add our shell's process ID to the cgroup
# once again as our previous shell was terminated!
$ echo $$ | sudo tee /sys/fs/cgroup/memory/$CGROUPNAME/cgroup.procs

# Try to launch "ls" again, this time with a 1 MB RAM limit.
$ ls -a
. .. .bash_history .bashrc .profile

# … nice!
seccomp — Secure computing mode
The secure computing mode (introduced to Linux in 2005) allows processes to make a one-way transition into a “secure” mode. During this transition, the process relinquishes the right to use certain system calls and from then on is no longer able to use them (the process is killed by the Kernel if it still tries to). This allows to follow the principle of least privileges where an application can only do whatever it must be allowed to do to complete the task it is intended to complete.
Applications written in memory-unsafe programming languages such as C are often vulnerable to buffer overflows where an attacker can execute arbitrary code in the context of the application and can therefore run system calls which are not even used by the application under normal conditions.
seccomp is the only security feature we will explore which the application itself has to implement; it’s a feature which protects the application from itself.
In its strictest form, the strict mode, seccomp only allows the following 4 system calls to be made:
exitsigreturnreadwrite
Processes using the strict seccomp mode need to make all required file descriptors available before performing the one-way transition to their locked-down version.
If the strict mode is too strict, for example if a call to the open system call is still required after the transition, an allow list of valid system calls can be specified.
In C lang, seccomp can be used as follows:
#include <stdio.h>
#include <fcntl.h>
#include <unistd.h>
#include <sys/prctl.h>
#include <linux/seccomp.h>

int main(int argc, char* argv[]) {
    char fn1[] = "file1", fn2[] = "file2";
    int fd1, fd2;

    // Try to open file
    printf("Opening '%s'…\n", fn1);
    fd1 = open(fn1, O_RDONLY);
    printf("… done!\n");

    // Enter strict seccomp mode
    prctl(PR_SET_SECCOMP, SECCOMP_MODE_STRICT);

    // Try to open another file _after_ enabling strict seccomp mode
    // -> open() system call is prohibited, binary killed by Kernel
    printf("Opening '%s'…\n", fn2);
    fd2 = open(fn2, O_RDONLY);
    printf("… done!\n");

    close(fd1);
    close(fd2);
    return 0;
}
$ ./seccomp
Opening 'file1'…
… done!
Opening 'file2'…
Killed
Capabilities
Capabilities affects in more or less fine-grained detail which capabilities (i.e. which access-control settings) a process is allowed to use. As of Kernel v5.8, the list of capabilities encompasses:
CAP_NET_BIND_SERVICE— Allow binding to TCP/UDP sockets below 1024CAP_CHOWN— Allow the use of thechown()system call to change file and group ownershipCAP_SYS_CHROOT— Allow the use of thechroot()system callCAP_SYS_PTRACE— Allow toptrace()any processCAP_NET_BROADCAST— Allow broadcasting and listen to multicastCAP_NET_RAW— Allow the use of RAW socketsCAP_SYS_BOOT— Allow the use of thereboot()system call to reboot the system- …
Capabilities in action:
# By default, binding to a port below 1024 requires root permissions
# (or, strictly speaking, the "CAP_NET_BIND_SERVICE" capability which
# the "root" user has)
$ netcat -l -p 81
Can't grab 0.0.0.0:81 with bind : Permission denied

# Use "getcap" to list all capabilities available to a binary
$ sudo getcap $(readlink -f $(which netcat))
(empty) # i.e. "no additional capabilities"

# Use "setcap" to add the "CAP_NET_BIND_SERVICE" capability to "netcat"
$ sudo setcap cap_net_bind_service=+ep $(readlink -f $(which netcat))

# The "netcat" binary now has the "CAP_NET_BIND_SERVICE" capability
$ sudo getcap $(readlink -f $(which netcat))
/usr/bin/nc.traditional = cap_net_bind_service+ep

# … this means it is allowed to bind to ports below 1024 even when
# launched without root permissions!
$ netcat -l -p 81 &

$ sudo netstat -tulpen | grep 81
tcp    0    0 0.0.0.0:81    0.0.0.0:*    LISTEN    1002    39008    2284/netcat

# … yay! "netcat" was able to bind to port 81 without the need to
# run it with root privileges by a root user or the use of setuid!
LSMs — Linux Security Modules
In order to better understand the concept of Linux Security Modules (LSMs), we first need to talk about Linux Kernel Modules.
Linux basically is a large application written in C which, after being compiled, can no longer be extended with new functionality. That’s where Linux Kernel Modules (LKMs) come into play. Through special interfaces provided by Linux, LKMs allow to modify the Linux Kernel at runtime.
A simple Linux Kernel Module might look as follows:
#include <linux/init.h>
#include <linux/kernel.h>
#include <linux/module.h>

// Provide information about our Kernel module
MODULE_LICENSE("AGPL");
MODULE_AUTHOR("HdM Stuttgart");
MODULE_DESCRIPTION("Hello World Linux module.");
MODULE_VERSION("1.0.0");

// lkm_init is called when the module is _loaded_
static int __init lkm_init(void) {
    printk(KERN_INFO "Hello, World!\n");
    return 0;
}

// lkm_init is called when the module is _unloaded_
static void __exit lkm_exit(void) {
    printk(KERN_INFO "Goodbye, World!\n");
}

// Linux provides hooks for all kinds of internal
// events. Amongst so many others, this includes:
// - Call function when a Kernel module is loaded
// - Call function when a Kernel module is unloaded
// - Call function before a file is opened
// - Call function before a file is written to
// - etc.

module_init(lkm_init);
module_exit(lkm_exit);
MODULE_NAME := lkm_helloworld

obj-m += $(MODULE_NAME).o

.PHONY: all
all: build

.PHONY: build
build:
    make -C /lib/modules/$(shell uname -r)/build M="$(PWD)" modules

.PHONY: load
load:
    sudo insmod $(MODULE_NAME).ko

.PHONY: unload
unload:
    sudo rmmod $(MODULE_NAME).ko
Running make load and make unload adds the following output to the Kernel ring buffer (visible by the dmesg command):

That’s it for our small excursus to Linux Kernel Modules — LKMs.
Linux Security Modules — LSMs — are very similar to LKMs, although they can’t be loaded and unloaded at runtime (what’s the point of a Security module after all if it can simply be unloaded by a malicious program?).
LSMs extend the Linux Kernel with additional security features whose use should not be mandatory. Instead, LSMs can be enabled and disabled through the bootloader configuration (for GRUB this is as easy as adding apparmor=1 security=apparmor to the GRUB_CMDLINE_LINUX_DEFAULT config option to enable the AppArmor LSM which we will get to know later on).
Several LSMs are already included in the Linux Kernel source tree, some of them even enabled by default:
- Yama
- Yama restricts the usage on
ptrace()
- Yama restricts the usage on
- LoadPin
- LoadPin ensures all kernel-loaded files (modules, firmware, etc.) originate from the same file system and not some external one
- SafeSetID
- SafeSetID restricts UID/GID process transitions by a system-wide whitelist.
- Example: Using SafeSetID, one can specify the following:
- “User1 may start process as User2”
- “User1 may NOT start process as User3”
- SELinux
- SELinux implements fine-grained Mandatory Access Control (MAC). To achieve a MAC, it labels objects (who is allowed to do what, e.g. User1 is allowed to modify the system timezone)
- Initially developed by the NSA in 2000 in the form of Kernel patches. Only later became a LSM and even part of the Linux source tree
- Enabled by default on Android since v4.3
- Comes with a GUI with is more or less user-friendly
- Smack
- Smack is similar to SELinux but much easier to use
- AppArmor
- AppArmor implements a MAC for confining applications. Compared to SELinux it uses no object-labeling; instead, the security policy is applied to pathnames
- Enabled by default in Debian 10 (Buster)
- Explained in more detail further below
- TOMOYO
- TOMOYO is similar to AppArmor but “domains” (trees of process invocation) are targeted instead of pathnames
- Example: Using TOMOYO, one can specify the following:
- The call chain
boot -> init -> sh -> pingis allowed - The call chain
boot -> init -> sh -> bash -> pingis not allowed - Therefore,
bashis not allowed to launch thepingbinary
- The call chain
AppArmor
AppArmor is one of the better-known Linux Security Modules which is part of Linux since 2009. It is similar to SELinux in that it implements a Mandatory Access Control, but it identifies subjects (files) based on their path instead of their inode allowing to make configuration profiles easier to create.
AppArmor comes with three modes of behaving:
- audit mode — Verification mode
- log all actions
- complain mode — Learning mode
- log but do not block restricted actions
- enforce mode — Enforcement mode
- log and block restricted actions
AppArmor relies on configuration profiles to limit the actions certain binaries are allowed to perform. Such a configuration profile might look as follows:
$ cat /etc/apparmor.d/bin.ping

# Include some global settings
#include <tunables/global>

# Our profile named "ping" is valid for the following binaries:
# - /bin/ping
# - /bin/iputils-ping
# - /usr/bin/ping
# - /usr/bin/iputils-ping
profile ping /{usr/,}bin/{,iputils-}ping flags=(complain) {
  #include <abstractions/base>
  #include <abstractions/consoles>
  #include <abstractions/nameservice>

  # Allow "ping binaries" to use RAW IPv4 and IPv6 network sockets
  capability net_raw,
  capability setuid,
  network inet raw,
  network inet6 raw,

  # Allow "ping" binaries to read the following paths
  # (its their own path, binaries must be able to read themselves)
  /{,usr/}bin/{,iputils-}ping mixr,
  # The following file must apparently be read by "ping" as well
  /etc/modules.conf r,
}
AppArmor by default comes with a variety of profiles for all kinds of applications and makes it easy to create profiles for other applications as well. Let’s walk through the process.
Say we have a small app (apparmor-demo) which tries to read the file /bin/ping and either print success or failure based on whether it succeeded:
#include <stdio.h>
#include <fcntl.h>
#include <unistd.h>

int main(int argc, char* argv[]) {
    char fn1[] = "/bin/ping";
    int fd1;

    printf("Opening '%s'…\n", fn1);
    if ((fd1 = open(fn1, O_RDONLY)) > 0) {
        printf("… success!\n");
    } else {
        printf("… fail!\n");
    }

    close(fd1);
    return 0;
}
Let’s try to launch the app:
$ ./apparmor-demo
Opening '/bin/ping'…
… success!
Obviously this succeeds.
Now we want to create an AppArmor profile for our binary to explicitly grant read-access to that file.
First, create a new empty profile:
$ aa-easyprof $PWD/apparmor-demo > /etc/apparmor.d/usr.bin.apparmor-demo

# This empty profile was created by the above command
$ cat /etc/apparmor.d/usr.bin.apparmor-demo
#include <tunables/global>
"/root/apparmor-demo" {
  #include <abstractions/base>
}
Enable the new profile using apparmor_parser:
$ apparmor_parser -r /etc/apparmor.d/usr.bin.apparmor-demo

$ aa-status
apparmor module is loaded.
22 profiles are loaded.
6 profiles are in enforce mode.
   /root/apparmor-demo
   …

# Our new profile is in enforce mode!
And try to launch our binary again:
$ ./apparmor-demo
Opening '/bin/ping'…
… fail!
This time it failed to read /bin/ping due to the fact that AppArmor works with an allow list instead of a disallow list which means all allowed actions must be explicitly specified instead of specifying which actions are not allowed.
As we’re pretty lazy in editing the profile ourself, let’s make use of some of AppArmor’s handy utilities which allow us to update profiles in an interactive way.
We first need to set our profile to complain mode so all actions are allowed and logged:
$ aa-complain apparmor-demo
Running our app succeeds again and produces the expected log entries:
$ ./apparmor-demo
Opening '/bin/ping'…
… success!

$ tail -n1 /var/log/syslog
Jun 21 22:06:06 buster kernel: [24034.481637] audit: type=1400 audit(1592777166.717:47): apparmor="ALLOWED" operation="open" profile="/root/apparmor-demo" name="/usr/bin/ping" pid=2985 comm="apparmor-demo" requested_mask="r" denied_mask="r" fsuid=0 ouid=0
aa-logprof can be used to read those log messages and create an entry in the profile to either allow or deny the action:
$ aa-logprof
Reading log entries from /var/log/syslog.
Updating AppArmor profiles in /etc/apparmor.d.
Complain-mode changes:

Profile: /root/apparmor-demo
Path: /usr/bin/ping
New Mode: owner r
Severity: unknown

[1 - owner /usr/bin/ping r,]
(A)llow / [(D)eny] / (I)gnore / (G)lob / Glob with (E)xtension / …
> A # We allow the action

Adding owner /usr/bin/ping r, to profile.
Enforce-mode changes:
= Changed Local Profiles =

The following local profiles were changed. Would you like to save them?

[1 - /root/apparmor-demo]
(S)ave Changes / Save Selec(t)ed Profile / [(V)iew Changes] / View Changes b/w (C)lean profiles / Abo(r)t
> S # We save our changes to the profile

Writing updated profile for /root/apparmor-demo.
And indeed, our profile was updated!
$ cat /etc/apparmor.d/usr.bin.apparmor-demo
#include <tunables/global>
"/root/apparmor-demo" {
  #include <abstractions/base>

  owner /{usr/,}bin/ping r,
}
Now that we explicitly allow read access to /bin/ping, let’s put our application in enforce mode again:
$ aa-enforce apparmor-demo
Our app now works even with an active AppArmor profile!
$ ./apparmor-demo
Opening '/bin/ping'…
… success!

# Nice!
LSMs such as AppArmor might seem incredibly complicated to implement, but they are actually quite simple:
In it’s init function, AppArmor registers to all kinds of Kernel hooks such as file_open which is fired before a file is opened by the Linux Kernel.
// …
LSM_HOOK_INIT(file_open, apparmor_file_open),
// …
(Source: linux-1b50440210/security/apparmor/lsm.c#L1194)
AppArmor’s apparmor_file_open function then, based on the relevant AppArmor profile, decides whether the call should be aborted (if the action is not allowed) or if the Kernel shall continue to open the file.
// …
error = aa_path_perm(OP_OPEN, label, &file->f_path, 0,
                     aa_map_file_to_perms(file), &cond);
// …
Where to go from here?
This was our introduction to some of Linux’ security features. And let us tell you what: these are pretty much the only security features to make containers (as used by Docker et al.) possible and secure to even run untrusted code. You should now be able to implement the core of Docker yourself!
All of these security features are useful, yet they require manual work of either the application developer or an (experienced) computer user to enable. For server applications, when set up by a system administrator, this knowledge probably exists, but for the larger part of the computer user base, the home user, it doesn’t. Security features which are available but not enabled by default are pretty useless.
This brings us to part two of this blog post which explains more about containers, virtualization and security solutions for the end-user.
Sources
All links were last accessed on 2020-09-08.
- https://www.kernel.org/doc/html/latest/userspace-api/seccomp_filter.html
- https://github.com/torvalds/linux/blob/1b5044021070efa3259f3e9548dc35d1eb6aa844/Documentation/admin-guide/cgroup-v2.rst
- https://github.com/torvalds/linux/blob/1b5044021070efa3259f3e9548dc35d1eb6aa844/include/uapi/linux/capability.h
- https://github.com/torvalds/linux/tree/1b5044021070efa3259f3e9548dc35d1eb6aa844/Documentation/admin-guide/LSM
- https://man7.org/linux/man-pages/man7/capabilities.7.html
- https://man7.org/linux/man-pages/man2/seccomp.2.html
- https://man7.org/linux/man-pages/man2/syscalls.2.html
- https://www.kernel.org/doc/html/latest/admin-guide/LSM/index.html
- https://www.linux.com/training-tutorials/overview-linux-kernel-security-features/
- https://ajxchapman.github.io/linux/2016/08/31/seccomp-and-seccomp-bpf.html
- https://en.wikipedia.org/wiki/Cgroups
- https://en.wikipedia.org/wiki/Security-Enhanced_Linux
- https://gitlab.com/apparmor/apparmor/-/wikis/AppArmor_Failures
- https://debian-handbook.info/browse/en-US/stable/sect.apparmor.html
- https://wiki.ubuntuusers.de/AppArmor/
- https://wiki.archlinux.org/index.php/Chroot
- https://github.com/moby/moby/blob/master/profiles/seccomp/default.json
Leave a Reply
You must be logged in to post a comment.