1. Introduction
For the examination of the lecture “Software Development for Cloud Computing”, I want to build a simple Random Chat Application. The idea of this application is based on the famous chat application called Omegle. Omegle is where people can meet random people in the world and can have a one-on-one chat. With Omegle people can have a conversation with not only normal chat but also a video chat. Not like Omegle, my application has only a normal texting function.
2. Technologies for the development of application
a. Frontend
React
For Frontend Development there are a great number of open-source libraries. React is recently one of the most popular and widely used libraries. There are many reasons for a developer to choose and use React. It is one of the most popular front-end technologies in the market. Compared to other libraries out there React seems to be easier to learn. As it doesn’t take much time to learn this technology, the developers can rapidly practice and build their own very first project. React helps increase productivity by using reusable components and development tools. There are many development tools available for React that speech up the project. The most important reason is that it has very strong community support. There are thousands of free React tutorial videos and blog posts on the internet which is very helpful for the developer. Therefore, I decided to learn this library during previous semesters. This project gives me a chance to have real practice.
b. Backend
Node.js
Node.js has become one of the most popular JavaScript tools. Node.js is a JavaScript runtime environment, which allows companies to improve their efficiency of the web development process. The frontend and Backend teams can now work more easily together. Since Node.js is written in JavaScript and bases on Google V8 Engine, everything is done very quickly. Node.js can create an Event Loop, which can cover all asynchronous input-output operations. And the best part is that it can increase the speed of any other framework as well. By allowing developers to write JavaScript code for both the Frontend and the Backend, Node.js makes it easy to send data between the server and the client, which makes it easier to synchronize data immediately.
Socket.io
When I decided to develop a chat application, I already thought about Socket.io. I had a chance to know this JavaScript library during the course Web Development 2. To build a real-time application we should use Socket.io. Socket.io will help parties in different locations connect with each other, transmitting data instantly through an intermediary server. Socket.io can be used in many applications such as chat, online games, updating the results of an ongoing match, … It is used a lot by the developer community, because of its speed and convenience. Socket.io provides us with many methods as well as outstanding features such as security, auto-connect, disconnection detection, multiplexing, room creation, …
3. Application explanation
a. Client
As I mentioned, for the client-side I use React. Therefore, I have a chance to know the concept of a Single Page Application, whose content is loaded only once and updated dynamically. For the interaction with the page or with subsequent pages, we don’t need another server, which means that the page is not reloaded. To apply this concept of the web application, React offer a packet names “react-router-dom”. My application is very simple, so it only has two paths to be loaded. The root path is where the user inputs his name, and it will load the Join component. The other path is the Chat component, in which the user sends messages after getting a room.
Socket.io library for the client is imported because it is not provided by JavaScript. This will expose the ‘io’ namespace.

Endpoint URL will be given for ‘io’ to connect with the socket.io server.

Now users can send and receive messages from the server after the room is created.
b. Server
To setup server, some packets need to be imported:

The server is set up and listen on port 5000
The server can also save users temporally, so it will know which user’s name already existed. And then it can remove users after they terminate their chat. To execute all those actions, I write a users.js file, which will have some functions such as, addUser, removeUser, getUser, …
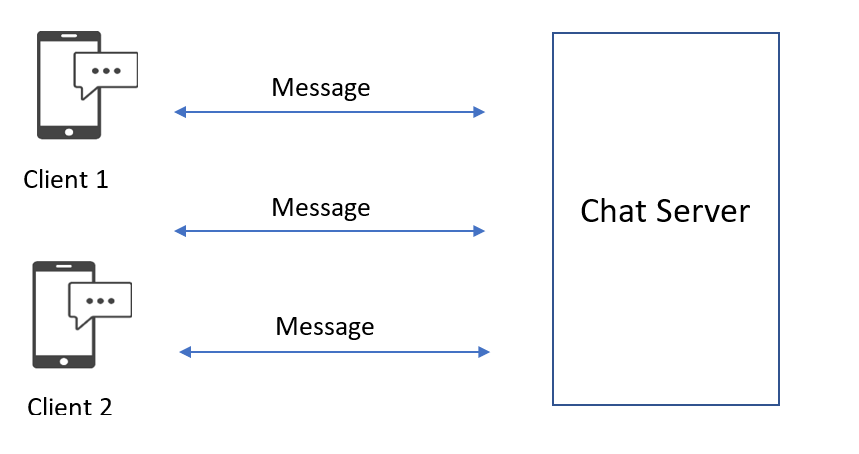
I want to create a chat application where users don’t have to have an already known friend and a Chat room will be automatically created for them. With this application, they can meet a new friend and the server will get them a chat room.
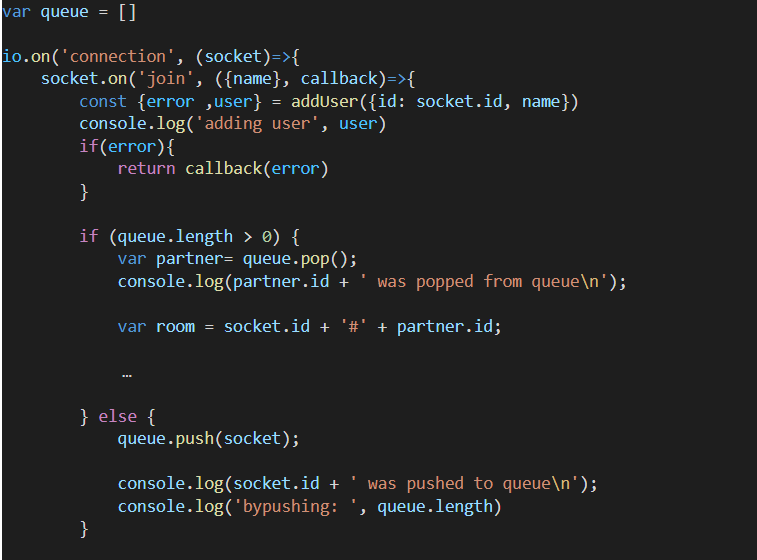
I created a variable queue, which is an array. It will save a user, who has not had any partner yet, temporarily. Every user, who already inputted their names, will be connected to the socket. Socket knows that he wants to join a room. In the callback function of the socket, the name and socket ID of the user will be saved by function ‘addUser’, which is in users.js. Then socket will check if any other user is waiting for a partner in a queue. If someone is waiting for a partner, he will be popped from the queue. His socket and partner’s socket will be connected. And their room ID will be a combination of the 2 socket IDs. If no one is waiting for a room, the current socket is pushed to a queue and wait for another user to join.
c. Problem
CORS:
It is an abbreviation for Cross-Origin Request Sharing, which means that all data should come from the same resource. They use it as a security measure because JavaScript can load content from other servers without the knowledge of the user. This problem can be solved when both websites are aware of the data exchange, then the process will be allowed.
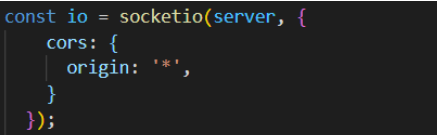
I installed the CORS package on my server. Origin will configure the Access-Control-Allow-Origin CORS header. Now client and server can communicate without error.
4. Testing
Testing is very important during the development of the application. Testing helps developers to discover existing errors/bugs before releasing the application. Therefore, the quality of the application would be enhanced. I decided to test only the server-side because it is more complicated than the client-side. Two tests are being created.
- A single user testing: tests if he can connect to a server and receive a welcome message from the server.
- Two users testing: tests if a room can be created when there are two users and both of them can receive the same welcome message from the same room.
5. Deployment
a. Docker Swarm and Kubernetes
When deploying this project, I create a container for each of the client and server sites. Docker is the most popular solution for the container platform. I want to learn to write a DockerFile and a docker-compose to create a container.
For the cloud development environment, I choose Amazon Web Service. It is currently one of the most comprehensive platforms for cloud computing services. I use an EC2 virtual server to make my project online. I would like to work with Kubernetes to manage the containers. I choose EKS, which is a service from Amazon web service.
If you work with a lot of containers, you have to be able to manage them efficiently. An orchestration tool enables exactly that. With the orchestration tool, you can integrate containers that you created with Docker. Then you use orchestration to manage, scale, and move the containers.
Although Kubernetes and Docker can work well together, there is competition when it comes to Docker Swarm. I have considered some features of Docker Swarm and Kubernetes.
- Scaling: The load on our application is too high, Kubernetes can add more nodes to our cluster. Of course, we have to configure Kubernetes correctly so that it can create a new virtual machine. Then a node is added to the cluster.
- Installation: with Docker Swarm, it is easy to create a new node, then integrate it with Swarm. On the other hand, to configure Kubernetes you have to determine the size of the node, how many master nodes, and worker nodes.
- Load balancing: Docker swarm offers application auto load balancing. However, Kubernetes gives the flexibility to configure load balancing manually.
- Storage volume participation: since the docker swarm manages Docker containers, containers find it easy to share data. Not just data, as well as other things. Kubernetes puts the container in a pod so the container cannot simply communicate with another. You need other components from Kubernetes, e.g., Service to create the connection.
- Monitoring: While Swarm requires additional resources for monitoring and keeping a log, these tasks are already provided for in Kubernetes.
b. Amazon EKS and Kops
When deploying Kubernetes on AWS, you can configure and manage the deployment yourself for full flexibility and control. There are a few options for self-management: Amazon Elastic Kubernetes Service and Kops.
EKS is a managed service offered by AWS. EKS uses automatically provided instances and offers a managed control plane for deployment.
Kops is an open-source tool that can be used to automate the deployment and management of clusters on AWS. It is officially supported by AWS.
c. Docker File
To work with Kubernetes, I need to create all necessary containers. Containers are created by writing docker files. These docker files contain all information about the container, e.g.: name of the image, directory store our application, port, … Docker will follow this information, then step by step, create containers. Besides, I use Docker Compose to start the process of creating containers.
d. Kubernetes architecture on AWS cloud
I choose Kubernetes, Amazon EC2, EKS, ECR for the deployment of my project. What is showed below is the architecture of Kubernetes on AWS cloud.
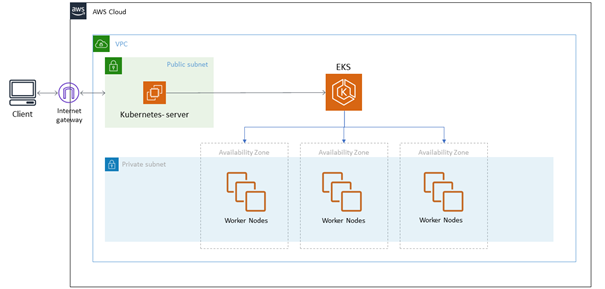
Kubernetes server is a control panel. It creates a cubic cluster. In the cluster, there are master nodes that create and manage worker nodes. When you call deployment commands, the Kubernetes server sends messages to EKS, then EKS sends the tasks to the worker nodes.
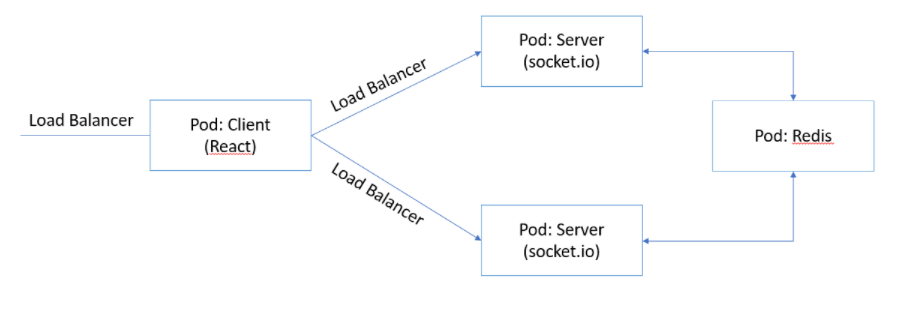
Worker node contains some pods, in which the docker container will be run. I choose controller Deployment to keep these pods running and observe them. For the worker node, I create a pod for the client, 2 pods for the server, and a pod for Redis. The load balancer can be used to communicate with the application from outside.
I decided to have 2 pods Server because I want to scale my application. In case when more people try to connect to my application, the request will be handled faster when we have 2 pods instead of 1 pod. The picture below shows a horizontal scaling, which means that it has more copies of the application and these copies can work with each other at the same time.
For example: for the pod client I write a client-deployment.yaml file
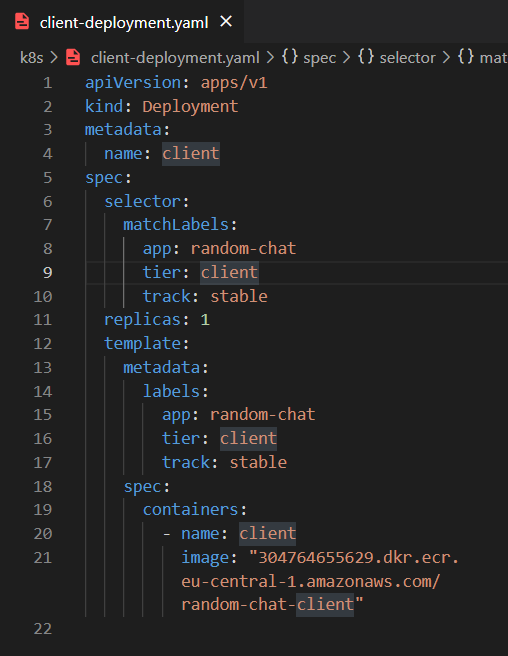
- A deployment named client is created, indicated by the .metadata.name field.
- The .spec.selector field defines how the deployment finds the pods to be managed.
- The deployment creates one replica pod, indicated by the .spec.replicas field.
- the .template.spec field indicates that the pod is running a container. The container is created by docker image, which has been saved in ECR (Elastic Container Registry)
- The container is created using the .spec.template.spec.containers.name field which is called client.
To enable network access to the set of pods I have to create a Service, which is written in client-service.yaml.
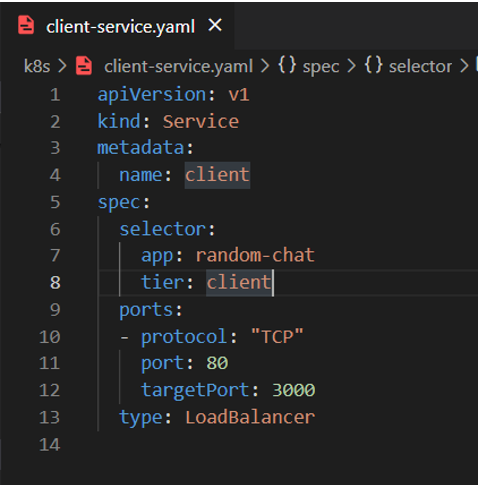
This specification creates a new service object called “client” that targets TCP port 3000 on each pod, which is labeled as app = random-chat.
For pods Server and Redis, I also create Deployment and Service for each.
e. Problem
Service of pod Server:

Pods can usually send requests with each other by using a normal type of Service, which means, in my case, that the pod Client can send a request to the pod Server without having an attribute ‘type’ in server-service.yaml. The Endpoint of the Client will be ‘server:5000’, which is the combination of the name of the service and the targetPort. But after many attempts, it still does not work. So, I decided to make the Service of pod Server as type Load Balancer, which is shown in the picture above. Now the Endpoint of the client will be the address of this Load Balancer.
6. Conclusion
During the course ‘Software Development for Cloud Computing’ and this project, I have a chance to know the concept of Docker containers and how to manage them with Kubernetes. I gain not only theoretical knowledge but also practical experience by developing and deploying the application. Moreover, working with cloud computing is new and interesting for me. Cloud computing is nowadays applied in the development of applications a lot. What I applied in my project is just a small part of cloud computing and I want to learn more about it in the future.
Leave a Reply
You must be logged in to post a comment.