Gitlab
You can find the Project under this link https://gitlab.mi.hdm-stuttgart.de/fb089/automatecloud
Wiki
You can find all the Infos in our Gitlab Wiki (https://gitlab.mi.hdm-stuttgart.de/fb089/automatecloud/-/wikis/AutomateCloud). You can even try it urself. Feel free
Short Description
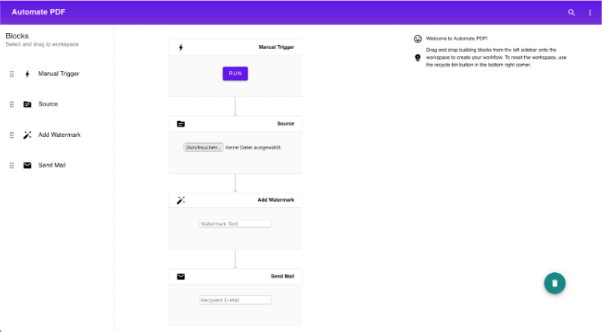
Automate PDF is a workflow automation tool created in the course “Software Development for Cloud Computing”. The application provides a simple graph editor with which a user can create workflows to perform different automation tasks for PDF Files like modifying or mailing a PDF File
Architecture
Cloud Functions:
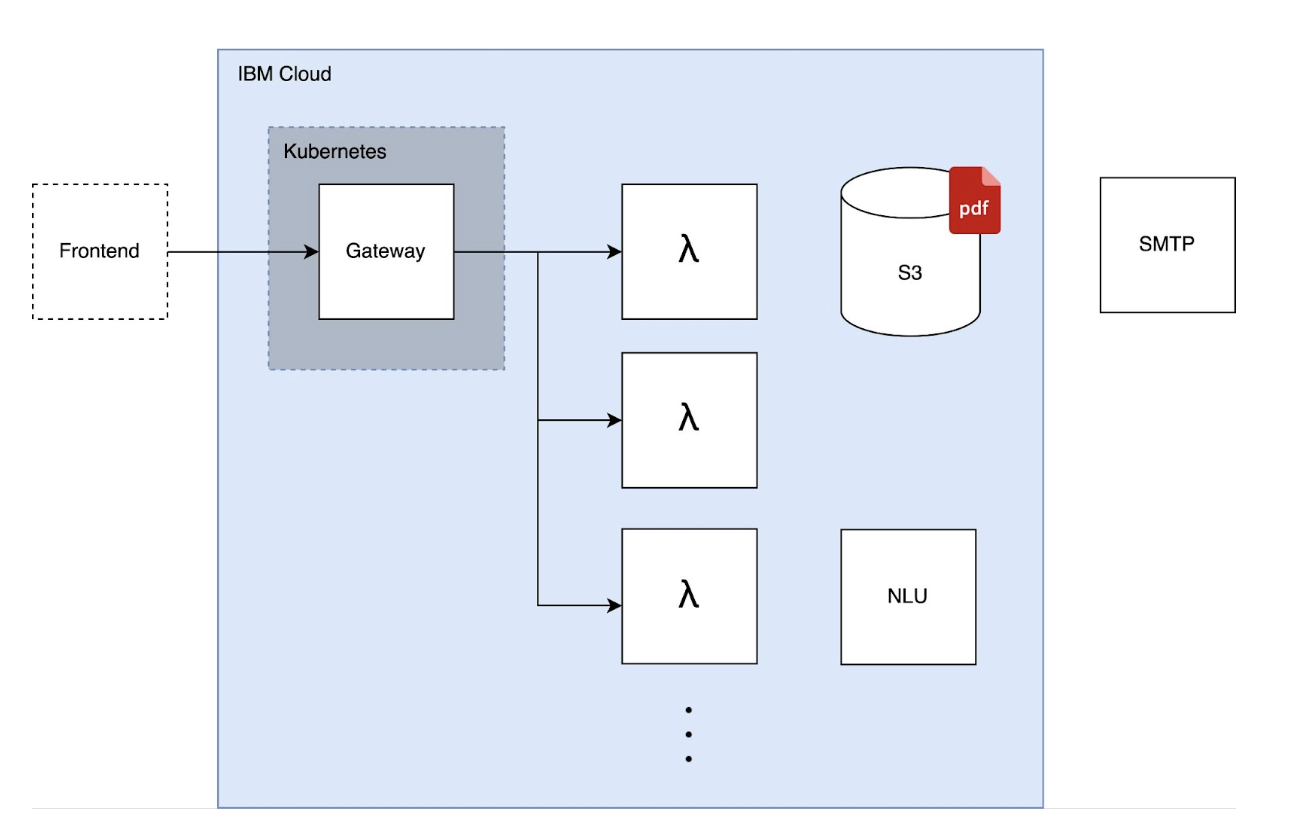
Since workflows are of modular nature, we found that the application of Cloud Functions would be a good use case. The idea was to map every executing Building Block to a dedicated Cloud Function.
Gateway:
While Cloud Functions take care of the core tasks, another service was introduced to interpret the workflow, delegate the tasks to the Cloud Functions and to act as a Gateway for our frontend client. The service was deployed in a Kubernetes Cluster.
Object Storage:
The only persistent part of our application is a S3 bucket that stores the different versions of PDF Files. During the workflow execution, Cloud Functions read and write PDF Files directly to the bucket.
SMTP.
To simulate the mailing feature, we are using ethereal.email as a fake SMTP service.
Kubernetes:
For the option to build a scalable Backend we decided to use Kubernetes
We decided to go to the IBM Cloud because of a Lite Plan that gave us the freedom to try out a large palette of resources for free.
Since working in a Cloud environment was quite new to us, the learnings from this project are quite fundamental, like What are Cloud Functions? How to use them? How to test? How to deploy with Kubernetes? It was also fun to explore the idea of Serverless and the advantages of Platform as a Service. Stay tuned for some insights!
Cloud Functions Learnings
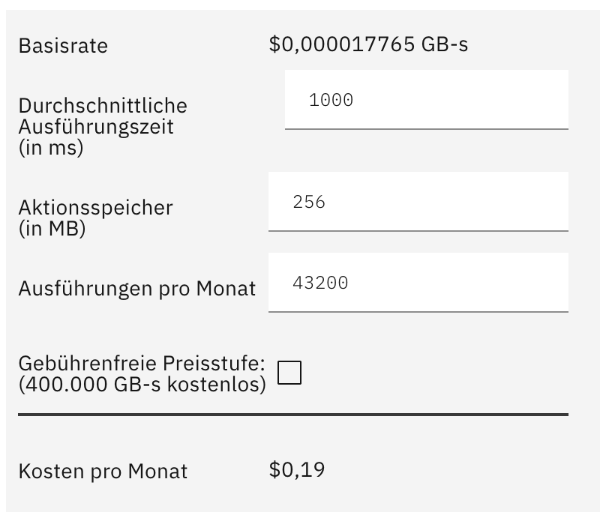
IBM Cloud Functions serve as counterparts to AWS Lambdas. The idea is, to run individual code blocks on the server-side whereby the required resources for running this code are only allocated while the code is executing.
Pay-As-You-Go:
This also means, you only have to pay for the seconds and memory you use during the invocation. Here’s an example of how much it costs, when you execute a IBM Cloud Function with 256 MB memory and 1s duration every minute in a month:
Runtime:
IBM Cloud supports a variety of Runtimes like NodeJS, Java, Go, Python and some more. We chose the NodeJS Runtime environment because we were already familiar with it. One advantage of using such a Runtime off the shelf are the pre-installed packages. No server-side npm install or bundling of libraries into your function code is required, if the runtime already provides the needed dependency. Here’s a list of the current npm dependencies that are part of the IBM Cloud Function NodeJS Runtime.
One downside might be the inflexibility of the Runtime, when a more extensive control is needed. Therefore IBM Cloud Functions offer the opportunity to deploy Docker Containers as Cloud Functions.
Code:
Like stated above, the idea was to execute each workflow task in a separate Cloud Function. Therefore, we developed three different Cloud Functions: transform-pdf, send-pdf, nlu-validate (WIP). In the following example a user triggers a workflow to print a watermark text on a PDF File (transform-pdf) and send it afterwards via mail (send-pdf). The instructions the Gateway then receives is basically a list of commands:

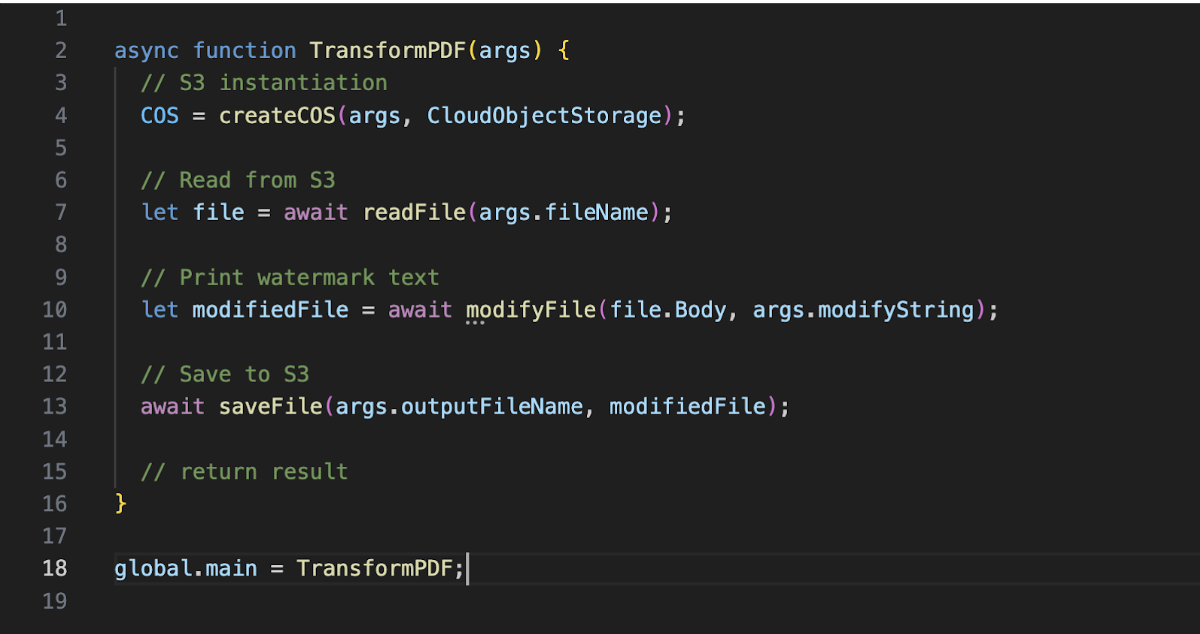
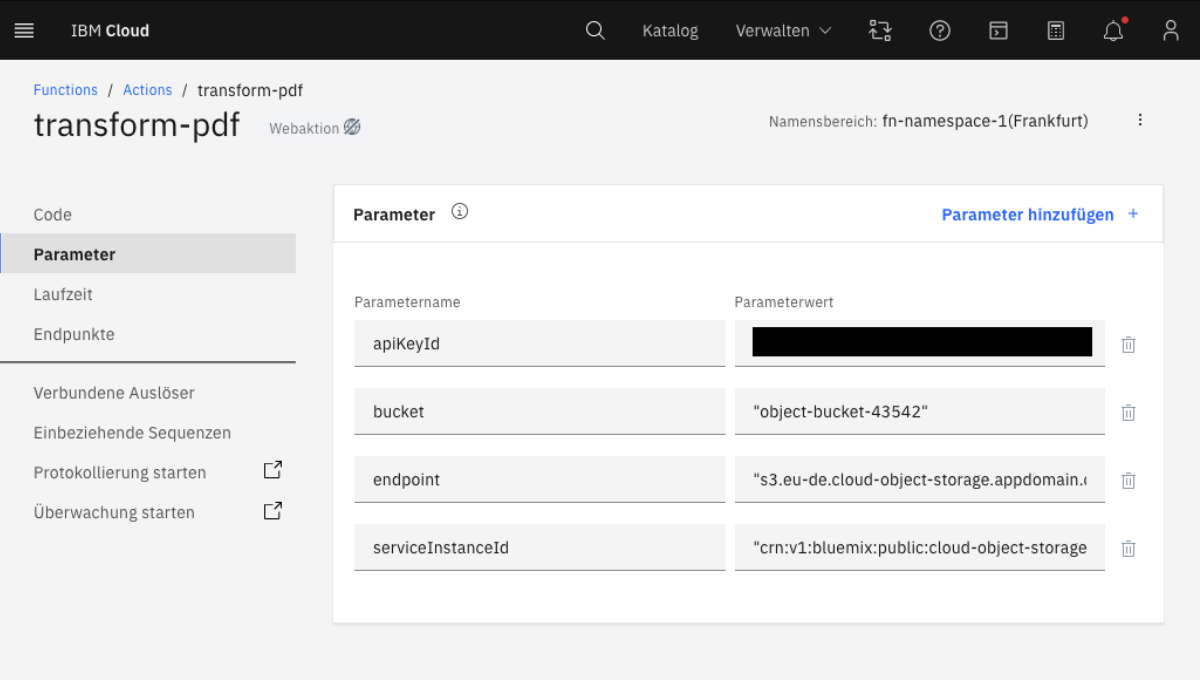
Each Cloud Function is then called with a set of parameters including the credentials for accessing the S3 object storage service. Here’s a simplified version of the transform-pdf function. The structure is the same for the other functions:
Authentication:
One of the more painful tasks was authentication. Because every Cloud Functions needs to access the S3 object storage, credentials need to be passed everywhere as parameters. The execution of Cloud Functions through the Gateway service also requires authentication. We ended up with a .env file and writing our own Authentication Service using the handy iam-token-manager package. However, it never felt like the How-to way of doing authentication management in a Cloud environment.
A better alternative?
Instead of introducing the Gateway as a none-Cloud Function service, we discovered a public Cloud Function could fulfill the same task. Consequently, we could have saved ourselves some problems regarding deployment and authentication. Additionally, in terms of scalability, we later foresaw the Gateway service as a potential bottleneck. Furthermore, we were not aware that Cloud Functions in combination with a public object storage endpoint can also provide static content to hand out for example our Frontend Web-Client. How we nevertheless went the way with Kubernetes and tackled the problem where the gateway becomes a bottleneck is covered in the next chapter.
Deployment:
A nice aspect of Cloud Functions lies not only in their automatic horizontal up-scaling with increasing user load but also in their deployment simplicity. We decided to bundle our function code with webpack. This gave us the flexibility to mark npm packages in the webpack.config.js as external, if they are already part of the runtime, like it is the case with the ibm-cos-sdk package for example. The actual deployment then happens by building with the webpack command and deploying using the IBM Cloud CLI with ibmcloud fn action update […], in our case only npm build && npm deploy. Here is a more detailed description of the setup.
Debugging
became manageable by subscribing to the function’s stdout using the CLI command ibmcloud fn activation poll.
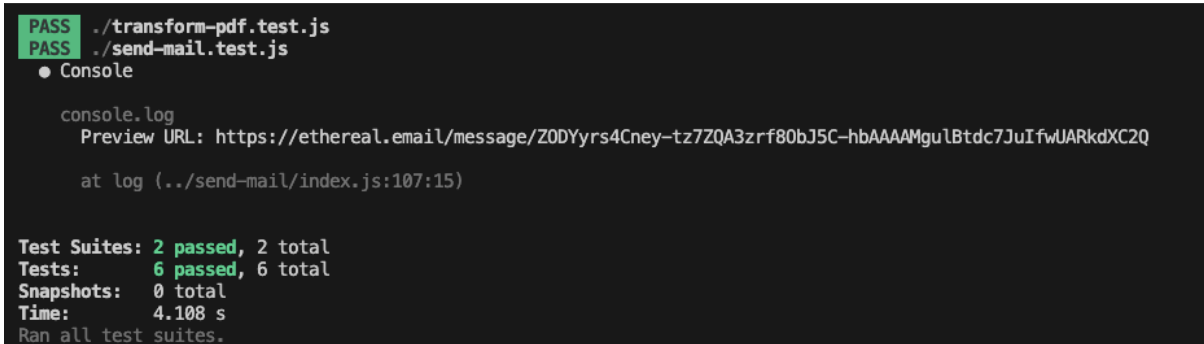
Testing:
We developed tests for our Cloud Functions using the jest framework. Therefore we mocked our S3 object storage. Since the object storage package from IBM Cloud has the same interface as the corresponding package from AWS, we made use of the mock-aws-s3 package. Looking back, it would have helped us a lot to create these tests in an earlier stage of development. Instead we tested our functions by deploying it directly to the cloud.
Setup
Up to this point, we did not use any infrastructure-as-code frameworks such as Terraform, which means that our services must be configured manually either through the cloud portal or by using the CLI. To begin, you should start by creating a bucket for the “Cloud Object Storage”. Then, create two “Cloud Functions” utilizing NodeJS as the runtime and configure the function parameters apiKeyId, bucket, endpoint and serviceInstanceId. To launch the Gateway, certain updates in the “app/config.js” file are essential (endpoints and namespaces). Additionally, you will need to create a .env file containing the necessary environment variables. Finally, you can access the frontend in the web browser by opening the “workspace.html” file.
Kubernetes
When you first dive into the world of Kubernetes, it can feel like stepping into a black box. You’ve heard about it everywhere, and it seems like everyone’s using it, but what exactly can you do with it? Initially, the concept might seem hazy at best. In this blog, I want to share my experiences with Kubernetes, shedding light on this complex system.
The Journey
As outlined in the architecture above, our journey began with the decision to run the frontend locally on our machines while setting up a Kubernetes cluster for the backend. This choice was further accentuated by our intention to employ cloud services. In this blog, I will focus solely on the Kubernetes aspect of our project.
With the groundwork laid, I set out to create a cluster with a deployment and various pods as replicas. I aimed to do this within the IBM Cloud environment as part of our project’s scope.
The First Hurdle: Cloud Services
However, during the development phase, the IBM Free Trial for students underwent changes. Previously, students could access a free Kubernetes cluster as part of this trial, but this offering was abruptly discontinued mid-project. As a result, we needed to pivot our project strategy.
Finding A Solution in the Kubernetes World
Not one to be deterred by such setbacks, I scoured the internet for an alternative, eventually stumbling upon the concept of a local Kubernetes setup, in the form of MiniKube. MiniKube provides the convenience of running a Kubernetes cluster on your local machine, making it an attractive option. The only caveat was the absence of a load balancer provided by cloud providers, but we’ll dive into that later.
The Advantages of the change
Our commitment to using Kubernetes remained unwavering, even though it was now operating locally. This shift did not hinder our project’s progress. Instead, it opened up the opportunity for everyone involved to run the project locally, provided they had set up the required cloud functions in the IBM Cloud environment. Detailed documentation on this can be found in our GitLab repository.
The Master Plan
Our plan was now to have the frontend running on localhost:3000, deploy the backend using Kubernetes, and link the frontend, backend, and cloud functions together. Liberated from cost constraints, we could freely experiment with Kubernetes. In the end, following best practices, we formulated the following architecture for our Kubernetes cluster:
Frontend: Localhost 3000
Backend: Kubernetes deployment
Integration: Cloud functions
As we ventured further into the Kubernetes maze, our journey was marked by challenges and discoveries, making it an exciting chapter in our project’s evolution. Stay tuned for more insights into our Kubernetes adventure.
The Architecture
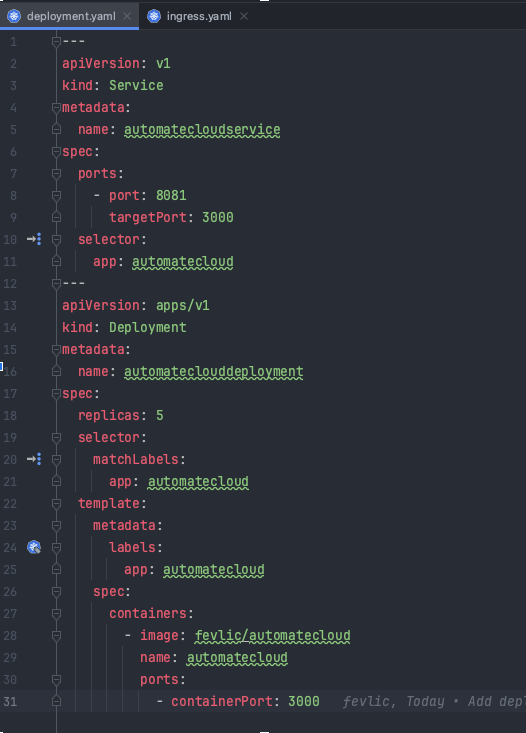
The deployment.yaml file defines two Kubernetes resources: a Service and a Deployment.
Service: This Service is named “automatecloudservice” and is responsible for routing traffic to the right pods. It listens on port 8081 and forwards incoming traffic to pods on port 3000. The selector field specifies that it should route traffic to pods with the label “app: automatecloud.”
Deployment: The Deployment resource named “automateclouddeployment” ensures that there are always five replicas (or instances) of your application running. It uses a selector to find pods with the label “app: automatecloud” and ensures that this desired state is maintained. Each pod runs a container with the Docker image “fevlic/automatecloud” on port 3000.
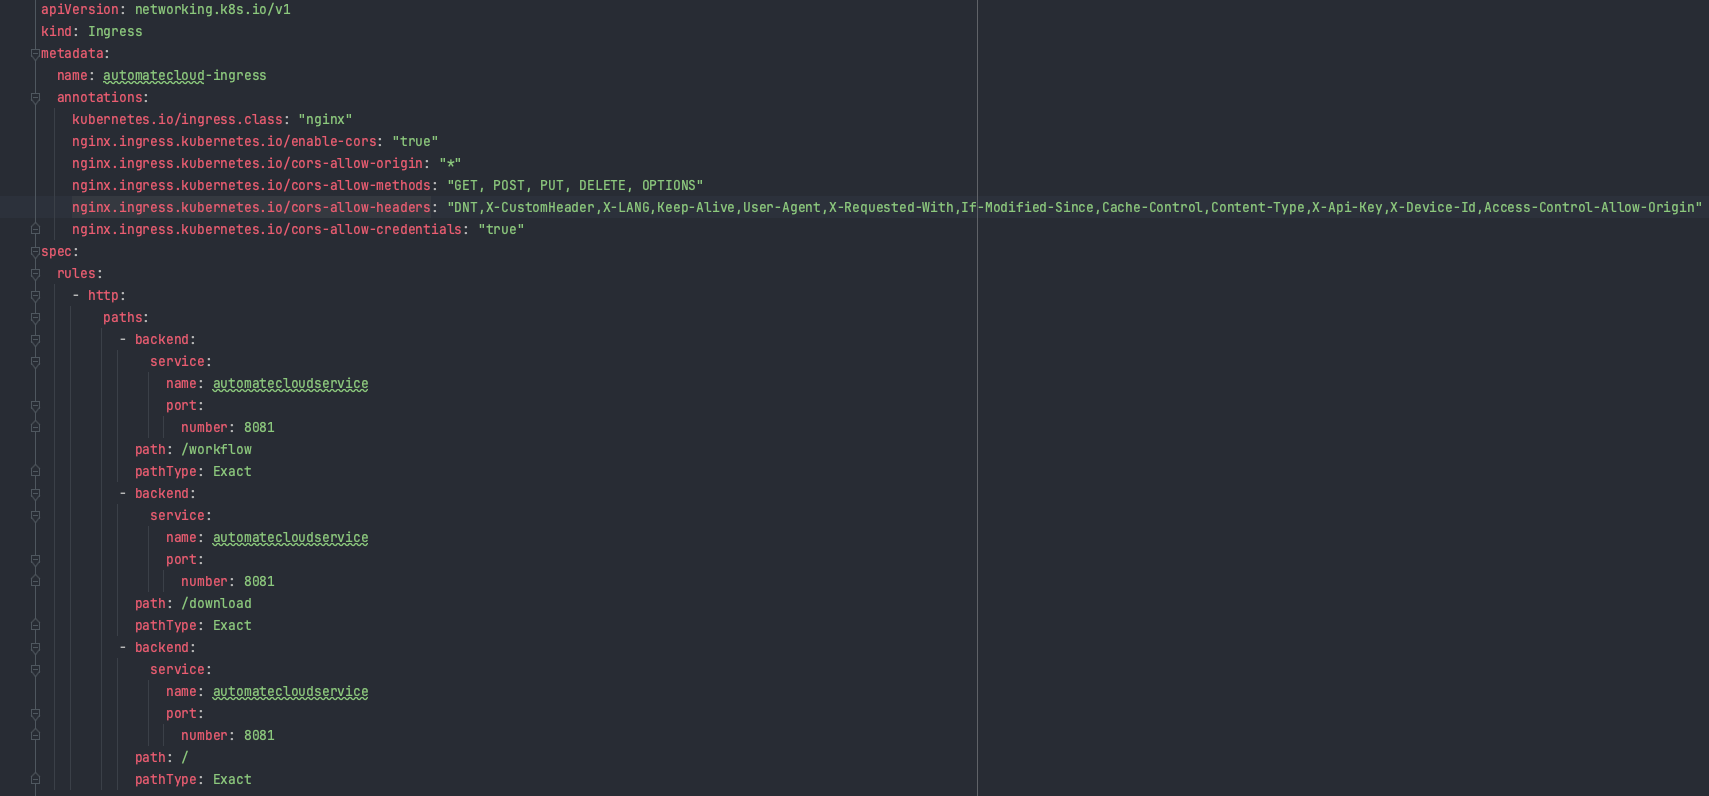
The ingress.yaml file configures how external traffic is routed to your Kubernetes Service through an Ingress resource.
Ingress: The Ingress resource named “automatecloud-ingress” defines rules for routing HTTP traffic. It uses annotations to configure behavior, such as enabling CORS (Cross-Origin Resource Sharing) to allow requests from different origins.
Rules: Within the Ingress, there are rules specifying how to handle different URL paths. For example, requests to “/workflow” and “/download” are directed to the “automatecloudservice” Service on port 8081, which, in turn, routes them to the respective pods running your application. Requests to the root path (“/”) are also directed to the same Service.
Why we choose Ingress over a Load Balancer
In summary, if you have multiple services running in your Kubernetes cluster and you need to route external traffic to them based on rules like hostnames or paths, Ingress is a more flexible and resource-efficient choice. On the other hand, if you need to expose a single service to external traffic, a LoadBalancer may be more straightforward, but it doesn’t provide the same level of routing and rule-based control as Ingress. The choice depends on your specific use case and requirements.
Lessons Learned Ingress
In the aftermath, I propose making some architectural improvements to enhance our scalability.
Currently, all our services are running within a single entity. However, by incorporating Ingress, we can precisely determine when each service should come into action.
If I were to return to Kubernetes, I would create individual services for each API endpoint, each with the necessary pods to boost scalability. Currently, each endpoint relies on a shared service and competes for resources. However, if we establish distinct services designated for different functions like /workload and /download, the burden on any single service would be significantly reduced.
Nonetheless, it’s worth noting that the initial challenge of connecting Ingress to the services presented a substantial hurdle.
Lastly, I encountered a problem that was entirely new to me in this process.
CORS
Until today I still have bad experience with the Cors principle
If you set up everything, you think nothing can go wrong, the cluster runs… Comes from the depths of the web world still the CORS problem
What is CORS
Imagine you’re on a website (let’s call it Website A) and you want to load some data or resources from another website (Website B). This could be a font, an image, or even some data from an API. Browsers, to keep things secure, have a same-origin policy. It means they won’t allow Website A to directly fetch data from Website B unless Website B explicitly says it’s okay.
Here’s where CORS comes into play. CORS is a set of rules implemented by web browsers that allows or restricts web applications running at one origin (like Website A) to request resources from a different origin (like Website B). It’s like a permission slip from Website B to Website A, saying, “Yes, you can use my stuff.”
Why was this an issue?
In our scenario, both the frontend and backend components were running locally, and they needed to communicate with each other. The backend was hosted within the cluster on localhost:8001, while the frontend was on localhost:3000.
The problem arose when we wanted to activate a cloud function that added a watermark to a PDF, resulting in the download being available at localhost:8001/downloads. However, this function was disabled by Cross-Origin Resource Sharing (CORS), which prevented the PDF download from functioning correctly.
To resolve this issue, we had to enable CORS in both the backend and frontend. This seemingly simple problem ended up consuming several days of effort. Surprisingly, it led me to delve deeper into the Kubernetes ecosystem, even though the core problem initially appeared to be related to web development.
Summary
Despite facing various challenges, including cloud provider issues, CORS problems, and the choice between Ingress and Load Balancers, I’ve gained valuable experience from this project. It has been a tremendous learning opportunity, equipping me with knowledge that I can apply to future projects, especially when discussions revolve around concepts like Pods, Services, Deployment, Kubernetes, and the Cloud.
While I may not have all the answers, I now have the skills to identify and troubleshoot errors effectively. This experience has reinforced a fundamental concept in the world of cloud computing: “The cloud is just someone else’s computer.”
Felix and Johannes.
Leave a Reply
You must be logged in to post a comment.