

by Erik Bondel, Anton Fischer and Adrian Einsele as part of the lecture Software Development for Cloudcomputing
Idea

If you have been using Reddit, you probably already heard about r/place. Its an online event that took place in 2017, 2022 and 2023. For a limited time, users could place individual pixels on a large, shared canvas and work together to create artworks. After placing a pixel, there was a cooldown between 5 up to 20 minutes, before a user could place its next pixel. Existing pixels could also be overwritten, allowing people to modify or replace artwork.
In 2025, another project called wPlace was created. It is based on the same idea as r/place, but this time, users no longer place pixels on an (in the beginning) empty canvas, but on a world map.
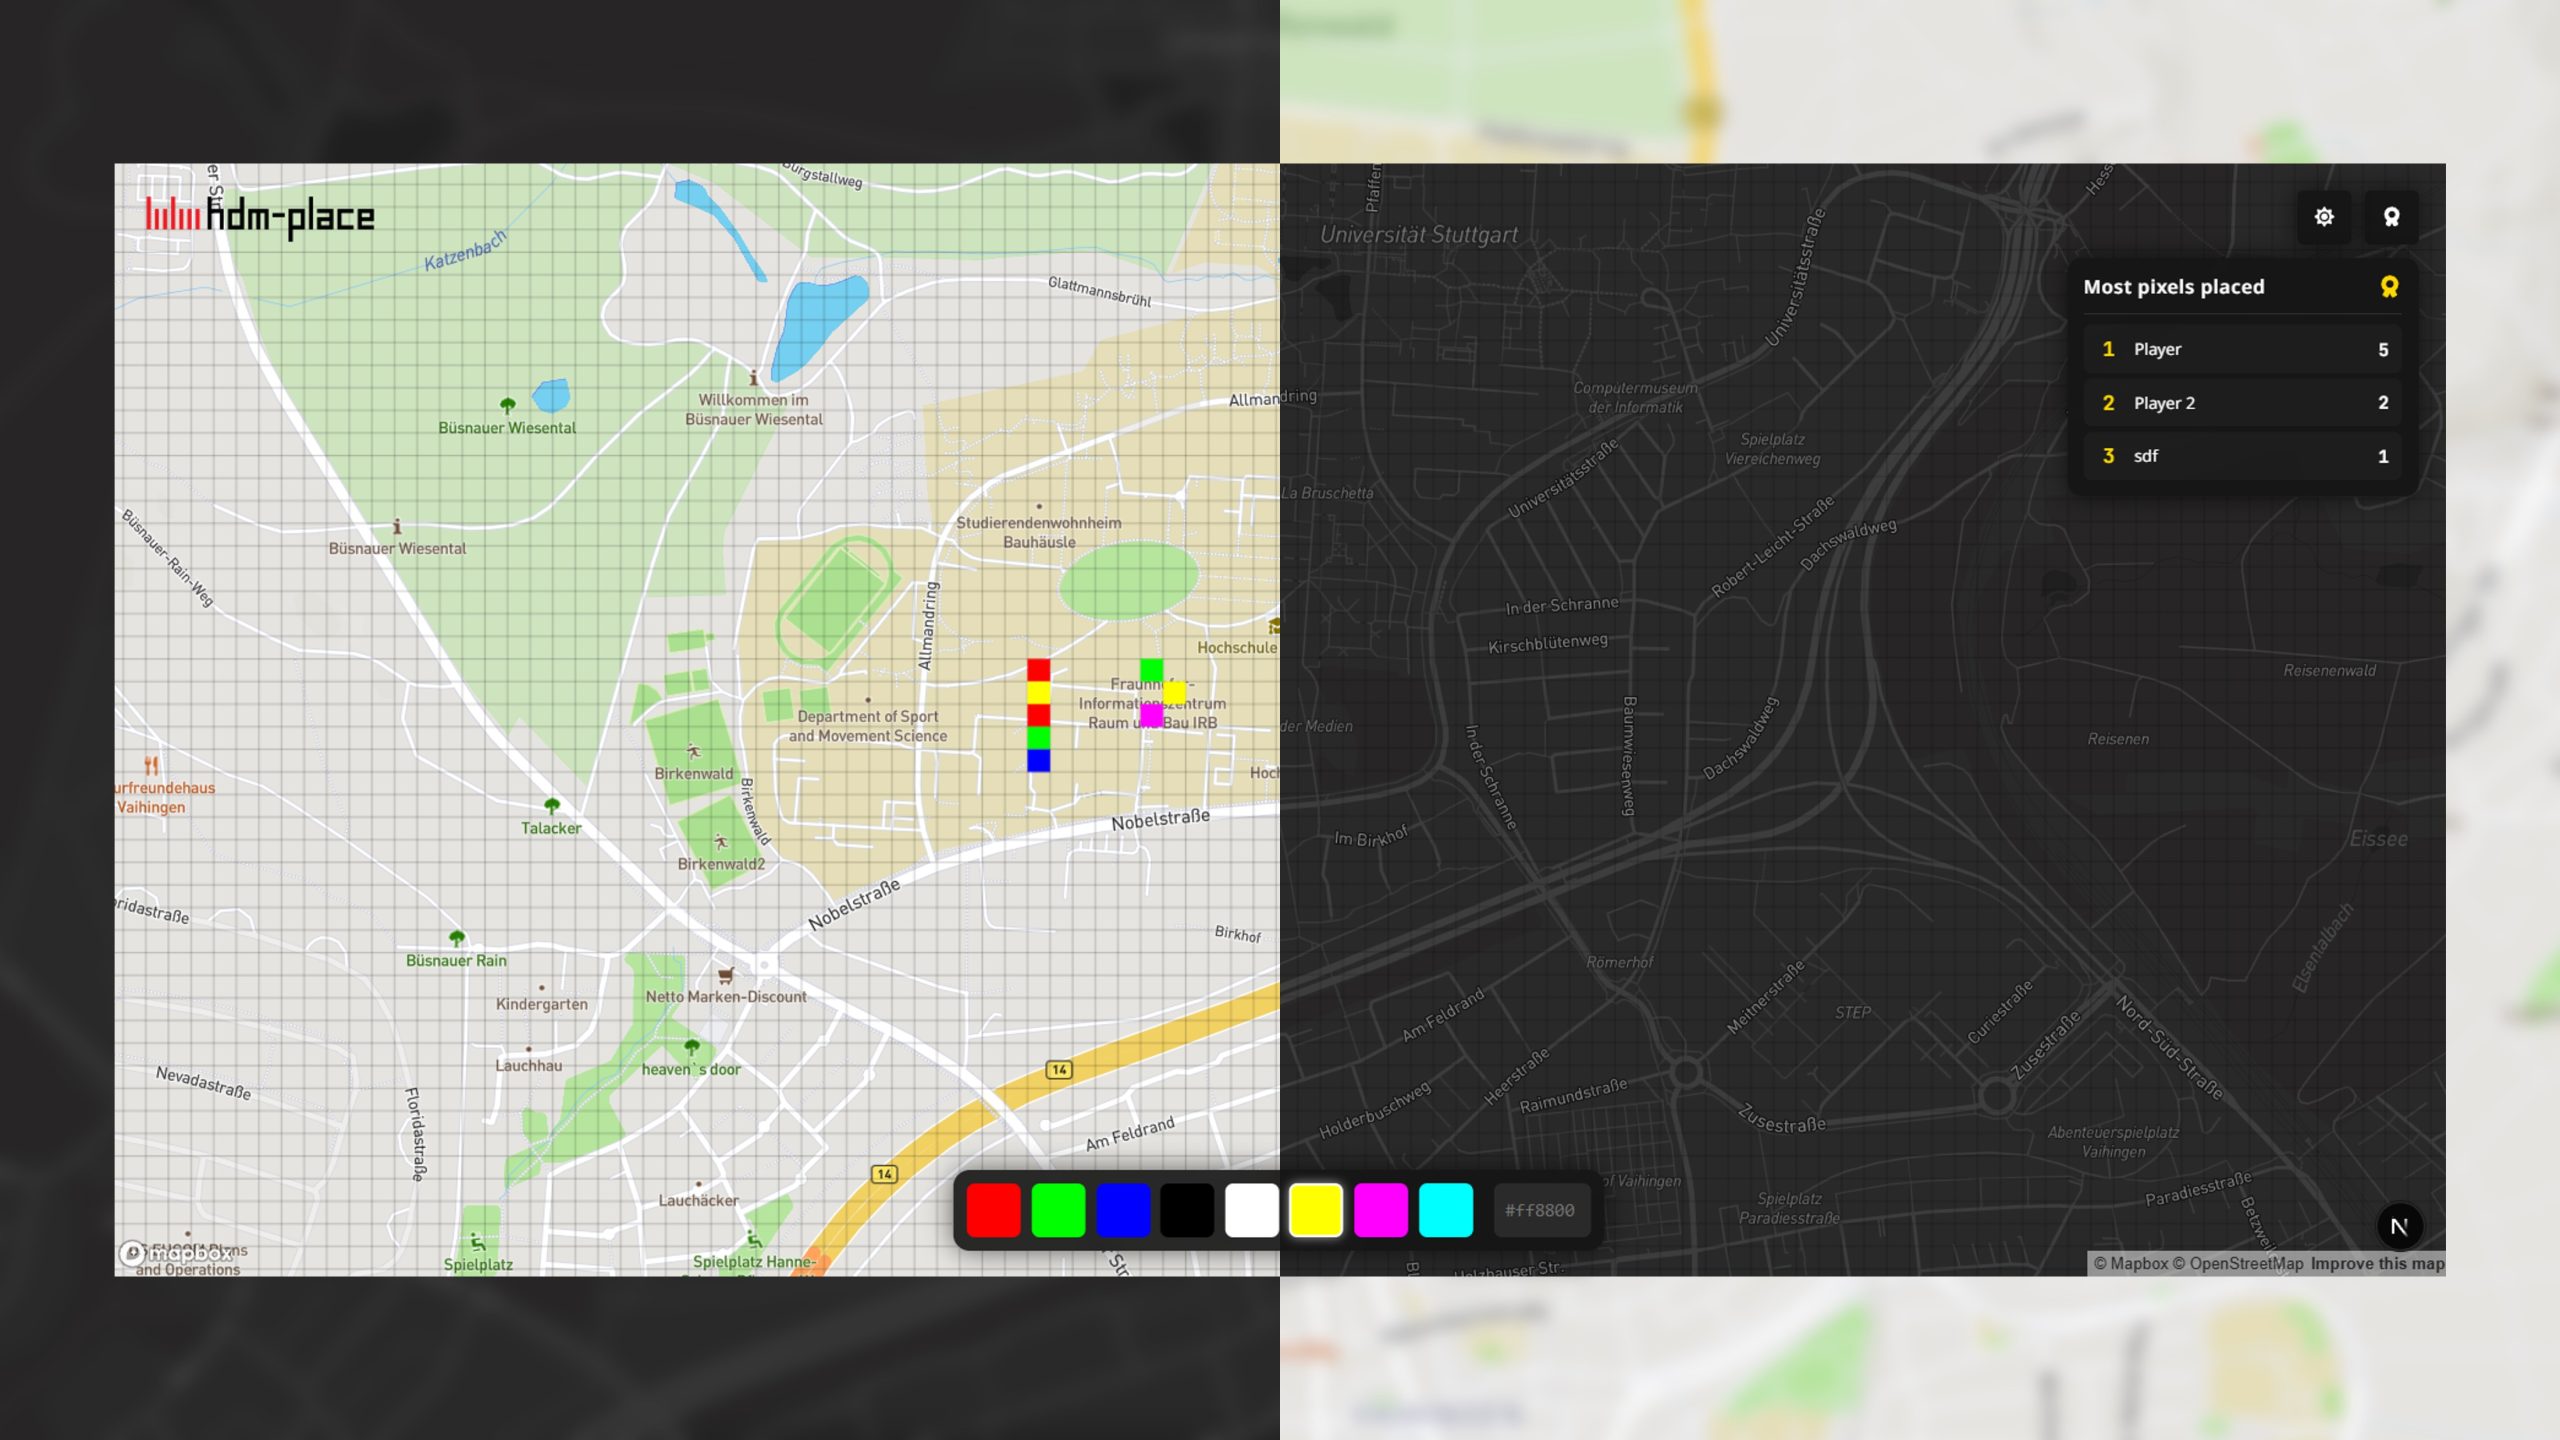
For the lecture Software Development for Cloud Computing we wanted to create something similar. An online game, in which users can place pixels on a map of the Vaihingen campus, including the HdM and the University of Stuttgart. Like this, players can mark their favorite spots through creating artworks next to them.
In this blog article, we want to explain, how we developed HdM-place, which technologies we used and what challenges we faced along the way. At the end there will be a link to our public GitHub repository with the source code. Feel free to try it out, the application can also be run locally.
Requirements
When starting, we first thought of some requirements our project should fulfill in the end. Some of them changed during development, but most stayed close to our initial ideas.
Functional Requirements
Interactive Campus Map
The application should feature an interactive map of our campus. Users should be able to move the map, zoom in and out and change its appearance. Instead of building only an r/place-inspired game, we wanted to create our own wPlace clone.
Pixel Placement System
Users should be able to place pixels on a grid, above the map. They should be able to choose between different colors. The pixels must be stored persistently and must be synchronized with all clients currently using the application. This means if a user places a pixel, the pixel must also appear for everyone else in real time.
Every pixel needs to be identified with own coordinates which represents its location on the map. They must always remain in the same position, even when moving the map or reloading the page.
Cooldown System
Between each pixel placement, a user specific cooldown should be triggered, during which the user cannot place any pixels. If the user is reloading the page while a cooldown is active should not skip the cooldown.
Leaderboard
The application should also have a leaderboard, featuring an overview of the users who have placed the most pixels so far.
User System
Both the cooldown and leaderboard require a way to identify different users. However, we wanted this system to be as lightweight as possible. Ideally, users should not need to create an account before and should be able to start playing right away.
AWS infrastructure
As this was a cloud-computing project, the application should be hosted using a cloud provider. We chose AWS to host the frontend, backend and our database. For the creation of the infrastructure, we use Terraform to make this process fast and consistent.
Automatic Deployment
In addition to manual deployment through the AWS console, the application should support automatic deployment through a GitHub Actions pipeline.
Non-Functional Requirements
Performance
The Vaihingen campus is a relatively small area, however we wanted to design the application in a performant way that it still works with possible much larger areas, ideally the whole world map. This means we needed to think of efficient ways to fetch the existent pixels when loading the page in both frontend and backend.
User experience
The UI should be intuitive for a user to use, it should be easy to place pixels. Also, if possible, users should be able to start playing immediately without creating an account.
Scalability
For now, the application is not intended to be publicly available permanently, but we wanted to make sure it can be actually deployed in the future. This means we want to make it scalable in a way to also make it work with potentially larger map areas or a larger amount of concurrent users.
Cost Efficiency
Our AWS credits were limited to $200 in the free tier, so the infrastructure needed to be as cheap as possible but still fulfill all of the project requirements.
Tech Stack
Once we have decided on our user requirements, we could start on deciding how to actually implement them. Since the focus of the lecture was cloud infrastructure, we initially tried to keep front- and backend as simple as possible.
Frontend
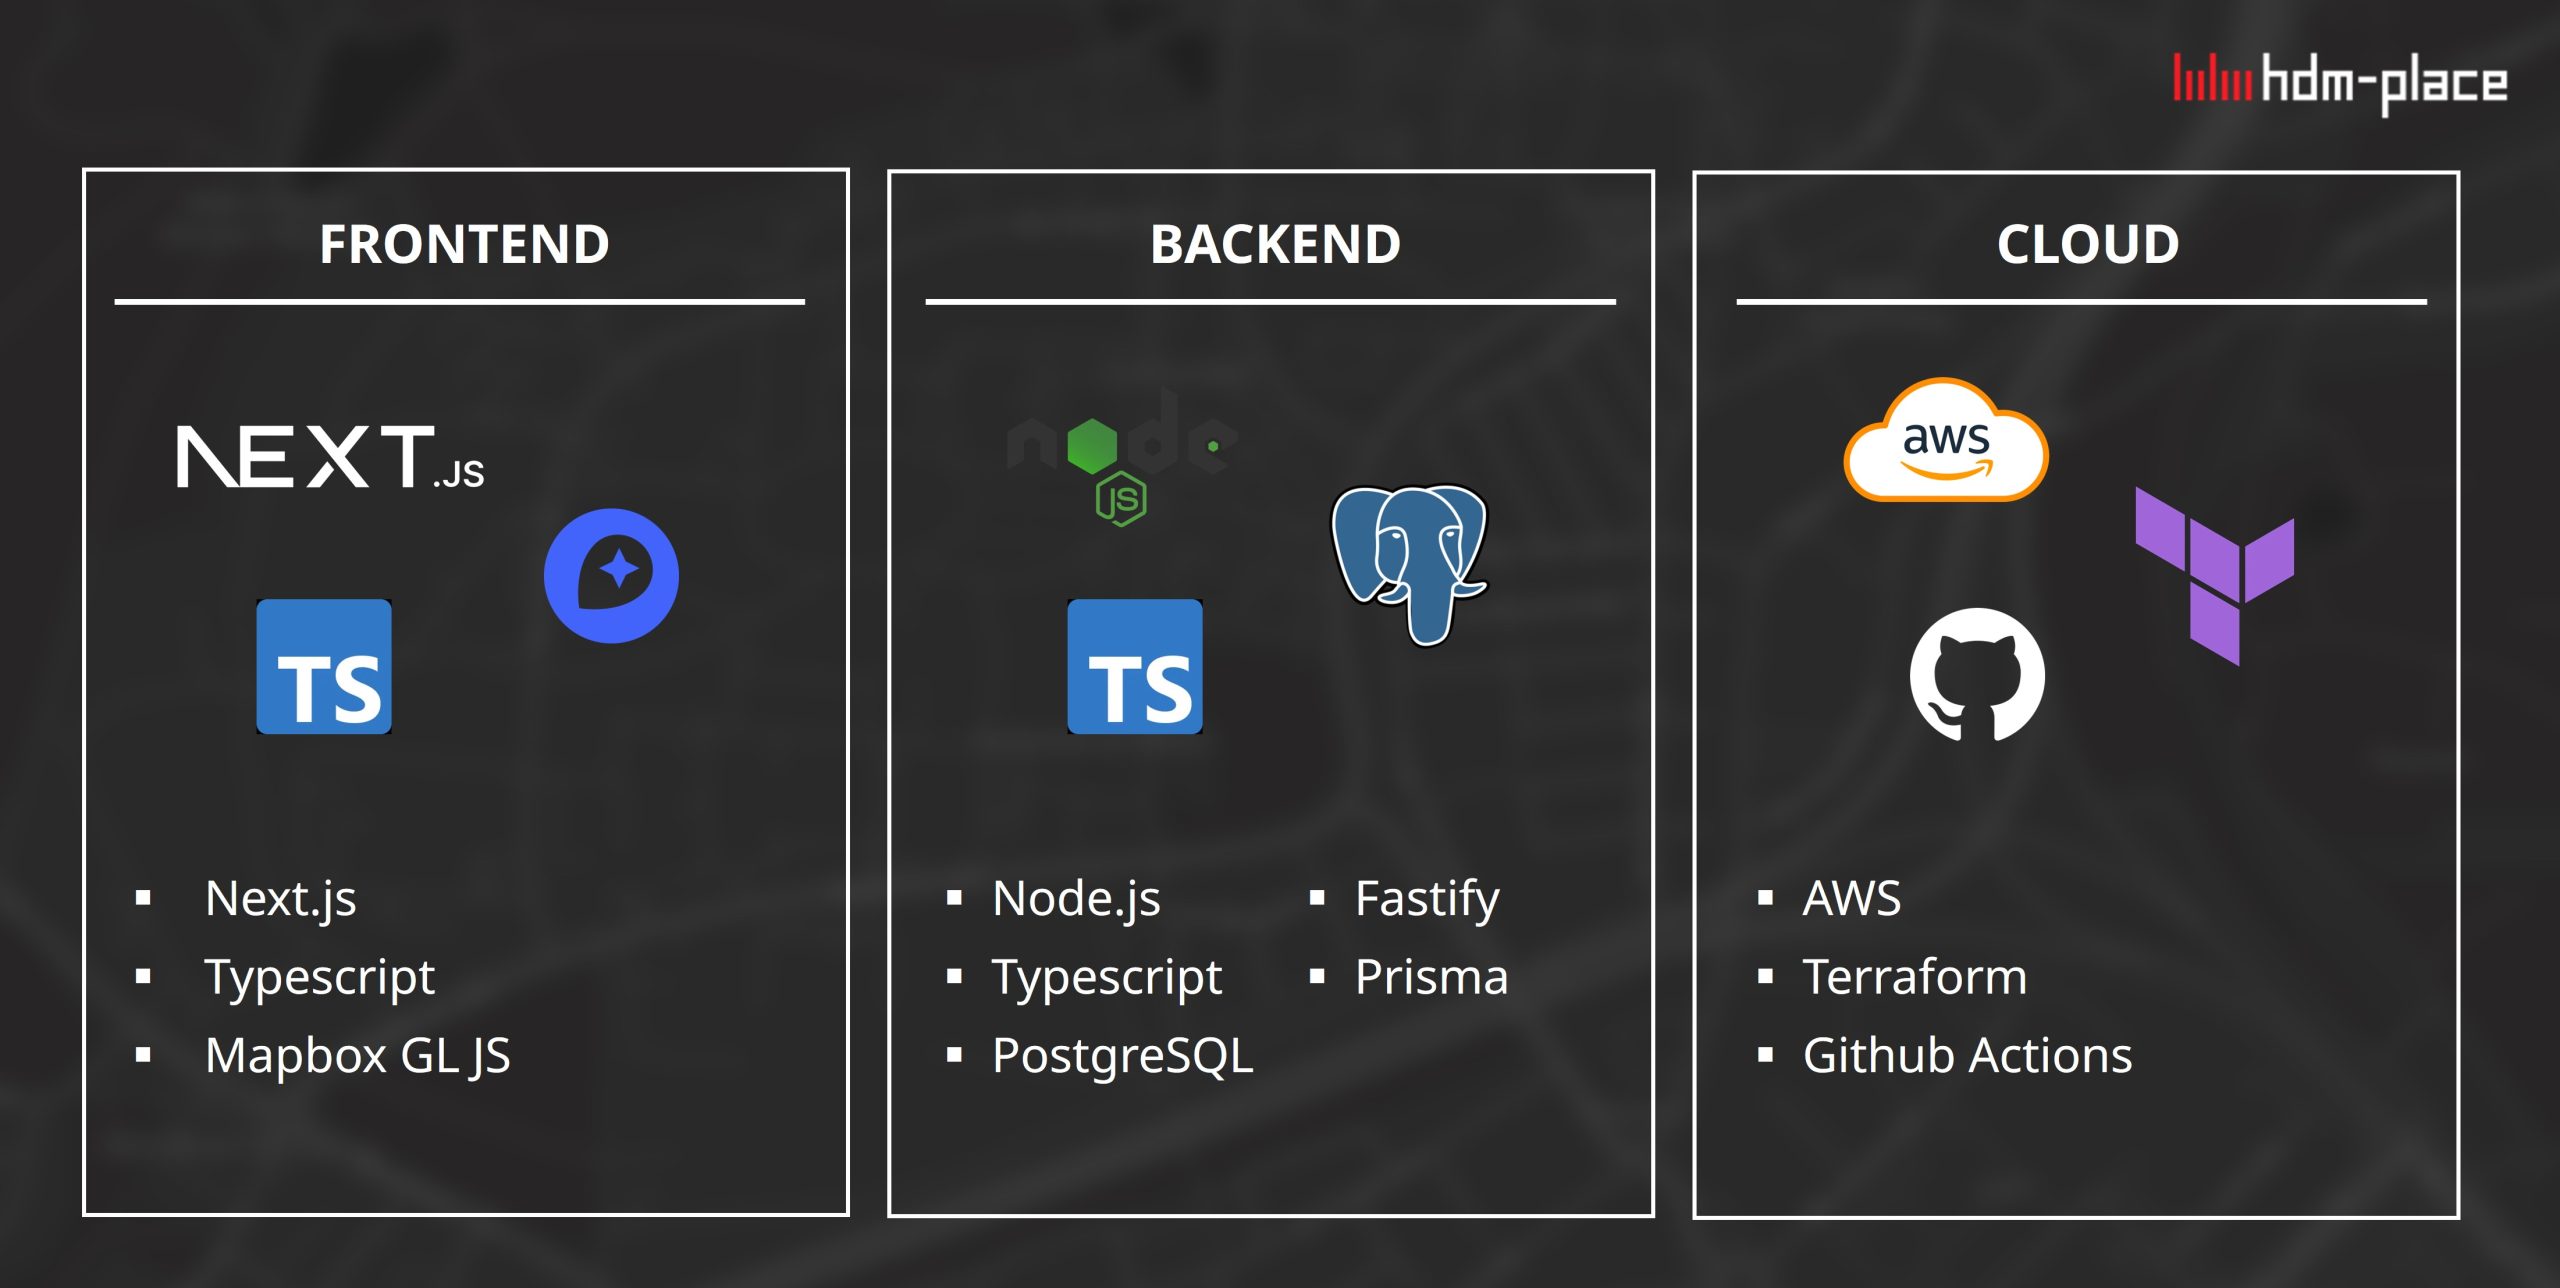
For the frontend, we built a Next.js application using TypeScript. Some of our team members have already worked with these technologies, so creating a rather simple user interface was not that hard to do. However, it was still a bit challenging, to find a way to load in the pixels in a performant way and to handle the coordinates, so that each pixel represents its own consistent location on the map (→ see section Problems & Challenges).
For the map, we first considered using the Google Maps API, because if you think about interactive world maps, that was the first thing that came to mind. However, this API is very complex, that’s why we looked for an alternative. We then decided on using the Mapbox GL JS, which is more straightforward to use can be integrated directly into NextJS as React component. Also, it offered a free tier with up to 50.000 free map loads per month, which is more than enough for us.
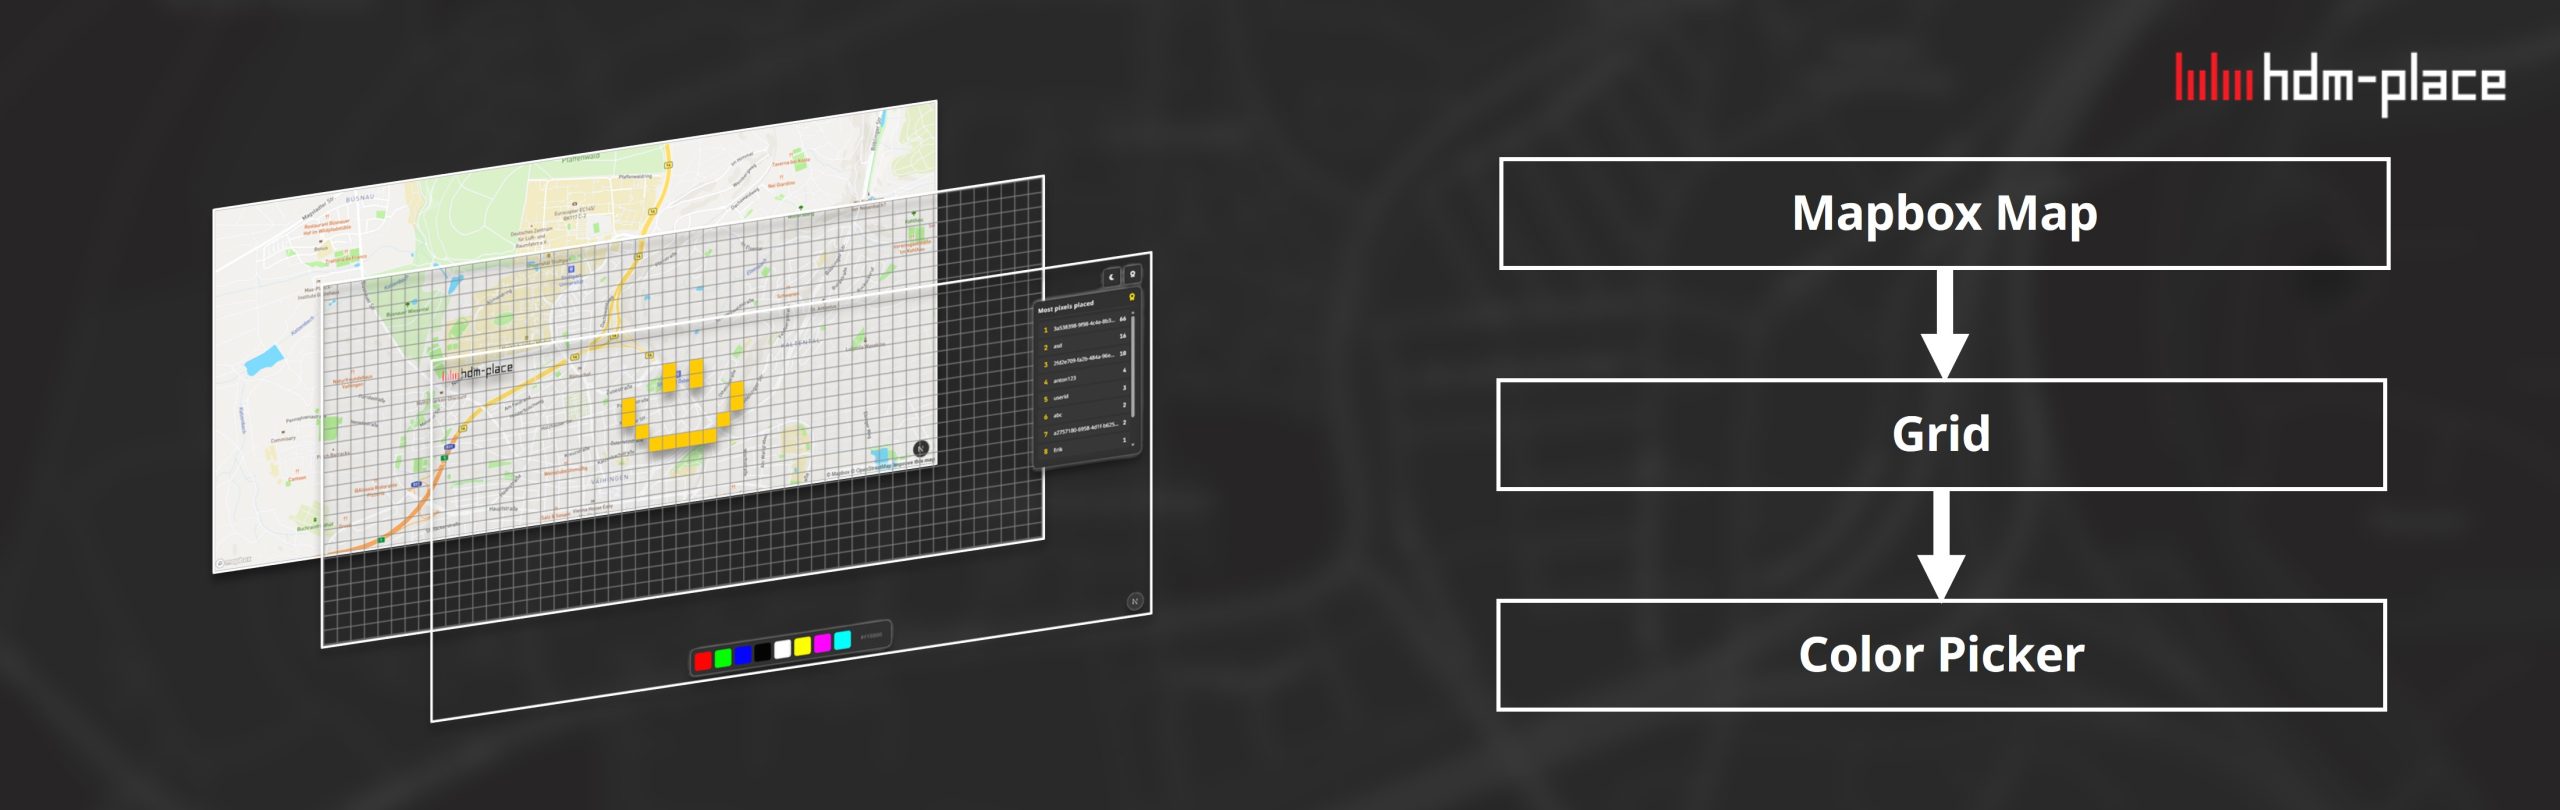
The frontend consists of three main layers. In the background, the Mapbox map is rendered as its own component.
Above, there is the Grid component, which renders the grid and all currently visible pixels. We implemented this layer using an HTML canvas, which can be redrawn quickly enough to have the grid move fluently along the map movements (e.g. drag or zoom).
In front of the grid, all other UI elements are placed, such as the color picker, our logo in the top left corner, and buttons to toggle the darkmode or leaderboard. We also wanted to show notifications to the user, for this we used the library react-hot-toast.
Backend
We also used TypeScript for the backend. For the persistent storage of pixel- and userdata, we chose PostgreSQL as database. To avoid having to deal with any SQL queries and to simplify the communication between backend and database, we decided to use Prisma as object-relational mapper.
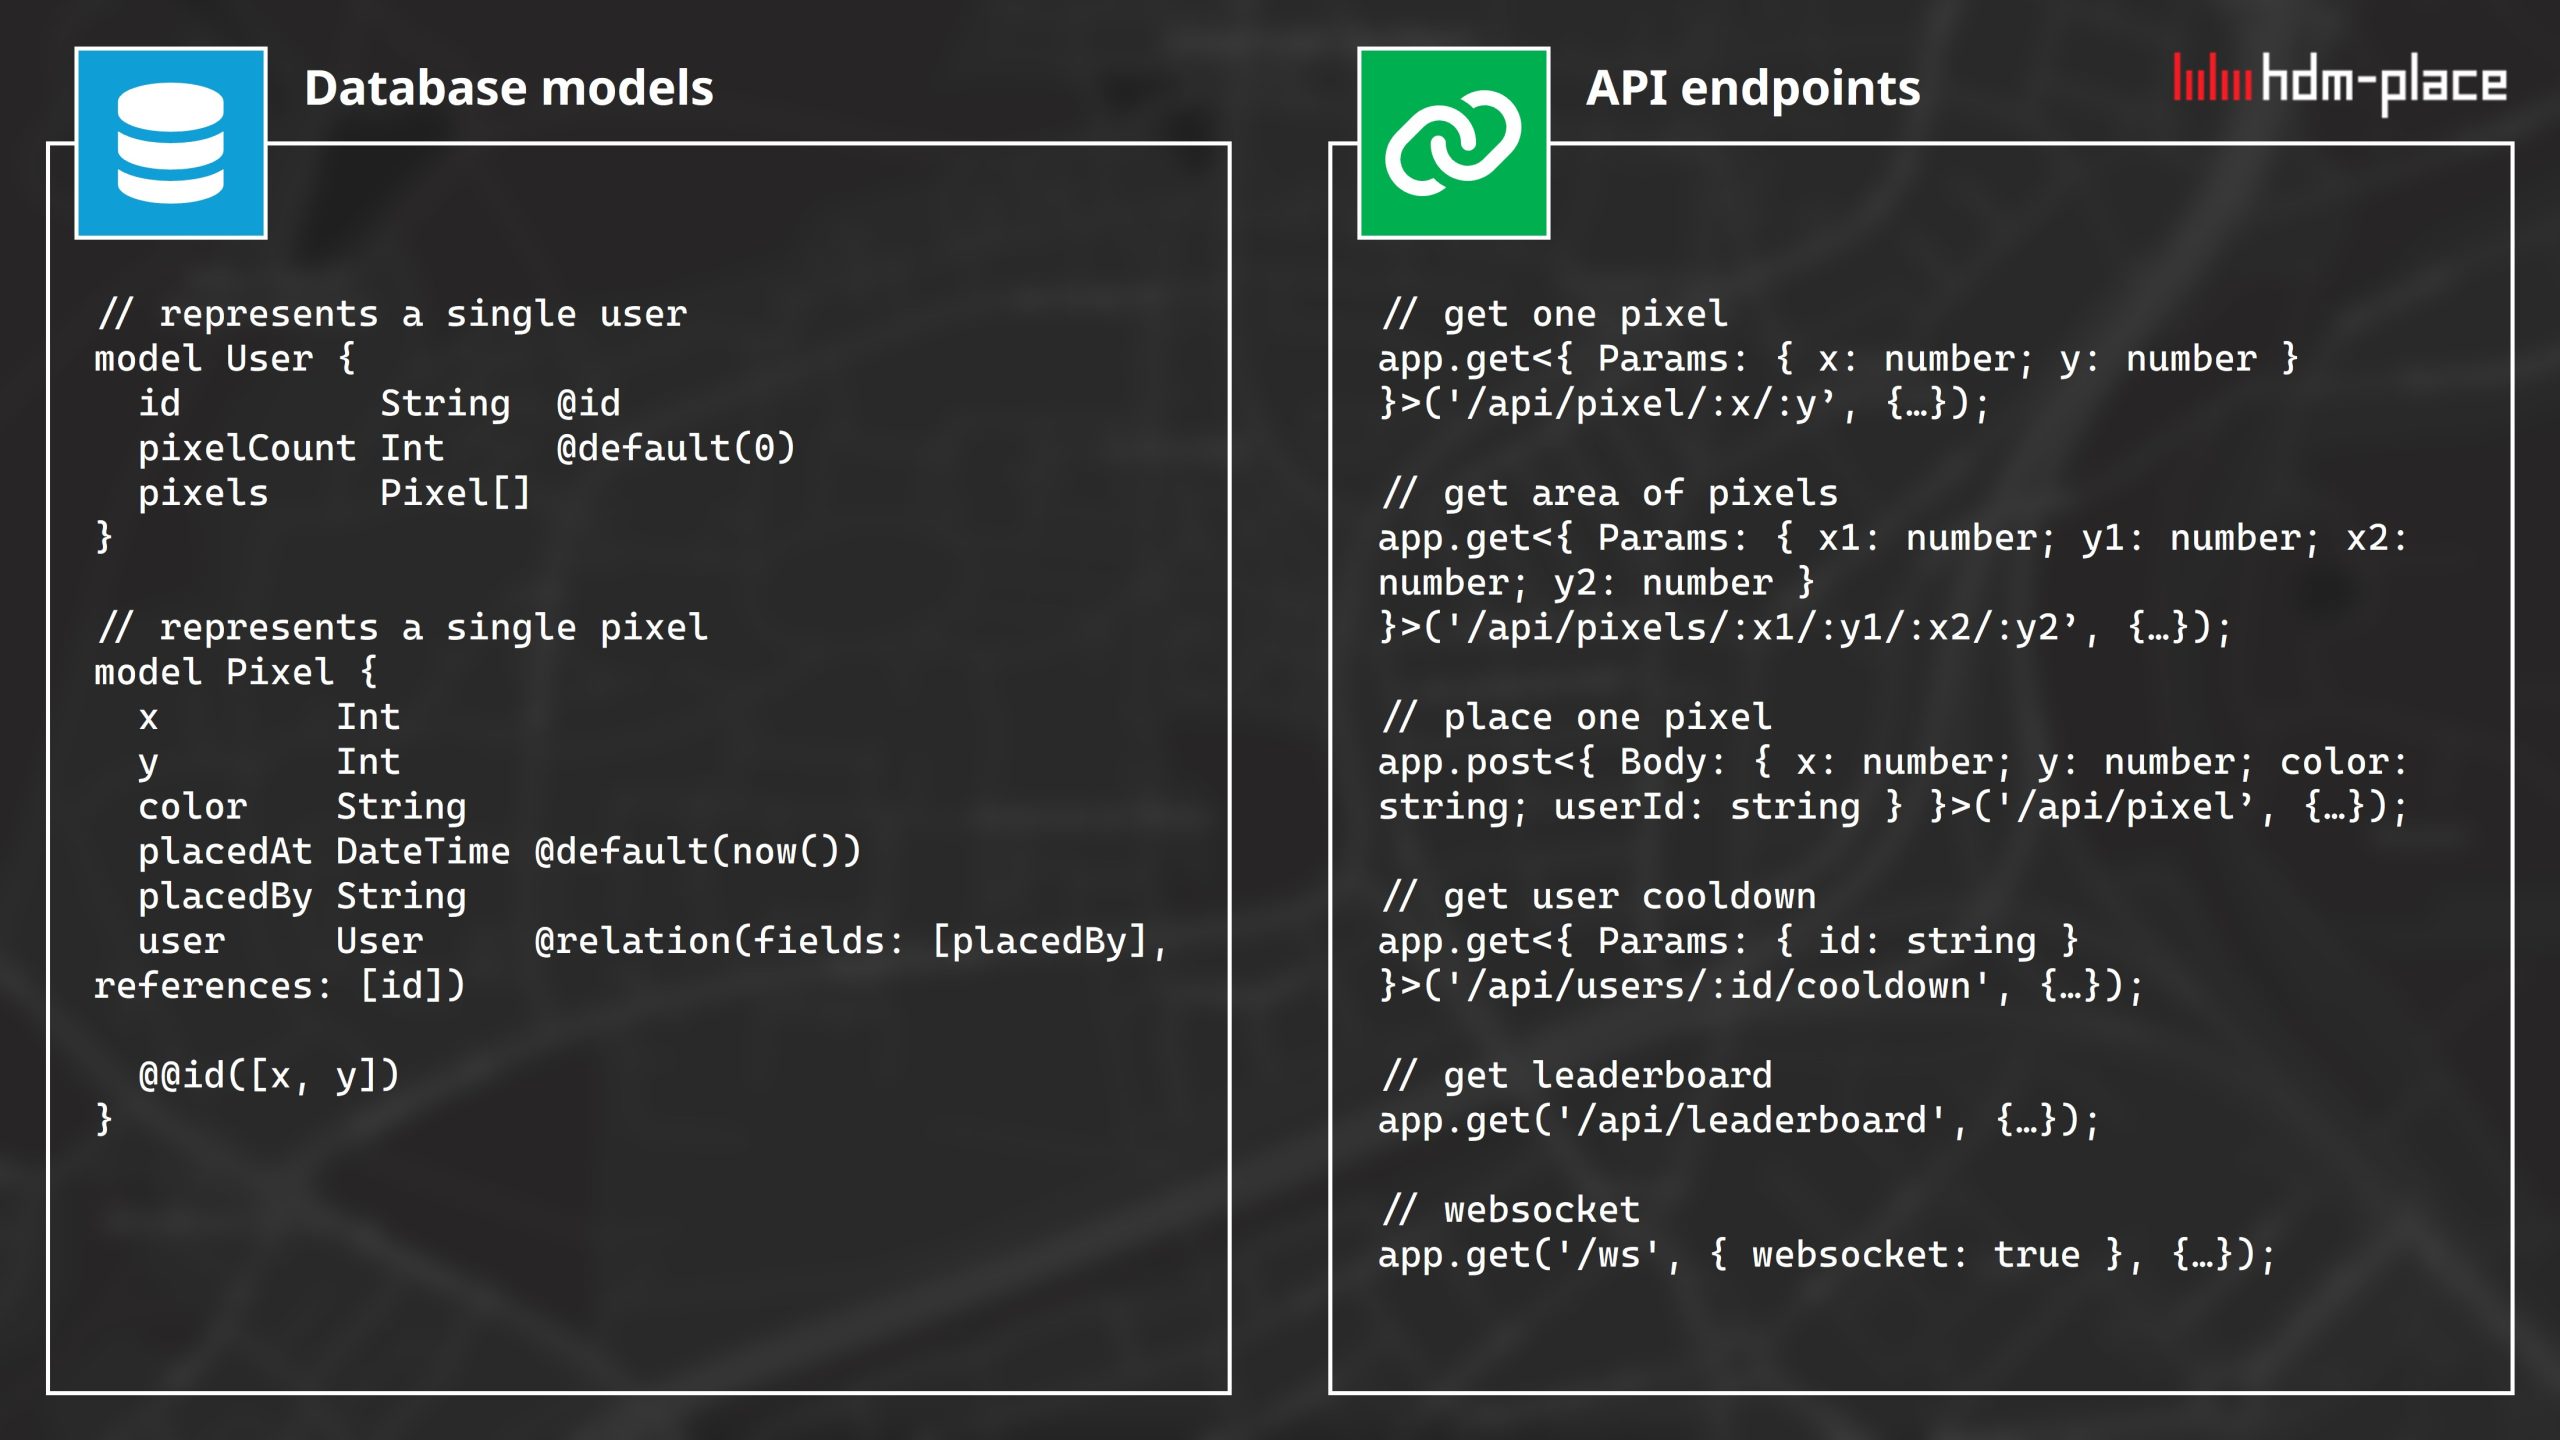
Our database contains two main models. The first represents a single pixels and stores information like its coordinates, color, placement time, and the user who placed it. The second model represents a single user and stores information such as the current cooldown and the total amount of pixels placed so far. This is needed for the leaderboard and to prevent the user from skipping the timer when reloading the page.
For communication between backend and frontend, we defined multiple API endpoints and a Websocket using Fastify.
The API provides endpoints for fetching individual pixels, loading groups of pixels, fetching the leaderboard, and checking a users current cooldown. A separate endpoint is called to place a new pixel.
Calling these endpoints will then perform different database operations. Fetching the leaderboard or pixels will simply return them from the database. Placing a new pixel will either create a new database entry or replace an existing one (because it is possible to overwrite existing pixels).
Whenever a pixel is placed through the API, the backend broadcasts the change to all connected clients through the Websocket. Each client can then update its canvas immediately, so the users see new pixels in real time without reloading the page.
Cloud Infrastructure
So far, we have a rather classic web application consisting of a static frontend website, a backend and a database. The next step was to make these components accessible online.
As cloud provider, we decided on using AWS. Before, none of us really worked with AWS yet, but we wanted to try out a new cloud provider. Also, they offered free credits worth 200$, which we could use for testing different AWS services and our application. We used Terraform to define and deploy the infrastructure because we already had some experience with it from another lecture.
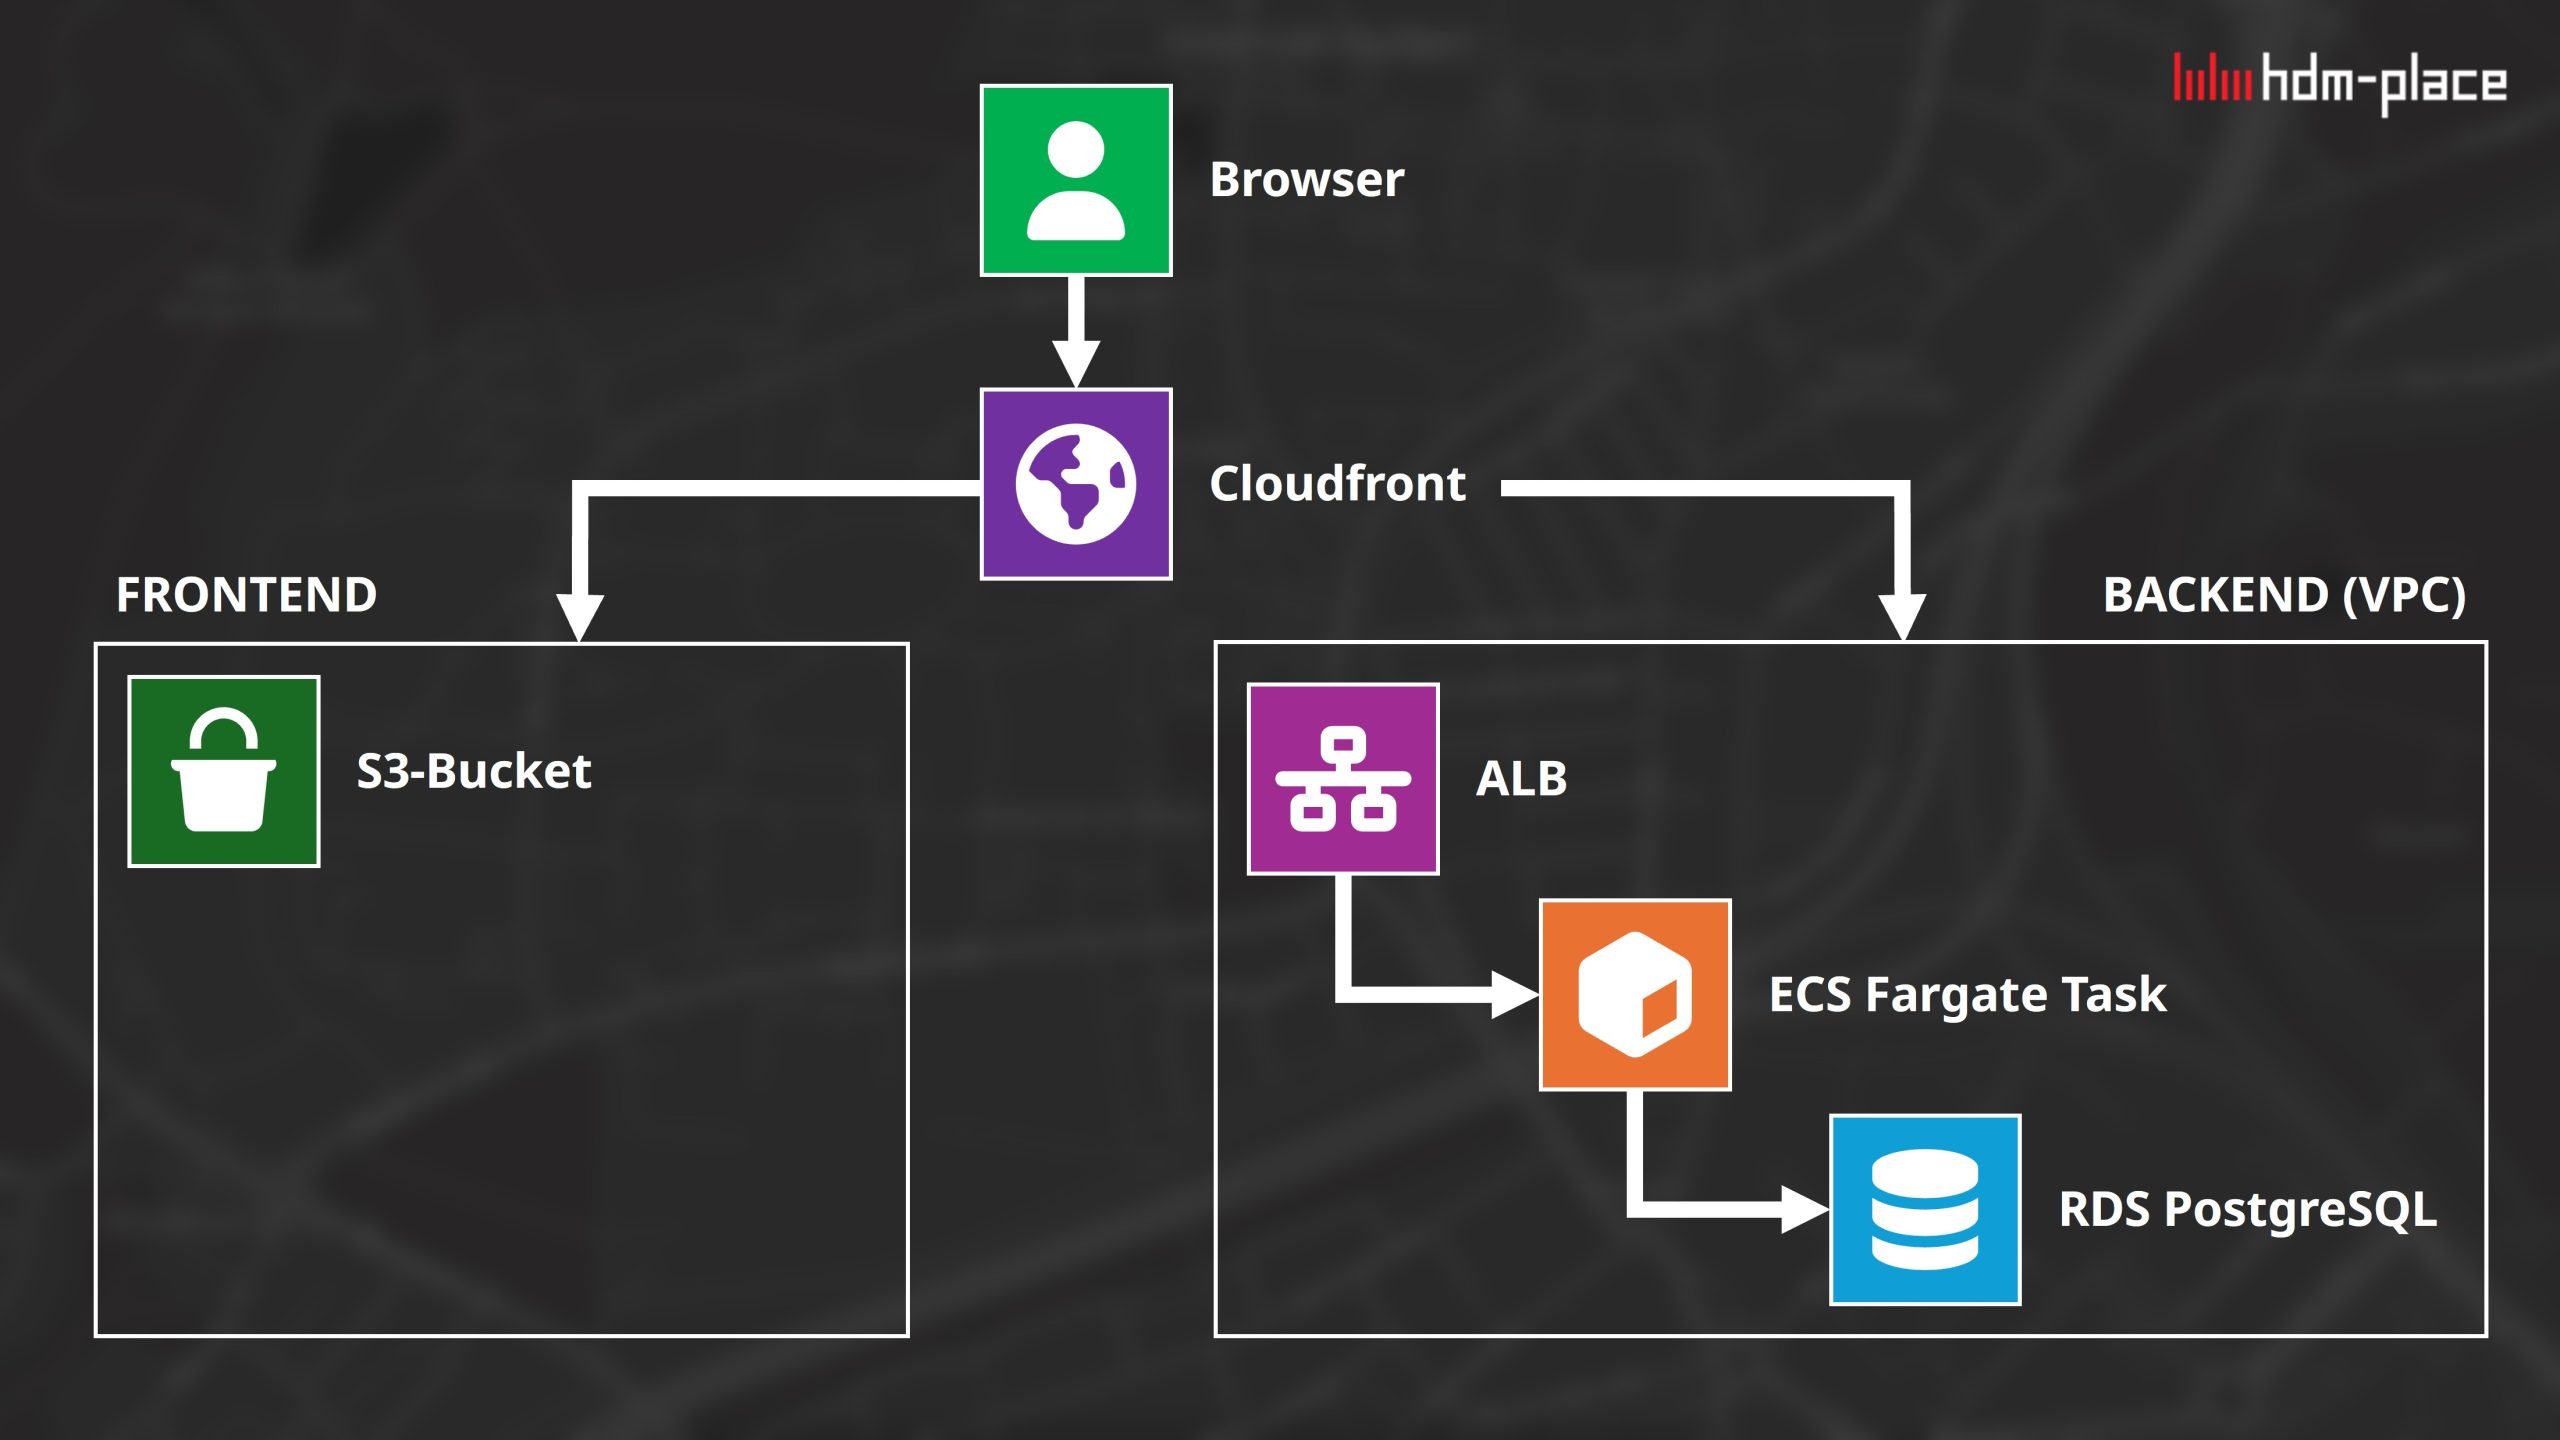
Above you can see an overview of our current infrastructure. Cloudfront serves as entry point and Content Delivery Network. Requests for static content are forwarded to a S3-bucket, which contains our frontend as built NextJS application. Other requests, which either contain /api/* or /ws in their URL, will be forwarded to our backend.
The backend runs inside a Virtual Private Cloud to separate it from public access or the other components. Incoming requests first reach an Application Load Balancer, which then forwards them to an ECS service running on AWS Fargate.
Even though the load balancer is quite expensive as component, we still used it because scalability was one of our non-functional requirements and we wanted an architecture which is easy to scale later on. Right now, it only forwards the requests to a single backend task, but additional instances can be added later to allow horizontal scaling of our application. The load balancer also works well with ECS and provides a stable endpoint for the Fargate tasks.
We chose AWS Fargate (even though it is also relatively expensive) because it allowed us to run the containerized backend without configuring and maintaining our own EC2 instances. This serverless approach made the infrastructure easier to manage, like for example when using ECS on EC2. However, this was not our initial approach (→ see section Problems & Challenges).
Our PostgreSQL database is hosted using a Relational Database Service. It is also located within the VPC and can be accessed by the backend.
Deployment with GitHub Actions
Additionally, to fully implement the functional user requirement, we also wanted to create a pipeline to automatically deploy our application. Before, this was done manually via the AWS console and quite complicated and time-consuming.
The pipeline is triggered whenever a commit with a tag containing a version number (e.g. v1.2.0) gets pushed to our repository. The pipeline will then execute our unit tests and then deploy front- and backend.
The frontend deployment is quite simple, as it only builds the NextJS application and replaces the existing contents in the S3 bucket with the new version. For the backend, the pipeline builds a new Docker image, pushes it to the ECR and starts a new ECS deployment. The database does not need to be changed, as we want to keep our pixel- and user data of the previous deployment.
Problems & Challenges
What AWS services do we need?
Before this project, nobody in our team had really worked with AWS before. We only had some knowledge with terraform and Hetzner through another lecture, but most of it was new to us. We decided on using AWS anyways, because we wanted to learn something new instead of using Hetzner again. Also, AWS offered a free tier including 200$ in free credits, which seemed more than enough for us (at first).
After creating our AWS account, however, it felt a bit overwhelming because of the wide range of services and components AWS offers. So we first tried to get an overview of what we actually need for our application, and then how to configure them in terraform.
The easiest part was probably the frontend, as this is simply placed as exported static side inside an S3-bucket, which also was easy to configure.
The more complex part was to find a way how we can host our backend including the database, as it needed to support both HTTP API requests and a persistent Websocket connection. That’s why simply placing the backend into another S3-bucket would not have worked out.
Also, because of our planned GitHub actions pipeline (which was not implemented at this point yet), we wanted to make sure the backend can be deployed easily. For that reason, we decided to package it as a Docker image.
First, we decided to host the backend on an EC2 instance, which seemed initially like the most straightforward way to us at first. We installed Docker on the instance and used it to run the backend image, while PostgreSQL was hosted separately using RDS.
As entrypoint to our application, we decided on using Cloudfront. Configuring it through Terraform was also quite challenging at first, but was in the end worth it, to easily connect the frontend and the backend under the same domain. Static requests go directly to the S3 bucket, while /api/* and /ws requests are redirected to the backend.
Before, to save costs (we only had 200$ in free credits) and because it was more convenient to deploy (before we had the pipeline), we only tested our application locally at first. This way, our application worked well locally, but however after deploying it for the first time onto the AWS infrastructure, some things did not work as expected anymore. For example, loading times (like connecting to the backend, requests to the database, etc.) took of course longer than when testing on a local machine, and also the Websocket was no longer working in a reliable way. This led to problems which we then needed to fix. So in future projects, it would be probably better, to test the application on the actual infrastructure way earlier in the process.
Migration from EC2 to ECS on Fargate
After our playback presentation, we received feedback on using ECS instead of running the backend directly on EC2. We tried this approach and it indeed simplified the infrastructure, also when we later created the GitHub Actions pipeline. However, the migration was a bit challenging, as we needed to restructure some of the other components as well.
We decided to use ECS on Fargate instead of ECS on EC2. Even though this is more expensive, it allowed us to make our whole infrastructure configuration a lot easier, as we no longer needed to configure an EC2, install Docker, and maintain the underlying server. Instead, we could directly deploy our backend image as task on the ECS.
To easily access the Fargate task on the ECS, we introduced an ALB. This also improved the scalability of our application, because it would allow us to add additional backend instances in the future. However, on the downside, this heavily increased the cost of hosting our application, as the ALB added additional 22$ of monthly cost on top of the other AWS services.
User Account System
Apart from the infrastructure related challenges, we also encountered some problems while building the front- and backend.
One difficulty was deciding on how to handle the user accounts. We wanted to keep things simple, because a whole login process including usernames, passwords and email verification could maybe prevent users, who just want to place some pixels, from trying our application. This was also a factor, we found discouraging from using wPlace, so we wanted to do it differently.
Also, introducing user accounts would have required us to heavily redesign our existing infrastructure, front and backend and would require us to introduce services like AWS Cognito, a login UI, and additional security related aspects like save transfer and storage of the passwords.
But this idea led to problems. For example, right now if two players chose the same username, our application treats them as the same player. So if one of them is on cooldown, the other cannot place a pixel either, and pixels placed by both users contribute to the same leaderboard entry.
As of right now, we have not found a perfect solution yet. This is why we decided to allow duplicate usernames in exchange for a lower barrier to try our application, but maybe we will implement another approach in the future.
We also checked on how r/place and wPlace handle the user account problem we encountered. wPlace actually has an account system, which requires to login first with your Google account before you can start placing pixels. r/place however simply uses the personal Reddit account to identify its users. If you never used Reddit before, it still would require a player to create an account first.
Mapping Pixels to Geographical Coordinates
This was a problem we encountered quite early in the process, when creating the frontend of the application. We needed a way to identify every single grid tile, which can hold a potential pixel.
Every tile needs a unique and stable position, but we could not simply use longitude and latitude as x and y coordinates, because the earth curved, but our pixel grid however is flat. Using these coordinates directly would have led to our grid not existing of squares of same sizes, but of many shapes of different sizes.
A solution for this was to use the Mercator projection. This projection stretches the world vertically, so that the x-axis stays linear (similar to the longitude), but the y-axis is stretched increasingly toward the North and South Poles. This means, on a flat map like we have in our application, the earth can be separated into consistent squares of same sizes.
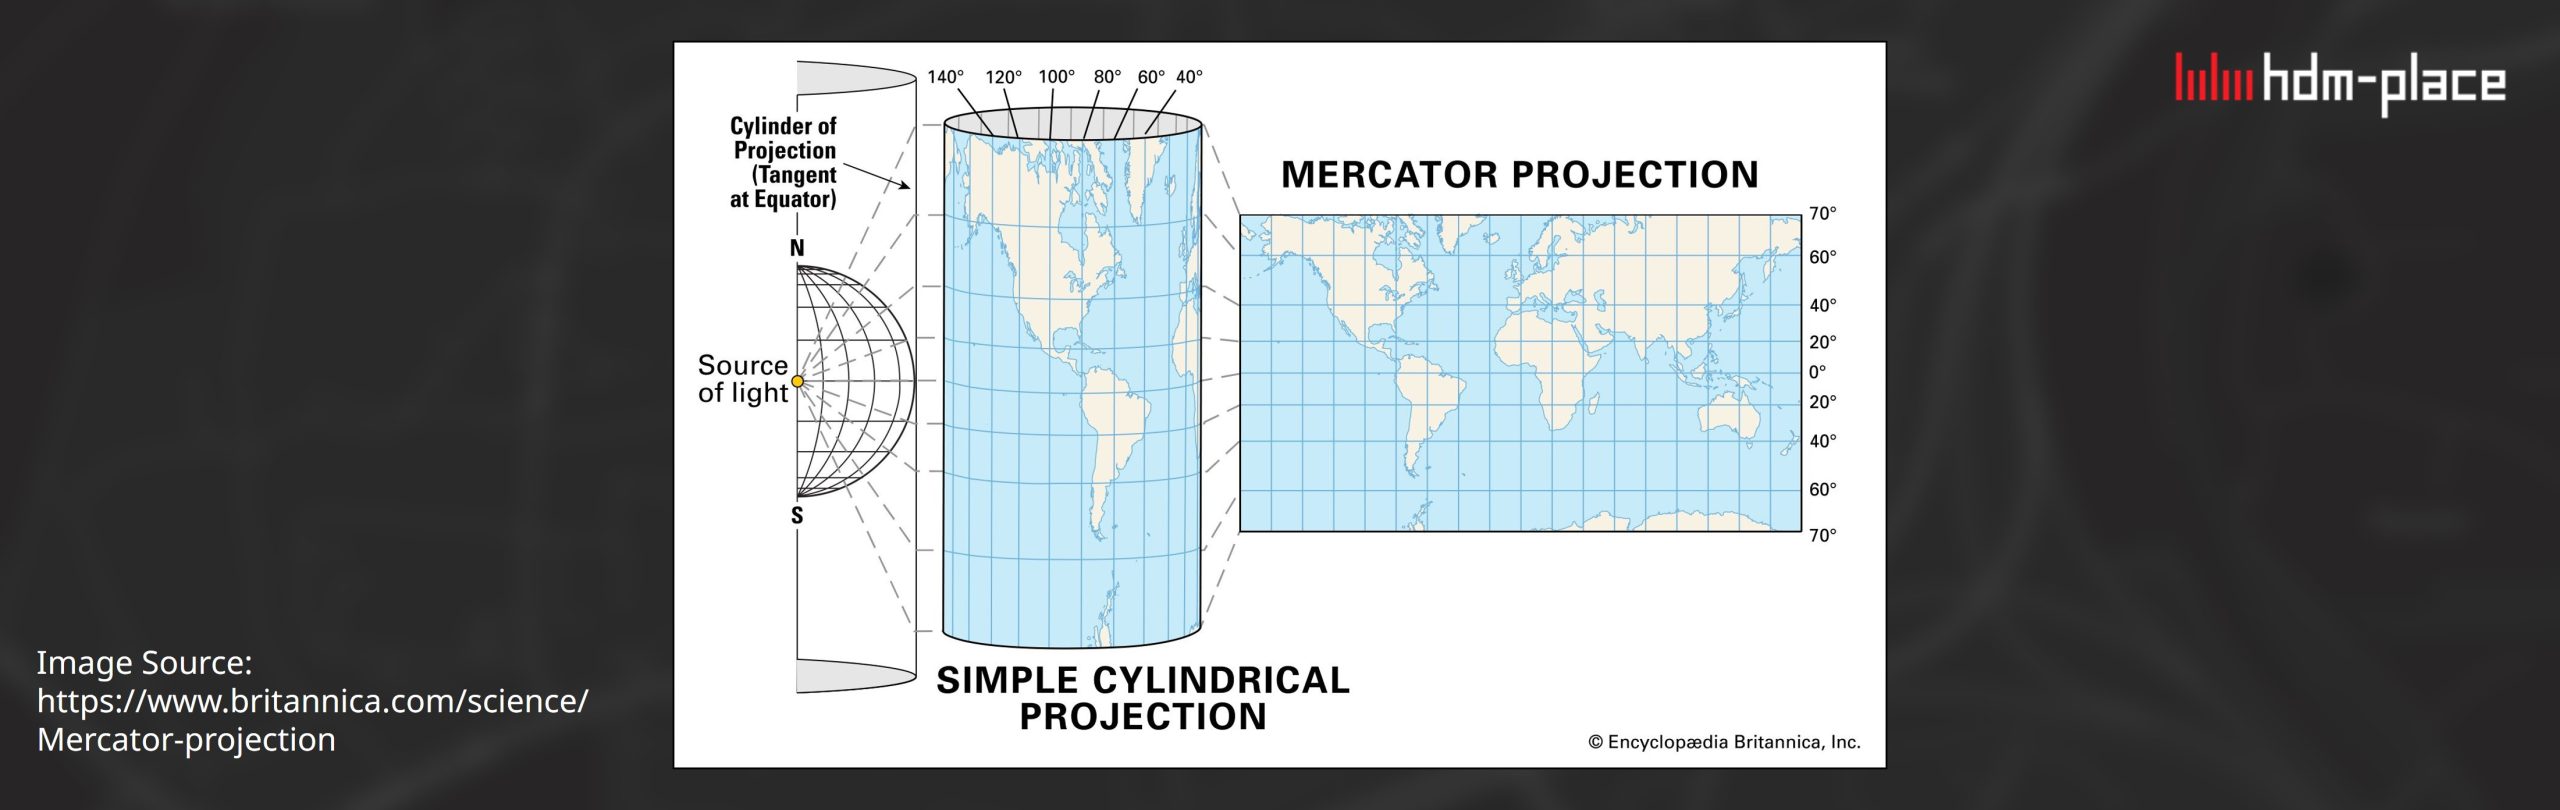
Luckily, we didn’t need to calculate this projection ourselves, as the mapbox has a built in methods, to project any longitude / latitude coordinate on the earth to its own Mercator x- /y-coordinate.
So we could just use these projected coordinates and scale them according to the grid-cell size. As a result, every tile has its own distinct coordinates and remains attached to the same location on the map.
Loading Pixels in Chunks
Another performance related challenge was how to load all placed pixels in an efficient way when loading the page. We wanted to create a scalable application, which would potentially work with the whole earth and not just with the university campus. Loading all pixels for a limited area like the campus at once would be acceptable. But loading all millions or billions of pixels for the whole world map at once, would probably break something.
This is why we both made some changes in front- and backend. In the backend, we introduced a new API-endpoint, which can be used to fetch pixels for specific pixel areas. Previously, the API could retrieve only individual pixels, now it also can return arrays with multiple pixels within the given area.
The frontend uses this endpoint to implement chunk loading. When loading the page, it no longer simply fetches all pixels in the database. Instead, it only loads the chunks that are currently visible on the screen. A single chunk has a size of 256×256 pixels, but this can be changed if wanted. When the user moves the map and an unloaded area becomes visible, the corresponding chunk is requested from the backend.
One possible further improvement, which we might look into in the future, could be to also unload existing chunks after a while. At the moment, once a chunk has been loaded, its pixels remain cached for the rest of the session. If a user loads a lot of chunks, this cache might get really large. We did not encounter problems with this during development, but it would be worth addressing in a larger deployment.
Conclusion
Through this lecture and project, we learned what is required to actually deploy an application and make it publicly accessible and what is required in the background as infrastructure to keep everything running. But also, how to make it more scalable, if more user end up using the application.
It was fun for us to build a project from the ground up (even though the idea was not completely new) and to actually see it work across different devices.
We haven’t worked much with AWS before this project, so it was interesting to see what wide range of services AWS offers, to try some of them out and to maybe even end up including them in our application in the end.
However there also have been some challenges on the way, but through them we also learned some new aspects which could be useful for future projects such as deploying to the actual infrastructure earlier in the process instead of relying on local testing.
One surprising factor for us was the cost of the components of our infrastructure. We initially expected a somewhat traditional application like ours, consisting of frontend, backend and a database would be quite cheap to host. But in the end, it turns out that all components together, and especially the ALB, are quite expensive.
That’s why we probably won’t release HdM-place to the public permanently, even though it would have been fun to see if some people would have actually tried it out and what artworks they create with it over a longer period of time.
There are still several opportunities for improvement, for example to find a good way to handle the user accounts, to further optimize the frontend caching or to reduce the hosting costs. For example, ECS on EC2 might be less expensive than Fargate, and the load balancer could potentially be removed while we only have one backend instance running. However, each of these changes would introduce its own disadvantages, such as additional configuration and more effort configuring them.
If you want to try our application locally or look into the source code, we leave a link to the GitHub repository below. Additionally, we will deploy the project and make it publicly available, but only until our free tier AWS budget runs out 😊.

GitHub repository: https://github.com/anton-fischer/hdm-place
HdM-Place (for a limited time): https://dy39sjbur4srd.cloudfront.net/
This project was made by Erik Bondel, Anton Fischer and Adrian Einsele as part of the lecture Software Development for Cloud Computing in the SoSe 2026.
Leave a Reply
You must be logged in to post a comment.