Written by: Immanuel Haag, Christian Müller, Marc Rüttler
Several steps are necessary to transfer the Radcup backend to the cloud and make it accessible to everyone from the outside. These are explained in more detail in the following sections.
Step 1: External MongoDB
We have decided to use an external service from https://www.mongodb.com/cloud/atlas for the MongoDB hosting. One of the reasons for this was that there is a cluster with a 3 node-replicaset based on AWS and can be used free of charge. This ensures easy to use high availability. It is also easier to start with an existing service, which you can replace later with your own service. MongoDB Cloud Atlas also offers advanced security features like IP-whitelisting. Metrics about the cluster can be easily viewed in the web interface. At this point it should be noted that you should always remember to enter the corresponding IP addresses in advance in the web interface, otherwise you will not be able to access the database. Below you can see some figures of our MongoDB Cluster administration page.


Step 2: IBM Cloud
Container Registry
A container registry serves as a central repository for docker images to make them accessible from anywhere. It also checks for security vulnerabilities and performs versioning. Since our goal is to deploy the backend image in a cluster, we have to store it in an appropriate registry. Our choice was the IBMCloud Container Registry.
In order to use the Container Registry of the IBMCloud, several requirements have to be fulfilled:
- The
IBMCloud CLIhas been installed. - The
Docker CLIhas been installed. - The IBMCloud Container-Registry Plug-In was installed via the command line through
ibmcloud plugin install container-registry -r Bluemix.
Once the tools have been installed or the prerequisites have been met, the setup of the container registry can be started. The following steps are necessary for this:
- Log in to your IBMCloud account:
ibmcloud login -a https://api.eu-de.bluemix.net- Choose a name for the namespace, and create that namespace:
ibmcloud cr namespace-add <my_namespace>

#e.g. <my_namespace> will be replaced by 'system_engineering_radcup'
Overview of the existing namespaces:

After the namespace has been created, images can be pushed into it:
- Log your local Docker daemon into the IBM Cloud Container Registry:
ibmcloud cr login
- Choose a repository and tag by which you can identify the image:
docker tag <image_name> registry.eu-de.bluemix.net/<my_namespace>/<my_repository>:<my_tag>

# e.g. <image_name> -> radcup_backend, <my_namespace> -> system_engineering_radcup,
# <my_repository> -> radcup_backend and <my_tag> -> 1- Push the image:
docker push registry.eu-de.bluemix.net/<my_namespace>/<my_repository>:<my_tag>

# e.g. <my_namespace> -> system_engineering_radcup,
# <my_repository> -> radcup_backend and <my_tag> -> 1- Verify that your image is in your private registry:
ibmcloud cr image-list

REPOSITORY                                                                TAG                   DIGEST         NAMENSBEREICH               ERSTELLT       GRÖSSE   Sicherheitsstatus
registry.eu-de.bluemix.net/system_engineering_radcup/radcup_backend   1.1.1-build.xxxxxxx   330xxxxxcb61   system_engineering_radcup   4 days ago     288 MB   0 Probleme
Container/Kubernetes Service
Objective: Deploy the docker image stored in the Container Registry in a cluster and make it publicly available.
In order to achieve this goal, we decided to use the IBMCloud Container Service. It is based on native Kubernetes and offers the user not only the possibility to deploy images, but also to track their status via a web interface.

In order to deploy images, a cluster must first be created. There are two ways to do this:
- The IBMCloud web interface
- In the catalog, select the IBM Cloud Kubernetes Service option
- Select a region where your cluster will be deployed
- Select the free cluster plan
- Give your cluster a name
- Click Set Up Cluster
- The IBMCLoud CLI
If the cluster is to be created by using the CLI, the following steps are necessary:
- Log in to your IBMCloud account:
ibmcloud login -a https://api.eu-de.bluemix.net- Install the IBMCloud Container Service Plug-In:
ibmcloud plugin install container-service -r Bluemix
- Create the cluster (this takes several minutes):
ibmcloud ks cluster-create --zone <my_zone> --name <my_cluster>
# e.g. <my_zone> -> mil01,
# <my_cluster> -> radcup- Check whether the cluster was created successfully:
ibmcloud ks clusters

Name     ID                                 Status   Erstellt     Worker   Position   Version        Ressourcengruppenname
radcup   axxxxxxxxxxxxxxxxxxxxxxxxxxxxxxxx   normal   6 days ago   1        mil01      1.10.11_1536   Default
Once the cluster has been created, you can continue with the deployment of the images.
Finding:
In order to deploy the image, an image PullSecret must be created for the container registry. If this is not available and a deployment takes place, an error will appear in the web interface of the cluster because the cluster lacks the authorization to pull the needed image.
- Create the token:
ibmcloud cr token-add --description "radcup" --non-expiring --readwrite- Check whether the token was created:
ibmcloud cr token-list

TOKEN-ID                               SCHREIBGESCHÜTZT   ABLAUF   BESCHREIBUNG
c192f4ad-xxxx-5208-98e4-xxxxxxxxxxxx   true               0        radcup
- Get the value for your token:
ibmcloud cr token-get <token-id>

# e.g. <token-id> -> c192f4ad-xxxx-5208-98e4-xxxxxxxxxxxx

Registry-Token mit eindeutiger Kennung 'c192f4ad-xxxx-5208-98e4-xxxxxxxxxxxx' wird abgerufen...

Token-ID   c192f4ad-xxxx-5208-98e4-xxxxxxxxxxxx
Token      value of the token
- Create the secret Kubernetes key to store your token information:
kubectl --namespace <kubernetes-namespace> create secret docker-registry <name_of_the_secret_key>  --docker-server=<registry-url> --docker-username=token --docker-password=<token_value> --docker-email=<docker-e-mail>

# e.g <kubernetes-namespace> -> default,
# <name_of_the_secret_key> -> radcup,
# <registry-url> -> registry.eu-de.bluemix.net,
# <token_value> -> value of the token (see above),
# <docker-e-mail> -> a@b.c- Check that the secret key was successfully created:
kubectl get secrets --namespace <kubernetes-namespace>

# e.g. <kubernetes-namespace> -> default
# Attention: For this to work, you must first 'log in' to the cluster. Otherwise you will get an error.

NAME                                   TYPE                                     DATA   AGE
radcup-hdm                        kubernetes.io/dockerconfigjson        1      13d
Two yaml files were defined in order to deploy the image stored in the container registry in the cluster and to make it accessible from outside:
web-controller.yaml
- Notice:
- We create a ReplicationController called web-controller, and we tell it to create two replicas of the template section (Pod configuration). The pod itself points to the container registry to load our image from there (please also see the imagePullSecrets section).
- Notice:
# web-controller.yaml
apiVersion: v1
kind: ReplicationController
metadata:
  labels:
    name: web
  name: web-controller-version-radcup
spec:
  replicas: 2
  selector:
    app: radcup-backend
    version: version-radcup
  template:
    metadata:
      labels:
        name: web
        app: radcup-backend
        version: version-radcup
    spec:
      containers:
      - image: registry.eu-de.bluemix.net/system_engineering_radcup/radcup_backend:version-radcup
        name: web
        command: ["bash", "-c"]
        args: ["npm run testfromclusterandrun"]
        env:
        - name: NODE_ENV
          value: "testDBatlas"
        ports:
        - containerPort: 3000
          name: http-server
      imagePullSecrets:
      - name: radcup-hdm
      restartPolicy: Always
Adjustments in the course of the project:
labels: are key-value pairs which are attached to pods, replication controller and services. They are used as identifying attributes for objects such as pods and replication controller.command and args: starts the server in the container. Without these two lines, the Pod started, but then crashed immediately.version: Uniquely identifies the deployment. Required to be able to perform a rolling update.
In addition, the name of the replication controller has been extended so that it can be adapted more easily before a rolling update (keyword: uniqueness).
web-service.yaml
- Notice:
- We expose the service on port 80 internally within the cluster. That is, the service becomes visible on this port, and will send requests made to this port to the pods selected by the service. The TargetPort 3000 is the port on the pod that the requests gets sent to in this case.
- Notice:
# web-service.yaml
apiVersion: v1
kind: Service
metadata:
  name: web
  labels:
    name: web
spec:
  type: NodePort
  ports:
    - port: 80
      targetPort: 3000
      protocol: TCP
  selector:
    name: web
Adjustments in the course of the project:
selector: Used to select a set of objects. Without the selector, there was no connection between the controller and the service (so no access was possible). Therefore, it had to be added with the appropriate key.
Now the ReplicationController and the service can be created. Several steps are also necessary for this:
- Log in to your IBM Cloud account:
ibmcloud login -a https://api.eu-de.bluemix.net- Target the IBM Cloud Container Service region in which you want to work:
ibmcloud cs region-set eu-central
- Get the command to set the environment variable and download the Kubernetes configuration files:
ibmcloud cs cluster-config <my_cluster>
# e.g. <my_cluster> -> radcup- Set the KUBECONFIG environment variable. Copy the output from the previous command and paste it in your terminal:
# The command output should look similar to the following command
export KUBECONFIG=/Users/$USER/.bluemix/plugins/container-service/clusters/<my_cluster>/kube-config-<my_zone>-radcup.yml
# e.g. <my_cluster> -> radcup,
# <my_zone> -> mil01- Verify that you can connect to your cluster by listing your worker nodes:
kubectl get nodes

NAME             STATUS   ROLES    AGE   VERSION
10.144.xxx.xxx   Ready    <none>   6d    v1.10.11+IKS
The ReplicationController and the service can be created as follows:
kubectl create -f web-controller.yaml

kubectl create -f web-service.yaml
After executing the commands, the image is deployed and retrievable.
Finding:
Since the public IP address of the cluster and the port under which the service can be accessed are not directly known, the backend could not be accessed directly. Therefore, these had to be found out accordingly.
Cluster-IP:
ibmcloud ks workers <cluster_name>

# e.g. <cluster_name> -> radcup

ID                                                 Öffentliche IP    Private IP       Maschinentyp   Status   Status   Zone    Version
kube-mil01-xxxxxxxxxxxxxxxxxxxxxxxxxxxxxxxxxxxxxx   159.122.181.248   10.xxx.xxx.xxx   free           normal   Ready    mil01   1.10.11_1537
Service-Port:
kubectl describe service <service_name>

# e.g. <service_name> -> web

Name:                     web
Namespace:          default
Labels:                    name=web
...
Selector:                 name=web
Type:                       NodePort
...
Port:                         <unset>  80/TCP
TargetPort:             3000/TCP
NodePort:               <unset>  30304/TCP
...
Accordingly, the radcup backend would be accessible under http://159.122.181.248:30304/api, for example.
Kubernetes Load Balancing
Problem: If the utilization of a Pod is too high, not all requests arrive and the availability of the backend will decrease.
One possible solution is the Horizontal Pod Autoscaler (HPA) from Kubernetes.The HPA automatically scales the number of pods in a replication controller, deployment or replica set based on observed CPU usage or other metrics.
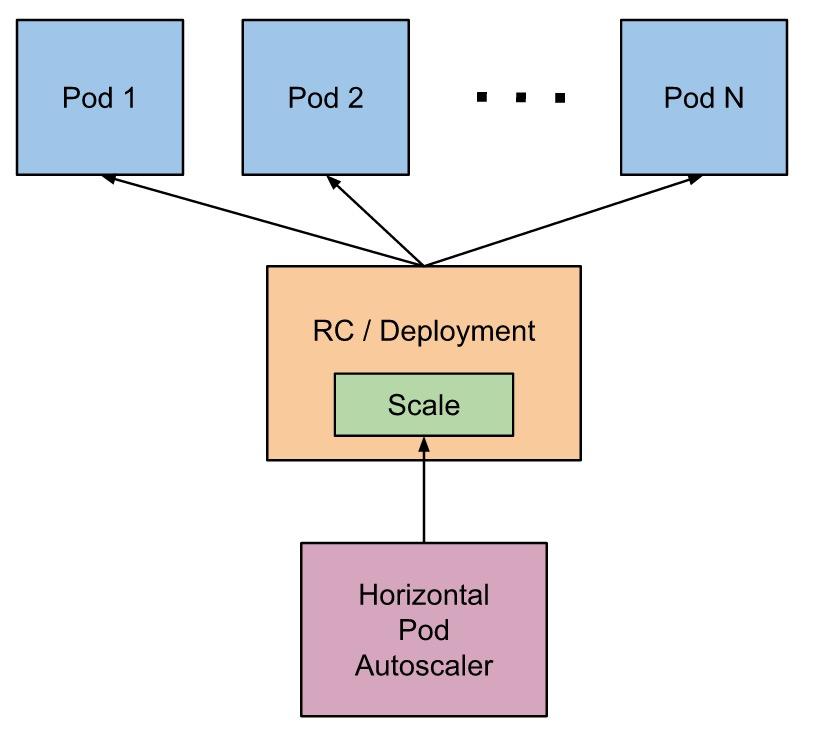
Requirements for the HPA to work:
- In the cluster heapster with an Influxdb and Grafana was applied.
- Extension of the web-controller.yaml by the following lines (In the Pod configuration area):
...
        resources:
          requests:
            cpu: 100m
...
We did not take these prerequisites into account at the outset, which meant that the HPA was active but did not scale even at high capacity utilization. Especially the extension of the web-controller.yaml was not directly visible. Only after some research it became clear that we need to set "cpu" as a resource request on the container.
Finding:
If HPA is activated, it needs the field request.cpu to be able to calculate the current load based on it and consequently boot new pods or shutdown existing ones.
This is not done automatically when creating an hpa object nor does Kubernetes warns you about it.This point was quite frustrating, as the solution is quite simple. If the prerequisites are fulfilled, the HPA can be activated either by yaml file or CLI:
- hpa_rc.yaml
apiVersion: autoscaling/v1
kind: HorizontalPodAutoscaler
metadata:
  name: web-scale
spec:
  scaleTargetRef:
    kind: ReplicationController
    name: web-controller
  minReplicas: 2
  maxReplicas: 10
  targetCPUUtilizationPercentage: 25
- Via CLI
kubectl autoscale rc <name_of_controller> --cpu-percent=25 --min=2 --max=10

# e.g. <name_of_controller> -> web-controller
Result: If the HPA detects a load of 25%, further instances are started up and as soon as this load drops again, they are shutdown again. This was checked with curl loops and the Gatling tool, among other things.
The following pictures provide an overview of the cluster with one ReplicationController without HPA and one with activated HPA:


As you can see, the load (which was generated with Gatling) was distributed to the two existing pods by the ReplicationController without HPA. In comparison, the ReplicationController with HPA booted two new Pod instances. Consequently, the correct configuration of HPA could be verified.
Leave a Reply
You must be logged in to post a comment.