This blog post shows how a plain Kubernetes cluster is automatically created and configured on three arm64 devices using an orchestration tool called Ansible. The main focus relies on Ansible; other components that set up and configure the cluster are Docker, Kubernetes, Helm, NGINX, Metrics Server and Kubernetes Dashboard. Individual steps are covered more or less; the whole procedure follows three principles:
- Keep it simple and stupid
- Don’t repeat yourself
- S.O.L.I.D.
Hardware Components
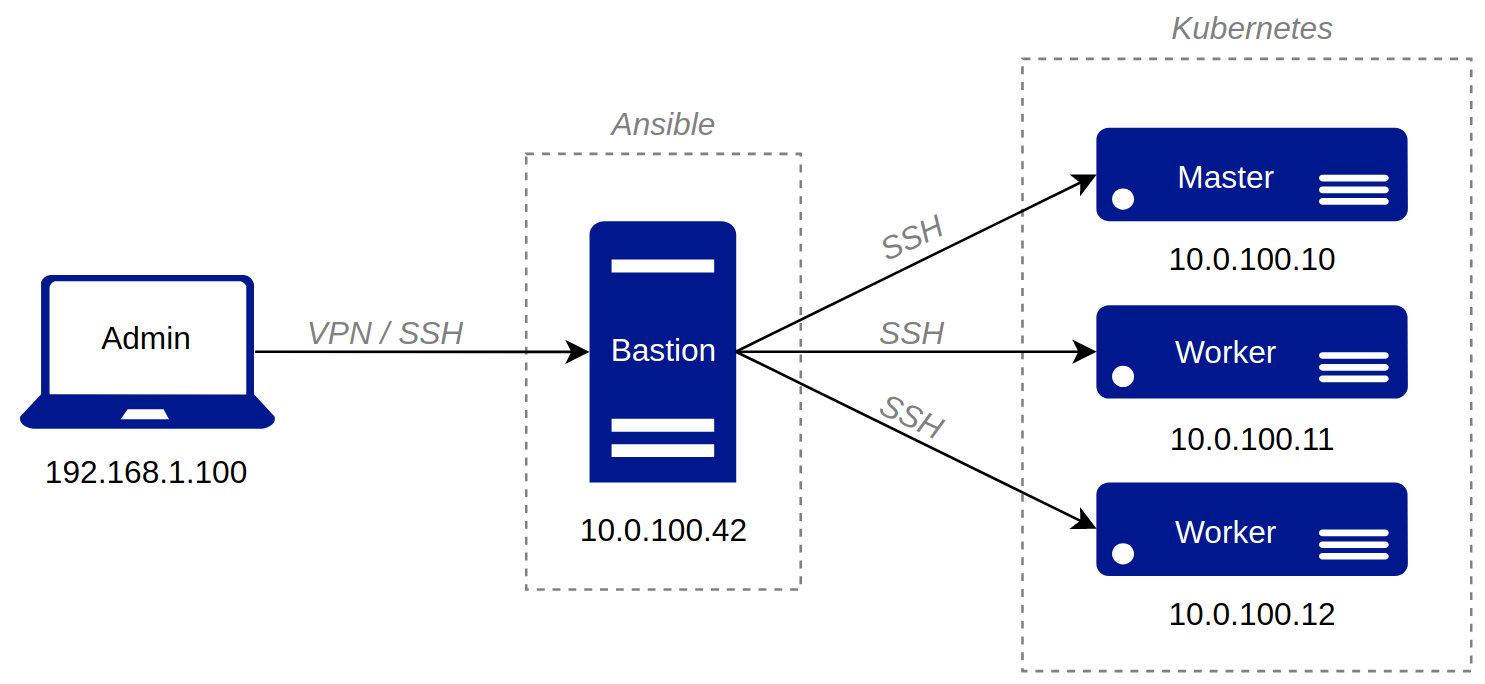
For this tutorial-oriented blog post, a Raspberry Pi 3 is used as a configuration, aka. bastion host and three NVIDIA Jetson Nano for the Kubernetes cluster. They all run around 5 Watt, which is very nice.

The Raspberry Pi 3 has the eponymous Raspberry Pi OS Lite (2021-01-11) installed.[1] Since the official NVIDIA JetPack, an Ubuntu 18.04 image for the Jetson Nano, has an extracted size of over 14 GB, which contains various unnecessary packages like the window manager or office applications that consume important resources, a custom minified Ubuntu 20.04 LTS was built from scratch.[2] Attention: make sure that the kernel modules ip_set and netfilters xt_set are loaded! If this is not possible directly via modprobe, the kernel and the corresponding modules must be rebuilt from source.[3] These modules will be needed later for the Kubernetes Pod network.
| Hardware | Arch | Memory | Name | IP |
|---|---|---|---|---|
| Raspberry Pi (bastion) | arm32 | 1 GB | uls42b | 10.0.100.42 |
| Jetson Nano (master) | aarch64 | 4 GB | uls10m | 10.0.100.10 |
| Jetson Nano (worker1) | aarch64 | 4 GB | uls11w1 | 10.0.100.11 |
| Jetson Nano (worker2) | aarch64 | 4 GB | uls12w2 | 10.0.100.12 |
Installation
After the micro SD (secure digital) cards are written with the OS (operating system) images, special hardening settings are made, at least one SSH key is created to get access to the bastion device via SSH (secure shell). An Ansible script creates and deploy the other SSH keys for the Jetsons over CLI (command line interface).
Requirements
First, the bastion host has to be configured. Therefore, the Ubuntu package python3-pip should already be included in the system. Python’s pip is needed to easily install the latest stable Ansible version from the PyPi package repository, as the official Raspberry Pi OS repositories are very outdated. The corresponding requirements file contains the following two lines to specify a specific version of Ansible and a linter, which are then executed and installed with the pip3 install --user --requirement requirements.txt command:[4]
ansible==2.10.6
ansible-lint==5.0.2
Ansible
ansible            	ansible-doc         	ansible-playbook
ansible-config      	ansible-galaxy      	ansible-pull
ansible-connection  	ansible-inventory   	ansible-test
ansible-console     	ansible-lint        	ansible-vault
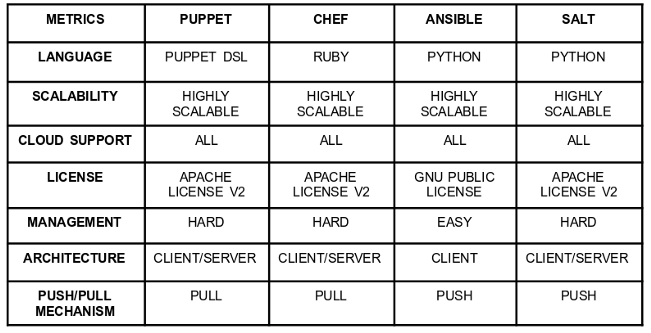
Yeah, the first step is done; Ansible is up and running on the Raspberry Pi. But what is Ansible about, and what can I do with it? Ansible at the top is a project from RedHat. With Ansible, it is possible to provide repeatable playbooks to automate infrastructure, applications, networks, or even containers on multiple machines. The main benefit of Ansible is the push delivery mechanism, besides tools like Puppet, Chef or SaltStack. It is no longer needed to install the provisioning software and the agent, on the remote hosts. Only simple CLI based administration applications around Ansible are installed on Bastion or on your local machine, which connects to the cluster via SSH. The decentralized approach used by Ansible reduces maintenance efforts and costs. Ansible sets those remote hosts in an inventory list; a project specific configuration file can be created, and the specific roles perform through playbooks. A Role is subdivided into tasks, handlers, environments, templates, or also tests. Readymade roles could be found in a Hub called Ansible Galaxy[5].
Environment
It’s exhausting to do authentication in a remote login shell every time manually, so automate this by adjusting and configuring some settings. Of course, it is possible to set up the local SSH agent to avoid retyping the SSH keys secret: ssh-agent bash && ssh-add ~/.ssh/id_rsa. But for specific use cases, this could lead to problems; that’s why we use here Ansible for key management. For this, the global configuration file /etc/ansible/ansible.cfg, or a project-specific file ansible.cfg is created in the project’s working directory (for most of us, a Git repository). This file contains default parameters to clarify the pipelining with the connection to the inventory cluster. In this example, the content of the file looks like this: [6]
[defaults]
...
inventory = inventory_uls
roles_path = roles
vault_identity_list = default@~/.ssh/.vault_pass_uls
remote_port = 42424
display_skipped_hosts = False
stdout_callback = skippy
log_path = logs/ansible.log
...
[privilege_escalation]
become = True
become_method = sudo
become_user = root
...
[inventory]
unparsed_is_failed = True
...
[ssh_connection]
timeout = 23
pipelining = True
ssh_args = -o ControlMaster=auto -o ControlPersist=230s
...
Besides the default settings for the Ansible CLI, infrastructure Details need to be configured in inventory files. The variable inventory defines the path to the hosts and groups and related variables containing encrypted files such as SSH access. Sensitive data should not be stored in clear text; for this, Ansible provides the tool ansible-vault. With this tool, you can crypt, view, or edit the credentials or other files.[7] Following file should be kept private! The variable vault_identity_list = default@~/.ssh/.vault_pass_uls contains the global password to decrypt secrets via ansible-vault. Ansible can set other interesting global variables in the privilege_escalation section, where we can see that the commands are executed as superuser.
Hosts
For now, the common login concept is settled up, but where are the machines we want to connect to. Basically, they are stored in the inventory list, called hosts. The group and hostnames should be different; otherwise, Ansible would not differentiate it. The inventory list of the servers looks like this: [8]
[master]
uls10m

[worker]
uls11w1
uls12w2

[cluster:children]
master
worker
As you can see, the upcoming Kubernetes cluster consists of three nodes which are divided into a master node and two worker nodes. Below that, you can see yet another grouping of all or various possibilities. Mapping to the specific IP ansible_host: 10.0.100.10 is defined in a separate file host_vars/uls10m. To check these hosts, Ansible offers another tool to list the available machines ansible-inventory --list -y:
all:
  children:
    cluster:
      children:
        master:
          hosts:
            uls10m:
              ansible_host: 10.0.100.10
              ansible_python_interpreter: /usr/bin/python3
              ansible_ssh_private_key_file: /home/config/.ssh/id_ed25519
              ansible_ssh_user: jetson
              ansible_sudo_pass: nano
        worker:
          hosts:
            uls11w1:
              ansible_host: 10.0.100.11
              ansible_python_interpreter: /usr/bin/python3
              ansible_ssh_private_key_file: /home/config/.ssh/id_ed25519
              ansible_ssh_user: jetson
              ansible_sudo_pass: nano
            uls12w2:
              ansible_host: 10.0.100.12
              ansible_python_interpreter: /usr/bin/python3
              ansible_ssh_private_key_file: /home/config/.ssh/id_ed25519
              ansible_ssh_user: jetson
              ansible_sudo_pass: nano
    ungrouped: {}
OMG, did you see my SSH user and the password 😉 At this point, I would like to mark that the use of Ansible Vault is quite useful. But be careful, “Encryption with Ansible Vault ONLY protects ‘data at rest’. Once the content is decrypted (‘data in use’), play and plugin authors are responsible for avoiding any secret disclosure”.[9] However, security concepts are not discussed in this post. To check the communication via Ansible just for the worker, the command ansible worker -m ping -u jetson can be used:
uls11w1 | SUCCESS => {
    "changed": false,
    "ping": "pong"
}
uls12w2 | SUCCESS => {
    "changed": false,
    "ping": "pong"
}
What is common for Ansible, are return values like the changed, failed or stdout attribute in the output console; this shows if a command has already been executed.[10] Now that the communication between Ansible and the server is working, we can start with specific playbook roles.
Roles & Playbook
“Roles are units of organization in Ansible. Assigning a role to a group of hosts (or a set of groups, or host patterns, and so on) implies that they should implement a specific behavior. A role may include applying certain variable values, certain tasks, and certain handlers – or just one or more of these things. Because of the file structure associated with a role, roles become redistributable units that allow you to share behavior among playbooks – or even with other users.”[11] What has already been mentioned is that roles have a specific structure. Ansible can easily initialize this structure with the following command: ansibile-galaxy init kubernetes.
../roles/kubernetes/
├── defaults
│   └── main.yml
├── handlers
│   └── main.yml
├── meta
│   └── main.yml
├── README.md
├── tasks<span style="color: silver">
│   ├── config-helm.yml
│   ├── config-kubernetes-dashboard.yml
│   ├── config-master-create-token.yml
│   ├── config-master.yml
│   ├── config-metrics-server.yml
│   ├── config-nginx.yml
│   ├── config-worker.yml
│   ├── install.yml</span>
│   ├── main.yml<span style="color: silver">
│   └── uninstall.yml</span>
├── templates<span style="color: silver">
│   ├── kubernetes-dashboard-service-nodeport.yml.j2
│   ├── kubernetes-dashboard.yml.j2
│   ├── metrics-server.yml.j2
│   ├── nginx_values.yml.j2</span>
├── tests
│   ├── inventory
│   └── test.yml
└── vars
    └── main.yml
- default – contain variables for the role with the lowest priority; higher variables can overwrite them without problems
- handlers – handle inside or outside the role when, for example, a service needs to be restarted
- meta – just basic meta data
- tasks – the main tasks of the role are defined here. As we can see in the tree structure above, there are already a few additional tasks added besides
`main.yml` - templates – are also available to distribute predefined files from local to remotes
- tests – are necessary to check with Ansible Molecule if this role works properly
- vars – are also variables but used for storing information like connection strings, which can be encrypted also [12]
There’s no magic; with the init command, all files are empty 😉 Let’s fill them with some tasks. For this purpose, Ansible uses Yet Another Modeling Language (YAML) Syntax to describe; the task/main.yml is mainly used to install or uninstall Kubernetes:
---
# role handling for special inventory
- fail:
    msg: "Please provide role_action=[install|uninstall|config-master|config-worker|config-nginx|config-metrics-server|config-kubernetes-dashboard]"
  when: role_action is not defined

# tasks file to install kubernetes
- include: install.yml
  when: role_action == 'install'

# tasks to configure master
- include: config-master.yml
  when: role_action in ['install', 'config-master'] and ansible_hostname in groups['master']

# tasks to add/configure worker
- include: config-worker.yml
  when: role_action in ['install', 'config-worker'] and ansible_hostname in groups['worker']

- include: config-nginx.yml
  when: role_action in ['install', 'config-master', 'config-nginx'] and ansible_hostname in groups['master']

# tasks to add/configure metrics incl dashboard
- include: config-metrics-server.yml
  when: role_action in ['install', 'config-master', 'config-metrics-server'] and ansible_hostname in groups['master']

- include: config-kubernetes-dashboard.yml
  when: role_action in ['install', 'config-master', 'config-kubernetes-dashboard'] and ansible_hostname in groups['master']

# uninstall
- include: uninstall.yml
  when: role_action == 'uninstall'
The configuration goes along with the installation process, but could be also triggered by using the role_action config option. The conditional is used to reduce the number of roles, to differ between master and worker, to keep the file structure simple and clean, and to keep the option to execute individual configuration files anyway. [13]
What Kubernetes is and what it does is not covered here. Click here, to get more information about Kubernetes. Furthermore, to focus more on Ansible, individual scripts such as Docker installation are shortened or partially omitted. To install Kubernetes via Ansible on the cluster, we first create a new file called task/install.yml with the following procedure:
---
- name: get system architecture
  shell: dpkg --print-architecture
  register: sys_architecture

- name: check if Kubernetes already exist
  stat:
    path: /usr/bin/kubeadm
  register: package_exist

- name: remove swapfile from /etc/fstab
  mount:
    name: "{{ item }}"
    fstype: swap
    state: absent
  with_items:
    - swap
    - none

- name: disable swap
  command: swapoff -a
  when: ansible_swaptotal_mb > 0

- name: set kernelmodule for bridge interface
  command: "{{ item }}"
  with_items:
    - modprobe bridge
    - modprobe br_netfilter
  when: not package_exist.stat.exists

- name: add kernelparameter for bridge interface
  sysctl:
    name: "{{ item.name }}"
    value: "{{ item.value }}"
    state: present
  with_items:
    - { name: 'vm.swappiness', value: '0' }
    - { name: 'net.bridge.bridge-nf-call-iptables', value: '1' }
  when: not package_exist.stat.exists

- name: add apt Kubernetes signing key for Ubuntu
  apt_key:
    url: https://packages.cloud.google.com/apt/doc/apt-key.gpg
    state: present
  when: not package_exist.stat.exists

- name: add Kubernetes repository
  apt_repository:
    repo: deb [arch={{ sys_architecture.stdout }}] https://packages.cloud.google.com/apt kubernetes-xenial main
    state: present
    filename: kubernetes
  when: not package_exist.stat.exists

- name: install Kubernetes binaries
  apt:
    name: "{{ packages }}"
    state: present
    update_cache: yes
  vars:
    packages:
      - kubelet
      - kubeadm
      - kubectl
  when: not package_exist.stat.exists
...
Ansible has its own modules[14] ranging from packaging over network configurations to third party hooks. First of all, it’s important to know what kind of system architecture is used to install Kubernetes. To avoid a reinstallation, a query will check if Kubernetes is already installed. After that, some tasks are defined that are necessary for Kubernetes, e.g., disable the paging memory (swap). After the pre-required tasks, more tasks like adding the repository, install Kubernetes and restart the service daemon is defined. Ansible uses YAML, and YAML uses the mustache syntax {{ var }} for the data binding, so the variables in the curly braces are placeholders. [15]
Alrighty, just a few lines to install Kubernetes on multiple Ubuntu instances. It’s also possible to refactor this to support different Linux derivatives. The other file, task/uninstall.yml, works vice versa. An excerpt to uninstall Kubernetes could look like this:
...
- name: force reset kubernetes cluster
  command: "kubeadm reset -f"
...
- name: remove Kubernetes binaries
  apt:
    name: "{{ packages }}"
    state: absent
    update_cache: yes
  vars:
    packages:
      - kubelet
      - kubeadm
      - kubectl
  when: not package_exist.stat.exists
...
In the first block, we see that the kubeadm command is executed. This causes the services to be stopped gracefully and further that symlinks, directories and config files are removed. The second block finally removes with state: absent all packages related to the APT (Advanced Package Tool) repository.
Now the time has come to create the playbook. What has already been mentioned is that playbooks are given different roles. Playbooks, therefore, describe the course of a process for a specific area of the inventory. “A playbook is a list of plays. A play is minimally a mapping between a set of hosts selected by a host specifier (usually chosen by groups but sometimes by hostname globs) and the tasks which run on those hosts to define the role that those systems will perform. There can be one or many plays in a playbook.”[16] In this guide there’s a playbook with two roles:
- hosts: cluster
  roles:
  - docker
  tags:
  - docker

- hosts: cluster
  roles:
  - kubernetes
  tags:
  - kubernetes
After installing the roles for Docker and Kubernetes, the following tools are available on the inventory devices.
- docker – the runC and containerd runtime[17]
- kubeadm – initialize and join components[18]
- kubelet – a node agent to manage pods[19]
- kubectl – configure and control cluster[20]
Configuration
Okidoki, the required toolset, is now available. The next step is to configure the master node as the Kubernetes control plane and join the worker nodes to it. The scaling of nodes, such as the control plane, is a different issue, as there are other requirements to be considered for the infrastructure used here.
Master
We start with the latest version at this point (v.3.5.2) of the Helm installation on the master, set up the Kubernetes directory, install Calico, a pod networking plugin, and create a token to connect the worker to the master. So, the configuration file tasks/config-master.yml looks like this:
---
- name: include config file to install Helm on master
  include_tasks: config-helm.yml

- name: initialize the Kubernetes cluster using kubeadm
  command: kubeadm init --apiserver-advertise-address={{ kube_api_addr }} --pod-network-cidr={{ kube_pod_cidr }} --token "{{ kube_token }}" --token-ttl "{{ kube_token_ttl }}"

- name: setup kubeconfig directory
  command: "{{ item }}"
  with_items:
   - mkdir -p ~/.kube
   - ln -s /etc/kubernetes/admin.conf ~/.kube/config

- name: generate Kubernetes token
  command: kubeadm token create
  register: "{{ kube_token }}"

...

- name: set kernelmodule for pod network
  command: "{{ item }}"
  with_items:
    - modprobe ip_set
    - modprobe xt_set
  when: not package_exist.stat.exists

- name: install Calico pod network
  command: kubectl create -f https://docs.projectcalico.org/archive/v3.18/manifests/calico.yaml
At the top, the Kubernetes control plane will be initialized with some basic options. Kubernetes executes several tasks in the background, such as a pre-flight check, generating a self-signed CA or creating an admin.conf file, et cetera. [21]
---
role_action: install
kube_api_addr: 10.0.100.10
kube_pod_cidr: 172.16.0.0/16
kube_token: "dieswi.rdueb3r5chr1eben"
kube_token_ttl: "1h2m3s"
As we can see, there’s the IP to advertise the master to the Kubernetes API server, the Pod-CIDR space for allocating the cluster Pod’s, the token for bootstrapping new clusters[22], and it’s time to live (TTL) value.
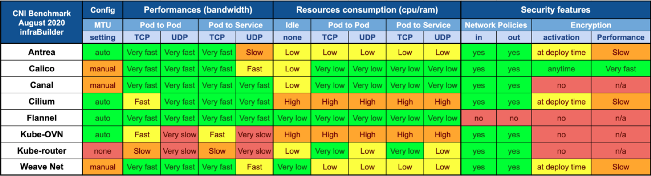
Back to the Kubernetes configuration, where the next step is to create a folder in the home directory with a symlink to the previously created admin.conf file. After the operation, the Kubernetes token is generated and held temporarily in a variable, as tokens are constantly regenerated. The last step is to install Calico. This is necessary so that, for instance, individual pods are assigned to an address to provide or exchange data over the internal decoupled network, managed via Container Network Interface (CNI).[23] Wait for a second, is there a special reason to use Calico instead of another pod network like Flannel? It depends on the specific purpose. In this case, it should cost nothing, the performance should be right, the resources consumption should be low, and it should also offer security features!
Helm, a package manager, is used to installing Kubernetes applications. If you want to read more about helm I recommend this article (click here).

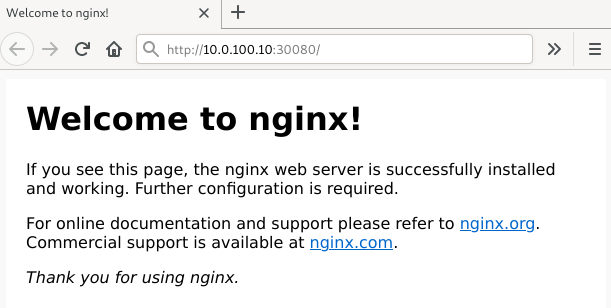
With the installation of Helm, an Ansible task adds the Bitnami repository, which contains a great amount of helmcharts to install the latest version of NGINX. In this tutorial-oriented blog post, NGINX is used just as a Kubernetes default application to present an automatically deployed web application that serves a simple static hello web page. Of course, this procedure can be extended to scale. But it is not a topic currently.
...
- name: add helm repository
  apt_repository:
    repo: "deb [arch={{ sys_architecture.stdout }}] https://baltocdn.com/helm/stable/debian/ all main"
    state: present
    filename: helm
  when: not package_exist.stat.exists
...
- name: add bitnami helm repository
  command: helm repo add bitnami https://charts.bitnami.com/bitnami
...
...
- name: create nginx config
  template:
    src: templates/nginx_values.yml.j2
    dest: "~/nginx_values.yml"
    owner: root
    group: root
    mode: 0644
...
- name: install nginx
  command: helm install nginx bitnami/nginx --values nginx_values.yml
...
An excerpt of the nginx_values.yml looks like this:
image:
  registry: docker.io<b>
  repository: arm64v8/nginx </b>
  tag: 1.19.7
  pullPolicy: IfNotPresent
  pullSecrets: []
  debug: false
…
service:
  type: NodePort
  port: 80
  httpsPort: 443
  nodePorts: <b>
    http: "30080"</b>
    https: ""
  targetPort:
    http: http
    https: https
  annotations: {}
  externalTrafficPolicy: Cluster
…
Worker
To authenticate the worker with the Kubernetes control plane, the command kubeadm join is used in combination with some options and variables:
- name: join worker "{{ ansible_hostname }}" to cluster
  shell: |
    kubeadm join --token "{{ kube_token }}" \
                 --discovery-token-unsafe-skip-ca-verification \
                 "{{ kube_api_addr }}":6443
Observer / Monitor
The Ansible kubernetes role is now expanded a bit to include Metrics Server for Kubernetes and the Kubernetes Dashboard. Metrics Server is a lightweight tool that gives additional information about what is happening behind Kubernetes magic processes.[24]
- name: create metrics-server config
  template:
    src: templates/metrics-server.yml.j2
    dest: "~/metrics-server.yml"
    owner: root
    group: root
    mode: 0644

- name: install metrics-server
  command: kubectl apply -f ~/metrics-server.yml
Through the CLI, it is now possible to get additional values about the status and resource consumption from the nodes or a specific pod:
$ kubectl top pod --namespace default
NAME                     		CPU(cores)   	MEMORY(bytes)
nginx-657f9bdb8b-6cm55   	1m           	2Mi
That’s not enough. For the fanciness, the next configuration will cover the installation of a web-based scraper. In this guide, it’s the Kubernetes Dashboard, but you may want to have a look at the Prometheus monitoring solution, also which has more latency in providing current pod status because of the events harvesting and log aggregation used and stored in a separate influx database. Metrics Server, in turn, is blazing fast and stores intermediate data into its own buffer. But latency is not the scope of this blog post. It is more addressed to Kubernetes hyper scalers. Installing and configuring Kubernetes Dashboard with Ansible is essentially straightforward:
---
- name: create kubernetes-dashboard config
  template:
    src: templates/kubernetes-dashboard.yml.j2
    dest: "~/kubernetes-dashboard.yml"
    owner: root
    group: root
    mode: 0644

- name: create kubernetes-dashboard config
  template:
    src: templates/kubernetes-dashboard-service-nodeport.yml.j2
    dest: "~/kubernetes-dashboard-service-nodeport.yml"
    owner: root
    group: root
    mode: 0644

- name: install kubernetes-dashboard
  command: kubectl apply -f ~/kubernetes-dashboard.yml

- name: install kubernetes-dashboard service nodeport
  command: kubectl apply -f ~/kubernetes-dashboard-service-nodeport.yml
...
For the Metrics Server and the Dashboard scraper, a new Ansible module template is used. The benefit of this module is that a task could use a customized configuration file. Roundabout, the content of the template files are not of interest at this point.
Provide
Nothing is installed and configured yet, so let’s provide it with: ansible-playbook -t kubernetes -e role_action=install uls-playbook.yml. After a few minutes of pulling multiple applications and containers and making settings, we can see in the Ansible output that everything went well.
A small check directly on the worker with kubectl -n kube-system get pods shows us that Calico is up and running and thus configured.
| NAME | READY | STATUS | RESTARTS |
|---|---|---|---|
| calico-kube-controllers-hsc7q | 1/1 | Running | 0 |
| calico-node-5zk5h | 1/1 | Running | 0 |
| calico-node-88cvb | 1/1 | Running | 0 |
| calico-node-zz4kx | 1/1 | Running | 0 |
| coredns-74ff55c5b-qcfvn | 1/1 | Running | 0 |
| coredns-74ff55c5b-tgtxs | 1/1 | Running | 0 |
| etcd-uls17m | 1/1 | Running | 0 |
| kube-apiserver-uls10m | 1/1 | Running | 0 |
| kube-controller-manager-uls10m | 1/1 | Running | 0 |
| kube-proxy-95tgp | 1/1 | Running | 0 |
| kube-proxy-n4xht | 1/1 | Running | 0 |
| kube-proxy-s89bv | 1/1 | Running | 0 |
| kube-scheduler-uls10m | 1/1 | Running | 0 |
| metrics-server-6c65cfc5d5-wvw5p | 1/1 | Running | 0 |
This also applies for kubectl get services:
| NAME | TYPE | CLUSTER-IP | EXTERNAL-IP | PORT(S) |
|---|---|---|---|---|
| kubernetes | ClusterIP | 10.96.0.1 | <none> | 443/TCP |
| nginx | NodePort | 10.104.37.148 | <none> | 80:30080/TCP |
Fine, everything is up and running.
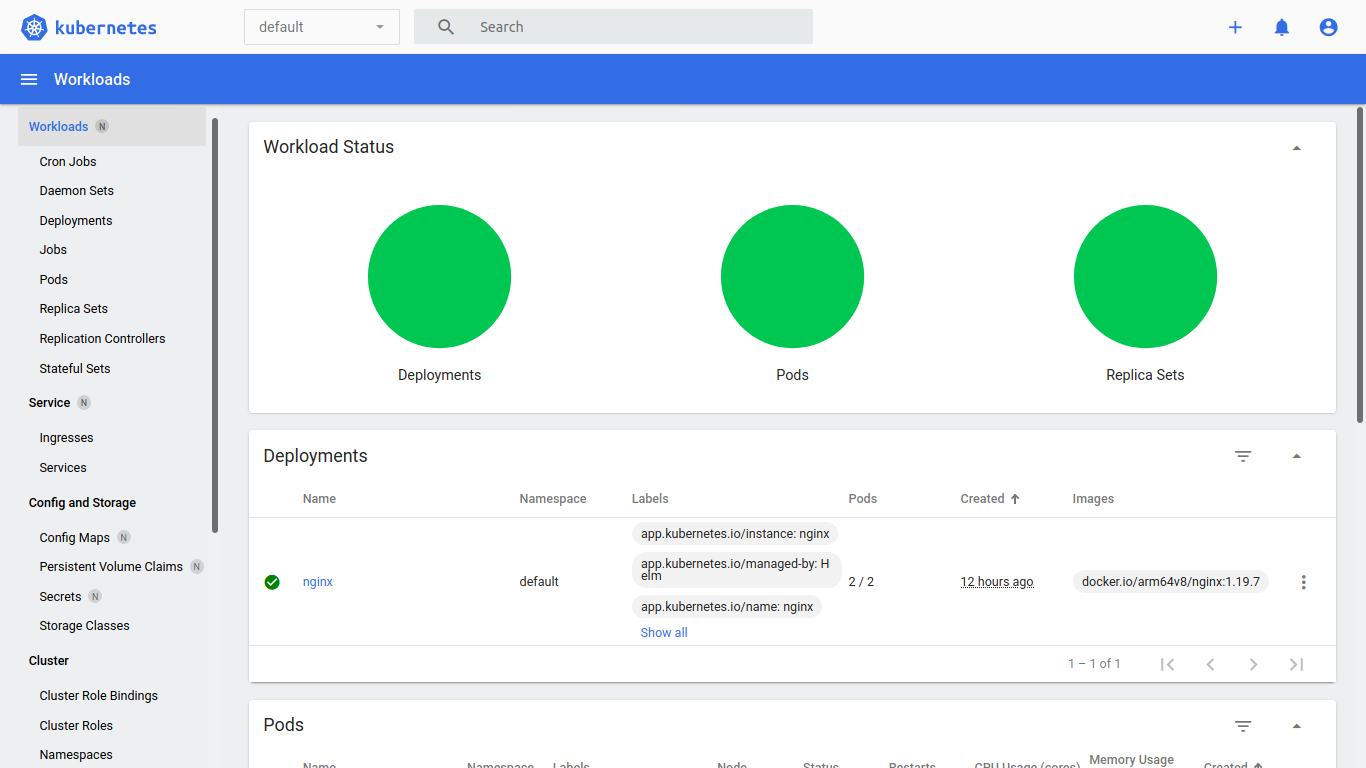
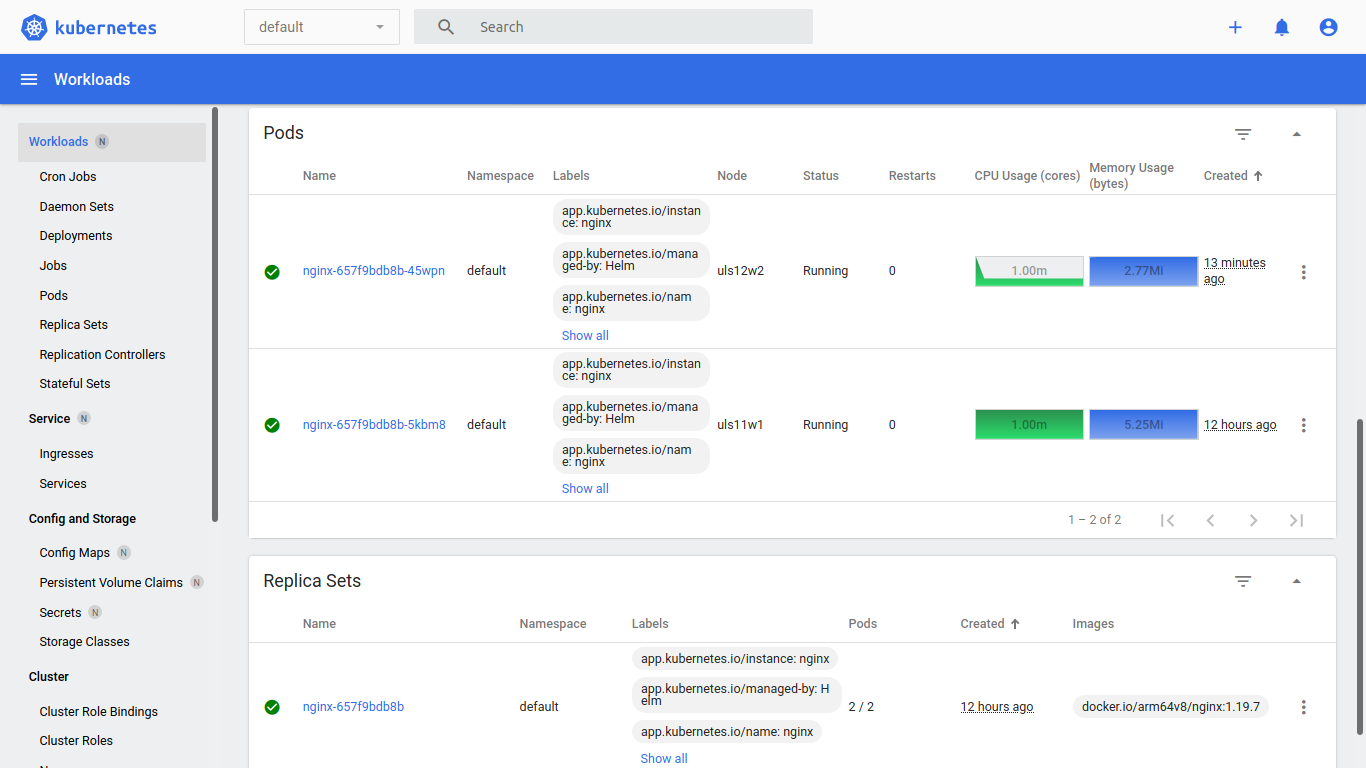
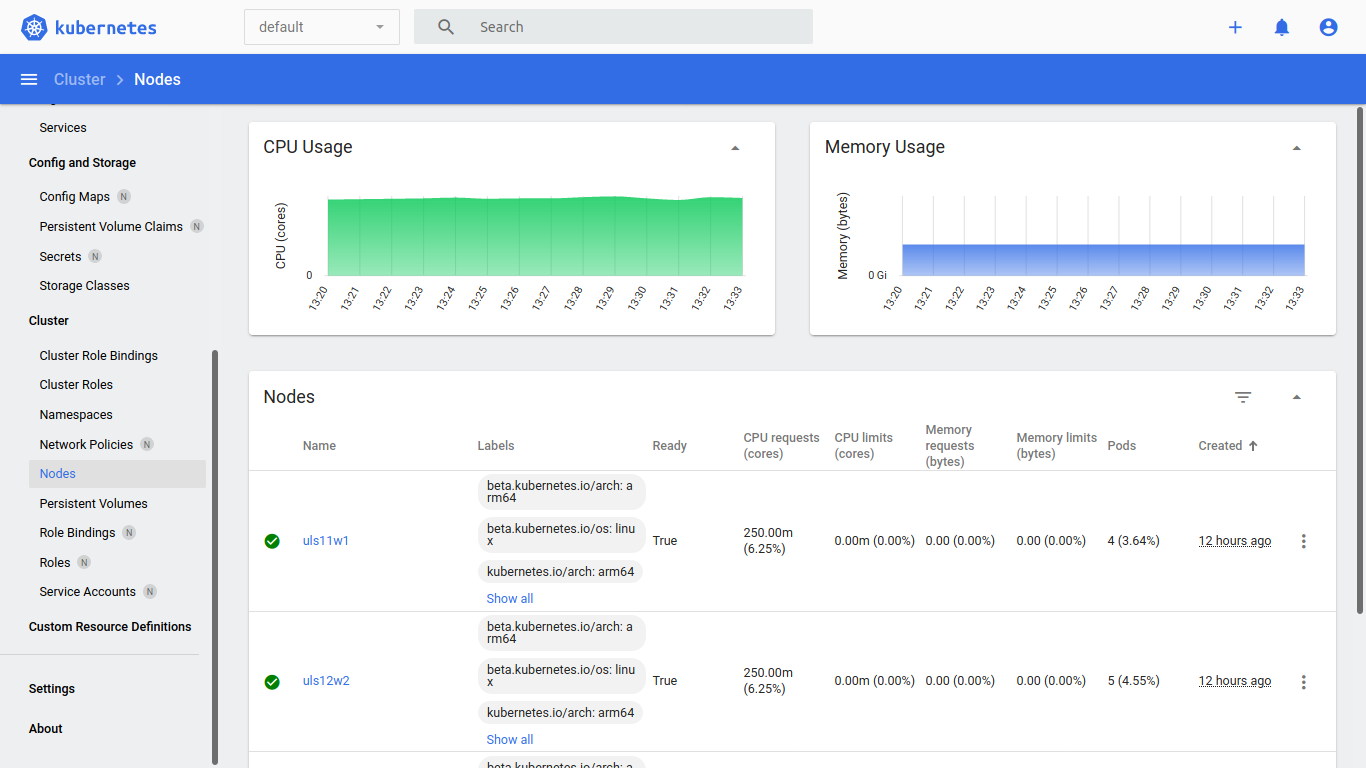
The Kubernetes Dashboard shows us the status of the nodes, pods, services and of course the resources graphically.
Upshot
This blog post shows what is possible with the orchestration tool Ansible; what is installed and configured with it is up to each individual. The Cloud Native Computing Foundation (CNCF) describes Ansible as “a radically simple IT automation platform that makes your applications and systems easier to deploy and maintain. Automate everything from code deployment to network configuration to cloud management”.[25] The strengths of Ansible for infrastructure automation and orchestration are simplicity, centralization, repeatability, configurability, and transparency through the inventory, playbooks, roles, and custom modules. Of course, this article is not intended to be, and cannot be, a comprehensive and complete account of Ansible. Much more can be said about each of the points that are mentioned here. But notice, keep it simple, don’t repeat yourself and build a solid system.
Sources
All links were last accessed on 2021-03-10.
- https://www.raspberrypi.org/software/operating-systems/#raspberry-pi-os-32-bit
- https://developer.nvidia.com/embedded/jetpack
- https://developer.nvidia.com/embedded/downloads#?search=kernel&tx=$product,jetson_nano
- https://docs.ansible.com/ansible/latest/installation_guide/intro_installation.html#installing-ansible-with-pip
- https://github.com/ecchong/cowsay_motd
- https://docs.ansible.com/ansible/2.4/intro_configuration.html
- https://docs.ansible.com/ansible/latest/cli/ansible-vault.html
- https://docs.ansible.com/ansible/latest/user_guide/intro_inventory.html
- https://docs.ansible.com/ansible/latest/user_guide/vault.html
- https://docs.ansible.com/ansible/latest/reference_appendices/common_return_values.html
- https://docs.ansible.com/ansible/latest/reference_appendices/glossary.html#term-roles
- https://docs.ansible.com/ansible/latest/user_guide/playbooks_reuse_roles.html
- https://docs.ansible.com/ansible/latest/user_guide/playbooks_conditionals.html
- https://docs.ansible.com/ansible/2.8/modules/list_of_all_modules.html
- https://kubernetes.io/blog/2019/03/15/kubernetes-setup-using-ansible-and-vagrant/
- https://docs.ansible.com/ansible/latest/reference_appendices/glossary.html#term-plays
- https://docs.docker.com/get-started/overview/
- https://kubernetes.io/docs/reference/setup-tools/kubeadm/
- https://kubernetes.io/docs/reference/command-line-tools-reference/kubelet/
- https://kubernetes.io/docs/reference/kubectl/overview/
- https://kubernetes.io/docs/reference/setup-tools/kubeadm/kubeadm-init/
- https://kubernetes.io/docs/reference/access-authn-authz/authentication/
- https://docs.projectcalico.org/archive/v3.18/about/about-calico
- https://kubernetes.io/docs/concepts/cluster-administration/system-metrics/
- https://landscape.cncf.io/?selected=ansible
Leave a Reply
You must be logged in to post a comment.