by Oliver Klein (ok061), Daniel Koch (dk119), Luis Bühler (lb159), Micha Huhn (mh334)
Abstract
You are probably familiar with the HdM SB-Funktionen. After nearly four semesters we were tired of the boring design and decided to give it a more modern look with a bit more functionality then it currently has. So we created “Studidash” in the course “Software Development for Cloud Computing”. “Studidash” shows your grades and automatically calculates the sum of your ECTS and also an average of your grades.
Since this is a project for SD4CC it runs as a serverless web application at Amazon Web Services, or AWS for short. Our tech stack for this project consists of Angular, Python, Terraform and some AWS Services like Lambda or S3.
While developing this Web-App we encountered some difficulties but also learned a lot of stuff and we hope that this blog post can give you a quick overview of what we did, what we learned, what problems we had and how we solved them so you have it easier for your next project.
What did we do?
As mentioned in the abstract, we developed a serverless Web-App called “Studidash” because of said boring design of the SB-Funktionen. First of all, we decided that we wanted to learn a new tech stack and came to the conclusion that Angular as our frontend would be the most modern frontend framework. For our backend we decided to use Python since it’s lightweight and easy to learn. From another course we learned about Terraform so this was something we were already somewhat familiar with and decided to use it for our deployment to AWS. We also used AWS to host the Web-App since we got access to AWS Student Accounts.
After we settled for a project and our tech stack we had to think about a way to make it “cloud native” and started to research some information and came across serverless. We dug a bit deeper and found some useful information. So we came to realize that serverless might be the way to go. Serverless means that our (or maybe your application) isn’t running completely on a “on-prem”-server but is running in the cloud instead. That means the application itself isn’t coupled to the server. Servers are still there but you don’t have to think about the administrative stuff around that. This is all going to be handled by your cloud service provider. The serverless approach brings scalability, high availability and efficient resource usage and management with it. As mentioned, you can focus more on the development itself rather than thinking about servers. A connection to a CI/CD pipeline makes it easy and fast to release a new version of your application. But serverless also has its downsides. The functions have to be as small as possible to only fit one purpose and some Web-Apps can have higher latency due to a cold start (When a function isn’t used for quite some time it gets destroyed and needs to be instantiated again, which takes time). You are also going to have a bad time debugging your application since it isn’t as easy as you might be used to. In the end we went with a static frontend in a S3-Bucket, a backend running as AWS Lambda Functions and AWS API Gateway to connect them.
Architecture
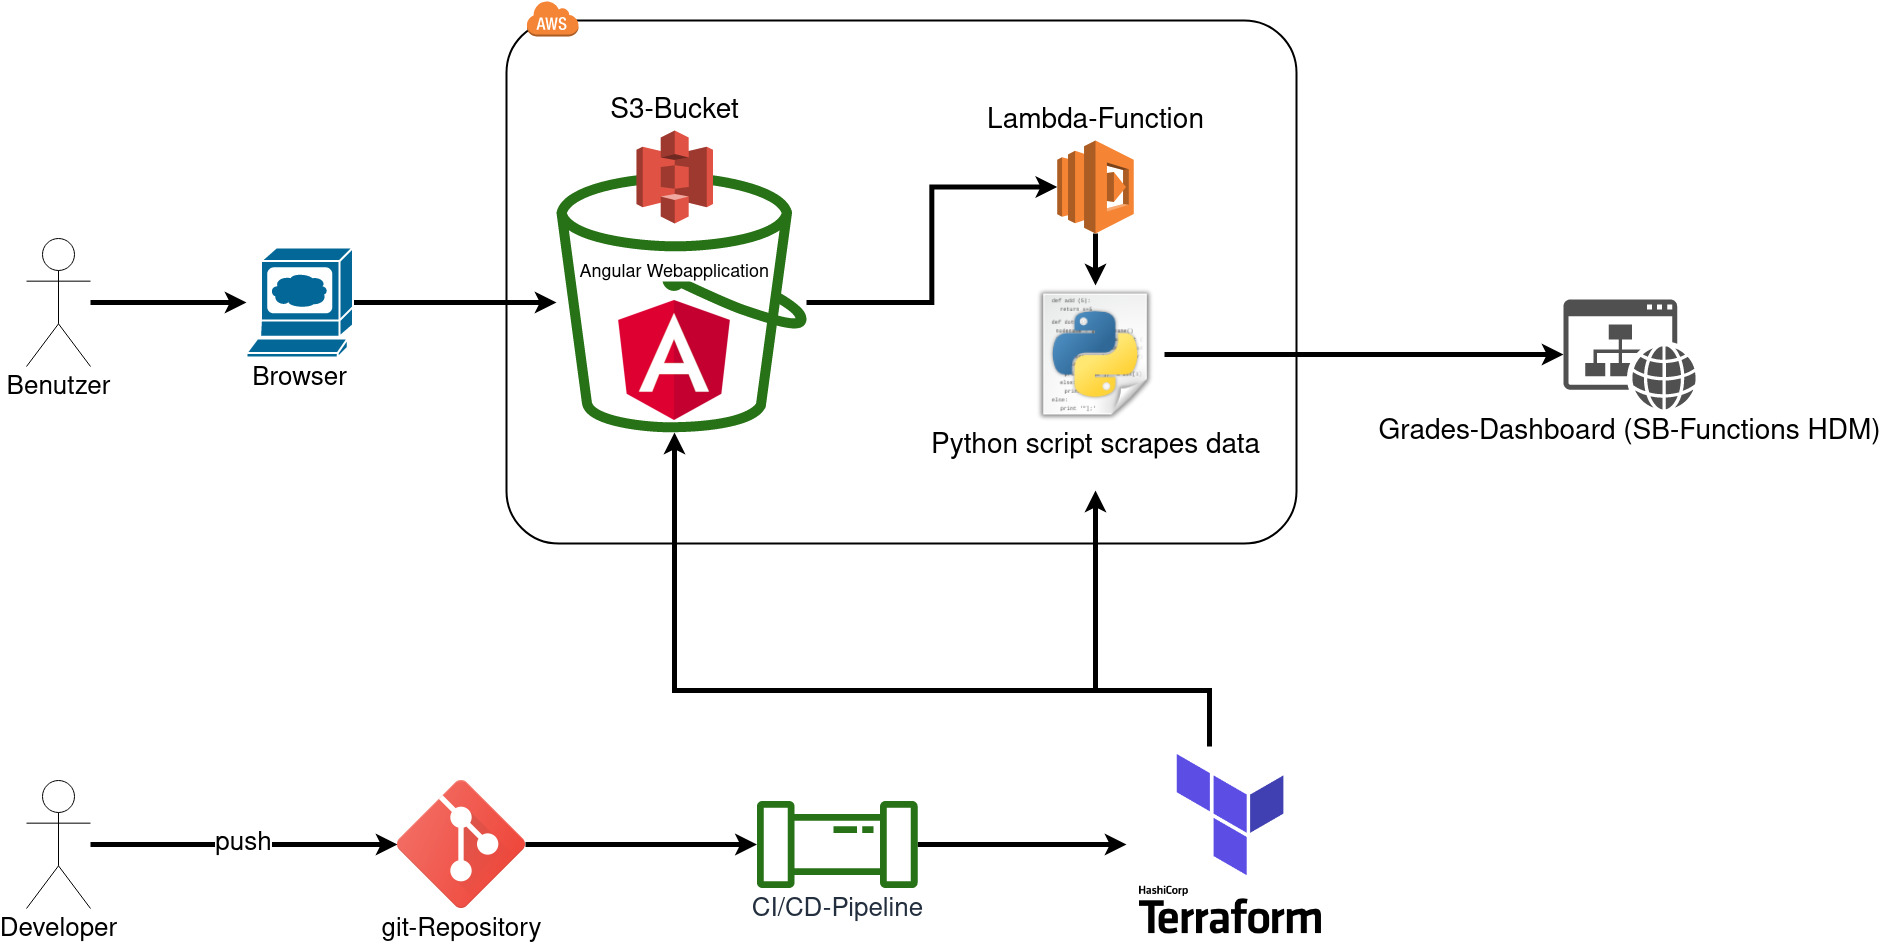
Our architecture is fully hosted on AWS and our code repositories are hosted on the HdM GitLab server. The clients can access our frontend via their favourite web browser. Our frontend application is hosted in an AWS S3-Bucket. The good thing here is that we don’t have to manage or deploy any web server by ourselves. This reduces the management overhead and in the end the costs. After the frontend is served to the client, the user can input their user credentials to access their grades from the third party service (HdM SB-Funktionen). A HTTP-Request will then be sent to a Lambda Function with an API-Gateway to receive the request. This Lambda Function contains a Python script which will parse the user credentials provided in the received HTTP-Request and use them to make a login at the SB-Funktionen platform and scrape the necessary grades and lecture data from the user. This scraped data will then be preprocessed and returned as a JSON-Object to the frontend.
From the developer side we used Git/GitLab for the version control of our code. In GitLab we created a CI/CD pipeline to build the frontend, the Python grade scraper and a Terraform image to deploy all our neccessary AWS resources. Thanks to the CI/CD pipeline the developer can just push the newest code base to the repository and it will be deployed automatically to AWS.
Frontend
For our frontend we decided to build an Angular single page application. We made this decision because it’s an up-to-date framework to build fast and easy web applications.
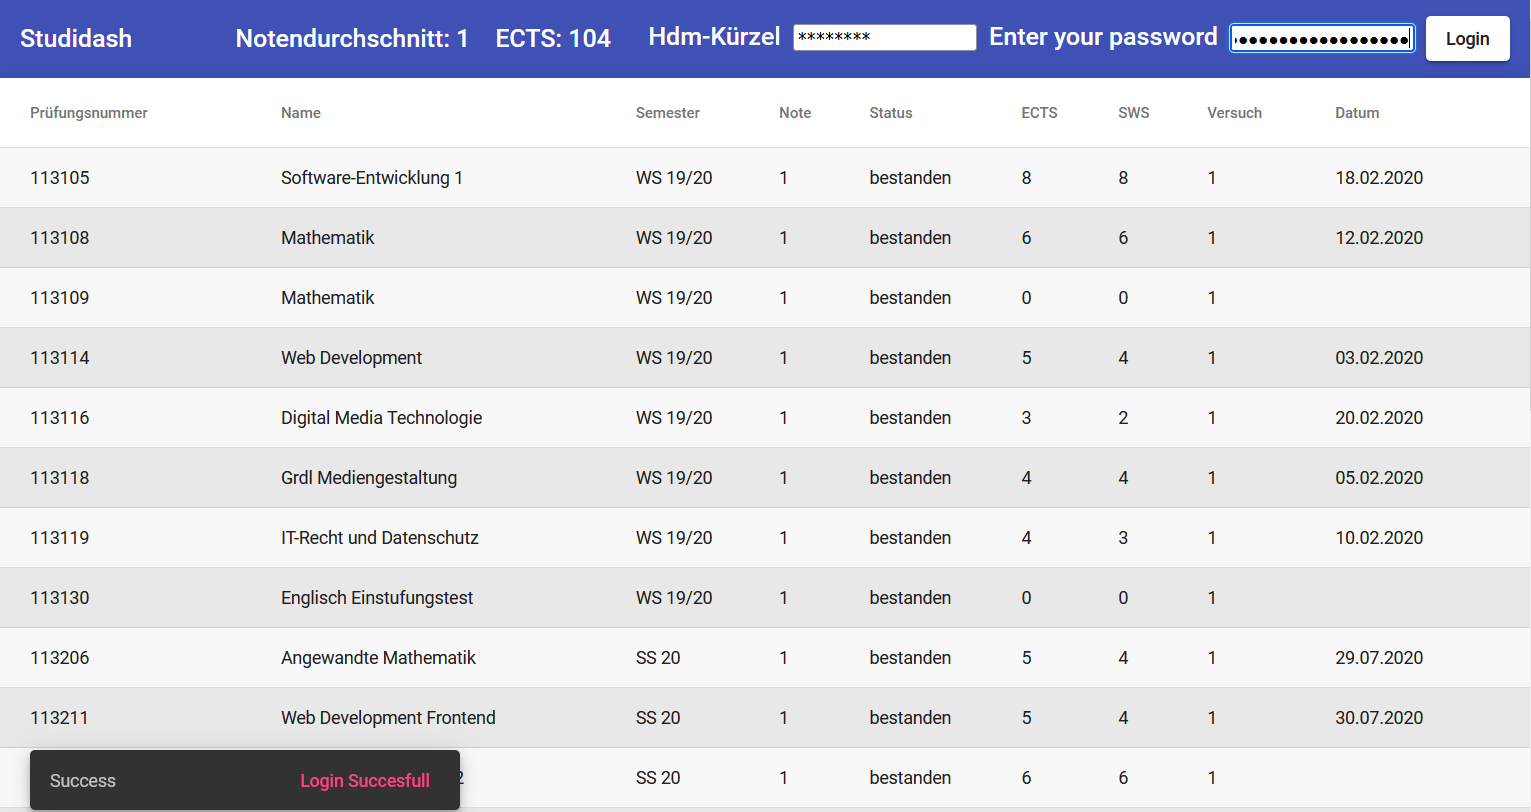
When the user loads the website the header only displays a login component for the HdM SB-Funktionen credentials. This component triggers a POST request to the Lambda Function containing the login data. The Lambda Function then responds and returns several grade objects to the frontend which are identically defined in front- and backend. The grade object exactly maps the table structure of the HdM page. The response then triggers the rendering of the table and you will receive a login message. Also there is an error handling if the login failed. The table can be sorted according to the different values, the grade average and ECTS are calculated and displayed in the header of the page.
Backend
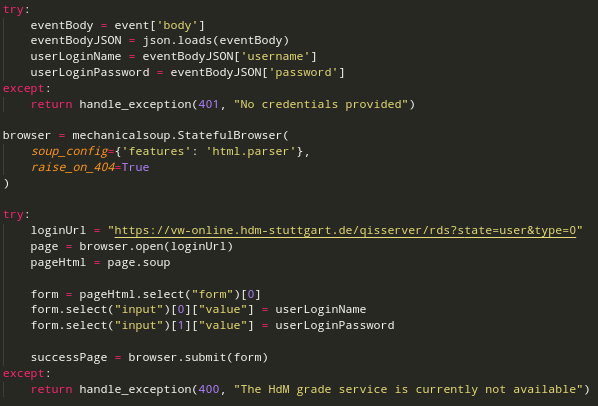
Our backend consists of a Python script which is hosted in a Lambda Function with an API-Gateway to receive HTTP-Requests. The frontend sends a HTTP-Request with the user credentials in the request body to the API-Gateway. The request is then forwarded to the Lambda Function which then injects the HTTP-Request into our Python grade scraper script. The Python script then parses the request body and performs a login at the SB-Funktionen website of the HdM where all the student grades and lectures are stored.

In our code example the event variable is the received HTTP-Request from the frontend. The received request body is a string, so the content of the body has to be parsed to JSON again. When there is no login data provided, the script will send a HTTP-Response with the status code 401 and a corresponding message.
In the next step our script scrapes all the data we need and parses them into a JSON format which our frontend can handle easily. This JSON data is then sent as response to the Lambda Function which will forward this response to the API-Gateway. The API-Gateway then also forwards this response back to our frontend application where the received data will be processed and displayed.
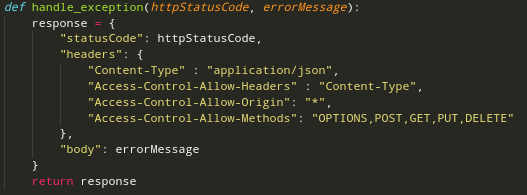
We also had to keep some other things in mind. For example what should happen when our backend throws an exception or the third-party-service isn’t available? In our backend we created an error handler which takes a HTTP-Status Code and an error message as parameter, converts the data in the right format for our frontend and then sends the response.
Our main lambda_handler function is then divided into different parts. Each part is surrounded by a try-except clause to catch exceptions. For example if the third party service is down or if there were no credentials provided by the frontend. This makes our backend more reliable and also gives the user enough feedback to know what’s going on. Since we use an external service we need to think of a solution for the case when the third party service is down, for example for maintenance reasons. A possible solution to this would be to implement a caching mechanism which we don’t provide in the current state.
CI/CD
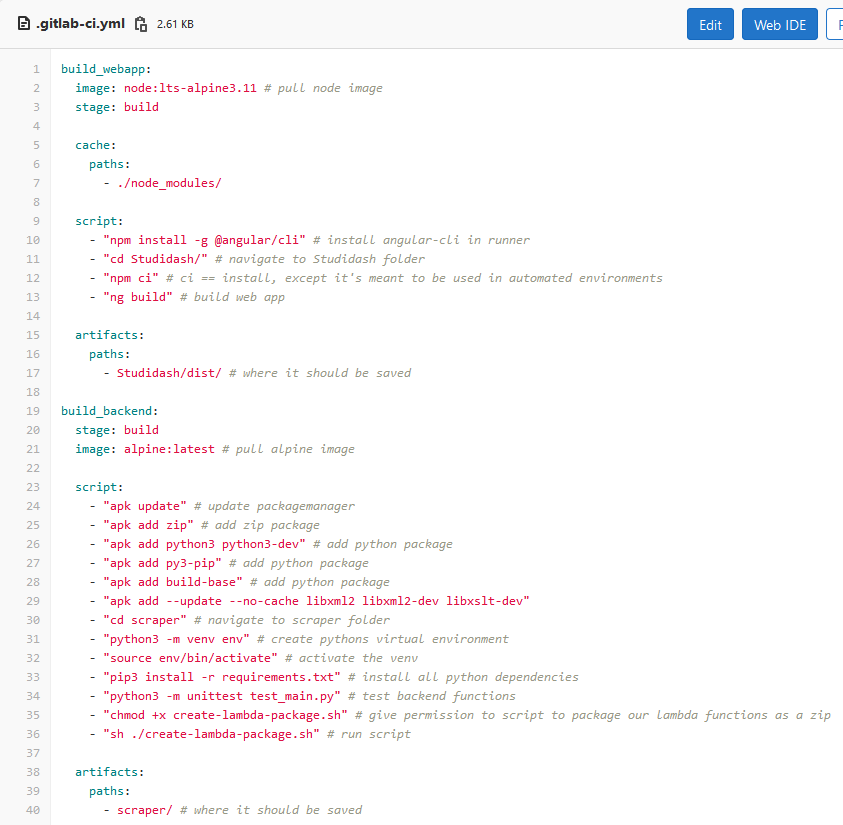
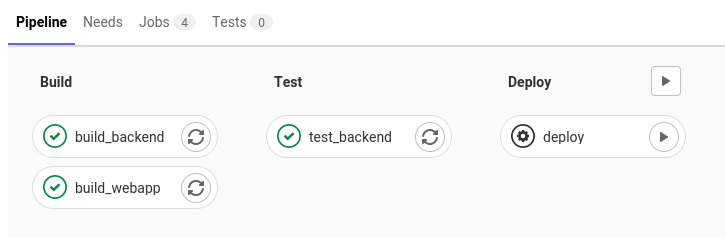
To make our application as cloud native as possible we implemented a CI/CD pipeline in our project. This pipeline builds our Web-App as well as our Lambda Functions, tests our Python script and deploys them to AWS. For that we are using different stages (build, test, deploy) in our .gitlab-ci.yml file. The build_webapp stage first pulls a Node-image and runs a few lines of script to install all dependencies and then builds the Angular based frontend. While this part is running, a second instance is pulling an Alpine image and is also running a few lines of script to package our Lambda Function(s) into a ZIP file.
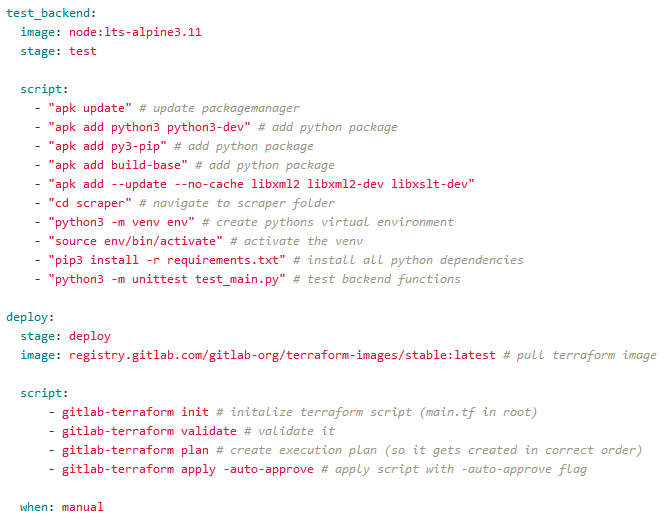
After that, the test stage is invoked to test the application before deployment. This is a crucial part in the pipeline since it can reveal mistakes that we made during development before going “live” with the application. When the tests succeed, the next stage is invoked.
In our case, we made the deployment stage manually since we didn’t want to push every small change to AWS and also the Student Accounts had some time limits that would forbid us doing that anyway. But what happens in the deploy stage is fairly simple. Like in the stages before we are pulling an image for Terraform to run the usual Terraform commands like init, validate, plan and apply. This initializes Terraform, validates our main.tf in the root of the repository, creates a plan for creating the different resources in this main.tf and finally applies it.
But what exactly is in this main.tf file? This file contains every resource we need in AWS and creates it. First of all, we declared variables for our different buckets, one for the Lambda Function and one on which the Angular app is going to be hosted at. After that, we created the S3-Bucket for the Lambda Function and uploaded the ZIP file with the function to the bucket. From there, it gets deployed to AWS Lambda. We also needed to create a role and policy to give the bucket the correct access rights to execute their task properly. After that, the S3-Bucket for the Angular app is created and the needed files are uploaded. This bucket hosts the frontend as a static website which we also configured in our main.tf to do that.
Testing
Testing is one of the most important things when implementing a CI/CD pipeline and with automated deployment. When you don’t implement tests you don’t really know if your application works before deployment and after the deployment, it is too late. So implementing a stage for testing in our project was the way to go. For our Python backend we wrote some basic Unit-Tests to test functionality and also added a test stage for the backend to our CI/CD pipeline.
We also managed to write an End-To-End-Test for our frontend which checks if the Error-Snackbar is shown when the user puts in wrong credentials. The harder part in this scenario was to get it running in the CI/CD pipeline, which we unfortunatly didn’t manage to do.
What problems did we have and how did we solve them?
One of the biggest problems we encountered was due to the fact that we only had access to an AWS Student Account. It ensured that we only had restricted access to AWS. For example we needed to create different kinds of roles to deploy our Lambda Function with the correct set of rights to be executed. Due to the restrictions we were not allowed to give the roles the needed permissions which caused our CI/CD pipeline to fail and our project didn’t get fully deployed. This could only be solved by getting a “real” AWS Account which gives you all the permissions you would need.
Another problem we faced was CORS (Cross-Origin Resource Sharing). In the first steps of our development we always got a CORS-Error when our frontend was requesting the grades and lecture data from our backend service. The reason for that was because in our Python backend script we just sent back the JSON-Object containing all the data but without any HTTP-Headers to our frontend. The frontend then failed to receive the response because the URL of the API-Gateway was different from the URL that our frontend had. To fix this problem we had to set the Access-Control-Allow-Origin HTTP-Header in the response from our backend.
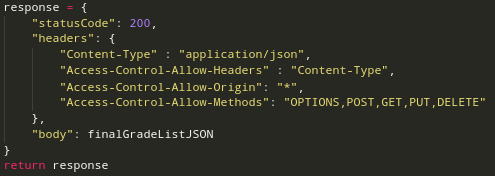
After that, the request worked and our frontend could receive the scraped data.
Another problem we had was to integrate our End-to-End-Test in our CI/CD-pipeline, which we unfortunately didn’t manage to fix in time. It would’ve required us to have a runner that has a browser available but we weren’t able to set that up. We managed to implement an E2E-Test which is running locally without any problems. So at least we have a bit of code quality assurance here. Having to run the tests manually isn’t what you want to do for a fully automated cloud native approach.
Conclusion
It was quite a long way from where we started, but in the end we managed to get our Web-App running on AWS as we liked. We made it a bit difficult in the beginning because we said we wanted to learn some new technologies like Python and Angular, so we first had to learn those. But we also had to learn about serverless-architecture. It is also something to look forward to working with in the future.
At the presentations we found out about AWS Amplify, which is basically a tool by AWS to get serverless Web-Apps running as fast as possible without the need of S3-Buckets. It showed us that there isn’t really the “one and only” way to get something running in the cloud. There are many possible solutions.
In our opinion we learned a lot about AWS, serverless-architecture and cloud in general. But also about developing an application where you don’t have to think about renting and maintaining a server. Maybe we can continue with this project in the near future and give the HdM SB-Funktionen a new look 🙂
Leave a Reply
You must be logged in to post a comment.