Written by: Immanuel Haag, Christian Müller, Marc Rüttler
Refactoring the Radcup backend is necessary because it was developed in the year 2015.
Step 1: Docker-Setup
In order to have a complete project setup, the backend was converted to a Docker-Compose setup. This offers the developers the possibility to always work with a fresh installation within the same environment. It also fixed software-dependencies on different operating systems. For more advantages of a setup like this, please consider the official docker documentation.
Note: you need the below mentioned files in the directory so that the docker-compose setup can run! If you want access to our repository please contact us.
bash-3.2$ pwd
/tmp/radcup_localdevexample

#we use the tool tree-cli, with which you can see the directory structure of our project:
bash-3.2$ tree
.
├── Dockerfile
├── docker-compose.yml
├── importer
│   ├── Dockerfile
│   └── radcupDevSample.json
│       └── radcupDevelopment
│           ├── games.bson
│           ├── games.metadata.json
│           ├── system.indexes.bson
│           ├── users.bson
│           └── users.metadata.json
└── src
    ├── README.md
    ├── config.js
    ├── controllers
    │   ├── auth.js
    │   ├── game.js
    │   └── user.js
#--------------SNIP--------------------
# the src directory contains all necessary files of the node.js backend

The content of the individual files (Dockerfile, docker-compose.yml, ...)
is described in the following blogpost.
If you want to start the setup run this cli command:
docker-compose up --build
At this point you can see the details of the individual files:
1. Docker-Compose.yml:
db: #this is our db-container which uses the default MongoDB Image from Dockerhub
  image: mongo
  ports:
   - "27017:27017"  #default exposed mongod ports
mongo-importer:
  build: ./importer #change directory to importer folder and build this dockerfile (see below for this file)
  links: #because the importer-container needs access to the db we have to link it
  - db
web: #builds the radcup backend dockerfile (see below for this file)
  build: .
  links: #because the container needs access to the db we have to link it
   - db
  ports:
   - "3000:3000" #exposed api ports
  environment:
   NODE_ENV: development #define the environment
  command: ["npm", "start"] #define the command which has to be executed in the container
If you want to run the testsuite within a container you can adjust the command and nodeenv as follows:
NODE_ENV: test
command: ["npm", "test", "--exit" ]
2.1 mongo-importer Dockerfile:
Previously a mongodump was generated into the radcupDevSample.json folder so that some testdata is available. This dump is used by the mongo-importer container which migrates the testdata into the mongodb container of each developer.
FROM mongo
COPY radcupDevSample.json /radcupDevSample.json
CMD mongorestore -h db /radcupDevSample.json &&\
mongo db/radcupDevelopment --eval "db.createUser({user: 'root', pwd: 'toor', roles:[ { role:'readWrite',db: 'dbAdmin'} ]  } ) ;" &&\
mongo db/radcupProduction --eval "db.createUser({user: 'root', pwd: 'toor', roles:[ { role:'readWrite',db: 'dbAdmin'} ]  } ) ;"  &&\
mongo db/radcupTest --eval "db.createUser({user: 'root', pwd: 'toor', roles:[ { role:'readWrite',db: 'dbAdmin'} ]  } ) ;"
2.2 Web-Dockerfile:
This Dockerfile represents our Backend:
FROM node:jessie #use node, based on a Debian jessie image
COPY . /home/app #copy the backend source files to /home/app
WORKDIR /home/app/src #set the default workdirectory for the container
RUN npm install #install dependencies with nom
USER node #set the execution user to node! (This is a important security feature - if you do not do this the app-process is executed as root user!
EXPOSE 3000 #expose the api port
Watch the cli-output of docker-compose on your machine. After all necessary images have been downloaded and built, you can access the backend within the web-container. Open a browser tab and enter:
You should see a JSON Object with this content:
{“message”:”this will be a beerpong app”}
Finding:
Now all developers can use this nice setup in a few minutes and can now focus fully on the business logic development. We have also created a good basis for deploying the backend via the docker containers into the cloud and making it available accordingly.
Frontend
As mentioned above, there is an ionic-hybrid app which can be linked to the radcup-backend. Since we didn’t want to install ionic and cordova, etc. on our local devices. We decided to move the frontend application to a docker-compose container setup, too. However, since our focus in this project is on the backend, the frontend is not discussed further at this point.
Docker under Windows 10
Under Windows 10 docker required “Linux Containers” not “Windows Containers”. This can be easily changed at any time in the Docker settings. At this point we had the problem that the error message was misleading when using Docker containers. The error message said that the version number was incorrect, which lead us onto the wrong track. To solve the issue only changing the containers to “Linux Containers” did the trick.
Docker also needs the Windows feature “Hyper-V”. But if it is not installed, docker prompts one with an expressive error message.
Every time the runtime environment is started, docker needs access to the “Windows Hosts Files”. However, antivirus software can block this access, depending on your settings. Unfortunately, the solution seems to be to change the antivirus software settings.
The Docker environment also needs a shared drive for the docker processes. Fortunately, Docker does this automatically and sets the permissions to the currently logged in Windows user account.
Step 2: Dependency Update
Since the backend, as mentioned before, was developed a long time ago, it was necessary to perform a dependency check. On the one hand to identify the partially obsolete or unneeded dependencies and on the other hand to remove warnings.
Because a manual check of the entries, is very time-consuming, a tool was needed which carries out the analysis. For this reason, various tools were evaluated and tested.
In the end, our choice was npm-check.
The following command is sufficient to install it (prerequisite: npm is installed):
npm install -g npm-check
After the installation, you have to navigate to the directory where the package.json is located. If the command npm-check is executed, the file and its dependencies will be analyzed.
Example Output:
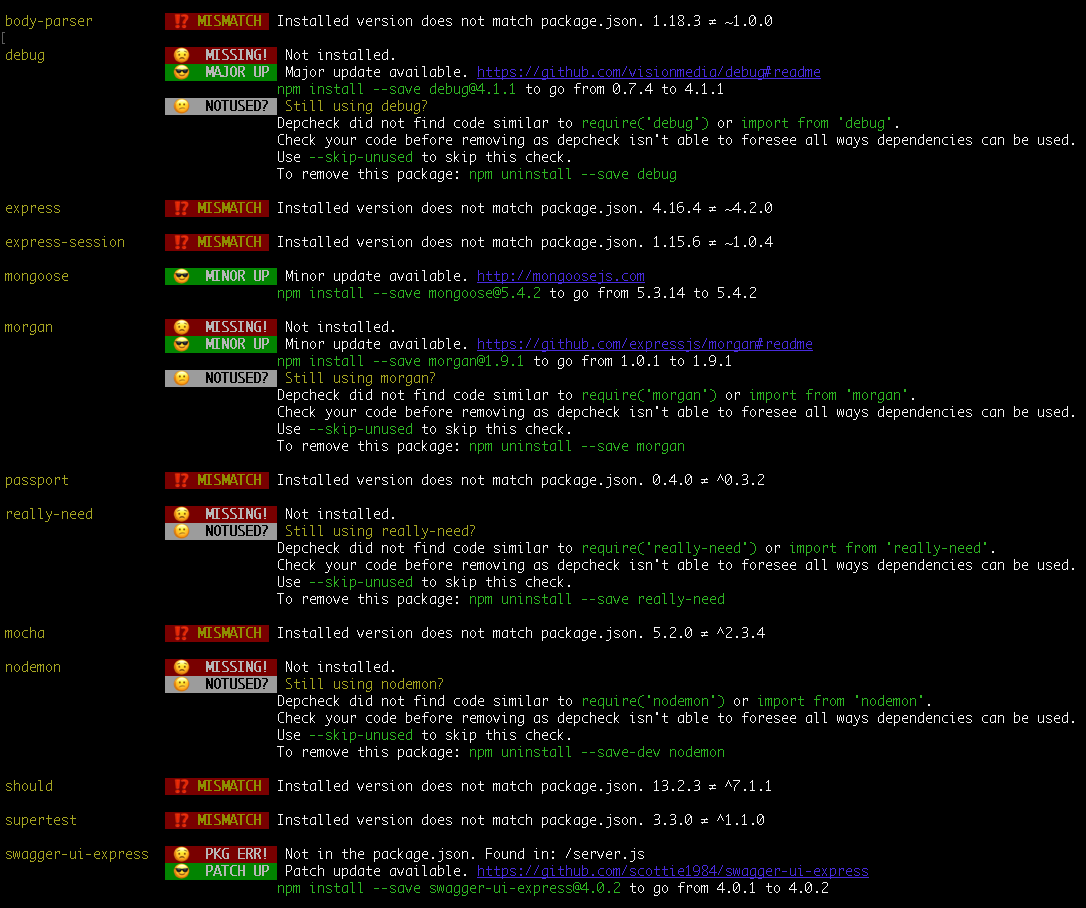
By analyzing the dependencies, some updates were performed, some even security relevant, and several dependencies were removed.
Before the analysis:
Step 4/6 : RUN npm install
---> Running in 24e38874f36f

> nodemon@1.18.7 postinstall /home/app/src/node_modules/nodemon
> node bin/postinstall || exit 0

Love nodemon? You can now support the project via the open collective:
> https://opencollective.com/nodemon/donate

npm WARN optional SKIPPING OPTIONAL DEPENDENCY: fsevents@1.2.4 (node_modules/fsevents):
npm WARN notsup SKIPPING OPTIONAL DEPENDENCY: Unsupported platform for fsevents@1.2.4: wanted {"os":"darwin","arch":"any"} (current: {"os":"linux","arch":"x64"})

added 356 packages from 616 contributors and audited 2535 packages in 15.28s
found 0 vulnerabilities
After the analysis:
Step 4/6 : RUN npm install
---> Running in 9fb8e1bf3f43
added 141 packages from 498 contributors and audited 283 packages in 6.056s
As you can see from the two outputs, analyzing the dependencies has helped a lot. For example, the number of packages has been reduced and the warnings were removed.
Finding:
In the middle of the project there was a problem with the npm package ‘event-stream‘, this distributed malware and tries to steal from users of the Bitcoin Wallet Copay.
As a result, npm-install stopped running and the affected package had to be updated to a newer version without malware.
Step 3: Testsuite improvements
Our test setup
Our testing framework is Mocha. If started it will per default run all .js files / tests defined in the test folder of the application.
(Documentation)
Here is one example of a test, the shortened version of the game tests:
[...]
/* Game Testsuite */
describe('Games API Testsuite.', function() {
  [...]
  it('should create a game', function(done) {
    request(server.app)
      .post('/api/games')
      .auth(user.email, user.password)
      .send( game )
      .end(function(err, res){
        expect(err).to.eql(null);
        expect(res.status).to.eql(200);
        expect(res.body.desc).to.eql(game.desc);
        expect(res.body.results.winner).to.eql('No Winner');
        expect(res.body.results.endTime).to.eql(null);
        expect(res.body.players.one).to.eql(user.username);
        done();
      });
  });
  [...]
});
In the above example you can see a test which checks if a game can be created. The result of the call is checked.
The following code shows a section of our package.json:
{
  "name": "radcup",
  "version": "1.1.1",
  "private": true,
  "scripts": {
    "start": "node radcup",
    "test": "NODE_ENV=test nyc ./node_modules/.bin/mocha --exit --timeout 3000; nyc report --reporter=text-summary; nyc check-coverage --branches 20 --functions 60 --lines 50; jshint './' --verbose"
    "testfromclusterandrun": "./node_modules/.bin/mocha --exit --timeout 3000; NODE_ENV=prodDBatlas node radcup"
  },
[...]
The file contains three script sections “start”, “test” and “testfromclusterandrun”. These define how the application can be started. If “test” is selected, the corresponding test is started.
We use the nyc package to handle mocha. “testfromclusterandrun” is used to start the application on the cluster. Before that a test is started, to see if everything works on the cluster.
(NYC Documentation)
(NYC with Mocha)
NODE_ENV=test: This variable has to be set to test for the integrated babel-plugin-istanbul of the NYC package to work. This is required so that NYC fully works with Mocha.
nyc ./node_modules/.bin/mocha --exit --timeout 3000; starts the mocha framework and therefore the test. The exit command is necessary because otherwise this command will not return. We also defined a time-out in case it still doesn’t return, for example if the tests have an issue. The other commands will be explained in further detail, in the following sections.
How to check Code Coverage?
The Code Coverage can also be tested within the CI-pipeline and depending on the result can cause the test pipeline to fail. To let the test pipeline, fail if a certain threshold is reached, the following command is required. The command was added to the test script in the package.json.
nyc check-coverage --branches 20 --functions 60 --lines 50;
With the shown parameters the command checks several coverage types: branches >= 20%, functions >= 60%, lines >= 50%
The following picture shows the results of each coverage type and shows that the pipeline fails if the threshold is not met. To show this, the branches threshold was set to 100%:
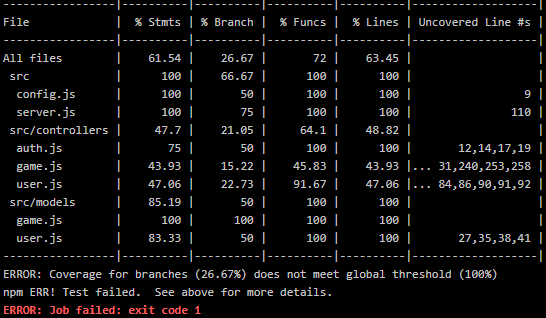
In the table an additional type Stmts can be seen. This stands for Statements, but the coverage of this type can’t be tested.
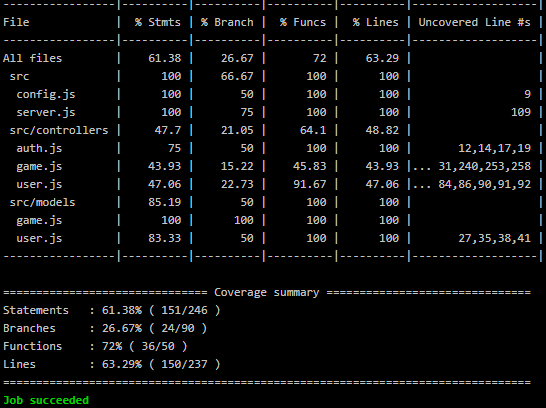
We also added the following command to get a more precise coverage info as overview:
nyc report --reporter=text-summary;
The following picture shows an additional summary of the results after the table, which can already be seen in the previous picture. This run also ran successfully.
How to test the javascript implementation?
We searched a test that will cause the pipeline to fail (return non-zero) if the javascript implementation, has any errors or warnings. To test the implementation the following command has to be added to the test script in the package.json. Also, the jshint npm package has to be installed and therefore we added a reference to the package.json
jshint './' --verbose;As one can see './' the command references the folder where it is started from, in our case this is the "src" folder of our project.
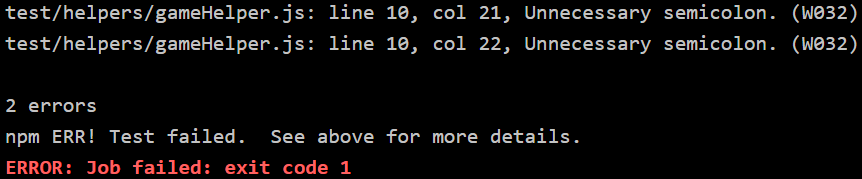
The following picture shows an example of found errors:
At first jshint seemed to run into an endless loop. Because of the npm installation a folder “node_modules” was added that we forgot. And testing this folder just took way more time.
Of course, we didn’t want to let jshint test this folder, especially because we can’t really correct errors/warnings in it and also because it isn’t in the scope of our project.
But we also didn’t want to leave it at just testing specified files, because we of course don’t want to reference each file here, that will be added to the project.
To solve this issue one can add a file named .jshintignore, in the directory the jshint command will be executed (the src folder in our case). In the file one can specify which files/folders should be ignored. Those exceptions will be interpreted using the minimatch npm module. Also, the --exclude-path flag needs to be added once, above those path patterns. Here one can see an example:
--exclude-path
./node_modules
If there is a warning which can’t be solved it can be marked, in the code, so that it will be ignored as follows:
/* jshint ignore:start */
// code over several lines (for example a function) that causes a warning
/* jshint ignore:end */
As a short side node, everything that is in between those ignore comments is completely ignored, which means if one for example splits a several lines long command with those comments, jshint will see the part outside of the comment as incomplete.
A Single line could also be ignored like this:
oneLineOfCode(); // jshint ignore:line
Step 4: Swagger integration
What is Swagger?
In short Swagger can be used to design and document an API. We already had an API and therefore we only needed to document it.
Swagger documents APIs and while doing this it is also an interactive tool to try out the API, so one can see for himself how the API works.

In this picture one can see a GET-API request which will return a user if given a correct email. This information can be seen and read quickly from the developer who accesses the swagger UI. Also, you can see that this GET call has a required parameter, the email address. An email address can be inserted and the call can be executed. Then you can see the request URL that was used to perform this API call. Also, the return object can be compared to an example value. This example value is also accessible if the request was not sent which means one does not have to execute it.
Whilst trying out the API we also found a security issue with our API. Any logged in user can access any API path, which means any user can access, alter and delete any data.
Swagger setup
For the first setup, we found this tutorial, very helpful.
We decided to use Swagger-UI-Express, because it is actively supported. In the „package.json“ file one must only add the following line to the dependencies:
"swagger-ui-express": "^4.0.1"At the time of this project the current version of the Swagger UI was 4.0.1. With this line NPM will also install the Swagger UI into the Docker image.
In the „server.js“ file, the following lines have to be added:
var swaggerUi = require('swagger-ui-express');
var swaggerDocument = require('./swagger.json');
In the same folder as the previous two files, one more file has to be added, the “swagger.json” file. It defines the documentation which will be displayed on the swagger website. For a “how to” see the next topic “swagger.json” below, but for the moment a simple example json suffices.
After building and starting the Docker image we were able to access the Swagger website under http://127.0.0.1:3000/api-docs. (We were testing this on a local computer, hence the call to localhost.)
swagger.json
Useful links
To create a swagger.json we found the following links helpful:
A short and easy introduction.
The official Swagger Editor (optional).
(This website comes with an detailed example Petstore. This example can be downloaded as an swagger.yaml or swagger.json.)
Detailed introduction into the creation of a “swagger.json”.
Building a swagger.json/yml
We developed a swagger.yml and then converted it into a swagger.json, because the swagger.yml syntax is easier to use.
We tried to use the swagger.yml directly without the swagger.json but we weren’t able to get it working. If we used the .yml-file in the required command, the .yml-file would be loaded, but the internal parser would throw weird errors. Even though the .yml-file was written according to specification and the swagger editor wouldn’t throw any errors or warnings.
The structure of a swagger.yml(/.json) can be divided into three parts. The first contains general info about the swagger file and API. The second part contains the API paths itself. And the last part contains the models which are used by the API.
In the following sections we will introduce those three parts and will provide a short overview over each part.
swagger.yml part one:
swagger: "2.0"
info:
  version: "1.1.1"
  title: "radcup"
  description: "radcup backend API"
host: "159.122.181.248:30304"
basePath: "/api"
tags:
- name: "Game"
  description: "API for games in the system"
- name: "Statistic"
  description: "API for statistics in the system"
- name: "User"
  description: "API for users in the system"
schemes:
- "http"
consumes:
- "application/json"
produces:
- "application/json"
[...]
Under info belongs general information about the API that is in use. host and basePath are used to define the URL for each API call. The host address should of course be set to the address of the server. tags is used to group the API calls and one can also describe each group/tag.
swagger.yml part two:
[...]
paths:
[...]
  /games/{game_id}:
[...]
    put:
      tags:
      - "Game"
      summary: "Update an existing game"
      description: ""
      consumes:
      - "application/json"
      produces:
      - "application/json"
      parameters:
      - name: "game_id"
        in: "path"
        description: "ID of game to put in"
        required: true
        type: "string"
      - name: "game"
        in: "body"
        description: "Game object that needs to be updated in the store"
        required: true
        schema:
          $ref: "#/definitions/game"
      responses:
        200:
          description: ""
          schema:
              $ref: "#/definitions/game"

    delete:
      tags:
      - "Game"
      summary: "Deletes a game"
      description: ""
      produces:
      - "application/json"
      parameters:
      - name: "game_id"
        in: "path"
        description: "Game id to delete"
        required: true
        type: "string"
      responses:
        200:
          description: "Deleted game 'game_id'"
[...]
The second part consists of paths, those define each API path. The shown code snippet defines one path /games/{game_id} with a PUT and DELETE command. This path has also an in path parameter {game_id}.
The PUT command is sorted under the Game tag and has a short summary and a long description field. It consumes a .json-file and also produces one. It also requires two parameters first an in path id of the game that shall be updated and an in body .json-file of the altered game. With schema the model of a game json can be referenced here. This allows the swagger website to show an example model of the game which is required. Under responses is defined how the responses should look like. In this case the code should be 200 and the updated game model is expected.
In comparison to the PUT command, the DELETE command only requires the in path game_id and produces a json file. The response here isn’t a json file.
Whilst programming this second part, we encountered two problems.
We defined two paths that where similar, /users/{email}: with Get and /users/{user_id}: with PUT and DELETE. The swagger editor prompted us with an error "Semantic error […] Equivalent paths are not allowed.". We ignored this error because we could still generate the json and the json did run as well. Another workaround we found is to add a comment to the paths /users/{email}#email. The following picture shows how this would look like in the UI:
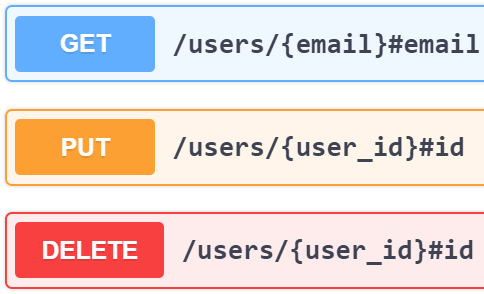
To use this solution wasn’t the nicer solution in our scenario and because of this we did choose the first one.
The other problem we found was that it seems, one can’t write any symbol combination in a string. We wanted to write “\<username>” in a description property but this letter combination was omitted on the website. The string “Created user
\<username> test test” for example, resulted in “Created user test test”. Mind that letters after the letter combination are not cut off and if an underscore is added the letter combination won’t be omitted. This sequenz can be escaped via the backslash like this “\”.
swagger.yml part three:
[...]
definitions:
  game:
    type: "object"
    required:
      - "_id"
    properties:
      players:
        $ref: "#/definitions/players"
      results:
        $ref: "#/definitions/results"
      desc:
        type: "string"
      _id:
        type: "string"
        uniqueItems: true
      time:
        type: "string"
      lng:
        type: "number"
      lat:
        type: "number"
      state:
        type: "string"

  games:
    type: "array"
    items:
      $ref: "#/definitions/game"
[...]
In the last part definitions, are all the models defined, that where referenced ($ref:) in the previous part.
The game object is defined with all of it properties and some of those (e.g. players) reference other models as well. The _id property is also defined as unique and referenced under the required section which, as one would assume, defines this property as required.
The games model describes an array of game objects.
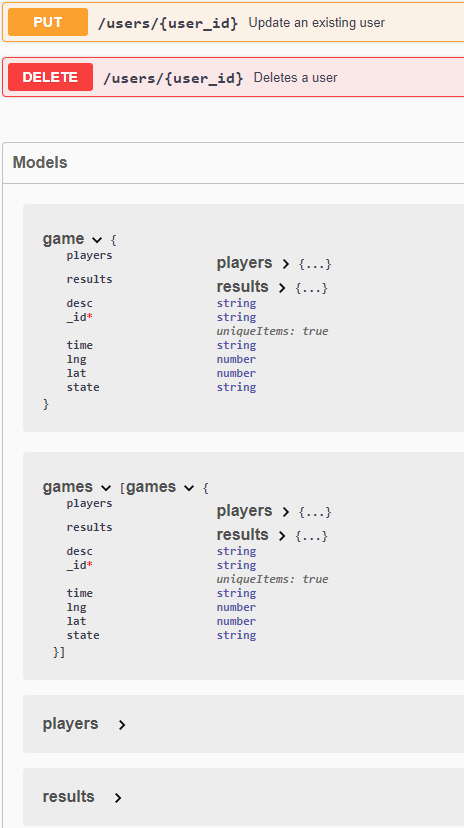
Those models can also be inspected separately on the Swagger page as you can see in the following picture:
Leave a Reply
You must be logged in to post a comment.